RSS

Monthly Archives: October 2014

Simple and Satisfying – Butternut Squash Polenta with Sausage and Onion

I always seem to forget about polenta. It’s not something I do on purpose, it’s just not a dish that I think of very often to make and then I realize just how versatile and great-tasting it can be. Sean was just saying to me the other day that we had not had polenta in a long time and he was right. I couldn’t even remember the last I made it and we always have some around the house to make. Polenta, much like it is with rice, oatmeal, grits and the like, is so great because you can add lots of things to it to bring out even greater flavors. That’s what I really liked about this particular recipe from the New York Times for butter nut squash polenta with sausage and onion. It makes great use of one of my favorite fall vegetables by incorporating it into the creamy polenta, adding another great layer of flavor and texture to the polenta itself.

Butternut Squash Polenta with Sausage and Onion

1 1/2 teaspoons kosher salt, more as needed

1 bay leaf

1 cup fine polenta (not quick cooking)

1 cup seeded and peeled butternut squash, coarsely grated

3 tablespoons butter

Freshly ground black pepper, as needed

1 tablespoon extra-virgin olive oil, more as needed

1 1/2 pounds sweet or hot Italian pork sausage, sliced into 1/4-inch rounds

2 teaspoons minced rosemary

2 onions, peeled, halved and sliced into 1/4-inch half moons

1 teaspoon fennel seeds (optional)

Rosemary sprigs, for garnish (optional)

In a large pot set over medium-high heat, combine 4 1/2 cups of water, the kosher salt and the bay leaf. Bring the water to a boil and then slowly whisk in the polenta. Stir in the butternut squash to the polenta. Reduce the heat to medium-low and simmer, stirring frequently, until the polenta and the squash are very tender, about 20 to 30 minutes. If the mixture is getting too thick while cooking, add a little bit more water to the pot to thin it out. Stir in the butter and the black pepper. Taste the polenta and adjust the seasoning with salt and pepper if it is needed.

While the polenta cooks, heat 1 tablespoon of the olive oil in a large skillet set over medium-high heat. Add the Italian sausage, the rosemary and the fennel seeds (if using). Cook, stirring occasionally, until the sausage is golden and cooked through, about 7 to 10 minutes. You can cook the sausages in batches if necessary, adding more olive oil to the pan if the pan looks dry. Transfer the sausages to a paper towel-lined plate to drain.

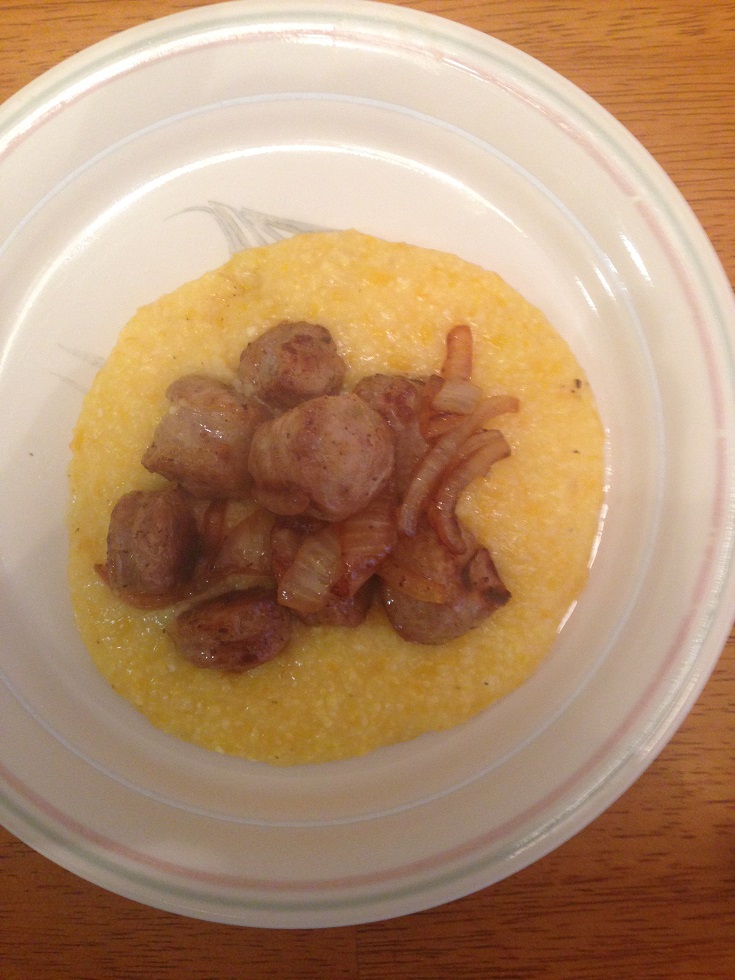
Add more olive oil to the skillet if it looks dry and then add the onions. Cook, stirring occasionally, until the onions are tender and golden, about 10 to 15 minutes. Return the sausage to the pan and stir it together with the onions to heat the sausage through. Spoon the polenta into bowls and top it with the sausage and onion and garnish with the rosemary sprigs if you like.

It’s a very simple meal that packs some great flavor and is very satisfying. I love the way the squash and the polenta worked together here and it gave the polenta great texture and color. The sausages went really well with the polenta and the whole meal only takes about 30 minutes to cook. If you have polenta left, it sets really nicely when it is chilled and you can cut it into squares and saute it up as a side dish for all kinds of meals if you like. This is a great easy meal for a busy weeknight when you want something quick to put together and I think it would work well with just about any type of fall squash that you might want to use.

That’s all I have for today. Check back next time for another recipe. Until then, enjoy the rest of your day and enjoy your meal!

IMG_0720

 
Leave a comment

Posted by on October 17, 2014 in Cooking, Dinner, Pork, Vegetables


Tags: , , , , , , , ,

Take a Try at Turkey Meatloaf

I have been using a lot of ground turkey lately for different things. The price has been right for it at the supermarket or at BJ’s where I can buy large packages of it and try different things. I have used it before in chili, turkey burgers, meatballs and even on nachos but I realized that I hadn’t given a turkey meatloaf a try. I am something of a meatloaf nut and love different meatloaf recipes so I was happy to take a look and see what I c ould find for turkey meatloaf, but to be honest I wasn’t bowled over by any one recipe that I saw anywhere. I then decided I would just do it on my own and see how it would come as far as flavor. To me ground turkey is one of those meats that needs seasoning and moisture, so I ended up putting a few things together and came up with this particular recipe of my own.

Turkey Meatloaf

1 shallot, minced

1 garlic clove, minced

1 tablespoon vegetable oil

1 cup fresh bread crumbs (about 2 pieces of white bread, crusts removed)

1/3 cup milk

1 egg

1 1/2 pounds ground turkey

2 teaspoons Worcestershire sauce

1/4 cup plus 1 tablespoon ketchup

Salt and freshly ground black pepper

1 teaspoon tomato paste

Preheat the oven to 400 degrees. In a medium saucepan set over medium heat, add the vegetable oil and heat the oil until it is shimmering. Add the shallot and garlic and cook, stirring often, until the shallot has softened and is fragrant, about 2 minutes. Take the pan off the heat and allow the mixture to cool.

In a large bowl, add the bread crumbs and the milk and allow it to sit for about 5 minutes. Add the cooled vegetables, the egg, the ground turkey, the Worcestershire sauce, the 1/4 cup of ketchup, 1/2 teaspoon of salt and 1/4 teaspoon of pepper. Mix the ingredients together by hand until they are just blended. Form the mixture into a loaf and place the loaf in a baking pan or on a baking sheet. Mix the remaining ketchup and tomato paste together in a small bowl and spread over the top of the meatloaf to coat it well. Bake the meatloaf in the oven for 45 minutes to 1 hour, or until a thermometer inserted into the meatloaf registers 170 degrees. Remove the meatloaf from the pan to a platter and allow it to rest for 5 to 10 minutes before slicing and serving.

As is the case with any meatloaf, you can always add different ingredients that you like to give it some extra flavor. If you are going for something leaner, you could certainly add different vegetables, like grated carrots and onions. If you want a different flavor, try topping it with bacon or putting crumbled up cooked bacon into the meatloaf. You could also add a cup of mushrooms you have processed in the food processor to give the meatloaf another layer of flavor. There are a lot of things you can do, but this one was pretty basic and came out with really good flavor. We even made a little gravy out of some  chicken stock and had it with the turkey and mashed potatoes. Of course, the turkey meatloaf is great for meatloaf sandwiches for lunch or dinner in the following days.

That’s all I have for today. Check back next time for another recipe. Until then, enjoy the rest of your day and enjoy your meal!

IMG_0716


Leave a comment

Posted by on October 16, 2014 in Cooking, Dinner, Poultry, Turkey


Tags: , , , , ,

A New Way to Try Pulled Pork – Asian Oven Roasted Pulled Pork

We are big pulled pork eaters in our house. I make mine in the oven most of the time (though I have tried the slow cooker as well) and have a standard recipe I have used in the past that makes a nice, spicy pulled pork with a great barbecue sauce, but sometimes I like to try things a little different to spice things up a bit. I have a couple of recipes for pork that I had been holding onto and when I saw pork shoulder on sale the other day I decided to pick it up and give one a try. I chose to use this recipe, which came from White on Rice Couple, for an Asian oven roasted pulled pork. It was easy to make, used some great spices and created a great tasting meal for us.

Asian Oven Roasted Pulled Pork

4-5 pound pork butt or pork shoulder

1 onion, diced

2 tablespoons olive oil

5-6 garlic cloves, minced

1 15-ounce can diced tomatoes

2 tablespoons finely grated fresh ginger

1/4 cup fish sauce or soy sauce

2 tablespoons chili garlic sauce

1 tablespoon spicy brown mustard

1/4 cup brown sugar, packed

1 teaspoon freshly ground black pepper

Preheat the oven to 350 degrees. Heat a medium saucepan over medium-high heat. Add the olive oil and heat the oil until it is shimmering. Add the onion and the garlic and cook until the onions are soft and fragrant, about 4 to 5 minutes. Add the tomatoes, ginger, fish sauce or soy sauce, chili garlic sauce, brown mustard, brown sugar and black pepper. Gently stir the sauce and simmer the sauce on low heat for about 5 minutes. Remove the pan from the heat and set it aside.

Heat a large cast iron pan or deep ovenproof skillet on medium-high heat. Lightly coat the pork butt or pork shoulder with olive oil and season the pork on all sides with salt and pepper. Sear each side of the pork in the skillet until the pork has browned all over, about 3 to 5 minutes per side. Remove the pan from the heat and pour the tomato sauce mixture over the pork to coat it completely. Cover the pork with aluminum foil. Bake the pork for about 3 to 4 hours or until the pork is tender and easily shreds when a fork is inserted into the meat.

Allow the pork to rest on a  cutting board for about 15 minutes before shredding the entire piece of pork. Keep aluminum foil over the pork to keep it warm until you are ready to serve it.

You get some tremendous flavors from the pork thanks to the fish sauce, ginger and chili sauce in this one and the mustard and brown sugar set in with their own sweetness and spiciness as well. I used a boneless pork butt for my meal but I think you could use either one if you prefer the flavoring you get with the bone in. I would recommend using fish sauce over soy sauce if you have it since it adds a completely different type of flavor, but soy sauce will work well if that is what you have around.Also, I did place the pork under the broiler for a couple of minutes to crisp up the outside just a little bit before I shredded it to add some extra crunch. This dish is perfect on rolls for pulled pork sandwiches, or to serve for tacos or quesadillas or even just by itself with some rice, which is what I did with it when we first made it and then used leftovers for tacos. It’s a nice twist if you want something a little different from the usual pulled pork.

That’s all I have for today. Check back next time for another recipe. Until then, enjoy the rest of your day and enjoy your meal!

IMG_0718

 
Leave a comment

Posted by on October 15, 2014 in Cooking, Dinner, Pork, Sandwiches


Tags: , , , , , , ,

Make It Easy with Low-Maintenance Risotto

I find that I have become a big fan of risotto. I really like the creamy texture and you can do so many different things with it, add in vegetables that you really like, poultry, seafood or really anything your heart desires. The big drawback for risotto is, of course, that it not only takes a bit to make it takes a lot of you being involved in the process. You need to make sure it is stirred so the broth, wine, or water is absorbed properly and added in the right amounts if you want the risotto to come out well. It can be a bit tricky and it can be a pain to cook with all of the constant stirring you have to do for 30 minutes or so. So when I saw this recipe from PureWow for a low maintenance risotto, I figured I would give it a try and see if it really was low-maintenance and came out nicely.

Low-Maintenance Risotto

2 tablespoons olive oil

1 onion, finely minced

1 garlic clove, finely minced

1 cup arborio rice

1/3 cup dry white wine

3 cups chicken or vegetable broth

4 tablespoons butter

1/2 cup grated Parmesan cheese

Salt and freshly ground black pepper

In a medium saucepan, heat the olive oil over medium heat until it is shimmering. Add the minced onion and garlic and cook until the onion softens and is translucent, about 4 to 5 minutes.

Add the arborio rice and stir to combine the rice with onion and to coat it, about 1 minute. Add the white wine and bring the mixture to a simmer over medium-low heat. Simmer until the liquid is nearly absorbed, about 6 to 8 minutes.

Add the broth to the mixture 1 cup at a time. Bring the first cup to a simmer and cook until the rice has nearly absorbed all of the liquid, about 10 to 12 minutes. Add the next cup of broth and allow it to simmer until it is nearly absorbed, about another 10 to 12 minutes. Repeat a third time with the last cup of broth and allow it to be absorbed, about another 10 to 12 minutes.

Add the butter and stir the rice vigorously until the mixture is well combined and the butter has melted. The vigorous stirring brings out the natural starches in the rice, which makes the risotto creamy.

Add the Parmesan cheese and mix well to combine. Season the risotto with salt and pepper to taste. To serve, spoon the risotto onto plates and top with any sautéed vegetables you like. Serve immediately.

I have to say that the risotto does turn out nicely and it is creamy and tasty. As far as the dish being low-maintenance, I guess it depends on your definition of low-maintenance. It’s true you do not have to constantly mix the risotto with this method and leave it to absorb the liquid, but you still must do vigorous stirring when the butter is added if you want it to be creamy. The recipe still takes just as long to cook as other risottos I have made, and you aren’t constantly stirring but there is still work involved. All in all, I think you could use this method or any other recipe and get quality results. Of course you can always add any vegetables or anything else you like at the end for added flavor.

That’s all I have for today. Check back next time for another recipe. Until then, enjoy the rest of the day and enjoy your meal!


Leave a comment

Posted by on October 14, 2014 in Cooking, Dinner, Rice, Side Dishes


Tags: , , , , ,

Back to Cooking with a Great Fall Side Dish – Cider-Glazed Root Vegetables

Now that my oven is up and running again I was able to do some actual cooking over the past weekend and a few different things that I can share on the blog. One of my favorite things about fall cooking is all of the great root vegetables that seem to go so well with fall meals come out. You can do great things with carrots, parsnips, sweet potatoes, turnips, beets and more and while I personally love to roast all kinds of vegetables, I also thought it would be great to bring all of these flavors together and use another great piece of fall produce – apples. Apples are pretty plentiful in this area of New York this time of year so it’s a great time to take advantage of them as well. This particular recipe for cider-glazed root vegetables was in the latest issue of Cook’s Country magazine and uses the cider to give the vegetables some added flavor and punch. The original recipe uses hard apple cider in it, which I did not have on hand. Instead I used some local apple cider as a substitute.

Cider-Glazed Root Vegetables

4 tablespoons butter

1 pound carrots, peeled and cut into 1/2-inch pieces

12 ounces parsnips, peeled and cut into 3/4-inch pieces

12 ounces turnips, peeled and cut into 3/4-inch pieces

3 shallots, peeled and halved

2 1/2 cups hard cider or regular cider

3 tablespoons sugar

Salt and freshly ground black pepper

1 apple, cored and cut into 1/2-inch pieces

2 tablespoons chopped fresh tarragon

2 teaspoons cider vinegar

Melt 1 tablespoon of the butter in a large skillet set over medium-high heat. Add the carrots, parsnips, turnips and shallots and cook until lightly browned, about 5 to 6 minutes. Add the apple cider, sugar, 1 1/2 teaspoons of salt and the remaining 3 tablespoons of the butter and bring the entire mixture to a boil. Reduce the heat to medium-low and cover the skillet. Cook the vegetables until they are just tender, about 7 to 10 minutes, stirring the vegetables occasionally.

Uncover the skillet and increase the heat to medium. Cook the vegetables until they are fully tender, about 13 to 15 minutes, stirring them occasionally. Stir in the apple and continue to cook the vegetables until the cider starts to become syrupy and the apple is just tender, about another 2 to 3 minutes. Take the skillet off the heat and stir in the chopped tarragon and the apple cider vinegar. Season the vegetables with salt and pepper to taste. Transfer the vegetables to a serving dish and pour any of the remaining glaze over the vegetables before serving.

Other than substituting regular apple cider for the hard apple cider, I also used golden beets instead of turnips since I already had the beets on hand. You can use pretty much root vegetables that you really like and I think they would work pretty well here. The original recipe as it is posted here is also designed to serve 8 people, so I cut the recipe in half when I actually made it for just the 3 of us and we still had plenty of leftovers. You get some really great flavor with all of the vegetables mixed together with the cider and the apple, though I have to admit that using the regular cider probably creates a bit of a weaker tasting glaze than if you use the hard cider, but it was still really good. I made this as a side dish to go with meat loaf, but I think it would go really well with any pork or poultry dish as well.

That’s all I have for today. Check back next time for another recipe. Until then, enjoy the rest of your day and enjoy your meal!

IMG_0715

 
Leave a comment

Posted by on October 13, 2014 in Cooking, Dinner, Side Dishes, Vegetables, Vegetarian


Tags: , , , , , ,

Pumpkinpalooza! 30 Days of Pumpkin Recipes | Williams-Sonoma Taste

Pumpkinpalooza! 30 Days of Pumpkin Recipes | Williams-Sonoma Taste.

It’s fall and the leaves are changing, the weather is getting crisper and Halloween is right around the corner. It also means the pumpkins come to the forefront of everyone’s mind for this time of year and there are some great pumpkin recipes you can try to incorporate pumpkins into your meals. Williams-Sonoma has put together 30 pumpkin recipes so you can try something different with pumpkins each day. Check it out!


Tags: , , , ,

Better Bake These Banana Bread Muffins with Browned Butter Glaze

I haven’t posted anything in a couple of days because I have been busy trying to get caught up with work and because our oven when on the fritz the other day and refused to ignite. I was able to cook on the stovetop but we were pretty limited in what we could have, but thankfully my brother helped me out and I got the part to fix the oven and he was able to get it going again today, so I can get back to cooking meals and treats again tonight. In the meantime, I can let you know about a recipe I tried a week ago when I had some bananas that were passing their prime and needed something to do with them – fast. I knew I could make some banana bread or some banana muffins, but how about combining the two and topping them off with a nice glaze? That sounded even better and I came across this recipe at Cooking with Ruthie for baked banana bread donuts with a browned butter glaze that I chose to make as muffins instead. I am sure they make great donuts too if you have the right donut pan, but muffins were the easier way to go for me this round so that’s what I did.

Baked Banana Bread Muffins with Browned Butter Glaze

1/2 cup butter

1/2 cup applesauce

3/4 cup sugar

2 whole eggs plus 4 egg whites

2 2/3 cup all-purpose flour

2 tablespoons fresh lemon juice (about 1/2 a lemon)

2 teaspoons baking soda

4 overripe bananas

1/4 cup butter

2 cup confectioner’s sugar

3/4 teaspoon vanilla extract

2-3 tablespoons milk

In a large bowl, blend the butter, applesauce, sugar, eggs and egg whites with a hand mixer. Slowly add in the all-purpose flour, lemon juice and baking soda and mix on high for about 2 minutes to mix the ingredients well. The batter will appear glossy when it is done. Mash the bananas in a separate bowl and gently fold in the bananas to the batter until they are well incorporated.

Preheat the oven to 350 degrees. Using a muffin pan lined with muffin papers, fill each paper with batter until it is about 2/3 full. The batter should make 18 to 24 muffins. Bake the muffins in the oven for about 18 to 20 minutes or until a toothpick or cake tester inserted into the center of a muffin comes out clean. Cool the muffins in the pans on a wire rack for about minutes, then turn them out onto the wire rack to finish cooling.

For the glaze, melt the butter in a medium saucepan set over medium-high heat, watching the butter carefully to see when it reaches a medium brown color and has a nutty aroma. Remove the pan from the heat. Whisk in 1 cup of the confectioner’s sugar at a time, adding 1 tablespoon of milk as the mixture thickens to help thin it out. Adjust the milk as necessary so that it stays thick enough to stay on top of the muffins. Add the vanilla to the mixture and whisk until the glaze is smooth. Drizzle the warm glaze over the tops of the muffins. The glaze will set quickly so you want to work quickly while it is warm and pourable. Cool the muffins again and serve.

The muffins had that great banana bread texture and flavor so they came out perfectly, and the glaze added a touch of sweetness to the muffins that plain banana muffins did not have in the past. I think you could get even better flavor out of the glaze and jazz it up a bit if you added a bit of banana liqueur or some dark rum to give it a bananas foster type of flavor. Maybe next time around I will give it a try. I think these would be great donuts too, but I only have the mini donut pan and it would have taken several batches to make them, so I opted for muffins instead. This is a nice alternative to banana bread if you need something to do with extra bananas.

That’s all I have for today. Check back next time for another recipe. until then, enjoy the rest of your day and enjoy your meal!

IMG_0709

 
Leave a comment

Posted by on October 10, 2014 in Breakfast, Brunch, Cooking, Dessert, Fruit


Tags: , , , , , ,

Got Leftovers? Make This Chicken and Rice Casserole with Lemon and Parmesan

More often than not we have one meal a week that I just call Leftovers Night. The night is either a hodgepodge of different things that have been leftover from various meals re-heated separately or, if the ingredients go well together, some type of stir fry, hash or casserole for dinner. When we had some leftover vegetables and a rotisserie chicken in the fridge the other day, it seemed to be crying out to be made into some type of casserole and I had seen this recipe from America’s Test Kitchen for a chicken and rice casserole recently and found this was the perfect opportunity to give it a try.

Chicken and Rice Casserole with Lemon and Parmesan

2 tablespoons butter

2 carrots, peeled and sliced thin

1 onion, minced

3 garlic cloves, minced or pressed through a garlic press

1 cup long-grain white rice

2 cups water

1 1/2 cups chicken stock

1/2 cup heavy cream

Salt and freshly ground black pepper

2 cups cooked chicken, shredded

1/2 bunch asparagus, tough ends trimmed, cut into 1-inch lengths

3/4 cup grated Parmesan cheese

3 tablespoons fresh lemon juice (about 1 lemon)

1 tablespoon minced fresh tarragon leaves

25 Ritz crackers, crushed to coarse crumbs (about 1 cup) or crunchy bread crumbs

Adjust an oven rack to the middle position and heat the oven to 400 degrees. Melt the butter in a large nonstick skillet set over medium-high heat until the foaming subsides. Add the carrots and the onions and cook until the vegetables are lightly browned, about 6 minutes.

Stir in the garlic and cook until the garlic is fragrant, about 30 seconds. Add the rice and stir until the rice is evenly coated. Add the water, chicken stock, heavy cream, 1/4 teaspoon of salt and 1/4 teaspoon of black pepper and bring the mixture to a simmer. Turn the heat down to low, cover the skillet and cook, stirring often, until the rice has absorbed most of the liquid and is just tender, about 20 to 25 minutes.

Stir in the cooked chicken, the asparagus, Parmesan cheese, lemon juice and the tarragon and season the mixture with salt and pepper to taste. Pour the mixture into an 8-inch square baking dish and sprinkle the Ritz cracker crumbs over the top to coat the top of the casserole. Bake the casserole until the topping is browned, about 10 to 12 minutes. Allow the casserole to cool for about 10 minutes before serving.

This recipe makes great use of all kinds of leftovers and comes together nicely to form a one pot dish filled with chicken, rice and vegetables. The chicken stock and heavy cream create a nice sauce that goes throughout the dish and you get a hint of the lemon and the cheese in each bite. I really liked using the Ritz crackers as topping as well and it gave some added buttery flavor and crunch to the dish. This would work well with any type of leftover chicken or turkey and you can put it all together in under 40 minutes, making it great for a weeknight and for easy clean up.

That’s all I have for today. Check back next time for another recipe. Until then, enjoy the rest of your day and enjoy your meal!

IMG_0710

 
Leave a comment

Posted by on October 7, 2014 in Cooking, Dinner, Leftovers, One Pot Meals, Poultry


Tags: , , , , , , , ,

Indulge That Craving with Chocolate Chocolate Teacake

Desserts are not something we have every night in our house. Many nights, if you want something it is a piece of fruit, maybe a cookie or a bowl of ice cream. Then there are those days where one of us gets a craving and really wants to having something sweet, or decadent or chocolate. It doesn’t happen often, but it does happen and there are some times where you just don’t have a candy bar or anything like that around the house. If you have the right ingredients around though, you can whip up a very easy chocolate cake that is rich and succulent like you would not believe. I came across this recipe on Serious Eats a few days ago and the cake, called a chocolate chocolate teacake, sounded too good to pass up and looked like it could be made pretty easily. The recipe does call for pastry flour, but if you do not have any on hand (and I didn’t) I found a substitute online that says you can make a cup of pastry flour by combining 1/2 cup of all-purpose flour with 1/2 cup of cake flour (which I did have) and it worked out well for me.

Chocolate Chocolate Teacake

3/4 cup pastry flour

6 tablespoons all-purpose flour

6 tablespoons unsweetened cocoa powder

1 teaspoon baking powder

3/4 teaspoon baking soda

1/2 cup strong brewed coffee, cooled

1/2 cup buttermilk

1 teaspoon vanilla extract

1 3/4 cups coarsely chopped dark chocolate, 60 to 70% cacao

1/2 cup plus 2 tablespoons butter, at room temperature

1 cup plus 2 tablespoons sugar

1/2 teaspoon kosher salt

3 eggs

Powdered sugar, for topping (optional)

Position a rack to the middle of the oven and preheat the oven to 350 degrees. Grease a 9-inch by 5-inch loaf pan.

Sift together the pastry flour, all-purpose flour, cocoa powder, baking powder and baking soda in a large bowl. Set the bowl aside.

Combine the cooled coffee, buttermilk and vanilla extract in a measuring cup and set it aside. Melt 3/4 cup of the chopped dark chocolate gently over a double boiler or in a small bowl set over a small saucepan of simmering water. Remove the pan from the heat, but leave the chocolate over the double boiler to keep it warm while you mix the cake. In a stand mixer fitted with the paddle attachment, cream the butter, sugar and salt on medium-high speed until it is light and fluffy, about 2 minutes. Incorporate the eggs, one at a time, beating well after each addition. Be sure to scrape down the sides of the bowl well. pause the mixing and add the flour mixture. Mix just until the ingredients are incorporated. With the mixer on low-speed, pour in the coffee mixture. Fold in both the melted chocolate and the remaining chopped chocolate pieces.

Pour the batter into the prepared loaf pan and bake the cake for about 55 minutes, or until a cake tester inserted into the cake comes out clean. Do not overbake the cake. Allow the cake to cool completely.

Place a flat plate on top of the cake and the loaf pan. Carefully invert the cake onto the plate by flipping both upside down. Lift the pan off the cake. Rest your serving plate on the bottom of the cake and turn the cake right-side up onto the serving plate. Top the cake with powdered sugar, if desired and serve.

This is a very rich, very chocolately cake. Between the cocoa powder, the dark chocolate that is melted and the chopped chocolate pieces there is a lot of chocolate and the cake itself is very dark. I think the coffee adds a really nice flavor and moistness to the cake itself as well. The flavor of the cake is fantastic and it is just the right size for you to keep around for a few days so you can have a piece at night after dinner. This would also be something that you could easily bring to someone else’s home. I’ll certainly be making this one again.

That’s all I have for today. Check back next time for another recipe. Until then, enjoy the rest of your day and enjoy your meal!

IMG_0713

 
2 Comments

Posted by on October 6, 2014 in Cakes, Cooking, Dessert


Tags: , , , , , , ,

Best Chicken Wing Recipes : Buffalo, Honey & More : Cooking Channel

Best Chicken Wing Recipes : Buffalo, Honey & More : Cooking Channel.

It’s Sunday and you know what that means! Fall and Football season means tailgates and get-togethers at home or out at the stadium or a friend’s home to watch the games, so you naturally need some great snacks to go along with the game. I love chicken wings and they are perfect for any party, especially when watching the game. Cooking Channel has put together 21 great chicken wing recipes for you so you can choose from all types and flavors and sauces to suit your wants and needs. Check it out!


Tags: , , , , , ,

 
National Day Calendar

Fun, unusual and forgotten designations on our calendar.

Jennifer Probst

a little bit naughty a little bit nice

Laissez Faire

Letting Life Lead

What To Have For Dinner Tonight

Simple and delicious dinner inspiration