RSS

Monthly Archives: May 2014

A Refreshing Summer Side Dish – Apple Coleslaw

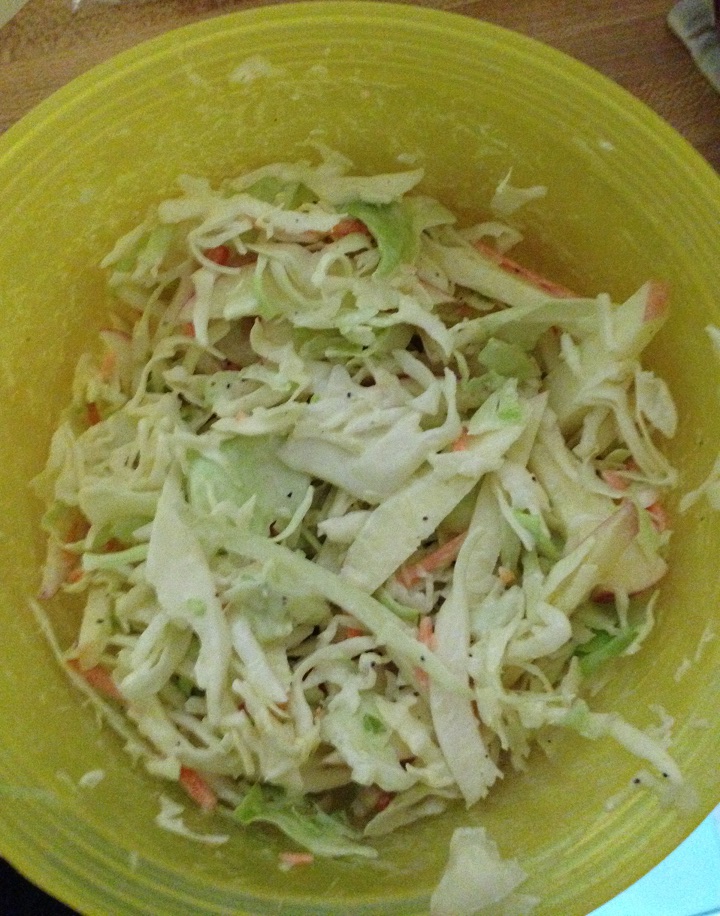
A great side dish for the warm weather when you are having a barbecue, picnic, party, buffet or just want a lighter and refreshing side is coleslaw. There are so many different things that you can do and ingredients that you can use to make a coleslaw that your options seem almost endless. Even better, with the bags of coleslaw mix that are available in most grocery stores today you do not have to go through the effort of shredding cabbage and carrots on your own (unless you want to of course). Many times during the summer these bags of coleslaw are on sale at my store for a dollar a bag or less, which makes them a great deal to buy. I have tried a bunch of coleslaw recipes in the past and am always on the lookout not just for something new, but one that uses little or no mayonnaise at all. I found this recipe on Kitchen Daily for an apple coleslaw and made a few modifications to make it my own.

Apple Coleslaw

1 package of coleslaw mix or 1 cup shredded green cabbage, 3/4 cup shredded red cabbage and 1/2 cup carrots, cut into matchsticks

1 apple, julienned

1 tablespoon mayonnaise

3 tablespoons olive oil

1/2 tablespoon apple cider vinegar

Juice of 1/2 lemon

1/2 tablespoon poppy seeds (optional)

Kosher salt and freshly ground black pepper, to taste

In a large bowl, combine the green cabbage, red cabbage, julienned carrots, or the 1 bag of coleslaw mix (whichever you happen to be using) and the julienned apple.

In a large glass measuring cup, whisk together the mayonnaise, the olive oil, the apple cider vinegar, lemon juice, the poppy seeds (if using) and the salt and pepper to taste.

Pour the dressing mixture over the cabbage mixture and stir everything together using a rubber spatula. Stir until everything is well combined. Cover the bowl and place it in the refrigerator for at least one hour so that the flavors can meld. Serve the coleslaw cold.

Personally, I left out the poppy seeds because I didn’t have any on hand and I didn’t think they would add that much to the dish. While they will look nice and add some texture, it just wasn’t for me this time. I loved the freshness that the apple added to the mix with the cabbage and carrots and since there was very little mayonnaise it didn’t get all watery as it chilled. I think you could probably eliminate that mayo all together if you wanted to go without it and just stick with the olive oil, but the mayo does help to bind everything together nicely. You could certainly try substituting yogurt or sour cream for the mayo as well. I used Gala apple for mine but I think you can use whatever apple you like the best for crispness and flavor. The original recipe called for Granny Smith, which I find to be very tart so I opted to change that out. in any case, I think it was a great coleslaw with excellent flavor that is a great side dish for burgers, hot dogs, ribs, chicken, sandwiches or just about anything else you can think of for a summer meal.

That’s all I have for today. Check back next time for another recipe. Until then, enjoy the rest of your day and enjoy your meal!

IMG_0554


Advertisement
 
1 Comment

Posted by on May 31, 2014 in Cooking, Picnic Fare, Salad, Side Dishes, Vegetarian


Tags: , , , ,

A New Twist on Chicken Fingers – Pretzel-Crusted Chicken Fingers

I had made some classic chicken fingers not that long ago along with some homemade dipping sauces and the grocery store was having a really good sale on chicken tenderloins so I picked up another batch of them and was looking for something else to do. Sure, I could have just cut up the chicken and used it for something like a stir-fry or a warm chicken salad, but I wanted to try something else with chicken fingers again. Lo and behold along came the newest issue of Cook’s Country magazine in the mail shortly after and in it was a recipe for pretzel-crusted chicken fingers. I thought this was a good one to try to see if I could get some extra crunch and flavor out of the chicken. The recipe is very simple and only takes a few minutes to make, so you can easily make this anytime you want some chicken fingers.

Pretzel-Crusted Chicken Fingers

6 ounces thin pretzel sticks

1/2 cup all-purpose flour

2 eggs

2 tablespoons Dijon mustard

1 1/2 pounds chicken tenderloins, trimmed

Salt and pepper

6 tablespoons vegetable oil

Process the pretzel sticks in a food processor until they are finely ground, about 20 seconds. you should end up with about 1 1/2 cups of pretzel crumbs. Transfer the pretzel crumbs to a shallow dish. Spread the all-purpose flour in a second shallow dish. Beat the eggs and the Dijon mustard in a third shallow dish.

Pat the chicken dry with paper towels and season it well with salt and pepper. Dredge the chicken pieces in the flour, shaking off any excess. Then dip the chicken pieces in the egg mixture, allowing any excess to drip off. Finally, dip the chicken pieces in the pretzel crumbs, pressing on the chicken gently in the crumbs so the crumbs adhere well.

Heat 3 tablespoons of the vegetable oil in a large nonstick skillet over medium-high heat until the oil is shimmering. Cook half of the breaded chicken tenderloins until they are golden brown and cooked through, about 5 minutes per side. Adjust the heat along the way if the crust seems like it is beginning to burn. Transfer the chicken fingers to a paper towel-lined plate, discard the oil, and wipe out the skillet with paper towels. Repeat the process with the remaining 3 tablespoons of vegetable oil and the remaining chicken tenderloins. Serve the chicken fingers with your favorite dipping sauces.

You want to make sure you use the thin pretzel sticks for this recipe and not the thick pretzel rods. The thin pretzels will grind easier and are not as dense and hard as the rods, giving you better crumbs for the crust. You get a really nice flavor from the pretzel crust and just a hint of the Dijon mustard along the way to give them great flavor. This is a great recipe to offer up for the kids who love chicken fingers but want something a little different or as a quick dinner or to serve at a party. You can make large batches of them and freeze them cooked for later use at another time.

That’s all I have for today. Check back next time for another recipe. until then, enjoy the rest of your day and enjoy your meal!

pretzel crusted chicken fingers


1 Comment

Posted by on May 30, 2014 in Appetizers, Cooking, Dinner, Lunch, Picnic Fare, Poultry, Snacks


Tags: , , , , ,

Changing up Fried Chicken – Cook’s Country Latin Fried Chicken

Nearly everyone loves to eat fried chicken. It seems to be a particularly great dish as the weather gets warmer and you can incorporate it into your outdoor parties and picnics, but it is also a great dish that you can try just on a weekend or weeknight. While there are thousands of variations on fried chicken and everyone seems to have their own best method or family recipe for making it, I came across this recipe in the latest issue of Cook’s Country and thought it sounded unique enough that I wanted to give it a try. It is for Latin fried chicken and takes the basics of fried chicken and incorporates some Latin spices and flavor to give things a little bit of a different taste for you.

Latin Fried Chicken

For the Marinade:

2 tablespoons kosher salt

6 garlic cloves, chopped coarse

1 tablespoon pepper

1 tablespoon ground cumin

2 teaspoons smoked paprika

2 teaspoons dried oregano

2 teaspoons grated lime zest plus 1/4 cup lime juice(2 limes)

3 pounds bone-in chicken pieces (drumsticks, thighs, wings split breasts cut in half)

For the Coating:

1 1/4 cups all-purpose flour

3/4 cup cornstarch

1 tablespoon pepper

1 tablespoon granulated garlic

1 teaspoon baking powder

1 teaspoon white pepper

1 teaspoon kosher salt

1 teaspoon ground cumin

1/4 teaspoon cayenne pepper

3 egg whites, lightly beaten

3 quarts vegetable or canola oil

For the marinade: Combine the salt, garlic, pepper, cumin, smoked paprika, oregano, and the lime zest and lime juice together in a bowl. Add the chicken pieces and turn the chicken to coat it thoroughly with the marinade.Cover the bowl with plastic wrap and refrigerate the chicken for at least 1 hour and up to 2 hours.

For the coating: Whisk the flour, cornstarch, pepper, granulated garlic, baking powder, white pepper, salt, cumin and cayenne pepper together in a bowl. Place the beaten egg whites in a separate shallow dish.

Set a wire rack in a rimmed baking sheet. Remove the chicken from the marinade and scrape off any of the solids from the marinade from the chicken. Pat the chicken dry with paper towels. Working with one piece at a time, dip the chicken in the egg whites to thoroughly coat the chicken, letting any excess drip off back into the dish. Dredge the chicken in the flour mixture, pressing on the chicken piece to get the coating to adhere well. Transfer the chicken to the prepared wire rack and refrigerate the chicken for at least 30 minutes or up to 2 hours.

Add the vegetable or canola oil to a large Dutch oven until it measures about 2 inches deep and heat the oil over medium-high heat until it registers 325 degrees on a candy thermometer. Add half of the chicken to the hot oil and fry the chicken until the breasts register 160 degrees and the thighs.drumsticks register 175 degrees on an instant-read thermometer, about 13 to 16 minutes. Adjust the burner, if necessary, to maintain an oil temperature between 300 and 325 degrees. Transfer the chicken to a clean wire rack set in a rimmed baking sheet.Return the oil to 325 degrees and repeat the process with the remaining chicken pieces. Serve.

One thing about when you marinate the chicken – you don’t want to leave the chicken longer than 2 hours in the marinade. The lime juice in the marinade will start to toughen up the  chicken, so you should try to get it before the 2 hour mark passes. You can really taste the lime, garlic and spices in the chicken and the coating comes out perfectly crispy. Adding the cornstarch and baking powder to the flour really makes a big difference in the results. I only made 4 pieces of chicken when I tried the recipe, so I cut everything in half for a smaller batch, but you can easily make a big batch of this to serve for a party or a picnic. This chicken would go great with all kinds of side dishes and it is just as good the next day.

That’s all I have for today. Check back next time for another recipe. until then, enjoy the rest of your day and enjoy your meal!

IMG_0553

 
Leave a comment

Posted by on May 29, 2014 in Cooking, Dinner, Poultry


Tags: , , , ,

A Classic Steakhouse Meal – Steak with Maitre D’Hotel Butter and Mock Frites

I would love to have a great steakhouse meal now and then, but the steakhouses in New York City (which is about 45 miles away from us) are just too expensive and there just are not very many quality steakhouses in the area that we live that are affordable to the average family anymore. Sure, it’s a treat to go out and have a nice dinner once in a while, but it is also great if you make something similar to that experience all on your own at home and without the benefit of having a gas or charcoal grill to use. Even with a good grill, you never are really going to get the same type of steak you get at a good steakhouse unless you are spending a fortune for some quality aged beef and have a professional-grade oven that can get the heat cranked up to 800 degrees to get that great sear you need. So for the rest of us, there are still options to get a great meal for yourself. The New York Times recently had an article in their dining section regarding making a good steak at home and it can be a lot easier than you think with this recipe. It just takes some time and paying attention and you can make your own great steak and potato meal.

Steak with Maitre D’Hotel Butter and Mock Frites

For the Potatoes:

Kosher salt

8-12 new or baby potatoes

3 tablespoons canola oil

For the Maitre D’Hotel Butter:

6 tablespoons butter

2 teaspoons fresh thyme leaves, minced

1 small shallot, peeled and minced

1 teaspoon freshly squeezed lemon juice

Splash of Champagne or white wine vinegar

For the Steak:

2 pounds beef steak, such as boneless rib-eye, approximately 1-inch thick

Kosher salt and freshly ground black pepper

1 tablespoon canola oil

Preheat the oven to 450 degrees. Set a large pot filled with salted water on the stove. Add the potatoes, turn the heat to high and cook, gently boiling, until the potatoes are softened, about 12 to 15 minutes. Drain the potatoes and dry them well.

Oil a sheet pan with half of the canola oil and put the potatoes in the pan in a single layer. Using a potato masher or the bottom of a heavy glass, gently smash each potato, pressing it down to a thickness of less than 1 inch. Drizzle the rest of the canola oil over the smashed potatoes and place the sheet pan on the top rack in the oven and allow them to roast until the exteriors are golden and crunchy, about 20 to 25 minutes. Add salt to taste.

For the butter, place the butter on a cutting board and, using a fork, cut the thyme, shallot, lemon juice and vinegar into the butter until the butter is creamy and smooth. Scrape the butter together with a chef’s knife and form it into a rough log. Roll the butter tightly into a sheet of plastic wrap and refrigerate until you are ready to use it.

As the potatoes finish crisping, make the steaks. Set a heavy-bottomed skillet (or 2 if your steaks are very large) over high heat and let the skillet sit for a few minutes until it gets very hot.Pat the steaks dry with paper towels to absorb any exterior moisture. Shower the steaks aggressively with salt and pepper on both sides. Add the canola oil to the pan and shake the pan to distribute the oil evenly. The oil should almost immediately begin to smoke to let you know the pan is ready. Place the steaks in the skillet and allow them to sear, unattended, for 4 minutes, until they have developed a good crust on one side. Turn the steaks over and cook for an additional 3 to 6 minutes for medium-rare. Remove the steaks to a warm platter to rest. Top each steak with a tablespoon of the compound butter.

Remove the potatoes from the oven and season them with salt and pepper to taste. Place 2 or 3 potatoes on each plate alongside a steak. Top each steak with pats of the butter and serve.

You really need to make sure your pan is very hot before you put the steaks in to make sure you can get a good crust. You also want to make sure you have gotten rid of any surface moisture from the steaks so they are not just steaming in the skillet but cooking to get a good sear. The steaks came out perfectly (of course you can always cook them longer to your particular liking, just keep a close eye on them so they don’t overcook) and the potatoes were perfect, crisp and crunchy just the way I like them. I used New York strip steaks since that is what was on sale when I got steaks and they worked out well. You can serve this with any traditional steakhouse recipe, like creamed spinach or asparagus, and having some nice bread to go along with it or some dinner rolls can really round it out for you. I made some corn on the cob and sautéed some mushrooms and onions to go along with the meal and used some of the steakhouse bread I had in the freezer. The butter is great not just on the steaks but on everything else you might serve as well.

That’s all I have for today. Check back next time for another recipe. Until then, enjoy the rest of your day and enjoy your meal!

IMG_0548 IMG_0546 IMG_0547

 
Leave a comment

Posted by on May 27, 2014 in Beef, Breads, Cooking, Dinner, Potatoes, Side Dishes


Tags: , , , , , ,

A Basic Barbecue Side Dish – America’s Test Kitchen Boston Baked Beans

There are a lot of great side dishes you can make when you are cooking for outdoor meals, barbecues, pool parties, summer graduations, buffet meals, picnics and general outdoor get-togethers. There are always options for potato salad, coleslaw, fruit salads, green salads and more, but one of my personal favorites is baked beans. Baked beans can pretty much go with any type of meal, and seem to go really well with all kinds of barbecue, whether it is ribs, chicken, burgers and hot dogs or just about anything else. I have tried a variety of baked bean recipes and posted a few of them right here on this blog, but one that I always seem to go back to is this one from America’s Test Kitchen for Boston baked beans. It’s simple and delicious and gives you that deep flavor you want.

Boston Baked Beans

4 ounces salt pork, trimmed of the rind and cut into 1/2-inch cubes
2 ounces bacon (2 slices), cut into 1/4-inch pieces
1 medium onion, chopped fine
1/2 cup molasses
1 tablespoon molasses
1 1/2 tablespoons brown mustard
1 pound dried small white beans (about 2 cups), rinsed and picked over
Table salt
1 teaspoon apple cider vinegar
Ground black pepper

Adjust an oven rack to the lower-middle position; heat the oven to 300 degrees. Add the salt pork and the bacon to an 8-quart Dutch oven; cook the pork and the bacon over medium heat, stirring occasionally, until they are lightly browned and most of the fat is rendered, about 7 minutes. Add the onion and continue to cook, stirring occasionally, until the onion is softened, about 8 minutes. Add the 1/2 cup of molasses, the brown mustard, the beans, 1 1/4 teaspoons of salt, and 9 cups of water; increase the heat to medium-high and bring the mixture to a boil. Cover the pot and set the pot in the oven. Bake until the beans are tender, about 4 hours, stirring once after about 2 hours of cooking time. Remove the lid from the pot and continue to bake the beans until the liquid has thickened to a syrupy consistency, about 1 to 1 1/2 hours longer. Remove the beans from oven; stir in the remaining tablespoon of molasses, the apple cider vinegar, and the additional salt and pepper to taste. Serve.

You really want to use dried beans for this recipe. Canned beans cooking this long will just get very mushy on you and lose all of their texture and consistency (besides, dried beans are pretty cheap, usually about 75 cents for a 1-pound bag). This recipe makes a lot of beans, as most beans recipes seem to do, so it is great if you are cooking them for a crowd at a barbecue. if you want to just make them for a smaller, home crowd or family, you can do what I did this time and cut the recipe in half. you’ll get a good portion of beans for your meal and still have leftovers to use for other days. You get great flavor from the bacon and salt pork with just a hint of the brown mustard and the molasses and vinegar both really help to build the overall flavor of the dish. This one is a family favorite for us and we make it a lot, especially in the summer or to bring over to a party.

That’s all I have for today. Check back next time for another recipe. I hope you enjoy your Memorial Day weekend and remember to take the time to thank a veteran today and remember those who have given so much to help the world through their sacrifice and commitment. Enjoy the rest of your day and enjoy your meal!

IMG_0550


4 Comments

Posted by on May 26, 2014 in Beans, Cooking, Grilling, Rice, Side Dishes


Tags: , , , , , ,

Break Out the Slow Cooker for These Slow Cooker Asian Barbecue Ribs

Since I don’t have the advantages of having a charcoal or gas grill it sometimes feels like it can really limit some of the things I can cook, particularly when it comes to making ribs. I have been able to find some great recipes for making ribs in the oven and they have turned out well, but I am always looking to see if there is something new I can try to get even greater flavor out of a meal of ribs. I came across this recipe awhile back from Kelsey Nixon on the Cooking Channel for Asian barbecue ribs that are made in the slow cooker, which makes them perfect for you to try for a weeknight meal when you want something ready for you when you get home from work. These are very easy to make, with just a few ingredients that go a long way to giving you some great flavor.

Slow Cooker Asian Barbecue Ribs

1/4 cup sesame oil

2 tablespoons chopped fresh ginger

4 cloves garlic, chopped

1 bunch green onions, white and green parts, chopped

1 cup brown sugar

1/2 cup chili sauce

1/2 cup soy sauce

1/3 cup rice wine vinegar

1/4 cup honey

2 racks pork baby back ribs (4 to 5 pounds)

Salt and pepper

1 tablespoon cornstarch

Heat the sesame oil in a large saucepan over medium-high heat. Saute the ginger, garlic and green onions until all are fragrant, about 1 minute. Add the brown sugar, chili sauce, soy sauce, rice wine vinegar, honey and 1/2 cup of water. Whisk the mixture until everything is fully incorporated. Bring the mixture to a simmer over medium-high heat, stirring occasionally. Continue cooking until the sauce has thickened, about 5 minutes. Remove the sauce from the heat and allow it to cool.

Sprinkle the ribs generously with salt and pepper and place the ribs in an upright position in the slow cooker. The meaty side of the ribs should be facing outwards. Spoon the sauce over the ribs and cover the slow cooker. Cook the ribs in the slow cooker on high for 3 to 4 hours or on low for 6 to 8 hours.

Strain the sauce from the slow cooker into a saucepan and remove any accumulated grease from the top of the sauce. Combine 1 tablespoon of water with the 1 tablespoon of cornstarch and whisk them together in a small bowl. Add the cornstarch mixture to the saucepan and bring the sauce to a boil over medium-high heat. Reduce the sauce until it has thickened and serve it with the ribs.

I actually added one more step to this recipe at this point. When I removed the ribs from the slow cooker, I put some of the reduced and thickened sauce onto the ribs and then placed the ribs under the broiler for about 2 minutes to really get a nice glaze and crisp up the ribs some more. I think this made a big difference as far as flavor, texture and look of the ribs and I would do that again with this recipe. The sauce was great, giving a nice Asian flavor and flair to the dish with the ginger, soy sauce and honey. The ribs were very tender inside and crisp on the outside just the way I like them. I would definitely make this one again.

That’s all I have for today. Check back next time for another recipe. until then, enjoy the rest of your day and enjoy your meal!

IMG_0549


Leave a comment

Posted by on May 23, 2014 in Cooking, Dinner, Pork, Slow Cooker Meals


Tags: , , , , , , , ,

A Weeknight, One Pot Meal – Skillet Pork Chops and Rice

It is hard to resist making a one pot meal when you come across one. Not only does it help you significantly when it comes time to clean up (which is especially important when you are having one of those hectic weeknights) but it also gives you a great chance to really meld some flavors of your protein, starch and vegetables all in one so that everything tastes great. One pot meals work well with anything – beef, chicken, fish, vegetables – but I find they work really well with pork chops. Pork chops on their own need some seasoning and flavor to really make them explode, and when you combine them with a great sauce, some vegetables and a starch you can get a great meal without it having to take a long time to cook. this recipe, from Cook’s Country, is the perfect example of that, making a simple skillet pork chops and rice.

Skillet Pork Chops and Rice

4 tablespoons butter, softened

2 tablespoons minced fresh parsley

2 /4 cups chicken broth

1 cup long-grain white rice

4 (6 to 8-ounce) boneless pork chops, 3/4 to 1-inch thick, trimmed

Salt and pepper

1 onion, chopped fine

1 garlic clove, minced

1/2 teaspoon dried thyme

Combine 2 tablespoons of the butter and the parsley together in a small bowl; reserve. Microwave 1 cup of the chicken broth and the rice in a covered large bowl until the liquid is absorbed, about 6 to 8 minutes.

Meanwhile, pat the pork chops dry with paper towels and season them with salt and pepper. Melt 1 tablespoon of the butter in a large skillet set over medium-high heat. Brown the pork chops, about 3 to 4 minutes per side. Transfer the pork chops to a plate and tent them loosely with aluminum foil. Melt the remaining 1 tablespoon of butter on the now-empty skillet over medium-high heat. Cook the onion until it is softened and browned, about 6 to 8 minutes. Add the garlic and the dried thyme and cook until they are fragrant, about 30 seconds.

Stir in the parcooked rice and the remaining 11/4 cups of chicken broth and bring the mixture to a boil. Return the pork chops and any accumulated juices to the skillet and cook, covered, over medium-low heat until the pork chops register 145 degrees on an instant-read thermometer inserted into the thickest part of the chop and the rice is tender, about 12 to 15 minutes. Serve the pork with the reserved parsley butter.

It is very simple and gives you juicy and tender pork chops along with great tasting rice. This recipe uses white rice, but I actually made some brown rice, using this method to cook it and taking it out of the oven 45 minutes into cooking, when the brown rice was mostly done, and the adding it to the skillet with the pork chops to finish up the dish. I thought it turned out really well, but you could use whatever type of rice or grain that you really like. Getting the rice started in the microwave is a great way to save yourself some cooking time to make sure everything is done all at once. This is the perfect meal for a weeknight dinner when you want something that tastes great but does not take a long time to put together, prepare and cook.

That’s all I have for today. Check back next time for another recipe. until then, enjoy the rest of your day and enjoy your meal!

IMG_0552

 
2 Comments

Posted by on May 22, 2014 in Cooking, Dinner, One Pot Meals, Pork, Rice


Tags: , , , , , ,

A Treat for the Whole Family – Baked Honey Barbecue Chicken Fingers

For many adults, just hearing the words “chicken fingers” is enough to make them cringe. They immediately think back to the days when the only things their young children would eat were chicken fingers, tenders, McNuggets or whatever else that happened to be called that are sold in the frozen food aisle of your grocery store, at the local fast food restaurant or any of the dozens of family style convenience restaurants around today. While you may not be thrilled with the notion of what you get in those frozen bags, there are plenty of alternatives out there that you can try making on your own that taste good so that everyone in the family will enjoy them. This particular recipe, that I picked up from Sally’s Baking Addiction, covers just that, giving you a tasty chicken fingers alternative that get away from the frying and offer you a baked alternative that tastes great.

Baked Honey Barbecue Chicken Fingers

3/4 cup barbecue sauce (whatever your favorite may be)

1/4 cup honey

1/2 cup whole wheat or all-purpose flour

1 teaspoon salt

1/2 teaspoon black pepper

1/2 teaspoon smoked paprika

2 eggs, beaten

1 1/2 cups panko breadcrumbs (or more, if needed)

1 1/2 pounds boneless, skinless chicken breasts or chicken tenders

Nonstick cooking spray

Combine the barbecue sauce and the honey in a large bowl. If you are using chicken breasts, pound the chicken breasts between two sheets of plastic wrap to 1/4-inch thickness and cut the breasts into strips. If you are using chicken tenders, cut them in half lengthwise. Add the chicken strips to the bowl with the barbecue sauce and honey and stir so all of the chicken is evenly coated. Cover the bowl tightly and marinate the chicken in the refrigerator for at least 30 minutes and up to 6 hours. The longer you marinade, the more flavorful the chicken will be.

Preheat the oven to 400 degrees. Line a baking sheet with parchment paper or a silicon baking mat or coat the sheet with nonstick cooking spray.

Combine the flour. salt, pepper and the smoked paprika in a shallow dish. Pour the beaten eggs into another shallow dish. Pour the panko breadcrumbs into a third shallow dish. Coat each chicken strip with flour, shaking off any excess. Next. dip the floured chicken in the egg and allow any excess egg to drip off. Then roll the chicken strip in the panko breadcrumbs, coating completely before shaking off any excess. Place the chicken strips on the prepared baking sheet and repeat the process until all of the chicken has been coated. Spray each chicken strip with the nonstick cooking spray to help seal the breading to the chicken, preventing the breading from staying raw and allowing it to bake into the chicken strips.

Bake the chicken fingers in the preheated oven for 10 minutes. Turn each piece over and continue baking until the outside of the chicken is crisp and the centers of the chicken pieces are cooked through, about another 10 to 12 minutes. Serve the chicken fingers with extra barbecue sauce for dipping.

The great thing about this recipe is that you can make a large batch and freeze any extras that you may have to use when you need a quick dinner for the kids or yourself or just want an easy snack. These are perfect for a meal any night with some homemade fries (I made some homemade baked sweet potato fries with ours) or you can use these for any type of buffet when you are having a party and you know kids may be around. They are also great snacks for watching the game or when you have a crowd over. You get good crunch from the breadcrumb mixture and underneath is great flavor from the barbecue sauce and the honey. This is definitely one to remember and you can experiment with this also, perhaps making the chicken fingers ranch flavored instead of barbecue with some spices, or maybe even adding some Parmesan to the breadcrumbs, eliminating the barbecue sauce and substituting tomato sauce to have an Italian-style chicken fingers. There’s lots of room to use your imagination with this one and the best part is you have control over the ingredients so you know what goes into each one, and they are baked, making them a better choice for you.

That’s all I have for today. Check back next time for another recipe. Until then, enjoy the rest of your day and enjoy your meal!

IMG_0540


Tags: , , , , , , ,

Keeping On With Chicken – Soy-Glazed Chicken with Asparagus and Scallions

In keeping up with the trend of a number of the chicken recipes that I have tried lately, this one was one of my personal favorites. I had seen this recipe in the last issue of Bon Appetit magazine and it sounded so delicious and made use of some great ingredients that I absolutely had to give it a try. While the original recipe calls for just using chicken thighs, I had a mix of thighs and drumsticks available to use so I made a little bit of both for us to have for dinner that night. This recipe for sot-glazed chicken with asparagus and scallions is easy enough to make for a weeknight meal and elegant enough for whenever you might be entertaining or want a meal that looks as great as it tastes.

Soy-Glazed Chicken with Asparagus and Scallions

2 teaspoons aniseed

4 garlic cloves, finely chopped

1/4 cup fresh lime juice, plus wedges for serving

1/4 cup soy sauce

2 tablespoons honey

8 chicken thighs (about 4 pounds)

1 bunch asparagus (about 3/4 pound), trimmed

2 bunches scallions, trimmed

2 tablespoons vegetable oil

Kosher salt and freshly ground black pepper

1/2 cup fresh cilantro leaves with tender stems

Toast the aniseed in a small dry skillet over medium heat, tossing frequently and watching to make sure it does not burn, until the aniseed is fragrant, about 2 minutes. Let the aniseed cool and then finely chop it.

Whisk the garlic, lime juice, soy sauce, honey and the chopped aniseed together in a large bowl. Add the chicken pieces and toss the mixture to coat the chicken well. Allow the chicken to sit in the marinade for at least 30 minutes.

Preheat the oven to 450 degrees. Transfer the chicken and the marinade to a foil-lined, rimmed baking sheet, making sure to place the chicken skin side down on the foil. Roast the chicken until the fat begins to render, about 15 to 20 minutes. Turn the chicken skin side up and continue to roast it, basting the chicken occasionally with the pan drippings, until the chicken is cooked through and deeply browned, about 15 to 20 minutes longer.

After turning the chicken, toss the asparagus and the scallions with the vegetable oil on another rimmed baking sheet. Season the vegetables with salt and pepper. Roast the vegetables, shaking the pan about halfway through the cooking process, until the vegetables are tender, about 10 to 15 minutes. If you have thinner stalks of asparagus or scallions, they will cook more quickly and will be done faster.

Transfer the chicken to a platter. Pour any pan juices into a glass measuring cup. Let the juices sit for a few minutes and then spoon the fat from the surface of the juices. Spoon the pan juices over the chicken and serve the chicken with the asparagus, scallions, cilantro and lime wedges.

You can always begin marinating the chicken a day ahead and simply cover the bowl and store it in the refrigerator until the next day if you want even deeper flavors. I did not have aniseed on hand but substituted fennel seed instead and got that licorice flavor that you get from either herb, so I think it worked well.The marinade is wonderful and imparts incredible flavor to the chicken thanks to the combination of the soy sauce, honey, aniseed and lime juice. I love roasted asparagus as well and with the scallions together they just seem to go really well with the chicken. It’s a great dinner that you can do in just over an hour and you get this deep brown chicken with amazing flavor and the house smells great while it is cooking.

That’s all I have for today. Check back next time for another recipe. until then, enjoy the rest of your day and enjoy your meal!

IMG_0545 IMG_0544

 
Leave a comment

Posted by on May 20, 2014 in Cooking, Dinner, Poultry, Vegetables


Tags: , , , , , , ,

A Honey of a Recipe – Honey Chili Beer Chicken

With the prices of just about everything else going up at the grocery stores, chicken is one of the few things that has remained reasonable for some of the pieces. Boneless chicken breasts remain high-priced, in my opinion, but you can get legs and thighs for a very good price, bone-in breasts are reasonable, and you can always get a whole chicken and cut it up yourself to get several meals out of it and then some stock as well. In any case, I have been stocking up on legs and thighs lately so I have also been scouring around looking for new recipes to try to get some different tastes and flavors so it doesn’t seem like we are eating the same thing several times a week. I cam across this recipe on the Internet not long ago from The Beeroness for a honey chili beer chicken that looked great, so I thought I would give it a try.

Honey Chili Beer Chicken

3 tablespoons olive oil

1/2 cup sliced onions

2 cloves garlic, minced

1 cup brown ale, divided in half

1 tablespoon balsamic vinegar

2 tablespoons honey

1/2 teaspoon red chili sauce (such as Sriracha), plus additional if desired

6 boneless, skinless chicken thighs

1/2 teaspoon salt

1 teaspoon pepper

1-2 tablespoons all-purpose flour

In a cast iron skillet over medium heat, add the olive oil and heat until the oil is shimmering. Add the onions and caramelize the onions over medium heat, mixing occasionally, until the onions are a nice golden brown, about 10 to 15 minutes.

Stir in the garlic and then add 1/2 cup of the brown ale, the balsamic vinegar, the honey and the chili sauce. Simmer the mixture until it is reduced and thickened, about 3 to 5 minutes. Remove the sauce from the pan and set the sauce aside.

Sprinkle the chicken thighs on all sides with the salt, pepper and all-purpose flour to coat the thighs well. Increase the heat of the stovetop to medium-high, place the chicken thighs in the now-empty cast iron skillet and cook the chicken thighs until they are browned on all sides, about 3 minutes per side.

Pour the sauce back into the cast iron skillet with the chicken along with the remaining 1/2 cup of the brown ale. Cover the skillet loosely with a lid, lower the heat of the stovetop to maintain a simmer in the skillet and allow the chicken to cook until the chicken thighs are cooked through, about 10 to 12 minutes, turning the chicken once during the cooking process. Remove the chicken and sauce to a platter and serve.

The sauce that you make with this chicken is really good. You get a great combination of flavors from the brown ale, the balsamic and the honey and a little bit of heat from the chili sauce to round it all out. Add in the sweetness of the caramelized onions and it seems just perfect. I am sure you could do this meal with boneless chicken breasts if you wanted to or even just make the sauce to use over something like chicken wings or drumsticks and get the same great results. The sauce might even go well with some pork chops if you wanted to give that a try as well. It was a quick, easy way to make good use of chicken and gives you some great options when you are looking for something different to try for your meal. I used a lighter ale than the recipe called for, Smithwick’s, because that is what I had on hand, but I think you could use just about any type of ale and it would work well here.

That’s all I have for today. Check back next time for another recipe. I have lots of things I have tried lately, including a bunch of chicken recipes, and I just got the latest issue of Cook’s Country (my personal favorite cooking magazine) and it has some great chicken recipes to try along with some other great options, so I will be giving a bunch of those a shot as well. until next time, enjoy the rest of your day and enjoy your meal!

IMG_0539 IMG_0538


2 Comments

Posted by on May 19, 2014 in Cooking, Dinner, Poultry, Sauce


Tags: , , , , ,

 
National Day Calendar

Fun, unusual and forgotten designations on our calendar.

Authentic Autograph Source, LLC

Licensed autographs and collectibles dealer in the Pacific NW! We have a wide range of sports, celebrities, and more!

Jennifer Probst

a little bit naughty a little bit nice

Laissez Faire

Letting Life Lead

%d bloggers like this: