RSS

Monthly Archives: May 2013

Taking on the Big Marc Burger

Everyone loves to have a hamburger of some sort. There are thousands of different recipes all over the place using all kinds of different meats, cheeses, sauces, condiments and rolls. I have posted links just within the last week of many different burger recipes you can use for this summer on your grill. One in particular that struck me and made me want to give it a try was one that was posted by the Food Network. The recipe specifically is from Marc Murphy, a well-known chef and restaurant owner many may be familiar with the as one of the judges on the show “Chopped.” He offered up a recipe for what he calls “The Big Marc.”

The Big Marc Burger

Homemade Cheddar and Black Pepper Buns

1 cup warm water
1 1/2 ounces fresh yeast
1/2 cup sugar
4 ounces butter, melted, plus more for greasing
4 eggs
1 1/2 teaspoons salt
4 to 5 cups all-purpose flour
8 ounces shredded cheddar cheese
1 and freshly cracked black pepper

Spiked Ketchup

1 head garlic
Olive oil
Salt and freshly ground black pepper
1 cup mayonnaise
2 tablespoons Dijon mustard
1 1/2 cups ketchup
5 ounces vodka (about 2/3 cup)

Burgers

2 1/2 pounds 80/20 ground beef, formed into six 6-ounce patties
Salt and freshly ground black pepper
2 tablespoons canola oil
3 ounces melted butter
Bread and butter pickles

For the buns, stir the water, yeast and sugar together to activate the yeast. You can tell when the yeast is activated-little bubbles will have formed, which will take several minutes. Add the melted butter and 3 of the eggs and mix until incorporated.

Add 4 cups of flour and the salt to the bowl of a stand mixer fitted with the dough hook attachment. Mix together on low speed, then stop and add the wet ingredients. Continue to mix until the dough is very smooth, about 5 minutes. You may want to add a little bit more flour as you mix; the dough should be sticky but workable. Transfer the dough to a bowl. Cover the bowl with a kitchen towel, place in a warm area and let rise until the dough has doubled in size, about 30 minutes.

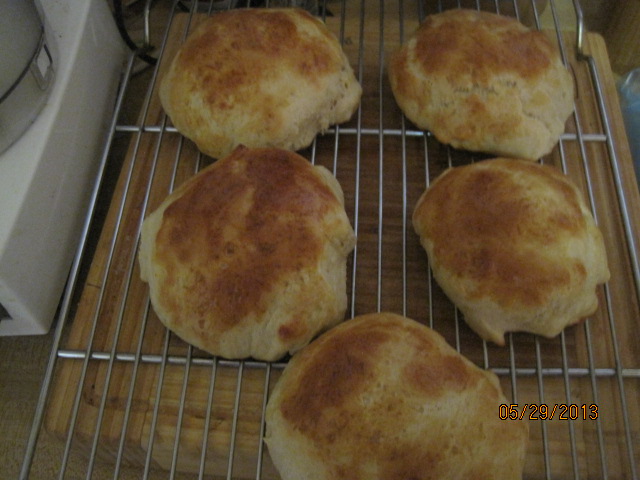
After the dough has proofed (risen), turn it out onto a lightly-floured countertop and knead in the cheddar and black pepper. Try not to overwork the dough; once the cheese is mixed in you can stop. Cut the dough into 6 equal portions and shape them into round balls. Place on a buttered baking sheet and flatten them with your hand. Cover and let rise again in a warm area until they have doubled in size, about 30 minutes more. When they are almost doubled in size, preheat the oven to 350°. Beat the remaining egg in a small bowl and brush the tops of the rolls with the egg. Bake until golden brown, rotating halfway through, about 10 to 15 minutes.Cool the rolls on a wire rack.

For the ketchup, turn the oven down to 250°. Cut the garlic in half crosswise and sprinkle with olive oil, salt and pepper. Wrap the garlic in aluminum foil and roast until soft, about 35 to 40 minutes. Remove the garlic from the skins and mix into a paste. Reserve 1 tablespoon for the ketchup, and keep the remaining garlic for another use. Whisk together the mayonnaise, mustard and roasted garlic in a bowl. Add the ketchup and vodka and mix until incorporated. This will keep for up to 6 days in the refrigerator.

For cooking the burgers, heat a skillet over high heat or heat an outdoor grill to high. Sprinkle the patties with salt and pepper. Coat with oil and sear or grill until medium rare, about 3 to 5 minutes per side.

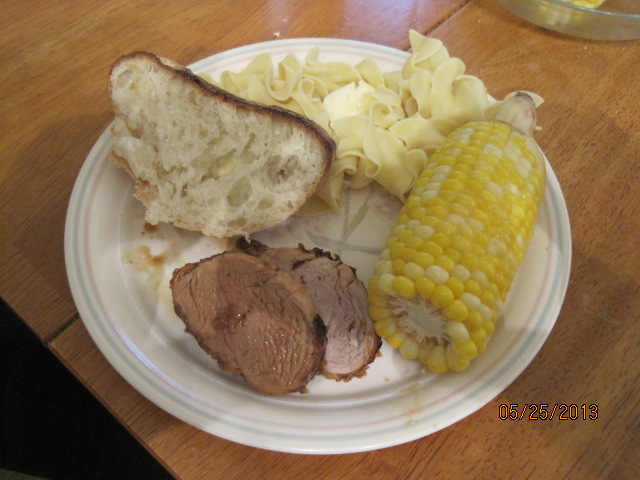
Slice the buns in half horizontally and brush with the melted butter. Toast in the skillet or on the grill. Arrange pickles slices on each bottom bun and place a hamburger on top. Slather 1 to 2 tablespoons of spiked ketchup over the burger and set the top bun in place. Serve with the remaining ketchup on the side.

Just a few things about this recipe. Number one, I’ve never made any type of buns like this before so it was a new experiment for me. I have to say it was pretty easily done and they came out quite nice. I did eliminate putting the cheddarr and black pepper into the rolls because I wasn’t sure how they would come out and wanted to try them just plain the first time around. We all liked the hamburger buns better than anything you would buy at the supermarket. As is noted in the recipe, however, the recipes for the buns and the ketchup are quite large. The buns themselves come out big when they are finished and are probably more than what you need for a hamburger unless you really like a large roll. I actually ended up cutting the recipes for the buns and the ketchup in half of what is shown here and still ended up with a lot of ketchup and big buns. Next time, I think I will portion the buns out to make them even smaller and see how they come out and maybe even just do 1/3 of the ketchup recipe. You could go for completely homemade in this recipe and grind your own beef with a mixture of chuck and sirloin and form your own patties that way. Of course, you can serve any condiments or sauces that you like on the side. We actually made ours with some crispy bacon and some onion rings.

That’s the recipe for today. Check back next time and you can see the meatloaf recipe I tried out recently that comes from Tyler Florence. I also have a few other recipes for the coming days and weeks so you want to keep checking back and see what comes up. Until then, try to stay: this heat wave were experiencing in New York and enjoy the rest of your day and enjoy your meal!

006 003 004 005

Advertisement
 
Leave a comment

Posted by on May 31, 2013 in Beef, Breads, Cooking, Dinner, Grilling, Sauce


Tags: , , , , , , , ,

Bring On the Baby Back Ribs

I love making ribs of all kinds no matter what time of year it is, but as the summer approaches it gets to be more and more the type of thing that people want to cook on the grill. Unfortunately, living in a condominium here in New York limits the grilling that we can do since we can’t have a charcoal or gas grill here. This means that I have to try to find ways to do this type of cooking indoors. I am always on the lookout for new recipes for ways to make spare ribs or baby back ribs (which are my personal favorite) and I came across this one from Williams-Sonoma on their website so I thought I would give it a try.

Baby Back Ribs

2 racks baby back ribs (about 5 pounds total)
2 teaspoons kosher salt
1 teaspoon smoked paprika
1 teaspoon dried oregano
1 teaspoon dried thyme
1/2 teaspoon granulated garlic
1/2 teaspoon onion powder
1/2 teaspoon freshly ground pepper
1/2 cup ketchup-style chili sauce
1/2 cup peach or apricot preserves
2 tablespoons dark molasses
1 tablespoon cider vinegar
1 tablespoon Dijon mustard
1/2 teaspoon hot pepper sauce

Preheat the oven to 350°. Cut each rib rack into 2 or 3 sections. Mix together the salt, paprika, oregano, thyme, granulated garlic, onion powder and pepper. Sprinkle the mixture on both sides of the ribs and rub it into the meat.

Arrange the ribs, overlapping slightly if necessary, in a large roasting pan. Cover the pan tightly with aluminum foil, place in the oven and cook for 30 minutes. Remove the foil, turn the ribs and return them to the oven. Continue cooking until the ribs are tender and browned, about 30 minutes more.

Meanwhile, make the sauce. In a small saucepan, stir together the chili sauce, peach preserves, molasses, vinegar, mustard and hot pepper sauce and bring to a simmer over medium-low heat. Remove from the heat and set aside.

If you are you using a grill, prepare the grill for direct-heat cooking over medium-high heat. Lightly oil the cooking grate. Brush both sides of the ribs with the sauce. Place on the grill, cover and cook, turning once, until shiny and glazed, about 3 minutes per side. Alternatively, if you are planning to use the oven, increase the oven temperature to 425°. Pour off the fat in the roasting pan, then return the ribs to the pan. Brush the ribs with some of the sauce and cook until the ribs are shiny and glazed, about 5 minutes. Turn, brush the ribs with more of the sauce and cook to glaze the other side, about 5 minutes more.

Transfer the ribs to a carving board and let stand for 5 minutes. Cut between the bones into individual ribs, heap on a platter and serve with any of the remaining sauce.

You could easily use spare ribs for this recipe instead of the baby back ribs. Just keep in mind that the spare ribs tend to be larger and a little tougher than the baby back ribs so they will take more time to cook. You should allow for about 45 minutes of covered baking, another 45 minutes uncovered and then 15 minutes after you put the sauce on for glazing. I think they came out great cooked just in the oven but if you have the opportunity to put them on the grill after starting them in the oven I think you could get nice flavor from that as well. I like the glaze and the combination of the apricot preserves (which is what I had on hand), the chili sauce, the mustard and the hot pepper sauce. It made a nice combination and gave a great flavor to the ribs. I served this with sweet potatoes and corn on the cob, although you could easily do it with coleslaw and potato salad, which go great with things like ribs.

That’s all there is for today. Check back again next time and see which recipes that I will post. I tried a new method for burgers yesterday and made my own homemade hamburger rolls and a special ketchup, both recipes that I got from Marc Murphy, and I think they turned out great. Check in next time and I’ll be posting those recipes. I am also planning a few other things for the coming days and weeks so you want to keep checking back and see what comes along. Until then, enjoy the rest of your day and enjoy your meal!002

 
Leave a comment

Posted by on May 30, 2013 in Cooking, Dinner, Grilling, Pork


Tags: , , ,

Michelle’s Not-So-Secret Oatmeal Cookies

Everyone, and I mean everyone, always loves the cookies Michelle makes. This is particularly true of the chocolate chip cookies she makes and the oatmeal raisin cookies. I love the both myself, but I have to admit the oatmeal raisins are my favorite. They come out perfectly and I am pretty sure I could eat an entire batch of them myself if I put my mind to it. What’s her secret recipe? Well, it’s hardly a secret really. She uses the same recipe as is listed on Quaker Oats’ website for their cookies, but she does tweak it a little.

Michelle’s Famous Oatmeal Raisin Cookies

1 cup (2 sticks) butter, softened

1 cup firmly packed brown sugar

1/2 cup granulated sugar

2 eggs

1 teaspoon vanilla extract

1 1/2 cups all-purpose flour

1 teaspoon baking soda

1 teaspoon cinnamon

1/2 teaspoon salt

3 cups quick cooking Irish oatmeal

2 cups raisins

Preheat the oven to 350 degrees. Beat together the butter and both of the sugars until creamy. Add the eggs and vanilla extract; beat well. Combine the flour, baking soda, cinnamon and salt in a separate bowl and mix well. Add the combined flour mixture to the butter mixture and mix well. Slowly stir in the oats until just combined.Fold in the raisins until just combined. Drop rounded teaspoons of cookie dough onto cookie sheets lined with parchment paper. Bake the cookies for 10 to 12 minutes or until golden brown. Cool for 1 minute on the cookie sheet and then remove to a wire rack for further cooling.

That’s all there is to them. The only changes she really makes are in the oats and raisins. She uses the Irish oatmeal a lot of  the time. It seems to have a more natural and better flavor than from the standard Quaker Oats we have bought in the past and I really like them this way. She also adds in twice the amount of raisins as is in the standard recipe. This seems to make the cookies softer and more chewy, which is great in an oatmeal raisin cookie. As I said, everyone really seems to enjoy them, and she just made them this weekend and we devoured them at every chance, almost as quick as they were coming out of the oven. I had to stop and make a plate just to be sure I could get a picture of them before they all disappeared.

That’s the recipe for today. Check back later in the week and I’ll have a few more recipes, including a little different take on baby back ribs that I made last night, a new chicken recipe and even some burger recipes I want to try. I have a few others in store for the coming weeks as well that should be great that I have picked up from various sources, including The New York Times, Food Republic, Alton Brown, Marc Murphy, Bon Appetit and many more. Keep checking back to see how they work out. Enjoy the rest of your spring day today and enjoy your meal!

001

 
2 Comments

Posted by on May 29, 2013 in Cookies, Cooking, Dessert


Tags: , , , ,

Positively Perfect Pound Cake

We’ve done a lot of cooking and baking over the last few days, and it has given me quite a few recipes to work with. One of the things we made this past weekend was a classic pound cake recipe that I got from America’s Test Kitchen. I love just a plain piece of pound cake with a cup of coffee or maybe even a simple dollop of whipped cream or a little bit of fruit on the side. It’s a great thing to make it and doesn’t take a lot of work on your part so you could easily make one and bring it to a party or a friend’s home.

Pound Cake

1 1/2 cups cake flour
1 teaspoon baking powder
1/2 teaspoon salt
1 1/4 cups sugar
4 large eggs, at room temperature
1 1/2 teaspoons vanilla extract
16 tablespoons (2 sticks) butter, melted and hot

Adjust an oven rack to the middle position and heat the oven to 350°. Lightly coat a 9 x 5-inch loaf pan with vegetable oil spray, then line the bottom with parchment paper. Whisk the flour, baking powder, and salt together in a large bowl and set aside.

Process the sugar, eggs, and vanilla in a food processor until combined, about 10 seconds. With the machine running, pour the melted butter through the feed tube in a steady stream, about 30 seconds. Pour the mixture into a large bowl.

Sift one-third of the flour mixture over the egg mixture and whisk in. A few streaks of flour should remain. Repeat twice more with the remaining flour mixture and continue to whisk the batter gently until most of the lumps are gone. Do not over mix.

Pour the batter into the prepared pan and smooth the top. Wipe any drops of batter off the sides of the pan. Bake until a wooden skewer inserted into the center of the cake comes out with just a few crumbs attached, about 50 to 60 minutes, rotating the pan halfway through baking. Let the cake cool in the pan for 10 minutes, then flip it out onto a wire rack. Turn the cake right side up, remove the parchment paper, and allow it to cool to room temperature, about 3 hours.

There are few notes about this recipe. You could easily vary the recipe up a little bit and add some flavor to it. Adding 2 tablespoons of grated lemon zest and 2 teaspoons of fresh lemon juice to the sugar just before you process everything in the 2nd step will give you a nice lemon pound cake. You can do the same with a tablespoon of grated orange zest and a tablespoon of orange juice and get an orange flavor instead. If you don’t have any cake flour on hand, you can make your own replacement. For every 1 cup of cake flour, you need 7/8 of a cup of all-purpose flour and 2 tablespoons of cornstarch in order to get the same results You can serve this cake with a variety of different fruits on the side or some homemade whipped cream. Remember that blueberry sauce I made about a week ago? I used that on the cake and it tasted great.

That’s all there is for today. Next time out I held be sharing the recipe Michelle uses for her oatmeal raisin cookies. I also have some other recipes to try to share this week so keep checking back to see if there’s anything you like. Until then, enjoy the rest of your day and enjoy your meal!

003 001 002

 
Leave a comment

Posted by on May 28, 2013 in Cakes, Cooking, Dessert, Sauce


Tags: , , , , , ,

Best Burger Recipes: Classic, Sliders, Lamb, Bison & More : Cooking Channel

Best Burger Recipes: Classic, Sliders, Lamb, Bison & More : Cooking Channel.

And because you can never have enough burger recipes to use for the summer, the Cooking Channel also posted 50 burger recipes that you can use. Some of these look pretty awesome and they are not all beef so you can find something you like even if you want to cook meatless burgers. Check it out!

 
Leave a comment

Posted by on May 27, 2013 in Cooking, Cooking Websites, Grilling


Tags: , , ,

Recipe of the Day: What to Cook in May 2013 : Recipes and Cooking : Food Network

Recipe of the Day: What to Cook in May 2013 : Recipes and Cooking : Food Network.

Here’s some more great grilling ideas from Food Network if you are still looking for something to make today or use them anytime this summer when you want to grill. Check it out!

 
Leave a comment

Posted by on May 27, 2013 in Cooking, Cooking Websites, Grilling


Tags: , ,

Best Burger Recipes : Recipes and Cooking : Food Network

Best Burger Recipes : Recipes and Cooking : Food Network.

If you are still looking for some great burger ideas to use on the grill today, Food Network has these 50 burger recipes that can fill all your needs. There’s nothing like a good burger so you are sure to find a recipe you like on this list. Check it out!

 
Leave a comment

Posted by on May 27, 2013 in Beef, Cooking Websites, Grilling


Tags: , , , ,

Holiday Weekends are Meant for Homemade Breakfasts

We don’t get to spend enough time together as it is, so trying to take advantage of the holiday weekend and spend time with each other is a premium for us. This particularly involves any meals that we may have. As it is with most families, it’s pretty rare when all 3 of us can sit down together and actually have breakfast at the same time. So when it does happen, I try to make it something special. This was the case yesterday when I decided we were going to have a completely homemade breakfast. It’s much simpler than it sounds and you can easily do any of these things in moments. I kept it even simpler by just sticking with scrambled eggs, homemade sausage, and home fries. We added in a couple of store-bought items as well, including Taylor ham and English muffins.

Easy Scrambled Eggs

8 large eggs
1/4 cup half-and-half
1/2 teaspoon salt
1/8 teaspoon pepper
1 tablespoon butter

Whisk together the eggs, half-and-half, salt, and pepper. Melt the butter in a large nonstick skillet over medium-high heat, swirling to coat the pan. Add the eggs and cook while gently pushing, lifting, and folding them from one side of the pan to the other until they are nicely clumped, shiny, and wet, about 2 minutes. Remove the cooked eggs from the pan quickly.

I know it seems kind of ridiculous to actually have a recipe for scrambled eggs since it’s a fairly basic recipe, but I think it’s actually pretty easy to mess these up. Michelle actually makes much better scrambled eggs that I do; her eggs seem to come out fluffier and taste better and I think it’s because she follows this method exactly. Having a hot pan to start with is a key and you also want to be sure that you fold your eggs and push them instead of stirring them. Stirring them keeps them from getting as fluffy as they could be. Naturally, there are many things that you could add in to scrambled eggs if you choose to, such as onions, herbs, various cheeses, hot sauce, ham, bacon – the list seems to go on and on. Make them how you feel most comfortable.

Next up is a very simple recipe for some homemade breakfast sausage. Now there are few ways you can do this, and if you want to make it a little differently you could certainly grind your own pork. It will take you more time to do it that way but if that’s what you’re looking for then you should go right ahead. I chose to just use already ground pork and keep things simple.

Homemade Breakfast Sausage

2 pounds ground pork
1 tablespoon maple syrup
1 garlic clove, minced
1/2 tablespoon salt
1/2 teaspoon pepper
1/2 teaspoon dried sage
1/2 teaspoon dried thyme
1/4 teaspoon cayenne pepper
4 teaspoons of vegetable oil

Spread the pork out in a large bowl and sprinkle with the syrup, garlic, salt, pepper, sage, thyme, and cayenne. Using your hands, gently fold the flavorings into the pork, then portion and shape each into sixteen 2-ounce patties (about 1/4 cup each).

Heat 2 teaspoons of the oil in a large nonstick skillet over medium heat until shimmering. Add half of the patties and cook until well browned on both sides, about 5 minutes per side. Transfer the patties to a paper towel-lined plate. Wipe out the skillet, add the remaining 2 teaspoons of oil, return the pan to medium heat until shimmering, and cook the remaining patties.

Of course if you’re going to grind your own pork and maybe you even have your own sausage casings you can make breakfast links instead of breakfast patties. It really depends on how ambitious you happen to feel, but this seems to be the simplest way to do it. You could also easily freeze some of the patties between wax paper and have them portioned out for use at another time. Then it is simply a matter of placing them in a hot skillet with a little bit of butter to get them started and then add a little bit of water and cover the pan so they steam first to help them cook, remove the cover, turn the heat up and cook the patties until they are browned. You could also make this with ground turkey instead of ground pork. I actually have a turkey sausage patty recipe that I will post at another time which is a great breakfast alternative.

I also made some home fries to help round out the meal. Home fries are really easy to make, and if you happen to have some leftover potatoes already done you can easily use them as well. You have a lot of options here when it comes to what you want to use. Even if you have a can of diced potatoes around you could use that as well. This recipe, from America’s Test Kitchen, actually recommends that you microwave your potatoes first to help get some of the starch out of them before you do any of the frying. This helps to build up the better crust on the potatoes.

Home Fries

2 pounds Yukon gold potatoes (4 medium), scrubbed and cut into one half-inch cubes
1/4 cup vegetable oil
3 tablespoons butter
1 onion, chopped fine
Salt and pepper

In a large microwave-safe bowl, toss the potatoes with the oil. Cover the bowl tightly with plastic wrap and microwave on high until the potatoes are tender but not falling apart, 5 to 10 minutes, shaking the bowl without removing the plastic to re-distribute the potatoes every 3 minutes. Carefully remove the plastic wrap, transfer the potatoes to a colander, and drain thoroughly.

Meanwhile, melt the butter in a large skillet over medium-high heat. Add the potatoes to the skillet and, using a wooden spoon or heatproof spatula, distribute them evenly over the pan. Cook undisturbed until the potatoes are golden brown on one side, about 5 minutes. Carefully turn the potatoes to ensure even browning and add the onion to the skillet. Continue cooking, turning the potato and onion mixture every few minutes, until the potatoes are well browned and the onion is softened, 10 to 15 minutes longer. Season with salt and pepper to taste.

Again, there are other things you could add to the potatoes if you want to get a little bit of a different flavor. I actually added a little bit of orange bell pepper and some paprika to my recipe and I think they tasted great. I know they do sell frozen diced potatoes, but I think if you’re planning to use them you need to make sure that you thaw them and that they are dried very well to remove as much of the moisture as possible if you want them to cook well. Otherwise they will just steam in the liquid and not get crispy.

While I didn’t make any bacon with our breakfast, I have found that making the bacon in the oven has worked much better and gives the bacon a chance to cook and crisp up much more evenly than it does when you cook it in the pan. You can also cook a lot more of it all at once if you are making breakfast for a large crowd, which is an advantage.

Oven Bacon

1 pound bacon (16 slices), thin or thick-cut

Adjust an oven rack to the middle position and heat the oven to 400°. Arrange the bacon on a rimmed baking sheet (the slices can overlap just slightly) and bacon until crisp and browned, about 10 to 15 minutes, rotating the baking sheet front to back halfway through. Transfer the bacon to a paper towel-lined plate and let the excess fat drain off before serving.

If you’re going to cook it this way, you could also consider using a wire rack set inside the rimmed baking sheet so it keeps the bacon from sitting in the fat and allows the air to circulate around it, making it a little more crisp. As I said, I did make Taylor ham with the breakfast because it is one of Michelle’s favorites. It seems to be mostly a Northeast thing, and even more particularly a New Jersey thing to have Taylor ham with breakfast. It is basically a pork roll that you slice and fry for a minute or 2 on each side just to get it crisp. I didn’t have time to make any homemade biscuits or anything like that, but they would be great to go with a traditional home breakfast. Of course I had coffee with mine, and you could certainly have homemade orange juice if you have a juicer or whichever store-bought juice you prefer.

The important thing with the breakfast like this is that it actually brings everyone to the table all at the same time. It doesn’t really matter what you make; you could just each have bowls of oatmeal or bagels and coffee if that’s all you really want as long as you’re enjoying some time together.

That’s all there is for today. Check back again later on in the week and I’ll have some new recipes to share, including a pound cake, oatmeal cookies, a black bean salad, and I do have a few other things planned in for dinner this week including baby back ribs, meatloaf and chicken so check back and see what comes along. Until then, enjoy the rest of your 3 day weekend, and enjoy your meal!

003

 
Leave a comment

Posted by on May 27, 2013 in Breakfast, Cooking, Eggs, Holidays, Potatoes, Sausage


Tags: , , , , , , , ,

A Moment for Maple-Glazed Pork Tenderloin

It was a cool and rainy day here in our part of New York yesterday. I know parts north of here actually got snow, which sounds ridiculous for Memorial Day weekend, but it did happen. I’m sure that had something of an influence in the type of dinner I decided to make last night. I chose this recipe from America’s Test Kitchen for a maple-glazed pork tenderloin. It was very quick to make and would be excellent for a weeknight meal and the time of the year.

Maple-Glazed Pork Tenderloin

3/4 cup maple syrup
1/4 cup molasses, light or mild
2 tablespoons bourbon or brandy
1/8 teaspoon ground cinnamon
Pinch ground cloves
Pinch cayenne pepper
1/4 cup cornstarch
2 tablespoons sugar
1 tablespoon salt
2 teaspoons ground black pepper
2 pork tenderloins (1 1/4 to 1 1/2 pounds each)
2 tablespoons vegetable oil
1 tablespoon whole-grain mustard

Adjust an oven rack to the middle position and heat the oven to 375°. Stir 1/2 cup of maple syrup, molasses, bourbon, cinnamon, cloves, and cayenne together in a 2-cup liquid measure; set aside. Whisk the cornstarch, sugar, salt, and black pepper in a small bowl until combined. Transfer the cornstarch mixture to a rimmed baking sheet. pat the tenderloins dry with paper towels, then roll them in the cornstarch mixture until they are evenly coated on all sides. Thoroughly pat off any excess cornstarch mixture.

Heat the oil in a large, heavy-bottomed nonstick skillet over medium-high heat until just beginning to smoke. Reduce the heat to medium and place both tenderloins in the skillet, leaving at least 1 inch in between them. Cook until they are well browned on all sides, about 8 to 12 minutes. Transfer the tenderloins to a wire rack set inside a rimmed baking sheet.

Pour off any excess fat from the skillet and return it to medium heat. Add the syrup mixture to the skillet, scraping up any browned bits with a wooden spoon, and cook until the mixture is reduced to 1/2 cup, about 2 minutes. Transfer 2 tablespoons of the glaze to a small bowl and set aside. Using the remaining glaze, brush each tenderloin with approximately 1 tablespoon of glaze. Roast the tenderloins until an instant-read thermometer inserted in the thickest part of the tenderloins registers 130°, about 12 to 20 minutes. Brush each tenderloin with another tablespoon of glaze and continued to roast until an instant-read thermometer inserted in the thickest part of the tenderloins registers 135 to 140°, about 2 to 4 minutes longer. Remove the tenderloins from the oven and brush each with the remaining glaze; allow to rest, uncovered, for about 10 minutes.

While the tenderloins rest, stir the remaining 1/4 cup of maple syrup and mustard into the reserved 2 tablespoons of glaze. Brush each tenderloin with 1 tablespoon of the mustard glaze. Transfer the meat to a cutting board and slice into 1/4-inch-thick pieces. Serve, passing the extra mustard glaze at the table.

Rolling the tenderloins in the cornstarch mixture really did make a difference in making sure that the coating and glaze adhered well to the meat. It also helped to give a nice crunch to the outer coat of the meat and glaze. Make sure you use real maple syrup and not the imitation stuff most of us use on pancakes and waffles. The imitation will be way too sweet for this type of recipe. I love the way it all came out and that it did have a little bit of sweetness to it because of the syrup and molasses and you could even taste a little bit of the bourbon in the recipe. I served this with noodles and corn on the cob.

That’s all there is for today. I’ll have some more recipes this week, including a few desserts that we made for a classic pound cake and Michelle’s famous oatmeal cookies. We also did a nice homemade breakfast today that included some nice home fries, some sausage and scrambled eggs, a basic breakfast but it was all homemade. Check back later in the week for all of that. Until then, enjoy the rest of your day today and enjoy your meal!002

 
Leave a comment

Posted by on May 26, 2013 in Cooking, Dinner, Pork


Tags: , , ,

A Chilly Day Calls for Spaghetti and Meatballs for a Crowd

I know it’s not the ideal start to a long weekend when two days ago it was 85° out and I was looking to turn the air conditioner on and then we wake up this morning and it’s 42° outside and windy and rainy. Since the weekend doesn’t look like it’s going to get any better until Monday, today is a good day to do a recipe for a classic spaghetti and meatballs. This recipe, from Cook’s Illustrated, is designed if you’re cooking for a large crowd so you want to keep that in mind if you are going to use this recipe. When I do it for just the three of us I generally have to adjust it down a little bit and we still end up with enough sauce and meatballs left over where we can freeze some for another several meals.

Classic Spaghetti and Meatballs for a Crowd

Meatballs

2 1/4 cups panko bread crumbs
1 1/2 cups buttermilk
1 1/2 teaspoons unflavored gelatin
3 tablespoons water
2 pounds 85% lean ground beef
1 pound ground pork
3 large eggs
3 ounces Parmesan cheese, grated
6 tablespoons minced fresh parsley
3 garlic cloves, minced
1 1/2 teaspoons salt
1/2 teaspoon pepper

Sauce

3 tablespoons extra-virgin olive oil
1 large onion, grated
6 garlic cloves, minced
1 teaspoon dried oregano
1/2 teaspoon red pepper flakes
3 (28-ounce) cans crushed tomatoes
6 cups tomato juice
6 tablespoons dry white wine
Salt and pepper
1/2 cup minced fresh basil
3 tablespoons minced fresh parsley
Sugar

3 pound spaghetti
2 tablespoons salt
Grated Parmesan cheese

For the meatballs: adjust oven racks to the lower-middle and upper-middle positions and heat the oven to 450°. Set wire racks into aluminum foil-lined rimmed baking sheets and spray the racks with vegetable oil spray.

Combine the bread crumbs and the buttermilk in a large bowl and let sit, mashing occasionally with a fork, until a smooth paste forms, about 10 minutes. Meanwhile, sprinkle the gelatin over the water in a small bowl and allow it to soften for 5 minutes.

Mix the ground beef, ground pork, eggs, Parmesan, parsley, garlic, salt, pepper, and gelatin mixture into the bread crumb mixture using your hands. Pinch off and roll the mixture into 2-inch meatballs (about 40 meatballs total) and arrange on the prepared baking sheets. Bake until the meatballs are well browned, about 30 minutes, switching and rotating the baking sheets halfway through the baking process.

For the sauce: while the meatballs bake, heat the oil in a Dutch oven over medium heat until shimmering. Add the onion and cook until softened and lightly browned, about 5 to 7 minutes. Stir in the garlic, oregano and pepper flakes and cook until fragrant, about 30 seconds. Stir in the crushed tomatoes, tomato juice, wine, 1 1/2 teaspoons of salt, and 1/4 teaspoon of pepper, bring to a simmer, and cook until the sauce thickens slightly, about 15 minutes.

Remove the meatballs from the oven and reduce the oven temperature to 300°. Gently nestled the meatballs into the sauce. Cover, transfer to the oven, and cook until the meatballs are firm and the sauce has thickened, about one hour. The sauce in the meatballs can be cooled and refrigerated for up to 2 days. To re-heat, drizzle 1/2 cup of water over the sauce, without stirring, and re-heat on the lower-middle rack of a 325° oven for 1 hour.

Meanwhile, bring 10 quarts of water to a boil in a large 12-quart pot. Add the pasta and salt and cook, stirring often, until al dente. Reserve 1/2 cup of the cooking water, then drain the pasta and return it to the pot.

Gently stir the basil and parsley into the sauce and season with sugar, salt, and pepper to taste. Add 2 cups of sauce (without meatballs) to the pasta and toss to combine. Add the reserved cooking water as needed to adjust the consistency. Serve, topping the individual portions with more tomato sauce and several meatballs and passing the Parmesan cheese

As I said, this recipe makes a lot of food. They outline it as having enough to serve 12 people, but if you make the full recipe I think it could even serve more than that. I have always gotten more than 40 meatballs out of the recipe so we always have plenty left over for uses down the road. Their recipe also calls for some prosciutto to be used in the meatball mixture, which I leave out. I do like the way that the meatballs come out when they are baked in the oven and then the entire concoction with the sauce is placed in the oven again. The thickness of the sauce and the taste of the meatballs seems to be a lot better to me. You could easily served this with any type of pasta that you wish and I love to make some garlic bread to go along with it.

That’s the recipe for today. We did some shopping this morning so I did get a few things and to make over the next few days or so. Tonight I’ll be making a pork tenderloin dinner so you can check back for the recipe on that one. I also picked up some baby back ribs and the makings for some meatloaf so will be having those this week as well. I do plan to head up to Adams and see if they have anything else interesting that we might use for dinner this week. Check back and see what we come up with. Until then, enjoy the rest of your rainy day and enjoy your meal!

003

 
1 Comment

Posted by on May 25, 2013 in Beef, Cooking, Dinner, Pasta, Sauce


Tags: , , , , , ,

 
National Day Calendar

Fun, unusual and forgotten designations on our calendar.

Authentic Autograph Source, LLC

Licensed autographs and collectibles dealer in the Pacific NW! We have a wide range of sports, celebrities, and more!

Jennifer Probst

a little bit naughty a little bit nice

Laissez Faire

Letting Life Lead

%d bloggers like this: