RSS

Monthly Archives: June 2016

Anytime is Burger Time! Turkey Burgers with Caramelized Pineapple

I love a good hamburger (and probably even a bad one). Burgers make a quick and easy meal, taste great and we always seem to think about them more in the summertime because it is the perfect time to grill. I like to cook burgers all year-long and since I don’t have an outdoor grill to use I make use of my trusty cast iron skillet, nonstick skillet or cast iron grill pan to get the job done for me. Having the same old traditional hamburger can get a little boring at times so I do like to vary things up now and then. That is why when I saw this recipe from the Tasting Table I knew I wanted to give it a try. The original recipe calls for using ground chicken, but I find ground chicken to be pretty bland. Ground turkey may not sound that much better to some people, but I use it a lot more because it seems to hold up better and takes on other flavors really well so I decided to substitute that into this recipe. Besides, I had just gotten some ground turkey on sale at the grocery store so this was the perfect way to use it.

Turkey Burgers with Caramelized Pineapple

For the Turkey Patties:

1¼ pounds ground turkey

¼ cup crème fraîche or sour cream

1 tablespoon chopped parsley

2 teaspoons chopped chervil

2 teaspoons kosher salt

2 eggs

1 shallot, minced

Freshly ground pepper, to taste

For the Caramelized Pineapple:

2 cups (12 ounces) finely chopped pineapple

1 cup white wine vinegar

2½ tablespoons honey

½ yellow onion, minced

1 cup water

Kosher salt and freshly ground pepper, to taste

For Assembly:

2 tablespoons olive oil

4 hamburger rolls, toasted

Arugula, for garnish

To make the turkey patties: In a medium bowl, add all the turkey patty ingredients and mix them together until they are incorporated completely. With your hands, form 4 equal-sized patties from the mixture and place the patties on a plate; cover the plate with plastic wrap then chill the patties in the refrigerator for 1 hour. This will help them to firm up and hold together nicely during cooking.

Meanwhile, make the caramelized pineapple: In a large skillet set over medium heat, combine the pineapple, white wine vinegar, honey and onion. Bring the mixture to a simmer and cook until the vinegar has completely evaporated, about 20 to 25 minutes.

Once the pineapple begins to caramelize, stir in the water. Simmer the mixture until the pineapple thickens to form a compote, another 6 to 8 minutes. Season the pineapple with salt and pepper to taste.

Cook the burgers: In another large skillet, heat the olive oil over medium-high heat. Add the turkey patties and cook, flipping once, until the patties are golden brown and their internal temperature reads 165 degrees on an instant-read thermometer inserted into the center of a patty, about 4 to 5 minutes per side.

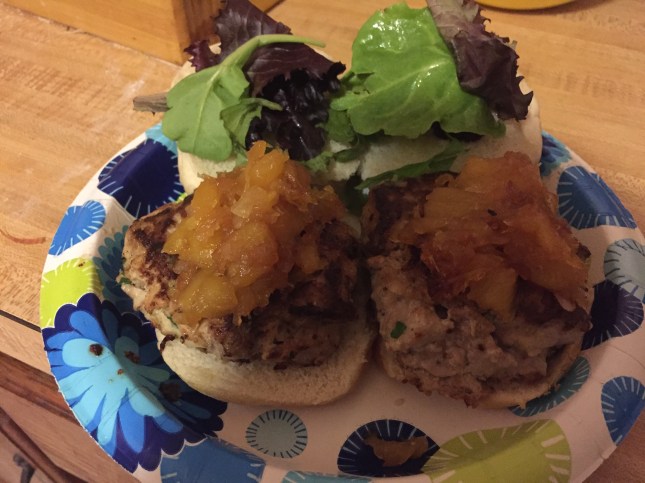
5. Assemble the burgers: On each toasted bun bottom, place a  turkey patty, then top each with a spoonful of the caramelized pineapple, a handful of arugula and the other bun half and serve.

This is probably one of the best turkey burger recipes I have tried. The turkey was cooked just right and it was moist and flavorful, something I always worry about with turkey burgers. I think the sour cream really helps to add moisture and flavor to the burger. The pineapple is great as well, though I did find that it took me more than 25 minutes to completely get all of the vinegar evaporated in the initial step. I took me more like 30 to 35 minutes, but it was okay with me. The pineapple came out nicely caramelized and was great on the burger. I could see using that type of pineapple for other dishes, like a pulled pork sandwich or even as a side dish for a pork dinner. Sean added a piece of cheddar cheese to his burger to round things off and really enjoyed it. I even I had enough turkey to make a couple of extra burgers that we could have for lunch the next day since I did not make them too large.

That’s all I have for today. Check back next time for another recipe. until then, enjoy the rest of your day and enjoy your meal!

IMG_0442


Advertisement
 

Tags: , , , , , , , ,

Get Asian Inspired with Pork Tonkatsu and Japanese Cabbage Salad

One of things I can always count on when making a meal Sean will like is to look to an Asian-inspired meal. He has a fondness for Japanese, Chinese and Korean cooking and doesn’t even seem to mind when I make the dishes a little spicier, even though he will turn his nose up at spicy chili or Buffalo wings (go figure). I had some pork cutlets in fridge and was trying to come up with something different to make with them other than the typical breaded cutlets when I thought about Tonkatsu. I had seen recipes for it before but never really thought to try it myself until I realized just how easy it was going to be. This recipe from Food and Wine is very straightforward and easy to make so you can get the crispy meal your family will love.

Pork Tonkatsu

Four 6- to 7-ounce boneless pork loin chops, pounded 1/2 inch thick

2 cups all-purpose flour

2 large eggs, lightly beaten

3 cups panko bread crumbs

Kosher salt

Pepper

Canola oil, for frying

3 tablespoons Japanese mustard powder  or Colman’s mustard powder

Japanese Cabbage Salad (recipe to follow)

For the Tonkatsu Sauce:

1 Tbsp. ketchup

2½ tsp. Worcestershire sauce

1½ tsp. oyster sauce

1⅛ tsp. sugar

Using a pair of kitchen shears, score the fat at the edges of the pork chops at 1-inch intervals, about 1/4 inch deep (this will keep them from curling while they cook).

Put the flour, eggs and panko bread crumbs in 3 separate shallow bowls. Season the flour with 1 teaspoon each of salt and pepper. Season the pork cutlets with salt and pepper and coat them with flour, tapping off the excess. Dip the cutlets in the beaten eggs and then in the panko, pressing to help the panko adhere.

In a large skillet, heat 1 inch of oil to 360 degrees. Fry 2 pork cutlets over moderate heat, turning once, until they are golden brown and white throughout, about 4 minutes. Drain the chops on paper towels. Transfer the pork chops to a cutting board and season them with salt. Repeat the process  with the remaining cutlets.

In a small bowl, whisk the mustard powder with 3 tablespoons of water until the mixture is smooth.

To make the sauce, combine the ketchup, Worcestershire sauce, oyster sauce and sugar together in a small and whisk until blended.

Slice the tonkatsu into 3/4-inch strips and transfer it to plates. Serve the  with the cabbage, Japanese mustard, tonkatsu sauce and lemon wedges.

Not only is the recipe very easy and turns out great, crispy pork, but you could easily substitute chicken or beef for the pork if you wanted to or even shrimp or your favorite fish. The breading is nice and crispy and it goes really well with the mustard and the Tonkatsu sauce. The Japanese cabbage salad is also very easy to make and there are several different recipes out there that you can try. I used this one from Martha Stewart.

Japanese Cabbage Salad

1 tablespoon white or yellow miso paste

2 tablespoons soy sauce

Juice and zest of 1 lime

2 teaspoons rice wine vinegar (seasoned)

1 teaspoon sesame oil

1/4 cup safflower oil

6 cups thinly shredded green cabbage

Garnish: toasted sesame seeds

  1. In a large bowl, whisk together the miso paste, soy sauce, lime zest and  lime juice, rice wine vinegar, sesame oil, and safflower oil.


Toss the cabbage with the dressing and serve it garnished with sesame seeds, if desired.

I didn’t have safflower oil on hand so I just used vegetable oil and it turned out just fine to my tastes. It was a very simple salad that tasted great with the dressing, which was a nice mix of the sesame oil, lime and vinegar. I think it goes perfectly with the tonkatsu and would work well with any other meal that needs a light salad.

That’s all I have for today. Check back next time for another recipe. Until then, enjoy the rest of your day and enjoy your meal!

IMG_0401

 
Leave a comment

Posted by on June 29, 2016 in Cooking, Dinner, Dressings, Pork, Salad, Sauce, Vegetables


Tags: , , , , , , ,

It’s Never Too Hot for Turkey – Herb-Roasted Boneless Turkey Breast

Okay, the last thing you probably think about as you go into June, July and the rest of the summer is turkey. Just the idea of making a turkey is very often enough to make someone start sweating and wondering when the Christmas tree is going up. However, in my home, turkey is always a family favorite. It is one of Michelle’s favorite meals and since she has been traveling quite a bit lately I like to make her a favorite when she does come home. However, finding a whole turkey this time of year is next to impossible and having the desire to heat up the whole house for hours on end is not at the top of my list. That being said, I had ventured out to Fresh Market not that long ago and found a boneless turkey breast half that was just about 2 1/2 pounds, making it ideal for us. I picked it up and then discovered this recipe at Taste of Home for a very simple herb-roasted turkey breast that was perfect for what I wanted to do.

Herb-Roasted Boneless Turkey Breast

6 tablespoons butter, cubed

2 tablespoons lemon juice

1 tablespoon soy sauce

1 tablespoon chopped green onion

1/2 teaspoon dried thyme

1/2 teaspoon dried marjoram

1/4 to 1/2 teaspoon rubbed sage

1/4 teaspoon salt, optional

1/8 teaspoon pepper

1 boneless skinless turkey breast half (2 pounds)

In a small saucepan set over medium heat, combine the cubed butter, lemon juice, soy sauce, green onion, thyme, marjoram, rubbed sage, salt (if using) and pepper. Bring the mixture to a boil then remove the saucepan from the heat and set it aside to cool, about 10 minutes.

Place the boneless turkey breast on a rack in a greased shallow roasting pan. Spoon some of the butter mixture over the top of the turkey breast. Cover the turkey breast with aluminum foil and bake it at 325 degrees, basting along the way every 15 to 20 minutes with the remaining butter mixture,  for 1-1/4 to 1-3/4 hours or until the juices run clear  and an instant-read thermometer inserted into the thickest part of the breast reads 170 degrees.

Let the turkey breast stand for 10-15 minutes before slicing.

I did have a couple of slight variations that I added to the original recipe. First, the turkey breast I used did have skin on it and I left it on. I could have removed it easily enough, but who doesn’t like turkey skin? In order to crisp the skin up a little, I removed the foil cover about 15 minutes before the turkey was done and turned the heat up to 375 degrees. The skin crisped and the turkey breast did not dry out. I also roasted some broccoli crowns, a quartered onion and corn on the cob pieces in the pan along with the turkey. They picked up some the good flavor from the herb mixture on the turkey and went well with the meal. The turkey was cooked nicely, sliced perfectly and we were able to have a nice turkey dinner with mashed potatoes and vegetables even though it was 90 degrees outside. If you have a grill you could certainly do a piece this small on the grill as well in a shorter amount of time and not heat up the house at all.

That’s all I have for today. Check back next time for another recipe. Until then, enjoy the rest of your day and enjoy your meal!

IMG_0431

 
1 Comment

Posted by on June 27, 2016 in Cooking, Dinner, Herbs, Poultry, Turkey, Uncategorized


Tags: , , , ,

The Perfect Side Dish – Hasselback Potato Skillet Bake

Side dishes don’t necessarily get a lot of love from people when it comes to the meal, especially during the week when you may be in a bit more of a rush to get a meal on the table for dinner. It’s really easy to just throw a few potatoes in the microwave or use some instant or quick rice and frozen vegetables to complete your meal. I very often use frozen vegetables myself because they are quick, easy and can very often taste just as good as fresh for certain things. When it comes to having some type of starch with a meal though, I want to go beyond the basic baked potato, instant rice or french fries. That is why making this dish can be the perfect compromise. Hasselback potatoes seem all the rage over the last year or so and you can find lots of different recipes and variations on them, but this one I found at Food52 seemed to be the right one for me.

Hasselback Potato Skillet Bake

6 to 8 baby Yukon Gold potatoes (any long and narrow waxy heirloom will work), based on the skillet size you use

tablespoons butter, melted

garlic cloves, minced

tablespoons finely minced herbs (I used parsley and thyme.)

tablespoons grated Parmesan (optional)

Salt and pepper, to taste

Preheat the oven to 425 degrees. Scrub the potatoes thoroughly and remove all the hard bits from the skin since the skins will be left on.

Slice one thin layer off each potato, along the length, then set it aside. This serves as a solid base to rest on while you slice the potatoes. Place a potato flat side-down and use a sharp knife to make slices that are about 1/8-inch apart; slice into the potato but not completely through it — the slices should stay connected at the bottom. (Tip: Place a chopstick on either side of the potato so that you hit the chopstick before slicing all the way through.) Carefully fan out the sliced pieces without breaking them apart. Repeat with each potato.

In a small mixing bowl, combine the melted butter, garlic, and minced herbs. Set the mixture aside.

Using a pastry brush, brush the bottom and the sides of a cast iron skillet and each potato with the garlic-herb butter mixture. Brush the potatoes generously, making sure to get in-between each slice. Reserve 1/3 of the garlic-herb butter for basting. Nestle the potatoes into the skillet. Sprinkle the potatoes with Parmesan cheese, if using, and salt and pepper, to taste.

Bake for 1 hour — basting the potatoes every 15 minutes with the remaining garlic-herb butter — or until the potatoes are tender on the inside and crisp on the outside.

They are very easy to make whenever you might want them. It might take a little practice in cutting through the potatoes to make sure you don’t go all the way through so you can get that nice, fanned look from the potatoes and they cook well on the inside. You get a really great, crisp outside of the potatoes while still having the creamy potato center you like. I have found these can go well with any type of main dish – steak, pork chops, chicken, lamb – and you can pop them in the oven alongside of whatever protein you are making and they will be done at around the same time. If you have any leftovers, slice them all the way through and you can have great potatoes to have with a breakfast of eggs, sausage and bacon or some hash.

That’s all I have for today. Check back next time for another recipe. Until then, enjoy the rest of your day and enjoy your meal!

IMG_0381


Tags: , , , , ,

This is the Bread Recipe You Have Been Looking For

I have found over the last several months that I really like making bread. I have a good quality bread maker and use it often, but there is also something about making it all yourself from scratch that I get real enjoyment out of. From the time the yeast begins to bloom and you get that great aroma to getting your hands into the dough and kneading away (don’t forget how great of a workout kneading dough for 10 minutes can be for you) to shaping the dough and smelling it baking in the oven to the time you cut into that first piece and see the steam rise from the loaf as you put some soft butter on the warm bread, it can all be quite wonderful. Needless to say I have tried a lot of different bread recipes in this time frame, but the one I always seem to go back to is this one from King Arthur Flour. King Arthur Flour has been a fantastic source for me for inspiration, baking products and recipes and this bread recipe has turned into my favorite. I make this one about every 10 days or so because it gives me two loaves of bread and it is better than anything you can find yourself buying at any grocery store. The best part about it? It is really easy to make yourself.

French-Style Country Bread

For the Starter:

1 cup cool to lukewarm water (90°F to 100°F)

1/2 teaspoon active dry or instant yeast

1 1/4 cups unbleached bread flour or organic bread flour

1/4 cup (1 ounce) white whole wheat flour or whole wheat flour

For the Dough:

all of the starter (above)

1 cup lukewarm water (100°F to 115°F)

3/4 teaspoon active dry or 1/2 teaspoon instant yeast

1 tablespoon sugar

3 3/4 to 4 cups unbleached bread flour or organic bread flour

1 1/2 to 2 1/4 teaspoons salt, to taste

To make the starter: Stir all of the starter ingredients together in a large bowl to make a thick, pudding-like mixture. Cover the starter with plastic wrap and let it rest for at least 2 hours. For the best flavor, let the starter rest longer; overnight (up to 16 hours) is best. If you plan on making the dough in a bread machine, place the sponge ingredients in the bucket of your bread machine and turn the machine on for just a few seconds to mix the ingredients together. Turn the machine off and close the cover, then let the starter rest as directed above.

To make the dough: Stir down the starter with a spoon and add the water, yeast, sugar, 3 1/4 cups of the flour, and the salt. The dough will be a loose, messy mass. Let the dough rest for 12 to 15 minutes, then stir it again; it should become more cohesive and a bit smoother. The dough will handle better once it has had time for the flour to absorb the water while resting and relaxing. By using this method, you’ll tend to add less flour, and have much bigger holes in your finished bread.

Knead the dough, adding more flour as necessary, to make a soft dough, about 10 to 12 minutes.

Place the dough in a lightly greased bowl or plastic container, cover the container with lightly greased plastic wrap, and let the dough rise until it has almost doubled in size (depending on the weather, this could be 1 to 2 hours). If you are going out, or if you prefer, let the dough rise slowly in the refrigerator. If your dough has been refrigerated, allow it to come to room temperature before shaping it. It will warm up and rise at the same time.

Deflate the dough gently, but don’t knock out all the air; this will create those “holes” so important to French bread. For one large loaf, form the dough into a round ball; for two loaves, divide the dough in half and shape into two balls.

Place a semolina or cornmeal-dusted piece of parchment paper onto a baking sheet. Gently place the ball(s) of dough on the baking sheet, seam-side down.

Cover the bread gently with lightly greased plastic wrap and let it rise until it is puffy and about 40% to 50% larger, anywhere from 45 to 90 minutes.

Preheat your oven to 475°F.

Slash or cross-hatch the bread with a sharp knife or lame. Dust the dough with a little flour. Spritz water into the oven with a clean plant mister, and place the bread in the oven. Reduce the heat to 425°F and spritz the oven with water every few minutes for the first 15 minutes of baking.

Bake the bread for about 25 to 30 minutes, or until it’s a rich golden brown, and its interior temperature registers at least 190°F on a digital thermometer. The smaller loaves will bake more quickly, so keep your eyes on them.

Remove the bread from the oven, and cool it on a rack. Store the bread loosely wrapped in paper for a couple of days at room temperature; wrap it in plastic and freeze for longer storage.

If you are normally intimidated by the idea of making a starter or making your own bread, don’t be. This recipe makes things simple for you to do and you come out with bread that you will be proud to call your own. The crust of the bread comes out perfectly (spraying mist in the oven makes a big difference here) and the bread itself has the flavor, smell and look that is divine. The bread is great for sandwiches or to serve with any type of meal, makes great toast and is really great any time you want some. I typically leave one loaf out and freeze the other but I still find they are gone in about two weeks. I purchased a lame (pronounced lahm) from King Arthur so that I could score the bread and I am still learning and working with it, but you can create your own great looks and patterns on the bread with it (just be careful; they use razor blades and are incredibly sharp). You could certainly use your bread machine to do all of the kneading and the rise for you if you wanted to, but I love to do that part myself. It makes me feel like I am really creating something of my own. As I said, I make this recipe a lot and highly recommend it.

That’s all I have for today. Check back next time for another recipe. Until then, enjoy the rest of your day and enjoy your meal!

IMG_0393


Tags: , , , , , ,

It Was a Dark and Stormy Banana Bread

I really like banana bread. It not only can make a great dessert item with a little bit of ice cream (go for Ben and Jerry’s Chunky Monkey for the complete banana experience, or make your own homemade banana ice cream), but it also is perfect for a brunch buffet or even just for breakfast on its own. I have tried a few different banana bread recipes and have never been disappointed in any that I have made, so when I saw this one from Joy the Baker I knew it had to be a hit. How could you go wrong by combining two great things – banana bread and a Dark and Stormy? If you have never had a Dark and Stormy, I was introduced to them long ago on a cruise to Bermuda and it’s a great combination of dark rum and ginger beer. this recipe incorporates the concept, though it leaves out the ginger beer and uses ginger instead.

Dark and Stormy Banana Bread

1/2 cup (1 stick) plus 2 tablespoons unsalted butter

1 cup lightly packed muscovado brown sugar (or dark brown sugar)

2 large eggs

2 teaspoons pure vanilla extract

1 tablespoon dark rum

2 ripe bananas, mashed

1/2 tablespoon fresh grated ginger

heaping 1/2 teaspoon ground cinnamon

1/2 teaspoon ground nutmeg

1/2 teaspoon ground ginger

2 cups all-purpose flour

3/4 teaspoon baking soda

1/2 teaspoon salt

Place a rack in the upper third of the oven and pre-heat the oven to 350 degrees F. Melt the butter in an 9-inch cast iron skillet over medium-low heat. Melt the butter until the crackling subsides and the butter begins to brown. Remove the skillet from the heat and stir in the sugar. Whisk until the butter and sugar are thoroughly combined. The mixture may seem broken as the butter won’t completely absorb into the sugar just yet. Allow the mixture to stand and cool for about 5 minutes.

Whisk in the eggs, one at a time. The mixture will begin to emulsify, be glossy and no longer greasy. Whisk in the vanilla and the dark rum. Add the mashed bananas, fresh ginger, cinnamon, nutmeg, and ground ginger and stir to combine.

Add the flour, baking soda, and salt. Stir the mixture carefully until all of the dry ingredients are incorporated. Use a spatula to scrape down the sides and spread the batter evenly across the skillet.

Place the skillet in the oven and bake for 18-25 minutes until mixture is dry on the top, but still slightly soft in the center. Remove the skillet from the oven and allow the banana bread to cool for 15 minutes. Sprinkle the banana bread with powdered sugar if you’d like and enjoy it warm.

There are a few great things about this recipe. Naturally, the first one is in the flavor. It is awesome banana bread, nice and moist with good banana flavor and the dark rum and ginger really shine through here. Second, this bread is the epitome of easy make and clean up since you do everything in one skillet start to finish. It’s a great use of your cast iron skillet and the bread comes out perfectly in color and has some nice texture to it and there’s no extra bowls to have to clean. Add some ice cream or homemade whipped cream to this and you have something great.
That’s all I have for today. Check back next time for another great recipe to try. Until then, enjoy the rest of your day and enjoy your meal!
IMG_0399
 

Tags: , , , ,

Checking In with Pan-Seared Chicken Thighs with Potatoes and Chorizo

Chicken thighs are pretty much a staple in our house when it comes to dinners. They have great flavor, are versatile and are almost always on sale somewhere. You can get them as they are or boneless and skinless (though they are very easy to bone and remove the skin and can save you money if you just buy them as is) and can use them in nearly any way. They make a great substitute for the typical boneless chicken breasts that you see, cost less and, in my opinion, taste better. I always have some in the freezer available to use for a dinner and this particular dinner, from Cook’s Country, was the one I chose to make. It is for pan-seared chicken thighs with potatoes and chorizo so you get a great mix of flavors here.

Pan-Seared Chicken Thighs with Potatoes and Chorizo

8 (5- to 7-ounce) bone-in chicken thighs

Salt and Pepper

1 tablespoon extra-virgin olive oil, plus extra for drizzling

1 1/2 pounds Yukon Gold potatoes, unpeeled, cut into 1/2-inch chunks

4 ounces chorizo sausage, halved lengthwise and sliced crosswise

8 ounces (8 cups) baby spinach

Smoked paprika

Adjust an oven rack to the middle position and heat the oven to 375 degrees. Pat the chicken dry with paper towels and then season the chicken with salt and pepper. Heat the olive oil in a large nonstick skillet set over medium-high heat until the oil is just smoking. Add the chicken pieces, skin side down, and cook until the skin is well-browned, about 7 to 10 minutes. Transfer the chicken, skin side up, to a rimmed baking sheet and roast the chicken until the meat registers 175 degrees on instant-read thermometer inserted into one of the chicken pieces, about 15 to 20 minutes.

Meanwhile, add the potatoes to the now-empty skillet and cook, covered, over medium heat until lightly browned, about 5 minutes. Add the chorizo and cook, uncovered, until the potatoes are tender, about 5 minutes longer. Add the spinach and cook until the spinach is just wilted and the liquid has evaporated, about 2 minutes. Serve the chicken with the potato mixture, sprinkled with the smoked paprika.

You have plenty of options here if you want to change things up along the way. If you and your family prefer white meat you could always substitute boneless chicken breasts or even bone-in chicken breasts. Just adjust the time accordingly so that the chicken is cooked through and not dry. If you prefer a milder sausage, you could always use Italian sausage or even kielbasa with this dish instead, though I liked the spice the chorizo added to the dish with the potatoes. I served the spinach on the side instead of putting it right into the dish with the potatoes, but you could certainly do either. In the end, you end up with some nice crispy chicken pieces that blend well with the potatoes, chorizo and spinach and you get to make a meal that only takes about 30 minutes to do.

That’s all I have for today. Check back next time for another new recipe to try. until then, enjoy the rest of your day and enjoy your meal!

IMG_0276


Tags: , , , , , , ,

Say It’s Simple with Sheet Pan Shrimp and Vegetables

So it’s been way too long since I have done any blog posting at all and I came to the decision yesterday that I need to start making more time to do it, so here I am. Since my last original post I have made lots of great things so I have all kinds of fun recipes to share. Some I have pictures for and some I do not since I had to switch phones in the midst and lost some photos along the way, but I will do my best to keep up with everything.

For the first recipe upon return, we have an easy sheet pan shrimp and vegetables recipe I picked up from the Tasting Table. Sheet pan dinners are just as good as skillet dinners since you can do everything in just one pan for easy clean up and if you use aluminum foil on the bottom of the pan the clean up gets even easier for you. This recipe is a nice combination of shrimp and vegetables and has an Italian/Mediterranean flair to it with a great dressing for the vegetables. It is very much like a panzanella salad meal you might make. Best of all, you can put it all together pretty quickly and have dinner on the table in about 20 to 30 minutes.

Sheet Pan Shrimp and Vegetables

INGREDIENTS

For the Shrimp:

1 pound shrimp, peeled and deveined

3 tablespoons olive oil

2 tablespoons lemon juice

½ teaspoon lemon zest

2 garlic cloves, minced

Kosher salt and freshly ground black pepper, to taste

For the Dressing:

¼ cup balsamic vinegar

1 tablespoon Dijon mustard

2 teaspoons honey

¼ cup olive oil

Kosher salt and freshly ground black pepper, to taste

For the Salad:

8 ounces asparagus, cut into 2-inch pieces

½ cup marinated artichokes hearts

½ cup pitted Castelvetrano olives, halved

½ red onion, large dice

¼ cup (10 each) sun-dried tomatoes, thinly sliced

Dressing

4 cups roughly torn sourdough bread

For Assembly:

½ cup (6 ounces) small mozzarella balls, halved

¼ cup parsley leaves

¼ cup basil leaves, torn

Kosher salt and freshly ground black pepper, to taste

Prepare the shrimp: Preheat the oven to 450 degrees and line a baking sheet with aluminum foil. In a medium bowl, toss all of the shrimp ingredients together and place the shrimp in the center of the sheet tray.

To make the dressing: In a medium bowl, whisk together the balsamic vinegar, Dijon mustard and honey. While whisking constantly, slowly stream in the olive oil until the mixture is emulsified. Season with salt and pepper to taste.

In a large bowl, toss the asparagus, artichoke hearts, olives, red onion and sun-dried tomatoes with the dressing to coat. Scatter the vegetables around the shrimp, then top the salad with the chunks of sourdough bread. Bake the shrimp and vegetables until the shrimp are cooked and the bread is crisp, about 10 to 12 minutes.

4. Transfer the contents of the baking sheet to a large bowl and toss with the mozzarella balls, parsley leaves and torn basil leaves. Season with salt and pepper to taste, then transfer to a platter and serve.

I did make a couple of slight changes to the recipe. Instead of using sun-dried tomatoes, which I didn’t have on hand, I used grape tomatoes instead. I also added a couple of ears of corn on the cob that I had cut into thirds to roast along with the other vegetables. Personally I liked the way it all turned out this way. I simply served the sheet tray platter on the table for the 3 of us and kept the mozzarella balls on the side for anyone to add if they wanted them. The vinegar dressing went really well with all of the vegetables and left a nice bite on the asparagus, artichoke hearts and red onion. The shrimp was done perfectly. I had used some wild American shrimp I got on sale and they were an ideal size and tasted delicious. The garlic and lemon also worked over to the corn on the sheet to give the corn some great added flavor. The sourdough bread worked nicely as well and was great for sopping up the dressing. It was certainly an easy meal to make and one that you can put together quickly on those busy summer nights.

That’s the recipe for today. I’ll try to be back tomorrow and get on a better routine again to keep things going. Until then, enjoy the rest of your day now that summer is here and enjoy your meal!

IMG_0421


Tags: , , ,

 
National Day Calendar

Fun, unusual and forgotten designations on our calendar.

Authentic Autograph Source, LLC

Licensed autographs and collectibles dealer in the Pacific NW! We have a wide range of sports, celebrities, and more!

Jennifer Probst

a little bit naughty a little bit nice

Laissez Faire

Letting Life Lead

%d bloggers like this: