RSS

Category Archives: Brunch

A Bobby Flay Brunch for Dinner – Buttermilk Waffles with Buttermilk Fried Chicken Tenders and Bourbon Maple Syrup

One of the actual cooking shows I like to watch on Food Network (yes, there are still shows that have chefs actually cooking recipes on there) is Brunch with Bobby. While I do not make brunch very often, I do enjoy a lot of the recipes that he comes up with, and they are perfect for use for breakfast or dinner for the three of us. Just recently, I saw an episode where Bobby Flay was making his take on chicken and waffles. I have done chicken and waffles once before a while ago, but I liked his particular take on it because it seemed easy and it looked like it would taste great. The key to making the recipe for me would be to find the time in to make the batter for the waffles, the soak for the chicken and then the time to cook it all. Luckily, I did have one day where I had some downtime from work and was able to fit it all in and gave it a whirl.

Buttermilk Waffles with Buttermilk Fried Chicken Tenders and Bourbon Maple Syrup

For the Waffles:

1 3/4 cups all-purpose flour

2 teaspoons baking powder

1/4 teaspoon baking soda

3 tablespoons sugar

1/2 teaspoon fine salt

3 large eggs

1 1/2 cups buttermilk

1 stick (8 tablespoons) unsalted butter, melted and cooled, plus more for the waffle iron

For the Chicken Tenders:

12 chicken tenders

2 cups buttermilk

Few dashes hot sauce, plus for serving

2 cups all-purpose flour

1/2 teaspoon garlic powder

1/2 teaspoon onion powder

1/4 teaspoon chili powder or cayenne pepper

Kosher salt and freshly ground black pepper

Canola oil, for frying

For the Syrup:

3/4 cups pure maple syrup

1cup softened butter

2 to 3 tablespoons bourbon whiskey (or 1 teaspoon bourbon extract)

For the waffles, combine the flour, baking powder, baking soda, sugar and salt in a large bowl.

In a second bowl, whisk the eggs until they are smooth, then whisk in the buttermilk and butter until the ingredients are combined. Add the wet ingredients to the dry ingredients and mix just until the batter comes together; there will be lumps. Cover the dough and let it sit at room temperature for at least 30 minutes and up to 1 hour.

Preheat the oven to 250 degrees. Set a baking rack over a baking sheet and place the baking sheet on the center rack in the oven. Preheat a waffle maker according to the manufacturer’s instructions and brush the plates with melted butter.

For each waffle, ladle about 1/3 cup of the batter onto the iron. Cover the batter with the lid and cook the waffle until it is golden brown and crispy, about 3 to 4 minutes. As you go, transfer the cooked waffles to the baking rack in the oven and hold them there while you fry the chicken.

For the fried chicken, while the waffle batter rests, place the chicken tenders in a resealable plastic bag. Add 1 cup of the buttermilk and the hot sauce, then seal the bag and marinate the chicken at room temperature for 1 hour.

In a medium bowl, combine the flour with the garlic powder, onion powder, chili powder or cayenne, 1 teaspoon of salt and 1/4 teaspoon of black pepper. Transfer half of the flour mixture to a second bowl. In a third bowl, put the remaining 1 cup of buttermilk.

Remove the chicken from the marinade and pat the pieces dry with paper towels. Sprinkle the chicken tenders with salt and pepper.

Heat 2 inches of oil in a high-sided skillet, preferably cast-iron, set over medium heat until it registers 360 degrees on a deep-fry thermometer. Working in batches to avoid crowding the pan, dredge the chicken in the first dish of seasoned flour, then dip the pieces in the buttermilk, letting the excess drain off, and finally dredge the chicken tenders in the second bowl of seasoned flour, tapping off any excess. Fry the chicken until it is golden brown on both sides and just cooked through, about 5 minutes. Remove the chicken to a paper-towel-lined plate and season it with salt.

For the maple syrup, bring the maple syrup and the softened butter to a boil in a medium saucepan set over medium heat. Stir in the bourbon whiskey or extract. Allow the syrup to simmer for 1 to 2 minutes until the flavors meld, and the syrup is warmed through.

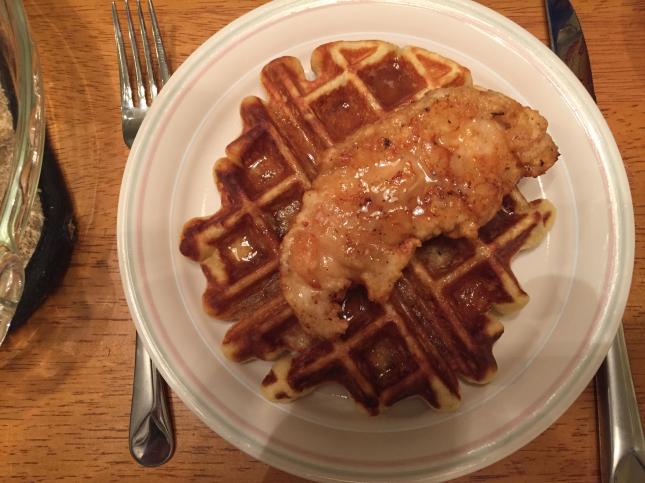
To serve, put one of the waffles on a plate and top it with a fried chicken tender or two. Drizzle the chicken and waffles with the warm syrup, or with hot sauce or honey, if you desire.

I have to say while I have not had a lot of chicken and waffles in my lifetime, this was the best recipe I had tried. We all agreed that the waffle batter was fantastic, producing perfect waffles with an incredible flavor from the buttermilk and just the right amount of crunch. My waffle maker is a Belgian waffle maker, so the waffles were bigger, but you can cut them down to size if you like. The chicken tenders were the ideal size and portion for the meal, in my opinion. I always found a big piece of chicken with the waffles to be too filling, but the chicken tender was perfect. I liked the coating and double coating the pieces produced an excellent crust on the chicken. The syrup, which I got the recipe for from Food.com, was a nice touch to round out the meal. It was sweet and tasty, and this recipe makes a good portion of syrup, so you are likely to have some leftovers to use for another occasion. All in all, this was a good choice that makes a nice meal for dinner or brunch.

That’s all I have for today. Check back next time for another recipe. Until then, enjoy the rest of your day and enjoy your meal!

img_0687


Advertisement
 
1 Comment

Posted by on March 1, 2017 in Brunch, Cooking, Dinner, Poultry


Tags: , , , , , , , , , ,

Welcome to Bread Week! – Starting Off with Cook’s Country English Muffin Bread

I decided since I have a backlog of bread recipes that I have made recently that each post this week will be for one of the different bread types I have tried. Breadmaking is one of my favorite things to do, and I make lots of different things all the time, to the point where I know have 8 different flours occupying space in my cabinets. I am always on the lookout for a new bread recipe to try, and this one from Cook’s Country for English muffin bread seemed like a good one to start with. I have made homemade English muffins before, and they turned out great, but the process can be quite time-consuming. This recipe offers you the same texture and chew that you expect from a traditional English muffin in bread form and it is much easier to put together.

English Muffin Bread

Cornmeal

5 cups bread flour

4 1/2 teaspoons instant or rapid-rise yeast

1 tablespoon granulated sugar

2 teaspoons salt

1 teaspoon baking soda

3 cups warm milk (120 degrees)

Grease two 8 1/2 by 4 1/2-inch loaf pans and dust each pan with cornmeal. Combine the bread flour, yeast, sugar, salt and baking soda in a large bowl. Stir in the warm milk until it is combined, about 1 minute. Cover the dough with greased plastic wrap and let it rise in a warm place for 30 minutes, or until the dough is bubbly and has doubled in size.

Stir the dough and divide it equally between the two pans, pushing the dough into the corners of the loaf pan with a greased spatula. The pans should be about two-thirds full of dough. Cover the pans with greased plastic wrap and let the dough rise in a warm place until the dough reaches the edges of the pans, about 30 minutes. Adjust an oven rack to the middle position and heat the oven to 375 degrees.

Discard the plastic wrap covering the pans and transfer the pans to the oven. Bake the bread, switching and rotating the pans halfway through the baking process, until the loaves are well browned and register 200 degrees on an instant-read thermometer inserted into the center of the bread., about 30 minutes. Turn the bread out onto a wire rack and allow the bread to cool completely, about 1 hour.

If you are looking for a great bread to toast, this one is it. The texture is very similar to what you get from an English muffin, and it toasts up very nicely for you, giving you great flavor, crunch and chew. It goes very nicely with breakfast, but I also made myself a slice to have with some soup I was having for lunch, and it was the perfect accompaniment. I left one loaf out and froze the other, wrapping it in foil and then in plastic, so we can take it out whenever we are ready for another loaf. I haven’t tried it as a sandwich bread, though I am sure it would be okay; to me, it is a breakfast and toast kind of bread and one I will certainly make again since it is so easy to put together.

That’s all I have for today. Check back next time for another recipe. Until then, enjoy the rest of your day and enjoy your meal!


Leave a comment

Posted by on February 20, 2017 in Breakfast, Brunch, Cooking, Dinner, Lunch


Tags: , , , , ,

Another From the King Arthur Playbook – Flour’s Original Pound Cake

I have to admit, I have a great love of pound cake. I know for some people it seems to be plain and not very exciting, but I love the texture and flavor of a good pound cake. It can go nicely as a dessert for just about any occasion, can be dressed up with fresh fruit or just whipped cream and even allows for some variation of flavors by adding different extracts, alcohols or flavorings. Another great thing about pound cake is that it is relatively easy to make, which is perfect for someone like me that is not the best baker in the world. The ingredients are all pretty basic and things you usually have around the house anyway so you can even put one together on relatively short notice to have a nice dessert or snack for surprise guests or for something to bring to someone’s home or party. While I was looking through the latest King Artur Flour catalog, I came across this recipe for their traditional pound cake and thought it would be a very good time to give the new oven a try and check it out.

Traditional Original Pound Cake

1 cup (16 tablespoons, 8 ounces) butter, softened

1 cup granulated sugar

4 large eggs, room temperature

2 cups all-purpose flour

1 1/2 teaspoons baking powder

1 teaspoon salt

1/2 cup milk

1 teaspoon vanilla extract

1 tablespoon brandy, sherry, rum or other liqueur or extract of your choice (optional)

Preheat the oven to 350 degrees. Lightly grease a 10 to 12-cup bundt pan.In a large bowl, beat the butter with a hand mixer or stand mixer until it is very light. Beat in the sugar gradually and then add the eggs, one at a time, until they are blended in. Scrape the bottom and sides of the bowl and beat the mixture until it is very light and fluffy.

In a large bowl, beat the butter with a hand mixer or stand mixer until it is very light. Beat in the sugar gradually and then add the eggs, one at a time, until they are blended in. Scrape the bottom and sides of the bowl and beat the mixture until it is very light and fluffy.

In a separate large bowl, whisk together the all-purpose flour, baking powder, and salt.

In another small bowl, whisk together the milk, vanilla extract, and alcohol or extract of your choice, if using.

Alternately add the wet and dry ingredients to the butter/sugar/egg mixture, starting the process with the flour mixture and ending with the flour mixture. Stir the mixture to combine the ingredients after each addition. Pour the batter into the prepared pan, smoothing out the top with a spatula.

Bake the cake for 60 to 65 minutes, until it springs back when pressed lightly on the top, and a long toothpick or cake tester inserted into the center of the cake comes out clean. If the cake appears to be browning too quickly, tent it with foil for the final 15 minutes of baking.

Remove the cake from the oven and loosen its edges in the pan. Allow the cake to cool in the pan for 5 minutes, then carefully turn the cake out of the pan onto a wire rack to cool. Slice and serve the cake the same day or store the cake, wrapped in plastic or wrapped well in plastic if you intend to freeze it for longer storage.

The cake goes perfectly with ice cream, fruit, whipped cream or just by itself (which is the way I like it personally). I enjoy the cake with a nice cup of coffee, and it is perfect after dinner or even as a mid-morning snack. The cake is rich and buttery and has excellent flavor. I had made cakes before where I added flavoring like lemon to it or added alcohol for extra flavor, but the plain version works best for me. Freezing the cake is easy and lets you have a quick dessert for those last-minute guests. You can warm it up quickly in just a few minutes in a 250-degree oven until it is just hot, about 8 to 12 minutes, and it will be perfect. It is always one of my favorite, go-to cakes and this one is pretty tried and faithful to go with for any time.

That’s all I have for today. Check back next time for another recipe. Until then enjoy the rest of your day and enjoy your meal!

img_0664

 
Leave a comment

Posted by on January 31, 2017 in Breakfast, Brunch, Cakes, Cooking, Dessert, Snacks, Uncategorized


Tags: , , , , ,

54 Pastries You Should Absolutely Eat for Breakfast | Bon Appetit

For me, there is nothing like great pastry treat any time of the day, but pastries can be fantastic, something special for breakfast, particularly on a Sunday. I can always remember having jelly doughnuts as a kid on Sunday morning from the bakery and how wonderful it was. Well, you can make great pastries right in your own home, with everything from doughnuts to muffins and all in between, with these 54 recipes from Bon Appetit. Check it out!

I had hoped to start posting some recipes this week now that our kitchen is finished, but life has interrupted things, and I haven’t been home much to try much new and post anything. I do have some stuff backlogged and hope I will have more time later this week to start sharing again. Hang in there, recipes are coming!


Source: 54 Pastries You Should Absolutely Eat for Breakfast | Bon Appetit


Tags: , , , , , ,

Christmas Morning – Recipes from NYT Cooking

When you work through the frenzy that can often go along with Christmas morning, there is nothing better than sitting down as a family and having a nice, fun breakfast to start out the day. New York Times Cooking has put together some great Christmas breakfast ideas so you can have as little or as much as you want after you finish opening up those presents. Check it out!

Source: Christmas Morning – Recipes from NYT Cooking


Tags: , , , , ,

Leftovers Redux – Pastrami Hash with Eggs

Continuing along with my last post’s theme of making use of some leftovers, I needed to find something to do with some of the leftover pastrami I had when I made it myself last week. Too much work and effort went into making it to just let what was left go to waste and Sean and I had eaten quite a bit of it for lunches over the days and needed something different. To the rescue comes breakfast for dinner! Breakfast for dinner is always a family favorite and something Sean has liked since he was a little boy. We do it every few weeks when I have run out of ideas of what to make for dinner that night. It usually involves something like pancakes, bacon, eggs or sausage, but since we had leftover pastrami to work with, what better opportunity was there to make some hash? Has is a great way to use up leftovers and create something new and tasty all at the same time and it gives you a change of pace for breakfast or dinner. I used this basic recipe from Bon Appetit for a pastrami hash with eggs as a template, though you probably don’t really need one when you are making hash.

Pastrami Hash with Eggs

4 tablespoons unsalted butter

4 tablespoons olive oil, divided

pounds Yukon Gold potatoes (about 4 large), scrubbed, cut into 1-inch pieces

½ pound winter squash (such as acorn, butternut, or kabocha), peeled, cut into 1-inch pieces

Kosher salt, freshly ground pepper

2 leeks, white and pale-green parts only, chopped

1 garlic clove, chopped

1 pound pastrami or any leftover braised meat, cut or shredded into bite-size pieces

4 large eggs

¼ cup sliced chives (optional)

¾ cup sour cream (optional)

Heat the butter and 2 tablespoons of the olive oil in a large skillet set over medium-high heat. Add the potatoes and the winter squash and season the vegetables with salt and pepper. Cook, stirring occasionally, until the vegetables are tender, about 25–30 minutes.


Add the leeks and garlic to the hash and season the mixture with salt and pepper. Using the back of a spoon or a spatula, lightly smash the vegetables. Add the pastrami and cook, stirring occasionally, until the meat is warmed through and the flavors have melded, about 10–12 minutes.


Heat the remaining 2 tablespoons of olive oil in a medium non-stick skillet set over medium-high heat. Carefully crack the eggs into the skillet one at a time and season them with salt and pepper. Cook the eggs until the whites are set and slightly puffed but the yolks are still runny, about 2 minutes.


Divide the hash among shallow bowls and top each bowl with an egg; scatter the chives over the top, if using. Serve with sour cream alongside, if desired.
If you have made corned beef hash before then you can see that this recipe is pretty similar. It would work with just about any type of meat you wanted to use – short ribs, prime rib, steak, turkey, sausage, chicken – and creates some great flavor. I really liked the spices that the pastrami already has and what they lent to the dish to give it even more flavor and it was a great way to use up the leftovers. I used butternut squash with the potatoes and opted for onions instead of leeks since I didn’t have any leeks on hand that day. Sean had his with scrambled eggs while my eggs were over easy and it was tasty to mix in the hash with some of the runny egg. We both loved it and there was a bit of hash leftover that is perfect to use with breakfast with an egg over an English muffin.
That’s all I have for today. Check back next time for another recipe. Until then, enjoy the rest of your day and enjoy your meal!
 
2 Comments

Posted by on October 8, 2016 in Beef, Breakfast, Brunch, Cooking, Dinner, Eggs, Leftovers, One Pot Meals


Tags: , , , , ,

Make the Homer Simpson in You Proud – Strawberry Glazed Buttermilk Donuts

It is hard to deny my passion for donuts. I know they aren’t good for me and I don’t eat them very often because when I do I have a hard time controlling myself with wanting them all. Every once in a while I will get one as a special treat. I rarely make them at as well, only because they take some work and deep-frying them, along with being unhealthy, leaves a lot of clean up behind it. I invested in a donut pan from King Arthur Flour a few months back with the intention of making some oven-baked donuts but I was waiting for a really good recipe to come along to try out. I found one in this recipe from Saveur for strawberry glazed buttermilk donuts and they gave me another good use for some of the locally-grown strawberries I had just picked up from the farmers’ market.

Strawberry Glazed Oven-Baked Buttermilk Donuts

1 14 cups all-purpose flour, sifted
34 cup  granulated sugar
12 teaspoon baking soda
12 teaspoon kosher salt
23 cup canola oil, plus more for greasing
12 cup buttermilk
1 egg
12 teaspoon white vinegar
12 teaspoon vanilla extract
12 cup finely chopped strawberries
2 cups confectioners’ sugar
Heat the  oven to 350 degrees. Combine the flour, sugar, baking soda and salt in a  large bowl; make a well in the center of the mixed ingredients and set the bowl aside. Whisk the canola oil, buttermilk, egg, vinegar, and vanilla in a separate medium bowl; add the wet ingredients to the well in the dry ingredients and mix all the ingredients together until they form into a smooth batter. Stir in half of the strawberries and set the batter aside. Lightly grease a nonstick donut pan then spoon 2 tablespoons of the batter into each mold. Bake until the donuts are golden and a toothpick inserted into a donut comes out clean, about 13 to 15 minutes. Invert the donuts onto a baking sheet with a wire rack set in it to let the donuts cool completely.
Whisk the remaining strawberries, confectioners’ sugar, and 2 tablespoons of water together in a medium bowl until the mixture is smooth until smooth. Dip the tops of the donuts into the glaze and return the donuts to the wire rack until the glaze is set.
The recipe states that you will get 18 donuts from the ingredients; I got about 15 but I guess it depends on how accurate you are about placing the batter into the mold. I tried to fill each until it was about 2/3 of the way up the mold. In any case, the donuts came out very nice and having that little bit of strawberry mixed into the batter added just the right touch to them. The glaze was great as well, though it’s not quite as pink as you might see in the donuts as donut shops. I suppose you could add more strawberries to the mix to brighten the color more or even add a bit of food coloring if you really wanted it, but I thought the glaze came out just right and was not overly sweet but had good taste to it. These were easy enough to make and while they may not taste the same as the deep-fried donuts you love, they are still pretty good.
That’s all I have for today. Check back next time for another recipe. Until then, enjoy the rest of your day and enjoy your meal!
IMG_0543
 
2 Comments

Posted by on August 15, 2016 in Breakfast, Brunch, Cooking, Dessert, Fruit, Snacks


Tags: , , , , , ,

Put Some Zing in Your Shrimp – Bloody Mary Shrimp

I just got back from a great vacation in the Outer Banks with my brothers and sisters, nieces and nephews. We had a lot of fun, spent times by the pool, had some great local beer and craft beers and even got to try out a couple of new recipes along the way. One thing that we enjoyed during the trip was having Bloody Marys by the pool in the morning. If you like a Bloody Mary then you love the taste of tomato juice, spices and vodka over ice. We used a Bloody Mary mix called Zing Zang, which has some great flavor and a spicy kick to it that made the drinks fantastic. My brother and I got to thinking since the Zing Zang was so good, I bet it would taste great on some of the fresh local shrimp from one of the nearby fish stores. We headed down to Whalebone Seafood where we got a few pounds of fresh shrimp (and some great fresh clams as well) and then set about finding a recipe for the shrimp. We came upon this one from AllRecipes.com for Bloody Mary Shrimp and gave it a try.

Bloody Mary Shrimp

2 pounds cooked medium shrimp, shelled and deveined

1 (32 ounce) bottle bottled Bloody Mary mix (such as Zing Zang), or as needed

1 jalapeno pepper, seeded and finely chopped

1 large sweet onion, finely chopped

1 cup finely chopped jicama

4 limes, juiced

2 tablespoons Worcestershire sauce

1 avocado, peeled and chopped, or more to taste

In a large bowl, gently combine the shrimp, Bloody Mary mix, jalapeno pepper, onion, jicama, lime juice, and Worcestershire sauce until all of the ingredients are thoroughly mixed. Cover and chill the mixture for at least 3 hours to allow flavors to blend (overnight is even better if you can). Gently stir in the avocado, then chill the mixture for 1 more hour before serving.

Man this is so simple and you get such great flavor from the dish. I have to admit, having super fresh shrimp really made this recipe standout for me, but I think it could be just as good with any cooked shrimp that you can get for yourself. The dish had great combinations of the sweetness of the shrimp with the spice of the Zing Zang and jalapeno and the addition of the lime juice was just perfect. We couldn’t find any jicama down where we were so we left it out, but I can see where it would add some really nice crunch to round out the dish. We served this as a side dish to go along with the steaks we were having that night but it would be great for any type of appetizer before a meal or as the main dish for your dinner when you want a cold meal. I could see serving this with just a side salad and some crusty bread and you are good to go. You could really spice things up and add a little vodka to the dish as well to get the full Bloody Mary experience, though we left it out since the kids were having some too. Overall it was a great dish to make.

That’s all I have for today. Check back next time for another recipe. Until then, enjoy the rest of your day and enjoy your meal!

IMG_0510


Tags: , , , , ,

(Blueberry) Turnover a New Leaf

Turnovers are one of those pastries that seem to fit in just about anywhere. They can be tasty for breakfast, make for a fantastic brunch item and can be the centerpiece of your meal as a really nice dessert. While most of us are probably used to having apple turnovers, and they certainly are a classic that you can make yourself, buy frozen in the stores and heat up or get from your local bakery (if you’re lucky enough to have such a thing in today’s world). I love a good apple turnover, but getting good apples for turnovers is not an easy thing to do this time of year. Instead, now is the perfect opportunity to use some of the great summer fruit that is available. Blueberry is always a favorite of mine for pies, so why not for a turnover as well? This recipe from Bon Appetit is for blueberry-blackberry turnovers, but since I didn’t have any blackberries on hand (and while I love blackberries, Sean and Michelle are not big fans of the seeds) I decided to just go with blueberry and make the turnovers that way.

Blueberry Turnovers

For the Turnovers:

1 1/2 cups fresh (or frozen, thawed) blueberries


2 teaspoons finely grated peeled ginger

2 teaspoons fresh lime juice

¼ teaspoon kosher salt

2 tablespoons all-purpose flour, plus more for the surface

1 large egg, beaten to blend

¼ cup heavy cream

1 store-bought pie crust, or your favorite pie dough recipe

For the Glaze and Assembly:

cups powdered sugar

1 teaspoon vanilla extract

¼ teaspoon kosher salt

For the turnovers, pre-heat the oven to 350 degrees. Toss the blueberries, sugar, ginger, lime juice, salt and 2 tablespoons of flour in a medium bowl until the ingredients are combined. Beat the egg and heavy cream in a small bowl until no streaks remain.
Roll out the pie dough on a lightly floured work surface to a 15 x 10-inch rectangle. Cut a thin border around the dough to square off the edges. Cut the dough in half lengthwise and then in thirds crosswise to form six 5-inch squares. Brush the edges of the dough with the egg mixture, then mound about ¼ cup of the blueberry filling in 1 corner of each square. Working with 1 square at a time, fold the corner opposite the filling up and over to create a triangle; press the edges with a fork to seal the edges. Place the turnovers on a parchment-lined baking sheet and brush them with the remaining egg mixture. Cut about a 1-inch-long slit in the center of each turnover. Bake until the pastry is golden brown and juices run from the slits, about 35–45 minutes. Let the turnovers cool on a baking sheet until they are just slightly warm.
For the glaze and assembly, whisk the powdered sugar, vanilla, and the salt in a large, wide bowl. Whisking constantly, add warm water a tablespoonful at a time until the glaze is thick and smooth and falls off the whisk in a slowly dissolving ribbon (it should look like sweetened condensed milk).
Working one at a time, dip the top sides of the slightly warm turnovers into the glaze, letting the excess drip back into the bowl. Transfer the turnovers to a wire rack and let them sit until  the turnovers are cool and  the glaze is set, about 30 minutes.
I loved the way they turned out, but I have to admit I did make a mistake along the way while I was making them. I did not pay close enough attention to the direction when I was cutting the dough the first time and cut it incorrectly, leaving me with small squares I couldn’t do turnovers with. Instead, I turned those small squares into hand pies and went with those instead. Luckily, I was using store-bough pie dough and had another sheet that I could do them with again. I paid better attention this time and got the turnovers right. They turned out really well, with just the right amount of blueberries. The mix of the ginger and blueberries gave good flavor too that everyone seemed to like. The recipe makes 6 turnovers if you do it right and if you wanted hand pies instead, just cut the squares smaller and use one square for the top and the other for the bottom, crimp the edges and you are good to go. With the glaze on the hand pies they turn out just like the Drake’s fruit pies I love (if you live in the Northeast you know Drake’s pies).
That’s all I have for today. Check back next time for another recipe. Until then, enjoy the rest of your day, have a happy 4th of July with friends and family, and enjoy your meal!
IMG_0461


Tags: , , , , , ,

It Was a Dark and Stormy Banana Bread

I really like banana bread. It not only can make a great dessert item with a little bit of ice cream (go for Ben and Jerry’s Chunky Monkey for the complete banana experience, or make your own homemade banana ice cream), but it also is perfect for a brunch buffet or even just for breakfast on its own. I have tried a few different banana bread recipes and have never been disappointed in any that I have made, so when I saw this one from Joy the Baker I knew it had to be a hit. How could you go wrong by combining two great things – banana bread and a Dark and Stormy? If you have never had a Dark and Stormy, I was introduced to them long ago on a cruise to Bermuda and it’s a great combination of dark rum and ginger beer. this recipe incorporates the concept, though it leaves out the ginger beer and uses ginger instead.

Dark and Stormy Banana Bread

1/2 cup (1 stick) plus 2 tablespoons unsalted butter

1 cup lightly packed muscovado brown sugar (or dark brown sugar)

2 large eggs

2 teaspoons pure vanilla extract

1 tablespoon dark rum

2 ripe bananas, mashed

1/2 tablespoon fresh grated ginger

heaping 1/2 teaspoon ground cinnamon

1/2 teaspoon ground nutmeg

1/2 teaspoon ground ginger

2 cups all-purpose flour

3/4 teaspoon baking soda

1/2 teaspoon salt

Place a rack in the upper third of the oven and pre-heat the oven to 350 degrees F. Melt the butter in an 9-inch cast iron skillet over medium-low heat. Melt the butter until the crackling subsides and the butter begins to brown. Remove the skillet from the heat and stir in the sugar. Whisk until the butter and sugar are thoroughly combined. The mixture may seem broken as the butter won’t completely absorb into the sugar just yet. Allow the mixture to stand and cool for about 5 minutes.

Whisk in the eggs, one at a time. The mixture will begin to emulsify, be glossy and no longer greasy. Whisk in the vanilla and the dark rum. Add the mashed bananas, fresh ginger, cinnamon, nutmeg, and ground ginger and stir to combine.

Add the flour, baking soda, and salt. Stir the mixture carefully until all of the dry ingredients are incorporated. Use a spatula to scrape down the sides and spread the batter evenly across the skillet.

Place the skillet in the oven and bake for 18-25 minutes until mixture is dry on the top, but still slightly soft in the center. Remove the skillet from the oven and allow the banana bread to cool for 15 minutes. Sprinkle the banana bread with powdered sugar if you’d like and enjoy it warm.

There are a few great things about this recipe. Naturally, the first one is in the flavor. It is awesome banana bread, nice and moist with good banana flavor and the dark rum and ginger really shine through here. Second, this bread is the epitome of easy make and clean up since you do everything in one skillet start to finish. It’s a great use of your cast iron skillet and the bread comes out perfectly in color and has some nice texture to it and there’s no extra bowls to have to clean. Add some ice cream or homemade whipped cream to this and you have something great.
That’s all I have for today. Check back next time for another great recipe to try. Until then, enjoy the rest of your day and enjoy your meal!
IMG_0399
 

Tags: , , , ,

 
National Day Calendar

Fun, unusual and forgotten designations on our calendar.

Authentic Autograph Source, LLC

Licensed autographs and collectibles dealer in the Pacific NW! We have a wide range of sports, celebrities, and more!

Jennifer Probst

a little bit naughty a little bit nice

Laissez Faire

Letting Life Lead

%d bloggers like this: