RSS

Monthly Archives: October 2014

A Crowd Favorite to Go With Anything – Broccoli Slaw

I know for many it may not seem like a coleslaw time of year and it might be something you only consider to be a summertime dish to go with your picnics and cookouts, but I like to have coleslaw just about any time of the year and I am always trying all different kinds. Coleslaw is a pretty versatile side dish that can go great with hamburgers and hot dogs for sure, but I really like it with all types of pork and chicken dishes. I often make it when we are just going to have sandwiches for dinner as an easy side dish. As I said I try to do different things with it, using different cabbage or changing up the dressing so it has mayonnaise or without mayo for more of vinaigrette style, but I also really like to try broccoli slaw now and then. Broccoli slaw is basically shredded broccoli and carrots and cabbage mixed together to get a unique flavor. You very often see it in the produce section of your store by the other bagged coleslaw options, though you could certainly make your own mix if you like. Last time I was at the store I decided to pick up a bag and give this recipe a try from Add a Pinch for a very simple broccoli slaw.
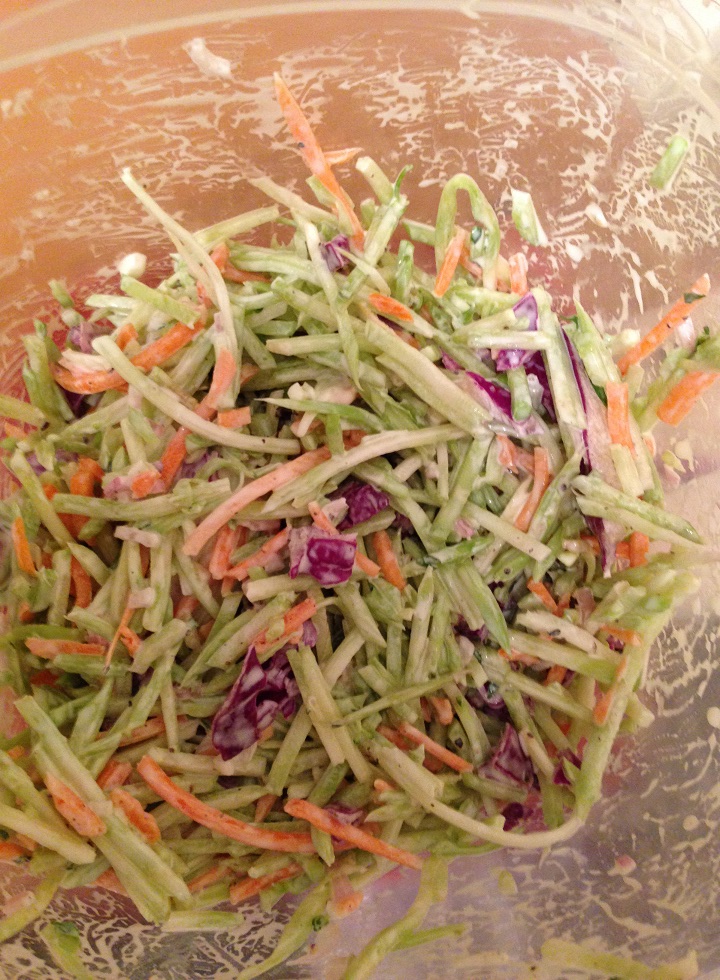
Broccoli Slaw

2 (12-ounce) bags of broccoli slaw

1/2 red onion, chopped

1/4 cup mayonnaise or Greek yogurt

1 tablespoon apple cider vinegar

1 teaspoon granulated sugar

Juice of 1 lime

Salt and freshly ground black pepper, to taste

1 teaspoon chopped fresh parsley (optional)

Pour the broccoli slaw into a large bowl and add the chopped red onion. In a 2-cup measuring cup, add the mayonnaise or yogurt, the apple cider vinegar, the sugar and the lime juice. Whisk the ingredients together with a fork or whisk and then pour about half of the dressing over the broccoli slaw in the bowl. Toss the slaw together to make sure it has all become well-dressed. Add any additional dressing as may be needed. Season the slaw with salt and pepper to taste and mix the slaw together well. Add the chopped parsley as a garnish, if using, and serve the slaw with any remaining dressing on the side.

You can easily make this ahead of time and store it in the refrigerator for a couple of days if you are planning to use it for a party or to take to someone’s home as part of a meal or a buffet. It goes really well with any type of sandwiches and I first served it with the steak sandwiches that we made recently and it was perfect. We have also used it for a side dish to go with lunches for the week and it goes really well with dishes like spare ribs or pulled pork, where you can put it right on the pulled pork sandwich as a topping. It is definitely easy and gives you a nice alternative to traditional coleslaw recipes.

That’s all I have for today. Check back next time for another recipe. Until then, enjoy the rest of your day, have a happy and safe Halloween and enjoy your meal (and your candy too!).

IMG_0727 IMG_0728

Advertisement
 

Tags: , , , ,

Living Large with Pat LaFrieda’s Filet Mignon Steak Sandwich

If you know me you know I am a big baseball fan and we go to a lot of Mets games during the season.Of course I enjoy the games and love watching and going to the stadium with Sean and Michelle, but there are also some great opportunities for eating that go on at Citi Field, more than there ever was at Shea Stadium. You can get great pastrami sandwiches, a shrimp po’boy, pizza, burgers, hot dogs, special fries, Shake Shack, Blue Smoke, and the list goes on and on. One of Michelle’s personal favorites is the stand set up by Pat LaFrieda that offers his meatball sliders sandwiches (which are out of this world) and his filet mignon steak sandwich, is unlike any other cheesesteak sandwich you will find. Michelle had been asking me for a while to try to find a recipe and I finally came across one at Food Republic for this phenomenal steak sandwich and we just happened to have a small piece of tenderloin in the freezer that I could use.

Pat LaFrieda’s Filet Mignon Steak Sandwich

4 tablespoons canola or vegetable oil, plus more as needed

2 sweet yellow onions or Spanish onions, thinly sliced (about 3 cups)

6 ounces thinly sliced Monterey Jack cheese

1 cup beef stock

1 1/2 teaspoons balsamic glaze

12 (1 1/2-inch thick) filet mignon medallions (about 1 1/2 pounds total of beef)

1 tablespoon kosher salt

1/2 teaspoon turbinado sugar or light brown sugar

1 long baguette, cut into 6-inch segments

In a large skillet, heat 2 tablespoons of the canola oil over medium heat until the oil slides easily in the pan, about 2 to 3 minutes. Add the sliced onions and cook, stirring occasionally so the onions do not stick to the pan, until the onions are soft and caramelized, about 20 minutes. Spread the onions out over the surface of the pan. Remove the pan from the heat and lay the Monterey Jack cheese on top of the onions, letting the cheese melt.

To make a jus, in a small saucepan bring the beef stock to a simmer over medium heat. Remove the pan from the heat and stir in the balsamic glaze. Cover the pan to keep the jus warm.

Season the tenderloin pieces on both sides with the kosher salt and the sugar. in another large skillet, heat the remaining 2 tablespoons of the canola oil over high heat. Add half of the filet medallions, or as many as will fit in a single layer in the pan, and sear them until they are caramelized, about 1 to 1 1/2 minutes per side. Cook the remaining filet medallions the same way, adding more canola and letting the oil get hot before adding the meat to the pan.

Meanwhile, without opening them, toast the baguettes so that the outsides, top and bottom, are hot and crispy. Halve the baguettes horizontally, leaving them hinged on one side.

To assemble the sandwiches, lay 3 medallions on the bottom of each baguette. Top the medallions with the onions and cheese, dividing the onions and cheese equally among all of the sandwiches. Drizzle 1/4 cup of the jus on the inside top half of each baguette and serve.

These sandwiches are amazing. The meat is super tender and cooked perfectly and the recipe is so simple but you get fantastic flavor from the onions and the jus. The balsamic glaze is quite simple to make on your own as it is just a mixture of balsamic vinegar and sugar that you warm in a saucepan until a glaze starts to form. The baguettes I used are actually from a recipe I posted recently from Mark Bittman for his not quite whole grain baguettes and they went perfectly with the meat. While Michelle and Sean had onions and cheese on theirs, I left the cheese off of mine and put some roasted red peppers on there instead, which was quite yummy. You could try this with other cuts of steak if you want to make a more inexpensive version and I think it would taste good, but if you have the chance to be decadent and use the filet medallions, go for it.

That’s all I have for today. Check back next time for another recipe. Until then, enjoy the rest of your day and enjoy your meal!

IMG_0727


1 Comment

Posted by on October 30, 2014 in Beef, Breads, Cooking, Dinner, Sandwiches


Tags: , , , , , , ,

Tasty, Tantalizing and Terrific – Homemade Tater Tots with Spicy Mayonnaise

Sean has been asking me for months now to try my hand at making some homemade tater tots. Tater tots are pretty much a religious experience around my home and Michelle and Sean absolutely love them. When we have burgers, it’s always with tater tots. I have looked at recipes for homemade tots before and they always seemed very involved and difficult and didn’t look like they would really turn out all that great so I stayed away from them. A few days ago I saw this recipe from Bon Appetit and read through it and could not believe how easy it would be, so I knew this was going to be the time I would try it out.

Homemade Tater Tots with Spicy Mayonnaise

For the Spicy Mayonnaise:

1 cup mayonnaise

1 teaspoon adobo sauce from canned chipotles in adobo

1 teaspoon hot pepper sauce

¼ teaspoon smoked Spanish paprika (optional)

Kosher salt and freshly ground black pepper

For the Tater Tots:

3 medium russet potatoes (about 2 pounds), scrubbed

2 scallions, chopped

½ cup seasoned Italian breadcrumbs

¼ cup heavy cream

1 tablespoon sour cream or plain yogurt

1 tablespoon butter, room temperature

½ teaspoon granulated garlic

¼ teaspoon freshly ground black pepper

2 teaspoons kosher salt, plus more

2 tablespoons grated Parmesan, plus more

2 large eggs, beaten to blend

Vegetable oil, for frying

For the spicy mayonnaise, combine the mayonnaise, adobo sauce, hot pepper sauce, and paprika, if using, in a small bowl; season the mayonnaise with salt and pepper to taste.


For the tater tots, preheat the oven to 400 degrees. Prick the potatoes all over with a fork and bake them directly on an oven rack until the potatoes are very soft when they are squeezed, about 60 to 75 minutes. Let the potatoes cool slightly so they are easy to handle.


Cut the potatoes in half and scoop the flesh into a medium bowl; discard the potato skins. Mash the potatoes, then mix in the scallions, breadcrumbs, cream, sour cream, butter, granulated garlic, pepper, 2 teaspoons of salt, and 2 tablespoons of Parmesan cheese. Mix in the eggs until they are just  combined. Roll 1-tablespoon portions of the potato mixture into balls.


Pour the vegetable oil into a medium skillet to a depth of ½-inch and heat the oil over medium heat until bubbles form immediately when a little potato mixture is added. Working in batches, fry the tater tots until they are a deep golden brown, about 3 minutes per side. Drain the tater tots on paper towels. Season the tater tots with salt to taste and serve them with the spicy mayonnaise.
I did do one thing that is not included in the recipe that does seem to make a difference, at least to me. After I rolled the tater tots (and I used a cookie scoop to roll them, the medium-sized one) I put them on a plate and put them in the refrigerator for 30 minutes. This seemed to firm the potatoes up nicely so they really held their shape well and went into the oil easily and did not fall apart along the way. I have to say while they are not exactly like the frozen tater tots you buy in the store, they are much creamier and have better texture. It kind of tastes like a deep-fried mashed potato, which for us was fantastic. They were really easy to make and came out perfectly for me and I think it made about 30 to 40 tater tots, which was plenty for us. It takes a little longer than opening up the bag out of the freezer but in my mind it is worth the effort to make them.
That’s all I have for today. Check back next time for another recipe. Until then, enjoy the rest of your day and enjoy your meal!
IMG_0738 IMG_0733
 
Leave a comment

Posted by on October 29, 2014 in Cooking, Potatoes, Sauce, Snacks, Uncategorized


Tags: , , , , , ,

Eat and Enjoy Herbed Chicken with Zesty Potato Salad

I’ve been working pretty hard the last few days and I haven’t had much time to blog so I will try to get to it early today so I can get a recipe up. I have made a bunch of different things over the last few weeks that I hope to get up here, including some different chicken dishes that give you a little something different to do with a tasty and more inexpensive option for your meal. To me chicken thighs are the best part of the chicken and even more versatile than the famous boneless chicken breast. You get much more flavor from the thighs and you can buy them boneless and skinless if you choose, though you get even more flavor from the boned version and you can easily remove the skin and bones on your own if you life and chicken thighs are very affordable. Most of the time I get them for about 99 cents a pound so you can do really well with them. This particular recipe I tried, from Williams-Sonoma. is a simple herbed chicken thigh recipe that you can do in the slow cooker with a warm zesty potato salad as a nice side dish.

Herbed Chicken with Zesty Potato Salad

3 pounds skin-on, bone-in chicken thighs, trimmed of excess fat

Salt and freshly ground black pepper, to taste

2 tablespoons olive oil

1/2 yellow onion, finely chopped

4 garlic cloves, smashed

2 fresh thyme sprigs

2 fresh oregano sprigs

3 bay leaves

1/3 cup white wine

2 teaspoons white wine vinegar

1/3 cup chicken broth

For the Zesty Potato Salad:

1 teaspoon Dijon mustard

1 shallot, minced

3 tablespoons red wine vinegar

Salt and freshly ground black pepper, to taste

1/4 cup extra-virgin olive oil

20 small red potatoes

2 cups cherry tomatoes, halved

1 tablespoon finely chopped fresh oregano

For the chicken, pat the chicken thighs dry and season them generously all over with salt and pepper. In a large, heavy frying pan over medium-high heat, warm the olive oil. When the oil is hot, working in batches to avoid crowding in the pan, add the chicken, skin side down, and sear until the chicken pieces are a golden brown, about 4 to 5 minutes. Do not turn the chicken. Transfer the chicken to paper towels briefly to drain then transfer the chicken thighs to the slow cooker.

Add the onion, garlic, thyme and oregano and bay leaves to the same frying pan used for the chicken and saute everything over medium-high heat until the vegetables are just beginning to color, about 5 minutes. Pour in the wine and the white wine vinegar and stir the pan to scrape up and browned bits on the bottom of the pan. Stir in the chicken broth, 1/2 teaspoon of salt and several grinds of black pepper, then pour the contents of the frying pan over the chicken in the slow cooker. Cover the slow cooker and cook in the low setting for 4 hours until the chicken is very tender.

About 30 minutes before the chicken is done, make the potato salad. In a small bowl, whisk together the Dijon mustard, shallot, red wine vinegar, 1/4 teaspoon of salt and a few grinds of black pepper. Whisk in the olive oil until it has emulsified. Set the dressing aside.

Quarter the red potatoes and place them in a large saucepan with salted water to cover. Bring the potatoes to a gentle boil over medium-high heat and cook, uncovered, until the potatoes are just tender, about 8 minutes. Drain and transfer the potatoes to a serving bowl, drizzle the potatoes with about 1/3 cup of the vinaigrette and toss to coat the potatoes. Taste the potato salad and more of the remaining vinaigrette if desired. Let the potato salad cool slightly, then add the cherry tomatoes and oregano. Toss the salad to combine everything.

When the chicken is done, transfer the chicken to a plate and keep it warm. Remove and discard the bay leaves and the thyme and oregano sprigs. Let the braising liquid stand for a few minutes then skim off the fat with a large spoon. Divide the chicken thighs among warm individual plates and drizzle the chicken with some of the braising liquid. Mound the potato salad alongside the chicken and serve.

It is a very easy meal to put together thanks to the slow cooker and you end up with very tender chicken that has great flavor from the braising liquid. It pairs very nicely with the zesty potato salad, which has some nice zing from the mustard and red wine vinegar and the tomatoes add a nice touch to the salad. The chicken was even better the next day as a leftover for lunch when the flavors had a chance to meld even more.

That’s all I have for today. Check back next time for another recipe. Until then, enjoy the rest of your day and enjoy your meal!

IMG_0723 IMG_0722


Leave a comment

Posted by on October 28, 2014 in Cooking, Dinner, Potatoes, Poultry, Salad, Slow Cooker Meals


Tags: , , , , , ,

Homemade Candy Recipes – Photo Gallery | SAVEUR

Homemade Candy Recipes – Photo Gallery | SAVEUR.

With the holiday time of year upon us, making homemade candy can be perfect for you to have for your own holiday parties or to give out as gifts to friends, family, neighbors, co-workers or anyone that you might like to say thank you to. Saveur Magazine has put together 40 homemade candy recipes for you to try out so you can make some delicious treats of your own. Check it out!

 
Leave a comment

Posted by on October 25, 2014 in Candy, Cooking, Cooking Websites, Dessert, Holidays, Snacks


Tags: , , , , ,

Make a Mess of These Meatball Sliders

I am always on the lookout for different meatball recipes. It is just one of those meal items that I like to tinker with and I am looking to add new flavors to meatballs to jazz them up a little bit. Whether it is for a simple meal with spaghetti in tomato sauce, as an appetizer for a buffet or party, to have in gravy over rice or noodles or to make a nice sub or sandwich meatballs are one of those things that you can do a lot of things with and make them in wide variety of ways with many different ingredients. I came upon this recipe from Alton Brown for meatball sandwiches on Parmesan parsley biscuits and thought it sounded great, but to me they are perfect meatball sliders for an appetizer, party or dinner. it’s a very easy recipe that gives you some basic meatballs with great tasting biscuits and a nice spaghetti sauce to boot.

Alton Brown’s Meatball Sandwiches (Meatball Sliders)

For the Meatballs:

1 pound ground beef
1 pound ground pork
1 pound ground veal
1 egg
1/2 small onion, chopped
1 teaspoon dried parsley
1 teaspoon granulated garlic
1 teaspoon dried oregano
1 teaspoon salt
1/2 teaspoon freshly ground black pepper
Parmesan Parsley Biscuits, recipe follows
Spaghetti Sauce, recipe follows
Provolone cheese, thinly sliced

For the Parmesan Parsley Biscuits:
3 cups all-purpose flour
1 cup grated Parmesan
1/4 cup sugar
2 tablespoons baking powder
1/2 teaspoon salt
1/2 teaspoon freshly ground black pepper
1 stick chilled unsalted butter, cut into cubes
1/4 cup chopped fresh parsley or chives
1 cup whole milk, chilled

For the Spaghetti Sauce:
1 medium onion, chopped
2 cloves garlic, minced
2 tablespoons olive oil
2 (14-ounce) cans diced tomatoes
20 fresh basil leaves, chopped

Preheat the oven to 375 degrees.

For the meatballs,in a large bowl, combine the beef, pork, veal, egg, onion, parsley, garlic, oregano, salt, and pepper and mix all of the ingredients until they are well combined. Scoop the mixture into mini muffin tins or onto a wire rack set over a rimmed baking sheet. Bake the meatballs until they are browned and cooked through, about 15 to 20 minutes.

For the Parmesan parsley biscuits:
Preheat the oven to 400 degrees.

In a large bowl, combine the flour, 1/2 cup of the Parmesan, sugar, baking powder, salt, and pepper. Whisk until everything is well blended. Add the butter and combine the mixture with your fingertips until a coarse meal forms. Mix in the parsley. Gradually add the milk, tossing the mixture with a fork until moist clumps form. Add extra milk if the mixture is too dry. Put the dough on a floured work surface, folding 8 to 10 times until it becomes firm. Let the dough rest for 10 minutes under a damp towel. Roll out the dough on a lightly floured work surface. Using a 2-inch-diameter biscuit ring, cut out the biscuits and put them on a parchment paper-lined baking sheet. Sprinkle the tops of the biscuits with the remaining 1/2 cup of Parmesan cheese and bake until the biscuits are puffed and golden, about 15 minutes.

For the spaghetti sauce, in a medium pan set over high heat, saute the onion and the garlic in olive oil until both are softened, about 3 minutes. Add the tomatoes and allow the mixture to simmer until it is slightly reduced and thickened, about 25 minutes. Stir in the fresh basil just before serving.

To build the sliders, slice a biscuit in half and place a meatball on the bottom half of the biscuit. Cover the meatball with as much spaghetti sauce as you like and top each meatball with a slice a provolone cheese. Place the biscuit top on top of the meatball and continue until all of the biscuits are filled.

I have to say I really liked these. While the meatball recipe is very basic, it does taste good and produces a moist meatball that goes well with the sauce. The real star of this one I think is the Parmesan biscuit, which comes out perfectly and goes really nicely with the meatballs as a slider. The biscuit has great flavor and is really easy to make so you can make this to go with other meals besides this one. we even used some to make breakfast sandwiches with some bacon or sausage and egg. Of course the meatballs and sauce can be for anything that you would use meatballs for as well besides just sliders if you want a nice, basic and easy meatball recipe.

That’s all I have for today. Check back next time for another recipe. Until then, enjoy the rest of your day and enjoy your meal!

IMG_0730


Tags: , , , , , , ,

Rainy Days are Perfect for This Chicken, Carrot and Sweet Potato Stew

It’s been pretty rainy and chilly here in our part of New York this week, so much so that the heat actually kicked in and came on the other morning, letting me know that the colder weather is rapidly approaching. It means I spend the early morning hours wearing my sweater around the house while I type away about various topics for my writing, covering everything from dental offices and travel tips to Thailand vacation spots and video gaming. Work has been busy lately and since the weather is cooler it is the perfect time to break out the slow cooker and make some soups or stews. This seemed like the perfect time to make this recipe from Cooking.com for chicken, carrot and sweet potato stew, a nice, thick, hearty stew that was easy to put together and has some great flavors to it.

Chicken, Carrot and Sweet Potato Stew

1 1/2 pounds boneless, skinless chicken breast, cut into 1-inch cubes

1-2 large sweet potatoes, peeled and cut into 1/2-inch cubes

2 carrots, peeled and cut into 1/2-inch cubes

1 onion, diced

3 cloves garlic, peeled and minced

1 (6-ounce) can tomato paste

1 cup white wine

1 teaspoon dried thyme

2 bay leaves

Salt and freshly ground black pepper, to taste

Place the chicken, sweet potatoes, carrots, onion, minced garlic, tomato paste, white wine, thyme and bay leaves into the slow cooker. Stir the ingredients to combine everything well. Cover the slow cooker and cook the ingredients on low for 5 hours or until the vegetables are tender and the chicken is cooked through. Remove the bay leaves and put the stew into a large bowl or serve right from the crock of the slow cooker.

Believe it or not, that’s all there is to this recipe. It is very simple to put together and gives you a nice stew with a great tomato-based broth. I added in a couple of diced and peeled parsnips that I had on hand to get a little bit of extra flavor in there as well and I think you could pretty much add any fall vegetables that you really like, such as some diced butternut or acorn squash, to go along with the meal. You could always use chicken broth or water in place of the white wine if you did not want to use the wine and I think you could even substitute skinless, boneless chicken thighs for the breast meat if you prefer the dark meat or even use some stew beef instead of the chicken if that is what you prefer. Whatever you decide, it is a nice and simple mix that you can put in the slow cooker early in the day, set about your business and then have a great stew for dinner. I served this with some of the not quite whole grain baguette that I had made and it was perfect.

That’s all I have for today’s recipe. Check back next time for another new recipe and see what’s cooking. Until then, enjoy the rest of your day, stay dry, and enjoy your meal!

IMG_0732 IMG_0731


Tags: , , , , , , ,

Bake Your Own Bread with This Not Quite Whole Grain Baguette Recipe

The taste you get from homemade bread is so much better than what you buy prepackaged in any grocery store that it makes you wonder why you don’t make your own bread all of the time. For me, I then remember how much time it can make to prepare and make the dough along with the kneading and everything else and I realize I don’t always have enough time to make my own bread even though we love having it. Recently though I came across this recipe at New York Times Cooking from Mark Bittman and it may me realize just how easy some bread recipes can be. This is for a baguette that is a combination of rye or whole wheat flour and all-purpose flour  that you can put together quite easily. I was able to start it in the morning, let it rise for a few hours while I worked and then finish it off right before dinner so that it came out perfectly. It is only 4 ingredients, which makes things even better, and all of the kneading can be done in the food processor to save you some time and effort.

Not Quite Whole Grain Baguette Recipe

3/4 cup rye or whole-wheat flour

3 cups all-purpose flour, plus more for handling

2 1/2 teaspoons kosher salt

2 teaspoons instant yeast

Combine the rye or whole-wheat flour and the all-purpose flour, along with the kosher salt and the yeast, in the bowl of a food processor. With the machine running add water until a ball forms, about 30 seconds. Start with 1 1/2 cups of water. You may need a little bit more or a little bit less. After the water has been added completely, process the dough for an additional 30 to 45 seconds. Place the dough in a large bowl and cover it with plastic wrap and allow it to sit until it has risen, about 2 to 3 hours.

Place the dough on a lightly floured surface and cut the dough into 3 pieces. Form each piece into a rough log, or, as an option, leave the dough as one piece so you can make one large boule, ciabatta-shaped loaf or other shape that you like. Cover the shaped dough with a towel and allow it to rest for about 20 minutes. Shape the logs into long baguettes and, if you wish, support the shape by placing them into baguette pans or a lightly floured piece of canvas (I actually just left mine alone and they seemed fine to me). Preheat the oven to 465 degrees and if you have a pizza or baking stone, leave it in the oven to heat.

After shaping the loaves, they will be ready to bake in about 30 minutes. Slide the loaves onto a pizza peel or into the baguette pans. Slash or cut the top of the loaf with a sharp knife. Bake the loaves, lowering the heat if necessary to prevent the loaves from over-browning, until the loaves reach a temperature of 210 degrees on an instant-read thermometer inserted into the loaf, about 20 to 30 minutes. Cool the loaves on a wire rack before using.

It is a very simple recipe that you can use to have bread any day or time that you like. The loaves turned out great and I decided to shape the dough into just 2 loaves for us. We used one for dinner that night and saved the other for other uses such as sandwiches and with another dinner and it was fantastic. It had a nice crunchy crust and the dough had just the right type of chew to it and the combination of the 2 flours gave it some great flavor. I am making some more today to go with a  chicken stew I am making and it should be great..You could always take one and wrap it up and freeze it so you have it on hand when you want a fresh loaf of bread.

That’s all I have for today. Check back next time for another recipe. Until then, enjoy the rest of your day and enjoy your meal!

IMG_0726 IMG_0725


2 Comments

Posted by on October 21, 2014 in Breads, Cooking


Tags: , , , , , ,

Sweet and Simple for a Monday – Sausage and Bean Dutch Oven Stew

I don’t know about you, but for me Monday is the busiest day of the week. even though I work from home, the bulk of my assignments come in over the weekends or on Monday so I spend most of the day doing research and writing, trying to get as much done as I can. this often means that Monday tends to be a leftover day or one where we have made something for dinner the night before and can cook it quickly and easily Monday night. this recipe for today could really fit into either of those categories. It is easy enough to do with leftovers right on the spot or you could put it all together the day before and simply heat it up for a great meal. The idea for the recipe comes from MyRecipes.com, but I did change it a little bit to fit my needs since their original version is designed to be cooked when you are camping and cooking over an open flame. I changed it slightly to fit into a nice, home-cooked meal of an easy sausage and bean Dutch oven stew.

Sausage and Bean Dutch-Oven Stew

2 cans (15.5-ounce size) each cannellini beans and chickpeas (garbanzo beans), drained and rinsed

2 tablespoons olive oil

1 tablespoon chopped fresh rosemary leaves

1/2 red bell pepper, seeded and sliced

1/2 yellow bell pepper, seeded and sliced

1/2 orange bell pepper, seeded and sliced

1 onion, sliced

1 poblano chile or jalapeno, seeded and sliced

4 garlic cloves, chopped

1 1/2 pounds cooked Italian sausages, cut into 1-inch chunks

Salt and freshly ground black pepper

1 tablespoon dried oregano

In a Dutch oven set over medium-high heat, add the olive oil and heat until it is shimmering. Add in the red pepper, yellow pepper, orange pepper, poblano or jalapeno and the onions and saute until the vegetables have just softened, stirring occasionally, about 3 to 4 minutes. Add the chopped garlic and heat until the garlic is fragrant, about 30 seconds to 1 minute. add the cannellini beans and chickpeas, the rosemary and the Italian sausage pieces, along with 3/4 cup of water, and stir until the mixture is incorporated. Bring the mixture to a boil and reduce the heat until the stew is simmering. Cover the pot and continue cooking until the sausages swell and all of the vegetables are cooked through, checking the pot every 10 minutes and adding more water if the stew gets dry, until it has cooked for about 30 to 40 minutes. Season the stew with salt and pepper to taste and sprinkle the top with the oregano before serving.

It is very simple and quite tasty. The sausage and beans go very nicely together and the peppers and onions help round it out with the poblano giving it just a hint of heat, which is nice. I think this would be even better with kielbasa or a smoked sausage instead of the Italian sausage, but it all works really well together and gives you a nice one pot meal in under an hour that does not take a lot of work. If you have leftover Italian sausage they are perfect for this meal (which is what I did) but if you don’t you can cook some up quickly before putting them in with the other ingredients. I really liked the beans used in the recipe, but you could use other beans if you prefer them as well.

That’s all I have for today. Check back next time for another recipe. Until then, enjoy the rest of your day and enjoy your meal!

IMG_0729


Tags: , , , , ,

Fun and Frightful Halloween Recipes : Cooking Channel

Fun and Frightful Halloween Recipes : Cooking Channel.

Halloween is just around the corner and if you want to make some tasty treats that are fun and Halloween themed, Cooking Channel has put together 31 fun and frightful recipes perfect for Halloween fun.Check it out!


Tags: , , , , , , ,

 
National Day Calendar

Fun, unusual and forgotten designations on our calendar.

Authentic Autograph Source, LLC

Licensed autographs and collectibles dealer in the Pacific NW! We have a wide range of sports, celebrities, and more!

Jennifer Probst

a little bit naughty a little bit nice

Laissez Faire

Letting Life Lead

%d bloggers like this: