RSS

Monthly Archives: October 2013

A Chinese Takeout Classic at Home – Gong Bao Chicken with Peanuts

Let’s face, we all love the convenience and taste of most Chinese takeout. There is nothing quite like getting an egg roll, some fried rice and one of a dozen or so classic Chinese takeout meals to make things easy and tasty on a weeknight or weekend. I admit we get Chinese takeout about once a month now, mainly because I have found that anything that we really like I can make at home and have it cost a lot less and often times taste better and fresher.I had come across this recipe in the New York Times a while back for a classic Chinese menu meal of Gong Bao chicken with peanuts. This one is so easy to make and only takes a few minutes of your time and you can have a meal that tastes better than your favorite takeout.

Gong Bao Chicken with Peanuts

For the Chicken:

2 boneless, skinless chicken breasts

3 garlic cloves

1-inch section of fresh ginger, peeled

5 scallions, white parts only

4-6 dried chiles

2 tablespoons vegetable oil

1 teaspoon Sichuan pepper

1/3 cup roasted peanuts

For the Marinade:

1/2 teaspoon salt

2 teaspoons light soy sauce

1 teaspoon dry sherry or dry vermouth

1 1/2 teaspoons cornstarch

For the Sauce:

1 tablespoon sugar

3/4 teaspoon cornstarch

1 teaspoon dark soy sauce

1 teaspoon light soy sauce

1 tablespoon balsamic vinegar

1 teaspoon sesame oil

1 tablespoon chicken stock or water

Cut the chicken as evenly as possible into half-inch strips, then cut the strips into small cubes. Place the chicken in a small bowl. Add all of the marinade ingredients and 1 tablespoon of water to the bowl with the chicken. Mix well and set the bowl aside.

Peel and thinly slice the garlic and the ginger. Chop the scallions into chunks as long as the chicken cubes so they match in diameter. Snip the chiles in half or into sections, discarding the seeds.

In a small bowl, combine all the sauce ingredients and mix well.

Heat a large skillet over high heat. Add the vegetable oil, chiles and Sichuan pepper and stir-fry briefly until the chiles are darkening but not burned. Remove the skillet from the heat if necessary to prevent the pan from overheating.

Quickly add the chicken and stir-fry it over high heat, stirring frequently. As soon as the chicken cubes have separated, add the ginger, garlic and scallions and continue to stir-fry everything until the garlic and ginger are fragrant and the chicken is just cooked through, about 2 or 3 minutes. You can test one of the larger pieces of chicken to be sure it is done.

Give the sauce a stir and add it to the ingredients in the skillet, continuing to stir and toss the mixture. As soon as the sauce has become thick and shiny, add the peanuts, stir into the mixture and remove the skillet from the heat. Serve.

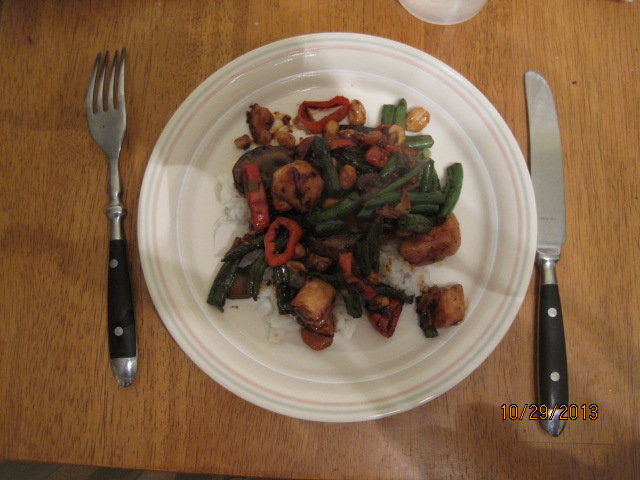
There are a few things about this dish. First, if you can’t find Sichuan pepper (and it may not be readily available), there is a Sichuan oil that you can get instead to use. It doesn’t add any heat to the dish but has a lemony flavor to it. you can always omit it from the dish if you can’t locate anything else. The peppercorns are often used in Chinese five spice powder. The same goes for the dried chiles. My family does not like things very hot, so I simply went with red bell peppers and added some chili oil for a little bit of heat. One thing you do need in this dish is the peanuts. Michelle and I both agreed the peanuts made the dish. They add great crunch and flavor. You can buy already roasted peanuts in the store or you can roast your own in a 250 degree oven for 15 to 20 minutes. Just watch them closely because they can burn pretty easily. I stir-fried some green beans, mushrooms and carrots in a separate skillet so we had some vegetable with the meal and also served it with white rice. I loved the flavor of the sauce and marinade and the peanuts really gave a lot to the dish.

That’s all I have for today. Check back next time for some more recipes. I had hoped to get some Halloween stuff together, but it just didn’t happen with other things going on around here, so maybe next time. however, I did make some homemade peanut butter cups which I will share next time. Until then, enjoy the rest of your day and enjoy your meal and have a happy Halloween!

004 003


Advertisement
 
Leave a comment

Posted by on October 31, 2013 in Cooking, Dinner, One Pot Meals, Poultry, Sauce


Tags: , , , ,

More Fun With Homemade Pizza Dough – Stromboli and Breadsticks

I still had some pizza dough leftover from what I made recently and decided to put it to use last night. I had made a pot of turkey chili, one of Michelle’s favorites but one of Sean’s least favorites. Michelle and I both like it but Sean is not a big fan and was looking for something else to eat. I decided to make use of some leftover items such as the pizza dough and sausage and make a stromboli. I have made one before using Scott Conant’s recipe and it was very good, but I decided to try something a little different this time and gave this one from Emeril Lagasse a shot.

Stromboli

1 pizza dough portion from the Food Processor Pizza Dough recipe

1/4 pound sweet or hot Italian sausage, removed from casings and crumbled

1/2 cup sliced onions

1/4 cup thinly sliced red bell peppers

1/4 cup thinly sliced yellow bell peppers

1 tablespoon minced garlic

1/2 teaspoon Italian seasoning

1/4 pound sliced ham

1/4 pound thinly sliced pepperoni

1 cup grated mozzarella cheese

1 cup finely grated Parmesan cheese

1 large egg, beaten with 1 tablespoon of water

Preheat the oven to 375 degrees. Oil a large baking sheet or place a baking stone in the oven to heat.

In a large skillet, cook the sausage over medium-high heat until browned and the fat is rendered, about 5 minutes. Remove the sausage with a slotted spoon and drain well on paper towels. Discard all but 1 tablespoon of the fat from the skillet. Add the onions and bell peppers and cook, stirring, until very soft, about 4 to 5 minutes. Add the garlic and Italian seasoning and cook, stirring, for 1 minute. Remove the skillet from the heat and allow the mixture to cool.

Punch down the dough and on a lightly floured surface roll the dough out into a large rectangle, about 10 inches by 14 inches. Spread the cooled sausage mixture across the dough, leaving a 1-inch border on the edges. Overlapping slightly, layer the ham, pepperoni, mozzarella and half of the Parmesan cheese over the top of the sausage mixture. Using a pastry brush, paint the border of 1 long edge with the egg wash. Starting at the opposite long end without the egg wash, roll up the dough into a cylinder, pinching the edges to seal. Place on the prepared baking sheet and allow the dough to rise for 20 minutes.

Brush the top of the stromboli with the egg wash. Bake until nearly golden brown and starting to crisp, about 20 minutes. Sprinkle the top of the stromboli with the remaining Parmesan cheese and return it to the oven until the cheese is melted and the dough is golden brown, about 5 minutes. Remove from the oven and allow the stromboli to stand for 10 minutes. Slice thickly and serve.

The great thing about stromboli is that you can really put anything inside it. Sean is not a big fan of the peppers, so I left them out and put some extra ham and cheese inside instead. You could just as easily put leftover chicken in there or any other vegetables you may like and have on hand. You can even just do vegetables and cheese if that is what you prefer. I am guessing Sean liked it since he devoured it.

Since I still had a little bit of pizza dough left, I decided to make some small breadsticks with what I had leftover. This is a very simple way to make use of some leftover pizza dough if you happen to have some around.

Homemade Breadsticks

1 portion pizza dough from the Food Processor Pizza Dough recipe

1 tablespoon olive oil

1/2 teaspoon Italian seasoning

1/4 cup grated Parmesan cheese

Place the pizza dough on a lightly floured surface. Line a baking sheet with parchment paper and spray it with cooking spray. Preheat the oven to 425 degrees.

Roll the dough into a rectangle and cut the dough into 12 to 15 thin strips. Place the strips on the baking sheet and cover the dough with a towel and allow it to rise for 20 minutes.

Sprinkle the olive oil over the dough to coat the breadsticks. Sprinkle the breadsticks with the Italian seasoning and the Parmesan cheese and bake in the oven until they are golden brown, about 10-12 minutes.

You can use the breadsticks to go along with any type of meal, like spaghetti and meatballs or any other dish that you like. Michelle and I used them with our chili and they were quite tasty. They came out perfectly with just the right amount of seasoning.

That’s all I have for today. Check back next time for some more recipes to try. Until then, enjoy the rest of your day and enjoy your meal!

003 001 002


Leave a comment

Posted by on October 29, 2013 in Breads, Cooking, Dinner, One Pot Meals, Pizza, Side Dishes


Tags: , , , , , ,

Outrageous Oven-Baked Spare Ribs with Porter Beer Mop

Spare ribs are one of my favorite things to make no matter what time of year it may be. If the weather doesn’t cooperate or it’s too cold to use the grill outside, baking ribs in the oven can be just as good, if not better, than grilled ribs. I found this recipe from the Food Network’s Amy Thielen, who does a show called “Heartland Table,” for a very unique style of making ribs in the oven with a different glaze to them. I have made ribs in the oven many times in different ways, but this particular glaze she uses really intrigued me so I thought I would give it a try.

Oven-Baked Spare Ribs with Porter Beer Mop

6 pounds spare ribs, on the bone

1 teaspoon salt

1 teaspoon ground black pepper

1 teaspoon dried thyme

4 dried red chiles

1-inch knob fresh ginger root

1/2 to 1 fresh Serrano chile (depending on the amount of heat you desire), stem discarded

1/2 medium onion, cubed

4 inches fresh ginger root, peeled and sliced

1 teaspoon salt

2 tablespoons butter

1 bottle porter beer

1/4 cup molasses

1/4 cup brown sugar

2 tablespoons maple syrup

2 tablespoons minced fresh cilantro

Zest and juice of 1 lime

For the ribs, preheat the oven to 325 degrees.

Trim any gristle from the ribs and cut them into two-rib portions. Rub each piece with salt, and sprinkle with black pepper and thyme. Arrange the ribs in a large roasting pan, add 1/4 cup of water, the dried chiles, and the ginger, cover the pan tightly with aluminum foil and bake until the ribs are tender when poked with a fork, about 3 hours.

For the porter beer mop, in a food processor, combine the Serrano chile, onions, ginger and salt and process until the mixture is smooth.

Heat a large saute pan over medium heat and add the butter. Add the onion mixture to the pan and cook, stirring often, until it is caramelized, a shade darker and fragrant, about 10 minutes. Add the porter beer, molasses, brown sugar and maple syrup and cook at a simmer until the mixture thickens but is still saucy, about 10 to 15 minutes. Add the cilantro, lime zest and lime juice and stir.

To glaze the ribs, raise the oven temperature to 450 degrees. Brush the mop on both sides of the ribs and re-apply the mop until you have used it all and the ribs are well coated with a shiny black glaze. Bake uncovered for about 10 minutes before serving.

A couple of things about this recipe. You could use beef or pork ribs for this recipe depending on what you have on hand or prefer. I used pork ribs even though the recipe called for beef and I think they turned out great. Also, if you don’t want the added heat of the dried chiles or the Serrano chile, you could easily omit them or substitute a milder pepper that you prefer. I actually used chili powder in with the ribs instead of the dried chiles and used a jalapeno in the mop and everything was fine with me. You can really get a nice taste from the ginger baking with the ribs and the ginger in the mop and you can certainly taste the beer in the mop as well, so if you like the flavor of a good porter than this one is for you. I served this simply with some white rice and steamed green beans, but some homemade baked beans or cornbread would go really well with this meal as well. I would certainly use this recipe again. One more thing – the recipe is to serve 8 so it is a lot of ribs. You could cut down the portions accordingly to fit a smaller group if you like, or just have lots of leftovers for another meal.

That’s all I have for today. Check back next time for some more recipes. I have a bunch of things lined up for this week, including a couple of Halloween ideas for snacks and food, so watch for those. Until next time, enjoy the rest of your day and enjoy your meal!

002 001

 
Leave a comment

Posted by on October 28, 2013 in Cooking, Dinner, Pork, Sauce


Tags: , , , , , ,

The Best Recipes To Make In Your Cast Iron Skillet (PHOTOS)

The Best Recipes To Make In Your Cast Iron Skillet (PHOTOS).

If you follow my blog, you know how much I love using my cast iron skillet. The Huffington Post posted this article today highlighting 10 great recipes to try using your cast iron skillet. They cover everything from entrees to side dishes to dessert so you can try a little of everything. Check it out!


Tags: , ,

A Weekend Treat: Cinnamon Buns

Ever since I got the issue of Cook’s Country magazine with the cinnamon buns on the cover I have been wanting to give the recipe a try. Granted, it’s not something we eat very often, but they just looked so delicious and the recipe seemed so simple that I just had to give it a try. I had always thought that making them would take a long time and I think a lot of people just find it easier to get the prepackaged rolls with the little glaze packet and make those instead. I can tell you that the time it takes to make these is relatively quick, well worth the effort and cheaper than it costs for a package of those rolls.

Quick Cinnamon Buns

Filling:

3/4 cup packed light brown sugar

1/4 cup granulated sugar

1 tablespoon ground cinnamon

1/8 teaspoon salt

2 tablespoons butter, melted

1 teaspoon vanilla extract

Dough:

1 1/4 cups milk, room temperature

4 teaspoons instant or rapid-rise yeast

2 tablespoons granulated sugar

2 3/4 cups all-purpose flour

3/4 teaspoon salt

6 tablespoons butter, melted

Glaze:

3 ounces cream cheese, softened

2 tablespoons butter, melted

2 tablespoons milk

1/2 teaspoon vanilla extract

1/8 teaspoon salt

1 cup confectioners’ sugar. sifted

For the filling: Combine the brown sugar, granulated sugar, cinnamon, and salt in a bowl. Stir in the melted butter and vanilla until the mixture resembles wet sand; set aside.

For the dough: Grease a 9-inch round cake pan, line it with parchment paper and then grease the parchment paper. pour 1/4 cup of milk in a small bowl and microwave it to 110 degrees, about 15 to 20 seconds. Stir in the yeast and 1 teaspoon of sugar and the mixture sit until it is bubbly, about 5 minutes.

Whisk the flour, baking powder, salt and the remaining 5 teaspoons of granulated sugar together in a large bowl. Stir in 2 tablespoons of the melted butter, the yeast mixture, and the remaining 1 cup of milk until the dough forms. The dough will be sticky. Transfer the dough to a well-floured counter and knead it until a smooth ball forms, about 2 minutes.

Roll the dough into a 12 by 9-inch rectangle with the long side parallel to the counter edge. Brush the dough all over with 2 tablespoons of the melted butter, leaving a 1/2-inch border on the far edge. Sprinkle the dough evenly with the filling, then press the filling firmly into the dough. Using a bench scraper or metal spatula, loosen the dough from the counter. Roll the dough away from you into a tight log and pinch the seam to seal it.

Roll the log seam side down and cut it into 8 equal pieces. Stand the buns on their ends and gently re-form the ends that were pinched during the cutting. Place 1 bun in the center of the prepared pan and the others around the perimeter of the pan, seam sides facing in. Brush the tops of the buns with the remaining 2 tablespoons of melted butter. Cover the buns loosely with plastic wrap and let them rise for 30 minutes. Adjust an oven rack to the middle position and heat the oven to 350 degrees.

Discard the plastic wrap and bake the buns until the edges are well browned, about 23 to 25 minutes. Loosen the buns from the sides of the pan with a paring knife and let cool for 5 minutes. Invert a large plate over the cake pan. Using potholders, flip the plate and the pan upside down; remove the pan and the parchment paper. Re-invert the buns onto a wire rack and set the wire rack inside a parchment-lined rimmed baking sheet and let them cool for 5 minutes.

For the glaze: Place the cream cheese in a large bowl and whisk in the butter, milk, vanilla and salt until it is smooth. Whisk in the sugar until smooth. Pour the glaze evenly over the tops of the buns, spreading the glaze with a spatula to cover the buns.

While the total time of the recipe is about 1 1/2 hours, this is a lot quicker than other traditional cinnamon bun recipes that can take up to 3 hours to complete. I think you get the same great results from this recipe and the buns were very tender and tasted great. They smelled awesome the whole time they were cooking and everyone couldn’t wait for them to come out of the oven. Of course, the three of us split a warm one with glaze on it right away and it was wonderful. I would make this again for a dessert or even as a great brunch item when you may have a brunch party.

That’s all I have for today. Check back next time for another recipe. I still have a bunch of new ones to try and I am always finding some new and fun things to do. I may even do a few Halloween themed recipes this week that might be fun. Until next time, enjoy the rest of your day and enjoy your meal!

006 001

 
4 Comments

Posted by on October 26, 2013 in Biscuits, Breads, Dessert


Tags: , , ,

Better Than Delivery: Food Processor Pizza Dough and a Couple of Pizzas

Very often when I make pizza at home I use a store-bought dough to make life a little bit easier for me. I have bought the dough and sometimes a pre-made pizza crust so we can have a quick meal. Recently I came upon recipes both from Williams-Sonoma and America’s Test Kitchen that made pizza dough right in the food processor with minimal ingredients and no real kneading at all, making it very easy to make your own dough at home. I actually ended up combining the two recipes somewhat to make my own pizza dough for this one. The America’s Test Kitchen recipe used bread dough, which I liked, but made too many pizza crusts for me, so I combined it with the Williams-Sonoma recipe to get what I wanted.

Food Processor Pizza Dough

1 tablespoon active dry yeast
1 teaspoon sugar
1 cup warm water (105° to 115°F)
3 cups bread flour
1 teaspoon salt
2 tablespoons extra-virgin olive oil

In a small bowl, dissolve the yeast and sugar in the warm water and let stand until foamy, about 5 minutes.

In the bowl of a food processor fitted with the dough blade, combine the flour and salt and process with 3 or 4 pulses. With the motor running, slowly add the yeast mixture, allowing each addition to be absorbed before adding more. Continue processing until the dough forms a ball and cleans the sides of the bowl, about 1 minute, then process for 1 minute more.

Coat the inside of a large bowl with the olive oil and place the dough in the bowl. Cover with a clean kitchen towel and let the dough rise in a warm place until doubled in size, about 1 1⁄2 hours. Divide the dough in half and roll out as directed in the pizza recipe.

This recipe makes two 12-inch pizzas, which was perfect for my needs. It was very simple and didn’t take long at all. I was then able to move on to the pizzas. The first pizza I made was a simple cheese pizza, since that is all Sean really likes anyway.
Classic Cheese Pizza
1 Food processor pizza dough
Flour for the counter
1 recipe Pizza Sauce (to follow)
1 cup mozzarella cheese, shredded
1 tablespoon Parmesan cheese
Adjust an oven rack to the lower-middle position, place a baking stone on the rack and heat the oven to 500 degrees. Let the baking stone heat for at least 30 minutes.
Meanwhile, turn the dough out onto a lightly floured counter and shape it into a smooth, round ball and cover it with plastic wrap. Allow it to rest at room temperature for 20 to 30 minutes.
Uncover the ball of dough and stretch and shape the dough into a 12-inch round on a piece of parchment paper. Spread 1 cup of pizza sauce over the dough, leaving a 1/2-inch edge of dough uncovered. Sprinkle the mozzarella cheese and the Parmesan across the pizza to cover it. Lightly brush the edges of the pizza dough with some olive oil.
Slide the parchment paper and pizza onto a rimless or inverted baking sheet, then slide it onto the hot baking stone. Bake until the crust edges brown and the cheese is golden in spots, about 8 to 13 minutes.
Transfer the pizza to a cutting board, discarding the parchment paper. Cut the pizza into 6 or 8 wedges and serve.
I rolled out he pizza dough with a rolling pin instead of working it by hand. I just seem to have better luck working with the dough this way so I went with it, but do what you are most comfortable with. The crust came out great, though I probably kept the cheese pizza in for a minute or two too long as it browned a bit more than I would have liked, but Sean didn’t seem to care since he devoured all of the pizza. The pizza sauce recipe itself is quite simple:
Basic Pizza Sauce
2 tablespoons extra-virgin olive oil
2 garlic cloves, minced
1 (28-ounce) can crushed tomatoes
Salt and pepper
Heat the oil and garlic in a medium saucepan over medium heat until the garlic is sizzling, about 1 1/2 minutes. Stir in the tomatoes and simmer until the sauce is thickened, about 15 minutes. Season with salt and pepper to taste.
I made a second pizza, but decided to try things a little bit differently and went for a sausage and pepper pan pizza instead of using the baking stone.
Sausage and Pepper Pan Pizza
1 Food processor pizza dough
2 links Italian sausage, cooked and sliced 
1 yellow bell pepper, seeded and cored, sliced thin
1 cup Basic tomato sauce
1 cup mozzarella cheese, shredded
1 teaspoon dried oregano
Adjust an oven rack to the lower-middle position and preheat the oven to 400 degrees. Lightly coat a 9-inch cake pan with 1 tablespoon of olive oil or coat the bottom of an ovensafe skillet with 1 tablespoon of olive oil.
Lightly roll the dough into a smooth ball. Roll and shape the dough into a 9-inch round and press it into the oiled pan or skillet. Cover the pan with plastic wrap and set it in a warm spot (not in the oven) until puffy and slightly risen, about 20 minutes.
Remove the plastic wrap from the dough and ladle the tomato sauce on the pizza dough, leaving a 1/2-inch border around the edges. Sprinkle the pizza with the mozzarella cheese and then top it with the sliced Italian sausage and the bell pepper. Sprinkle the top with the dried oregano. Bake the pizza in the oven until the cheese is melted and the sausage is browning around the edges, about 20 minutes. Remove the pizza from the oven and allow it to rest for 1 minute in the pan. Using a spatula, transfer the pizza to a cutting board and slice into the desired amount of wedges.
I really liked the thick crust that came out with the pan pizza and I love the sausage and peppers on a pie, so it worked out well for me. I actually used red, yellow and orange pepper on my pizza since I had some small sweet peppers on hand. Since Sean was full from eating the other pizza, There was plenty leftover so I can have some for lunch today.
That’s all I have for today. Check back next time for some more recipes. There is still plenty to come – a classic Chinese chicken takeout recipe, some oven barbecued ribs, cinnamon buns, and more. Until next time, enjoy the rest of your day and enjoy your meal!
002 001
 
6 Comments

Posted by on October 25, 2013 in Cooking, Dinner, Pizza


Tags: , , , , , , , ,

The Easiest Chicken Noodle Soup You Will Ever Make

I had planned to make some pizza last night, but Sean and I both had dentist appointments so we got home late. As it turns out, Sean had a couple of fillings done, so he couldn’t really eat anything anyway and asked if he could have some soup for dinner. I didn’t have any pre-made in the freezer or anything, so I had to throw something together quickly using just what I had around the house. Luckily, they are fewer things that can make great use of leftovers and household items than chicken noodle soup. All you need is some homemade or store-bought broth, some leftover chicken and vegetables, a bag of noodles, are you are good to go in about 15 minutes.

Easy Chicken Noodle Soup

4 cups chicken broth

8 ounces noodles

1-2 pieces leftover chicken (breasts, thighs or drumsticks), shredded

6 ounces frozen vegetables (or any leftover vegetables you may have)

In a large saucepan over medium heat, bring the chicken broth to a boil, Add the noodles and return the broth to a boil, then turn the heat down to low to simmer until the noodles are almost tender, about 4 or 5 minutes. Add in the shredded chicken and the vegetables and heat until the chicken and the vegetables are warmed through, about 3 or 4 minutes. Serve.

That’s all there is to it. We actually made use of some leftover chicken gravy I had on hand and added that into the soup as well to act as a thickener and really make it nice. Sean loved it and ate all of it so fast I never even had a chance to take a picture of it. The nice thing is that you can do this same thing with just about any kind of leftovers you may have. You can use rice instead of noodles, use beef broth or vegetable broth instead of chicken, simply add some frozen tortellini and spinach to the broth for a spinach tortellini soup, use beef instead of chicken or just use all vegetables and some herbs along with the vegetable broth and you can make yourself a nice vegetarian soup. The options seem nearly limitless when it comes to making a quick soup if you just want something fast and satisfying. You can serve this with a side salad, just some crunchy bread or even have soup with a sandwich for a fast dinner or a great lunch (I had a tuna sandwich with mine).

That’s all I have for today. Check back next time for another recipe. I hope to get to the pizza tomorrow, I have some ribs planned for Friday, and I also have a cinnamon bun recipe I want to try, so there’s always more to check out. Until next time, enjoy the rest of your day and enjoy your meal!

 
Leave a comment

Posted by on October 23, 2013 in Cooking, One Pot Meals, Soups & Stews


Tags: , , , ,

Swift and Simple Glazed Salmon

Salmon is one of those meals I don’t make very often but I really should make more of it. It is very good for you, but Michelle really only likes the Wild salmon, which does have a different taste and look than that of farm-raised salmon and tends to cost quite a bit more. For this reason, I really only get some when I notice it on sale and looking particularly good. This was the case recently when I saw some at Adam’s Farm and picked up a pound for us to have for dinner. The great thing about fish meals is that they take almost no time at all to prepare, and this simple dish from Cook’s Illustrated is no exception and gives the salmon a great Asian flavor.

Glazed Salmon

1 teaspoon packed light brown sugar

1/2 teaspoon kosher salt

1/4 teaspoon cornstarch

1 (1 1/2 – 2-pound)skin-on salmon fillet

Pepper

1 teaspoon vegetable oil

1 recipe Asian Barbecue Glaze (to follow)

Asian Barbecue Glaze:

2 tablespoons ketchup

2 tablespoons hoisin sauce

2 tablespoons rice vinegar

2 tablespoons packed light brown sugar

1 tablespoon soy sauce

1 tablespoon toasted sesame oil

2 teaspoons Asian chili-garlic sauce

1 teaspoon grated fresh ginger

For the Asian barbecue glaze, whisk all the ingredients together in a small saucepan. Bring the mixture to a boil over medium-high heat; simmer until it is thickened, about 3 minutes. Remove from the heat and cover the saucepan to keep the glaze warm until use.

For the salmon, adjust an oven rack to the middle position and preheat the oven to 300 degrees. Combine the brown sugar, kosher salt and cornstarch together in a small bowl. Use a sharp knife to remove any whitish fat from the belly of the salmon and then cut the fillet into 4 equal portions. Pat the fillets dry with paper towels and season with pepper. Sprinkle the brown sugar mixture evenly over the top of the flesh side of the salmon fillets, rubbing it to distribute it evenly.

Heat oil in a large, oven-safe nonstick skillet over medium-high heat until it is just smoking.  Place the salmon, flesh side down, in the skillet and cook until it is well browned, about 1 minute. Using tongs, carefully flip the salmon and cook it on the skin side for about 1 minute.

Remove the skillet from the heat and spoon the Asian barbecue glaze evenly over all the salmon fillets. Transfer the skillet to the oven and cook until the fillets register 125 degrees (for medium-rare) and are still translucent when cut into with a paring knife, about 7 to 10 minutes. Transfer the fillets to a serving platter or individual plates and serve.

The brown sugar on the salmon helps it develop a nice crust when you first sear it while the cornstarch helps the glaze to adhere nicely to the fish. You end up with a beautiful pink salmon with just a nice crust and a great glaze to top it off. The whole meal can be cooked in about 20 minutes. I served this with white rice and spinach, though I also had a bit of the leftover Fall vegetable risotto with mine instead of the white rice. It was very good and simple enough to make anytime you have salmon and just want a quick and easy meal.

That’s all I have for today. Check back next time for some more recipes. Until then, enjoy the rest of your day and enjoy your meal!

001

 
Leave a comment

Posted by on October 22, 2013 in Cooking, Dinner, Sauce, Seafood


Tags: , , ,

Meals with Family and Friends Part 4 – Pan-Seared Rib Eye Steaks with Red Wine Sauce

One of my favorite meals to eat is just a simple steak dinner. Of all the cuts, I have to say that I think my favorite of all is the rib eye. it has a little more fat than some other cuts, but this does help to give it tremendous flavor and when it is cooked just right it melts when you cut it. Serve it with a nice pan sauce and a couple of good sides and you can have an elegant meal any night of the week. I made some steaks last night when we had a friend visiting and chose to make some nice rib eye steaks I had picked up at. I just followed this simple recipe from Cook’s Illustrated and made a nice pan sauce to go on the side.

Simple Pan-Seared Steaks

1 tablespoon vegetable oil

4 (8 to 10-ounce) boneless strip steaks or rib eye steaks, 1 to 1 1/4 inches thick

Salt and pepper

1 pan sauce recipe (to follow)

Heat the vegetable oil in a large skillet over medium-high heat until just smoking. Meanwhile, pat the steaks dry with paper towels and season both sides of the steaks with salt and pepper.

Lay the steaks in the pan, leaving 1/4 inch between them. Cook, without moving the steaks, until they are well browned, about 4 minutes. Using tongs, flip the steaks and continue to cook until the meat registers 115  to 120 degrees (for rare) or 120 to 125 degrees (for medium-rare), about 3 to 7 minutes. Transfer the steaks to a serving platter and tent them loosely with aluminum foil to rest while you prepare the pan sauce, if using.

Very, very simple. My preference is always to cook the steaks to about medium so they are still nice and pink inside. Letting them rest while you make the pan sauce will help them come up to just the right temperature and doneness. This particular sauce I made does require a little preparation beforehand, so you can make the wine reduction earlier before you cook the steaks.

Red Wine Pan Sauce

Wine Reduction:

1 small carrot, peeled and chopped fine (about 2 tablespoons)

1 small shallot, minced (about 2 tablespoons)

2 medium white mushrooms, chopped fine (about 3 tablespoons)

1 bay leaf

1 tablespoon chopped fresh parsley

1 cup red wine

Sauce:

1 medium shallot, minced (about 2 tablespoons)

1/2 cup chicken broth

1/2 cup beef broth

3 tablespoons butter, cut into 6 pieces

1/2 teaspoon fresh thyme leaves

Ground black pepper

Salt

For the red wine reduction, heat the carrot, shallot, mushrooms, bay leaf, parsley and wine in a large nonstick skillet over low heat; cook, without simmering (the liquid should be steaming but not bubbling) until the entire mixture is reduces to 1 cup, about 15 to 20 minutes. Strain the mixture through a fine-mesh strainer and return the liquid (about 1/2 cup) to a clean skillet. Continue to cook the liquid over low heat, without simmering, until the liquid is reduced to 2 tablespoons, about 15 to 20 minutes longer. Transfer the reduction to a bowl.

For the sauce, follow the recipe for the Pan-Seared Steaks, transferring the plate with the steaks to a 200 degree oven to keep them warm. To the same skillet used to make the steaks (do not clean the skillet or discard any accumulated fat), add the shallot and cook over low heat until softened, about 1 minute. Turn the heat to high; add the chicken and beef broths. Bring the mixture to a boil, scraping up any browned bits on the pan bottom with a wooden spoon until the liquid is reduced to about 2 tablespoons, about 6 minutes. Turn the heat to medium-low, gently whisk in the reserved wine reduction and any accumulated juices from the plate with the steaks. Whisk in the butter, one piece at a time, until it is melted and the sauce is thickened and glossy; add the thyme and season with salt and pepper to taste. Spoon the sauce over the steaks and serve.

The red wine sauce for the steaks turned out very nice and adds some great flavor to the steaks. Of course, you can always skip the sauce completely and just go with the steaks, but I think it added something quite nice to the meal. I served the steaks with the fall vegetable risotto recipe I posted last week and some pan roasted asparagus and sautéed spinach,  a recipe I will post later this week. For dessert that night, we also had the fallen chocolate cake that we have made before to completely round out the meal.

That’s all I have for today. Check back next time for some more recipes. I raided the freezer this weekend and took some things out to make this week, so look for recipes using wild salmon, pizza dough, Italian sausages, boneless chicken breasts and some spare ribs, among others. Until next time, enjoy the rest of your day and enjoy your meal!

001

 
2 Comments

Posted by on October 21, 2013 in Beef, Cooking, Dinner, Sauce


Tags: , , , , , , ,

Meals with Family and Friends, Part 3 – Fall Vegetable Risotto

As I have said in previous posts, we did some entertaining over the last couple of weeks so it gave me the opportunity to try out some new recipes. One thing I made when we had a friend over for dinner was a nice gluten-free dish of Fall vegetable risotto. I have gotten more ambitious lately in trying to make risotto and I think for the most part it has turned out pretty well with good results. There is some work and care that needs to go into the dish, but the results are quite worth it. This original recipe is from Williams-Sonoma, though I did alter it slightly and omitted the blue cheese from the recipe and substituted Parmesan cheese instead. We’re not big blue cheese eaters here in our house, but I have included it in the original recipe here.

Fall Vegetable Risotto

5 cups chicken or vegetable broth

10 ounces Brussels sprouts, ends trimmed, quartered lengthwise

2 tablespoons olive oil

1 large onion, finely chopped

1/4 pound shitake mushrooms, stems removed, sliced

Coarse kosher salt and freshly ground black pepper

1 1/2 cups arborio rice

1/2 cup dry white wine

1/2 cup gorgonzola or other blue cheese, crumbled

1/2 cup walnut pieces, toasted (optional)

in a saucepan, bring the chicken or vegetable broth to a boil. Add the Brussels sprouts and cook until they are a bright green color and almost tender, about 4 minutes. Using a slotted spoon, transfer the Brussels sprouts to a bowl and set aside. Reduce the heat on the broth to low.

In a heavy medium saucepan over medium-high heat, warm the olive oil. Add the onion and saute until it is a golden brown, about 5 minutes. Add the mushrooms, sprinkle with salt and pepper, reduce the heat to medium, and cook, stirring frequently, until they begin to soften, about 3 minutes. Add the arborio rice and stir until the rice turns opaque, about 1 minute. Add the wine and stir until it is absorbed. Add about 3/4 cup of the warmed broth and adjust the heat so the liquid bubbles and is absorbed slowly. Cook, stirring frequently, until all the liquid is absorbed. Continue cooking, adding the broth about 3/4 cup at a time and stirring frequently until the rice is just tender but slightly firm in the center and the mixture is creamy, about 20 minutes. Mix in the Brussels sprouts, blue cheese and a generous amount of pepper. Taste and adjust the seasoning as necessary.

Spoon the risotto into warmed shallow bowls or plates, sprinkle with the walnuts (if using), and serve.

A couple of notes about this recipe. As I stated, I used Parmesan instead of a blue cheese and I think the results were fine. I also omitted the walnuts as well but feel free to add them in if you like them and want the added crunchy texture. I also substituted water for the white wine in the recipe and it was fine. Finally, I could not get my hands on any shitake mushrooms locally so I just used sliced white mushrooms instead. I think they worked out well though if you can get shitakes, I would use them as I like the look and flavor of them myself. The risotto came out nicely and was very creamy. I loved the flavor of the Brussels sprouts in the mix and everyone seemed to enjoy the dish, I actually used this as a side dish to the meal, but this  could be a meal all on its own if you were going for a meat free meal and just serve this with a salad on the side and I think it would be nice. It could then be vegetarian if use vegetable broth and gluten-free.

That’s all I have for today. Check back next time for another recipe. There is still plenty more to come, as always. Thanks for following along and if you ever have any questions or comments, feel free to leave a comment here, or send me a message on Facebook or Twitter or at my email address of IguanaFlats@msn.com. Until next time, enjoy the rest of your day and enjoy your meal!

002

 
Leave a comment

Posted by on October 19, 2013 in Cooking, Dinner, One Pot Meals, Rice, Vegetarian


Tags: , , ,

 
National Day Calendar

Fun, unusual and forgotten designations on our calendar.

Authentic Autograph Source, LLC

Licensed autographs and collectibles dealer in the Pacific NW! We have a wide range of sports, celebrities, and more!

Jennifer Probst

a little bit naughty a little bit nice

Laissez Faire

Letting Life Lead

%d bloggers like this: