RSS

Monthly Archives: June 2014

Simple and Sweet – Skillet Chicken with Rhubarb

When most people hear rhubarb their thoughts immediately turn to strawberry rhubarb pie (which I love by the way). You probably see a lot of rhubarb around the produce departments of markets this time of year since strawberries are in season now, but there are lots of other things you can do with rhubarb besides making great desserts like sorbet, compote or pie. I came across this recipe in the New York Times recently for a simple way to jazz up a chicken dinner with some rhubarb, scallions and honey for a bit of a different flavor. While this recipe uses a whole chicken cut into pieces, I made just chicken thighs instead but you could use any chicken pieces you like for this recipe.

Skillet Chicken with Rhubarb

1 (5 1/2-pound) whole chicken, cut into eight pieces, or various chicken parts (thighs, breasts, drumsticks)

1 tablespoon plus 1/2 teaspoon kosher salt, more as needed

1 teaspoon black pepper, more as needed

5 sprigs thyme

2 tablespoons extra-virgin olive oil

1 bunch spring onions or scallions, white and light green stalks thinly sliced (slice and reserve greens for garnish)

2 garlic cloves, minced

1/2 cup dry white wine, chicken broth or water

3/4 pound fresh rhubarb, cut into 1/2-inch dice (about 3 cups)

1 tablespoon honey, or to taste

2 tablespoons butter, cut into pieces

Pat the chicken dry with paper towels and season the chicken with 1 tablespoon of the kosher salt and 1 teaspoon of the black pepper. Place the chicken in a bowl with the thyme sprigs and cover it with plastic wrap. Refrigerate the chicken for at least 1 hour and up to overnight.

Heat the olive oil in a large skillet over medium-high heat. Remove the thyme from the bowl with the chicken and reserve the thyme sprigs. Add the chicken pieces to the skillet and sear, turning them occasionally, until the chicken is golden brown all over, about 10 minutes. Transfer the chicken pieces to a platter and set them aside.

Reduce the heat of the skillet to medium. Stir in the scallions (the white and light green parts) and cook until the scallions have softened, about 5 minutes. Add the garlic and the reserved thyme sprigs. and cook until fragrant, about 1 minute more. Stir in the wine and bring the mixture to a simmer, scraping up any browned bits in the bottom of the pan. Add the rhubarb, honey, 1/2 teaspoon of kosher salt and a few grinds of black pepper.

Return the chicken pieces to the skillet in a single layer. Cover the skillet and reduce the heat to medium-low. Simmer until the chicken is cooked through, about 15 to 20 minutes for breasts and 20 to 25 minutes for the thighs and drumsticks. Transfer the  chicken pieces to a platter as they finish cooking so they can rest.

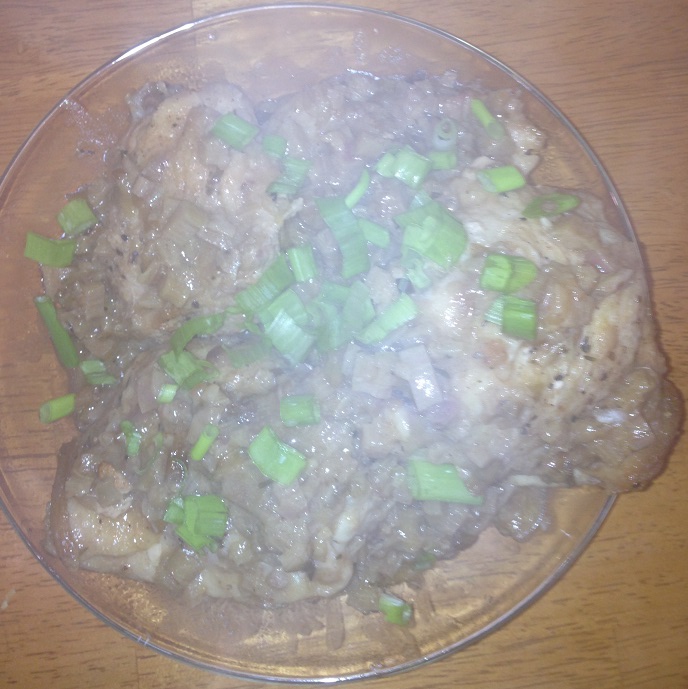
Whisk the butter into the rhubarb sauce. Taste the sauce and adjust the seasoning if needed or desired. Spoon the rhubarb sauce over the chicken pieces and garnish the dish with the sliced scallion greens and serve.

It is a very simple dish that is perfect for a weeknight or a weekend meal. The rhubarb tastes great with the chicken and we all loved the sauce. It was ideal to spoon over the chicken and also with the rice that I had served with the meal, but it would also be great with mashed potatoes or other grains as well. I apologize for the picture as it didn’t turn out that great since there was still steam coming up off the dish when I took it, but trust me it tastes great and looks good too!

That’s all I have for today. Check back next time for another recipe. Until then, enjoy the rest of your day and enjoy your meal!

IMG_0587

Advertisement
 
Leave a comment

Posted by on June 30, 2014 in Cooking, Dinner, Poultry, Sauce


Tags: , , , , ,

An All-American Cookout | SAVEUR

An All-American Cookout | SAVEUR.

As Independence draws closer, you may be having a  cookout or party of your own and want to make the event as All-American as possible. Saveur magazine has some great menu ideas for you that cover all the basics for you with burger, salad, dessert and more. Check it out!

I am taking a long weekend to visit some family so I will be back to blogging on Monday, June 30th with more recipe to share. There’s always lots going on, so check back and see what comes up next. Enjoy your weekend!

 
2 Comments

Posted by on June 26, 2014 in Cooking, Cooking Websites, Grilling, Holidays


Tags: , , , ,

Going Bananas for Banana Upside Down Cake

Michelle had asked me what I wanted for a Father’s Day dinner last week and I knew what I wanted for dessert right away. I love desserts that make use of bananas (see the Bananas Foster cake Michelle made for my past birthday) and I had just recently seen this recipe on the Food Republic website for an awesome looking banana upside down cake. I have tried pineapple upside down cake and peach upside down cake so this one seemed like it would be just as good and was not going to be hard to make. I was really looking forward to it and was not disappointed with the results.

Banana Upside Down Cake

For the Banana Caramel:

1 1/2 cups sugar

4-5 bananas, ripened

1/4 teaspoon cinnamon

For the Cake:

2/3 cup butter, plus extra for greasing

1 1/4 cups all-purpose flour

11/2 teaspoons baking powder

1 teaspoon ground cinnamon

4 eggs, separated

3/4 cup sugar

2 large ripe bananas, peeled and mashed

Preheat the oven to 325 degrees. Generously butter the bottom and sides of a 9-inch diameter springform cake pan then line the pan with parchment paper.

To make the banana caramel, put the sugar and 2/3 cup of water in a heavy saucepan and cook the mixture over high heat until the sugar has dissolved. Let the mixture boil until it has thickened to a golden-brown caramel, taking care not to burn it. Remove the caramel immediately from the stove and pour it into the prepared cake pan, tipping the pan slightly from side to side until the pan is evenly coated. Peel the bananas and halve them lengthwise. Arrange the bananas over the caramel in a neat pattern, trimming the bananas as necessary, then dust the bananas with the ground cinnamon.

For the cake batter, sift together the flour, baking powder and cinnamon in a large bowl. Put the egg whites in a separate clean bowl and whisk the egg whites using an electric hand mixer until stiff peaks have formed. Put the butter and the sugar in another large bowl and whisk them together until the mixture is light and fluffy. Slowly whisk in the egg yolks into the butter-sugar mixture one at a time until combined. Fold in the mashed bananas, followed by the dry ingredients in the flour mixture. Fold in the egg whites into the entire mixture and gently mix to form the batter.

Pour the batter into the cake pan and spread the batter evenly with a spatula. Bake the cake in the oven for 50 to 60 minutes, or until a skewer inserted into the center of the cake comes out clean. Remove the cake from the oven and allow it to cool for 5 minutes in the pan before unmolding it. The cake is easier to unmold while it is still warm before the caramel has had a chance to cool and harden. Run a thin knife around the inside of the pan. Put a large flat plate over the top of the cake pan and, holding the pan and the plate, invert it and gently lift off the pan and peel off the parchment paper. Serve the cake warm.

Wow, this cake tasted really good! It was kind of a mix of really moist banana bread with the caramel you have on a typical upside down cake except it is chock full of banana flavor. Put some homemade whipped cream on top of the cake and you have yourself a masterpiece. I loved every bite of it and the cake stayed moist for a couple of days afterward to provide a wonderful snack each night. We will definitely be making this one again and I think it would be great to make to bring to a party, housewarming or summer barbecue.

That’s all I have for today. Check back next time for another recipe. Until then, enjoy the rest of your day and enjoy your meal!

bananaupsidedowncake


Leave a comment

Posted by on June 24, 2014 in Cakes, Cooking, Dessert


Tags: , , , , , ,

Take Your Burgers to Pretzel Heaven with These Pretzel Bread Rolls

One of the things I always seem to buy when I go to the farmer’s market is pretzel rolls. There is just something about these rolls with their great pretzel flavor, crusty top and the pretzel salt that just make them fantastic for all kinds of sandwiches and burgers. That being said, I decided that they shouldn’t be that hard to make on my own and wanted to give it a shot for when we were having burgers the other night. I found this recipe on Food Republic that was a pretty easy recipe, only used a few ingredients and looked pretty easy to do, so I thought I would give it a shot. This recipe actually makes 35 small dinner rolls, but I halved the recipe and made larger rolls and got 9 good-sized rolls out of it. This is the original recipe posted on Food Republic, so you can adjust it to fit your needs if you want.

Pretzel Bread Rolls

6 teaspoons active dry yeast

2 1/2 cups warm water

3/4 cup plus 1 teaspoon granulated sugar

7 cups all-purpose flour

2 1/4 teaspoons kosher salt, plus more for sprinkling

2 tablespoons canola or vegetable oil

1/4 cup baking soda

2 cups warm water

In a mixer fitted with a dough hook attachment, briefly blend the yeast, warm water and 1 teaspoon of the granulated sugar. Let the mixture rest about 10 minutes so it can bloom to activate the yeast.

After the yeast has activated, add the flour, the remaining sugar, the kosher salt and the oil. Mix for 5 minutes or until a smooth, dense dough has formed. Remove the dough from the mixer and transfer it to a greased medium-sized bowl. Let the dough rise in a warm place for 2 hours or until the dough has just about doubled in size.

Line a baking sheet with parchment paper and spray it with some nonstick cooking spray. Divide the dough into 3 equal pieces and roll out each piece into a rope that is about 2 inches in diameter. Cut each rope into 1-inch pieces (larger if you are looking for bigger rolls). This should give you roughly about 35 small dinner rolls. Place the rolls on the prepared baking sheet about 2 inches apart. Cover the rolls with a clean dishcloth and let them rise again for about 30 minutes.

Heat the oven to 425 degrees. in another bowl, combine the baking soda and the 2 cups of warm water. Transfer the baking soda solution to a spray bottle and spray the rolls generously with the solution. Sprinkle the rolls with some extra kosher salt if desired. Bake the rolls for 15 minutes until the rolls are a dark brown all over. Remove the rolls from the oven and allow them to cool on the baking sheet before serving.

It is a very easy recipe, easier than some of the pretzel recipes I have seen, and it yields great results. The rolls were nice and crunchy on the outside and warm and sweet on the inside, just like a pretzel. They were perfect for the burgers that night and we used the extras for sandwiches for the rest of the week as well. I will certainly make this one again since it was so easy to do.

That’s all I have for today. Check back next time for another recipe. Until then, enjoy the rest of your day and enjoy your meal!

IMG_0573


Leave a comment

Posted by on June 23, 2014 in Breads, Cooking


Tags: , , , ,

Summer Cooking Tips – Photo Gallery | SAVEUR

Summer Cooking Tips – Photo Gallery | SAVEUR.

Now that Summer is upon us, you need to to get ready to do all of your summer cooking, whether it is grilling, making salads or just taking advantage of the fruits and vegetables that are seasonal in the summertime. Saveur Magazine has put forth some great summer cooking tips to cover everything you need to get help in making your cooking days fantastic. Check it out!


Tags: , , ,

Sweet and Simple – Sweet Glazed Chicken

I have made a lot of chicken lately because it has been on sale a lot around here and quite frankly right now it is one of the most affordable meats for a family. All it takes is a simple trip to the grocery store lately to see that the price of just about everything has gone up lately, causing most people’s food bills to skyrocket and bust your budget. That is why I look for the best deals I can find and go to BJ’s Warehouse to buy some meat where I can things at bulk for a good price for many meals. This was the case recently when I bought big packages of chicken thighs, breasts and drumsticks and portioned them out into the freezer, cramming it full of chicken for the foreseeable future. Now the trick will be just what to do with all of that chicken. I decided to make some drumsticks and thighs the other day and saw this easy recipe from Sunny Anderson on the Food Network for a simple, sweet glazed chicken. While she used a whole chicken on the grill and butterflied it, I opted to just use chicken pieces and my grill pan as an alternative. I’ll post the original recipe here, but I’ll also tell you how I adapted it for my needs.

Sweet Glazed Chicken

One 5 to 7-pound chicken, butterflied

Kosher salt and freshly ground black pepper

Canola or vegetable oil, for oiling the grill grates

3 tablespoons butter

2 tablespoons grated onion

1/8 teaspoon allspice

Kosher salt and freshly ground black pepper

2 cloves garlic, grated or finely minced

1/4 cup packed light brown sugar

1 tablespoon stone-ground mustard

2 teaspoons apple cider vinegar

1/4 teaspoon hot sauce

For the chicken, season the chicken generously with salt and pepper all over. Rest the chicken on the counter, covered, until the chicken  comes to room temperature, about 2 hours.

Preheat a grill to 400 degrees. Lightly oil the grill grates with canola or vegetable oil.

Grill the chicken over indirect heat, rotating the chicken occasionally,until the internal temperature of the chicken registers 165 degrees on an instant-read thermometer, about 50 to 60 minutes.

For the glaze, while chicken is grilling, melt the butter in a small saucepan. Add the grated onion, the allspice, a pinch of kosher salt and a pinch of black pepper. Cook the mixture until the onions are tender, then add the grated garlic and cook until it is tender but not browned. Add the brown sugar, the stone-ground mustard, the cider vinegar and the hot sauce. Cook the mixture until it has begun to reduce and thicken, about 5 minutes, then remove the glaze from the heat.

When the chicken is nearly cooked through, brush on the glaze. Cover he grill and continue to cook the chicken until the glaze begins to color and the chicken is done. Cover the chicken loosely with foil and allow it to rest for 15 minutes to allow the juices to redistribute in the chicken. Cut the chicken into sections and serve.

Since I decided to just make chicken pieces and use the grill pan inside, I cooked the chicken in the grill pan over medium-high heat until it was browned on all sides and got some grill marks on it. I also made the glaze as directed and then put the glaze on the chicken pieces and then put the whole pan in a 400 degree oven to finish cooking. This allowed me to get the crispy skin, a nice glaze and I still had the grill marks as if it was grilled. The glaze had just the right amount of sweet to it from the brown sugar and nice flavor from the allspice to make it a little different from other glazes you might try. It was certainly easy to put together and we all enjoyed the chicken pieces with some sweet potatoes and green beans.

That’s all I have for today. Check back next time for another recipe. Until then, enjoy the rest of your day and enjoy your meal!

IMG_0578

 
Leave a comment

Posted by on June 20, 2014 in Cooking, Dinner, Grilling, Sauce


Tags: , , , , , ,

Pick This Pickleback Slaw as a Side Dish for Summer

There are so many different variations of coleslaw that it seems you can try it in just about any manner with any kind of ingredient. As long as it has some form of cabbage in it, slaw seems to be fair game today. For me, I love to have a slaw that is crispy and wet and soggy and full of mayonnaise. Don’t get me wrong – I like a  coleslaw that uses mayo but I don’t want the vegetables swimming in it. It takes away from the flavors of the cabbage and other vegetables and it isn’t very practical as a summer side dish if you use a lot of mayo and can’t leave the dish out for a bit on a table. This particular recipe I picked up from the New York Times and Sam Sifton and it makes use of an item that you probably throw away most of the time – pickle juice.

Pickleback Slaw

1 small head green cabbage

1 small head red cabbage

2 carrots, peeled and grated

2 apples, such as Granny Smith, peeled and cut into matchsticks

1/2 cup mayonnaise

3 tablespoons juice from a pickle jar or pickle relish jar

1 tablespoon Dijon mustard

1 tablespoon cider vinegar

2 teaspoons hot sauce

Kosher salt

Ground black pepper

Cut the green and red cabbages in half and remove the core from each of the sides. Cut each half of cabbage in half again and slice each quarter of cabbage into very thin ribbons. Mix the red and green cabbages with the grated carrots and sliced apples in a large, non-reactive bowl.

In a separate bowl, whisk together the mayonnaise, pickle juice,Dijon mustard, cider vinegar,hot sauce, kosher salt and black pepper until well blended.

Pour the dressing over the cabbage mixture and toss the cabbage well to coat it. Season the slaw with salt and pepper to taste. The coleslaw may be covered with plastic wrap and refrigerated until you are ready to serve it. Toss the coleslaw again before serving.

Alternatively to slicing the heads of cabbage and grating the carrots yourself you could just as easily use a bag of coleslaw mix that already has all of this done for you. Choose some apples that have good flavor to them and you get even a little bit more taste into the slaw. This slaw has just the right bite to it from the pickle juice and the hot sauce and I loved the way it all mixed with the cabbages and apples. It only seemed to get better after a day or two in the fridge as well, making a great side dish for all kinds of burgers, hot dogs, ribs, sandwiches and more. of all of the coleslaw dishes I have made recently, this one seems to be one of the best choices and I have made it a couple of times since I tried the original.

That’s all I have for today. Check back again next time for another recipe. Until then, enjoy the rest of your day and enjoy your meal!

IMG_0567

 
1 Comment

Posted by on June 19, 2014 in Cooking, Dinner, Lunch, Salad, Side Dishes, Vegetables


Tags: , , , , ,

Lamb it up with Alton Brown’s Shepherd’s Pie

So after I made the lamb the other night for dinner, we naturally had some leftover. Finding something to do with leftover lamb can seem a little daunting as it is not something that always reheats well without some help. I have found that the best solution for using leftover lamb is to grind it up and use it for shepherd’s pie. Cold, leftover lamb lends itself well to being ground up in the food processor or you could simply dice it up small and use it that way. In either case, it is very easy to make and makes a great one pot meal. I have tried a few different shepherd’s pie recipes over the years, but I came across this one from Alton Brown on the Food Network website that seemed very easy to make and would give you some great flavors.

Alton Brown’s Shepherd’s Pie

For the potatoes:
1 1/2 pounds russet potatoes
1/4 cup half-and-half
2 ounces butter
3/4 teaspoon kosher salt
1/4 teaspoon freshly ground black pepper
1 egg yolk
For the meat filling:
2 tablespoons canola or vegetable oil
1 cup chopped onion
2 carrots, peeled and diced small
2 cloves garlic, minced
1 1/2 pounds ground lamb
1 teaspoon kosher salt
1/2 teaspoon freshly ground black pepper
2 tablespoons all-purpose flour
2 teaspoons tomato paste
1 cup chicken broth
1 teaspoon Worcestershire sauce
2 teaspoons freshly chopped rosemary leaves
1 teaspoon freshly chopped thyme leaves
1/2 cup fresh or frozen corn kernels
1/2 cup fresh or frozen English peas

Peel the potatoes and cut them into a 1/2-inch dice. Place the potatoes in a medium saucepan and cover them with cold water. Set the saucepan over high heat, cover and bring it to a boil. Once boiling, uncover the pot, decrease the heat to maintain a simmer and cook until the potatoes are tender and easily crushed with tongs, approximately 10 to 15 minutes. Place the half-and-half and butter into a microwave-safe container and heat in the microwave until warmed through, about 35 seconds. Drain the potatoes in a colander and then return them to the saucepan. Mash the potatoes and then add the half and half, butter, salt and pepper and continue to mash the potatoes until they are smooth. Stir in the yolk until it is well combined.

Preheat the oven to 400 degrees F.

While the potatoes are cooking, prepare the filling. Place the canola or vegetable oil into a 12-inch saute pan and set it over medium high heat. Once the oil shimmers, add the onion and carrots and saute just until they begin to take on color, approximately 3 to 4 minutes. Add the garlic and stir to combine. Add the lamb, salt and pepper and cook until browned and cooked through, approximately 3 minutes. Sprinkle the meat with the flour and toss to coat, continuing to cook for another minute. Add the tomato paste, chicken broth, Worcestershire sauce, rosemary, thyme, and stir to combine. Bring the mixture to a boil, reduce the heat to low, cover the pan and simmer slowly for about 10 to 12 minutes or until the sauce is thickened slightly.

Add the corn and peas to the lamb mixture and spread the mixture evenly into an 11 by 7-inch baking dish. Top the lamb mixture with the mashed potatoes, starting around the edges to create a seal to prevent the mixture from bubbling up and smooth the top with a rubber spatula. Place the baking dish on a parchment lined half sheet pan on the middle rack of the oven and bake the pie for 25 minutes or just until the potatoes begin to brown. Remove the pie to a cooling rack for at least 15 minutes before serving.

This is a very simple and tasty way to make use of leftover lamb or to just use some ground lamb that you may have. You get a nice mix of vegetables, meat and sauce with a great mashed potato topping. if you don’t want to use lamb, you could always used ground beef, turkey or chicken, but for me to really call it shepherd’s pie you need the lamb and that particular lamb flavor that you get. All you need to do is  cut yourself a slice and enjoy your meal with a simple cleanup after dinner.

That’s all I have for today. Check back next time for another recipe. Until then, enjoy the rest of your day and enjoy your meal!

shepherdspie

 
5 Comments

Posted by on June 17, 2014 in Cooking, Dinner, Lamb, Leftovers, One Pot Meals, Potatoes


Tags: , , , , ,

The Lamb Lies Down with Roasted Potatoes

I have had a boneless leg of lamb in the freezer for a few weeks now and we had been waiting for just the right occasion to make it, but it was a pretty large roast so I had to wait until we were having some people over to share it with. It was over five pounds and I had bought it at a really great sale price so it was going to make a nice, elegant meal. For me, one of the best things with lamb is just some simple roasted potatoes and asparagus, which is what I decided to make that day, so I adapted this recipe from  Michael Symon for roasted leg of lamb with potatoes. I had to alter it a bit to fit my particular needs since the recipe is for a 6-pound leg of lamb with the bone in, but I really wanted it more for the marinade than anything else. I just adjusted the spices down a little bit, but here is the original recipe that I used as a basis.

Roasted Leg of Lamb with Roasted Potatoes and Tzatziki Sauce

For the Leg of Lamb:
6 shallots, minced
4 garlic cloves, minced
1/4 cup fresh rosemary
1/4 cup fresh oregano
2 tablespoons sugar
2 tablespoons coriander seeds, toasted and crushed
1 tablespoon crushed red pepper flakes
1 1/2 tablespoon kosher salt
1 6-pound bone-in leg of lamb

For the Roasted Potatoes:
Nonstick vegetable cooking oil spray
4 pounds unpeeled fingerling potatoes, rinsed and halved lengthwise
1/2 cup olive oil
1 cup extra-virgin olive oil
1/2 cup fresh lemon juice
6 tablespoons fresh chopped dill
4 teaspoons finely grated lemon peel
Kosher salt and black pepper

For the Tzatziki Sauce:
2 cups Greek yogurt
1 cucumber
kosher salt
Juice and zest of 2 lemons
2 tablespoons Chopped Fresh Mint
1 tablespoon minced garlic
1 tablespoon minced shallot
Freshly ground black pepper

For the Leg of Lamb: Mix together in a medium bowl the shallots, garlic, rosemary, oregano, sugar, coriander, red pepper flakes, and salt.
Rub the mixture all over the surface of the lamb. Place the lamb in a large baking dish, cover it with plastic wrap, and refrigerate it overnight.
  Remove the lamb from the baking dish, rinse off the seasonings, and pat dry. Let the lamb sit a room temperature for 1 hour.
  Preheat the oven to 375 degrees. Heat a roasting pan or large ovenproof skillet over medium heat. Add the lamb and brown the lamb on all sides, about 7 to 10 minutes.Transfer the lamb, fat side up, to a roasting rack set into a roasting pan. If you have extra rosemary lay the sprigs over the lamb with a drizzle of olive oil over the top. Roast the lamb until the lamb reaches an internal temperature of about 140 degrees, about 1 1/2 hours. Remove the lamb from the pan and set it aside on a cutting board loosely tented with aluminum foil to rest for 20 minutes before slicing.
For the Potatoes: Position a rack in the top third and 1 rack in bottom third of the oven and preheat the oven to 375 degrees.
Spray 2 large rimmed baking sheets with nonstick spray. Toss the potatoes with 1/2 cup of the olive oil in a large bowl. Sprinkle the potatoes generously with salt and freshly ground black pepper. Spread the potatoes in a single layer on the baking sheets, dividing the potatoes equally among the two pans. Roast  the potatoes for 30 minutes.
Meanwhile, whisk extra-virgin olive oil, lemon juice, dill, and lemon peel in small bowl to blend for dressing for the potatoes. Reverse the baking sheets in the oven and toss the potatoes and continue to roast them until the potatoes are tender and brown around the edges, about 15 minutes longer.
Toss the roasted potatoes in a large bowl with enough of the remaining dressing to coat them and serve.
For the Tzatziki Sauce: Put the yogurt in a paper towel-lined or cheesecloth-lined strainer and set it over a bowl and let the yogurt drain for 24 hours in the refrigerator. Peel and dice the cucumber, sprinkle it with salt and place the cucumbers in a strainer at room temperature for 2 to 3 hours to drain.
Stir together the yogurt, cucumber, lemon juice and zest, mint, garlic, and shallot in a medium bowl until the mixture is thoroughly combined. Season to taste with salt and pepper.
Naturally, you can roast the potatoes and the lamb together in the oven at the same time or even together in the same roasting pan to save yourself some space. When you take the lamb out to rest, you can then dress the potatoes and continue roasting them until they are roasted the way you like them. The Tzatziki sauce really goes well with the lamb and seems to blend nicely with everything. Don’t worry if your lamb is still pink inside when you roast it to 140 degrees; it really is at its best when it is medium-rare and has the best flavor. Overcooked lamb can be pretty tough and chewy, so this is one of those meals you want to keep an eye for temperature. It takes some prep work ahead of time, but the seasoning for the lamb is great and adds fantastic flavor and crust to the lamb. It is always a family favorite for us and something we don’t have too often, but ut is worth the effort to put in to make it once in a while.
That’s all I have for today. Check back next time for another recipe. Until then, enjoy the rest of your day and enjoy your meal!
roastedlamb

Comments
 
6 Comments

Posted by on June 16, 2014 in Cookbooks, Dinner, Lamb, Potatoes, Sauce, Vegetables


Tags: , , , , ,

Wow the Crowd with This Zesty Potato Salad

Summer side dishes can seem limited at times and you might get tired of having the same old options of potato, coleslaw, salad, baked beans and the like. Everyone once in a while you just want to try to spice things up a little bit and try some new twists on old favorites so you can experience some new flavors and get ideas for future meals. Potato salad is one of those things that every family seems to have a basic recipe that they fall back on and pass down from person to person. I know I have made the same potato salad for years and was looking for a new way to spice things up a little bit and add some great flavor to this dish when I was making burgers the other night. I came upon this recipe in searching the Internet from a blog called Pass the Sushi and saw a posting for whiskey burgers and zesty potato salad. I decided to give both a try, and I am posting the zesty potato salad recipe first for you to take a look at.

Zesty Potato Salad

2 1/2 pounds small red potatoes, quartered

3 cloves garlic, smashed

Kosher salt

6 slices bacon, chopped

2 tablespoons extra-virgin olive oil

1 red onion, diced

3 stalks celery, diced

1/2 cup red wine vinegar

1 1/2 cups mayonnaise

1/2 cup Dijon mustard

Place the potatoes and the smashed garlic in a large stock pot. Fill the pot with water to about 2 inches above the potatoes and generously salt the water with the kosher salt. Bring the water to a boil over high heat. Reduce the heat to medium and simmer the potatoes until they are fork tender, about 10 to 12 minutes.

Meanwhile, heat the olive oil in a large skillet set over medium heat. Cook the bacon, stirring occasionally, until the bacon is browned and crispy, about 10 minutes. Remove the skillet from the heat and stir in the red onion, diced celery and the red wine vinegar. Season the mixture with salt to taste.

Drain the cooked potatoes from the stock pot and transfer them to a large bowl. Remove the garlic and throw it away. Add the bacon mixture to the hot potatoes and toss the mixture with the potatoes until the potatoes are well coated. Gently fold in the mayonnaise and the Dijon mustard until they are blended well into the potato salad. Refrigerate the potato salad until it is cold and serve.

To me, this is very close to have a colder version of German potato salad with the mix of the bacon, onions and vinegar with the potatoes, but you also get the flavors of the Dijon mustard and the mayonnaise added to it as well for some extra tang. The potato salad was very good, but it got even better the longer it sat in the refrigerator. We had some again with lunch the next day and it tasted even better than the first time. I really liked this recipe and I will definitely be using it again for barbecues or summer parties, though it does need to be refrigerated because of the mayonnaise so you need to be careful about leaving it out.

That’s all I have for today. Check back next time for another recipe. Until then, enjoy the rest of your day and enjoy your meal!

IMG_0568

 
Leave a comment

Posted by on June 13, 2014 in Cooking, Lunch, Potatoes, Salad, Side Dishes


Tags: , , ,

 
National Day Calendar

Fun, unusual and forgotten designations on our calendar.

Authentic Autograph Source, LLC

Licensed autographs and collectibles dealer in the Pacific NW! We have a wide range of sports, celebrities, and more!

Jennifer Probst

a little bit naughty a little bit nice

Laissez Faire

Letting Life Lead

%d bloggers like this: