RSS

Tag Archives: mashed potatoes

Savor These Simple Sides (Sans Pictures) – Maple-Glazed Root Vegetables and Mashed Potatoes with Buttermilk

One of the areas that I am trying to do the most improving in during 2015 comes to the pictures that I take for this blog. Very often I just take pictures right after I have finished preparing the meal so that I can have a picture to display, and the pictures do not always turn out to be the best that I can use but I go with it and that is what I have. I admit I am no professional photographer and I do not spend a lot of time working on the photography for the blog, but I would like to try to get a little bit better at it and take some nicer pictures to use. I would also like to be able to remember to take pictures more often. Very often I forget to take pictures of the side dishes that I have made and only remember it after we have already started eating, not leaving me with anything to take pictures of to put up.. This has kept me from putting a lot of recipes on the blog since I do not have pictures of the recipes I want to use. Today I decided I am going to use a couple of the recipes anyway so at least I can share them with you and let you know how they turned out for me even if I do not have pictures to show you. In particular here are 2 side dishes I tried recently, one from Williams-Sonoma and the other from Bobby Flay. They are for maple-glazed root vegetables and for mashed potatoes with buttermilk, black pepper and green onion. Both are really simple to make and make great side dishes for all kinds of meals.


Maple-Glazed Root Vegetables

3 tablespoons butter

1 pound turnips, peeled and cut into wedges 1/2-inch wide

1 1/4 pound carrots, peeled and cut on the bias into pieces 2-inches long and 1/2-inch wide

1 1/4 pounds parsnips, peeled and cut on the bias into pieces 2-inches long and 1/2-inch wide

1/2 cup chicken broth

1 teaspoon finely chopped fresh thyme

3 tablespoons maple syrup

Salt and freshly ground pepper, to taste

1 teaspoon fresh lemon juice

In a large sauté pan set over medium-high heat, melt the butter. When the foaming subsides, add 1/3 each of the turnips, carrots and parsnips. Cook, without stirring, until the vegetables are browned on one side, about 3 to 4 minutes. Transfer the vegetables to a bowl. Repeat the process to brown the remaining vegetables in 2 more batches.

Return all of the vegetables to the pan. Stir in the chicken broth, time and 2 tablespoons of the maple syrup, and season with salt and pepper. Cover and cook until the vegetables are just tender, about 7 to 8 minutes. He uncover the pan and continue to cook the vegetables, stirring them occasionally, until most of liquid has evaporated and the vegetables are glazed, about 2 minutes. Remove the pan from the heat. Stir in the lemon juice and the remaining 1 tablespoon of maple syrup and serve.


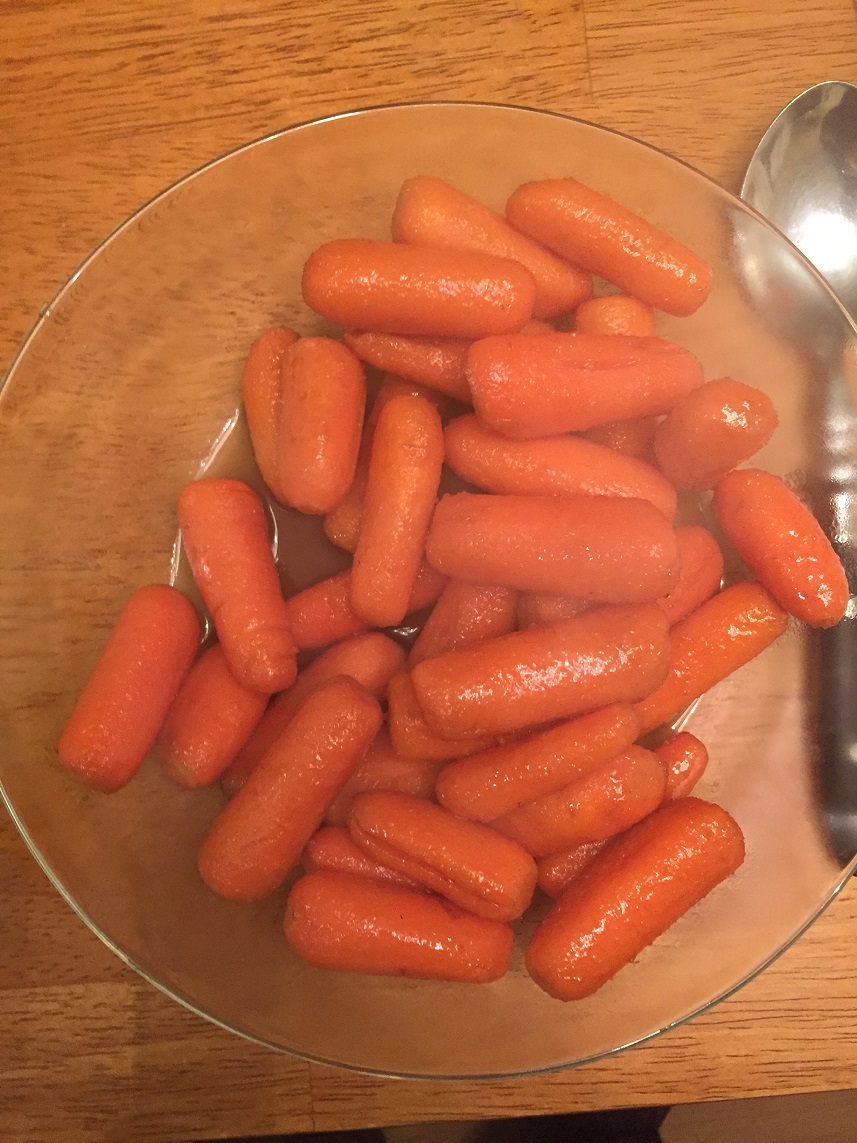
You can pretty much try this recipe with any root vegetables that you like, or just one single type of vegetable that you may happen to have on hand and it works pretty well. While this recipe is for a larger group of about 8 to 10, you could scale it down to fit your particular family size needs. I actually just made this again recently using just some baby carrots that I had on hand and it turned out perfectly, with the carrots having a really nice glaze on it thanks to the maple syrup. It is a great dish to remember to use for holidays or weekend meals and goes really well with beef, chicken, turkey, or pork. The mashed potato recipe is just as easy and just as versatile.


Mashed Potatoes with Buttermilk, Black Pepper and Green Onion

4 pounds Yukon Gold potatoes, peeled and cut into 2-inch dice

Kosher salt

1 stick (8 tablespoons) butter, cut into pieces

2 1/2 to 3 cups buttermilk

Coarsely ground black pepper

2 green onions, green and pale green parts only, thinly sliced

Place the potatoes in a large pot and cover them with cold water by 2 inches. Add 2 tablespoons of salt, bring to a boil, and cook until the potatoes are fork tender, about 20 to 25 minutes. Drain the potatoes well. While the potatoes are cooking, combine the butter and buttermilk in a small sauce pan set over medium heat and bring it to a simmer.

Working in batches, pass the cooked potatoes through a food mill or a ricer (or just use a potato masher) over a pot. Stir the hot buttermilk mixture into the potatoes until they are smooth and creamy. Season the potatoes generously with pepper and add more salt as needed. Stir in the green onions. Cover and keep the potatoes warm over a simmering pot of water until you are ready to serve.


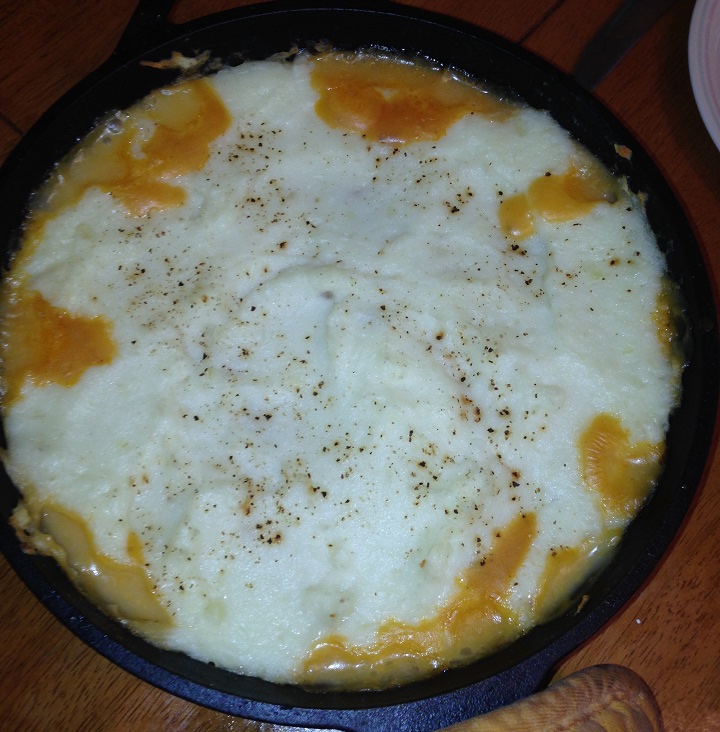
While everyone makes mashed potatoes pretty regularly, this is just a slight variation that gives you a little bit different flavor thanks to the buttermilk, pepper and green onion. I really like a lot of pepper in my potatoes so this was the perfect recipe since the pepper really shines through and the buttermilk really helps to make the potatoes extra creamy and add a little bit of tang to the flavor. Again this is a great dish that you can use for a holiday meal or a nice Sunday meal but it is also simple enough for you can make it during the week to have as a side dish for just about anything, including beef, chicken, turkey or pork. While using a ricer or food mill does produce great mashed potatoes and I do have a ricer to use, I very often find myself just using the potato masher to make them and they come out just fine. The ricer can be a little tedious to use when you have a lot of potatoes and some people like the mashed potatoes a little chunkier with the potato masher anyway.


That’s all I have for today. Check back next time for another recipe. Until then, enjoy the rest of your day and enjoy your meal!

mapleglazecarrots


Advertisement
 
Leave a comment

Posted by on January 21, 2015 in Cooking, Dinner, Potatoes, Side Dishes, Vegetables


Tags: , , , , , , ,

Lamb it up with Alton Brown’s Shepherd’s Pie

So after I made the lamb the other night for dinner, we naturally had some leftover. Finding something to do with leftover lamb can seem a little daunting as it is not something that always reheats well without some help. I have found that the best solution for using leftover lamb is to grind it up and use it for shepherd’s pie. Cold, leftover lamb lends itself well to being ground up in the food processor or you could simply dice it up small and use it that way. In either case, it is very easy to make and makes a great one pot meal. I have tried a few different shepherd’s pie recipes over the years, but I came across this one from Alton Brown on the Food Network website that seemed very easy to make and would give you some great flavors.

Alton Brown’s Shepherd’s Pie

For the potatoes:
1 1/2 pounds russet potatoes
1/4 cup half-and-half
2 ounces butter
3/4 teaspoon kosher salt
1/4 teaspoon freshly ground black pepper
1 egg yolk
For the meat filling:
2 tablespoons canola or vegetable oil
1 cup chopped onion
2 carrots, peeled and diced small
2 cloves garlic, minced
1 1/2 pounds ground lamb
1 teaspoon kosher salt
1/2 teaspoon freshly ground black pepper
2 tablespoons all-purpose flour
2 teaspoons tomato paste
1 cup chicken broth
1 teaspoon Worcestershire sauce
2 teaspoons freshly chopped rosemary leaves
1 teaspoon freshly chopped thyme leaves
1/2 cup fresh or frozen corn kernels
1/2 cup fresh or frozen English peas

Peel the potatoes and cut them into a 1/2-inch dice. Place the potatoes in a medium saucepan and cover them with cold water. Set the saucepan over high heat, cover and bring it to a boil. Once boiling, uncover the pot, decrease the heat to maintain a simmer and cook until the potatoes are tender and easily crushed with tongs, approximately 10 to 15 minutes. Place the half-and-half and butter into a microwave-safe container and heat in the microwave until warmed through, about 35 seconds. Drain the potatoes in a colander and then return them to the saucepan. Mash the potatoes and then add the half and half, butter, salt and pepper and continue to mash the potatoes until they are smooth. Stir in the yolk until it is well combined.

Preheat the oven to 400 degrees F.

While the potatoes are cooking, prepare the filling. Place the canola or vegetable oil into a 12-inch saute pan and set it over medium high heat. Once the oil shimmers, add the onion and carrots and saute just until they begin to take on color, approximately 3 to 4 minutes. Add the garlic and stir to combine. Add the lamb, salt and pepper and cook until browned and cooked through, approximately 3 minutes. Sprinkle the meat with the flour and toss to coat, continuing to cook for another minute. Add the tomato paste, chicken broth, Worcestershire sauce, rosemary, thyme, and stir to combine. Bring the mixture to a boil, reduce the heat to low, cover the pan and simmer slowly for about 10 to 12 minutes or until the sauce is thickened slightly.

Add the corn and peas to the lamb mixture and spread the mixture evenly into an 11 by 7-inch baking dish. Top the lamb mixture with the mashed potatoes, starting around the edges to create a seal to prevent the mixture from bubbling up and smooth the top with a rubber spatula. Place the baking dish on a parchment lined half sheet pan on the middle rack of the oven and bake the pie for 25 minutes or just until the potatoes begin to brown. Remove the pie to a cooling rack for at least 15 minutes before serving.

This is a very simple and tasty way to make use of leftover lamb or to just use some ground lamb that you may have. You get a nice mix of vegetables, meat and sauce with a great mashed potato topping. if you don’t want to use lamb, you could always used ground beef, turkey or chicken, but for me to really call it shepherd’s pie you need the lamb and that particular lamb flavor that you get. All you need to do is  cut yourself a slice and enjoy your meal with a simple cleanup after dinner.

That’s all I have for today. Check back next time for another recipe. Until then, enjoy the rest of your day and enjoy your meal!

shepherdspie

 
5 Comments

Posted by on June 17, 2014 in Cooking, Dinner, Lamb, Leftovers, One Pot Meals, Potatoes


Tags: , , , , ,

While Shepherd’s Watch By Night, They Eat Shepherd’s Pie

I hope everyone had a wonderful Christmas yesterday. We had a great day filled with lots of love and laughs and plenty of good food, which I will be getting to over the next few days or so. It was a packed meal with lots of great recipes that I have to share. in the meantime, I do have a recipe to share that I made just before the holidays. I had some lamb that I had used to make a meal early in the week and decided to grind it up to make some shepherd’s pie, one of our favorite meals. I actually made this one right in my trusty cast-iron skillet to make things even easier. This recipe is from Cook’s Country and was very easy to make.

Shepherd’s Pie

Filling:

2 tablespoons butter

1 large onion, chopped fine

2 medium carrots, peeled and chopped fine

2 pounds ground beef or lamb

Salt and pepper

5 tablespoons all-purpose flour

1 tablespoon tomato paste

1/4 cup heavy cream

1 3/4 cups chicken broth

3/4 cup beer

2 tablespoons soy sauce

2 teaspoons minced fresh thyme leaves

1 cup frozen peas

Topping:

2 1/2 pounds russet potatoes, peeled and cut into 2-inch pieces

Table salt

2 tablespoons butter, melted

1/3 cup heavy cream, warmed

Ground black pepper

1 egg, beaten

For the filling, heat the butter in a large skillet over medium-high heat until it is foaming. Add the onion and the carrots and cook until they are soft, about 8 minutes. Add the meat, 1/2 teaspoon of salt and 1/2 teaspoon of pepper and cook, breaking up the meat into small pieces with a wooden spoon, until browned, about 12 minutes. Add the flour and the tomato paste and cook until the tomato paste begins to darken, about 1 minute.

Add the heavy cream and cook until it spatters, about 1 minute. Add the chicken broth, beer, soy sauce and thyme leaves and simmer over medium heat, stirring frequently, until the mixture is thick but still saucy, about 15 to 20 minutes. Remove the pan from the heat, stir in the frozen peas, adjust the seasonings to taste and transfer the mixture to a broiler safe 2-quart casserole dish.

For the topping, adjust an oven rack to the upper-middle position and heat the oven to 375 degrees. Bring the potatoes, 1/2 teaspoon of salt and water to cover the potatoes to a boil in a large saucepan over high heat. Reduce the heat to medium-low and simmer until the potatoes are tender, about 15 to 20 minutes. Drain the potatoes and return them to the saucepan and mash the potatoes with the butter and heavy ream until they are smooth. Season with salt and pepper to taste.

Spread the potatoes over the filling, using a spatula to smooth out the top. Brush the topping with the beaten egg and drag a fork across the top to make ridges. Bake until the filling is bubbling, about 15 minutes. Turn on the broiler and cook until the top is golden brown, about 3 to 5 minutes. Remove the pie from the oven and cool for 10 minutes before serving.

Just a couple of quick things about this recipe. If you prefer to use ground beef instead of lamb, it is easy to substitute. For the beer in this recipe, I used a basic lager (Samuel Adams in fact) but I think any mild beer would work well here or even a nonalcoholic beer if you prefer. The flour and cream mixed with the beer and soy sauce and tomato paste make for a nice, thick filling with great flavor. The topping is really just a basic mashed potatoes recipe, so if you have any leftover mashed potatoes you could also use them instead. In the past, I have also made a layer of mashed turnip or rutabaga to really add another layer of flavor. This one is a favorite around our house and I make this a few times a year.

That’s all I have for today. Check back next time for another great recipe. I have quite a backlog of recipes to share now, so there are some great things ahead, including a roast lamb, roasted prime rib roast with vegetables and chimichurri sauce, melted potatoes, green bean casserole,French onion soup,, Swedish meatballs, homemade pizza rolls,baked beans,skillet pizza and more. I also got some new kitchen toys for Christmas to add to my arsenal and some new plans for the blog for the coming year, so keep checking back to see what is next. Until next time, enjoy the rest of your day and enjoy your meal!

004

 
1 Comment

Posted by on December 26, 2013 in Beef, Cooking, Dinner, Lamb, One Pot Meals


Tags: , , , ,

Time to Strip (Steak) in the Kitchen (and Some Mushroom Gravy too)

Michelle had picked up a couple of nice looking New York strip steaks the other day and today seemed like a good day to make them.There’s nothing really fancy about them or cooking them either. You can easily pan fry them or just put them under the broiler, which is what I usually do. The other thing about steak is you want to make sure you let it rest before you slice it so all the juices stay in the steak and not run out all over the plate, leaving you with dry meat. I had bought the mushrooms a few days ago and I have been looking for an excuse to make some mushroom gravy, and this was it. Mushroom gravy is great with meat loaf or Salisbury steak, but I think it can work well with other steak or just to have with some mashed potatoes.

New York Strip Steaks with Mushroom Gravy

2 New York strip steaks, about 10 ounces each

Salt and freshly ground pepper

1 tablespoon butter

10 ounces white mushrooms, trimmed and sliced

1 shallot, minced

3/4 teaspoon minced fresh thyme

1/4 cup all-purpose flour

1/2 teaspoon Worcestershire sauce

2 1/2 cups beef broth

Take the steaks out of the refrigerator and sit, covered, on the counter for 30 minutes to 1 hour to allow them to come to room temperature. Preheat the broiler and position a rack about 4-5 inches from the element. Season the steaks liberally with salt and pepper. Place the steaks on an aluminum foil-covered broiler pan and place the steaks under the broiler. Heat for four minutes and then flip and heat for another four minutes. Remove the steaks from the oven to a serving dish and loosely tent with aluminum foil and allow to rest for about 10 minutes.

Meanwhile, heat the butter in a medium skillet and add the mushrooms and shallot. Saute until the mushrooms and shallot are soft and the mushrooms are a deep brown, about 6 minutes. Stir in the thyme and cook until fragrant, about 30 seconds. Add the flour and cook, stirring frequently, until golden, about 2 minutes. Slowly whisk in the broth and the Worcestershire sauce and bring to a boil. Reduce the heat to medium and simmer, whisking until thickened, about 10 minutes. Season with salt and pepper to taste. Serve on the side with the steaks.

If you want a creamier sauce, you could add a 1/2 cup of heavy cream in the last-minute of the cooking of the gravy to give you the creaminess you want. Of course I served it with mashed potatoes and some broccoli, but creamed spinach would be great with this as well to make it a classic steak dinner.

That’s it for tonight. We won’t be home for dinners the next few nights but I’ll be back on Monday with a new recipe and I have some plans for a few things next week, so check back and see what I come up with. Until then, enjoy the rest of your evening and enjoy your meal!


Leave a comment

Posted by on October 18, 2012 in Beef, Cooking, Dinner, Gravy


Tags: , , , ,

Let the Week of Chicken Begin!!

As I said in yesterday’s post, I have an awful lot of chicken in the freezer and have decided to just cook out of the freezer this week. Tonight I started off with the bone-in chicken breasts. As usual, I wanted an easy recipe, not a lot of ingredients and a reasonable cooking time. As usual, America’s Test Kitchen did not disappoint by supplying this recipe for Pan-Roasted Chicken Breasts with Sage-Vermouth Sauce. it doesn’t take long, gives you moist, juicy chicken and a very flavorful sauce for the chicken. This recipe calls for brining the chicken breasts for 30 minutes before cooking, but if you don’t have the time for that, you can go right to the roasting and it will also turn out well.

Pan-Roasted Chicken Breasts with Sage-Vermouth Sauce

1/2 cup table salt

2 (1 1/2 pound) whole bone-in, skin-on chicken breasts, split in half along the breast bone and trimmed of rib sections

Ground black pepper

1 teaspoon vegetable oil

1 large shallot, minced

3/4 cup chicken broth

1/2 cup dry vermouth

4 medium fresh sage leaves, each leaf torn in half

3 tablespoons butter, cut into 3 pieces

Salt and pepper

Dissolve the salt in 2 quarts of cold water in a large container; submerge the chicken in the brine, cover and refrigerate about 30 minutes. Rinse the chicken well and pat dry with paper towels. Season the chicken with pepper.

Adjust an oven rack to the lowest position and heat the oven to 450 degrees. heat the oil in a large ovenproof skillet (I used my large cast iron pan) over medium-high heat until the oil begins to smoke. Brown the chicken, skin side down, until deep golden, about 5 minutes; turn the chicken and brown until golden on the second side, about 3 minutes longer. Turn the chicken skin side down and place the skillet in the oven. Roast until the thickest part of the breast registers 160 to 165 degrees on an instant-read thermometer, 15 to 20 minutes. Transfer the chicken to a platter and let it rest while making the sauce. (If you’re not making the sauce, let the chicken rest for 5 minutes before serving it)

Using a potholder to protect your hands from the hot skillet handle, pour off all but 1 teaspoon of the fat from the skillet; add the shallot, then set the skillet over medium-high heat and cook, stirring frequently, until the shallot is softened, about 1 1/2 minutes. add the chicken broth, vermouth and sage, increase the heat to high and simmer rapidly, scraping the skillet bottom with a wooden spoon to loosen the browned bits, until slightly thickened and reduced to about 3/4 cup, about 5 minutes. Pour the accumulated chicken juices into the skillet, reduce the heat to medium and whisk in the butter 1 piece at a time; season with salt and pepper to taste and discard the sage. Spoon the sauce around the chicken breasts and serve immediately.

I served this with some mashed potatoes and broccoli, but you could easily use rice or noodles instead to go with the chicken. The sauce comes out great and has a wonderful flavor thanks to the sage and the vermouth.

That’s tonight’s meal, quick and easy. Tomorrow I have a choice between chicken legs and boneless chicken, but I haven’t decided which way I want to go with it yet. It will be a mystery until you check back tomorrow! Until then, enjoy your evening and enjoy your meal!

 
Leave a comment

Posted by on June 25, 2012 in Cooking, Dinner, Poultry


Tags: , , ,

Face to (Open) Face With Leftovers

So I have some leftover turkey from a few nights ago and some leftover roast beef from the other night, so what to do with them? Well we decided a good option would be to make open-faced sandwiches for dinner tonight. We can use the turkey, use the roast beef, use the gravy, the stuffing and the mashed potatoes and get rid of all the leftovers in the fridge. There’s not much to these recipes so they are pretty easy to follow, but I think you could pretty much wing them if you wanted to.

Open-Faced Roast Beef Sandwiches

2 tablespoons butter

1/2 medium onion, sliced

3 tablespoons all-purpose flour

2 1/2 cups leftover au jus

2 teaspoons Worcestershire sauce

4 slices bread (your choice as to what you like best)

3 tablespoons Dijon mustard (optional)

1 tablespoon prepared horseradish (optional)

Leftover roast beef, sliced thin

Salt and pepper

Melt the 2 tablespoons of butter in a skillet over high heat. Add the onion and cook until soft, about 4 minutes. Stir in the flour and cook until slightly brown. Gradually whisk in the au jus until smooth. Whisk in the Worcestershire sauce and simmer until thick, about 3 minutes.

Toast the bread under the broiler, about 1 minute. Spread the mustard and horseradish, if using, on the toasts; place each on a plate. Pour some gravy over the toast; top with the roast beef and then more gravy. Season with salt and pepper. Serve the sandwiches with the leftover mashed potatoes.

Some people like to melt some cheese over their sandwich; it’s not my thing, but hey, if you like it, go for it. put the cheese on top and place the sandwich under the broiler for a minute, and you’re all set.The open-faced turkey sandwiches are just as easy:

Open-Faced Turkey Sandwiches

Leftover turkey meat, sliced

Leftover turkey gravy (if you don’t have any, you can make this quick gravy recipe)

Leftover stuffing (I have some leftover Stove Top I’ll be using; you can always make Stove Top quickly, or use your own recipe for stuffing if you have one. I haven’t posted one, but I will soon 🙂 )

Slices of bread (again, use what you like)

Salt and pepper

Heat the gravy in a large skillet until bubbly (if the gravy is too thick for your liking, you can thin it out with some stock or water). Add pieces of sliced turkey to the gravy and heat through, about 1 minute. Re-heat the leftover stuffing in either a small saucepan or the microwave (I did it in the microwave for 1 minute). Toast the bread under the broiler, about 1 minute. Remove the toast from the oven, place on a plate, and cover the toast with gravy. Place some turkey slices on top of the gravy. Scoop some stuffing on top of the turkey slices; cover on top with some more gravy. Season with salt and pepper to taste.

With the sandwiches and the leftover mashed potatoes, you’re just about all set. If you have any leftover veggies (and we do, so I am using them) add them to the meal, or make some fresh veggies as a side dish, or make a small salad and you are all set. You’ll have used up the leftovers for the week, which is a beautiful thing.

I’m not sure what I am making for dinner tomorrow. I am heading over to Adams Farms in Newburgh to shop tomorrow, and to pick up a $50.00 gift card I won from them (it pays to follow places on Facebook and Twitter!), so I hope to find something there to make for dinner tomorrow night in the seafood department. Tune in tomorrow to see what I was able to get. Until then, enjoy your evening and enjoy your meal!


1 Comment

Posted by on April 19, 2012 in Beef, Cooking, Dinner, Gravy, Leftovers, Potatoes, Poultry, Sandwiches, Turkey


Tags: , , , , , , ,

A Nice Hot Day Seems Like a Good One For… Turkey??

I had actually planned to make a roast beef dinner tonight, but decided I wanted to slow roast it so it is covered in salt right now in the fridge for tomorrow’s dinner. So that left me to change things around again, which is kind of business as usual in this house anyway. I had bought a bone-in turkey breast at the store this weekend and hasn’t decided whether to freeze it or not, but it seemed like a good night to make it. It was a really good deal for a 3 pound turkey breast for under $3.00, and we’ll get several meals out of it. So tonight was Roasted Turkey Breast with Sage and Cayenne, Pan Roasted Asparagus and Mashed Potatoes.

Roasted Turkey Breast with Sage and Cayenne

1 6 pound bone-in turkey breast (I only had a 3 pound, so I cut the recipe in half)

1 tablespoon salt

1 tablespoon dried rubbed sage

1 teaspoon cayenne pepper

1 teaspoon ground cumin

1 teaspoon Hungarian sweet paprika

Place the turkey breast, skin side up, on a rack set inside a rimmed baking sheet or roasting pan. Combine the salt, sage, cayenne, cumin, and paprika in a small bowl. Rub the spice mix all over the turkey skin and let the turkey stand at room temperature for 1 hour.

Arrange a rack in the center of the oven and pre-heat the oven to 500 degrees. Roast the turkey for 25 minutes. Reduce the heat to 375 degrees and continue roasting until an instant-read thermometer inserted into the thickest part of the breast registers 155-160 degrees, about 50 minutes longer. transfer the pan to a wire rack and let the turkey rest for at least 20 minutes before carving.

A 90 degree day may not have been the best day to do this, but it came out really well and the crispy skin tasted great. I had also bought some asparagus this weekend (also on sale) so I decided to make that tonight as well, using a pan roasting method that I had seen in Cook’s Illustrated. Use thicker asparagus for this recipe as I think thinner spears may tend to burn or overcook.

Pan Roasted Asparagus with Toasted Garlic and Parmesan

1 tablespoon olive oil

2 medium garlic cloves, sliced thin

1 tablespoon butter

1 pound thick asparagus spears, ends trimmed

Salt and black pepper

1 tablespoon grated Parmesan cheese

1/2 lemon (optional)

Heat the olive oil and sliced garlic in a large skillet over medium heat; cook, stirring occasionally, until the garlic is crisp and golden but not dark brown, about 5 minutes. Using a slotted spoon, transfer the garlic to a paper towel-lined plate.

Add the butter to the oil in the skillet. When the butter has melted, add half the asparagus to the skillet with the tips pointed in one direction; add the remaining spears with the tips pointed in the opposite direction. Using tongs, distribute the spears in an even layer (the spears will not quite fit into a single layer); cover and cook until the asparagus is bright green and still crisp, about 5 minutes.

Uncover the pan and increase the heat to high; season the asparagus with salt and pepper. Cook until the spears are tender and well browned along one side, about 5 to 7 minutes, using tongs occasionally to move the spears from the center of the pan to the edge of the pan to ensure all the spears are browned. Transfer the asparagus to a serving dish, sprinkle with grated Parmesan and toasted garlic slices, adjust the seasonings with salt and pepper, and, if desired, squeeze the lemon over the spears. Serve immediately.

I think they turned out great. I added some mashed potatoes to the meal, which I have made many times before and posted the recipe on here, and Michelle loves stuffing and I didn’t have time to make my own, so bless the fine people at Stove Top for their contribution to the meal.

Tomorrow I am really making the roast beef (I am committed now since it is in the salt), so I will be posting that recipe tomorrow. Until then, enjoy your evening (hopefully it’s not as warm where you are) and enjoy your meal!

 
6 Comments

Posted by on April 16, 2012 in Cooking, Dinner, Potatoes, Poultry, Vegetables


Tags: , , ,

Back to the Kitchen For Some Fried Chicken

Hectic schedules, homework, late work days, you name it and it has a way of interfering with life in general, including cooking dinner. We ended up having leftovers the last 2 nights because of crazy schedules, doctor’s appointments and everyday life, but today I am going to get back in the kitchen and I am going to make some fried chicken.

I don’t make fried chicken too often, and when I do I usually oven fry it to cut down on the mess and all the oil needed, but tonight I think I am going to really fry it. I could use the deep fryer, but I am going to do it on the stove this time, and I am going to try a different recipe tonight, one I got from America’s Test Kitchen.

Fried Chicken

1 quart buttermilk

3 tablespoons salt

4 pounds bone in chicken pieces (halved split breasts, thighs, and/or drumsticks)

5 cups all-purpose flour

4 teaspoons baking powder

1 1/2 teaspoons dried thyme

1 teaspoon pepper

1/2 teaspoon garlic powder

5 to 6 cups vegetable oil

Whisk 3 1/4 cups of the buttermilk and the salt together in a large bowl until the salt dissolves. Add the chicken and coat thoroughly. Cover the bowl with plastic wrap and refrigerate for 1 hour (Don’t let the chicken soak much longer or it will become too salty).

Whisk the flour, baking powder, thyme, pepper, and garlic powder together in a large bowl. Add the remaining 3/4 cup of buttermilk and rub it into the flour until the mixture resembles coarse wet sand. Remove the chicken from the buttermilk soak and then coat thoroughly with the flour mixture and lay it on a wire rack set over a baking sheet while the oil heats.

Adjust an oven rack to the middle position and heat the oven to 200 degrees. Pour 1 inch of the oil into a large Dutch oven and heat over medium-high heat to 375 degrees. Add half of the chicken, skin-side down. Cover and cook until deep golden brown on the first side, about 10 minutes (After the first 4 minutes, re-arrange the pieces if some are browning faster than others).

Turn the chicken pieces over. Continue to fry, uncovered and maintaining an oil temperature of 315 degrees, until the chicken pieces are a deep golden on the second side, about 7 minutes longer. Transfer the chicken to a paper towel-lined plate to drain for 5 minutes, then lay on a wire rack set over a baking sheet and keep warm in the oven. Add additional oil to the pot as needed to maintain a depth of 1 inch and return it to 375 degrees before frying the remaining chicken.

With the fried chicken, I am going to serve mashed potatoes and gravy. I have made mashed potatoes many times in the meal plan, and if you would like to see the method I use for the potatoes, you can check an earlier blog posting here. You definitely need to have some gravy with this one as well. I have posted a quick chicken gravy recipe before, but since I don’t have any pan drippings to use, I am going to use the all purpose gravy recipe that I have used in the past.

All Purpose Gravy

3 tablespoons butter

1 carrot, peeled and chopped fine

1 rib celery, chopped fine

1 onion, minced

1/4 cup all-purpose flour

2 cups chicken broth 

2 cups beef broth

1 bay leaf

1 teaspoon minced fresh thyme, or 1/4 teaspoon dried

5 whole black peppercorns

Salt and pepper

Melt the butter in a large saucepan over medium-high heat. Add the vegetables and cook until softened and well browned, about 9 minutes. Stir in the flour and cook, stirring constantly, until thoroughly browned, about 5 minutes. Gradually whisk in the broths and bring to a boil. Add the bay leaf, thyme, and peppercorns and simmer, stirring occasionally, until thickened, about 20-25 minutes, skimming off any foam that forms on the surface.

Pour the gravy through a fine-mesh strainer (or gravy separator) into a clean saucepan, pressing on the solids to extract as much liquid as possible. Discard the solids. Season the gravy with salt and pepper to taste.

I’ll be serving all this with some simple steamed green beans. It’s just a pound of green beans (stem ends trimmed) in a steaming rack in a large pot of boiling water just touching the rack. I cover and steam the green beans for 6 to 8 minutes, or until the beans are crisp-tender.

If there are any leftovers, there’s nothing like some cold fried chicken with some potato salad for a nice lunch or dinner the next day. Tomorrow is Friday, which means we’ll be having fish. I picked up some tilapia this morning so we’ll be having a nice simple baked tilapia with some brown rice and asparagus tomorrow.   Check out the blog tomorrow so you can see how it goes. Until then, enjoy your day and enjoy your meal!


1 Comment

Posted by on March 22, 2012 in Cooking, Dinner, Gravy, Potatoes, Poultry, Vegetables


Tags: , , , , ,

Slow Cooking Short Ribs

Tonight’s dinner is all about short ribs. Short ribs are all about the meat and the sauce, and this recipe gives a great deep flavor for both and most of the work is done in the slow cooker.

Red Wine-Braised Short Ribs

5 pounds bone-in shirt ribs, meat and bones separated

Salt and pepper

 2 tablespoons vegetable oil

2 onions,chopped medium

1 carrot, peeled and chopped medium

1 celery rib, chopped medium

2 tablespoons tomato paste

1 tablespoon minced fresh thyme, or 1 teaspoon dried

3 tablespoons all-purpose flour

2 cups dry red wine

2 tablespoons balsamic vinegar

2 cups chicken broth

2 bay leaves

2 tablespoons minced fresh parsley

Separate the meat from the bones by inserting a knife between the rib and meat, staying as close to the bone as possible. Saw the meat off the bone and set aside. Arrange the beef bones in a dish and microwave (in batches, if your microwave is small) until well browned, 10 to 15 minutes; transfer the bones to the slow cooker.

Dry the short ribs meat with paper towels and season with salt and pepper. Heat 1 tablespoon of oil in a large skillet over medium-high heat until just smoking. Brown half of the short ribs well on all sides, 7 to minutes; transfer the meat to the slow cooker. Repeat with the remaining tablespoon of oil and the remaining short ribs; when done, transfer them to the slow cooker.

Add the onions, carrot, celery, tomato paste and thyme to the fat in the skillet and cook over medium-high heat until the onions are softened and lightly browned, about 8 to 10 minutes. Stir in the flour and cook for 1 minute. Slowly whisk in the wine and the vinegar, scraping up any browned bits and smoothing out any lumps. Bring to a simmer and cook until reduced to 1 cup, about 5 minutes; transfer to the slow cooker.

Stir the broth and the bay leaves into the slow cooker. Cover and cook until the beef is tender, 9 to 11 hours on low or 5 to 7 hours on high. Transfer the short ribs to a serving platter and tent loosely with aluminum foil. Let the braising liquid settle for 5 minutes, then remove the fat from the surface using a large spoon. Strain the braising liquid, discarding the solids, and season with salt and pepper to taste. Stir in the parsley. Spoon 1 cup of sauce over the short ribs and serve with the remaining sauce on the side.

Microwaving the bones before cooking may seem a little odd, but it actually does two things for you: first, it renders out a lot of unwanted fat (short ribs can be very greasy) and second, it gives the bones a roasted flavor which in turn deepens the sauce during the long cooking time. It’s a little work at first with the microwave and the skillet, but I think you’ll be happy with the results if you put the work into it.

I am serving the short ribs with mashed potatoes. Mashed potatoes go perfectly with this meal and  placing a couple of the ribs with the sauce directly over the mashed potatoes is delicious. I have posted my recipe for mashed potatoes before, so if you would like to check it out, feel free to click here to get it. I am also keeping the vegetable simple with just some steamed broccoli to round out the meal.

That’s all there is to this dinner. Mondays seem to cry out for a nice, slow cooker meal. So many of us are ready to crash by the time the day ends on Monday, so it would be nice to come home to meal that is just about done. You can even peel the potatoes ahead of time and just leave them in a pot of water on the stove so you can just turn it on and go when you get home.

Tomorrow night’s meal is a simple Spaghetti and Meatballs, which I have made before. I may do a slight variation on it this time, so check back and see how the recipe looks. I’ll also be writing about a couple of items I am looking to purchase to make cooking a little easier and fun, so check back and see those as well. If you have any questions, comments, suggestions or recipes you may be looking for, please feel free to leave a comment and I’ll get back to you. I hope everyone is enjoying the warm weather today. Spring is right around the corner, and I’ll be cleaning up the grill soon so we can start using that for cooking too! Enjoy your day and enjoy your meal!

 
4 Comments

Posted by on March 12, 2012 in Beef, Cooking, Dinner, Potatoes, Slow Cooker Meals


Tags: , , , , ,

Lamb, Redux

Okay, so I have leftover lamb from dinner yesterday, leftover turnips and some mashed potatoes from a few days ago. This all adds up perfectly to make a Shepherd’s Pie. It will be quick, easy and a great way to use up the leftovers. You can make shepherd’s pie with ground beef instead of ground lamb if that suits your tastes better, but since I have the lamb anyway, and that is the traditional ingredient, than why not?

Shepherd’s Pie

3 cups lamb, cooked and diced

1 tablespoon butter

1 small yellow onion, finely chopped

2 carrots, finely chopped

3/4 cup frozen peas, thawed

1 cup beef broth

1 tablespoon chopped fresh thyme

2 cups  cooked and cooled mashed potatoes

2 cups cooked, pureed and cooled turnips

Take the 3 cups of lamb and run through a food processor until ground. Set aside. In a large saucepan or skillet over medium heat, melt the butter. Add the onions and carrots and cook, stirring often, until softened, about 5 minutes. Stir in the peas, ground lamb, broth and thyme and bring to a simmer. Cook, stirring occasionally, until heated through, about 7 to 10 minutes.

Preheat the oven to 400 degrees. Spoon the hot lamb mixture into a baking dish. Spread the turnips over the top of the mixture evenly, then spread the mashed potatoes evenly over the top of the turnips. Place the dish in the oven and cook until the potatoes start to brown and the edges of the pie begin to show some bubbles, about 7 minutes. Serve directly from the baking dish.

You can serve the pie with some nice, crusty bread, which I’ll  be doing since I forgot to serve the bread last night with dinner and have not heard the end of it from Michelle and Sean :). A quick meal, easy clean up and a good use of what is left over from previous meals.

Tomorrow’s meal will be from scratch and it’s going to be a good one. I’ll be making Chicken Marsala in the slow cooker tomorrow with some rice on the side. It’s the first time I’ll be making it in the slow cooker, so it will be interesting to see how it turns out. If you have any questions, comments or any input at all, feel free to leave a comment or message here. I hope everyone had a nice, long weekend and enjoy your meal tonight!

 
Leave a comment

Posted by on February 20, 2012 in Cooking, Dinner, Potatoes


Tags: , , , , , , , ,

 
National Day Calendar

Fun, unusual and forgotten designations on our calendar.

Authentic Autograph Source, LLC

Licensed autographs and collectibles dealer in the Pacific NW! We have a wide range of sports, celebrities, and more!

Jennifer Probst

a little bit naughty a little bit nice

Laissez Faire

Letting Life Lead

%d bloggers like this: