RSS

Tag Archives: fried chicken

A Fitting Feast Anytime – Make Ahead Fried Chicken

Fried chicken is one of those things people love to eat but hate to make. Granted it is not the healthiest way to eat chicken but to me it has to be one of the tastiest. I may not make it very often because of all the oil it uses the big cleanup that typical follows making fried chicken, but if you can make the time to make a big batch of it (provided the weather is cool enough in your kitchen in the summer to do it), it can be great to have for outdoor parties, picnics or as your favorite meal. Fried chicken is one of those things that tastes great anytime you want it, whether it is for dinner that night, cold for lunch the next day, re-heated or even as a late night snack. I have tried a bunch of fried chicken recipes in the past but recently i have found myself returning to this one from Melissa Clark at New York Times Cooking for make ahead fried chicken. It seems to strike the perfect balance of spices, good coating and great taste.

Make Ahead Fried Chicken

FOR THE MARINADE:

1 quart buttermilk

2 torn bay leaves

2 thinly sliced shallots

2 garlic cloves, minced

2 tablespoons hot sauce

1 tablespoon Old Bay Seasoning

1 teaspoon dry mustard powder

2 tablespoons kosher salt

2 teaspoons cracked black pepper

1 tablespoon honey

12 drumsticks or a mix of chicken pieces, about 2½ to 3 pounds of chicken

FOR THE COATING:

4 cups all-purpose flour

1 teaspoon cayenne

2 teaspoons kosher salt

1 teaspoon good chile power such as chipotle powder

Corn, grapeseed or vegetable oil, for frying

Make the marinade: Whisk together all the marinade ingredients, except the chicken, and place the marinade in a large bowl or plastic bag. Submerge the chicken in the marinade, cover the bowl or seal the bag, and let the chicken rest in the refrigerator for at least 4 hours or, better, overnight.

Make the coating: In a bowl, whisk together the flour, cayenne pepper, salt and chile powder. Place a paper bag inside another paper bag (this is to prevent seepage, use large bags or several small ones) and transfer the flour mixture into it. This is so you can shake the chicken pieces. (You can also just mix the flour in a large bowl and dredge the chicken parts in it, or use a heavy-duty plastic zipper bag for shaking.)

Take a piece of chicken out of the marinade and place it in the bag with the flour mixture. Close the bag and shake it so the chicken is fully coated. (Or, if you are using a bowl, dredge the chicken in the flour mixture.) Remove the chicken piece and place it on a plate or sheet pan. Repeat the process with the remaining chicken pieces, one by one. Let the chicken rest for 30 minutes so it can come to room temperature. Reserve the coating mixture.

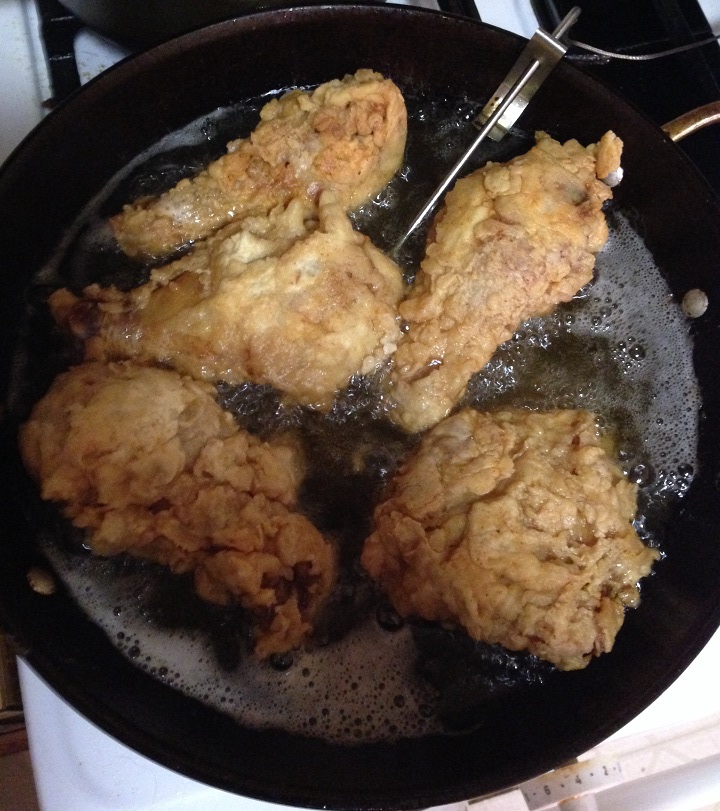
In a large Dutch oven or heavy cast iron skillet with a lid, heat the oil until it reaches 350 degrees on an instant-read thermometer or candy thermometer. Just before frying, shake the chicken pieces in the coating mixture once again, one by one.

Fry the chicken for about 6 to 8 minutes in a covered pan, then uncover the pot and flip the chicken with tongs. Continue frying the chicken for about another 6 to 8 minutes, or until the coating is dark golden brown and the juices run clear when the meat is pricked with a fork.

Place chicken on a wire rack set over a paper-towel-lined baking sheet to drain and cool. Serve the chicken within  8 hours, but it’s best to serve within 4 hours.

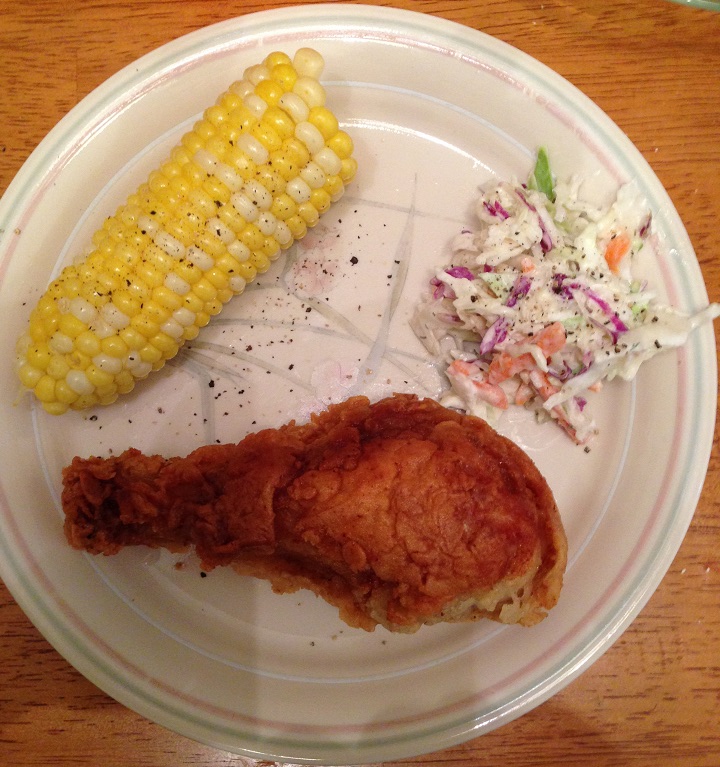
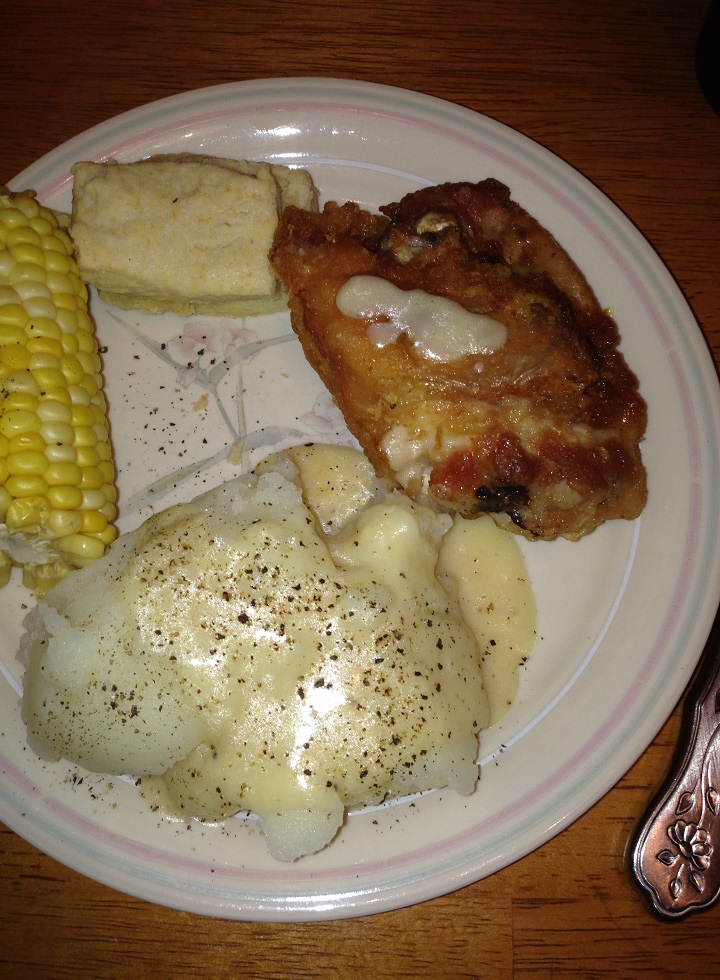
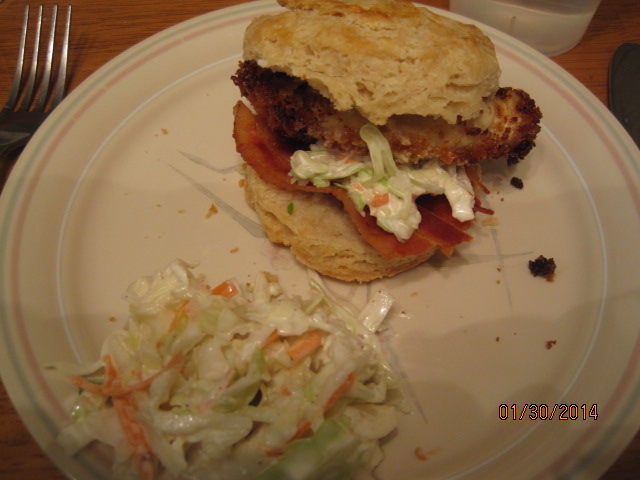
The recipe indicates that you could leave the chicken at room temperature for 4 hours, and while you probably could I personally don’t feel right about and refrigerate it. I like cold fried chicken anyway so it’s fine with me and you don’t have to worry about any potential bacteria from leaving the food out too long. I made a mix of chicken pieces – wings, legs, thighs and breasts I had cut in half – and found that the timing worked out well, though I did make the chicken in batches and kept the finished pieces on the rack in a sheet pan in a warm 250 degree oven so that they kept warm. I also checked the temperature of the chicken along the way with my instant-read thermometer to make sure the pieces were at 165 degrees just to be safe. Keep a close eye on your oil and the temperature as you go along if you cook in batches to make sure it stays at the right temp so you can get an even crust on the chicken. The chicken was very flavorful and juicy thanks to the marinade and the double coating you put on the chicken really helps to give it a nice crunch. For the marinade I actually do not always use the Old Bay as Michelle finds it a bit overpowering, so I do occasionally leave it out and the chicken still tastes great. I still use other fried chicken recipes, but this is one that always seem to fall back on as a good go to recipe everyone likes. It tastes just as good the next day for lunch as it does the day you cook it.

That’s all I have for today. Check back next time for another recipe. Until then, enjoy the rest of your day and enjoy your meal!

IMG_0295

Advertisement
 
3 Comments

Posted by on August 18, 2016 in Dinner, Leftovers, Lunch, Picnic Fare, Poultry


Tags: , , , , , ,

Kicking Cook’s Country Cracker-Crusted Fried Chicken

Fried chicken is an awesome thing when it is done right. Sure it can be messy and take some time to get done with brining and making the coating and deep-frying, but in the end, if it is all done right, you end up with a great crunchy coating and juicy chicken pieces to make the meal perfect. I have tried a bunch of different fried  chicken recipes in the past and I am always up for a new one to try out to get the perfect coating. I have had some where the coating is disappointing and without crunch but when I saw this recipe in the latest issue of Cook’s Country for a cracker-crusted fried chicken the picture along made it worth giving a shot to. I had four pieces of bone-in chicken thighs and nothing to do with them and then Sean saw this picture in the magazine and said “let’s have this tonight.” The ingredient list is pretty basic and we had everything on hand, so we gave it a try.

Cracker-Crusted Fried Chicken

Salt and pepper

2 tablespoons Worcestershire sauce

2 tablespoons soy sauce

2 teaspoons cayenne pepper

2 teaspoons granulated garlic

3 pounds bone-in chicken pieces (split breasts cut in half crosswise, drumsticks, thighs and/or wings)

36 square saltines (1 sleeve)

1/2 cup all-purpose flour

1/2 cup cornstarch

1 teaspoon baking powder

3 quarts peanut or vegetable oil

Whisk 1 1/2 quarts of cold water, 2 tablespoons of salt, Worcestershire sauce, soy sauce, cayenne pepper and granulated garlic together in a large container until the salt dissolves. Add the chicken pieces, cover the container and refrigerate the chicken for at least 1 hour or up to 4 hours.

Place the saltines in a gallon zipper-lock bag, seal the bag and crush the crackers to medium-fine crumbs with a rolling pin or mallet. you should have about 1 cup of cracker crumbs. Transfer the crumbs to a large bowl and whisk in the flour, cornstarch, baking powder, 2 teaspoons of pepper and 1/2 teaspoon of salt until the ingredients are well combined.

Set a wire rack in a rimmed baking sheet. Set a second wire rack in a second rimmed baking sheet and line half of the rack with a triple layer of paper towels. Working with 1 piece at a time, remove the chicken from the brine mixture and transfer it to the saltines mixture, pressing the chicken firmly so the coating adheres well to the chicken. Transfer the coated chicken to the prepared rack without the paper towels and repeat the process with the remaining chicken. Refrigerate the coated chicken pieces for at least 30 minutes or up to 2 hours.

Add the peanut or vegetable oil to a large Dutch oven until it measures about 2 inches deep and heat the oil over medium-high heat to 350 degrees. Add half of the chicken to the hot oil and fry the chicken until the breasts register 160 degrees and the drumsticks, thighs or wings register 175 degrees on an instant-read thermometer, about 13 to 16 minutes total. Adjust the burner, if necessary, to maintain the oil temperature between 300 and 325 degrees. transfer the cooked chicken to the paper towel-lined side of the second wire rack to drain on each side for 30 seconds, then move the pieces to the unlined side of the rack. Return the oil to 350 degrees and repeat the process with the remaining chicken pieces.

I did adjust the recipe down a bit since I was only making 4 pieces of chicken, so I cut the recipe by about 1/3 and it seemed to work out pretty well for me with the size chicken thighs I had. The coating was great with a nice crunch to it and it was perfect in color and texture. the chicken remained moist as well and it was well seasoned thank to brining the pieces ahead of time. Refrigerating the pieces with the coating did help to settle the coating on the pieces as well. I really liked the additions to the brine of the soy sauce, Worcestershire and cayenne as it imparted some great flavor on the chicken. Everything came out nicely with the chicken and of course this would be great for leftovers for lunch the next day, but Sean liked it enough so we had none leftover to save.

That’s all I have for today. Check back next time for another recipe. Until then,enjoy the rest of your day and enjoy your meal!

crackercrustedfriedchicken


Leave a comment

Posted by on March 30, 2015 in Cooking, Dinner, Poultry


Tags: , , , , , ,

Trying a Family Favorite Again – Fried Chicken Biscuit Sandwiches

If it were up to me, I could pretty much eat sandwiches all of the time and probably every day. They’re great for breakfast, lunch or dinner and very often we will have different variations of sandwiches for dinner during the week to make things a little bit easier to fit into our crazy schedules. Chicken sandwiches are always a personal favorite and there are a lot of different things you can do with them. Sean really liked the fried chicken sandwiches I have made in the past and I have done them on biscuits before, but when I came across this particular recipe at Chow.com, it seemed like a really easy one to do and it made use of the boneless chicken thighs that I already had on hand. The recipe makes both the biscuits and the chicken and both are really simple to do so that you can have in easy meal just about any night of the week.


Fried Chicken Biscuit Sandwiches

For the biscuits:

2 cups all-purpose flour, plus more for dusting

2 teaspoons baking powder

1/2 teaspoon baking soda

1 teaspoon kosher salt

1/2 cup cold butter (1 stick), cut into 12 pieces

1 cup cold buttermilk

For the fried chicken:

6 boneless, skinless chicken thighs

Kosher salt

1 cup all-purpose flour

2 teaspoons sweet paprika

1/4 teaspoon cayenne pepper (optional)

1/4 teaspoon dried thyme

1 cup buttermilk

Vegetable oil or canola oil

To serve:

Sliced dill pickles

Hot sauce

Honey (optional)

For the biscuits, preheat the oven to 425° and arrange a rack in the middle of the oven. Line a large rimmed baking sheet with parchment paper. In a food processor, add the flour, baking powder, baking soda, and salt. Pulse to combine the mixture. Scatter the butter pieces over the top of the flour mixture and pulse until the butter is pea-sized. Add the buttermilk and pulse the mixture just until a moist, shaggy dough comes together.


Alternatively, in a mixing bowl, the whisk together the flour, baking powder, baking soda, and salt. Scatter the butter pieces over the top of the flour mixture and toss to coat them in the flour mixture. Using a pastry blender, and working quickly, cut the butter into the dry ingredients until it is pea-sized. Drizzle in the buttermilk and stir the mixture just until he moist, shaggy dough comes together.


Dust a work surface with flour. Scrape the dough onto the surface and dust the top with more flour. With floured hands, pat the dough into a circle 1-inch thick. Using a 3 1/2-inch round (or fluted) cutter dipped in flour, cut out as many biscuits as possible. Press straight down through the dough — do not twist the cutter, or the biscuits will not rise properly.


Transfer the biscuits to the prepared baking sheet, spacing them at least 1-inch apart. Gather the scraps into a ball, pat it into a 1-inch-thick circle, and cut out more biscuits. Repeat as needed until you have 6 biscuits in total. Bake until the biscuits are golden brown, about 15 minutes. Set the biscuits aside to cool on a wire rack.


For the fried chicken, arrange the chicken in a shallow baking dish and sprinkle it all over with salt; set the chicken aside at room temperature. In a shallow bowl, stir together the flour, paprika, cayenne pepper (if using), and thyme. Pour the buttermilk over the chicken and toss the chicken to coat it well. Add the vegetable or canola oil to a large, straight-sided cast-iron skillet or frying pan. The oil should be 1 1/2 to 2 inches deep, reaching slightly less than halfway up the sides of the pan. Warm the oil over medium heat until it reaches 340° on a candy thermometer. When the oil is ready, lift a piece of chicken from the buttermilk, letting the excess drip off, then dip the chicken into the flour mixture, coating it completely. Shake off any of the excess flour. Fry the chicken until it is cooked through and golden brown, turning the pieces halfway through the cooking process, about 6 to 8 minutes in total. The interior of the chicken should register 155° on an instant-read thermometer when you remove the chicken from the oil; the temperature will rise to 165° as the chicken rests. Drain the chicken on a paper towel-lined plate.


To serve, split the biscuits and place a piece of the fried chicken on the bottom half of each biscuit. Add dill pickles, hot sauce, and the optional honey, or any other condiments you may like, cover the chicken with the biscuit top, and serve.


There is nothing quite like having a piece of fried chicken, and having it on a flaky, moist buttermilk biscuit just seems to make it even better. I always add pickles to my chicken biscuits and they go really well with coleslaw either on the side or right on the biscuit itself with the chicken. Adding a little hot sauce to the mix also can kick it up just a bit if you like that kind of flavor, though the honey is also a nice touch and Sean did add some honey to the top of his piece of chicken and he said it went really well with the biscuit. You can serve these pretty simply with coleslaw or potato salad or any other type of salad you might like, or even some homemade or store-bought French fries if you prefer. Overall I think it is a great sandwich you could even do for a buffet or a party if you are all getting together to watch the game or hang out.


That’s all I have for today. Check back next time for another recipe. Until then, enjoy the rest of your day, try to stay warm (it is about 4° here in New York without the wind, and with the wind it is about 15 below), and enjoy your meal!

chickbiscuit


Leave a comment

Posted by on January 8, 2015 in Biscuits, Breads, Cooking, Dinner, Poultry, Sandwiches


Tags: , , , , , ,

Back in the Groove with Extra-Crispy Fried Chicken

As I try to get back into the swing of things and balancing work and home after vacation, along with the heat of summertime, I am trying to get back into the kitchen as well, even with the weather may make for some sticky days in the kitchen (thank God for air conditioning!). I have really felt like have fried chicken lately and I always have plenty of chicken pieces on hand but I wanted to try a recipe that would be a little bit different from those fried chicken recipes I have tried in the past. I came across this one from Saveur magazine for an extra-crispy fried chicken that makes a flavorful brine to put the chicken in ahead of time and then does some double coating with a special batter to make things super crunchy.

Extra-Crispy Fried Chicken

¼ cup kosher salt, plus more to taste
2 tablespoons coarsely ground black pepper, plus more to taste
2 tablespoons honey
2 tablespoons sugar
15 whole cloves
6 sprigs fresh parsley
6 sprigs fresh thyme
4 bay leaves
Zest and juice of 1 lemon
1 (3½–4 pound) chicken, quartered or equivalent chicken pieces (breasts, thighs, legs)
4 cups all-purpose flour
2 tablespoons granulated garlic
1½ tablespoons cayenne pepper
1½ tablespoons onion powder
1 teaspoon paprika
1 tablespoon baking powder
Canola or vegetable oil, for frying

Boil a ¼ cup of the kosher salt and 1 tablespoon of black pepper with the honey, sugar, cloves, parsley, thyme, bay leaves, lemon zest, and lemon juice, plus 6 cups of water in a 4-quart saucepan until the salt is dissolved, about 5–7 minutes. Remove the brine from the heat and let it cool completely. Add the chicken to the brine and cover; refrigerate overnight.

The next day, drain the chicken, rinse it, and pat it dry well with paper towels. Whisk 2 cups of the all-purpose flour and half each of the granulated garlic, cayenne, onion powder, and paprika with salt and pepper in a bowl until they are combined. In another bowl, whisk the remaining flour, granulated garlic, cayenne, onion powder, and paprika with the baking powder, salt, pepper, and 2 cups of water into a smooth batter.

3. Pour enough oil into a large Dutch oven or cast iron pan to reach a depth of 2 inches. Heat the oil until a deep-fry thermometer reads 300 degrees. Working in batches, dredge the chicken in flour mixture, shaking off any excess, then dip the chicken in the batter, and then dredge the chicken again in the flour. Fry the chicken, flipping the pieces once, until the chicken is golden and almost cooked through, about 7–8 minutes, or until an instant-read thermometer inserted into the thickest part of the thigh reads 150 degrees. Transfer the chicken to paper towels to drain.

4. Increase the oil temperature to 350 degrees and fry the chicken again (working in batches again if needed) until the chicken is crisp, about 2–3 minutes more; drain the chicken on paper towels and season it with salt and pepper to taste before serving.

The coating from the flour and batter is really crispy and wonderful and the chicken comes out perfectly moist underneath the crust. The brining really helps here so if you have time to do it you should. It helps the chicken and adds some great flavor as well. I served the chicken with some homemade coleslaw and corn on the cob to make it a great meal. I used only thighs and drumsticks for my meal, but you could use any combination you like and it will work well here.

That’s all I have for today. Check back next time for another recipe. Until then, enjoy the rest of your day and enjoy your meal!

IMG_0633 IMG_0634 IMG_0635

 
Leave a comment

Posted by on August 6, 2014 in Cooking, Dinner, Poultry


Tags: , , , , ,

Easy and Tasty Skillet Fried Chicken with Black Pepper Gravy

Now that the meatball kick is over, I can get back to some other recipes. I have found myself trying a few different fried chicken recipes lately, and even though it may not be the healthiest choice in the world as far as ways to make chicken, it sure does taste good. There is nothing quite like a piece of crispy fried chicken for dinner or even better, for lunch the next day. I had a craving for fried chicken with some gravy, so I was glad when I came across this recipe on the Food Network for skillet fried chicken with a black pepper gravy. It is a simple recipe that has excellent taste and flavor.

Skillet Fried Chicken with Black Pepper Gravy

One 2 to 2 1/2-pound chicken, cut into 8 pieces, or chicken parts (legs, thighs, breasts and wings)

Kosher salt and freshly ground black pepper

2 cups all-purpose flour

1/4 teaspoon cayenne pepper

Canola or vegetable oil, for frying

1 cup milk

1 cup chicken stock or water

Sprinkle the chicken with salt and pepper on both sides and set the chicken aside. Place the flour in a shallow plate and season the flour with the cayenne pepper, salt and black pepper. Toss the mixture to combine it well and set it aside.

Pour the canola or vegetable oil into a large cast-iron skillet to a depth of about 3/4-inch. Heat the oil over medium-high heat until a deep-fry thermometer inserted into the oil registers 375 degrees. Set up paper bags or layers of paper towels nearby for draining the chicken after frying.

Starting with the dark meat, one piece at a time, add the chicken to the seasoned flour and turn the chicken to coat it well on both sides. Shake the chicken to remove any excess flour. One piece at a time, add the chicken to the hot oil. The oil should not quite cover the chicken. Do not overcrowd the skillet as it can be dangerous and cause splattering and make the chicken steam instead of fry, leaving your with soggy chicken. Cook the chicken in batches if needed.

Fry the chicken pieces, turning them once or twice, until the coating on chicken is rich golden brown on all sides, about 10 to 14 minutes. Reduce the heat to medium and cover the skillet. Continue cooking until the chicken is cooked all the way through and the juices run clear when a piece of chicken is pricked with a knife, about another 10 to 15 minutes. An instant-read thermometer inserted into a thigh should register 170 degrees. Remove the chicken and drain the chicken on the brown paper bags or the paper towels.

Remove the skillet from the heat. Carefully pour off most of the grease into a metal bowl or can, leaving about 2 or 3 tablespoons in the pan with the browned crumbs. Reduce the heat to very low. Add 4 tablespoons of the remaining flour from the coating. Stir together the grease and the flour with a wooden spoon and cook, stirring often, until the mixture is golden brown, about 3 minutes. Add the milk and the chicken stock or water. Cook, stirring often, until the gravy is smooth and thick enough to coat the back of a spoon. Add a heaping pinch of black pepper. taste and adjust the seasoning with salt.

Serve the gravy with the chicken and rice or mashed potatoes.

I only made 5 pieces of chicken, all thighs, so as not to overcrowd the pan and that was more than enough for the three of us for dinner. you can always make a few batches if you need to or use 2 pans at the same time. in any case, this is a very simple recipe that yields excellent fried chicken with nice, crispy skin. The best part of the meal though is the gravy that goes with it. It has a great pepper flavor and is rich and creamy, making it perfect for mashed potatoes or rice (I used masked potatoes last night). you can round out the meal with a nice vegetable (like corn on the cob) and some homemade biscuits and you have a great meal of fried chicken during a weeknight.

That’s all I have for today. Check back next time for another recipe. Until then, enjoy the rest of your day and enjoy your meal!

IMG_0571

 
Leave a comment

Posted by on June 10, 2014 in Cooking, Dinner, Gravy, Poultry


Tags: , , , , , ,

Changing up Fried Chicken – Cook’s Country Latin Fried Chicken

Nearly everyone loves to eat fried chicken. It seems to be a particularly great dish as the weather gets warmer and you can incorporate it into your outdoor parties and picnics, but it is also a great dish that you can try just on a weekend or weeknight. While there are thousands of variations on fried chicken and everyone seems to have their own best method or family recipe for making it, I came across this recipe in the latest issue of Cook’s Country and thought it sounded unique enough that I wanted to give it a try. It is for Latin fried chicken and takes the basics of fried chicken and incorporates some Latin spices and flavor to give things a little bit of a different taste for you.

Latin Fried Chicken

For the Marinade:

2 tablespoons kosher salt

6 garlic cloves, chopped coarse

1 tablespoon pepper

1 tablespoon ground cumin

2 teaspoons smoked paprika

2 teaspoons dried oregano

2 teaspoons grated lime zest plus 1/4 cup lime juice(2 limes)

3 pounds bone-in chicken pieces (drumsticks, thighs, wings split breasts cut in half)

For the Coating:

1 1/4 cups all-purpose flour

3/4 cup cornstarch

1 tablespoon pepper

1 tablespoon granulated garlic

1 teaspoon baking powder

1 teaspoon white pepper

1 teaspoon kosher salt

1 teaspoon ground cumin

1/4 teaspoon cayenne pepper

3 egg whites, lightly beaten

3 quarts vegetable or canola oil

For the marinade: Combine the salt, garlic, pepper, cumin, smoked paprika, oregano, and the lime zest and lime juice together in a bowl. Add the chicken pieces and turn the chicken to coat it thoroughly with the marinade.Cover the bowl with plastic wrap and refrigerate the chicken for at least 1 hour and up to 2 hours.

For the coating: Whisk the flour, cornstarch, pepper, granulated garlic, baking powder, white pepper, salt, cumin and cayenne pepper together in a bowl. Place the beaten egg whites in a separate shallow dish.

Set a wire rack in a rimmed baking sheet. Remove the chicken from the marinade and scrape off any of the solids from the marinade from the chicken. Pat the chicken dry with paper towels. Working with one piece at a time, dip the chicken in the egg whites to thoroughly coat the chicken, letting any excess drip off back into the dish. Dredge the chicken in the flour mixture, pressing on the chicken piece to get the coating to adhere well. Transfer the chicken to the prepared wire rack and refrigerate the chicken for at least 30 minutes or up to 2 hours.

Add the vegetable or canola oil to a large Dutch oven until it measures about 2 inches deep and heat the oil over medium-high heat until it registers 325 degrees on a candy thermometer. Add half of the chicken to the hot oil and fry the chicken until the breasts register 160 degrees and the thighs.drumsticks register 175 degrees on an instant-read thermometer, about 13 to 16 minutes. Adjust the burner, if necessary, to maintain an oil temperature between 300 and 325 degrees. Transfer the chicken to a clean wire rack set in a rimmed baking sheet.Return the oil to 325 degrees and repeat the process with the remaining chicken pieces. Serve.

One thing about when you marinate the chicken – you don’t want to leave the chicken longer than 2 hours in the marinade. The lime juice in the marinade will start to toughen up the  chicken, so you should try to get it before the 2 hour mark passes. You can really taste the lime, garlic and spices in the chicken and the coating comes out perfectly crispy. Adding the cornstarch and baking powder to the flour really makes a big difference in the results. I only made 4 pieces of chicken when I tried the recipe, so I cut everything in half for a smaller batch, but you can easily make a big batch of this to serve for a party or a picnic. This chicken would go great with all kinds of side dishes and it is just as good the next day.

That’s all I have for today. Check back next time for another recipe. until then, enjoy the rest of your day and enjoy your meal!

IMG_0553

 
Leave a comment

Posted by on May 29, 2014 in Cooking, Dinner, Poultry


Tags: , , , ,

It’s a Chicken Invasion, Part 4 – Fried Chicken Biscuits

So yesterday was for a basic fried chicken sandwich from Cook’s Country, which was very tasty. Today is something that is just as easy, might taste even better and is a little more homemade. The recipe id for fried chicken biscuits and is from Bon Appetit, who got the recipe from the Pies-N-Thighs restaurant in Brooklyn, New York. The recipe sounded too good to pass up – delicate and spicy fried chicken on a nice fluffy homemade biscuit with honey butter. How could you not at least give it a try?

Fried Chicken Biscuits

For the Fried Chicken:
1 cup buttermilk
1 tablespoon hot sauce
½ teaspoon kosher salt
¼ teaspoon freshly ground black pepper
¼ teaspoon cayenne pepper
4 skinless, boneless chicken cutlets (about 1½ lb. total), pounded to ¼” thickness

For the Biscuits:

3 teaspoons baking powder
2½ teaspoons kosher salt
1 teaspoon sugar
¼ teaspoon baking soda
5½ cups all-purpose flour, plus more
1½ cups (3 sticks) chilled unsalted butter, cut into pieces
1½ cups chilled buttermilk
1 large egg, beaten to blend
For the Honey Butter and Assembly:

½ cup (1 stick) butter, room temperature
¼ cup honey
½ teaspoon kosher salt, plus more
Vegetable oil, for frying; about 2½ cups
2 cups panko Japanese breadcrumbs
Freshly ground black pepper
4 Pies-N-Thighs Biscuits (recipe above)
Hot sauce, for serving

For the chicken cutlets, combine the buttermilk, hot sauce, salt, black pepper, and cayenne in a resealable plastic bag; add the chicken. Seal the bag, turn the bag several times to coat, and chill the chicken in the refrigerator for at least 3 hours.

For the biscuits, preheat the oven to 375°. Pulse the baking powder, salt, sugar, baking soda, and 5½ cups of flour in a food processor. Add the butter and pulse until the texture is of coarse meal with a few pea-size pieces of butter remaining.
Transfer the mixture to a large bowl. Mix in the buttermilk with a fork, then gently knead the dough just until a shaggy dough comes together.
Pat out the dough on a lightly floured surface until it is about 1¼ inches thick. Cut out the biscuits with a 3” biscuit cutter, re-rolling the scraps once.
Place the biscuits on a parchment-lined baking sheet and brush the tops with egg. Bake the biscuits until they are golden brown, about 30–35 minutes.
To make the honey butter, mix the butter, honey, and ½ a teaspoon of the salt in a small bowl until smooth; set the honey butter aside.
To prepare the chicken, pour the vegetable oil into a large skillet, preferably cast iron, to a depth of ½ an inch and heat the pan over medium-high heat until the oil bubbles immediately when a little panko is added.
Meanwhile, place the panko bread crumbs in a shallow bowl. Remove the chicken from the marinade; season it with salt and pepper. Dredge the chicken in the panko, shaking off any excess. Working in 2 batches and maintaining the oil temperature, fry the chicken until it is golden brown, crisp, and cooked through, about 3 minutes per side. Transfer the chicken to a paper towel–lined baking sheet to drain.
Split the biscuits and spread each side of the biscuits with 1 tablespoon of the. reserved honey butter. Build the sandwiches with biscuits, chicken, and hot sauce, if desired and serve.
Just a couple of things about these recipes. I used chicken tenders that I had bought on sale this past week instead of the chicken breasts and they seem to work out just fine for me. I think you could probably just as easily use boneless thighs as well if you like them better. i did have a little trouble with the panko bread crumbs not sticking very well to all of the chicken pieces. I think I might flour them a little next time after they come out of the marinade to make them stick better, but overall the flavor was really good. To me, the real winner here is the biscuits. They tasted really good and were nice and fluffy. The recipe calls for you to use a 3 inch biscuit cutter, which seemed too big to me so I made them smaller, using a 2 inch cutter and got more biscuits out of the batch so we were able to use them for other meals. Everyone loved the biscuits so I know I’ll be making this one again. I made a little cole slaw to go along with the biscuits. I tried a different recipe this time, which I will post soon, but you can use any cole slaw recipe you like best.
That’s all I have for today. Check back next time for another recipe. until then, enjoy the rest of your day and enjoy your meal!
012 011
 
2 Comments

Posted by on February 1, 2014 in Biscuits, Breads, Cooking, Dinner, Poultry, Sandwiches


Tags: , , , , , , ,

It’s a Chicken Invasion Part 3 – Fried Chicken Sandwiches

This recipe is actually the first of two chicken sandwiches that I tried this past week. I think they are great simple sandwiches for dinner or for lunch, but they are also great to use for football Sunday if you want something easy that is a great snack alternative. This first recipe is for a fried chicken sandwich recipe that I got from the latest issue of Cook’s Country magazine. it’s a pretty simple one that tries a little bit of a different method for the coating for the chicken, but I think it worked out pretty well.

Fried Chicken Sandwiches

1 1/2 teaspoons kosher salt

1 teaspoon paprika

1 teaspoon pepper

1 teaspoon garlic powder

1/2 teaspoon dried thyme

1/2 teaspoon dried sage

1/4 teaspoon cayenne pepper

2 boneless, skinless chicken breasts, trimmed and halved crosswise

1 1/2 cups all-purpose flour

1 teaspoon baking powder

3 tablespoons water

2 egg whites, lightly beaten

2 quarts vegetable oil (I didn’t use this much oil, but the recipe calls for it)

4 sandwich rolls

Combine the salt, paprika, pepper, garlic powder, thyme, sage and cayenne pepper in a bowl. Measure out 1 tablespoon of the spice mixture and set it aside. Pat the chicken dry with paper towels. Using a meat pounder, gently pound each piece of chicken to about 1/2-inch thickness between two pieces of plastic wrap. Season the chicken all over with the remaining 2 3/4 teaspoons of the spice mixture.

Whisk the flour, baking powder, and the reserved 1 tablespoon of the spice mixture together in a large bowl. Add the water to the flour mixture and rub it together with your fingers until the water is evenly incorporated and shaggy pieces form. Place the egg whites in a shallow dish.

Set a wire rack in a rimmed baking sheet. Working with 1 piece of chicken at a time, dip the chicken in the egg whites to thoroughly coat them, letting any excess drip back into the dish, then dredge the chicken in the flour mixture, pressing on the flour to make sure it adheres. Transfer the chicken to the prepared wire rack and refrigerate the pieces for at least 30 minutes and up to 1 hour.

Add the vegetable oil to a large Dutch oven until it measures about 1 1/2 inches deep and heat the oil over medium-high heat to 375 degrees. Add the chicken to the hot oil. Adjust the burner, if necessary to maintain the oil temperature between 325 and 350 degrees. Fry the chicken, stirring gently to prevent the pieces from sticking together, until the chicken is golden brown and registers 160 degrees on an instant-read thermometer, about 4 to 5 minutes, flipping the chicken pieces halfway through the frying. Transfer the chicken to a clean wire rack and allow the pieces to cool for 5 minutes. Serve on the rolls.

Adding that little bit of liquid to the seasoned flour makes the flour clumpy, which gives it a lot more texture when it has cooked. To me it seemed a lot more like good fried chicken pieces and had better crunch to it than a typical fried chicken sandwich, which was great. As I said, I hate using that much oil for frying and I pretty much cut the amount in half and still got good results. I just don’t like to use that much myself and it is a pain to dispose of, so I try to get away with less when I can but if you want to follow the recipe exactly, go for it. I got good results with less but maybe you get a better fry with more oil. I served the sandwiches with some pickles, lettuce and bacon and some french fries, but some cole slaw would have been great with this. I actually made a cole slaw with the other chicken sandwich I made, so you’ll see that recipe next time :). Overall, I think it was a good recipe with a really crispy crunch, which was great.

That’s all I have for today. Check back next time for another chicken recipe. until then, enjoy the rest of your day and enjoy your meal!

005 004

 
Leave a comment

Posted by on January 31, 2014 in Cooking, Dinner, Poultry, Sandwiches


Tags: , , , , , ,

Breakfast? Dinner? Why Not Both? Chicken and Waffles

Sean has been asking me to make this one for a long time and I am not really sure why. I tried to tell him that chicken and waffles is just what it sounds like – fried chicken with some waffles. For some reason he really wanted to give it a god so I tried to find a recipe that specialized in both. You could simply just take your favorite fried chicken recipe and any waffle recipe and go to town if that is what you wanted to do, but I found this recipe from Emeril Lagasse that was easy, basic and made really good chicken with some spice to it and very tasty waffles to go along side of them.

Chicken and Waffles

Chicken:

1 (3 1/2 pound) fryer chicken, cut into 8 pieces, giblets removed

1 cup all-purpose flour

1 tablespoon Essence seasoning, recipe to follow

Vegetable oil, for frying

Waffles:

2 cups all-purpose flour

3 1/2 teaspoons baking powder

1 teaspoon sugar

1/4 teaspoon salt

2 eggs

4 tablespoons butter, softened

1 1/2 cups buttermilk

Butter, for topping

Maple Syrup

Essence Seasoning:

2 1/2 tablespoons paprika

2 tablespoons salt

2 tablespoons garlic powder

1 tablespoon onion powder

1 tablespoon cayenne pepper

1 tablespoon dried oregano

1 tablespoon dried thyme


To make the Essence seasoning, combine all the dried herbs thoroughly and store them in an airtight container.

For the chicken: Heat enough vegetable oil to come about 1-inch up the sides of a large, deep cast iron skillet. Heat the oil until a candy thermometer inserted into the oil registers 350 degrees.

Rinse the chicken pieces under cold water and do not dry; leave the pieces wet. In a large, sealable plastic bag, combine the flour and the Essence seasoning. Add the chicken pieces one at a time, seal the bag, and shake the coat the chicken evenly. Remove the chicken and place it on a wire rack set over a baking sheet. Repeat this process until all the chicken is coated. Allow the chicken to rest on the wire rack for 5 to 10 minutes.

Carefully add the chicken to the hot oil and fry, turning once, until the chicken is golden brown and the meat is cooked through, about 15 to 20 minutes total for the pieces being cooked. Do not overcrowd the skillet and cook the chicken in batches if necessary. Remove the chicken pieces from the pan and drain on paper towels. Place the cooked chicken pieces on a wire rack set over a baking sheet and place in a 250 degree oven to keep them warm while you finish cooking the rest of the chicken.

For the waffles: Preheat a waffle iron and lightly spray it with cooking spray. In a large bowl, sift the flour, baking powder, sugar and salt.

In a separate bowl, beat the eggs and add the butter and buttermilk and beat to combine. Add the wet ingredients into the dry ingredients and mix them well until combined.

Pour the batter into the hot waffle iron and cook until the waffle is golden brown and lightly crisp. Remove the waffle and repeat the process until all the batter is used or you have the desired amount of waffles. Top each waffle with a slice of butter, if desired, and serve with the chicken and maple syrup.

It certainly is an interesting combination if you have never had it before. The crispy chicken along with the crispy waffle and the maple syrup make for a tasty dish. I did not use a cut up fryer but only bone-in chicken thighs that I had on hand to make things a little bit easier. you could use whatever type of chicken pieces you prefer. For the Essence seasoning, the recipe makes about 2/3 cup, so you will have some leftover to use for other meals as a rub or seasoning. You could always just use whatever you like most on fried chicken instead and you can even buy your favorite waffle mix and use that if you did not want to make your own. I think it was certainly easy enough that it would warrant making again and it was different to try. Sean seemed to really enjoy it. This recipe made 4 servings, so it was just enough for the three of us with some leftover fried chicken that we can use for other meals.

That’s all I have for today. Check back next time for some more recipes. I still have a few Thanksgiving items to post, including another turkey recipe I am trying, so stay tuned. Until next time, enjoy the rest of your day and enjoy your meal!

001

 
6 Comments

Posted by on November 22, 2013 in Breakfast, Cooking, Dinner, Poultry


Tags: , , , , ,

A Down Home Meal: Fried Chicken and Cornbread

As soon as I saw this recipe in a recent version of the Dining section of The New York Times a few weeks ago I knew I was going to have to give it a try. It’s a very basic recipe for fried chicken without all the bells and whistles of breadcrumbs, crushed cereal, saltine crackers, and various spices. This is just good, simple ingredients that you don’t need much to do. All you need is a good cast-iron skillet, a cut-up chicken, some flour and some oil and you are good to go. The recipe almost sounded too easy and I wondered how good it was actually going to come out. I was not disappointed in the results. While the recipe was posted in the newspaper a few weeks ago, it actually comes from Southern Living.

Southern Living’s Best Fried Chicken

1 tablespoon +1 teaspoon salt
1 chicken with skin, about 2 1/2 pounds, cut up into 8 pieces
1 teaspoon black pepper
1 cup all-purpose flour
2 cups vegetable oil
1/4 cup bacon drippings (or use more oil)

Combined 1 tablespoon of the salt with 3 quarts of water in a large bowl or container. Add the chicken, cover, and refrigerate 8 hours or overnight. Drain, rinse with cold water, and pat dry.

Stir together the remaining 1 teaspoon of salt and the black pepper. Sprinkle half the mixture evenly over the chicken. In a large sealable plastic bag, combine the remaining pepper mixture and the flour. Add two pieces of chicken to the bag and shake well to coat. Remove the chicken pieces, shaking off any extra flour, and set them aside. Repeat the process with the remaining chicken.

Take a large cast-iron skillet or chicken fryer, for which you have a lid, and fit with a candy or deep-frying thermometer. Add the oil and bacon drippings and heat to 360° over medium heat; the oil will ripple and possibly give off a few wisps of smoke.

Using a pair of tongs, immediately add chicken pieces, skin side down (work in batches if necessary to avoid crowding the pan). The oil temperature will drop to about 325°, where it should stay; adjust the heat so that the oil is bubbling gently around the chicken pieces. Cover the pan and cook for 6 minutes; uncover the pan and cook for 9 minutes. Turn the chicken pieces; re-cover the pan and cook for another 6 minutes. Uncover the pan and cook for another 5 to 9 minutes, depending on the size of the pieces. If necessary for even browning, turn the pieces over a few times towards the end. Remove the pieces and drain on paper towels or in a paper bag. Repeat the process with any remaining chicken pieces. Allow the chicken to cool at least 20 minutes before serving.

There are a couple of notes that go along with this recipe that they pointed out in the article that I think to make a difference to the way the chicken comes out. First, if the chicken is larger than 2 1/2 pounds, you should cut each breast in half so that you have a total of 10 pieces. This will help for more even cooking and keep the pieces to a smaller portion size. Also, I would not use olive oil for this recipe as a substitute for vegetable oil. Olive oil tends to leave a particular taste on the food that you are cooking in it, and this is not the type of meal where you want that to happen. The article itself actually recommends using grapeseed oil, but I do not have any grapeseed oil and I find it to be very expensive to purchase. I simply used the vegetable oil, but you could also use peanut oil or canola oil instead. I did not add the bacon drippings and used more oil instead since we don’t make bacon very often around the house anymore and I didn’t see the need.

Brining the chicken for this recipe does seem to make a good difference in the flavor and the moistness of chicken after it is fried. Not everyone always has the time to do it, but if you are planning ahead and you know you’ll have the time and the space in your refrigerator, I would recommend doing it. Finally, the article highly recommends using a cast-iron skillet for this recipe. I keep mine on the stove pretty much all the time to use for a wide variety of recipes and it was perfect for the chicken. It is plenty deep enough for the amount of oil that you use (and I actually use less oil than the recipe called for and I think it turned out fine), but you do want to make sure that you have some type of cover to put over the chicken.Overall, I loved the crunch of the chicken and there was not too much crust as often happens with fried chicken that has a thick batter. The chicken itself was very moist and cooked perfectly.

To go along with the recipe, I did make some mashed potatoes and coleslaw. I also had some extra cornmeal laying around so I decided that it would be a good opportunity to try and make some cornbread. I’ve made cornbread before and posted the recipe on this blog, but in the past I have made Southern-style cornbread that is made right in the cast-iron skillet. Since I was already using my cast-iron skillet for the chicken, I needed to find a little bit of a different recipe to use. The Cook’s Illustrated Cookbook has a good, general all-purpose cornbread recipe that you could easily use for this or use as part of a stuffing if you are going to want leftovers for that purpose.

All-Purpose Cornbread

1 1/2 cups all-purpose flour
1 cup cornmeal
2 teaspoons baking powder
1/4 teaspoon baking soda
3/4 teaspoon salt
1/4 cup packed light brown sugar
3/4 cup frozen corn, thawed
1 cup buttermilk
2 large eggs
8 tablespoons butter, melted and cooled

Adjust an oven rack to the middle position and heat the oven to 400°. Spray an 8-inch square baking dish with the vegetable oil spray. Whisk the flour, cornmeal, baking powder, baking soda, and salt in a medium bowl until well combined; set aside.

In a food processor or blender, process the brown sugar, corn kernels, and buttermilk until combined, about 5 seconds. Add the eggs and process until well combined (some corn lumps will remain), about 5 seconds longer.

Using a rubber spatula, make a well in the center of the dry ingredients; pour the wet ingredients into the well. Begin folding the dry ingredients into the wet, giving the mixture only a few turns to barely combine. Add the melted butter and continue folding until the dry ingredients are just moistened. Pour the batter into the prepared baking dish and smooth the surface with the rubber spatula.

Bake until the cornbread is a deep golden brown and a toothpick inserted in the center comes out clean, 25 to 35 minutes. Allow the cornbread to cool in the pan on a wire rack for 10 minutes, then invert the pan onto the wire rack, and turn right side up and allow the cornbread to cool until just warm, about 10 minutes longer, and serve. Leftover cornbread can be wrapped in aluminum foil and re-heated in a 350° oven for 10 to 15 minutes.

Adding the extra corn in with the cornmeal gave it up pretty nice flavor, and the combination with the light brown sugar really did give some extra sweetness to the bread. I also like the golden crust that came out on this bread. The recipe recommends using Quaker yellow cornmeal and I guess that is what the recipe was designed for. I only had a stone-ground cornmeal on hand, and the bread did come out a little bit drier, just as the recipe had indicated it might.

Those of the recipes for today. Next time out, I’ll be posting the recipe that I used just last night for some scallops with a carrot cream. Check back for that one and see if you like it. Until next time, enjoy the rest of your day and enjoy your meal!

005 003 004

 
1 Comment

Posted by on May 21, 2013 in Breads, Cooking, Dinner, Poultry


Tags: , , , , ,

 
National Day Calendar

Fun, unusual and forgotten designations on our calendar.

Authentic Autograph Source, LLC

Licensed autographs and collectibles dealer in the Pacific NW! We have a wide range of sports, celebrities, and more!

Jennifer Probst

a little bit naughty a little bit nice

Laissez Faire

Letting Life Lead

%d bloggers like this: