RSS

Monthly Archives: March 2017

Score Big Smiles with Seared Sea Scallops with Leek Risotto and Lemon-Brown Butter Sauce

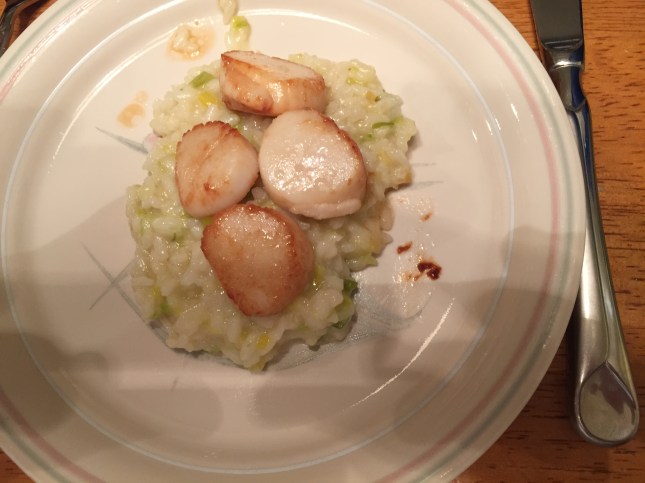
Sea scallops are one of those foods that are an occasional treat around our house. They are one of the favorite seafood meals for all three of us, but the cost of sea scallops today make them pretty prohibitive to have often. Even when you can get them on sale, they are very often still around twenty dollars per pound. However, once you are eating them and they are cooked correctly, you tend to forget all about the price and wonder why you do not have them more often. Scallops, like all seafood, requires attention when cooking so that you do not turn them into little disks of rubber and ruin your meal. You can cook them pretty easily, putting a nice sear on them for some color and flavor, in just a few minutes, and when you can find some great dishes to complement the rest of the meal, you will hit a home run. Such is the case with this recipe I tried from Serious Eats for seared sea scallops with a leek risotto and lemon-brown butter sauce. It sounds fancy and complicated, but it is pretty easy to make (save for the stirring of the risotto).

Seared Sea Scallops with Leek Risotto and Lemon-Brown Butter Sauce

For the Leek Risotto:

1 tablespoon extra-virgin olive oil 

1 1/2 cups Arborio rice 

4 tablespoons butter, divided

2 large leeks, white and light green parts only, washed well and diced (about 2 1/2 cups)

1/2 cup dry white wine (or chicken stock if you do not use wine)

5 to 6 cups homemade or store-bought low-sodium chicken or vegetable stock or water, kept warm

3 tablespoons mascarpone cheese

1/2 cup grated Parmigiano-Reggiano cheese (about 2 ounces)

2 teaspoons lemon zest, finely grated (from about 1 large lemon)

1 tablespoon fresh juice from 1 lemon 

Kosher salt and freshly ground black pepper

For the Lemon-Brown Butter Sauce:

5 tablespoons butter 

1 medium clove garlic, minced

1 tablespoon fresh juice from 1 lemon

Kosher salt and freshly ground black pepper

For the Scallops:

8 to 10 large dry-packed sea scallops (about 3/4 pound), dried thoroughly with towels

Kosher salt

1 tablespoon neutral oil, such as vegetable, canola, or grape seed 

2 tablespoons pickled pepper (optional)

For the Leek Risotto: In a medium saucepan, heat the olive oil over medium heat until the oil is shimmering. Add the rice and cook, stirring, until the rice turns translucent around the edges, about 3 minutes. Add 2 tablespoons of the butter and the leeks and cook, stirring, until the butter is melted and the leeks are tender but not browned, about 5 minutes.

Add the wine and simmer, stirring, until the wine has evaporated, about 3 minutes. Add 1/2 cup of warm stock and stir the rice mixture until almost all the liquid has been absorbed. Continue cooking the rice, adding the broth in 1/2-cup additions, and stirring until the liquid is absorbed before the next addition, until rice is al dente, about 20 minutes. The rice can be kept warm at this point until you are ready to finish cooking.


When you are ready to finish, stir in enough warm stock to loosen the risotto to a creamy consistency. Stir in the remaining 2 tablespoons of butter, mascarpone, Parmigiano-Reggiano, and lemon zest and juice. Season with salt and pepper to taste. When the risotto is finished, the grains of rice should be suspended in a thick and creamy sauce; if the risotto thickens too much, simply add additional warm stock or water to restore the risotto to the proper consistency.


Meanwhile, for the Lemon-Brown Butter Sauce: Add the butter to a small saucepan set over medium heat. Cook, stirring and swirling the pan every few seconds until the foam subsides and the butter begins to turn golden brown and smells nutty, about 3 minutes. Off the heat, stir in the garlic and let it sizzle for about 10-15 seconds, then add the lemon juice. Season the butter with salt and pepper; keep warm.


For the Scallops: Season the scallops with salt. Let the scallops stand in the refrigerator for 15 minutes.


Remove the salted scallops from the fridge and pat them dry with paper towels. Season the scallops lightly with a little more salt. Heat the vegetable oil in a large stainless steel cast-iron skillet set over high heat until the oil is lightly smoking. Add the scallops, leaving space between each one. Press each scallop down very gently with a spatula to ensure good contact with the pan.


Cook the scallops without moving them until they are well browned on the first side, about1-2 minutes. Carefully flip the scallops and cook them until they are seared on the opposite side and medium-rare within, about 1 minute longer. Transfer the scallops to a paper towel-lined plate to drain. To serve the meal, scoop the risotto into warmed bowls or warmed plates, top the risotto with the scallops, and drizzle the scallops with the sauce. Top with a few pickled peppers, if using.

Okay, making risotto is always a bit of a chore because you have to constantly stir it to get the liquid absorbed properly so the rice comes out right. Many people today are making use of their Insta-Pot or pressure cooker to make risotto. I have yet to give it a try myself but some people swear by the results and say it is worth it so if you can do it, go for it. I didn’t mind the stirring all that much (consider it your workout for the day). The flavor of the risotto was very creamy and the leeks really shine through in the dish. The scallops are cooked very simply so that you get the best flavor of the scallops and Michelle and I loved the lemon-brown butter sauce as a topping for it all. I think this is an easy and delicious way to cook your scallops. You could serve it with a nice side of asparagus, broccoli or peas and you have a great meal (don’t forget to use the rest of your white wine from the recipe to go with dinner; it’s a nice touch and pairs well with the meal).

That’s all I have for today. Check back next time for another recipe. Until then, enjoy the rest of your day and enjoy your meal!

IMG_0685


Advertisement
 
Leave a comment

Posted by on March 30, 2017 in Cooking, Dinner, Rice, Seafood


Tags: , , , , , ,

A Monday Monkfish Recipe – Monkfish Fillets Dijon Style

It’s nice to be able to get back to posting a blog! I am feeling better, and though I am still swamped with work, and we have lots going on around the house, I wanted to make sure I had time to post a recipe today, even if it is just a short one. Since it is the Lent time of year, more people are eating fish right now, which means you might be looking for some new recipes or different ways to make the fish you eat this week. We are lucky since we have a great fish market in the area now where I can get very fresh, great-tasting fish anytime. Such is the case when I went over there recently and picked up some monkfish to make for dinner. Monkfish has great flavor and a good texture, making it meatier than many other whitefish that you find sold. Many people refer to it as “Poor Man’s Lobster” since it has a similar texture and taste lobster without having to go through all of the hassles of getting through a shell for not a lot of meat. Though, by today’s standards, monkfish in many cases costs just as much per pound or more than what you pay for a lobster. In any case, it is a great fish to make and this simple recipe from Pierre Franey at New York Times Cooking gives a fast preparation that has great flavor.

Monkfish Fillets Dijon Style

2 tablespoons olive oil

4 skinless, boneless monkfish fillets, about 1 1/2 pounds

Salt to taste if desired

Freshly ground pepper to taste

2 tablespoons Dijon-style mustard

¼ cup finely chopped onions

1 teaspoon finely minced garlic

cup dry white wine

½ pound small mushrooms

1 tablespoon butter

2 tablespoons chopped fresh parsley

Preheat the oven to 450 degrees. Select a baking dish large enough to hold the monkfish fillets in one layer without crowding them. Pour the olive oil over the bottom of the baking dish. Turn the fillets in the oil to coat them well all over. Sprinkle each fillet with salt and pepper on both sides. Brush the fillets with the Dijon mustard. Scatter the onions and the garlic around the fillets.

Place the baking dish on top of the stove and heat the dish until the oil begins to sizzle. Add the white wine and scatter the mushrooms around the fillets. Bring the wine just to a simmer.

Place the baking dish in the oven and bake for about 15 minutes. Baste the fillets and return the dish to the oven and continue cooking the fish for about 5 minutes. Remove the fish from the baking dish and place it on a platter. Swirl the butter in the sauce in the baking dish and then place the sauce over the fish fillets on the plate. Sprinkle the fish with parsley and serve.

This recipe is definitely one you can make quickly, and with ingredients you are likely to have on hand most of the time (except the fish, of course). The flavors all come together nicely, and the Dijon mustard does not overpower the fish at all. The onions, garlic, and mushrooms add a nice touch to the meal, and even just the hint of white wine in the sauce is very nice. You could even substitute another fish in here if you like, though I personally like the monkfish for this recipe. I served this with some wild rice and broccoli, and it was a nice, light, and complete meal.

That’s all I have for today. Check back next time for another recipe. Until then, enjoy the rest of your day, enjoy your meal!

IMG_0696

 
Leave a comment

Posted by on March 27, 2017 in Cooking, Dinner, Seafood, Uncategorized


Tags: , , , ,

Easy Homemade Condiment Recipes | Tasting Table

We all rely on store-bought condiments most of the time, but is there a better option? Who has the time to make things like ketchup or mayo at home? Surprisingly enough, you do! Making your own condiments is a lot easier than you think, gives you better control of the ingredients you and your family eat and they just plain taste better. Tasting Table has put together 7 easy recipes for different condiments that you can make yourself so you can save some money, eat something that tastes great and really impress your family! Check it out!

I am finally over my sickness after several weeks of fighting it. Though work has been pretty crazy lately too, I am going to try to get caught up on my blogging next week so I can get back into my routine. I have some great recipes I have tried recently that will be fun to share. Stay tuned and thanks!

Source: Easy Homemade Condiment Recipes | Tasting Table


Tags: , , , , ,

St. Patrick’s Day Recipes – NYT Cooking

St. Patrick’s Day is right around the corner, and if you are looking for some great ideas of what to make this year or want something different beyond the usual corned beef and cabbage, New York Times Cooking has put together an excellent collection of recipes that cover everything you might need. From soda bread to side dishes to desserts and drinks, you will find it all. Check it out.

On a side note, I haven’t been around lately because I have been fighting a terrible cold for 2 weeks now. The cold has pretty much sapped all my strength and leaves me coughing quite a bit. When this has been combined with a heavy workload I have had recently, I have little time for blogging. I am hoping to kick the cold this week as it seems to be waning, and then I can get back to posting recipes. Please bear with me a little bit while I get my strength back. Thanks!


Source: St. Patrick’s Day Recipes – NYT Cooking


Tags: , , , , , ,

A Bobby Flay Brunch for Dinner – Buttermilk Waffles with Buttermilk Fried Chicken Tenders and Bourbon Maple Syrup

One of the actual cooking shows I like to watch on Food Network (yes, there are still shows that have chefs actually cooking recipes on there) is Brunch with Bobby. While I do not make brunch very often, I do enjoy a lot of the recipes that he comes up with, and they are perfect for use for breakfast or dinner for the three of us. Just recently, I saw an episode where Bobby Flay was making his take on chicken and waffles. I have done chicken and waffles once before a while ago, but I liked his particular take on it because it seemed easy and it looked like it would taste great. The key to making the recipe for me would be to find the time in to make the batter for the waffles, the soak for the chicken and then the time to cook it all. Luckily, I did have one day where I had some downtime from work and was able to fit it all in and gave it a whirl.

Buttermilk Waffles with Buttermilk Fried Chicken Tenders and Bourbon Maple Syrup

For the Waffles:

1 3/4 cups all-purpose flour

2 teaspoons baking powder

1/4 teaspoon baking soda

3 tablespoons sugar

1/2 teaspoon fine salt

3 large eggs

1 1/2 cups buttermilk

1 stick (8 tablespoons) unsalted butter, melted and cooled, plus more for the waffle iron

For the Chicken Tenders:

12 chicken tenders

2 cups buttermilk

Few dashes hot sauce, plus for serving

2 cups all-purpose flour

1/2 teaspoon garlic powder

1/2 teaspoon onion powder

1/4 teaspoon chili powder or cayenne pepper

Kosher salt and freshly ground black pepper

Canola oil, for frying

For the Syrup:

3/4 cups pure maple syrup

1cup softened butter

2 to 3 tablespoons bourbon whiskey (or 1 teaspoon bourbon extract)

For the waffles, combine the flour, baking powder, baking soda, sugar and salt in a large bowl.

In a second bowl, whisk the eggs until they are smooth, then whisk in the buttermilk and butter until the ingredients are combined. Add the wet ingredients to the dry ingredients and mix just until the batter comes together; there will be lumps. Cover the dough and let it sit at room temperature for at least 30 minutes and up to 1 hour.

Preheat the oven to 250 degrees. Set a baking rack over a baking sheet and place the baking sheet on the center rack in the oven. Preheat a waffle maker according to the manufacturer’s instructions and brush the plates with melted butter.

For each waffle, ladle about 1/3 cup of the batter onto the iron. Cover the batter with the lid and cook the waffle until it is golden brown and crispy, about 3 to 4 minutes. As you go, transfer the cooked waffles to the baking rack in the oven and hold them there while you fry the chicken.

For the fried chicken, while the waffle batter rests, place the chicken tenders in a resealable plastic bag. Add 1 cup of the buttermilk and the hot sauce, then seal the bag and marinate the chicken at room temperature for 1 hour.

In a medium bowl, combine the flour with the garlic powder, onion powder, chili powder or cayenne, 1 teaspoon of salt and 1/4 teaspoon of black pepper. Transfer half of the flour mixture to a second bowl. In a third bowl, put the remaining 1 cup of buttermilk.

Remove the chicken from the marinade and pat the pieces dry with paper towels. Sprinkle the chicken tenders with salt and pepper.

Heat 2 inches of oil in a high-sided skillet, preferably cast-iron, set over medium heat until it registers 360 degrees on a deep-fry thermometer. Working in batches to avoid crowding the pan, dredge the chicken in the first dish of seasoned flour, then dip the pieces in the buttermilk, letting the excess drain off, and finally dredge the chicken tenders in the second bowl of seasoned flour, tapping off any excess. Fry the chicken until it is golden brown on both sides and just cooked through, about 5 minutes. Remove the chicken to a paper-towel-lined plate and season it with salt.

For the maple syrup, bring the maple syrup and the softened butter to a boil in a medium saucepan set over medium heat. Stir in the bourbon whiskey or extract. Allow the syrup to simmer for 1 to 2 minutes until the flavors meld, and the syrup is warmed through.

To serve, put one of the waffles on a plate and top it with a fried chicken tender or two. Drizzle the chicken and waffles with the warm syrup, or with hot sauce or honey, if you desire.

I have to say while I have not had a lot of chicken and waffles in my lifetime, this was the best recipe I had tried. We all agreed that the waffle batter was fantastic, producing perfect waffles with an incredible flavor from the buttermilk and just the right amount of crunch. My waffle maker is a Belgian waffle maker, so the waffles were bigger, but you can cut them down to size if you like. The chicken tenders were the ideal size and portion for the meal, in my opinion. I always found a big piece of chicken with the waffles to be too filling, but the chicken tender was perfect. I liked the coating and double coating the pieces produced an excellent crust on the chicken. The syrup, which I got the recipe for from Food.com, was a nice touch to round out the meal. It was sweet and tasty, and this recipe makes a good portion of syrup, so you are likely to have some leftovers to use for another occasion. All in all, this was a good choice that makes a nice meal for dinner or brunch.

That’s all I have for today. Check back next time for another recipe. Until then, enjoy the rest of your day and enjoy your meal!

img_0687


1 Comment

Posted by on March 1, 2017 in Brunch, Cooking, Dinner, Poultry


Tags: , , , , , , , , , ,

 
National Day Calendar

Fun, unusual and forgotten designations on our calendar.

Authentic Autograph Source, LLC

Licensed autographs and collectibles dealer in the Pacific NW! We have a wide range of sports, celebrities, and more!

Jennifer Probst

a little bit naughty a little bit nice

Laissez Faire

Letting Life Lead

%d bloggers like this: