RSS

Tag Archives: King Arthur Flour

Bread Week, Day 2 -For Fun, Make This Light-As-Air Focaccia

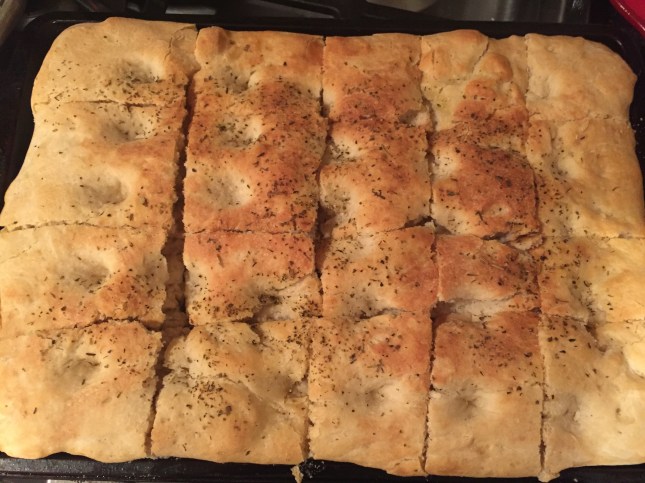
For the second day of this all-bread week, I turn to a recipe I made recently for focaccia bread. I had purchased some Italian “00” flour from King Arthur Flour with the intent of trying my hand at making pasta, but then the whole kitchen renovation thing got started and I just never got to it. Now that the kitchen is done and I still have the flour I do still intend to make a go of homemade pasta, but first I tried the flour out in this focaccia recipe that King Arthur offers on the bag. If you have never had focaccia before, it is a flat-crusted, oven-baked bread that has a similar consistency to pizza dough and pizza crust. The primary difference between pizza dough and focaccia rests with the amount of yeast used. Pizza dough uses only a bit of yeast while focaccia uses more for a higher rise. I decided I wanted to give the bread a try out using the Italian-style flour to see how it would go.

King Arthur Flour Light-As-Air Focaccia

For the Dough:3 3/4 cups King Arthur Italian-Style Flour

3 3/4 cups King Arthur Italian-Style Flour

1 1/2 teaspoons salt

2 teaspoons instant yeast

2 tablespoons olive oil

1 cup plus 2 to 4 tablespoons water

For the Topping:

1 to 2 tablespoons olive oil

Coarse salt

Your favorite herbs (fresh or dry rosemary, thyme, oregano, basil, etc.)

For the dough, mix together the Italian-style flour, salt, yeast, olive oil and 1 cup of water and knead the dough briefly, for about 5 to 6 minutes, by hand or in the bowl of a stand mixer. If you’re using a bread machine, knead the dough for about 8 minutes. If you need the dough to be softer, add more water, a tablespoon at a time, to get the consistency you want. Cover the dough and allow it to rest for 15 minutes. Remove the dough from the bowl and fold it over a few times to redistribute the growing yeast.

Place the dough on a lightly greased or parchment paper-lined baking sheet and pat the dough into a rectangle of about 10 inches by 15 inches. Brush the top of the dough with olive oil and sprinkle it lightly with salt and your favorite herbs. Cover the dough with a piece of lightly greased plastic wrap and set it in a warm place to rise for about 30 minutes.

Preheat the oven to 425 degrees. Just before putting the dough in the oven, use your fingers to gently dimple the top of the dough, about every 2 inches. Bake the focaccia in the oven for 15 to 18 minutes, until it is golden brown. Remove the focaccia from the oven and allow it to cool slightly before cutting it into squares and serving.

The bread turns out perfectly, with a great rise and it has spectacular flavor. I used some dried Italian seasoning on top of the bread to give it some extra flavor and adding some good olive oil to the top works nicely. We all enjoyed the bread, and it can be great to use when you have a crowd over for a large dinner of spaghetti and meatballs or another Italian dish. I know some people use this as the crust for their pizza and I think it would work nicely for that as well. I have seen some people use it as a sandwich bread also. You could make this dough with all-purpose flour instead of the “00” flour, and I have seen recipes doing that, but this flour seems to lend itself nicely to the texture and feel of the bread.

That’s all I have for today. Check back next time for another recipe. Until then, enjoy the rest of your day and enjoy your meal!

img_0670


Advertisement
 
Leave a comment

Posted by on February 21, 2017 in Appetizers, Breads, Cooking, Dinner, Pasta, Pizza, Side Dishes


Tags: , , , , , ,

Another From the King Arthur Playbook – Flour’s Original Pound Cake

I have to admit, I have a great love of pound cake. I know for some people it seems to be plain and not very exciting, but I love the texture and flavor of a good pound cake. It can go nicely as a dessert for just about any occasion, can be dressed up with fresh fruit or just whipped cream and even allows for some variation of flavors by adding different extracts, alcohols or flavorings. Another great thing about pound cake is that it is relatively easy to make, which is perfect for someone like me that is not the best baker in the world. The ingredients are all pretty basic and things you usually have around the house anyway so you can even put one together on relatively short notice to have a nice dessert or snack for surprise guests or for something to bring to someone’s home or party. While I was looking through the latest King Artur Flour catalog, I came across this recipe for their traditional pound cake and thought it would be a very good time to give the new oven a try and check it out.

Traditional Original Pound Cake

1 cup (16 tablespoons, 8 ounces) butter, softened

1 cup granulated sugar

4 large eggs, room temperature

2 cups all-purpose flour

1 1/2 teaspoons baking powder

1 teaspoon salt

1/2 cup milk

1 teaspoon vanilla extract

1 tablespoon brandy, sherry, rum or other liqueur or extract of your choice (optional)

Preheat the oven to 350 degrees. Lightly grease a 10 to 12-cup bundt pan.In a large bowl, beat the butter with a hand mixer or stand mixer until it is very light. Beat in the sugar gradually and then add the eggs, one at a time, until they are blended in. Scrape the bottom and sides of the bowl and beat the mixture until it is very light and fluffy.

In a large bowl, beat the butter with a hand mixer or stand mixer until it is very light. Beat in the sugar gradually and then add the eggs, one at a time, until they are blended in. Scrape the bottom and sides of the bowl and beat the mixture until it is very light and fluffy.

In a separate large bowl, whisk together the all-purpose flour, baking powder, and salt.

In another small bowl, whisk together the milk, vanilla extract, and alcohol or extract of your choice, if using.

Alternately add the wet and dry ingredients to the butter/sugar/egg mixture, starting the process with the flour mixture and ending with the flour mixture. Stir the mixture to combine the ingredients after each addition. Pour the batter into the prepared pan, smoothing out the top with a spatula.

Bake the cake for 60 to 65 minutes, until it springs back when pressed lightly on the top, and a long toothpick or cake tester inserted into the center of the cake comes out clean. If the cake appears to be browning too quickly, tent it with foil for the final 15 minutes of baking.

Remove the cake from the oven and loosen its edges in the pan. Allow the cake to cool in the pan for 5 minutes, then carefully turn the cake out of the pan onto a wire rack to cool. Slice and serve the cake the same day or store the cake, wrapped in plastic or wrapped well in plastic if you intend to freeze it for longer storage.

The cake goes perfectly with ice cream, fruit, whipped cream or just by itself (which is the way I like it personally). I enjoy the cake with a nice cup of coffee, and it is perfect after dinner or even as a mid-morning snack. The cake is rich and buttery and has excellent flavor. I had made cakes before where I added flavoring like lemon to it or added alcohol for extra flavor, but the plain version works best for me. Freezing the cake is easy and lets you have a quick dessert for those last-minute guests. You can warm it up quickly in just a few minutes in a 250-degree oven until it is just hot, about 8 to 12 minutes, and it will be perfect. It is always one of my favorite, go-to cakes and this one is pretty tried and faithful to go with for any time.

That’s all I have for today. Check back next time for another recipe. Until then enjoy the rest of your day and enjoy your meal!

img_0664

 
Leave a comment

Posted by on January 31, 2017 in Breakfast, Brunch, Cakes, Cooking, Dessert, Snacks, Uncategorized


Tags: , , , , ,

Coming Back with an Easy, No-Knead Deep Dish Pepperoni Pizza

It seems like it has been ages since I have had time to post any recipes I have tried. Now that the kitchen is back to being a kitchen again (and it looks great by the way), and some other family stuff is behind us, I can try to get back to posting on a regular basis. I thought I would try to ease back into everything with a simple recipe that I put together for dinner on Friday night. This one is from King Arthur Flour, which is my favorite source for all things baking. I buy a lot of their items for the different breads I make, but they also make an excellent pizza blend flour that makes a wonderful crust for pizza. This recipe makes a simple, no-knead pizza dough that you can turn out pretty quickly and dress up with your favorite toppings to make a great meal anytime. The recipe was published in their last catalog, and I thought it would be a great one to try out.

No-Knead Deep-Dish Pepperoni Pizza

1 1/4 cups lukewarm water

2 tablespoons olive oil

3 1/4 cups Pizza Flour Blend

1 1/2 tablespoons salt

2 teaspoons instant yeast

1 (15-ounce) can crushed tomatoes in puree

3 cups shredded mozzarella cheese

4 ounces sliced pepperoni

1/2 cup grated Parmesan cheese

Grease or oil with olive oil a 9″ x 13″ pan. To make the crust, Stir the water, olive oil, pizza flour blend, salt, and yeast together in a large bowl to form a slightly sticky, soft dough. Let the dough rise, covered for 30 minutes.

Place the dough in the oiled pan and let it rest for 10 to 15 minutes. Pat and stretch the dough to cover the bottom of the pan. Let the dough rest in the pan, covered with a towel, for another 30 minutes.

Preheat the oven to 425 degrees.

Cover the crushed pizza crust dough with the crushed tomatoes. Top the tomatoes with the mozzarella, then the pepperoni, and finally the Parmesan cheese. Place the pizza in the oven and bake the pizza for about 25 minutes, or until the filling is bubbly and the topping is golden brown.

Remove the pizza from the oven and carefully lift it out of the pan and onto a cooling rack (if you have a large spatula, it is a big help here). Allow the pizza to cool for about 15 minutes before cutting it and serving it.

The pizza crust recipe itself is the same recipe you will find listed on the back of the pizza flour blend bag from King Arthur. I typically make the dough in my bread maker, allowing it to do the kneading and rising over the course of two hours. This method cuts that in half and produces a nice crust perfect for use in a deep dish pan or rectangular pan. I added some spice to the tomatoes, mixing in some Italian seasoning for extra flavor, and you could easily add some basil, oregano or another spice blend that you might like on your pizza for added flavor. The crust comes out nicely, and you get a good size pizza out of it that has nice flavor and crunch to it. It is certainly one I will try again since we make pizza here about once a month.

That’s all I have for today. Check back next time for another recipe. I do plan to do a post about the kitchen and some of the new gadgets I have to play with, so keep an eye out for that. Until next time, enjoy the rest of yuor day and enjoy your meal!

img_0665

 
Leave a comment

Posted by on January 30, 2017 in Breads, Cooking, Dinner, Pizza, Uncategorized


Tags: , , , , ,

This is the Bread Recipe You Have Been Looking For

I have found over the last several months that I really like making bread. I have a good quality bread maker and use it often, but there is also something about making it all yourself from scratch that I get real enjoyment out of. From the time the yeast begins to bloom and you get that great aroma to getting your hands into the dough and kneading away (don’t forget how great of a workout kneading dough for 10 minutes can be for you) to shaping the dough and smelling it baking in the oven to the time you cut into that first piece and see the steam rise from the loaf as you put some soft butter on the warm bread, it can all be quite wonderful. Needless to say I have tried a lot of different bread recipes in this time frame, but the one I always seem to go back to is this one from King Arthur Flour. King Arthur Flour has been a fantastic source for me for inspiration, baking products and recipes and this bread recipe has turned into my favorite. I make this one about every 10 days or so because it gives me two loaves of bread and it is better than anything you can find yourself buying at any grocery store. The best part about it? It is really easy to make yourself.

French-Style Country Bread

For the Starter:

1 cup cool to lukewarm water (90°F to 100°F)

1/2 teaspoon active dry or instant yeast

1 1/4 cups unbleached bread flour or organic bread flour

1/4 cup (1 ounce) white whole wheat flour or whole wheat flour

For the Dough:

all of the starter (above)

1 cup lukewarm water (100°F to 115°F)

3/4 teaspoon active dry or 1/2 teaspoon instant yeast

1 tablespoon sugar

3 3/4 to 4 cups unbleached bread flour or organic bread flour

1 1/2 to 2 1/4 teaspoons salt, to taste

To make the starter: Stir all of the starter ingredients together in a large bowl to make a thick, pudding-like mixture. Cover the starter with plastic wrap and let it rest for at least 2 hours. For the best flavor, let the starter rest longer; overnight (up to 16 hours) is best. If you plan on making the dough in a bread machine, place the sponge ingredients in the bucket of your bread machine and turn the machine on for just a few seconds to mix the ingredients together. Turn the machine off and close the cover, then let the starter rest as directed above.

To make the dough: Stir down the starter with a spoon and add the water, yeast, sugar, 3 1/4 cups of the flour, and the salt. The dough will be a loose, messy mass. Let the dough rest for 12 to 15 minutes, then stir it again; it should become more cohesive and a bit smoother. The dough will handle better once it has had time for the flour to absorb the water while resting and relaxing. By using this method, you’ll tend to add less flour, and have much bigger holes in your finished bread.

Knead the dough, adding more flour as necessary, to make a soft dough, about 10 to 12 minutes.

Place the dough in a lightly greased bowl or plastic container, cover the container with lightly greased plastic wrap, and let the dough rise until it has almost doubled in size (depending on the weather, this could be 1 to 2 hours). If you are going out, or if you prefer, let the dough rise slowly in the refrigerator. If your dough has been refrigerated, allow it to come to room temperature before shaping it. It will warm up and rise at the same time.

Deflate the dough gently, but don’t knock out all the air; this will create those “holes” so important to French bread. For one large loaf, form the dough into a round ball; for two loaves, divide the dough in half and shape into two balls.

Place a semolina or cornmeal-dusted piece of parchment paper onto a baking sheet. Gently place the ball(s) of dough on the baking sheet, seam-side down.

Cover the bread gently with lightly greased plastic wrap and let it rise until it is puffy and about 40% to 50% larger, anywhere from 45 to 90 minutes.

Preheat your oven to 475°F.

Slash or cross-hatch the bread with a sharp knife or lame. Dust the dough with a little flour. Spritz water into the oven with a clean plant mister, and place the bread in the oven. Reduce the heat to 425°F and spritz the oven with water every few minutes for the first 15 minutes of baking.

Bake the bread for about 25 to 30 minutes, or until it’s a rich golden brown, and its interior temperature registers at least 190°F on a digital thermometer. The smaller loaves will bake more quickly, so keep your eyes on them.

Remove the bread from the oven, and cool it on a rack. Store the bread loosely wrapped in paper for a couple of days at room temperature; wrap it in plastic and freeze for longer storage.

If you are normally intimidated by the idea of making a starter or making your own bread, don’t be. This recipe makes things simple for you to do and you come out with bread that you will be proud to call your own. The crust of the bread comes out perfectly (spraying mist in the oven makes a big difference here) and the bread itself has the flavor, smell and look that is divine. The bread is great for sandwiches or to serve with any type of meal, makes great toast and is really great any time you want some. I typically leave one loaf out and freeze the other but I still find they are gone in about two weeks. I purchased a lame (pronounced lahm) from King Arthur so that I could score the bread and I am still learning and working with it, but you can create your own great looks and patterns on the bread with it (just be careful; they use razor blades and are incredibly sharp). You could certainly use your bread machine to do all of the kneading and the rise for you if you wanted to, but I love to do that part myself. It makes me feel like I am really creating something of my own. As I said, I make this recipe a lot and highly recommend it.

That’s all I have for today. Check back next time for another recipe. Until then, enjoy the rest of your day and enjoy your meal!

IMG_0393


Tags: , , , , , ,

Christmas Guide | King Arthur Flour

Looking for some baking ideas for Christmas? King Arthur Flour, one of my favorite companies, has got you all set with everything you need and all the recipes, tips and techniques you desire for baking breads, cookies, candy, rolls and you Christmas breakfast. See what you can do for the holidays. Check it out!

Source: Christmas Guide | King Arthur Flour


Tags: , , , , , , ,

Monday’s a Great Day for Beautiful Buns (Burger Buns, That Is)

Work has been overwhelming the last few days and I have barely had time to breathe, let alone cook and blog. I have a little bit of time right now as I have gotten caught up between projects, doing laundry, trying to get the house clean, picking Sean up from play practice and dealing with a wife and son that both have some type of virus so they sound like frogs. On top of that I really need to find time to go and get my haircut in all of this mess! Anyway, when I have found time to cook over the last few days I have been able to try out some recipes and one of them was perfect for when I made some pulled pork for dinner. I decided I wanted to make my own rolls for this one and found this great easy recipe from King Arthur Flour for beautiful burger buns. it is a very simple recipe that gives you great soft buns that are perfect for any type of sandwich and you can have them done in a couple of hours. With he breadmaker, they are even easier.

Beautiful Burger Buns

1 cup lukewarm water

2 tablespoons butter

1 egg

3 1/2 cups all-purpose flour

1/4 cup sugar

1 1/4 teaspoons salt

1 tablespoon instant yeast

3 tablespoons melted butter, for topping (optional)

Mix and knead the water, butter, egg, all-purpose flour, sugar, salt and yeast together – by hand, mixer with a dough hook attachment or by breadmaker making a basic dough – to make a soft and smooth dough. Cover the dough and let it rise for 1 to 2 hours or until the dough has nearly doubled in bulk. If you are using the breadmaker, you can use the rise function during the basic dough course for this.

Place the dough on a cutting board or work surface and gently deflate the dough and then divide the dough into 8 pieces. Shape each piece into a round ball and then flatten the ball so it is about 3 inches across. Place the buns on a lightly greased or parchment paper-lined baking sheet. Cover the buns with a damp kitchen towel and allow them to rise for about an hour until they are noticeably puffy.

Preheat the oven to 375 degrees. Brush the buns with about half of the melted butter, if desired. When the oven is up to temperature, bake the buns in the oven for 15 to 18 minutes until they are golden brown. remove the buns from the oven and brush them with the remainder of the melted butter, if desired. This will give the buns a satiny, buttery crust. Cool the buns on a wire rack before using.

If you want to make slightly smaller buns, which is what I did, divide the dough into 12 pieces instead of 8 and bake them for 12 to 15 minutes instead of the 15 to 18 minutes. you could go over even smaller if you wanted slider buns and cut the dough into 24 pieces and bake them for 12 to 15 minutes if you like. I have to say the resulting buns were really good. they were perfectly browned and cooked, soft on the outside with a nice crust and ideal for the pulled pork that we had for dinner. These would also be great for hamburgers or really any type of sandwiches that you might like to serve on them. they are so easy to do you could put them together just about any weekend that you have time to do them and then freeze some to use the rest of the week when you need them. Sean is already planning on his lunches for the rest of this week with them.

That’s all I have for today. Check back next time for another recipe (hopefully it will be tomorrow). Until then, enjoy the rest of your day and enjoy your meal!

burgerbuns

 
Leave a comment

Posted by on March 9, 2015 in Breads, Sandwiches


Tags: , , , , ,

A Bounty of Bread to Enjoy with My Breadmaker – Homemade Rye Bread

Yesterday I wrote about the breadmaker that I received for Christmas and have been using pretty regularly since then. I have tried a few different recipes, including the basic white bread recipe that Sean and Michelle both use for their lunches and sandwiches. I prefer something a little different from just white bread, so I decided I was going to give the rye bread recipe a try. The one they list in the book for the breadmaker is pretty basic and simple so I decided to go along with that, but I also wanted to combine it with a recipe that I found at King Arthur Flour for a sandwich rye bread. The resulting recipe listed below is really just combination of the two recipes.


Basic Sandwich Rye Bread

1 1/2 cups water

4 1/4 cups bread flour

2/3 cup rye flour

2 tablespoons sugar

1 1/2 teaspoons salt

1 tablespoon Dijon mustard

2 tablespoons butter

2 teaspoons active dry yeast

1 tablespoon caraway seeds (optional)


To use with the Zojirushi breadmaker, measure and combine the ingredients into the baking pan in this order: water, bread flour, rye flour, sugar, salt, Dijon mustard and butter. Make a depression in the middle of the flour and place the yeast in the depression. Make sure the yeast does not touch any of the liquid. If the dry yeast contacts water the results from the breadmaker may not be ideal. Insert the baking pan into the unit and close the lid. To select the desired course, press the SELECT COURSE button to set the arrow to the BASIC WHEAT. Press the start button and allow the breadmaker to proceed through the cycles of preheating, kneading, rising and then baking. If you are using the caraway seeds, when it is time to add the ingredients such is the seeds, the breadmaker will beep for 30 seconds and ADD will flash in the display. Open the lid to the breadmaker and add the appropriate ingredients. Allow the machine to proceed through the baking cycle and carefully remove the baking pan when the machine has indicated that the baking process is complete. Remove the bread from the baking pan and allow it to cool.


Granted, this particular recipe is designed for the specific Zojirushi breadmaker that I am using, but I think it could be adapted to fit with other breadmakers. The breadmaker takes 3 hours and 40 minutes to complete everything for this particular recipe. In the end, the result of the recipe was very tasty. The bread had a nice crust and crunch to it on the outside while the inner layer of the bread was done perfectly. I used this for my sandwiches pretty much all week long and have made it again since that initial recipe because I like the result so much. It certainly does provide a savings considering what the cost of a typical rye bread is here at the local stores. One loaf seem to last for me about 7 to 10 days so I think we certainly got a lot out of it. I did not add the caraway seeds to mine though I do like to have rye bread that way on occasion and I am sure it would taste just fine. I enjoyed the bread with chicken salad and tuna salad but anything you want to use the bread for would be perfect. You could also adapt this recipe to make it without a breadmaker. If you are interested in that particular method, here is the link to the original recipe at King Arthur Flour.

That’s all I have for today. Check back next time for another recipe. Until then, enjoy the rest of your day and enjoy your meal!

ryebread


8 Comments

Posted by on February 5, 2015 in Breads, Cooking, Lunch, Sandwiches


Tags: , , , , , , ,

It’s No Pretzel From a Shopping Cart, But they are Close – Homemade Pretzel Bites

One of my favorite snacks since I was a kid has always been the hot pretzels we used to get of the streets of New York City or when we went to the ballpark. I can remember going to Shea Stadium and getting a hot pretzel that was made over hot coals in the shopping cart from one of the vendors outside of the stadium. Sure they were a little bit burnt but the smell and the flavor is something that stayed with me and I really enjoyed it. I have made pretzels at home before and while they have not been able to replicate that shopping cart experience, they have been pretty good. With the Super Bowl this past weekend, I was looking for a snack that we could make that would go well with the game and I came across this recipe at King Arthur Flour for a very simple pretzel bite that takes no time at all to put together. I actually did most of the work in my new bread machine, which I will write more about tomorrow and in the coming days with recipes that I have tried in there.


Homemade Pretzel Bites

2 1/2 cups all-purpose flour

1 teaspoon salt

1 teaspoon sugar

2 1/4 teaspoons instant yeast

7/8 to 1 cup warm water

1 cup boiling water

2 tablespoons baking soda

Coarse, kosher or pretzel salt

6 tablespoons butter, melted

To make the dough by hand, or with a mixer: Place the all-purpose flour, salt, sugar, yeast and warm water into a bowl, and beat until the ingredients are well combined. Knead the dough, by hand or machine, for about 5 minutes, until it is soft, smooth, and quite slack. Flour the dough in place it in a bag and allow the dough to rest for 30 minutes.

To make the dough with a bread machine, place the all-purpose flour, salt, sugar, yeast, and warm water into the pan of your bread machine. Program the machine for a basic dough and press Start. Allow the dough to proceed through its kneading cycle (there is no need to allow the dough to rise), then cancel the machine, flour the dough, and give it a rest in a plastic bag, as instructed above, for 30 minutes.

While the dough is resting, prepare the topping. Combine the boiling water and baking soda, stirring until the baking soda is totally or almost totally dissolved. Set the mixture aside to cool until it is lukewarm. Preheat the oven to 400°. Prepare a baking sheet by spraying it with vegetable oil or nonstick cooking spray, or by lining the pan with parchment paper.

Transfer the pretzel dough to a lightly greased work surface, and divide it into 6 equal pieces. Roll the 6 pieces of dough into 12 inch to 15 inch long ropes. Cut each rope crosswise into about 12 pieces. Pour the cooled baking soda solution into a pan large enough to hold the pretzel bite dough pieces. Place the bites into the solution, gently swish them around, and leave them there for about 2 to 3 minutes. Transfer the bites to the greased or parchment lined baking sheet, and topped them with pretzel salt, coarse salt or kosher salt. Bake the bites in the oven for 12 to 15 minutes, until they are golden brown. Remove the bites from the oven, and roll them in melted butter. Place the pretzel bites on a rack to cool slightly. If you are not going to eat them immediately store them in an airtight container until you are ready to serve them.


The process was really easy using the bread machine, but it does not seem like it would be much harder if you did this by hand or with a mixer. The pretzels turned out perfectly with a really nice chew to them and they had that golden crunchy outside that you like to have in a pretzel. You could easily leave off the salt if you did not want them salted or substitute something like cinnamon-sugar or just plain sugar if you prefer to have a sweeter pretzel. The total time did not take that long, only a little bit more than an hour or so, so you can put these together for just about any type of occasion, party, buffet or snack that you might feel like having. I know I will be making them again pretty soon.


That’s all I have for today. Check back next time for another recipe. Until then, enjoy the rest of your day, and enjoy your meal!

pretzelbites

 
2 Comments

Posted by on February 2, 2015 in Breads, Cooking, Picnic Fare, Snacks


Tags: , , , , , ,

 
National Day Calendar

Fun, unusual and forgotten designations on our calendar.

Authentic Autograph Source, LLC

Licensed autographs and collectibles dealer in the Pacific NW! We have a wide range of sports, celebrities, and more!

Jennifer Probst

a little bit naughty a little bit nice

Laissez Faire

Letting Life Lead

%d bloggers like this: