RSS

Category Archives: Pork

Bring On the Baby Back Ribs

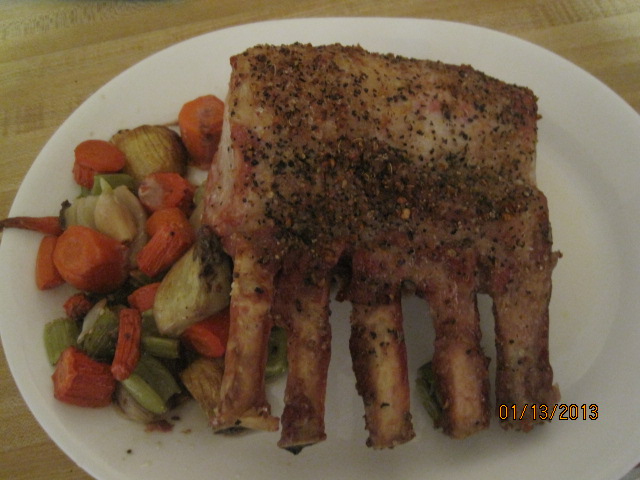
I love making ribs of all kinds no matter what time of year it is, but as the summer approaches it gets to be more and more the type of thing that people want to cook on the grill. Unfortunately, living in a condominium here in New York limits the grilling that we can do since we can’t have a charcoal or gas grill here. This means that I have to try to find ways to do this type of cooking indoors. I am always on the lookout for new recipes for ways to make spare ribs or baby back ribs (which are my personal favorite) and I came across this one from Williams-Sonoma on their website so I thought I would give it a try.

Baby Back Ribs

2 racks baby back ribs (about 5 pounds total)
2 teaspoons kosher salt
1 teaspoon smoked paprika
1 teaspoon dried oregano
1 teaspoon dried thyme
1/2 teaspoon granulated garlic
1/2 teaspoon onion powder
1/2 teaspoon freshly ground pepper
1/2 cup ketchup-style chili sauce
1/2 cup peach or apricot preserves
2 tablespoons dark molasses
1 tablespoon cider vinegar
1 tablespoon Dijon mustard
1/2 teaspoon hot pepper sauce

Preheat the oven to 350°. Cut each rib rack into 2 or 3 sections. Mix together the salt, paprika, oregano, thyme, granulated garlic, onion powder and pepper. Sprinkle the mixture on both sides of the ribs and rub it into the meat.

Arrange the ribs, overlapping slightly if necessary, in a large roasting pan. Cover the pan tightly with aluminum foil, place in the oven and cook for 30 minutes. Remove the foil, turn the ribs and return them to the oven. Continue cooking until the ribs are tender and browned, about 30 minutes more.

Meanwhile, make the sauce. In a small saucepan, stir together the chili sauce, peach preserves, molasses, vinegar, mustard and hot pepper sauce and bring to a simmer over medium-low heat. Remove from the heat and set aside.

If you are you using a grill, prepare the grill for direct-heat cooking over medium-high heat. Lightly oil the cooking grate. Brush both sides of the ribs with the sauce. Place on the grill, cover and cook, turning once, until shiny and glazed, about 3 minutes per side. Alternatively, if you are planning to use the oven, increase the oven temperature to 425°. Pour off the fat in the roasting pan, then return the ribs to the pan. Brush the ribs with some of the sauce and cook until the ribs are shiny and glazed, about 5 minutes. Turn, brush the ribs with more of the sauce and cook to glaze the other side, about 5 minutes more.

Transfer the ribs to a carving board and let stand for 5 minutes. Cut between the bones into individual ribs, heap on a platter and serve with any of the remaining sauce.

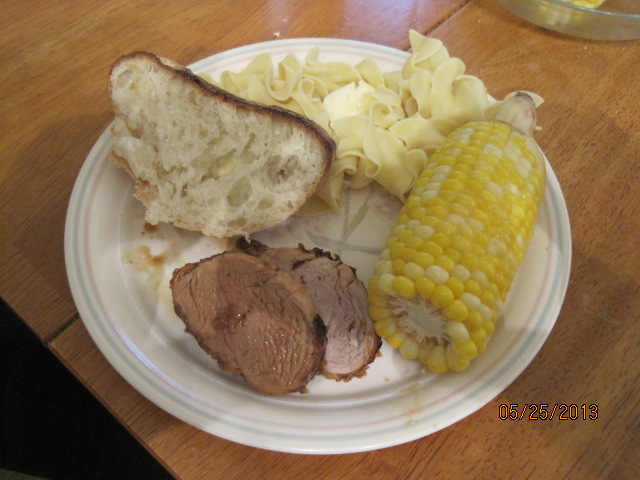
You could easily use spare ribs for this recipe instead of the baby back ribs. Just keep in mind that the spare ribs tend to be larger and a little tougher than the baby back ribs so they will take more time to cook. You should allow for about 45 minutes of covered baking, another 45 minutes uncovered and then 15 minutes after you put the sauce on for glazing. I think they came out great cooked just in the oven but if you have the opportunity to put them on the grill after starting them in the oven I think you could get nice flavor from that as well. I like the glaze and the combination of the apricot preserves (which is what I had on hand), the chili sauce, the mustard and the hot pepper sauce. It made a nice combination and gave a great flavor to the ribs. I served this with sweet potatoes and corn on the cob, although you could easily do it with coleslaw and potato salad, which go great with things like ribs.

That’s all there is for today. Check back again next time and see which recipes that I will post. I tried a new method for burgers yesterday and made my own homemade hamburger rolls and a special ketchup, both recipes that I got from Marc Murphy, and I think they turned out great. Check in next time and I’ll be posting those recipes. I am also planning a few other things for the coming days and weeks so you want to keep checking back and see what comes along. Until then, enjoy the rest of your day and enjoy your meal!002

 
Leave a comment

Posted by on May 30, 2013 in Cooking, Dinner, Grilling, Pork


Tags: , , ,

A Moment for Maple-Glazed Pork Tenderloin

It was a cool and rainy day here in our part of New York yesterday. I know parts north of here actually got snow, which sounds ridiculous for Memorial Day weekend, but it did happen. I’m sure that had something of an influence in the type of dinner I decided to make last night. I chose this recipe from America’s Test Kitchen for a maple-glazed pork tenderloin. It was very quick to make and would be excellent for a weeknight meal and the time of the year.

Maple-Glazed Pork Tenderloin

3/4 cup maple syrup
1/4 cup molasses, light or mild
2 tablespoons bourbon or brandy
1/8 teaspoon ground cinnamon
Pinch ground cloves
Pinch cayenne pepper
1/4 cup cornstarch
2 tablespoons sugar
1 tablespoon salt
2 teaspoons ground black pepper
2 pork tenderloins (1 1/4 to 1 1/2 pounds each)
2 tablespoons vegetable oil
1 tablespoon whole-grain mustard

Adjust an oven rack to the middle position and heat the oven to 375°. Stir 1/2 cup of maple syrup, molasses, bourbon, cinnamon, cloves, and cayenne together in a 2-cup liquid measure; set aside. Whisk the cornstarch, sugar, salt, and black pepper in a small bowl until combined. Transfer the cornstarch mixture to a rimmed baking sheet. pat the tenderloins dry with paper towels, then roll them in the cornstarch mixture until they are evenly coated on all sides. Thoroughly pat off any excess cornstarch mixture.

Heat the oil in a large, heavy-bottomed nonstick skillet over medium-high heat until just beginning to smoke. Reduce the heat to medium and place both tenderloins in the skillet, leaving at least 1 inch in between them. Cook until they are well browned on all sides, about 8 to 12 minutes. Transfer the tenderloins to a wire rack set inside a rimmed baking sheet.

Pour off any excess fat from the skillet and return it to medium heat. Add the syrup mixture to the skillet, scraping up any browned bits with a wooden spoon, and cook until the mixture is reduced to 1/2 cup, about 2 minutes. Transfer 2 tablespoons of the glaze to a small bowl and set aside. Using the remaining glaze, brush each tenderloin with approximately 1 tablespoon of glaze. Roast the tenderloins until an instant-read thermometer inserted in the thickest part of the tenderloins registers 130°, about 12 to 20 minutes. Brush each tenderloin with another tablespoon of glaze and continued to roast until an instant-read thermometer inserted in the thickest part of the tenderloins registers 135 to 140°, about 2 to 4 minutes longer. Remove the tenderloins from the oven and brush each with the remaining glaze; allow to rest, uncovered, for about 10 minutes.

While the tenderloins rest, stir the remaining 1/4 cup of maple syrup and mustard into the reserved 2 tablespoons of glaze. Brush each tenderloin with 1 tablespoon of the mustard glaze. Transfer the meat to a cutting board and slice into 1/4-inch-thick pieces. Serve, passing the extra mustard glaze at the table.

Rolling the tenderloins in the cornstarch mixture really did make a difference in making sure that the coating and glaze adhered well to the meat. It also helped to give a nice crunch to the outer coat of the meat and glaze. Make sure you use real maple syrup and not the imitation stuff most of us use on pancakes and waffles. The imitation will be way too sweet for this type of recipe. I love the way it all came out and that it did have a little bit of sweetness to it because of the syrup and molasses and you could even taste a little bit of the bourbon in the recipe. I served this with noodles and corn on the cob.

That’s all there is for today. I’ll have some more recipes this week, including a few desserts that we made for a classic pound cake and Michelle’s famous oatmeal cookies. We also did a nice homemade breakfast today that included some nice home fries, some sausage and scrambled eggs, a basic breakfast but it was all homemade. Check back later in the week for all of that. Until then, enjoy the rest of your day today and enjoy your meal!002

 
Leave a comment

Posted by on May 26, 2013 in Cooking, Dinner, Pork


Tags: , , ,

Mother’s Day Dinner, Part 3- Baked Sausage and Peppers

For the third part of the dinner I made on Mother’s Day, we decided to make something for those who may not be into pasta and tomato sauce as much. I had bought some Italian sausage and was intending just to make plain sausage and peppers and have some rice to serve with it on the side. There’s not much different you can really do with sausage and peppers, but I thought it would be much better, cleaner and maybe even healthier if possible if I did the whole thing in the oven. It’s quick, it’s easy and if you use a disposable foil pan, fast clean-up too.

Baked Italian Sausage and Peppers

1 1/2 pounds sweet or hot Italian sausage links (about 6 links)

2 large onions, sliced

1 red bell pepper, sliced

1 yellow bell pepper, sliced

1 orange bell pepper, sliced

2 tablespoons olive oil

Salt and pepper, to taste

Preheat the oven to 375 degrees. Slice the onions and peppers, seeding the peppers along the way.Place the onions and peppers in the bottom of a large 9 x 13 baking dish. Toss the peppers and onions with the two tablespoons of olive oil. Season with salt and pepper. Top the vegetables with the Italian sausage links. Prick each sausage several times with a sharp knife or the tines of a fork on the bottom and the top of each link. This will help to release some of their juices to flavor the peppers and onions.

Cover the pan with foil and bake in the oven for 20 minutes. After 20 minutes, remove the foil so that the sausages can brown and bake for another 20 minutes. Turn the sausages over to brown on the opposite side and bake for another 20 minutes. Remove from the oven and serve.

That’s all there is to it. I actually added some extra pepper and onions on top of the sausages when I first put them in the pan to get even more flavor. You could certainly serve these on hoagie rolls as a traditional sandwich if you wanted to go that route. You could even do the same recipe on your grill if you wanted, perhaps getting some grill marks on the sausage before you put them in the pan to cover them. Steaming them for that 20 minutes really helps to release some flavor and then browning them for 40 minutes makes them perfect and crisp, just the way I like it. Everyone loved them and there were no leftovers at all and they were taken so fast I never got a picture of them!

I still have a couple of recipes leftover from the Mother’s Day meal that I will post tomorrow. Work kind of slowed me down this week so I didn’t get to post as often as I would like,  but tomorrow we will have the wilted spinach salad with warm bacon vinaigrette and the tomato and mozzarella. Very simple and easy recipes for both of them. I am also working on the meals for next week so I hope to get to them as well. Keep checking back and see what we come up with. Until next time, enjoy the rest of your day and enjoy your meal!

 
5 Comments

Posted by on May 17, 2013 in Cooking, Dinner, One Pot Meals, Pork, Sandwiches, Sausage


Tags: , , , ,

Sweet and Sour Pork Stir Fry

I try to do a different stir-fry each week for one of our dinners. It gives us a chance to have a good meal loaded with vegetables and it usually only takes about 15 or 20 minutes to actually cook. The cleanup from a stir-fry meal is also very easy as there are usually only two pots to clean, one for this stir-fry and one for the race. The leftovers are also make a great lunch for the next day or so. This past week, I used the recipe I found on Food Network for a sweet and sour pork recipe.

Sweet and Sour Pork

1 pound pork tenderloin, cut into 1/2 inch pieces
2 1/2 tablespoons balsamic vinegar
Kosher salt
2 teaspoons low-sodium soy sauce
1 tablespoon cornstarch
3 tablespoons ketchup
3 tablespoons sugar, plus a pinch
3 tablespoons of vegetable oil
3 cloves garlic, minced
2 carrots, thinly sliced
3 scallions, cut into 1/2-inch pieces
3 cups snow peas, cut in half

Toss the pork with 1/2 tablespoon of the balsamic vinegar and a pinch of salt in a bowl. Mix the remaining 2 tablespoons of vinegar, the soy sauce, cornstarch, catch up, 3 tablespoons of sugar, 1/3 cup of water and half a teaspoon of salt in another bowl.

Heat 2 tablespoons of vegetable oil in a large skillet over high heat. Add the pork and slowly stir until it turns mostly opaque, about two minutes. Remove the pork with a slotted spoon and transfer it to a plate. Discard the oil and wipe out the skillet.

Keep the remaining 1 tablespoon of vegetable oil in the skillet, then stir-fry the garlic with the pinch each of salt and sugar, about 15 seconds. Add the carrots and scallions and stir-fry until crisp-tender, about two minutes. Add a little water if the garlic starts to stick to the skillet. Add the pork, snow peas and soy sauce mixture; stir until the pork is cooked through and the sauce is thickened, about three minutes.

As usually happens when I am making a stir-fry, I don’t always use the vegetables that are exactly in the recipe. As I’ve said before, I usually have the bag in the freezer of mixed frozen vegetables that are packaged specifically with a stir-fry in mind. This is what I ended up using this time as well. The mixture had broccoli, carrots, water chestnuts, snow peas, peppers and onions. You can always use whatever vegetables you like where keep things simple and just use the carrots and snow peas that are in the ingredients for this recipe. I served it with white Rice, but you could certainly use brown rice or any of the type of race you like or no rice at all if you are trying to eliminate the starch.

That’s all I have for today. I need to get back to work to try to get as much done as I can. Sean and I are heading out to the Mets game tonight at Citi Field. Were hoping to see a good game and of course we always enjoy whatever food happens to be available while we watch the game. I know they have a few new places as far as eating this year, so I’ll have to check it out and see what they have and report back. Until the next time, enjoy the rest of your day and enjoy your meal!

Sweet and Sour Pork 004

 
Leave a comment

Posted by on May 7, 2013 in Cooking, Dinner, One Pot Meals, Pork


Tags: , , , , ,

Cinco de Mayo Feast

I wanted to make something for Cinco de Mayo today that was different for me at least without it taking me hours in the kitchen or having something that is smothered in cheese (I am not a fan of all things cheesy). I looked around this past week and saw some great recipes in a few places and decided to give them a try. The bulk of them came from America’s Test Kitchen, including this one for Mexican Pulled Pork, or Carnitas.

Mexican Pulled Pork (Carnitas)

1 (3 1/2 to 4-pound) boneless pork butt, fat cap trimmed to 1/8 inch thick, cut into 2-inch chunks

Salt and ground black pepper

1 teaspoon ground cumin

1 small onion, peeled and halved

2 bay leaves

1 teaspoon dried oregano

2 tablespoons juice from 1 lime

2 cups water

1 medium orange, halved

Tortillas

Lime wedges

Minced red onion

Fresh cilantro leaves

Thinly sliced radishes

Sour cream

Guacamole (recipe to follow)

Salsa

Adjust an oven rack to the lower-middle position and heat the oven to 300 degrees. Combine the pork, 1 teaspoon of salt, 1/2 teaspoon of pepper, cumin, onion, bay leaves, oregano, lime juice and water in a large Dutch oven. The liquid should just barely cover the meat. Juice the orange into a medium bowl and remove any seeds. You should have about 1/3 a cup of juice. Add the juice and the spent orange halves to the pot. Bring the mixture to a simmer over medium-high heat, stirring occasionally. Cover the pot and transfer it to the oven; cook until the meat is soft and falls apart when prodded with a fork, about 2 hours, flipping pieces of meat once during the cooking process.

Remove the pot from the oven and turn the oven to broil. Using a slotted spoon, transfer the pork to a bowl; remove the orange halves, onion, and bay leaves from the cooking liquid and discard. Do not skim the fat from the liquid. Place the pot over high heat and simmer the liquid, stirring frequently, until thick and syrupy. A heat-safe spatula should leave a wide trail when dragged through the glaze. The process should take 8 to 12 minutes. You should have about 1 cup of reduced liquid when done.

Using two forks, pull each piece of pork in half. Fold in the reduced liquid; season with salt and pepper to taste. Spread the pork in an even layer on a wire rack set inside a rimmed baking sheet or on a broiler pan. The meat should cover almost the entire surface of the pan. Place the baking sheet on the lower-middle rack and broil until the top of the meat is well browned but not charred and the edges are slightly crisp, about 5 to 8 minutes. Using a wide metal spatula, flip the pieces of meat and continue to broil until the top is well browned and edges are slightly crisp, about 5 to 8 minutes longer. Serve immediately with warm tortillas and any garnishes that you like.

All 3 of us loved this pork. These tacos were easily some of the best I had made. The pork just melted in your mouth and was cooked perfectly. You could easily use this pork in other ways for other Mexican meals if you wanted, such as burritos, enchiladas or tamales, but I think they worked great as a taco myself. We did have some good leftovers which I am looking forward to having for lunch this week.

As a good side dish to go along with this, I decided to make a Cuban-Style Black Beans and Rice (Moros y Cristianos). I thought it would make a nice accompaniment to the pork and I got the recipe from America’s Test Kitchen as well.

Cuban-Style Black Beans and Rice (Moros y Cristianos)

Salt

1 cup dried black beans, rinsed and picked over

2 cups chicken broth

2 cups water

2 large green peppers, halved and seeded

1 large onion, halved at the equator and peeled, root end left intact

1 head garlic, 5 medium cloves removed and minced, remaining head halved at the equator with skin left intact

2 bay leaves

1 1/2 cups long grain white rice

2 tablespoons olive oil

6 ounces lean salt pork, cut into 1/4 inch dice

1 tablespoon minced fresh oregano leaves

4 teaspoons ground cumin

2 tablespoons red wine vinegar

2 medium scallions, sliced thin

1 lime, cut into 8 wedges

Dissolve 1 1/2 tablespoons salt in 2 quarts of cold water in a large bowl. Add the beans and soak at room temperature for at least 8 hours and up to 24 hours. Drain and rinse well.

In a large Dutch oven with a tight-fitting lid, stir together the drained beans, broth, water, 1 pepper half, 1 onion half (with root end), halved garlic head, bay leaves and 1 teaspoon salt. Bring to a simmer over medium-high heat, cover, and reduce the heat to low. Cook until the beans are just soft, about 30 to 40 minutes. Using tongs, remove discard the pepper, onion, garlic and bay leaves. Drain the beans in a colander set over a large bowl, reserving 2 1/2 cups of the bean cooking liquid. If you don’t have enough bean cooking liquid left, add some water to equal 2 1/2 cups. Do not wash out the Dutch oven.

Adjust an oven rack to the middle position and heat the oven to 350 degrees. Place the rice in a large fine-mesh strainer and rinse under cold running water until the water runs clear, about 1 1/2 minutes. Shake the strainer vigorously to remove all excess water; set the rice aside. Cut the remaining peppers and onion into 2-inch pieces and process them in a food processor until broken into rough 1/4-inch pieces, about eight 1-second pulses, scraping down the sides of the bowl as necessary; set the vegetables aside.

In the now-empty Dutch oven, heat 1 tablespoon of oil and the salt pork over medium-low heat; cook, stirring frequently until lightly browned and rendered, about 15 to 20 minutes. Add the remaining oil, chopped peppers and onion, oregano, and cumin. Increase the heat to medium and continue to cook, stirring frequently, until the vegetables are softened and beginning to brown, about 10 to 15 minutes longer. Add the minced garlic and cook, stirring constantly, until fragrant, about 1 minute. Add the rice and stir to coat, about 30 seconds.

Stir in the beans, reserved bean cooking liquid, vinegar and 1/2 teaspoon of salt. Increase the heat to medium-high and bring to a simmer. Cover and transfer to the oven. Bake until the liquid is absorbed and the rice is tender, about 30 minutes. Fluff with a fork and let rest, uncovered, for 5 minutes. Serve, passing the scallions and lime wedges separately.

A few things about this recipe. First, I did not use salt pork. I had bacon on hand, so that is what I used. If you are using bacon, you only need to cook it for about 4 to 8 minutes instead of the 15 to 20 for the salt pork. If you want a more vegetarian version of the recipe, eliminate the pork altogether and use water instead of the chicken broth. You could also add a little tomato paste when cooking the vegetables for some more body and flavor. Lastly, although a traditional sofrito calls for green peppers, green peppers upset my stomach and Michelle’s, so I went for red pepper instead. I actual like the flavor better and the color of the final product. This recipe makes a lot of rice and could easily feed 8 people, so you may want to cut it down to half if you have a smaller table to feed. Overall, I thought it was a very nice side dish and I could use the leftovers with a wide variety of other dishes.

I also made the fresh salsa that I usually make, which is America’s Test Kitchen as well if you want to check it out. I also made the guacamole I had made in the past as well if you want to see that recipe. The entire meal turned out great and we had a very relaxing late lunch/early dinner for the day.

I do have several other recipes to share for this week, including the dessert I made for tonight of a Mango-Pineapple Fruit Salad. I also have recipes this week for chicken, crab cakes, griddle cakes and a few others since I didn’t get to share any this past week. Check back and see if you like anything you see. Until then, enjoy the rest of your day and enjoy your meal!010 007 008 009


Tags: , , , , , , , , , ,

Oven Roasted Rack of Pork

This week was mostly a week of meals I had already posted recipes for, so I really didn’t have anything new to write about other than this one meal that I made. I had gone shopping at Adam’s last week and they had a center cut rack of pork on sale for a really good price. I had never made one before, the rack only cost about $5.00 and would more than feed the three of us, so I figured what the heck and I bought one. Then I had to try to find a recipe to use to make it. I looked around at all the usual places I got on the Internet for recipes, but I didn’t really see what I liked, so I put my faith in Google and went looking there. That is where I turned up this recipe, on a website called A Culinary Journey With Chef Dennis. The recipe sounded good, it was easy, and I had all the ingredients, so it was the winner.

Oven Roasted Rack of Pork

1 8 bone center cut rack of pork, frenched

Olive oil

Salt and pepper

2 tablespoons Montreal Steak Seasoning

2 carrots, chopped roughly

1 onion, chopped roughly

2 stalks of celery, chopped roughly

6 cloves of garlic, peeled

Preheat the oven to 450 degrees. In a roasting pan, add the rough cut vegetables. Rinse the rack of pork and pat it dry with paper towels. Place the rack, fat side up, on top of the vegetables in the pan. Apply a liberal amount of olive oil to the pork, rubbing it into the meat. Sprinkle the entire rack with salt and pepper, and then coat with the Montreal Steak Seasoning (use more if you want more of coating to form a crust). Place the pan in the oven and roast for 15 minutes.

After 15 minutes, reduce the oven temperature to 325 degrees and continue roasting for approximately 2 hours or until the internal temperature on the outside of the rack has reached 160 degrees. This will ensure that the outside of the pork is well done while the center cuts are not quite as cooked.

Remove the rack from the oven and place it on a cutting board and tent loosely with aluminum foil. Allow the pork to rest for 10 minutes before slicing. While the rack is resting, place 2 cups of water in the roasting pan and place on the stovetop over medium-high heat. With a spoon, loosen all the baked meat scraps from the pan to help make a pan gravy. Allow to cook and reduce for 10 minutes. Strain out all the vegetable pieces.

Cut the rack along the bones, making even portions of pork and serve with the pan gravy.

It was very simple and made for a nice, elegant meal. This one might be better served for a weekend  when you have more time to cook it instead of a weeknight meal, but it is quite delicious. I served it with some wild rice and brussels sprouts and it was all very good and looked great on the plate.

Another easy meal for your arsenal! We’re going shopping so I still haven’t planned out the meals for next week yet, so we’ll have to see what comes along and is on sale for next week to make. Check back and see what I can come up with. Until next time, enjoy your evening and enjoy your meal!

003 002

 
Leave a comment

Posted by on January 18, 2013 in Cooking, Cooking Websites, Dinner, Pork


Tags: , , ,

Glazed Pork Tenderloin

This is actually a recipe I made earlier in the week, but I haven’t had time to do a post until tonight so here it goes. I like to make a pork tenderloin because there are so many things you can do with it. Also, they don’t often take a real long time to cook,so they are great weeknight meal when you don’t have a lot of time to put a dinner together. This one comes from Williams-Sonoma and is a simple one with a nice glaze and you can use some fruit along with it. I actually added some apple to this one since I only had two pears on hand and I think they added a nice flavor to the dish.

Glazed Pork Tenderloin with Pear and Thyme

1 pork tenderloin, about 1 pound, trimmed of excess fat

Salt and freshly ground black pepper, to taste

1 tablespoon extra-virgin olive oil

1 red onion, cut into wedges

4 Bosc pears, cored and each cut into 8 wedges

2 tablespoons honey

1 tablespoon balsamic vinegar

Leaves from 12 fresh thyme sprigs

Preheat the oven to 400 degrees.

Season the pork tenderloin well with salt and pepper. In a ovenproof saute pan over medium-high heat, warm the olive oil until shimmering. Sear the pork, turning occasionally, until well browned, about 6 to 8 minutes total. Transfer to a plate.

Add the onion and pears to the pan and saute for 1 minute. Return the pork to the pan and drizzle with the honey and vinegar. Scatter the thyme leaves in the pan. Transfer to the oven and roast until the juices run clear when the pork is pierced with a knife, 15 to 20 minutes.

Transfer the pork to a cutting board, cover loosely with aluminum foil and let rest for 5 minutes. Cut into slices about a 1/2-inch thick. Divide the pork, pears and onion wedges among 4 individual plates and drizzle with the glaze from the pan and serve immediately.

This was a very tasty and quick meal to make. I served it with some roasted potatoes to keep it very simple.

That’s all there is to it. not much of a recipe I know, but it’s great for a middle of the week meal when you need something fast and simple. I’ll have some recipes this week of things I am making, including a rack of pork, split pea soup, some mini donuts, and more. Check back later in the week to see what’s cooking. until then enjoy your evening and enjoy your meal!

002


Leave a comment

Posted by on January 13, 2013 in Dinner, Pork


Tags: , ,

How to Make the Best Pork Chops – How to Cook – Cook’s Country

How to Make the Best Pork Chops – How to Cook – Cook’s Country.

Pork Chops seem to be a staple in every home. We all make them one way or another, but a lot of people are afraid of cooking them because they fear under-cooking or overcooking them. They can also be very dry just on their own if they aren’t done right and don’t have a little sauce to go with them. The folks at Cook’s Country give you some great techniques here on the best methods to cook pork chops, some recipes and some sauces to go along with them. Check it out and the next time you make pork chops you’ll be much happier with the results!

 
Leave a comment

Posted by on December 7, 2012 in Cooking, Cooking Websites, Dinner, Pork, Sauce


Tags: , , , ,

Let’s Have a Snack: Homemade Egg Rolls

I had seen some egg roll wrappers on sale in the supermarket this week and thought I would give this a try. I did need to pick up a few things along the way for this, but none of it was hard to find; it was all basic stuff that I would normally buy or had in the house. I actually found a use for that oyster sauce I bought to make the Thai dinner the other night!

Egg Rolls

1 package of egg roll wraps

1 pound ground pork

1 teaspoon minced fresh ginger

2 cups cabbage, finely chopped

1/4 pound bean sprouts

1/2 cup carrots, shredded

3 green onions, chopped

2 tablespoons oyster sauce

Heat a non-stick skillet over medium high heat. Add 1 tablespoon vegetable and heat until shimmering. Add the pork and the ginger and heat until lightly browned, about 2 to 3 minutes. Add the cabbage, bean sprouts, carrots and green onions and cook for 2 minutes. Stir in the oyster sauce. Remove the skillet from the heat and allow the mixture to cool completely.

Use 2 tablespoons of filling per egg roll. Place the filling diagonally on the wrap. Fold the bottom corner over the filling and roll snugly half-way to cover the filling. Fold in both side corners snugly against the filling; moisten the edges of the last flap with water. Roll the wrap up tightly and seal the top corner. Lay the egg roll flat side down until they are ready to cook.

If you want to fry them, In a large skillet heat vegetable oil to 350 degrees. Place the egg rolls flap side down, a few at a time, making sure not to crowd them in the pan (you’ll have to do this in batches if you are making a lot). Turn the rolls occasionally and cook until golden, about 2 to 3 minutes. Drain on paper towels and serve.

If you want to bake them (which I did), heat the oven to 400 degrees. Place the rolls on a baking sheet coated with non-stick cooking spray. Lightly brush the tops of the egg rolls with olive oil and bake until golden brown, 12 to 15 minutes.

I wanted to try baking them to avoid all the extra oil and I think they turned out great. Sean and I loved the way they came out. The great thing about egg rolls is that you can fill them with whatever you want. You can choose to just use vegetables, use chicken, beef, shrimp, really anything you want. The options are endless.

Just a couple of things about this recipe. I bought a bag of cole slaw mix and used that instead of shredding the cabbage and carrots myself. It was much easier and still turned out well. I did end up adding more cabbage then the recipe called for because it was cooking away so rapidly, so you may want to watch that. I also think it could use some flavoring, so you may want to make a little sauce to use instead of just using the oyster sauce. Also, this recipe is designed to use all the egg roll wrappers. The package I bought has 20 wrappers, which is a lot of egg rolls. I only made 8 and we still have 6 leftover. Once you open the package of wrappers, you either should use it in 7 days or freeze it and it should be good for about 2 months, which gives you time to make more later on. It’s a great recipe to do some experimenting with.

That’s it for tonight. We have another wedding to go to tomorrow, so there’s no dinner tomorrow, but we are planning to make beef stew or beef barley soup Sunday, so check back for that recipe. Until then, enjoy your evening and enjoy your meal!

 
Leave a comment

Posted by on October 26, 2012 in Appetizers, Cooking, Pork


Tags:

A Taste of Dublin, Part 3

Tonight I am going to cover the Irish breakfast we had on our second day in Dublin. We woke up early that morning with the intention of getting to breakfast, since it  was included in our package of the trip from Guinness. We went down to the dining room early, about 8 AM, and were seated in the dining room. As soon as we sat down, we were offered coffee or tea and some toast. I was little surprised by the toast, but hey, I like toast, so why not, we accepted. The waitress came back with a pot of tea for Michelle, a pot of coffee for me and a rack of toast, about 6 pieces, 3 of which were white and 3 other three were the brown bread that is made especially by the Brooks Hotel. The Hotel actually supplies the recipe for the bread, which is made with Guinness of course. Here it is if you want to give it a try. Keep in mind that when I got the recipe, the measurements are all in metric because it is European, so you’ll have to make some adjustments.

Brooks’ Homemade Guinness Brown Bread

600 grams Wholemeal Flour
150 grams Plain Flour
75 grams Oatmeal (porridge oats)
2½ teaspoons baking powder
1 teaspoon salt
2½ tablespoons brown sugar
40 grams butter

480 millilitres milk
200 millilitres black treacle
½ pint of Guinness

Preparation:
Mix the butter with all the dry ingredients until the dough develops the consistency of breadcrumbs.
Add the milk, black treacle and the Guinness and mix until you reach a wet dough.
Bake in a greased bread tin for 40 – 45 minutes at 170°C in a pre-heated oven.

Black treacle is what they call molasses in the UK and Ireland. The bread tasted very good and it seems very simple to make, so I may have to give it a try sometime. Michelle and I both liked the Irish butter that was served every day as well. it had a much better flavor than the butter we have here in the States.

For the rest of the breakfast, you have a  choice. They serve a simple breakfast which is a buffet breakfast of simple things like scones, croissants, cereal, fresh fruit and yogurt. The yogurt was very tasty as I had it on other morning we were there. it had fresh raspberries in it and tasted quite good. You could also order off the menu, and the menu offered a full Irish breakfast. Now, I had heard about the fill breakfast before and knew it was going to be quite large, but we both figured that we wanted to give it a try. When else were we going to have the opportunity to try this anyway? So Michelle and I both ordered the breakfast with scrambled eggs. I wish I had taken a picture of what we actually got, because when it came out on a plate we were both shocked. Here is what was on the plate:

Irish sausage – which was absolutely delicious, by the way

There was bacon, but not in the way we think of bacon in the United States. It was much more like a piece of ham, but it was better than any ham I had eaten. i am not a fan of ham myself. The hame we get here seems way too salty and usually has some kind of curing on it that makes it too sweet for my liking. This tasted much cleaner and purer with little fat. It was delicious.

A very large pile of scrambled eggs in the center – traditionally it is served with fried eggs, but we both opted for scrambled for some reason.

Underneath the eggs was a slice of potato bread, which seemed more like a potato pancake with a nice crust on the top of it. I had never had anything quite like it before and it was pretty tasty.

A fried tomato – it was half of a small tomato

Sauteed mushrooms – these were really good

Black and white pudding – Okay, I knew what it was before I tried it and this was something a lot of people shied away from or warned me about but I wanted to try it. Heck, if millions of people have eaten it for hundreds of years, how bad could it be? It’s also known as blood pudding for those who may not know and is made from onions, oatmeal, pork fat and other spices, much like a sausage, but it also has pig blood in it, hence the name. I have to admit, it’s not something I would go out of my way to get again, and it has a very distinct flavor to it, but I am glad I tried it. The white pudding is the same ingredients without the blood, and there is a taste difference. The white tastes more like a sausage that you would find here, except the oatmeal adds a certain texture to the meal.

I did find a recipe for blood pudding if you want to give it a try to make it yourself. Finding the pig’s blood might be tough, but if you can get it give it a try.

Blood Pudding

1 quart pig, lamb or goose blood

16 ounces milk

salt and pepper
1 pound shredded suet
2 large onions, minced
1 ounce oatmeal, toasted

Bring a large  stew pot 3/4 full of water almost to a boil. Pour the blood into a deep bowl.
Add 1 teaspoon of salt, stirring constantly. Strain with a sieve. Add milk, mix well.
Add suet, minced onions, toasted oatmeal, 1 teaspoon of salt and 2 teaspoons of black pepper and mix well. Pour the mixture into an oven-safe pan and cook in the oven at 350 degrees for about an hour. Remove from the oven and slice into one-inch squares or rounds. Fry the rounds in a saute pan with a pat of butter until crisp on the outside, about 1-2 minutes per side.

Give it a shot and see if you like it.

Tomorrow, I will post the recipe for the dinner we had on the second night, which was a traditional Irish stew that we had at the Hairy Lemon in Dublin. Check back tomorrow and see how it is. until then, enjoy your evening and enjoy your meal!

 
2 Comments

Posted by on October 9, 2012 in Breads, Breakfast, Cooking, Pork


Tags: , , , , , ,

 
National Day Calendar

Fun, unusual and forgotten designations on our calendar.

Jennifer Probst

a little bit naughty a little bit nice

Laissez Faire

Letting Life Lead

simple cooking recipes

a blog to share with you the best