RSS

Category Archives: Turkey

Meatball Frenzy Week Continues – Turkey Meatball Panini

So now that I had all of these meatballs I needed to find things to do with them. Luckily, Giada didn’t let me down and I supplied several other recipes in ways that you could use these great turkey meatballs. The best part about all of them is that they con convert into really easy meals that only take a few minutes to create and you have something entirely new to enjoy for the night. The first up was this really simple meatball panini recipe. I have a panini maker, but you can just as easily do this with a grill, grill pan or skillet with a little bit of effort and it will come out great too. This recipe makes use of the meatballs and a few other simple ingredients to make awesome paninis for the family to enjoy.

Turkey Meatball Panini

1 red onion, peeled, cut into eight 1/4 -to 1/2-inch-thick rounds

2 tablespoons olive oil, plus extra for drizzling

1/4 teaspoon kosher salt

1/4 teaspoon freshly ground black pepper

4 ciabatta rolls, halved horizontally (or other bread of your choice)

1 cup tomato sauce (homemade or your favorite jarred brand)

1 teaspoon red pepper flakes, optional

1 1/3 cups arugula

12 Classic Italian Turkey Meatballs, halved

8 thin slices prosciutto

8 slices provolone cheese

Preheat a grill pan or a panini maker. Brush the red onion slices on both sides with the olive oil. Sprinkle the onions with kosher salt and black pepper. Grill the onion slices until they are tender and lightly browned, about 3 to 4 minutes per side. Set the onions aside to cool

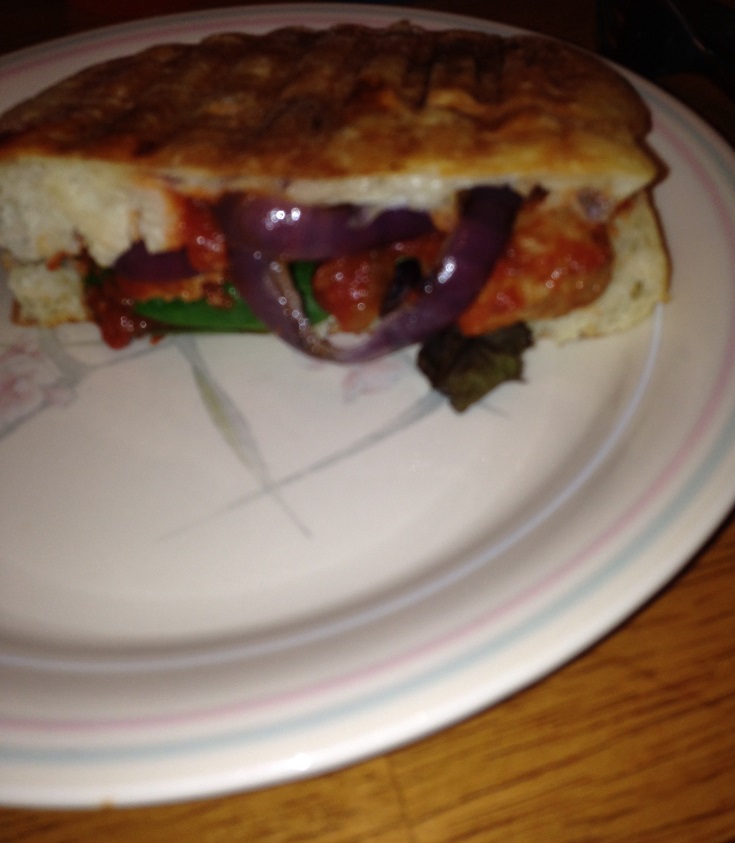
Pull out and remove some of he bread from the ciabatta rolls from each half of the rolls. This will give the meatballs a better place to sit in the sandwich. Spoon half of the tomato sauce over the bottom halves of each of the rolls. Sprinkle the sauce with red pepper flakes, if using. Add the arugula, the turkey meatballs, the prosciutto slices, grilled onions and the remaining sauce to each sandwich. Top each sandwich with two pieces of cheese. Add the tops of the rolls and drizzle the tops with olive oil. Using a pastry brush, brush the olive oil evenly over the tops of the rolls.

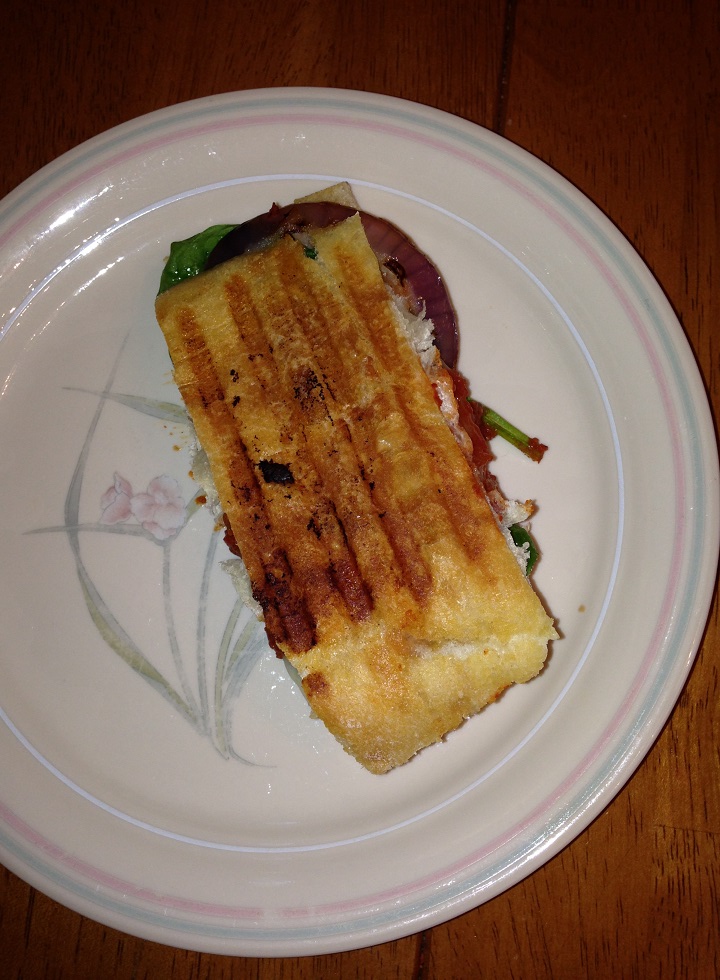
Place the sandwiches in the panini maker and lower the press and cook until the cheese has melted and the meatballs are heated through, about 5 minutes. Alternatively, place the sandwiches on a grill pan or in a heated skillet and place a cast-iron pan or other heavy pot (anything heavy will really do) to press the sandwiches down and cook through until the cheese is melted and the meatballs are heated through.

Cut the panini in half and serve.

The great thing about paninis, or any sandwich really, is that you can put whatever you like best on them. If you don’t like provolone, use your favorite cheese on it instead or no cheese at all (which is how I eat it). If you don’t have prosciutto, use any type of ham that you like (which I did for Sean; I used Black Forest Ham). you can use any type of other toppings that you really like or use different meatballs and still get good results (those these meatballs are really good and you should try them out). I had mine with just the grilled onions, meatballs, red pepper flakes and arugula. Michelle had hers with the meatballs, arugula, grilled onions and provolone. Sean had his with the meatballs, Black Forest Ham and prosciutto, no onions or arugula. They all looked really good and everyone really enjoyed the sandwiches. It was a great way to re-purpose some of the meatballs for a quick meal.

That’s all I have for today. Check back next time for another recipe. Until then, enjoy the rest of your day and enjoy your meal!

IMG_0561 IMG_0559 IMG_0560


1 Comment

Posted by on June 5, 2014 in Cooking, Dinner, Lunch, Poultry, Sandwiches, Turkey


Tags: , , , , ,

It’s a Meatball Frenzy Week! – Giada’s Classic Italian Turkey Meatballs

Meatballs are one of those things that everyone seems to have their own way of making. Just like it is with meatloaf, meatballs can have just about anything in them and can be all types of meat combinations depending on your preferences. I have tried a bunch of different recipes in the past, including recipes from Giada di Laurentiis, who this particular recipe is from. Not that long ago an episode of her show features several meatball recipes, including the basic one for turkey meatballs that you start out with and then other recipes you can use the same meatballs for. I decided to start out the week with the basic class turkey meatball recipe and then build out from there.

Classic Italian Turkey Meatballs

For the Meatballs:

1 cup plain breadcrumbs
1/2 cup finely grated Parmesan, plus more for serving
1/4 cup chopped fresh basil
1/4 cup chopped fresh Italian parsley
1/4 cup milk, at room temperature
1 tablespoon ketchup, optional
1 tablespoon tomato paste
3/4 teaspoon kosher salt
1/2 teaspoon freshly ground black pepper
2  eggs, at room temperature
2 cloves garlic, minced
1 small onion, finely chopped
1 pound ground turkey meat (dark meat if you can get it)
1 pound Italian turkey sausage links, casings removed
Extra-virgin olive oil, for drizzling
For the Sauce:
1/4 cup extra-virgin olive oil
3 cloves garlic, smashed and peeled
1  onion, finely chopped 1 teaspoon kosher salt, plus more to season
1/2 teaspoon freshly ground black pepper, plus more to season
3/4 cup chopped fresh basil
2 teaspoons finely ground fennel seeds
2 teaspoons dried oregano
Two 28-ounce cans crushed tomatoes
1/2 cup low-sodium chicken broth, optional

Preheat the oven to 400 degrees.

For the meatballs: In a large bowl, combine the breadcrumbs, Parmesan, basil, parsley, milk, ketchup if using, tomato paste, salt, pepper, eggs, garlic and onions. Using a wooden spoon, stir the ingredients until they are blended. Add the ground turkey and the turkey sausage meat. Using your fingers, gently mix all the ingredients until they are thoroughly combined.

Using a 1-ounce cookie scoop or a small ice cream scoop, form the meat mixture into 1 1/2-inch balls (22 to 24 meatballs). Place the meatballs on a heavy nonstick baking sheet, spacing them apart. Drizzle the meatballs with olive oil and bake until the meatballs are cooked through, about 15 minutes.

For the tomato sauce: Heat the olive oil in a large deep skillet with high sides or a Dutch oven over medium-high heat. Add the garlic, onions, salt and pepper. Cook the vegetables until they softened, about 5 to 6 minutes. Add 1/2 cup of the basil, the fennel, oregano and crushed tomatoes. Bring the sauce to a simmer. Cook the sauce over medium heat until the sauce thickens slightly, stirring occasionally, about 15 to 20 minutes. Stir in the remaining 1/4 cup of basil. Adjust the seasoning with more salt and pepper if desired.

Add the meatballs to the tomato sauce and simmer until the meatballs are heated through, about 10 minutes. Thin the sauce with chicken stock, 1/4 cup at a time, if needed.

Serve with grated Parmesan alongside.

I have to say that of all the meatball recipes I have tried recently, I think this is the best one and since it uses only turkey meat, it might be the healthiest alternative of the ones I have made. The texture of the meatball is perfect and the flavor you get from the mix of the turkey meat and sausage along with the spices is just perfect. Throw it all in a simple sauce and you have a great meal. I actually doubled the recipe and made a lot of meatballs with this recipe to use for the other meatball recipes Giada tried on that episode, so I’ll be posting meatball options all week with what we had leftover. Of course, you can always just freeze some and use them when you want them. I left about half out of the sauce to use for some of the other recipes.

That’s all I have for today. Check back next time for another recipe. Until then, enjoy the rest of your day and enjoy your meal!

classicitalianmeatballs

 
5 Comments

Posted by on June 3, 2014 in Cooking, Dinner, Poultry, Sauce, Turkey


Tags: , , , , , ,

Fancy Roasted Turkey…Okay, Roasted Turkey Breast… I Mean Roasted Half a Turkey Breast

Half a turkey breast may not even sound like a lot of meat for you, but for just the three of us it worked out fine and there were even leftovers for sandwiches the next day. If you have a  small family or are just cooking for yourself, using just a half a breast is ideal. They may not always be easy to find but if you look around in the meat area of your supermarket or ask your butcher, you may be able to find one. I actually got ours for only $4.00 and we got a full dinner and several lunches out of it, making it really worthwhile. I had to hunt around a bit to try to find a unique recipe for a piece this small. You could simply roast it in the oven, but this recipe that I found from Sweet and Crumby was just perfect and gave some great flavor to the meat.

Roasted Half Turkey Breast

1 half bone-in turkey breast with skin, rinsed and patted dry

2 teaspoons dry rosemary

2 teaspoons dried thyme

2 teaspoons dried sage

2 teaspoons salt

1 teaspoon freshly ground black pepper

2 tablespoons freshly squeezed orange juice

2 tablespoons olive oil

1 orange, thinly sliced

2 whole sprigs rosemary

4 large washed but unpeeled carrots

1-2 cups chicken broth

4 tablespoons butter

Preheat the oven to 325 degrees. In a small bowl mix together the dried rosemary, thyme, sage, salt and pepper. Squeeze in the orange juice and drizzle in the olive oil. Mix everything together to form a paste. Rub the paste all over the meat and skin of the turkey breast and then underneath the turkey skin.

Take the thinly sliced orange slices and tuck them under the turkey skin. in a single layer. Tuck 2 sprigs of the rosemary under the skin as well. Cut the butter into small pats and place single pats of butter all over the turkey skin and meat. Place the carrots lined up in a small roasting pan, casserole dish or cast iron skillet and the place the turkey breast on top of the carrots. Pour the chicken broth into the roasting pan, but not over the turkey and drop any remaining pieces of the orange into the pan as well. Tent the turkey with the aluminum foil and roast for 45 minutes. Remove the foil and let the turkey roast for another 30 minutes or until an instant read thermometer inserted into the thickest part of the breast registers 165 degrees.

Remove the turkey from the oven and tent with a fresh piece of aluminum foil. Allow the turkey to rest for 10 to 15 minutes before slicing.

Roasting time here will really depend on how big of a piece of turkey you have. The breast I had was just over two pounds and was done in just over an hour. A 3 or 4 pound breast will take longer, perhaps as long as 90 minutes, so you will want to check the temperature to be on the safe side. I liked the flavors from the paste and from the orange slices. It really added something nice to the dish that you might not normally think of. You’re not going to get much in the way of juices in the pan with this one, even with adding broth to the pan, but if you add some after you remove the turkey you can make a little bit of gravy or au jus for your meal as well. Overall I would say it is a great inexpensive way to have turkey during the week for a little bit of a change from chicken.

Speaking of chicken, I have lots of chicken recipes we have used lately to share, so keep an eye out for those among the recipes I will be sharing. That’s all I have for today. Check back again next time for a new recipe. Until then, enjoy the rest of your day, stay warm, and enjoy your meal!

003 002

 
7 Comments

Posted by on January 22, 2014 in Cooking, Dinner, Poultry, Turkey


Tags: , , , , ,

Leftover to Warm Your Heart (and Stomach) – Turkey Rice Soup

The weather keeps fluctuating around here from unseasonably warm to bitter cold and then back again. It’s amazing that we haven’t all come down with lots of colds yet this winter and the weather really does seem to affect the way I want to cook. On a nice day you feel like having something like ribs or burgers or some chicken and then on the cold days we want soups and stews. Luckily, I try to cook larger meals with the intent that we will get many meals out of the leftovers. Such is the case when I made some turkey recently and then made stock with the leftover carcass and we used the leftover meat to make some nice turkey rice soup. The rice adds a nice heartiness to the dish and you can use all your leftovers or frozen vegetables to help flavor the soup and make the cooking even easier than ever.

Turkey Rice Soup

2 tablespoons olive oil
1 onion, chopped
1 leek, white and light green parts halved lengthwise, sliced thin crosswise
2 celery ribs, chopped
1 pound cooked turkey meat, white and dark meat, chopped
6 cups turkey or chicken broth
2 sprigs fresh thyme
2 bay leaves
2 carrots, peeled, quartered lengthwise, and sliced ¼ inch thick
1/2 cup white rice
Salt and pepper
1 cup frozen peas
2 tablespoons minced fresh parsley

 Heat 1 tablespoon of the olive oil in a Dutch oven over medium-high heat until shimmering. Add the onion leeks carrots and celery and cook until just beginning to brown, about 5 minutes. Add the turkey meat and heat the meat through until it is beginning to brown, about 1 to 2 minutes. Remove the contents from the Dutch oven to a separate bowl and set it aside.
Wipe out the now-empty Dutch oven with paper towels and heat the remaining 1 tablespoon of olive oil over medium-high heat until shimmering. Add the white rice and cook, stirring frequently, until the edges of the rice become translucent, about 2 minutes.Add the turkey mixture back to the Dutch oven and heat through for about 1 minute. Add the turkey or chicken broth and 1 teaspoon of salt and bring the mixture to a boil. Reduce the heat to medium-low add the thyme and bay leaves and simmer, covered, stirring occasionally, until the rice is tender, about 12 to 14 minutes. Stir in the frozen peas and cook until they are heated through, about 5 minutes. Stir in parsley and season with salt and pepper to taste. Serve.
You can just as easily do this with leftover chicken instead of turkey or even with a rotisserie chicken that you can pick up at the store to save you some effort. The great thing about using a rotisserie chicken is that you can then use that carcass to make your own stock and get the great flavor from that. It doesn’t even have to cook all day; you really only need to add some onion, celery and carrot with the carcass and a bay leaf and let it cook for about 30 minutes and you can have flavorful stock. Other leftover veggies will work in this soup as well if you want and I added some leftover green beans we had. Sauteing the rice briefly does make a difference here as it helps to keep the rice firm by firming the starches before you add the liquid so the rice will not bloat. it makes for a great quick dinner you can do any night of the week and get good flavor from your leftovers.
That’s all I have for today. Check back next time for another new recipe. There’s still lots of good stuff to come, including a lamb recipe, a quick turkey breast recipe, baked ziti, a couple of different wings to try, skillet pizza and more. until next time, enjoy the rest of your day and enjoy your meal!
001


Tags: , , , ,

I Promise, My Last Turkey Recipe for a While – Turkey Pot Pie with Stuffing Crust

You have my word that this will be the last turkey recipe I post for a while. We are working on a lot of other things right now, trying to get Christmas organized, the tree up, Sean’s birthday and it seems like and endless amount of other things but I will get to some new recipes next week, I promise. Anyway, this is a new recipe and was one I had never tried before that makes good use of cooked turkey or chicken. I got this recipe from Cook’s Country and it is for a very simple turkey pot pie with a stuffing crust.

Turkey Pot Pie with Stuffing Crust

3 tablespoons butter

1 onion, chopped

1 celery rib, chopped

2 tablespoons all-purpose flour

2 cups chicken or turkey broth

1/2 cup heavy cream

1 cup frozen vegetables, thawed, or leftover vegetables

4 cups shredded cooked turkey

3 cups prepared stuffing or leftover stuffing

1 egg, lightly beaten

Adjust an oven rack to the upper middle position and heat the oven to 475 degrees. Melt the butter in a large oven-safe skillet over medium-high heat. Cook the onion and the celery until they are soft, about 4 to 5 minutes. Stir in the flour and cook until the flour is lightly browned, about 1 minute. Slowly whisk in the chicken or turkey broth and the cream and simmer until the mixture is thickened, about 5 to 7 minutes. Add the frozen or leftover vegetables and the turkey and cook until the mixture is heated through, about 2 minutes.

Meanwhile, combine the stuffing and the egg in a large bowl. Place the stuffing mixture between pieces of parchment paper and roll it into an 11-inch circle. Remove the top layer of the parchment paper and cut the stuffing into 6 wedges. Arrange the wedges evenly over the filling and bake until the stuffing is golden and crisp, about 12 to 15 minutes. Serve.

Instead of cutting the wedges, which seemed like some unnecessary work to me, I just spread the stuffing on top of the turkey mixture and baked it this way. I really liked the way it all came out and it made great use of all of the leftovers we had from our turkey meal. If you don’t have any leftover stuffing, you can easily just use some boxed stuffing for this recipe and make it the same way. I used all kinds of leftover vegetables in this one, like peas, carrots and Brussels sprouts. Everything thickened up really nicely and it made for a great one pot meal that was done quickly.

That’s all I have for today. Check back next time for some more recipes. we’ll be trying some new things out this weekend, including some cupcakes, a cake, baked ziti and more so I will lots of recipes to post to go along with those I haven’t gotten to yet. until next time, enjoy the rest of your day and enjoy your meal!

002


Leave a comment

Posted by on December 6, 2013 in Cooking, Dinner, Leftovers, One Pot Meals, Poultry, Turkey


Tags: , , , ,

How About Some Turkey Soup?

I know, I know, we are all sick of turkey recipes at this point and everyone is busy thinking about Christmas cookies and your Christmas meal at this point. However, I still have a couple of recipes leftover of things I made with turkey so I thought I would put them out here. These recipes are for a very simple turkey stock that I made and then I used most of that stock to make a wonderful turkey soup from some of the leftovers we had of turkey. You could easily substitute some chicken for the turkey in the soup or the stock and get good results from both. First, the turkey stock.

Turkey Stock

1 leftover turkey carcass from a 10 to 15-pound turkey, including the neck, wing and leg bones

4 or 5 onions, quartered

2 large carrots, peeled and cut into chunks

4 large celery ribs, cut into chunks

2 cups white wine

2 large garlic cloves, smashed and peeled

4 sprigs fresh thyme

2 bay leaves

1 teaspoon black peppercorns

Kosher salt

Heat the oven to 450 degrees. Using a sturdy knife or your hands, cut or tear the turkey carcass into large pieces. Arrange the pieces in a single layer in a roasting pan and roast until the pieces are brown and sizzling, about 20 to 25 minutes.

Remove the pieces from the oven and transfer them to a stockpot. Add the onions, carrots and celery to the empty roasting pan and place it over medium heat. Saute them briefly, just to loosen the crusty turkey bits in the bottom of the pan. Return the pan to the oven and cook until the vegetables are browned around the edges, about 20 to 25 minutes. Remove the pan from the oven and place it back over medium heat. Add the white wine and cook, stirring, until the wine is reduced to a syrup, about 3 minutes.

Add the wine-vegetable mixture to the stockpot with the turkey pieces. Add the garlic, thyme, bay leaves, black peppercorns and stir. Add 6 quarts of water and place the pot over medium-high heat just until the mixture comes to a boil. Immediately reduce the heat to low, skim any foam floating on the top and simmer, skimming as needed, for about 3 hours. Add 1 teaspoon of salt and taste. If the stock tastes too watery, keep simmering until the stock is flavorful. Taste for salt again and add more if needed.

Strain the stock through a sieve into a large container or containers. Discard all the solids. Let the stock cool slightly and the refrigerate or freeze it.

It’s a simple method that takes some time but gets maximum turkey flavor out of the carcass and what is left over. You get a wonderful roasted flavor into the stock that gives it a great addition. I froze some and used some for this soup recipe from Michael Chiarello.

Turkey Soup

8 cups turkey stock

3 cups diced turkey meat, white and dark meat

1 carrot, peeled and minced

1 celery stalk, minced

1 onion, peeled and minced

2 cloves garlic, smashed

2 tablespoons olive oil

3 cups leftover cooked vegetables (Brussels sprout, sweet potatoes, green beans)

1 tablespoon chopped sage

In a large soup pot, heat the garlic in the olive oil over medium heat. Allow it to brown slightly, about 3 minutes. Add the minced carrots, celery and onions. Sweat the vegetables over medium-low heat until softened, about 7 to 8 minutes.

Dice the leftover vegetables. Add the sage to the soup pot along with the turkey stock and 1 bay leaf. Bring the stock to a simmer. When the pot is simmering, add the Brussels sprouts, green beans and diced turkey meat to the soup. Bring the mixture back up to a simmer. Add the sweet potatoes to the center of the soup and gently push them down. Turn the heat off and cover the pot. Allow the soup to sit and steam, about 5 to 7 minutes. let the soup simmer for 5 more minutes before serving.

It is a quick and easy way to make good use of turkey meal leftovers or any chicken meal leftovers. it’s a simple soup that you can put together for a weeknight meal that will taste great and it makes for even better lunches the next day or two. I also added some frozen peas to the mix just to round everything out.

That’s all I have for today. Check back next time for some more recipes. Until then, enjoy the rest of your day and enjoy your meal!

002 001


Tags: , , , , ,

A Return to the Kitchen After Holidays, Birthdays and More – A Leftover Recipe

I took a few days off from blogging to spend some time with the family over Thanksgiving weekend and it was my Sean’s birthday this weekend as well, so it got my away from the computer for a few days, which is not always a bad thing. I know many of you are probably beyond the leftovers from Thanksgiving, but this leftover dish I prepared for breakfast on Sean’s birthday can really work any time of the year when you have leftover turkey or really any leftover poultry at all. It is a simple turkey has that you can put together quite easily and make use of some of your leftovers.

Turkey Hash

4 tablespoons butter

3 strips bacon, chopped

1 large onion, chopped

1 red bell pepper, seeded and chopped

Salt and freshly ground black pepper

1 pound red potatoes, cut into 1 1/2 – 2 inch cubes (about 4 large potatoes)

1 tablespoon chopped thyme

3 cloves garlic, chopped

2 cups cooked turkey, shredded into 1 – 2 inch chunks

1/2 cup chicken stock

1/4 cup cream

1 teaspoon Worcestershire sauce

2-3 dashes hot sauce

1 tablespoon dry sherry

4 fried eggs (optional)

Heat a cast iron skillet over medium-high heat. Add 2 tablespoons of butter and the bacon, and cook until the bacon is brown and crisped, about 5 minutes. Add the onion and the peppers and cook until they are lightly softened, about 12 minutes. Stir in the potatoes, thyme, garlic and the turkey and season with salt and pepper. Cook, stirring occasionally, until the potatoes begin to brown, about 15 minutes. Whisk together the chicken stock, cream, Worcestershire sauce, hot sauce and the sherry in a separate bowl and then pour it evenly over the hash. Mash the mixture together lightly and press it firmly into the skillet. Cook until the hash is well browned on the bottom and the hash holds together in a loose cake, about 25 to 30 minutes. Place a large plate over the skillet and invert the hast onto the plate; set the plate aside.

Melt the remaining butter in the skillet, scraping up any browned bits, and return the hash to the skillet, uncooked-side down. Cook until the has is browned on the bottom and the potatoes are tender, about 10 minutes more. Cut the hash into quarters and top each quarter with a fried egg.

You have lots of options with this particular recipe. If you have other vegetables that are leftover that you might like to use in the hash, like squash or Brussels sprouts, by all means throw them in. They will add some nice flavor to the hash. You can always place the skillet in a 350 degree oven after the first initial frying instead of trying to flip it over if you are worried about how that might go. You just want to leave the hash in the oven long enough to crisp up the top and the potatoes get crunchy but tender. We actually didn’t serve this with the eggs since it was Sean’s birthday breakfast; he wanted pancakes instead so we all had hash and pancakes as our meal. I thought it was pretty tasty and the turkey went nicely with everything else and the hot sauce added a nice little kick to the hash. I think you could easily make this with any leftover poultry or meat and it would turn out just as well.

That’s all I have for today. Check back next time for some more recipes. I have a number of things to share that we have made recently, including a turkey pot pie, some lasagna, fettuccine alfredo and we have lots more still coming up, so check back to see what is next. Until next time, enjoy the rest of your day and enjoy your meal!

004


Leave a comment

Posted by on December 3, 2013 in Breakfast, Cooking, Holidays, Leftovers, Poultry, Turkey


Tags: , , ,

One More Thanksgiving Side Dish – Stuffing with Mushrooms and Bacon

When I made the simple roast turkey the other day, I also wanted to make a very simple stuffing to go along with it. I wanted something that didn’t use a lot of ingredients and would use what I most often have on hand in the house so I could be sure to whip it up with ease. Luckily, in the same New York Times article that I found the turkey recipe I also came across this stuffing recipe and it was perfect for what I had on hand. Not a lot of fuss, ingredients or anything else. The only change I made to it myself to make things easier is that the recipes calls for leeks, which I did not have on hand. I substituted an onion instead, and I think the results were just fine.

Stuffing with Mushrooms and Bacon

3 tablespoons melted butter, plus more as needed for greasing the pan

1 1/2 pounds sliced white bread or corn bread

1/2 pound bacon

2 large leeks or onions, trimmed and sliced (3 cups)

1 1/2 pounds mushrooms (mixed variety or use what you have), cut into bite-size pieces

1 1/2 teaspoons kosher salt

3/4 teaspoon black pepper

2 tablespoons chopped sage

1/2 cup dry white wine

1 1/4 cups chicken stock, plus more if needed

1/4 cup apple cider, if using white bread

3 tablespoons chopped parsley

Heat the oven to 250 degrees. Butter a 9 x 13-inch baking pan. Trim the crusts from the white bread and cut it into 1-inch cubes; if you are using corn bread, coarsely crumble it. Spread the bread pieces out on one or 2 large baking sheets. Toast in the oven, tossing occasionally, until the bread crumbs are very dry, about 30 minutes for white bread, about 1 hour for the corn bread. Transfer the crumbs to a large bowl to cool. Increase the oven temperature to 375 degrees.

In a large skillet over medium-high heat, cook the bacon strips until they are crisp. Transfer the bacon to a paper towel-lined plate to drain, leaving the fat in the pan. Add the leeks (or onions) to the bacon fat and cook, stirring occasionally, until they are soft, about 5 to 10 minutes. Add the mushrooms, 1 teaspoon of kosher salt and 1.2 teaspoon of black pepper. Cook, tossing frequently, until the mushrooms are tender and most of their juices have evaporated, about 10 to 15 minutes. Stir in the sage and cook for 1 minute. Add the wine and cook until it evaporates, about 2 minutes. Spoon the mushroom mixture over the dried bread. Stir in the chicken stock. If you are using white bread, stir in the cider. Add the parsley, 1/2 teaspoon of kosher salt and 1/4 teaspoon of pepper. The mixture should be moist and very soft. If you like your stuffing extremely moist, add enough stock to make it seem slightly soggy but not wet (Think that it should look like pudding). Crumble the bacon and stir it into the mixture.

Transfer the bread mixture to the prepared baking pan. Drizzle 3 tablespoons of melted butter over the stuffing. Bake until the stuffing is golden, about 35 to 45 minutes and serve.

I did make one other change to this stuffing. I did add in one diced apple to give it a little extra crunch and flavor. Michelle said it seemed like just what the dish needed and she really enjoyed it with the apple in it, but make your own call if you like that kind of stuffing. The great thing about this dish is that it was easy to do. If you make the bread crumbs ahead of time (the day before), you can throw this together and put it in the oven while your turkey is resting and it should be done in plenty of time. I think this stuffing would go well with your regular weeknight roast chicken as well if you wanted to make your weeknight meal a little fancier or just feel like having some stuffing.

That’s all I have for today. Check back next time for more recipes. I will be making a post tomorrow, most likely with links to some other websites that have Thanksgiving meal hints and recipes. I will have a post in the coming days as well as you try to make use of some of your leftovers. I think I have some easy ideas of things you can do. Until next time, enjoy the rest of your day (if you are on the East Coast, you are getting pelted with rain, like we are) and enjoy your meal!

IMG_1760

 
Leave a comment

Posted by on November 27, 2013 in Cooking, Holidays, Side Dishes, Turkey


Tags: , , , ,

One More Easy Turkey Recipe Before Thanksgiving – Simple Roast Turkey

Okay, there is still plenty of time left if you haven’t really decided want you want to do with your turkey on Thanksgiving. It’s only Monday, so you still have time to do some kind of brining if that is what you want to do. I made another turkey this past weekend to try out a dry brine method that I saw from The New York Times and Melissa Clark recently because I wanted to see if it made any difference in the bird. If it seems like I have made a lot of  turkey the last few weeks, well I have. I wanted to try some things out to give people some options and see how things work and since I wasn’t cooking Thanksgiving dinner this year myself, it seemed like a good idea. I even have 1 turkey left to cook, but my family is getting kind of tired of eating turkey at this point so I might hold on to that one until we get closer to Christmas. In the meantime, here is a very simple dry brine recipe that adds some great flavor to the turkey.

Simple Roast Turkey

1 turkey, 10 to 12 pounds

Coarse kosher salt

1 tablespoon black pepper

1 lemon, zested and quartered

1 bunch fresh thyme or rosemary

1 bunch fresh sage

12 garlic cloves, smashed and peeled

1 bottle hard cider (12 ounces)

Dry white wine or water, as needed

2 onions, peeled and quartered

3 bay leaves

Olive oil or melted butter, as needed

Remove any giblets from the cavity and reserve for stock or gravy. Pat the turkey and the turkey neck dry with paper towels; rub the turkey all over with 1/2 teaspoon of kosher salt per 1 pound of turkey, the pepper and the lemon zest, including the neck. Transfer the turkey to a 2-gallon or larger resealable plastic bag. Tuck the herbs and 6 garlic cloves inside the bag. Seal and refrigerate the turkey on a small baking sheet or wrapped in another plastic bag for at least 1 day and up to 3 days, turning the bird over every day or after 12 hours if brining for only 1 day.

Remove the turkey from the bag and pat it dry with paper towels. Place the turkey, uncovered, back on the baking sheet. Return it to the refrigerator for at least 4 hours and up to 12 hours to dry out the skin. This will help to crisp the skin while it is cooking.

When you are ready to cook the turkey, remove it from the refrigerator and allow it to come to room temperature for one hour.

Heat the oven to 450 degrees. In the bottom of a large roasting pan, add the hard cider and enough wine or water to fill the pan to 1/4-inch depth. Add half of the onions, the remaining 6 garlic cloves and the bay leaves. Stuff the remaining onions and the lemon quarters into the turkey cavity. Brush the turkey generously with olive oil or melted butter.

Place the turkey, breast side up, on a roasting rack set inside the roasting pan. Transfer the pan to the oven and roast for 30 minutes. Cover the breast with aluminum foil. Reduce the oven temperature to 350 degrees and continue roasting until an instant-read thermometer inserted into the thickest part of a thigh registers 165 degrees, about 1 1/2 to 2 hours more. Transfer the turkey to a cutting board to rest for at least 30 minutes before carving.

A couple of things about roasting turkey. Though you have probably heard it a thousand times by now from every cooking show, magazine and blog out there, brining isn’t a necessity when cooking turkey; it does seem to help as far as flavor and the skin itself, but the only real key to having moist turkey is removing the turkey from the oven when it is the right temperature. Don’t go by those little buttons that pop up on the turkey; they are often set to pop when the internal temperature is already high, sometimes 180 degrees, and the bird will continue to cook as it rests outside the oven, leaving you with dry turkey. Invest the money in a thermometer and insert it into the thigh to check the temperature. When it is at 165, pull the turkey out and LET IT REST. Don’t carve it right away; it won’t be ready, you’ll lose all the liquid that needs to re-distribute while the bird rests, and you will end up with dry meat.

If you don’t have a roasting rack to put the turkey on, you can make something of your own to get the turkey up out of the liquid so it browns all over. Form a solid ring out of aluminum foil to place under the turkey to lift it out of the liquid. That is what I did with this bird since I wanted to use one of those disposable pans this time and my rack did not fit in the pan. It worked out really well and it is easy to do.

The dry brine in this recipe really seemed to add some flavor and I did like the combination of the cider and the aromatics. It helped to create some very tasty gravy for the meal. This is one of the easiest turkey recipes I have come across and one of the most effective. If you are making a larger bird, the New York Times does have a scale so you can adjust the herbs and seasonings and cooking time of your bird accordingly. You can check it out here if you wish. I would use this recipe if you want to do things easily for yourself and have great tasting turkey.

That’s all I have for today. I still have a couple of more side dishes to share before Thanksgiving, so check back for those. Until next time, enjoy the rest of your day and enjoy your meal!

IMG_1759

 
1 Comment

Posted by on November 25, 2013 in Cooking, Dinner, Holidays, Poultry, Turkey


Tags: , , , , , ,

Essential Thanksgiving – Interactive Feature – NYTimes.com

Essential Thanksgiving – Interactive Feature – NYTimes.com.

The New York Times lays everything out for you perfectly in this article. They cover everything you need to know and prepare for your Thanksgiving meal to make things as easy as possible for you. Check it out!

 
1 Comment

Posted by on November 20, 2013 in Cooking, Cooking Websites, Dinner, Holidays, Turkey


Tags: , , , ,

 
National Day Calendar

Fun, unusual and forgotten designations on our calendar.

Jennifer Probst

a little bit naughty a little bit nice

Laissez Faire

Letting Life Lead

simple cooking recipes

a blog to share with you the best