RSS

Tag Archives: turkey

For Holidays or Any Time, Try Bobby Flay’s Roast Turkey with Mustard Maple Glaze

Just before Thanksgiving came around I had a turkey that I had purchased at the supermarket. Even though we weren’t going to be home for Thanksgiving, it’s hard to pass up a bargain when they’re selling fresh turkeys for $.79 a pound so I picked up one and decided I would make it after Thanksgiving and try a different approach with a new recipe. I had seen before Thanksgiving recipe from Food Network that was made by Bobby Flay for a roast turkey with mustard maple glaze that sounded delicious and looked relatively easy to make. It incorporated some different ingredients to make the glaze, such as maple syrup, horseradish, Dijon mustard, and chili powder. There was also a nice gravy that went along with it, so I decided this was going to be the one to give a try to, and I’m glad I did.


For the glaze:
1 1/2 cups pure maple syrup
2 heaping tablespoons Dijon mustard
2 heaping tablespoons prepared horseradish, drained
1 tablespoon ancho chile powder
Kosher salt and freshly ground pepper

For the turkey:
1 17 -pound fresh turkey, patted dry (neck and giblets removed)
Kosher salt and freshly ground pepper
10 tablespoons butter, slightly softened
12 cups homemade chicken stock
3 large carrots, cut into 2-inch pieces
3 large stalks celery, cut into 2-inch pieces
2 large onions, quartered

For the gravy:
1 stick unsalted butter
7 tablespoons all-purpose flour
Splash of dry white wine (optional)
1/4 cup chopped mixed fresh herbs (such as sage, parsley and tarragon)
Kosher salt and freshly ground pepper

To make the glaze: Whisk the maple syrup, mustard, horseradish and chile powder in a bowl and season the mix with salt and pepper. Cover the mixture and let it sit at room temperature at least 30 minutes to allow the flavors to meld. The glaze can be made up to 2 days in advance; store the glaze, covered, in the refrigerator. Bring it to room temperature before using.

Prepare the turkey: Remove the turkey from the refrigerator 1 hour before roasting. Preheat the oven to 450 degrees. Season the cavity of the turkey with salt and pepper. Rub the outside of the turkey with the butter and season it liberally with salt and pepper. Put 4 cups of chicken stock in a medium saucepan and keep it warm over low heat.

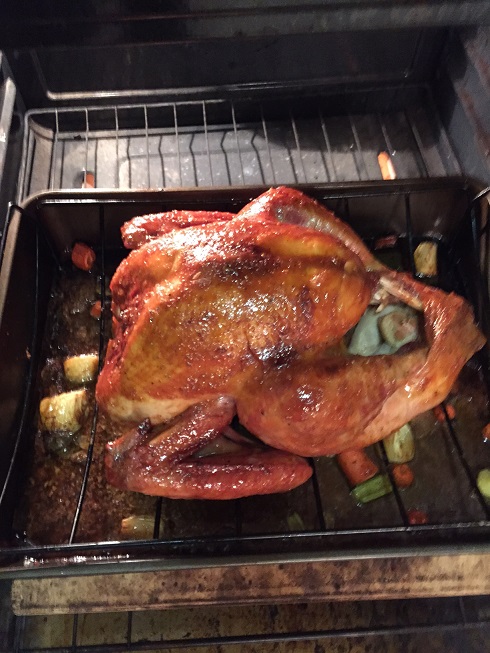
Place the carrots, celery and onions in a large roasting pan and place a roasting rack on top. Put the turkey on the rack, place the roasting pan in the oven and roast the turkey until it is a light golden brown, about 45 minutes.Tent the turkey loosely with foil if it is browning too quickly. Reduce the oven temperature to 350 degrees, baste the turkey with 2 cups of the warm stock and continue roasting, basting with 2 more cups of warm stock halfway through, until an instant-read thermometer inserted into the thigh registers 155 degrees, about 1 hour. After the turkey reaches 155 degrees, begin basting the turkey with the maple glaze; continue roasting, basting with the glaze every 10 minutes, until an instant-read thermometer inserted into the thigh registers 165 degrees, about 20 more minutes.

Remove the turkey from the oven and transfer it to a large cutting board. Tent the turkey loosely with foil and let it rest at least 45 minutes before slicing. Strain the drippings into a bowl and discard the solids. Add enough of the remaining chicken stock to make 6 cups of liquid.

To make the gravy: Melt the butter in a medium saucepan over medium heat. Whisk in the flour and cook until the flour is light golden brown, about 8 minutes. Slowly whisk in the stock-drippings mixture, then bring the mixture to a boil and whisk until the gravy begins thickening and the flour taste has been cooked out, about 10 minutes. Add more stock until you reach the desired consistency. If desired, add a splash of white wine and cook 2 more minutes. Stir in the herbs and season with salt and pepper to taste.

To serve, reheat the remaining stock in a saucepan over low heat. Remove the legs and wings, then remove the dark meat and shred. Remove the breasts and cut crosswise into 1-inch-thick slices. Place the meat on a platter and ladle some of the warm stock on top.

I think this recipe was fantastic. The glaze that was on the turkey made the skin perfectly brown and gave it a nice taste. The combination of the mustard and the maple syrup along with the horseradish, really did it for me. The original recipe uses 17 pound turkey so quantities are quite high. The turkey I bought was only 11 pounds so I cut the recipe by about one-third when I was making it. I think if you have a large bird, even bigger than 17 pounds, this recipe would work out pretty well. The meat was perfectly cooked and everything came out nice and juicy. Everyone seemed to really like the gravy as well. This is definitely a recipe that I will use again.


That’s all I have for today. Check back next time for another recipe. Until then, enjoy the rest of your day and enjoy your meal!


mapleturkey

Advertisement
 
Leave a comment

Posted by on December 8, 2014 in Cooking, Dinner, Gravy, Holidays, Poultry, Sauce, Turkey


Tags: , , , , , ,

One More Easy Turkey Recipe Before Thanksgiving – Simple Roast Turkey

Okay, there is still plenty of time left if you haven’t really decided want you want to do with your turkey on Thanksgiving. It’s only Monday, so you still have time to do some kind of brining if that is what you want to do. I made another turkey this past weekend to try out a dry brine method that I saw from The New York Times and Melissa Clark recently because I wanted to see if it made any difference in the bird. If it seems like I have made a lot of  turkey the last few weeks, well I have. I wanted to try some things out to give people some options and see how things work and since I wasn’t cooking Thanksgiving dinner this year myself, it seemed like a good idea. I even have 1 turkey left to cook, but my family is getting kind of tired of eating turkey at this point so I might hold on to that one until we get closer to Christmas. In the meantime, here is a very simple dry brine recipe that adds some great flavor to the turkey.

Simple Roast Turkey

1 turkey, 10 to 12 pounds

Coarse kosher salt

1 tablespoon black pepper

1 lemon, zested and quartered

1 bunch fresh thyme or rosemary

1 bunch fresh sage

12 garlic cloves, smashed and peeled

1 bottle hard cider (12 ounces)

Dry white wine or water, as needed

2 onions, peeled and quartered

3 bay leaves

Olive oil or melted butter, as needed

Remove any giblets from the cavity and reserve for stock or gravy. Pat the turkey and the turkey neck dry with paper towels; rub the turkey all over with 1/2 teaspoon of kosher salt per 1 pound of turkey, the pepper and the lemon zest, including the neck. Transfer the turkey to a 2-gallon or larger resealable plastic bag. Tuck the herbs and 6 garlic cloves inside the bag. Seal and refrigerate the turkey on a small baking sheet or wrapped in another plastic bag for at least 1 day and up to 3 days, turning the bird over every day or after 12 hours if brining for only 1 day.

Remove the turkey from the bag and pat it dry with paper towels. Place the turkey, uncovered, back on the baking sheet. Return it to the refrigerator for at least 4 hours and up to 12 hours to dry out the skin. This will help to crisp the skin while it is cooking.

When you are ready to cook the turkey, remove it from the refrigerator and allow it to come to room temperature for one hour.

Heat the oven to 450 degrees. In the bottom of a large roasting pan, add the hard cider and enough wine or water to fill the pan to 1/4-inch depth. Add half of the onions, the remaining 6 garlic cloves and the bay leaves. Stuff the remaining onions and the lemon quarters into the turkey cavity. Brush the turkey generously with olive oil or melted butter.

Place the turkey, breast side up, on a roasting rack set inside the roasting pan. Transfer the pan to the oven and roast for 30 minutes. Cover the breast with aluminum foil. Reduce the oven temperature to 350 degrees and continue roasting until an instant-read thermometer inserted into the thickest part of a thigh registers 165 degrees, about 1 1/2 to 2 hours more. Transfer the turkey to a cutting board to rest for at least 30 minutes before carving.

A couple of things about roasting turkey. Though you have probably heard it a thousand times by now from every cooking show, magazine and blog out there, brining isn’t a necessity when cooking turkey; it does seem to help as far as flavor and the skin itself, but the only real key to having moist turkey is removing the turkey from the oven when it is the right temperature. Don’t go by those little buttons that pop up on the turkey; they are often set to pop when the internal temperature is already high, sometimes 180 degrees, and the bird will continue to cook as it rests outside the oven, leaving you with dry turkey. Invest the money in a thermometer and insert it into the thigh to check the temperature. When it is at 165, pull the turkey out and LET IT REST. Don’t carve it right away; it won’t be ready, you’ll lose all the liquid that needs to re-distribute while the bird rests, and you will end up with dry meat.

If you don’t have a roasting rack to put the turkey on, you can make something of your own to get the turkey up out of the liquid so it browns all over. Form a solid ring out of aluminum foil to place under the turkey to lift it out of the liquid. That is what I did with this bird since I wanted to use one of those disposable pans this time and my rack did not fit in the pan. It worked out really well and it is easy to do.

The dry brine in this recipe really seemed to add some flavor and I did like the combination of the cider and the aromatics. It helped to create some very tasty gravy for the meal. This is one of the easiest turkey recipes I have come across and one of the most effective. If you are making a larger bird, the New York Times does have a scale so you can adjust the herbs and seasonings and cooking time of your bird accordingly. You can check it out here if you wish. I would use this recipe if you want to do things easily for yourself and have great tasting turkey.

That’s all I have for today. I still have a couple of more side dishes to share before Thanksgiving, so check back for those. Until next time, enjoy the rest of your day and enjoy your meal!

IMG_1759

 
1 Comment

Posted by on November 25, 2013 in Cooking, Dinner, Holidays, Poultry, Turkey


Tags: , , , , , ,

Thanksgiving Turkey Mistakes: How to Avoid Them: BA Daily: bonappetit.com

Thanksgiving Turkey Mistakes: How to Avoid Them: BA Daily: bonappetit.com.

With Thanksgiving coming fast, everyone is planning and getting their recipes together (I know I am, I’ll be posting some soon). While you’re doing that, here are some great hints and tips from Bon Appetit to make sure you don’t have any mishaps or mistakes with the centerpiece, your turkey. Check it out and see if it helps you!

 
Leave a comment

Posted by on November 13, 2012 in Cooking Tips, Cooking Websites, Turkey


Tags: , , , ,

Gobble, Gobble (Up Some Turkey Meatballs!)

Okay, so the title isn’t so great today, but I was trying to come up with some way to introduce today’s meal. Sean picked this one, and to be honest, I was little surprised he wanted this, but he elected Turkey Meatballs in Gravy, Baked Potatoes, and Broccoli. Since we’ve already made broccoli on the meal plan three times I believe, I won’t bore you with the steamed broccoli that Sean has chosen. I am going to find some more broccoli recipes since I am getting a little bored with it myself (if anyone has any suggestions, please pass them along!)

Okay, so turkey meatballs are not tough to make and they can be quite tasty. I use ground turkey in my chili all the time instead of beef and I think it tastes better and it is better for you. The one thing about ground turkey that I have found is that it can be very dry and needs seasoning. Personally, I have found through some experimenting that the best seasoning to add to ground turkey has been McCormick’s Montreal Chicken blend seasoning. It has a nice mix of garlic, salt, pepper, onion, paprika and orange peel and adds a really nice flavor to the turkey. For a little bit of added moisture to the mix I also put a couple of dashes of Worcestershire sauce as well. Other than those additions, this is basically the same exact recipe I used for the meatballs last week for our spaghetti and meatballs dinner.

Turkey Meatballs

2 slices of white sandwich bread (I prefer Pepperidge Farm, it works well for me)

1/3 cup milk (whatever type you have will work here)

1 pound ground turkey

1/4 cup grated Parmesan cheese

1 1/2 tablespoons McCormick’s Montreal Chicken Blend Seasoning (use less or more, depending on if you like the flavor)

2-3 dashes Worcestershire sauce

2 tablespoons minced fresh parsley

1 egg yolk

1 garlic clove, minced

Salt and pepper

Vegetable oil

1 recipe All Purpose Gravy (recipe to follow)

Remove and discard the crusts from the bread then tear the bread into small pieces. Use a fork to mash the bread pieces and milk to a smooth paste in a large bowl. Add the ground turkey, Montreal Chicken seasoning, Worcestershire sauce, Parmesan, parsley, egg yolk, garlic, 3/4 teaspoon salt, a dash of pepper (or more if you like) to the mashed bread. Stir the mixture gently until combined and uniform (I always use my hands – it gets messy but it mixes better. Take your rings off before you do this). Form the mixture into 1 1/2 inch round meatballs (about 12 meatballs if you make them this big, if you want smaller, go for it and you’ll get more. I always make smaller for the turkey).

Pour the oil into a 12 inch skillet and heat over medium high heat until shimmering. Add the meatballs in a single layer and cook until nicely browned on all sides, about 10 minutes. Transfer the meatballs to a paper towel-lined plate and discard any oil left in the skillet.

Place the skillet back over medium heat and add the gravy, Bring to a simmer, reduce the heat to low, and add the meatballs. Continue to simmer, turning the meatballs occasionally, until heated through, about 5 minutes.

Very, very easy to make. As a matter of fact, I think I will have Sean help me with this one since he did such a good job last week with the dinner he helped make. The all-purpose gravy recipe really is an all-purpose gravy. You could use it for any type of meat or poultry or just for over mashed potatoes, and you don’t need any pan drippings to make this one. It relies solely on vegetables. chicken and beef broth.

All Purpose Gravy

3 tablespoons butter

1 carrot, peeled and chopped fine

1 rib celery, chopped fine

1 onion, minced

1/4 cup all-purpose flour

2 cups chicken broth (used canned, box or your own. I am using my own because I have it. otherwise, use low sodium)

2 cups beef broth (same as the chicken. i don’t have my own right now, so I am using Swanson’s low sodium)

1 bay leaf

1 teaspoon minced fresh thyme, or 1/4 teaspoon dried

5 whole black peppercorns

Salt and pepper

Melt the butter in a large saucepan over medium-high heat. Add the vegetables and cook until softened and well browned, about 9 minutes. Stir in the flour and cook, stirring constantly, until thoroughly browned, about 5 minutes. Gradually whisk in the broths and bring to a boil. Add the bay leaf, thyme, and peppercorns and simmer, stirring occasionally, until thickened, about 20-25 minutes, skimming off any foam that forms on the surface.

Pour the gravy through a fine-mesh strainer (or gravy separator) into a clean saucepan, pressing on the solids to extract as much liquid as possible. Discard the solids. Season the gravy with salt and pepper to taste.

You can make the gravy ahead of time and refrigerate it in an airtight container for up to 4 days, or freeze it for up to 2 months. Just re-heat it over low heat, stirring to recombine, until warm and smooth.

A nice, tasty, very versatile gravy recipe to use any time. Sean wanted baked potatoes tonight ( I personally would have gone for rice) so that’s what were making. You can make baked potatoes the traditional way in the oven at 350 degrees for about 1 hour to 1 hour, fifteen minutes, or you can do it this way, by using the microwave first and then baking them to finish them off. I have found that starting them in the microwave and then cooking them the rest of the way in the oven produces a nice fluffy potato with a crispy skin and takes half the time of just baking them.

Baked Potatoes

4 medium russet potatoes, scrubbed and dried

Butter (for serving)

Salt and pepper (for serving)

Adjust an oven rack to the middle position and heat the oven to 450 degrees. Poke a few holes in each potato with the tines of a fork and microwave the potatoes on high until slightly soft to the touch, 6 to 12 minutes, turning them halfway through.

Carefully transfer the potatoes to the oven and cook directly on the hot oven rack until a knife blade glides easily through the flesh, about 20 minutes. Remove the potatoes from the oven and open them as soon as possible (the longer a potato sits after being removed from the oven, the more dense the flesh becomes. Opening immediately allows the steam to escape, resulting in a more airy potato). Serve immediately with butter, salt and pepper (or anything else you like to add – cheese, sour cream, chives, crumbled bacon, etc.)

Throw in the broccoli, and we are all done for the evening. I am getting to like these easy meals. Quick cooking, quick clean up and we can spend more time together instead of a long time in the kitchen. You could cut the meatball recipe in half if you want less meatballs and then use the leftovers to make some chili or some turkey sausage (which is what I am going to do. I’ll post the recipe for this on another day). Tomorrow is our meatless night, so we will be having Potato Soup tomorrow, which we made last night so it’s already done and just needs to be re-heated. We’ll be having a salad with it and some crunchy bread, but a nice sandwich would go along well with it also if you were looking to do that. I love a good sandwich! Any favorites out there? I plan to do a sandwich recipes day soon, so pass along you might know of and really like. Enjoy your dinner tonight!

 
3 Comments

Posted by on January 23, 2012 in Gravy, Potatoes, Poultry, Sauce, Vegetables


Tags: , , , , , , ,

Planning Your Meals This Week (and Some School Lunches Too)

I didn’t cook today, but we did do our shopping for this week’s meal plan I really do find that the plan helps me in staying on budget as far as shopping. Sure, there are still impulse buys now and then (who can resist a treat now and then) and I do have to buy household items once in a while (garbage bags, storage bags, toothpaste, etc.), but for the most part we really do only buy what we need to make the meals for the week. We do a lot of our shopping at BJ’s Warehouse Club, so we do get essentials that last us for a while, but I have found we can also get good deals on things we use a lot of, like diced tomatoes, pasta and rice, but we also get good deals on meat and poultry and produce. I can buy ground beef or london broil and get enough to freeze for several more meals. The same can be said of poultry. I buy the larger packs of boneless chicken breasts and whole chickens there and we get many meals out of it and also use the chicken carcass to make stock later on for soups. I then supplement that with a short trip to the supermarket for things I can’t get at BJ’s (which isn’t too much) and a trip to Adam’s Farms in Newburgh, where I get our fish for the week and some local produce.

Anyway, for this coming week, this is the meal plan:

Monday – Turkey Meatball with sauce, baked potatoes, broccoli (this was Sean’s choice this week)

Tuesday – Baked Potato Soup (this was Michelle’s pick, and is our meatless meal of the week)

Wednesday – Fish. I didn’t get to the fish market today, but I will go Wednesday morning and pick something out after I see what looks good.

Thursday – Meat Loaf, Mashed Potatoes and corn (this one was my pick)

Friday – Warm Chicken Salad (Michelle picked this one)

Saturday – Peppered Steak, White Rice, Cauliflower and carrots (Michelle picked this one too)

None of the meals are difficult this week and all can be made in a short amount of time. As a matter of fact, we are making the potato soup tonight and refrigerating it for Tuesday. I didn’t have to buy anything out of the ordinary this week other than leeks that we are using in the soup and the peppers for the peppered steak. I bought meat loaf mix of beef, pork and veal that I buy either for meatloaf or meatballs. The London broil was 2 large steaks that I quartered and froze so I’ll only need one piece when I make the peppered steak on Saturday. The ground turkey I bought will be used for meatballs and a portion frozen to be used later on either for chili or turkey sausage (I do make my own for breakfast sausage; it tastes really good and I will be posting that recipe at some point when we make a “breakfast for dinner” one night). Other than that, the rest of the ingredients we will use this week are things we already have in the house, refrigerator or freezer.

Now that dinners are planned for the week, I thought I would spend a little bit of time writing about school lunches. School lunches can be a problem sometimes. Sean buys lunch from school about once a week or less often, mainly because the choices that they have for lunch are, well, less than desirable. It’s pretty rare that when I ask Sean if he wants to buy that he says yes, but I am sure he gets tired of eating either a cheese sandwich or peanut butter and jelly every day. We have thought about doing warm lunches for him in a thermos, but he eats lunch so late in the day that even the thermos wouldn’t keep it warm for him. For others of you, however, warm lunches may be a good option. There is a good blog out there right now called “The Mom With Moxie” by Bree Glenn and she has a good posting on some ideas for school lunch planning. Here is the blog if you want to check it out:http://www.themomwithmoxie.com/2011/11/04/8-resources-for-healthy-fun-school-lunch-box-planning/. She offers up a great list of sites here for some good school lunch ideas. I was able to pull a few ideas off of Good Housekeeping’s website from here also, but if you want to go to Good Housekeeping directly, here is their link:http://www.goodhousekeeping.com/recipes/healthy/ideas-kids-school-lunches. I thought the ideas of Turkey Meatball Pitas, Ham and Cheese Pitas, Chicken Noodle Soup and the Mozzarella and Tomato Sandwich were all good ideas for lunches. There are several other great links on Bree Glenn’s blog about the school lunches that I think will be very helpful in getting some ideas for things to pack for the kids. If anyone has any other great ideas for school lunches, please pass them along and comment here. I am always looking for something new to offer Sean and I am sure plenty of other Moms and Dads could use some ideas as well.

I think that covers everything for today. I hope to go into greater detail on school lunches and some good recipes of my own in a later blog. I want to do a little more research and try out some recipes with Sean first before I put anything up here for you to try. Tomorrow will be the recipes for Turkey Meatballs with sauce, Baked  Potatoes and broccoli. I know, we seem to eat a lot of broccoli, but Sean really likes it so he seems to pick that one all the time. I need to find a few more recipes to find some more interesting ways to cook it. If you have any thoughts on that, feel free to share! Enjoy what’s left of your weekend, and if you’re watching the Giants-49ers game, enjoy the game! (what will you be snacking on during the game? I already plan to post some things as we get closer to Super Bowl Sunday)

 
Leave a comment

Posted by on January 22, 2012 in Lunch, School Lunches


Tags: , , , , , , , , , , , , , ,

 
National Day Calendar

Fun, unusual and forgotten designations on our calendar.

Authentic Autograph Source, LLC

Licensed autographs and collectibles dealer in the Pacific NW! We have a wide range of sports, celebrities, and more!

Jennifer Probst

a little bit naughty a little bit nice

Laissez Faire

Letting Life Lead

%d bloggers like this: