RSS

Monthly Archives: January 2014

Split From the Cold with Split Pea Soup

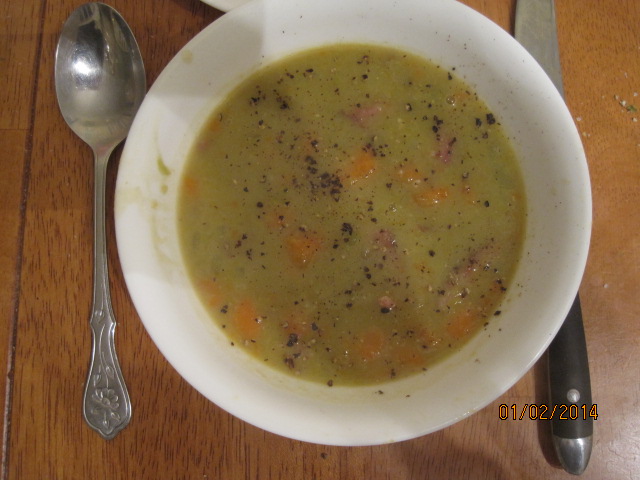
Split pea soup has always been one of my favorites and one that does not get made too often, at least in my house anyway. traditionally it  was always made with a ham bone to get the flavor from, which we never really have around this house very much. Secondly, Michelle has never been a big fan of pea soup, so I had stayed away from trying to make it. Recently she said I should give it a try since she knows how much I like it and she might feel differently about it now. Since I still did not have a ham bone to make it with, I went hunting for alternatives. I saw a lot of recipe that simply used bacon or ham steak as a replacement, but I wanted a bit more flavor than that. I immediately thought of ham hocks, but my local store did not have any. However, they did have some smoked pork necks and this seemed like it would work well enough so I gave it a try.

Split Pea Soup

2 smoked ham hocks or pork necks, each about 3/4 pound
1 1/2 cups green split peas, rinsed and picked over
2 tablespoons butter
1 onion, coarsely chopped
1 carrot, peeled and coarsely chopped
8 cups water or chicken stock

Salt and pepper, to taste

Bring a large saucepan three-fourths full of water to a boil over high heat. Add the ham hocks or pork necks and simmer for 1 minute. Drain and set aside. Pick over the split peas and discard any misshapen peas and stones. Rinse the peas and drain.

In a soup pot or Dutch oven over medium heat, melt the butter. Add the onion and carrot and sauté, stirring occasionally, until the vegetables are soft, about 10 minutes. Add the ham hocks, split peas and the 8 cups of water or stock. Bring to a boil, reduce the heat to low and simmer gently until the peas are soft, about 50 to 60 minutes.
Remove the soup from the heat. Remove the ham hocks and let them stand until they are cool enough to handle. Let the soup cool slightly.

Using a blender and working in batches, puree the soup on high-speed until smooth, about 2 minutes for each batch. Return the puree to a clean soup pot. Alternatively, process the soup with an immersible blender in the pot. Thin the soup with more stock, if needed. Place the soup over medium heat and reheat to serving temperature. Season with salt and pepper.

While the soup is heating, remove the meat from the ham hocks and discard the skin and bones. Cut the meat into small pieces and add to the soup. Stir to heat through.

To serve, ladle the soup into warmed bowls and serve.

I think the pork necks worked out really well and gave the soup a nice, smoky flavor that I really enjoyed. The soup thickened up nicely and tasted wonderful and there was just enough left over for me to have some for lunch today. It went really well with the Filipino sweet rolls that I made to go with them, but you could just as easily make some croutons to top the soup with also. As you can tell from the picture, I like to put a lot of pepper in my soup :).
That’s all I have for today. Check back next time for another recipe. I still have a backlog of items from the holidays to share so I’ll be sharing more of those over the next few days. Until next time, enjoy the rest of your day and enjoy your meal!
003
 
3 Comments

Posted by on January 4, 2014 in Cooking, Dinner, One Pot Meals, Soups & Stews


Tags: , ,

Some Filipino Flair With Dinner – Pan de Sal (Sweet Filipino Bread Rolls)

I just received the latest issue of Saveur Magazine the other day where they list their 100 favorite things and in that issue was a little blurb by Kellie Evans about these wonderful rolls that she used to east after church that were made by the Filipino women in her community. They had a picture of these rolls and the description was so good I knew I had to try them out and find the recipe. Luckily, the recipe was in Saveur a little further back and these could not be much easier to make. There is minimal kneading you need to do and you get wonderful rolls from it.

Pan de Sal

6 cups bread flour, plus more

1 cup plus 1 tablespoon granulated sugar

1 1/2 teaspoons kosher salt

2 1/2 cups milk, heated to 115 degrees

1 tablespoon dry active yeast

4 tablespoons unsalted butter, melted, plus more

1 egg

1 cup plain bread crumbs

Whisk the bread flour, 1 cup of the sugar, and the salt in a bowl. Stir the remaining 1 tablespoon of the sugar, 1 cup of the milk and the yeast in another bowl; allow the mixture to sit until it is foamy, about 10 minutes. Add the remaining milk, plus the melted butter and the egg; whisk until it is smooth. Slowly stir in the dry ingredients until the dough comes together. On a lightly floured surface, knead the dough until it is smooth, about 3 minutes. Transfer the dough to a lightly greased bowl and cover it loosely with plastic wrap, Set the bowl in a warm place until it has doubled in size, about 1 hour.

Place the bread crumbs on a plate. On a lightly floured work surface, divide the dough into 4 equal pieces. Working with 1 piece at a time, pat the dough into a 4 inch by 9 inch rectangle about 1/2 an inch thick. Working from one long end, roll the dough into a tight cylinder. Cut the dough crosswise into five 1 1/2 inch rolls. Gently coat the cut sides of the rolls with the bread crumbs. Place the rolls cut side up on a parchment paper-lined baking sheet spaced about 2 inches apart. Cover the rolls loosely with plastic wrap and set the sheets in a warm place until the rolls have doubled in size, about 1 hour.

Heat the oven to 350 degrees. Bake the rolls until they are golden brown, about 15 to 20 minutes. Serve.

These rolls are incredibly soft and very sweet. They went really well with the soup I made for dinner last night and I think they would perfect for just about dinner or great for sandwiches at lunch or dinner. I actually cut the recipe in half because the original recipe I have shared makes 20 rolls. I cut mine a little smaller and got 14 rolls out of the batch and they still proofed up to be big so I think you can make them even smaller if you want to get more from the batch. One thing to remember about this recipe is that you do not want to overwork the dough and knead it too much so it you get the nice fluffy rolls.

That’s all I have for today. Check back next time for another recipe. until then, enjoy the rest of your day and enjoy your meal!

002

 
1 Comment

Posted by on January 3, 2014 in Breads, Cooking


Tags: , ,

A Classic Side Dish From a Master – Alton Brown’s Best Ever Green Bean Casserole

You wouldn’t think there would be too much that you can actually do to change up this holiday classic, so when I noticed Alton Brown’s recipe for green bean casserole I had to check out what makes it so different from the classic you see on holiday tables each year. The biggest difference really is that everything is made from scratch. No canned fried onions, no cream of mushroom soup, no canned french green beans. I have nothing against the traditional way many people make this dish, but for me personally if you can use all fresh ingredients without preservatives and such that go into canned products, you are much better off and the taste will be a lot better. I made this dish for our Christmas meal and it was well worth the extra effort to put into it.

Alton Brown’s Best Ever Green Bean Casserole

For the topping:

2 medium onions, thinly sliced

1/4 cup all-purpose flour

2 tablespoons panko bread crumbs

1 teaspoon kosher salt

Nonstick cooking spray

For the beans and sauce:

2 tablespoons plus 1 teaspoon kosher salt, divided

1 pound fresh green beans, rinsed, trimmed and halved

2 tablespoons butter

12 ounces mushrooms, trimmed and cut into 1/2-inch pieces

1/2 teaspoon freshly ground black pepper

2 cloves garlic, minced

1/4 teaspoon freshly ground nutmeg

2 tablespoons all-purpose flour

1 cup chicken broth

1 cup half-and-half

Preheat the oven to 475 degrees. Combine the onions, flour, panko bread crumbs, and salt in a large mixing bowl and toss to combine. Coat a sheet pan with nonstick cooking spray and evenly spread the onions on the pan. Place the pan on the middle rack of the oven and bake until they are golden brown, about 30 minutes. Toss the onions 2 or 3 times during the cooking process to ensure they brown evenly. Once they are done, remove the onions from the oven and set them aside so that they are ready to use. Turn the oven down to 400 degrees.

While the onions are cooking, prepare the green beans. Bring a gallon of water and 2 tablespoons of kosher salt to a boil in an 8-quart saucepan. Add the green beans and blanch the beans for 5 minutes. Drain the beans in a colander and immediately plunge the beans into a large bowl of ice water to stop the cooking. Drain the beans and set them aside.

Melt the butter in a large cast-iron skillet set over medium-high heat. Add the mushrooms, 1 teaspoon of kosher salt and pepper and cook, stirring occasionally, until the mushrooms begin to release some of their liquid, about 4 to 5 minutes. Add the garlic and nutmeg and continue to cook for another 1 to 2 minutes. Sprinkle the flour over the mixture and stir to combine. Cook the mixture for 1 minute. Add the chicken broth and simmer for 1 minute. Decrease the heat to medium-low and add the half-and-half. Cook until the mixture thickens, stirring occasionally, about 6 to 8 minutes.

Remove the mixture from the heat and stir in 1/4 of the onions and all of the green beans. Top with the remaining onions. Place the skillet in the oven and bake until the casserole is bubbly, about 15 minutes. Remove the casserole from the oven and serve.

I have tried different recipes for this casserole before, but I think this one had the freshest taste of any I have made. I have never been a big fan of the canned condensed soups, so I was glad for the fresh mushrooms and half-and-half. I think this recipe had much better flavor than any others i have tried and it was definitely worth a little extra effort. Making your onions was quick and easy and they tasted great. The onions would be ideal just for burgers, let alone this casserole. I will definitely make this again, and not just for holiday meals.

That’s all I have for today. Check back next time for some more recipes. Until then, enjoy the rest of your day and enjoy your meal!

011

 
2 Comments

Posted by on January 2, 2014 in Cooking, Holidays, Side Dishes, Vegetables, Vegetarian


Tags: , , , , ,

A Prime Way to Start the New Year – Prime Rib Sandwiches

Happy New Year! I hope everyone had a wonderful day and evening yesterday and you are ready to start off 2014 in grand style. Granted, this recipe is not one that you can make very often, but since I had some leftover prime rib, this seemed like a great way to make good use of it. Of course you can always make a little prime rib if you want just to make these sandwiches. While I did get the recipe from Saveur, I altered it quite a bit to the point where I think it is mostly mine so I could make use of some items we all like in the sandwiches.

Prime Rib Sandwich

1 medium onion, peeled and thinly sliced

1 tablespoon vegetable oil

4 ounces mushrooms, cleaned, stems removed, thinly sliced

3 tablespoons all-purpose flour

2 1/2 cups beef broth

1/2 Roasted Prime Rib recipe or leftover prime rib, thinly sliced

1 tablespoon butter

Kosher salt and freshly ground black pepper, to taste

4 sandwich rolls

Slices of cheese – Provolone, Colby Jack, Cheddar (whatever you really like), for topping

Heat the vegetable oil in a large skillet over medium heat until it is shimmering. Add the onion and cook until the onion softens and is just starting to brown, about 5 minutes. Add the mushrooms and cook just until the mushrooms begin to release some liquid, about 3 to 4 minutes.Whisk in the flour and cook until it is well blended into the vegetables, about 2 minutes. Slowly begin to whisk in the beef broth, a little at a time until so that it absorbs a bit into the vegetables and then just add it slowly, whisking constantly, to avoid lumps from forming in the gravy, about 4 to 5 minutes. Bring the gravy to a boil and reduce the heat to medium-low and cook until the gravy is slightly thickened, about 4 to 5 minutes.Stir in the butter and add salt and pepper to taste.

Stir in the prime rib and cover the pan until the meat is heated through, about 5 minutes. Place one roll on each serving plate and place slices of prime rib in gravy, onions and mushrooms in the roll. if you desire top with any cheese that you like and serve as a cheese steak sandwich or simply serve as an open-faced sandwich without the cheese.

For the cheese steak style sandwich, you may want to place the sandwich under the broiler for a minute to get the cheese melted the way you would like it. I preferred mine without the cheese and just as an open-faced sandwich. You can add all kinds of toppings to this if you wish, like peppers, or hot peppers or even other vegetables that you might like to have. You can even serve it with some mashed potatoes or some oven baked french fries and let them get some of the delicious gravy as well. To me, there was no better way to make use of the leftover prime rib. It was super tender and tasted great with the gravy. It made me wish I had leftover prime rib around the house a little more than once a year!

That’s all I have for today. Check back next time for some more recipes. Until then, enjoy the rest of your day, Happy New Year and enjoy your meal!

002 001


2 Comments

Posted by on January 1, 2014 in Beef, Cooking, Dinner, Gravy, Leftovers, Sandwiches


Tags: , , , , ,

 
National Day Calendar

Fun, unusual and forgotten designations on our calendar.

Jennifer Probst

a little bit naughty a little bit nice

Laissez Faire

Letting Life Lead

What To Have For Dinner Tonight

Simple and delicious dinner inspiration