RSS

Category Archives: Appetizers

A Great Game Day (or Any Day) Snack – Homemade Pizza Rolls

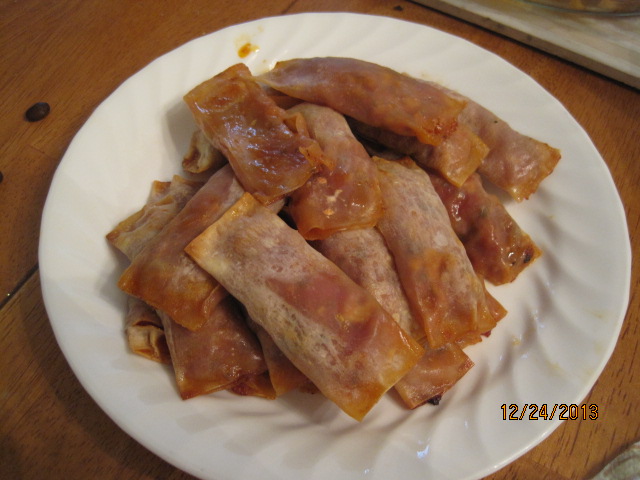
Okay, Sean has been asking me to make these for almost a year now and I was finally able to get around to making them not that long ago. I had gotten the recipe from America’s Test Kitchen a long time ago and have wanted to give it a try but it does take a little bit of work. Lots of people love to snack on pizza rolls at a party or while watching a football game. They make a great easy snack that you can pop in the oven quickly, but why not try to make some at home without all the added preservatives and ingredients that are in the ones you buy at the store? This recipe covers all of that. I did change one thing along the way. I opted not to fry these and simply baked them in a 400 degree oven for 25 minutes and I think they turned out just fine. I have included the frying instructions with the recipe, so the choice is yours as to how you want to make them.

Homemade Crispy Pizza Rolls

3 tablespoons cornstarch

2 tablespoons extra-virgin olive oil

3 tablespoons tomato paste

4 garlic cloves, minced

1/2 teaspoon dried oregano

1/2 teaspoon ground fennel

1/4 teaspoon red pepper flakes

1 (14-ounce) can diced tomatoes, drained well, chopped fine, juice reserved

2 cups shredded Italian blend cheese

3 tablespoons minced fresh basil

Salt and pepper

2 (12-ounce) packages wonton wraps

3 quarts vegetable oil for frying

Line a rimmed baking sheet with parchment paper. Use a fine sieve to dust evenly with about half of the cornstarch. Set a wire rack inside a second baking sheet. Heat the olive oil in a large nonstick skillet over medium heat until it is shimmering. Add the tomato paste and cook, stirring constantly, until the paste is a deep rust color, about 3 minutes. Stir in the garlic, oregano, fennel and red pepper flakes and cook until the mixture is fragrant, about 30 seconds.

Stir in the tomatoes and the reserved juice, bring to a simmer and cook over medium heat, stirring occasionally, until thickened and reduced to 1 cup, about 9 to 11 minutes. Scrape the mixture into a large bowl and refrigerate until it is cold, about 30 minutes. The mixture can be made, refrigerated until cold and covered for up to 2 days at this point.

Stir the cheese and basil into the tomato mixture to combine and season with salt and pepper to taste. Working with 4 to 6 wonton wrappers at a time, place 1 level teaspoon of filling in the center of each wrapper and press down to flatten. Lightly brush all sides of one wonton wrapper with water to moisten the edges. Fold the bottom half of the wrapper over the filling, then fold the wrapper again and roll it so the seam is down. Press the wonton around the filling to squeeze out the air, then press the edges firmly to seal the wonton.

Transfer the wonton seam side down to the prepared baking sheet. Repeat the process with more wonton wrappers and filling until all of the filling is used. Continue to fill the baking sheet and place another piece of parchment paper dusted with cornstarch over those already done to create a second layer. Freeze the pizza rolls until they are firm, about 30 to 60 minutes. The pizza rolls can be wrapped tightly with plastic wrap and frozen for up to 1 month at this point.

Add the vegetable oil to a large Dutch oven until it measures 2 inches and heat the oil over medium-high heat until it registers 375 degrees on a candy thermometer. Transfer 14 to 16 pizza rolls to the oil and cook, stirring and flipping occasionally, until they are golden brown, adjusting the heat as necessary to maintain the oil temperature between 350 and 375 degrees, about 1 to 2 minutes. Transfer the pizza rolls to a wire rack. Return the oil to 375 degrees and repeat with the remaining pizza rolls. Alternatively, heat the oven to 400 degrees. Place the pizza rolls on baking sheets lined with parchment paper and bake until they are golden brown, about 20 to 30 minutes. Let the pizza rolls cool for 5 minutes and serve with warm marinara sauce, if desired.

If you have had pizza rolls before, you know they are lava hot right out of the oven so make sure you resist the temptation and let them cool for a few minutes before eating. These did have a little bit of a bite to them because of the red pepper flakes, so you may want to cut back or eliminate them if you don’t want the heat. You could also mix things up and add things like some sautéed diced onions, peppers, bits of cooked Italian sausage, pepperoni or just about anything else. They were pretty tasty and I think they came out fine with baking instead of frying. You can avoid using all that oil and get good results this way.

That’s all I have for today. Check back next time for another recipe. until then, enjoy the rest of your day, stay warm and enjoy your meal!

009

 
Leave a comment

Posted by on January 7, 2014 in Appetizers, Cooking, Pizza, Snacks


Tags: , , , ,

A Simple Side for Your Burgers and Sandwiches – Beer Battered Onion Rings

I love onion rings. Admittedly, they are not the healthiest  choice when it comes to things to make. The frozen ones, even when baked in the oven, are not the best thing for you but I still love them. I have tried a few times to make my own and have made them by baking them in the oven and by frying them, but I had never really tried a beer batter recipe before. I cam across this one in Saveur Magazine not long ago and had been waiting for the right opportunity to make them. I made some burgers for dinner one night last week and the onion rings were just the perfect accessory for the burgers.

Beer Battered Onion Rings

1 3/4 cups all-purpose flour

1/2 cup cornstarch

1 1/2 teaspoons paprika

1 teaspoon dry mustard

1 tablespoon baking powder

1 tablespoon kosher salt, plus more to taste

2 teaspoons honey

12 ounces lager-style beer

Vegetable or canola oil, for frying

2 large onions, cut crosswise into 1/2-inch thick slices and separated into rings

In a large bowl, whisk together the flour, cornstarch, paprika, dry mustard, baking powder and salt. Add the honey and the beer and whisk the mixture until it is smooth.. Allow the mixture to sit for 10 minutes.

Pour the vegetable or canola oil to a depth of 2 inches in a Dutch oven or large skillet with high sides and heat the pan over medium-high heat until the temperature of the oil registers 375 degrees on a candy or deep-fry thermometer. Working in batches, dip the onion rings into the batter, shaking off any excess, and lower them into the oil. Fry the onion rings, flipping once, until they are golden brown, about 3 minutes total. Transfer the onion rings to a paper towel lined plate to drain briefly and season with more salt. Cover the onion rings and repeat the process with any remaining onion rings until they are all fried. Serve immediately.

The batter was a lot thicker than I thought it was going to be and it made for an excellent crust on the onion rings. You got some really great flavor from the mix of the beer, honey and paprika and they were done quite quickly. We all loved the taste of them and devoured all the onion rings with our burgers pretty quickly. These would be great to make with any burgers or other sandwiches like a chicken sandwich or even with some corned beef or pastrami. They would also make an awesome appetizer or snack when you are watching a football game or having some friends over for a party. I’ll definitely be trying this recipe again.

That’s all I have for today. Check back tomorrow for another recipe. Tomorrow is my birthday, so I will be posting the recipe Michelle used for my wonderful birthday cake that she made. Check back tomorrow to see what it is. Until then, enjoy the rest of your day and enjoy your meal!

003


Leave a comment

Posted by on December 10, 2013 in Appetizers, Cooking, Picnic Fare, Side Dishes, Snacks


Tags: , , , ,

Best Thanksgiving Appetizer Recipes : Recipes and Cooking : Food Network

Best Thanksgiving Appetizer Recipes : Recipes and Cooking : Food Network.

Appetizers are something that can get easily overlooked when you are planning your Thanksgiving Day meal. Food Network gives you some of the best and easiest appetizers, most of which you can put together without working up a big sweat so you can be sure you are covered. Check it out!

 
Leave a comment

Posted by on November 18, 2013 in Appetizers, Cooking, Cooking Websites, Holidays


Tags: , , , , ,

Another Great Holiday Appetizer – Meatball Sliders

There are some things you may not think of as a great holiday appetizer unless you just happen to have everything fall into place as far as ingredients and what you have on hand. This was one of those recipes for me. I had some meatballs on hand already that I had made and frozen, so it really just became a matter of putting them together with the rolls and some cheese and we were all set. Now, if you wanted to make this recipe ahead of time and use it for a holiday appetizer, it is certainly easy to do. This is the meatball recipe that I use most often, but you could easily use any meatball recipe you prefer or even use some frozen meatballs you may have on hand to make things even easier.

Meatball Sliders

2 stalks celery, chopped

1 medium carrot, roughly chopped

1 medium onion, roughly chopped

6 cloves garlic

1 cup fresh parsley leaves

1 pound ground beef

1 pound ground pork

2 large eggs

1 cup Italian-style breadcrumbs

1 cup plus 3 tablespoons grated Parmesan cheese

2 28-ounce cans tomato puree

2 large sprigs basil

1 teaspoon dried oregano

1 cup shredded mozzarella cheese

Slider rolls

Brush a baking sheet with olive oil. Pulse the celery, carrot, onion, garlic and parsley in a food processor to make a paste. Transfer half of the vegetable paste to a bowl; add the ground beef, ground pork, eggs, breadcrumbs, 1 cup of the Parmesan cheese and 1 teaspoon of salt and mix with your hands until it is just combined. Form the mixture into about 24 two-inch meatballs; transfer the meatballs to the prepared baking sheet. Bake the meatballs until they are firm but not cooked all the way through, about 10 minutes.

To make the sauce, heat 3 tablespoons of the olive in a large pot over medium-high heat. Add the remaining vegetable paste and cook, stirring occasionally, until it looks dry, about 5 minutes. Stir in the tomato puree; rinse each can with 1 cup of water and add it to the pot. Stir in the basil, oregano and 1 1/2 teaspoons of salt. Bring the sauce to a simmer, then add the meatballs and simmer until the sauce thickens and the meatballs are cooked through, about 15 to 20 minutes. Remove the basil.

Place 1 or 2 meatballs and sauce inside each of the slider rolls and top each with mozzarella cheese. Serve.

It is a very simple recipe to put together and the sliders were devoured when I made them in no time at all. You could easily do the same thing with sausage and peppers if you had some on hand or wanted to make some ahead of time and then simply re-heat the sausage and peppers and put them into slider rolls. For me, it was just a matter of warming he meatballs and sauce on the stove top for about 5 to 10 minutes just to heat them through and then assemble the sliders.

That’s all I have for today. Keep checking back as there is plenty more along the way leading up to Thanksgiving. I have lots of side dishes to share, some desserts, breads and even things to do with leftovers. Keep checking back to see what is next. Until then, enjoy the rest of your day and enjoy your meal!

003


Leave a comment

Posted by on November 15, 2013 in Appetizers, Beef, Cooking, Dinner, Holidays, Sandwiches


Tags: , , ,

An Easy Holiday Appetizer – Broccoli Dip in a Bread Bowl

You want to try to remember to have some appetizers on hand for your holiday or Thanksgiving meal to keep everyone happy before the big meal comes out. There are lots of things that you can do that are easy, like making a simple antipasto platter, some shrimp cocktail, crackers and cheese or even just some onion dip and chips. One thing that can be a little different and look fancy is this recipe I got from Cook’s Country for broccoli dip in a bread bowl. It is really easy to make and you can make the dip a day or two in advance and then just put it all together right before you serve it.

Broccoli Dip in a Bread Bowl

12 ounces broccoli, florets cut into 1-inch pieces, stalks peeled and cut into 1/2-inch pieces

2/3 cup mayonnaise

1/4 cup grated Parmesan cheese

2 tablespoons minced shallot

1 garlic clove, minced

1/2 teaspoon salt

1/4 teaspoon pepper

1/8 teaspoon cayenne pepper

2/3 cup whole Greek yogurt

1 (8-inch) round bread (whatever type you like)

Combine the broccoli stalks and 1 tablespoon of water in a bowl. Cover the bowl and microwave it until the stalks are tender, about 5 minutes. Transfer the stalks to a colander, rinse under cold water, and drain thoroughly. Transfer the stalks to a clean dish towel and pat dry. Combine the broccoli florets and 1 tablespoon of water in the same now-empty bowl. Cover the florets and microwave until just tender, about 3 minutes.Transfer the florets to a colander, rinse them under cold water and allow them to drain thoroughly. Transfer the florets to a clean dish towel and pat them dry. Keep the stalks and the florets separate.

Combine the stalks, mayonnaise, Parmesan cheese, shallot, garlic, salt, pepper and cayenne pepper in a food processor and process until the mixture is finely ground, about 30 seconds., scraping down the sides of the bowl as needed. Add the florets and pulse until the florets are finely chopped, about 4 pulses. Transfer the mixture to a bowl, stir in the Greek yogurt, and refrigerate the dip for at least 30 minutes or up to 24 hours.

Using a paring knife, cut into the top of the loaf of bread at a 45-degree angle, about 1 1/2 inches from the edge. Continue to slice around the bread at a 45-degree angle in approximately a 5-inch circle. Remove the cut top of the bread and cut it into bite size pieces. Make vertical slices through the perimeter of the bread bowl at 1 1/2-inch intervals, stopping just shy of the bottom crust. Transfer the broccoli dip to the bread bowl. Serve, using bread pieces and crudites to dip.

I did make one slight change to the recipe itself. Instead of using mayonnaise I used some sour cream and I think it came out just fine. The slices into the bread bowl allow people to pull out pieces of the bread to dip into the dip itself. The goal is that you won’t actually have anything leftover from the whole set up, though I did have some extra broccoli dip left that did not fit into the bread bowl, so we have been able to have that with some cut-up vegetables like carrots, celery, peppers and the like. I think you could also easily substitute spinach for the broccoli in this if you prefer to have a spinach dip to serve. In either case, I really liked the texture thanks to the yogurt and the flavor of the broccoli and shallots was great. You really do need to blanch the broccoli for this to work out well. Raw broccoli would be too woody and I think frozen broccoli is just too mushy to use.

That’s all I have for today. Check back next time for some more recipes. There’s still lots to come that you can use to help plan your Thanksgiving. Until next time, enjoy the rest of your day and enjoy your meal!

002

 
Leave a comment

Posted by on November 14, 2013 in Appetizers, Cooking, Holidays, Snacks, Vegetables, Vegetarian


Tags: , , , , ,

Dinner in a Flash – Quicker Than You Can Say Cornmeal Batter Shrimp

For many people, the only real association they have with seafood is shrimp. We eat a lot of different seafood in our home, but shrimp seems to be a constant favor among my family, as it is with many other families. The great thing about shrimp is that it is really easy to make and very versatile. You can do all kinds of things with it and cook it in many different ways. If you can get fresh shrimp for a good price in your local area, then go for it. For the majority of people around the country, most of the shrimp available in supermarkets or other stores is farm-raised and frozen. You can even get it often in resealable bags so you can take out just as many as you need to cook for your meal, thaw them in the refrigerator overnight or run them under cold water for an hour or less and you can start cooking. Just a few weeks ago, the New York Times Magazine ran an article about different ways to cook shrimp and gave some different recipes, which is where I picked up this recipe for cornmeal batter shrimp.

Cornmeal Batter Shrimp

Vegetable oil

1 pound shrimp, peeled and deveined

1 cup milk

1 egg

1 cup cornmeal

1/2 cup all-purpose flour

Heat about 2 inches of vegetable oil in a cast iron skillet or Dutch oven until the temperature of the oil registers 350 degrees. Slice the shrimp lengthwise while the oil is heating. Combine the milk and the egg in a separate shallow dish and beat the egg until blended with the milk. In another shallow dish, combine the cornmeal and flour and mix gently until just combined. Dip the shrimp in the liquid mixture, shaking off any excess. Dredge the shrimp in the cornmeal mixture, again shaking off any excess. Fry the shrimp in small batches in the hot oil for less than 5 minutes until golden brown. Drain the shrimp on a paper towel lined dish and cover the dish while you repeat the process with the remaining shrimp. Serve.

The whole meal can be done in about 10 or 15 minutes, including preparation. Make sure not to overcook the shrimp as it will very quickly get very rubbery and chewy. The shrimp will turn out nice and crisp and the cornmeal not only helps to give it a great crust, but really good flavor as well. You can serve this alongside some tartar sauce or cocktail sauce if you like. We had this as an entrée one night with some baked ginger sweet potatoes and some mixed vegetables, but you could also make this as a nice appetizer for any party, holiday or weekend and it would make a great snack while watching some football.

That’s all I have for today. Check back next time for some more recipes. There’s always lots more to come. Until then, enjoy the rest of your day and enjoy your meal!

003 001

 
Leave a comment

Posted by on November 7, 2013 in Appetizers, Cooking, Dinner, Seafood


Tags: , , , ,

31 Awesome Dips for Football Noshing – Bon Appétit

31 Awesome Dips for Football Noshing – Bon Appétit.

If you are going to have chips while you watch the game, or are having a party or just one a great snack, then you need to make sure you have a good dip on hand. Sure, you can buy stuff from the store and go with that, by what not get much better flavor and control the content yourself and put some time in to make your own. Most of these dips from Bon Appetit are really easy to make and you can find yourself making your own dip all the time with little effort. Check it out!

 
Leave a comment

Posted by on September 28, 2013 in Appetizers, Cooking, Picnic Fare, Sauce, Snacks


Tags: , , ,

Football Snack – Very Easy Basic Buffalo Wings

There are fewer snacks that are better for watching football games than Buffalo wings. Sure having chips and dip are great, but when you bring out the wings then you know it is football time. it’s so easy for most of us just to order wings from somewhere and pick them up or have them delivered or just buy the frozen packages of buffalo wings already. The problem is a lot of times the wings you order are overcooked and swimming in sauce and the frozen wings just don’t give you the crunch and flavor. Why not put in a few minutes of your time and make your own wings? This basic wing recipe is from Food Republic and doesn’t get much easier than this one.

Basic Buffalo Wings

3/4 cup all-purpose flour

1/2 teaspoon cayenne pepper

1/2 teaspoon garlic powder

1/2 teaspoon salt

20 chicken wings, tips removed and wings separated at the joint

1/2 cup melted butter

1/2 cup hot sauce or wing sauce (your choice, whatever you like best)

Line a baking sheet with aluminum foil and lightly spray the sheet with non-stick cooking spray. Mix the flour, cayenne pepper and garlic powder in a medium bowl.Dip each wing piece into the mixture and coat completely. Place the wings on the baking sheet and repeat the process until all of the wings are coated. Cover the baking sheet with the wings in plastic wrap and place it in the refrigerator for at least 1 hour.

Preheat the oven to 400 degrees. In a small bowl, whisk the melted butter and the hot sauce until blended. Dip the wings into the hot sauce mixture to coat the wings and place the wings back on the baking sheet. Bake the wings for 45 to 55 minutes, turning the wings once after 20 minutes of baking so that each side gets crispy. Remove from the oven and serve with bleu cheese dressing, ranch dressing, extra hot sauce and cut-up vegetables like celery and carrots.

Of course, you don’t have to coat all the wings in hot sauce if you prefer something else. You can always make a quick mix of your favorite barbecue sauce and some honey or just barbecue sauce, maybe some teriyaki sauce or just have them plain if that’s what you like. Personally I like the Buffalo wings and I really liked this recipe. The flour helped to give the wings a nice crunch when they were baked. Placing them in the refrigerator for an hour or so also helps them to dry out some and get rid of some of the moisture that can make them soggy. This is also a much better alternative to deep-frying, which is not the best for you where health is concerned with all that oil and it leaves quite a mess to clean up. I think this recipe is a great alternative and makes some great wings.

That’s all I have for today. Check back next time for another recipe. I have tried some soups this week, so I’ll be posting recipes for those as the week goes on. Check back and see what comes up next. Until next time, enjoy the rest of your day and enjoy your meal!

001

 
Leave a comment

Posted by on September 24, 2013 in Appetizers, Cooking, Poultry, Snacks


Tags: , , ,

Perfect Summer Dip Recipes for Parties : Cooking Channel

Perfect Summer Dip Recipes for Parties : Cooking Channel.

looking for some great dip ideas for a summer barbecue, party or just to have around the house for yourself? Cooking Channel has put together some great dips from basic to different for you to try out for your next party. Check it out!


Tags: , , , ,

Ballpark Food Recipes: Hot Dogs, Corn Dogs & More : Cooking Channel

Ballpark Food Recipes: Hot Dogs, Corn Dogs & More : Cooking Channel.

If you know me then you know I love baseball. There is nothing better than going to the ballpark and enjoying the game and a few of the snacks they have to offer along the way. Though most stadiums today offer a much wider array of food than ever before (Citi Field offers up a filet mignon cheesesteak sandwich and a shrimp po’boy for example), here are some ballpark favorites and basics offered up by the Cooking Channel so you can make your own and enjoy the game on television in your air conditioning. Check it out!


Tags: , , ,

 
National Day Calendar

Fun, unusual and forgotten designations on our calendar.

Jennifer Probst

a little bit naughty a little bit nice

Laissez Faire

Letting Life Lead

What To Have For Dinner Tonight

Simple and delicious dinner inspiration