RSS

Category Archives: Cookbooks

Mother’s Day Dinner Part 2 – Chicken Parmesan

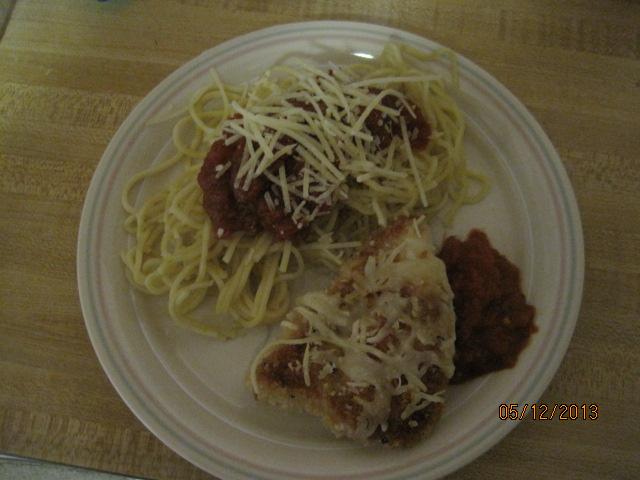
For the second recipe that I made for Mother’s Day, we selected another meal from the Cook’s Illustrated Cookbook. This time it was a more updated version of chicken Parmesan. We wanted to make something that was not cooked directly in the tomato sauce as I have found that this can make the breading on the chicken quite soggy. I prefer to have it crisp along with the baked cheese on top. This recipe seems to fit all of these requirements. I used the exact same tomato sauce recipe as I had posted yesterday with the eggplant Parmesan.

Updated Chicken Parmesan

Recipe for Tomato Sauce (See yesterday’s post)

4 (8-ounce) boneless, skinless chicken breasts

2 large eggs
Salt and pepper
2 cups panko breadcrumbs
1/2 cup extra-virgin olive oil
6 ounces mozzarella cheese, shredded (1 1/2 cups)
2 ounces Parmesan cheese, grated (1 cup), plus extra for serving
8 ounces spaghetti

Adjust an oven rack 6 inches from the broiler element and heat the broiler. Set a wire rack in a rimmed baking sheet. Halve the chicken horizontally, then cut each half down the middle to create four pieces. Cover the chicken with plastic wrap and pound each piece to an even 1/4-inch thickness with a meat pounder.

Lightly beat the eggs and 1/2 a teaspoon of salt together in a shallow dish or a pie plate. Combine the breadcrumbs, 1/2 teaspoon of salt, and 1/2 teaspoon of pepper in a second dish. Pat the chicken dry with paper towels and season with salt and pepper. Working with one cutlet at a time, coat each piece with the egg mixture, allowing any excess to drip off. Coat all sides of the cutlet with the breadcrumb mixture, pressing gently so that the crumbs adhere. Transfer the breaded cutlets to the prepared wire rack.

Heat oil in a large skillet over medium-high heat until shimmering. Working in batches, place the cutlets in the skillet and cook until a deep golden brown and crisp on the first side, about three minutes. Flip the cutlets, reduce the heat to medium, and continue to cook until they are a deep golden brown and crisp on the second side, about two minutes longer. Transfer the cutlets to a clean wire rack set in a baking sheet and repeat the process until all the cutlets have been cooked. Sprinkle the cutlets evenly with mozzarella and Parmesan. Broil the cutlets until the cheese is melted and spotty brown, about three minutes.

Meanwhile, bring 4 quarts of water to a boil in a large pot. Add the pasta and 1 tablespoon of salt and cook, stirring often until al dente. Drain the pasta. Serve the chicken with the pasta, spooning sauce over individual portions and passing the Parmesan separately.

I did change up the recipe just a bit. After slicing the chicken horizontally, I cut it again to make smaller portions. If you want the larger portions, just eliminate the second cut.The nice thing about this recipe, besides the fact that it did not take long to cook it all, is that some people don’t like the chicken drowning in tomato sauce. This gave them the opportunity to have the chicken with as much sauce as they like or with no sauce at all. The chicken came out very crispy and tasted great.

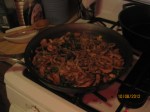
That’s the recipe for today. Tomorrow I will post the recipe I used for the sausage and peppers that I made. I have made sausage and peppers many times in the past and posted another recipe on my blog here, but this one I found does everything exclusively in the oven, and I think it turned out much better. Check back tomorrow to see if you like it. Later on in the week I will also have recipes that I used for a wilted spinach salad and a simple tomato and mozzarella cheese appetizer. Until the next time, enjoy the rest of your day and enjoy your meal!

008

 
Leave a comment

Posted by on May 14, 2013 in Cookbooks, Cooking, Dinner, Holidays, Pasta, Poultry


Tags: , , , , , , ,

Mother’s Day Dinner, Part 1 – Eggplant Parmesan

Cooking on Mother’s Day is always a special event. I wanted to make sure I made things that Michelle really wanted to have for dinner and that would be good for the guests that we were having for the day. After some back and forth we decided on a few different things to make, but it was mostly going to have an Italian theme to it. I made a few things, so for the first day of the recipes I am going to post the recipe I used for Eggplant Parmesan that I got from the Cook’s Illustrated Cookbook. Actually, a lot of recipes that I used for the Mother’s Day meal came from this cookbook. This one, I think, was my favorite of the day.

Eggplant Parmesan

1/4 cup extra-virgin olive oil
2 garlic cloves, minced
1 (28-ounce) can crushed tomatoes
1/2 teaspoon dried basil
1/4 teaspoon dried oregano
1/4 teaspoon sugar
Salt and pepper
2 pounds eggplant, sliced into one fourth-inch-thick rounds
Kosher salt and pepper
8 slices white sandwich bread, torn into quarters
2 ounces Parmesan cheese, grated (1 cup)
1 cup flour
4 large eggs
6 tablespoons vegetable oil
8 ounces mozzarella cheese, shredded (2 cups)
1 ounce Parmesan cheese, grated (1/2 cup)
10 fresh basil leaves, roughly torn

For the tomato sauce, heat the oil and garlic in a large saucepan over medium heat. Cook, stirring often, until the garlic turns golden but not browned, about three minutes. Stir in the tomatoes, basil, oregano, sugar, 1/4 teaspoon pepper, and a pinch of salt, bring to a simmer, and cook until the sauce thickens and the flavors meld, about 10 to 12 minutes. Take the sauce off the heat, season with salt to taste and cover to keep warm.

For the eggplant, line a baking sheet with a triple layer of paper towels and set it aside. Toss the eggplant and 1 1/2 teaspoons of salt together in a bowl, then transfer it to a colander. Let it sit until the eggplant releases about 2 tablespoons of liquid, about 30 to 45 minutes. Wipe the excess salt from the eggplant, then arrange it on a prepared baking sheet. Cover the eggplant with another triple layer of paper towels and firmly press each slice to remove as much liquid as possible.

While the eggplant is draining, adjust oven racks to the upper-middle and lower-middle positions, place a rimmed baking sheet on each rack, and heat the oven to 425°. Pulse the bread in a food processor to fine, even crumbs, about 15 pulses. You should have about 4 cups of breadcrumbs when you are done. Transfer the crumbs to a pie plate or shallow dish and stir in the Parmesan cheese and a half teaspoon of pepper; set aside.

Combine the flour and 1 teaspoon of pepper in a large zipper-lock bag and shake to combine. Beat the eggs in a second pie plate or shallow ditch. Place 8 to 10 eggplant slices in the bag with the flour, sealed the bad, and shake to coat the eggplant. Remove the eggplant slices, shaking off any excess flour, then dip in the eggs, letting any excess egg run off. Then coat the eggplant evenly with the bread-from mixture. Set the breaded slices on a wire rack set in a rimmed baking sheet. Repeat the process with the remaining eggplant.

Remove the preheated baking sheets from the oven. Add 3 tablespoons of oil to each sheet, tilting the sheet to coat it evenly with the oil. Place half of the breaded eggplant on each baking sheet and a single layer; bake until the eggplant is well browned and crisp, about 30 minutes, switching and rotating the baking sheets after 10 minutes, and flipping the eggplant slices with a wide spatula after 20 minutes. (Do not turn off the oven.)

To assemble the dish, spread 1 cup of the tomato sauce over the bottom of a 13 x 9-inch baking dish. Layer in half of the eggplant slices, overlapping slices to make sure everything fits. Distribute 1 cup of sauce over the eggplant, then sprinkle with 1 cup of the mozzarella cheese. Layer in the remaining eggplant, then.with 1 cup of sauce, leaving the majority of the eggplant exposed so it will remain crisp. Sprinkle with the Parmesan cheese and the remaining 1 cup of mozzarella. Bake until bubbling and the cheese is browned, 13 to 15 minutes. Cool for 10 minutes, and scattered the basil over the top, and serve, passing the remaining tomato sauce separately.

I had never made eggplant Parmesan before, and the few times that I have had it be eggplant to me comes out to be quite soggy and full of oil. I think a lot of this is because most people just simply fry the eggplant before they put it in the oven. This technique seems to work better to me as salting the eggplant first helps draw out a lot of the moisture out of it, and then the baking process helps to keep it crisp. I actually used Panko breadcrumbs instead of making the breadcrumbs in the food processor as suggested and I think it actually came out better. Only putting a little bit of sauce on the eggplant cook in the dish also seem to help keep it nice and crisp as well. I used the same technique with the chicken Parmesan that we also made for dinner and that seemed to work really well too; you’ll see that recipe posted tomorrow. Everyone seemed to love the eggplant and it disappeared quite quickly, so fast in fact that I never even got a picture of it to take to post on here, so for that I apologize. But I will certainly make this dish again as the recipe proved to be popular even with those who are not big fans of eggplant.

That’s it for today. Time to get back to work. Tomorrow I will post the recipe for the chicken Parmesan that I need it. It is slightly different than the recipe I have posted here in the past and that everyone seemed to really like the way that came out as well so I think you’ll enjoy it. Check back tomorrow and see if you like it. Until then, enjoy the rest of your day and enjoy your meal!

 
1 Comment

Posted by on May 13, 2013 in Cookbooks, Cooking, Dinner, Holidays, Sauce, Vegetables


Tags: , , , , ,

Pan-Fried Crab Cakes and Oven Fries

I have posted crab cakes and oven fries recipes on the blog before, but I did make them a little differently this past week when we had them for dinner. This time, I decided to use the Cook’s Illustrated Cookbook, which I find I used for many different things. It has lots of great recipes in it, both basic and a little more technical see you can cover just about everything. The cookbook also has a lot of great hints as far as equipment, kitchen accessories, techniques, and more. I highly recommend it if you are looking for a cookbook batting compresses everything. The crab cakes recipe that I used is pretty basic and easy to follow.

Pan-Fried Crab Cakes

1 pound jumbo lump crab meat, picked over to remove cartilage and shell fragments
4 scallions, green parts only, minced
1 tablespoon chopped fresh parsley, cilantro, dill, or basil
1/4 cup mayonnaise
2-4 tablespoons plain dried breadcrumbs
1 1/2 teaspoons Old Bay seasoning
Salt and ground white pepper
1 large egg, lightly beaten
1/4 cup flour
1/4 cup vegetable oil
Lemon wedges
Tartar sauce (recipe to follow)

Line a rimmed baking sheet with parchment paper. Gently mix the crab meat, scallions, parsley, mayonnaise, 2 tablespoons of breadcrumbs, and Old Bay in a medium bowl, being careful not to break up crab lumps. Season with salt and white pepper to taste. Carefully fold in the egg with a rubber spatula until the mixture just clings together. If the cakes do not bind, add more breadcrumbs, 1 tablespoon at a time, until they do.

Divide the crab mixture into four portions and shape each portion into a fat, round cake, about 3 inches in diameter and 1 1/2 inches thick. Arrange on a prepared baking sheet, cover, and refrigerate at least 30 minutes or up to 24 hours.

Place flour in a shallow baking dish or pie plate. Lightly dredge the cakes in the flour. Keep your loyal in a large nonstick skillet over medium-high heat until shimmering. Gently lay the flowered cakes in the skillet and cook until the exteriors are crisp and browned, about 4 to 5 minutes per side. Serve immediately with lemon wedges or sauce.

I’ve always found that the key to really good crab cakes is having less breadcrumbs, less filling and more crab. Most of the crab cakes you seem to get when you go out to a restaurant are just filled with breadcrumbs and don’t have much crab in them at all. Also, I have found many places tend overcook them so you really only need about four minutes per side just to crisp them up. Jumbo lump crabmeat can be quite expensive, so if you want a cheaper alternative you can certainly buy pasteurized crabmeat. That is what I used this time and I think the recipe turned out just fine. Another key is you really do need a good nonstick skillet to use to make these. There is nothing worse than trying to flip the crab cake that is stuck to the bottom of the pan. I served the crab cakes with that recipe that I also got from this cookbook for the tartar sauce. It’s really easy to make and it’s certainly better than anything you’re going to find in a store.

Homemade Tartar Sauce

3/4 cup mayonnaise
1/2 shallot, minced
2 tablespoons capers, rinsed and minced
2 tablespoons sweet pickle relish
1 1/2 teaspoons white vinegar
1/2 teaspoon Worcestershire sauce
1/2 teaspoon pepper

Mix all the ingredients together in a small bowl. Cover and let sit to blend of flavors together, about 15 minutes. Stir again before serving. The sauce can be refrigerated and stored for up to one week.

I didn’t have sweet pickle relish on hand, but I did have bread-and-butter pickles so I use them instead, I minced a few up and added a tiny bit of pickle juice to the mixture and I think it came out great. I also cut back a little bit on the mayonnaise as I am the only person leads tartar sauce in our house so this way we didn’t end up with a lot left over. The final piece of the dinner was one of Sean’s particular favorites for the night, which were the oven fries. I’ve tried making oven fries in the past with mixed results and this recipe is very similar to one I have tried before.

Oven Fries

2 1/4 pounds russet potatoes, peeled and cut lengthwise into 10 to 12 even wedges
5 tablespoons vegetable oil
Salt and pepper
Adjust an oven rack to the lowest position and heat the oven to 475°. Place the potatoes in a large bowl, cover with hot tap water, and soak for 10 minutes. Meanwhile, coat a large, heavy-duty rimmed baking sheet with 4 tablespoons of oil and sprinkle evenly with 3/4 teaspoon of salt and 1/4 teaspoon of pepper; set aside. Line the second baking sheet with triple layers of paper towels and set aside.

Drain the potatoes. Spread the potatoes out on the paper towel lined baking sheet, then thoroughly Pat dry the potatoes with additional paper towels. Rinse and wipe out the now empty bowl. Return the potatoes to the bowl and toss with the remaining 1 tablespoon of oil. Arrange the potatoes in a single layer on the oil baking sheet, cover tightly with aluminum foil, and bake for five minutes. Remove the foil and continue to bake until the bottoms of the potatoes are spotty golden brown, about 15 to 20 minutes, rotating the baking sheet after 10 minutes. Using a metal spatula and tongs, scraped to loosen the potatoes from the pan, then flip each wedge, keeping the potatoes in a single layer. Continue baking until the fries are golden and crisp, about 5 to 15 minutes longer, rotating the pan as needed if the fries are browning unevenly.

While the fries bake, line a baking sheet with a triple layer of paper towels. Transfer the baked fries to the prepared baking sheet to drain. Season with additional salt and pepper to taste and serve.

There seems to be a couple of keys to the recipe that made it turn out better for me this time than the past. First, I tried to cut the potatoes as evenly as possible so everything would cook at about the same time frame. Soaking the potatoes for the required amount of time really makes a big difference as it pulls out a lot of the starch from the potato and helps to keep them from sticking to the pan. Adding the oil to the pan and a little bit to the potato not only helps with the sticking but helps with the browning process. Finally, covering the potatoes with aluminum foil for five minutes at the beginning of cooking allows the potatoes to steam so you can then crisp them up the rest of the cooking time. I certainly think it was a pretty successful effort this time out.

That’s it for today. Time for me to get back to work after spending yesterday evening at Citi Field watching the Mets game. I’ll have another recipe for you tomorrow so check back and see if it’s something you are interested in giving a try. Until then, enjoy the rest of your day and hopefully you were not in the rain as we are here in New York. Enjoy your day and enjoy your meal!

002 001

 
4 Comments

Posted by on May 8, 2013 in Cookbooks, Cooking, Dinner, Potatoes, Sauce, Seafood


Tags: , , , , , , ,

It’s About Time For A Home Cooked Meal

Between my being sick and then Sean being sick, I haven’t had much time to do any real meals during the week, let alone doing any blogging about the meals. Since we are all finally starting to feel better around here, I though today would be a good day to try and get things back to normal around here and cook some good meals. I have had some flounder in the freezer and was looking for something to do with it when I came across this recipe in America’s Test Kitchen’s cookbook “Quick Family Cookbook.” I like this cookbook because it gives me some good meal options that can all be made in under 45 minutes, which make thhem great for any weeknight meal when you may not have a lot of time or energy to put into your meal but still want something made at home. This is a simple fried fish with Southwestern corn, though to be honest I eliminated a lot of the heat from this meal since Sean and Michelle both don’t really care for spicy food. Nonetheless, it’s a good recipe that you can play around with and use a variety of fish with if you have some on hand.

Cornmeal Fried Fish and Southwestern Corn

2 tablespoons butter

8 ounces chorizo sausage, chopped

1 red bell pepper, stemmed, seeded and chopped fine

1 jalapeno chile, stemmed, seeded and minced

1 shallot, minced

1 garlic clove, minced

Salt and pepper

4 cups frozen corn

2 teaspoons minced fresh cilantro

1/2 cup all-purpose flour

1/2 cup cornmeal

2 (12 ounce) skinless flounder fillets, cut in half lengthwise

1 cup vegetable oil

Melt the butter in a large nonstick skillet over medium-high heat. Add the chorizo and cook until lightly browned, about 2 minutes. Stir in the bell pepper, jalapeno, shallot, garlic and 1/2 teaspoon of salt and cook until the bell pepper begins to brown, about 5 minutes. Stir in the corn and cook until heated through, about 2 minutes. Stir in the cilantro and season with salt and pepper to taste. Transfer to a bowl and cover.

Meanwhile, mix the flour and cornmeal together in a shallow dish. Pat the flounder dry with paper towels and season with salt and pepper., then dredge the fish in the cornmeal mixture, pressing gently so it adheres to the fish.

Wipe out the now-empty skillet with paper towel, add the vegetable oil and return to medium-high heat until the oil is shimmering. Lay the fillets in the skillet and cook until golden on both sides, about 2 minutes per side. Transfer the fish to a paper towel-lined plate. Let the fish drain briefly, then serve with the corn.

You could really use any fish fillets you like for this meal – catfish, sole, tilapia, trout, snapper – you name it. Ialso added some other colored peppers to the corn to make the meal look a little more festive since I wasn’t using the chorizo or the jalapeno. You could serve this white rice or brown rice and you would have quite a nice meal.

A nice simple meal that is great for any dinner. We are getting back to the meal plan this week after I go shopping tomorrow. We have gotten away from it lately and haven’t been planning things out and I feel we actually eat better from a health standpoint when everything is planned out for the week, so we are going to try and get back to it and try to get back to one meatless meal for the week, one fish meal, one stir fry, one chicken and one lean meat. I’ll have to see how things go at the market tomorrow to see what I can pick up and go with it, so check back tomorrow and see what we have for the week. until then, have a great day and enjoy your meal!

 
Leave a comment

Posted by on February 25, 2013 in Cookbooks, Cooking, Dinner, Seafood


Tags: , , , , ,

Ultra-Romantic and Hassle-Free Valentine’s Day Menu and Recipes | Shine Food – Yahoo! Shine

Ultra-Romantic and Hassle-Free Valentine’s Day Menu and Recipes | Shine Food – Yahoo! Shine.

Still need some menu ideas for Valentine’s Day? These quick and easy recipes from America’s Test Kitchen can help you out without you having to spend a ton of time in the kitchen. They are all pretty simple yet elegant recipes that can be made in under 45 minutes. They come from their cookbook “America’s Test Kitchen Quick Family Cookbook,” which I have and use for some great weeknight meals without any fuss. Check it out and enjoy your day with your sweetie!

 
Leave a comment

Posted by on February 13, 2013 in Cookbooks, Cooking, Cooking Websites, Holidays


Tags: , , ,

Quick Skillet Salmon

Since Michelle and I both have pretty busy schedules, I am always looking for meals that can be prepared easily and quickly. One of the cookbooks I got this Christmas is from America’s Test Kitchen called the “Quick Family Cookbook,” with recipes that can be prepared in under 45 minutes and are perfect for families who need some weeknight meals without having a lot of unusual ingredients that you may not typically have around the house. It seems like a really good book and since I love the cookbooks from them I am sure I will use it a lot.

That being said, this recipe for Skillet Salmon is actually from the Food Network. I came across it a few days ago and we just happened to pick up some wild salmon, which was on sale for a really good price. Michelle only likes the wild salmon as the farm-raised often does not have the same good flavor that you get with wild salmon. Wild salmon, on the other hand, is often pretty expensive, except this time of year when you can often find it for a good price. I got mine here at Adams Farms for $9.99 a pound. Still pricey, but much cheaper for wild salmon. Anyway, I had everything else on hand for this recipe, so it was quick and easy.

Hoisin Skillet Salmon

One 15.5 ounce can black beans, drained and rinsed (I actually used dried beans instead of canned and did a quick soak to get them ready)

2 tablespoons hoisin sauce

1/4 teaspoon red pepper flakes

2 cloves garlic, crushed

4 cups broccoli florets

Four 5-ounce salmon fillets, skin removed

Juice of 1/2 a lemon

2 tablespoons roughly chopped fresh cilantro, optional

Kosher salt

Combine the beans, 3/4 cup of water, hoisin sauce, red pepper flakes and garlic in a large skillet. Top with the broccoli and nestle the salmon into the broccoli. Bring the skillet to a simmer over medium heat. Once it is simmering, cover the skillet and cook until the salmon is flaky and just cooked through and the broccoli is crisp-tender, about 5 to 6 minutes. Drizzle with lemon juice and sprinkle with cilantro, if using (I skipped the cilantro, my family are not big fans of it). Add salt to taste and serve.

That’s all there was to it. I did add some white rice to the meal to round it out, but you don’t really need it with the black beans. I particularly love quick meals you can do all in one pot. It makes for super easy clean up when all is done.

Just a quick recipe for today. I do have a pork tenderloin I am cooking tonight, beef stew tomorrow, and then a frenched pork roast on Thursday, so I’ll be posting some recipes for those things along the way the rest of the week. I am also scouting around for some new lunch recipes as Michelle is looking  for different things to bring for lunch that are quick and healthy without using any bread, We’ll see how it goes and what I can find. If you have any suggestions, please pass them along. Until next time, enjoy the rest of your day and enjoy your meal today!


001

 
Leave a comment

Posted by on January 8, 2013 in Cookbooks, Cooking, Cooking Websites, Dinner, Seafood


Tags: , , , , ,

A Great Weeknight Meal: Go Ahead and Thai One On

Now that the trip to Ireland is over and done, it’s time to get back to some everyday cooking again. I made a few different meals this week, but the one that stands out as something different was this one. I recently started a subscription to Cook’s Illustrated and when my first issue came, I had picked out this recipe as the first one I wanted to try. It is a Thai dish called pad see ew. It is a traditional street dish of charred rice noodles with some kind of meat, Chinese broccoli and eggs in a sauce. It looked good and the recipe seemed pretty straightforward to me and it seemed like something the whole family would eat. I am the first to admit, I do not normally like pasta or noodles, but the rice noodles had a little bit of different texture and taste to them and since they were crisping up in the cooking, I didn’t mind them at all. The hardest part I had was finding all the ingredients locally. Serrano chiles are apparently hard to come by around here, and it took a little work to find some broccolini and oyster sauce as well, but I did track them down at a local market that has mostly Asian food.

Stir-Fried Noodles with Chicken (Pad See Ew)

Chile Vinegar

1/2 cup white vinegar

1 serrano chile, stemmed and sliced into thin rings

Stir-Fry

2 boneless, skinless chicken breasts, trimmed and cut against the grain into 14-inch thick slices

1 teaspoon baking soda

8 ounces rice noodles

1/4 cup vegetable oil

1/4 cup oyster sauce

1 tablespoon plus 2 teaspoons soy sauce

2 tablespoons packed dark brown sugar

1 tablespoon white vinegar

1 teaspoon molasses

1 teaspoon fish sauce

3 garlic cloves, sliced thin

3 large eggs

10 ounces broccolini, florets cut into 1-inch pieces, stalks cut on the bias into 1/2-inch pieces

For the Chile Vinegar: Combine the vinegar and the serrano chile in a bowl. Let stand at room temperature for at least 15 minutes.

For the Stir-Fry:  Combine the chicken with 2 tablespoons of water and the baking soda in a bowl. Let sit at room temperature for 15 minutes. Rinse the chicken in cold water and drain well.

Bring 6 cups of water to a boil. Place the noodles in a large bowl. Pour the boiling water over the noodles. Stir, then soak the noodles until they are almost tender, about 8 minutes, stirring once halfway through the soak. Drain and rinse the noodles with cold water.  Drain well and toss with 2 teaspoons of the oil.

Whisk the oyster sauce, soy sauce, sugar, vinegar, molasses, and fish sauce together in a bowl.

Heat 2 teaspoons of the oil and the garlic in a large nonstick skillet over high heat, stirring occasionally, until the garlic is a deep golden brown, 1 to 2 minutes. Add the chicken and 2 tablespoons of the sauce mixture, toss to coat, and spread the chicken in an even layer. Cook without stirring until the chicken begins to brown, 1 to 1 1/2 minutes. Push the chicken to one side of the skillet. Add 2 teaspoons of the oil to the cleared side of the skillet. Add the eggs to the clear space. Using a rubber spatula, stir the eggs gently and cook until they set but are still wet. Stir the eggs into the chicken and continue to cook, breaking up the large pieces of egg, until the eggs are fully cooked, about 30 to 60 seconds. Transfer the chicken mixture to a bowl.

Heat two teaspoons of the oil in a now-empty skillet until smoking. Add the broccolini and 2 tablespoons of sauce and toss to coat. Cover the skillet and cook for 2 minutes, stirring once halfway through cooking. Remove the lid and continue to cook until the broccolini is crisp and very brown in spots, 2 to 3 minutes, stirring once halfway through cooking. Transfer the broccolini to the bowl with the chicken mixture.

Heat two teaspoons of oil in the now-empty skillet until smoking. Add half of the noodles and 2 tablespoons of the sauce to coat. Cook until the noodles are starting to brown in spots, about two minutes, stirring halfway through cooking. Transfer the noodles to the bowl with the chicken mixture. Repeat the process with the remaining 2 teaspoons of oil, the noodles and the sauce. When the second batch of noodles is cooked, add the entire contents of the bowl back to the skillet and toss to combine. Cook without stirring until everything is warmed through, 1 to 1 1/2 minutes. Transfer everything to a platter and serve immediately, passing the chile vinegar separately.

It’s a pretty simple meal that I think turned out quite well. Michelle and Sean both loved it, and I liked it too. And it’s nice because it fits easily into a one-pot meal for easy cleanup as well.The whole meal itself does not take long to cook and prepare, so it fit well into a school night meal.

As I said, finding some of the ingredients can prove to be a challenge depending on the type of markets you have locally to you. If you can’t get broccolini, you could substitute regular broccoli with no problem. I think you need to get the rice noodles to make it authentic and it does add to the taste, though I found the rice noodles to be quite expensive ($6.99 for a 1 pound box of noodles).

I had my budding photographer Sean take the picture of the meal for me as it cooked. He wants to be my blog photographer, so the job is his right now. I think he did a pretty good job on this one.

That’s it for today. i do have some more recipes to post that we have done recently, including some tacos and a bacon-wrapped tilapia, so look for those over the next few days. Until then, enjoy the rest of your fall day and enjoy your meal!

 
1 Comment

Posted by on October 13, 2012 in Cookbooks, Cooking, Dinner, One Pot Meals, Poultry


Tags: , , , ,

Quick Pan Roasted Chicken and Potatoes

I’ve been working really hard lately doing lots of articles, so I haven’t had much fun time for writing, like taking care of my blogs (I have another blog at www.thoeofficeofiguanaflats.com if you want to check it out) and I haven’t had a lot of time for cooking either. Yesterday I made some meatloaf and mashed potatoes, which I have made before and posted the recipes for on here earlier if you would like them (they are very tasty!). Today I needed something quick and happened to have a whole chicken breast in the fridge to make, so I decided to make a quick pan roasted chicken and potatoes, some asparagus, and I had some all-purpose gravy I made for the meatloaf that we can use as well. Ever since the Ranting Chef did a post on his blog a while back about his cast iron pan, I have been using mine a lot (it always sits out on the stove now) and this dish is perfect for that since I can throw everything in there and then put it right in the stove. Saves time and clean up! This is a super-fast meal that you can throw together pretty quickly and even use boneless chicken breasts if you don’t have the bone-in breasts. You could even just use chicken parts like legs and thighs instead if that’s what you have around.

Pan Roasted Chicken and Potatoes

4 split bone-in chicken breasts (or whatever parts you want to use)

6 tablespoons olive oil

1 1/2 pounds red potatoes, cut into 1-inch wedges

1 onion, cut into wedges

2 tablespoons fresh lemon juice

1 garlic clove, minced

1 teaspoon minced fresh thyme leaves

Pinch red pepper flakes

Adjust an oven rack to the lowest position and heat the oven to 450 degrees. pat the chicken dry with paper towels and season with salt and pepper. Heat 1 tablespoon of the olive oil in a large skillet over medium-high heat until just smoking. Brown the chicken well on the skin side, about 5 minutes.

While the chicken browns, toss the potatoes and onion with 1 tablespoon of the oil, 1/2 teaspoon of salt and 1/4 teaspoon of pepper in a microwave safe bowl. Cover the bowl tightly with plastic wrap. Microwave on high until the potatoes begin to soften, about 5 to 10 minutes, shaking the bowl (without removing the plastic) halfway through cooking.

Remove the chicken and place back down in the skillet skin side up. Add the potatoes and onions and transfer to the oven and bake until the thickest part of the breast registers 160 degrees on an instant read thermometer, about 15 to 20 minutes.

Whisk the remaining 3 tablespoons of oil, lemon juice, garlic, thyme and red pepper flakes together. Drizzle over the chicken and potatoes before serving.

Nice and simple for a weeknight meal and the potatoes and chicken are nicely browned in the cast iron pan (don’t forget to season your pan after you wash it; it will last forever if you take care of it).

That’s all I have for tonight. Tomorrow night Sean and I are off to the Mets game so there’s no meal tomorrow night, just hot dogs at the ballpark. I’ll get back to the blog on Thursday. Until then, enjoy your evening and enjoy your meal!

 
Leave a comment

Posted by on May 15, 2012 in Cookbooks, Dinner, Poultry


Tags: , , ,

Some Quiet Time to Read a Good Book

Sean and Michelle went to a fundraiser dinner tonight, so there’s no cooking tonight, just leftovers for me. I’ll be having some of the leftover Chicken and Dumplings I made on Sunday. I am sure I’ll put the recipe up here one day since it turned out pretty well. I know, I know, you’re saying, geez, we’re only a few days into this and we’ve only had one day of recipes. I promise, I am cooking the rest of the week so there will be stuff on here. For today, I thought I would just take a few minutes and let you know where I get a lot of my recipes from in case you want to check out these books or websites.

One cookbook that I use very often is “The America’s Test Kitchen Family Cookbook.” This cookbook covers just about everything you could ever want to know. They cover all the basics of cooking, techniques, ingredients, what works and what doesn’t, and they make lots of recommendations of brands for all kinds of different equipment and ingredients. If you want just one cookbook to start with, I would recommend this one to use. A lot of the recipes I use come from this book. The America’s Test Kitchen website has a lot of the recipes on it as well, but you have to pay to subscribe to the website (www.americastestkitchen.com), so you might as well use that money to buy the book yourself. It is available from Amazon here:http://www.amazon.com/Americas-Test-Kitchen-Family-Cookbook/dp/1933615486/ref=sr_1_1?ie=UTF8&qid=1326843698&sr=8-1

Another cookbook I use a lot is Mark Bittman’s “How to Cook Everything.” Whatever America’s Test Kitchen doesn’t cover, this one sure does. It’s a thick book that really does seem to cover everything. He also goes over lots of techniques as well as covers lots of recipes, and the newer version of the book does cover more vegetarian dishes. There are lots of variations on recipes also so you can change things up on classic recipes you have used for a while. There are over 2,000 recipes in this book, so you can find a recipe for just about any ingredient you would want to use. This book is also available on Amazon:http://www.amazon.com/Cook-Everything-Completely-Revised-Anniversary/dp/0764578650/ref=sr_1_1?s=books&ie=UTF8&qid=1326844032&sr=1-1. I also follow Mark Bittman on Facebook, where he also posts some recipes, along with other articles he writes:https://www.facebook.com/MarkBittman

Those are the two main cookbooks I use, but I also use a magazine to get recipes and ideas. We have been subscribing to Bon Appetit for years, and I have gotten lots of good recipes from them. Of course, the pictures they have look a lot nicer than what I have been able to turn out, but this magazine has dozens of recipes every month and also gives great tips for shopping, on particular techniques, wines and spirits to buy, and also where some of the best places to eat are in many different cities all over. You don’t have to subscribe to the magazine; you could also visit their website, http://www.bonappetit.com/, where they have quite a cache of recipes and articles for you to look through.

There are two other websites that I frequent to get recipes from. One is http://www.williams-sonoma.com/. I love to shop at the store and online, even if some of their prices are high. They have some great recipes on their website, but you have to keep in mind that this is also their retail website, so they include items that you can but directly from them to use in the recipes they list, They also have some recipes that are very specific to ingredients that they sell, so you have to keep an out when scanning through the recipes to make sure they aren’t using something you won’t have around. The other website I use a lot is http://www.foodnetwork.com/. They also have a very large cache of recipes from all their shows and from other sources. You can just type an item into their search box and it will pull up recipes for that item. You can then sort them based on what show they came from, how other users have rated the recipes, the method used, and even watch videos of the recipe. It’s a fantastic source of recipes. I personally use several recipes used by Ina Garten, Anne Burrell, Giada De Laurentiis and Tyler Florence. You can pretty much find a recipe for anything you want, and then read reviews of it by other everyday users to see how they liked the recipe, what worked and what didn’t. I find it a very useful website.

Do you have any particular books or websites that you like to use often? I would love to hear about them. I am always looking for new ideas and new sources of information. Please pass them along so we can all check them out.

That’s about all I have for today. It will be back to cooking tomorrow night and tomorrow night was my choice, so we are making seafood for dinner. We’ll be having sea scallops, rice, and roasted vegetables so check in tomorrow to see the recipes. Enjoy your evening!


2 Comments

Posted by on January 17, 2012 in Cookbooks, Cooking Websites


Tags: , , , , ,

 
National Day Calendar

Fun, unusual and forgotten designations on our calendar.

Jennifer Probst

a little bit naughty a little bit nice

Laissez Faire

Letting Life Lead

simple cooking recipes

a blog to share with you the best