RSS

Tag Archives: oven fries

Make it Fast – Fake Frites for Any Meal

Monday is typically my busiest day of the work week as I get a lot of my projects for the week and have several that start and are due on each Monday so I don’t get a lot of time to blog on Mondays anymore. that being said, as I take a brief break from writing for work I get the chance to write for fun and thought I would share this really easy recipe I tried recently for some homemade oven fries. I have tried a few oven fries recipes in the past and have had mixed success with them, but so many of them seem to use a lot of oil in order to get the fries nice and crispy, something I have been trying to avoid doing when I can. I came across this recipe recently on Food52.com from Patricia Wells for a recipe she calls “fake frites.” The recipe seemed deceptively easy and simple to me so I was not quite sure if I was going to be happy with the results, but I was pleasantly surprised by what came out.

Fake Frites (Oven-Fried French Fries)

2 pounds baking potatoes, such as Idaho russets, peeled and cut into thick fries, about 3/4-inch by 3 inches

2 to 3 tablespoons extra-virgin olive oil

Sea salt or Kosher salt, to taste

Preheat the oven to 500 degrees. Bring 1 quart of water to a simmer in the bottom of a steamer pot or in a Dutch oven or large saucepan with a steamer basket insert in it. Place the potatoes on the steaming rack or in the steamer basket and place the rack in the steamer. Cover the pot and steam the potatoes just until a knife tip inserted in a potato comes away clean, about 10 to 12 minutes. The potatoes should not be cooked all the way through or they will tend to fall apart.

Transfer the steamed potatoes to a bowl and drizzle them with the olive oil. Carefully toss the potatoes to make sure they are all coated with the oil. The potatoes can be prepared to this point several hours in advance of using them. Just them aside and let them sit at room temperature.

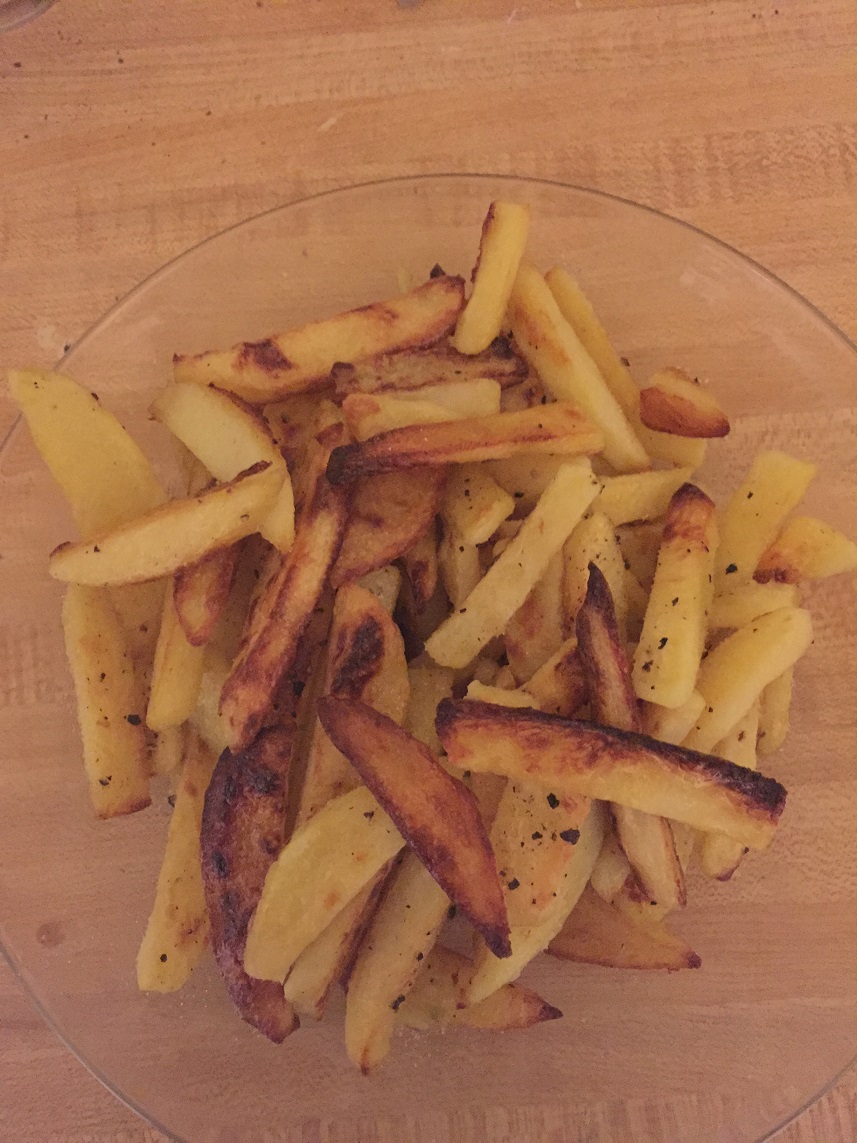
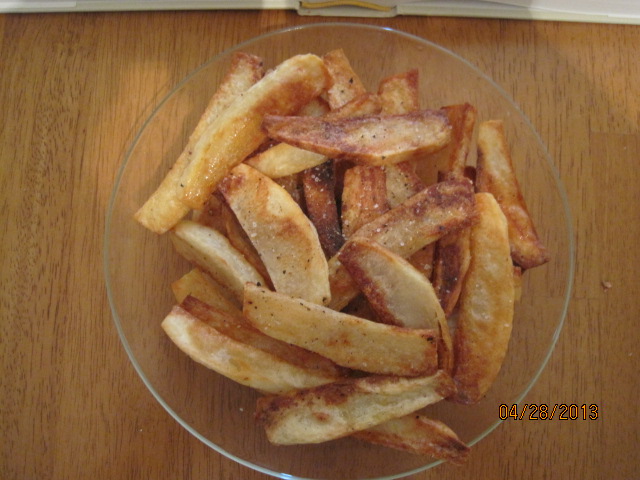
With a large slotted spoon, transfer the potatoes in a single layer to a nonstick baking sheet. Discard any excess oil or liquid that is in the bowl. Place the baking sheet in the oven and bake, turning the potatoes so they brown evenly, until the potatoes are crisp and deep golden brown, about 10 to 20 minutes. Remove the potatoes from the oven and season them generously with salt and serve immediately.

It sounds too easy to be true but this might be the best oven fries I have tried yet. The trick for me seemed to be in preparing them ahead of time and letting them sit at room temperature for an hour or two. The potatoes dried out a bit  even with the oil on them and this really helped to make sure they got nice and brown and crisp in the oven. you do need to make sure you flip them halfway through baking, and I flipped mine at the 10 minute mark and by about 15 or 16 minutes total cooking time they were done perfectly. Of course fries go well with just about any meal – hamburgers, hot dogs, steak, fish, meat loaf, ribs, chicken, you name it – and this one is easy enough to make any time. 2 pounds of russet potatoes might only be 3 potatoes (depending on how big they are) and you get plenty of fries out of the recipe. I’ll be making them again (perhaps even tonight) and they are a great go to when you don’t want to oil fry potatoes or don’t want bagged fries or have them around.

That’s all I have for today. Check back next time for another recipe. Until then, enjoy the rest of your day and enjoy your meal!

fakefrites

Advertisement
 
Leave a comment

Posted by on February 23, 2015 in Cooking, Dinner, Lunch, Potatoes, Side Dishes


Tags: , , , , , , ,

Pan-Fried Crab Cakes and Oven Fries

I have posted crab cakes and oven fries recipes on the blog before, but I did make them a little differently this past week when we had them for dinner. This time, I decided to use the Cook’s Illustrated Cookbook, which I find I used for many different things. It has lots of great recipes in it, both basic and a little more technical see you can cover just about everything. The cookbook also has a lot of great hints as far as equipment, kitchen accessories, techniques, and more. I highly recommend it if you are looking for a cookbook batting compresses everything. The crab cakes recipe that I used is pretty basic and easy to follow.

Pan-Fried Crab Cakes

1 pound jumbo lump crab meat, picked over to remove cartilage and shell fragments
4 scallions, green parts only, minced
1 tablespoon chopped fresh parsley, cilantro, dill, or basil
1/4 cup mayonnaise
2-4 tablespoons plain dried breadcrumbs
1 1/2 teaspoons Old Bay seasoning
Salt and ground white pepper
1 large egg, lightly beaten
1/4 cup flour
1/4 cup vegetable oil
Lemon wedges
Tartar sauce (recipe to follow)

Line a rimmed baking sheet with parchment paper. Gently mix the crab meat, scallions, parsley, mayonnaise, 2 tablespoons of breadcrumbs, and Old Bay in a medium bowl, being careful not to break up crab lumps. Season with salt and white pepper to taste. Carefully fold in the egg with a rubber spatula until the mixture just clings together. If the cakes do not bind, add more breadcrumbs, 1 tablespoon at a time, until they do.

Divide the crab mixture into four portions and shape each portion into a fat, round cake, about 3 inches in diameter and 1 1/2 inches thick. Arrange on a prepared baking sheet, cover, and refrigerate at least 30 minutes or up to 24 hours.

Place flour in a shallow baking dish or pie plate. Lightly dredge the cakes in the flour. Keep your loyal in a large nonstick skillet over medium-high heat until shimmering. Gently lay the flowered cakes in the skillet and cook until the exteriors are crisp and browned, about 4 to 5 minutes per side. Serve immediately with lemon wedges or sauce.

I’ve always found that the key to really good crab cakes is having less breadcrumbs, less filling and more crab. Most of the crab cakes you seem to get when you go out to a restaurant are just filled with breadcrumbs and don’t have much crab in them at all. Also, I have found many places tend overcook them so you really only need about four minutes per side just to crisp them up. Jumbo lump crabmeat can be quite expensive, so if you want a cheaper alternative you can certainly buy pasteurized crabmeat. That is what I used this time and I think the recipe turned out just fine. Another key is you really do need a good nonstick skillet to use to make these. There is nothing worse than trying to flip the crab cake that is stuck to the bottom of the pan. I served the crab cakes with that recipe that I also got from this cookbook for the tartar sauce. It’s really easy to make and it’s certainly better than anything you’re going to find in a store.

Homemade Tartar Sauce

3/4 cup mayonnaise
1/2 shallot, minced
2 tablespoons capers, rinsed and minced
2 tablespoons sweet pickle relish
1 1/2 teaspoons white vinegar
1/2 teaspoon Worcestershire sauce
1/2 teaspoon pepper

Mix all the ingredients together in a small bowl. Cover and let sit to blend of flavors together, about 15 minutes. Stir again before serving. The sauce can be refrigerated and stored for up to one week.

I didn’t have sweet pickle relish on hand, but I did have bread-and-butter pickles so I use them instead, I minced a few up and added a tiny bit of pickle juice to the mixture and I think it came out great. I also cut back a little bit on the mayonnaise as I am the only person leads tartar sauce in our house so this way we didn’t end up with a lot left over. The final piece of the dinner was one of Sean’s particular favorites for the night, which were the oven fries. I’ve tried making oven fries in the past with mixed results and this recipe is very similar to one I have tried before.

Oven Fries

2 1/4 pounds russet potatoes, peeled and cut lengthwise into 10 to 12 even wedges
5 tablespoons vegetable oil
Salt and pepper
Adjust an oven rack to the lowest position and heat the oven to 475°. Place the potatoes in a large bowl, cover with hot tap water, and soak for 10 minutes. Meanwhile, coat a large, heavy-duty rimmed baking sheet with 4 tablespoons of oil and sprinkle evenly with 3/4 teaspoon of salt and 1/4 teaspoon of pepper; set aside. Line the second baking sheet with triple layers of paper towels and set aside.

Drain the potatoes. Spread the potatoes out on the paper towel lined baking sheet, then thoroughly Pat dry the potatoes with additional paper towels. Rinse and wipe out the now empty bowl. Return the potatoes to the bowl and toss with the remaining 1 tablespoon of oil. Arrange the potatoes in a single layer on the oil baking sheet, cover tightly with aluminum foil, and bake for five minutes. Remove the foil and continue to bake until the bottoms of the potatoes are spotty golden brown, about 15 to 20 minutes, rotating the baking sheet after 10 minutes. Using a metal spatula and tongs, scraped to loosen the potatoes from the pan, then flip each wedge, keeping the potatoes in a single layer. Continue baking until the fries are golden and crisp, about 5 to 15 minutes longer, rotating the pan as needed if the fries are browning unevenly.

While the fries bake, line a baking sheet with a triple layer of paper towels. Transfer the baked fries to the prepared baking sheet to drain. Season with additional salt and pepper to taste and serve.

There seems to be a couple of keys to the recipe that made it turn out better for me this time than the past. First, I tried to cut the potatoes as evenly as possible so everything would cook at about the same time frame. Soaking the potatoes for the required amount of time really makes a big difference as it pulls out a lot of the starch from the potato and helps to keep them from sticking to the pan. Adding the oil to the pan and a little bit to the potato not only helps with the sticking but helps with the browning process. Finally, covering the potatoes with aluminum foil for five minutes at the beginning of cooking allows the potatoes to steam so you can then crisp them up the rest of the cooking time. I certainly think it was a pretty successful effort this time out.

That’s it for today. Time for me to get back to work after spending yesterday evening at Citi Field watching the Mets game. I’ll have another recipe for you tomorrow so check back and see if it’s something you are interested in giving a try. Until then, enjoy the rest of your day and hopefully you were not in the rain as we are here in New York. Enjoy your day and enjoy your meal!

002 001

 
4 Comments

Posted by on May 8, 2013 in Cookbooks, Cooking, Dinner, Potatoes, Sauce, Seafood


Tags: , , , , , , ,

There’s Nothing Like a Burger…

Sean wanted hamburgers tonight, so I decided I would make them for dinner. I also made oven fries again, which were delicious. They were nice and crunchy on the outside and creamy in the center, like fries should be made. I also made some oven-fried onion rings. I hadn’t made these before, but I have to say they came out nicely. I have posted the recipes I use for hamburgers and oven fries before, but if you would like to check them out, you can simply click here and go to that day’s blog. I will post the onion ring recipe I used.

Oven-Fried Onion Rings

1/2 cup all-purpose flour

1 large egg, at room temperature

1/2 cup buttermilk, at room temperature

1/4 teaspoon cayenne pepper

Salt and pepper

30 saltines

4 cups kettle-cooked potato chips

2 large yellow onions cut into 24 large rings

6 tablespoons vegetable oil

Adjust oven racks to lower-middle and upper-middle positions and heat oven to 450 degrees. Place 1/4 cup of flour in a shallow baking dish. Beat egg and buttermilk together in a medium bowl. Whisk the remaining 1/4 cup of flour, cayenne, 1/2 teaspoon of salt, and 1/4 teaspoon of pepper into the buttermilk mixture. Pulse the saltines and the chips together in a food processor until they are finely ground and place in a separate shallow baking dish.

Pull apart the rings of onion in each round, discarding any that are less than 2 inches in diameter. Working one at a time, dredge each onion ring in flour, shaking off the excess. Dip the onion ring in the buttermilk mixture, allowing excess to drip back into the bowl, then drop the ring into the crumb coating, turning the ring to coat evenly. Transfer the ring to a large plate and repeat the process with the remaining onion rings.

Pour 3 tablespoons of oil onto each of the two rimmed baking sheets. Place in the oven and heat until just smoking, about 8 minutes. Carefully tilt the heated baking sheets to coat them evenly with oil, then arrange the onion rings on the sheets. Bake, flipping the onion rings over and switching and rotating the positions of the baking sheets halfway through baking, until they are golden brown on both sides, about 15 minutes. Transfer the onion rings to plates lined with paper towels to drain briefly. Serve immediately.

You can bread the onion rings ahead of time refrigerate them for up to an hour. Let them sit at room temperature for 30 minutes before baking; if you bake them straight from the fridge, the onions will not soften properly and will remain crunchy.

These onion rings turn out very crisp and crunchy, almost like they were fried. Using the kettle chips helps produce a golden crust that makes the crust seem deep-fried. Adding the saltines add some saltiness to the mix and helps to absorb the excess grease from the potato chips. Definitely give them a try if you get the chance; we loved having them with the burgers tonight.

Tomorrow night is a meat-free meal night; well, not completely meat-free but pretty close. I am making Fettuccine Alfredo for Michelle and Sean for dinner, but since I am not too keen on pasta or cheese, I am having a crab stuffed rainbow trout for myself. I’ll be posting both recipes  so you can check them out tomorrow night. Until then, enjoy your meal and enjoy your evening!

 
1 Comment

Posted by on March 7, 2012 in Beef, Cooking, Dinner, Potatoes, Vegetables


Tags: , , , , ,

Your Own Hamburger Happy Meal

It’s Tuesday and it’s another mild day here in New York. While it may not have you thinking of using the grill just yet (although using it all year round would be nice), today’s dinner on the meal plan might help you think more towards summer. Today’s is Sean’s pick, and he has chosen Hamburgers and Fries with salad. Nothing special or fancy about it and everybody makes them. I love a good burger myself; I think it is probably one of my favorite things to eat and it’s great for lunch or dinner and can be made any time of the year, and it can be made quickly (which is always a plus).

Skillet Hamburgers

1 1/2 pounds (80 percent lean) ground beef

1 teaspoon salt

1/2 teaspoon pepper

2 tablespoons vegetable oil

4 hamburger rolls

Mix the beef, salt and pepper together. Divide the meat into 4 equal portions. Shape the meat into a loose ball, and using your hands, flatten the balls into 1-inch thick burgers. Press the center of the patty down with your fingertips to form an indentation that is about 1/4-inch deep. Heat the oil in a large skillet over medium-high heat until just smoking. Place the burgers in the skillet indentation-side up and cook until the bottoms are dark brown, about 3 minutes. Flip the burgers over and continue to cook to your desired doneness. Transfer the burgers to the buns and top as desired.

Everyone has their own variation of this and things they made to the meat before cooking, so do what you like the taste of best. Just a couple of recommendations on my part. Using 80 percent lean ground beef does seem to make a difference. Any more fat than this and the burgers are greasy, any less and the meat becomes dry and pretty bland. As for the indentation I put in the meat, it’s great for avoiding the puffy burgers that you often get while cooking and also leaves you a bit of a well for your toppings. As for the toppings, the list is endless. You can pretty much put anything on top of a burger, as most of us have seen thanks to cooking shows. Personally, I love sautéed onions, some pickle, maybe a slice of tomato or a slice of bacon, maybe even some sliced avocado some times. Sean goes for just American cheese and bacon on his burger. Michelle also goes for cheese and sautéed onions, and mixes in some ketchup and mayonnaise. Let me know what some of your favorite toppings are for burgers. I might be willing to try them out!

French fries almost seem a must if you are having a burger (although I do like onion rings too, or some homemade potato salad or cole slaw, but we’ll leave those recipes for summertime). Our house is mainly a tater tots kind of house as everyone seems to like them the best. I’ll be making some homemade fries when I make our Fish and Chips recipe on Friday, but here is a good recipe for homemade Oven Fries that I have made before. They turn out great and taste better than most things you’ll get out of a bag.

Oven Fries

3 large russet potatoes, peeled and cut lengthwise into 10 to 12 evenly sized wedges

5 tablespoons vegetable oil

Salt and pepper

Adjust an oven rack to the lowest position and heat the oven to 475 degrees. Place the potatoes in a large bowl, cover with hot tap water, and allow to soak for 10 minutes. While the potatoes are soaking, coat a heavy-duty rimmed baking sheet with 4 tablespoons of oil. Sprinkle the baking sheet evenly with 3/4 teaspoon of salt and 1/4 teaspoon pepper.

Drain the potatoes, spread them out over paper towels, and pat them dry thoroughly. Toss the dried potatoes with the remaining 1 tablespoon of oil. Arrange the potatoes, cut-side down, in a single layer over the prepared baking sheet. Cover the sheet tightly with foil and bake for 5 minutes.

Remove the foil and continue to bake until the sides of the potatoes touching the pan are crusty and golden, about 15 to 20 minutes, rotating the baking sheet after 10 minutes. Using a metal spatula, scrape to loosen the potatoes from the pan, then flip each wedge over, keeping the potatoes in a single layer. Continue to bake until the fries are golden and crisp on both sides, 10 to 15 minutes longer, rotating the pan as needed if the fries are browning unevenly. Transfer the fries to a paper towel-lined plate to drain and season with salt and pepper to taste.

Not too hard to do, if you ask me. Soaking the potatoes before you bake them is important in this recipe. They will cook much better, become crispy on the outside and be creamy on the inside. If you have a heavy-duty non-stick baking pan to use for this one, it does make your life easier as well. Just make sure you choose something to use that can hold up to the higher heat. A final note: I prefer using vegetable oil in this recipe. Olive oil leaves a distinct flavor on the potatoes that you may not want.

The final part of the meal, as we have had before in our meal plan, is a simple salad. You can check out my list of salad and accompaniments here from a previous blog entry if you like. I will, however, post a new dressing recipe today. A lot of people seem to like Ranch dressing, and you might want some to dip your fries in or use for a dip for veggies, so here is a good one to try. One note about this recipe, use fresh herbs for it. I tried it with dried and it just doesn’t work out well.

Ranch Dressing

1/2 cup buttermilk

1/2 cup mayonnaise

6 tablespoons sour cream

1 tablespoon minced shallot

1 tablespoon minced fresh parsley

1 tablespoon minced fresh dill

1 garlic clove, minced

1 teaspoon fresh lemon juice

A pinch of sugar

1/2 teaspoon salt

1/4 teaspoon pepper

Whisk all of the ingredients together in a bowl until smooth. The dressing, covered, can be refrigerated for up to 4 days; whisk to re-combine before using.

If you want a low-fat option of this one, use non-fat buttermilk, non-fat sour cream and low-fat mayonnaise and increase the amount of lemon juice to 2 tablespoons.

That about does it for today’s meal. Tomorrow is one of Sean’s favorites and Michelle picked it. We’ll be having breakfast for dinner, but it is also going to be our meat-free meal this week, so no bacon or sausage. We will be making pancakes and hash browns, and maybe some eggs too, we’ll have to see how that goes. Sean will only go for the pancakes and hash browns anyway. Breakfast for dinner is always a good choice; everyone seems to like it. Enjoy the rest of your day, have fun cooking tonight, and enjoy the burgers, if you make them. As always, feel free to leave a comment or just say hello!


3 Comments

Posted by on January 31, 2012 in Beef, Cooking, Dinner, Dressings, Potatoes, Salad


Tags: , , , , , , , ,

 
National Day Calendar

Fun, unusual and forgotten designations on our calendar.

Authentic Autograph Source, LLC

Licensed autographs and collectibles dealer in the Pacific NW! We have a wide range of sports, celebrities, and more!

Jennifer Probst

a little bit naughty a little bit nice

Laissez Faire

Letting Life Lead

%d bloggers like this: