RSS

Category Archives: Dinner

Back to Cooking with a Great Fall Side Dish – Cider-Glazed Root Vegetables

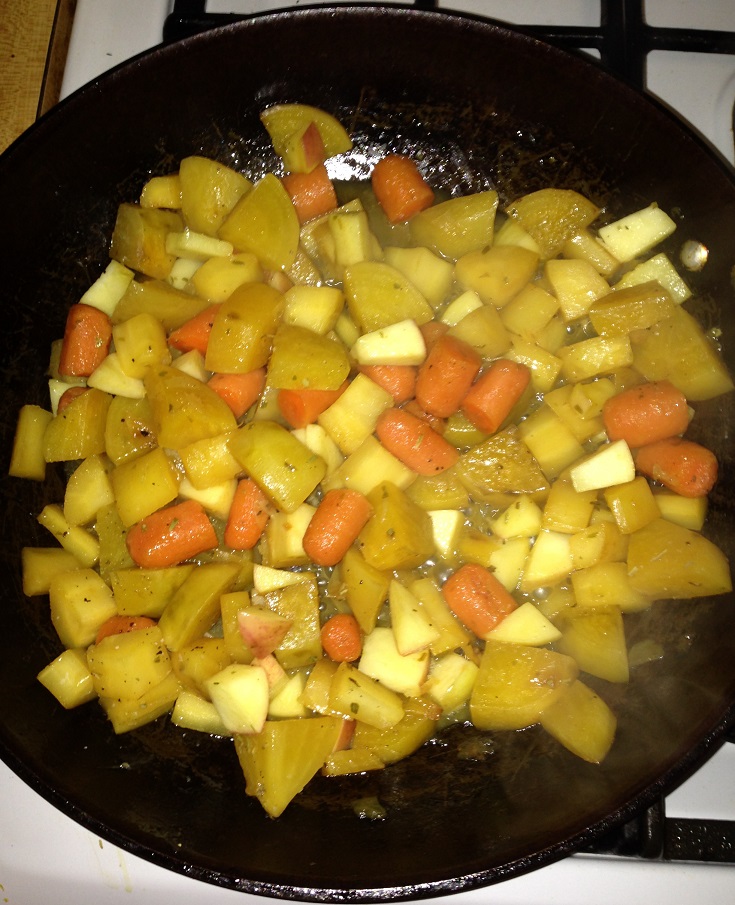
Now that my oven is up and running again I was able to do some actual cooking over the past weekend and a few different things that I can share on the blog. One of my favorite things about fall cooking is all of the great root vegetables that seem to go so well with fall meals come out. You can do great things with carrots, parsnips, sweet potatoes, turnips, beets and more and while I personally love to roast all kinds of vegetables, I also thought it would be great to bring all of these flavors together and use another great piece of fall produce – apples. Apples are pretty plentiful in this area of New York this time of year so it’s a great time to take advantage of them as well. This particular recipe for cider-glazed root vegetables was in the latest issue of Cook’s Country magazine and uses the cider to give the vegetables some added flavor and punch. The original recipe uses hard apple cider in it, which I did not have on hand. Instead I used some local apple cider as a substitute.

Cider-Glazed Root Vegetables

4 tablespoons butter

1 pound carrots, peeled and cut into 1/2-inch pieces

12 ounces parsnips, peeled and cut into 3/4-inch pieces

12 ounces turnips, peeled and cut into 3/4-inch pieces

3 shallots, peeled and halved

2 1/2 cups hard cider or regular cider

3 tablespoons sugar

Salt and freshly ground black pepper

1 apple, cored and cut into 1/2-inch pieces

2 tablespoons chopped fresh tarragon

2 teaspoons cider vinegar

Melt 1 tablespoon of the butter in a large skillet set over medium-high heat. Add the carrots, parsnips, turnips and shallots and cook until lightly browned, about 5 to 6 minutes. Add the apple cider, sugar, 1 1/2 teaspoons of salt and the remaining 3 tablespoons of the butter and bring the entire mixture to a boil. Reduce the heat to medium-low and cover the skillet. Cook the vegetables until they are just tender, about 7 to 10 minutes, stirring the vegetables occasionally.

Uncover the skillet and increase the heat to medium. Cook the vegetables until they are fully tender, about 13 to 15 minutes, stirring them occasionally. Stir in the apple and continue to cook the vegetables until the cider starts to become syrupy and the apple is just tender, about another 2 to 3 minutes. Take the skillet off the heat and stir in the chopped tarragon and the apple cider vinegar. Season the vegetables with salt and pepper to taste. Transfer the vegetables to a serving dish and pour any of the remaining glaze over the vegetables before serving.

Other than substituting regular apple cider for the hard apple cider, I also used golden beets instead of turnips since I already had the beets on hand. You can use pretty much root vegetables that you really like and I think they would work pretty well here. The original recipe as it is posted here is also designed to serve 8 people, so I cut the recipe in half when I actually made it for just the 3 of us and we still had plenty of leftovers. You get some really great flavor with all of the vegetables mixed together with the cider and the apple, though I have to admit that using the regular cider probably creates a bit of a weaker tasting glaze than if you use the hard cider, but it was still really good. I made this as a side dish to go with meat loaf, but I think it would go really well with any pork or poultry dish as well.

That’s all I have for today. Check back next time for another recipe. Until then, enjoy the rest of your day and enjoy your meal!

IMG_0715

 
Leave a comment

Posted by on October 13, 2014 in Cooking, Dinner, Side Dishes, Vegetables, Vegetarian


Tags: , , , , , ,

Pumpkinpalooza! 30 Days of Pumpkin Recipes | Williams-Sonoma Taste

Pumpkinpalooza! 30 Days of Pumpkin Recipes | Williams-Sonoma Taste.

It’s fall and the leaves are changing, the weather is getting crisper and Halloween is right around the corner. It also means the pumpkins come to the forefront of everyone’s mind for this time of year and there are some great pumpkin recipes you can try to incorporate pumpkins into your meals. Williams-Sonoma has put together 30 pumpkin recipes so you can try something different with pumpkins each day. Check it out!


Tags: , , , ,

Got Leftovers? Make This Chicken and Rice Casserole with Lemon and Parmesan

More often than not we have one meal a week that I just call Leftovers Night. The night is either a hodgepodge of different things that have been leftover from various meals re-heated separately or, if the ingredients go well together, some type of stir fry, hash or casserole for dinner. When we had some leftover vegetables and a rotisserie chicken in the fridge the other day, it seemed to be crying out to be made into some type of casserole and I had seen this recipe from America’s Test Kitchen for a chicken and rice casserole recently and found this was the perfect opportunity to give it a try.

Chicken and Rice Casserole with Lemon and Parmesan

2 tablespoons butter

2 carrots, peeled and sliced thin

1 onion, minced

3 garlic cloves, minced or pressed through a garlic press

1 cup long-grain white rice

2 cups water

1 1/2 cups chicken stock

1/2 cup heavy cream

Salt and freshly ground black pepper

2 cups cooked chicken, shredded

1/2 bunch asparagus, tough ends trimmed, cut into 1-inch lengths

3/4 cup grated Parmesan cheese

3 tablespoons fresh lemon juice (about 1 lemon)

1 tablespoon minced fresh tarragon leaves

25 Ritz crackers, crushed to coarse crumbs (about 1 cup) or crunchy bread crumbs

Adjust an oven rack to the middle position and heat the oven to 400 degrees. Melt the butter in a large nonstick skillet set over medium-high heat until the foaming subsides. Add the carrots and the onions and cook until the vegetables are lightly browned, about 6 minutes.

Stir in the garlic and cook until the garlic is fragrant, about 30 seconds. Add the rice and stir until the rice is evenly coated. Add the water, chicken stock, heavy cream, 1/4 teaspoon of salt and 1/4 teaspoon of black pepper and bring the mixture to a simmer. Turn the heat down to low, cover the skillet and cook, stirring often, until the rice has absorbed most of the liquid and is just tender, about 20 to 25 minutes.

Stir in the cooked chicken, the asparagus, Parmesan cheese, lemon juice and the tarragon and season the mixture with salt and pepper to taste. Pour the mixture into an 8-inch square baking dish and sprinkle the Ritz cracker crumbs over the top to coat the top of the casserole. Bake the casserole until the topping is browned, about 10 to 12 minutes. Allow the casserole to cool for about 10 minutes before serving.

This recipe makes great use of all kinds of leftovers and comes together nicely to form a one pot dish filled with chicken, rice and vegetables. The chicken stock and heavy cream create a nice sauce that goes throughout the dish and you get a hint of the lemon and the cheese in each bite. I really liked using the Ritz crackers as topping as well and it gave some added buttery flavor and crunch to the dish. This would work well with any type of leftover chicken or turkey and you can put it all together in under 40 minutes, making it great for a weeknight and for easy clean up.

That’s all I have for today. Check back next time for another recipe. Until then, enjoy the rest of your day and enjoy your meal!

IMG_0710

 
Leave a comment

Posted by on October 7, 2014 in Cooking, Dinner, Leftovers, One Pot Meals, Poultry


Tags: , , , , , , , ,

Best Chicken Wing Recipes : Buffalo, Honey & More : Cooking Channel

Best Chicken Wing Recipes : Buffalo, Honey & More : Cooking Channel.

It’s Sunday and you know what that means! Fall and Football season means tailgates and get-togethers at home or out at the stadium or a friend’s home to watch the games, so you naturally need some great snacks to go along with the game. I love chicken wings and they are perfect for any party, especially when watching the game. Cooking Channel has put together 21 great chicken wing recipes for you so you can choose from all types and flavors and sauces to suit your wants and needs. Check it out!


Tags: , , , , , ,

Feed on Friday in a Flash with Fried Calamari and Puttanesca Dipping Sauce

Michelle has been away on business all week so it has just been Sean and myself home for dinner each night and I let Sean choose some of the meals we would have this week. Naturally he chose things like burgers and pizza but he also wanted us to have some fried calamari this week for dinner. I love fried calamari myself, whether as an appetizer or as the main course, so  I decided to make some for dinner for us and I found this recipe from Chuck Hughes on the Cooking Channel that was some calamari with a nice puttanesca dipping sauce. It seemed very easy to make and looked delicious so I decided to give it a go.

Fried Calamari with Puttanesca Dipping Sauce

For the Calamari:

1 pound fresh calamari

2 cups milk

Juice of 1 lemon

1 teaspoon hot sauce

2 cups all-purpose flour

Salt and freshly ground black pepper

1 teaspoon paprika

1 teaspoon cayenne pepper

3 eggs

Vegetable oil, for frying

Lemon wedges, for serving

For the Puttanesca Dipping Sauce:

1 tablespoon olive oil

1 shallot, finely chopped

1 clove garlic, minced

1 tablespoon tomato paste

2 anchovy fillets, finely chopped

1/4 cup pitted, diced black olives

1 tablespoon capers

3 tomatoes, diced

Pinch of chile flakes

1/4 cup chopped fresh parsley

Zest of 1/2 lemon

Salt and freshly ground black pepper

For the calamari, clean the calamari and cut the bodies into thick rings, reserving the tentacles separately.

Mix the milk and the lemon juice in a large bowl. Let the mixture rest for 5 minutes until it thickens. Add the hot sauce. Add the calamari and allow it to soak in the buttermilk for up to 4 hours.

In a separate medium bowl, mix the flour, 1 teaspoon of salt, 1 teaspoon of black pepper, the paprika and the cayenne pepper until blended. In another separate medium bowl, beat the eggs.

Remove the calamari from the buttermilk and allow it to drain. Dip the calamari into the beaten egg and then into the flour mixture to dredge it.

Fill a large, heavy skillet or Dutch oven with 2 cups of vegetable oil and heat the oil over medium-high heat until it registers 360 degrees on a candy thermometer, or if you are using a deep fryer, set the deep fryer to 360 degrees. Fry the calamari, in batches, until they are golden brown and crispy, about 4 minutes. Place the calamari on a plate and pat them dry with paper towels to remove any excess oil. Sprinkle the calamari with salt and pepper. Serve with the puttanesca dipping sauce and lemon wedges.

For the Puttanesca dipping sauce, heat the olive oil in a medium saucepan set over medium heat. Add the shallot and saute for 2 minutes. Add the garlic, tomato paste, anchovies, chopped olives, capers and tomatoes. Saute the mixture, stirring occasionally, for another 5 minutes. Season the sauce with salt, pepper and the chile flakes to taste. If the sauce seems a little thick, add a little bit of water and mix to thin out the sauce. Stir in the parsley and the lemon zest and serve.

you end up with crispy and tasty calamari and the dipping sauce was great. The mix of the anchovy, olives, capers and tomatoes were perfect and made a great compliment to the calamari. Of course, you can always just use buttermilk if you have some on hand instead of making your own as the recipe does, but many people do not always have buttermilk on hand so this is a good quick fix for that.  As I said, this is great as an appetizer or an entrée, and we had it for dinner with some rice and vegetables to round out the meal. I forgot to take a picture of the sauce, but trust me, it comes out very tasty and fragrant.

That’s all I have for today. Check back next time for another recipe. Until then, enjoy the rest of your day and enjoy your meal!

01f064f86f1edef96890bdfc917c0ca0a7c5f4a463


Leave a comment

Posted by on October 3, 2014 in Appetizers, Cooking, Dinner, Sauce, Seafood


Tags: , , , , ,

Take on Thursday with Turkey in a Pot with Gravy

Sean has been asking me to make turkey for weeks, but until recently unless you bought a whole turkey around here you couldn’t really get anything at the price of turkey when the holidays are not coming around can be really high so I have been putting it off for a few weeks. Last week when I was shopping I noticed our Stop and Shop and a few turkey breast halves at a really reasonable price. They were about 3 pounds each and one of them easily provided enough for a meal for just the three of us, so I picked up two (one went right into the freezer for later use) and knew I would be able to satisfy Sean’s urge for turkey. As luck would have, the latest issue of Cook’s Country has an interesting recipe for turkey breast that I wanted to try that is called turkey in a pot with gravy.This recipe promises a moist bird with some really good gravy, so it was certainly worth a shot. The original recipe uses a whole turkey breast and I adjusted it down since I was only making a half, but I have posted the original recipe here if you want to try a whole one.

Turkey in a Pot with Gravy

1 (7-pound) bone-in whole turkey breast, wings discarded, trimmed

Salt and pepper

2 tablespoons olive oil

1 onion, chopped

1 carrot, chopped

1 celery rib, chopped

6 garlic cloves, crushed and peeled

1 teaspoon minced fresh thyme

1 bay leaf

1 tablespoon butter, melted

1/4 cup all-purpose flour

4 cups chicken broth

Adjust an oven rack to the middle position and heat the oven to 250 degrees. Using kitchen shears, trim any rib bones that extend beyond the underside of the turkey breast. If any backbone pieces are still attached to the underside of the turkey, remove them as well. Pat the turkey dry with paper towels and season it all over with salt and pepper.

Heat the olive oil in a large Dutch oven set over medium-high heat until the oil is just smoking. Add the turkey, skin side down, and cook until the breast is well browned, about 12 to 16 minutes, rolling it from side to side as needed to make for even browning. Transfer the turkey to a plate and set it aside. Pour off all but 2 tablespoons of fat from the pot. Add the onion, carrot, celery, garlic, thyme and bay leaf to the pot and cook until the vegetables are well browned, about 7 to 10 minutes.

Return the turkey and any accumulated juices to the pot, skin side up. Off the heat, place a large sheet of aluminum foil over the pot and press the edges to seal the foil, then cover the pot tightly with the lid. Transfer the pot to the oven and cook until the thickest part of the turkey breast registers 155 degrees on an instant-read thermometer inserted into the turkey, about 1 1/2 to 1 3/4 hours.

Remove the pot from the oven and heat the broiler. Uncover the pot (be careful, the handles will be very hot as well as the lid) and brush the turkey with the melted butter. When the broiler is heated, return the pot to the oven and broil the turkey until the skin is golden brown, about 8 to 15 minutes, rotating the pot as needed for even browning. Remove the pot from the oven. Transfer the turkey to a carving board, tent the turkey loosely with foil, and allow it to rest while making the gravy.

Place the pot over medium-high heat, bring the contents to a boil and cook until almost all of the liquid has evaporated, about 8 to 15 minutes. Stir in the flour and cook until it is lightly browned, about 2 minutes. Slowly whisk in the chicken broth and bring the mixture to a boil. Reduce the heat to medium and cook at a strong simmer, stirring often, until the gravy is thickened and measures about 2 cups, about 15 to 18 minutes. Strain the gravy through a fine-mesh strainer set over a medium saucepan; discard the solids. Season the gravy with salt and pepper to taste. Carve the turkey and re-warm the gravy, if needed, and serve it with the turkey.

Cooking the turkey at the low temperature in the oven after browning helps to ensure that you get a moister turkey in the end and then putting it under the broiler for a bit for some additional browning gives you great, crispy skin as well. The gravy had great flavor as well thanks to the concentration you get from letting all the liquid evaporate before you make your roux. Everything about it was perfect and of course we had some stuffing, mashed potatoes and vegetables for our little mini pre-Thanksgiving meal. There were even some leftovers after just making the half breast so we could have turkey sandwiches for lunch the next day (always a favorite of mine). I may do this again with the other half breast I have in the freezer.

That’s all I have for today, check back next time for another recipe. Until then, enjoy the rest of your day and enjoy your meal!

IMG_0703 IMG_0702

 
2 Comments

Posted by on October 2, 2014 in Cooking, Dinner, Gravy, Poultry, Turkey


Tags: , , , ,

Why Not Wednesday – Flank Steak on Ciabatta with Red Peppers

Sometimes appetizers can make the best meals for dinner, particularly on a weeknight when you may have run out of ideas of what to make, just want something quick and easy or are trying to make use of some leftovers so that you can clear the fridge, make a quick meal and get something tasty. This recipe from New York Times Cooking can do all of those things depending on the ingredients you choose to use. The original recipe is for a grilled flank steak on ciabatta bread with red peppers. I did modify my version slightly, using some leftover steak that we had from one meal and instead of the chopped red peppers I substituted some jarred roasted red peppers I had in the fridge. I think it came out just as well as the original recipe sounds, but I will post the original recipe here for you to use.

Grilled Flank Steak on Ciabatta with Red Peppers

1 1 3/4 to 2-pound flank steak

6 tablespoons extra-virgin olive oil

2 teaspoons smoked paprika

Salt and freshly ground black pepper

2 tablespoons black olive tapenade

1/3 cup finely chopped flat-leaf parsley

1 red onion, coarsely chopped

4 garlic cloves, slivered

2 large red bell peppers, cored and coarsely chopped

1/2 cup dry red wine

1 large loaf of ciabatta bread, halved horizontally

Smear the flank steak with 2 tablespoons of the extra-virgin olive oil and massage the smoked paprika into the steak. Season the steak with salt and pepper and set the steak aside. Combine 1 1/2 tablespoons of the black olive tapenade with the chopped parsley and 2 tablespoons of the olive oil and set it aside.

Heat the remaining olive oil in a large skillet. Add the red onion and saute the onion over medium heat until it is soft, about 4 to 5 minutes. Add the garlic and saute briefly, then add the red peppers. Reduce the heat to low and saute the vegetables gently until they are very tender, about 30 minutes. Stir the mixture occasionally. Stir in the red wine and the remaining black olive tapenade then remove the mixture from the heat.

Heat a gas grill to hot, or alternatively heat a grill pan over medium-high heat. When the pepper mixture is done, place the steak on the grill or the grill pan and sear the steak, about 2 to 3 minutes per side for medium-rare. The timing may differ depending on the thickness of the steak that you use, so you can make a diagonal cut at one end of the steak to check the doneness.

Transfer the steak to a cutting board and place the ciabatta halves, cut side down, on the grill to toast. Alternatively, you can place the ciabatta halves on a baking sheet under the broiler. Watch the bread closely to avoid burning and heat for about 2 minutes on the grill or 3 to 4 minutes under the broiler. Smear the toasted ciabatta with the reserved tapenade and parsley mixture. Slice the steak thin on the bias and arrange the steak slices atop the toasted ciabatta. Reheat the pepper mixture and spoon it on top of the steak. Cut each ciabatta half in six pieces, arrange on a platter and serve.

This is a pretty quick meal to put together if you take some shortcuts. As I said, I had some leftover steak from an earlier meal that I sliced thinly and quickly heated in a grill pan. I used roasted red peppers and some baby yellow peppers I had on hand along with the red onion and instead of using tapenade (which Michelle doesn’t like and I didn’t have on hand), I used some sliced black olives and sliced Kalamata olives in its place and it worked out quite nicely. We had this for dinner along with some rice and vegetables, but this could also be a great item for an appetizer or even for a buffet table if you are having a party. You can put it all together pretty easily and have a nice spread. I really liked the taste of the steak mixed with the olives, onions and peppers and put that all on top of some crunchy ciabatta and it was pretty awesome.

That’s all I have for today. Check back next time for another recipe. Until then, enjoy the rest of your day and enjoy your meal!

IMG_0700

 
Leave a comment

Posted by on October 1, 2014 in Appetizers, Beef, Cooking, Dinner, Grilling, Leftovers


Tags: , , , , , ,

Make it Simple Monday – Hoisin Glazed Pork Tenderloin

Very often for me Monday is the toughest day of the week when it comes to cooking dinner. I do a lot of cooking on the weekends and many times Monday is just a leftover day, using whatever we have from the weekend to put something together. Sometimes you want something a little different though and you want to put something together without having to go through a ton of effort to put dinner on the table. Luckily for me, the latest issue of Cook;s Country magazine came in the mail just recently and they always have some great ideas for quick and easy weeknight meals that are full of flavor. I had actually just picked up some pork tenderloins that were on sale recently when I came upon this recipe for a hoisin-glazed pork tenderloin that would give you great flavor without having to marinade the meat for hours.

Hoisin-Glazed Pork Tenderloin

2 (12-ounce) pork tenderloins, trimmed

Salt and pepper

3/4 cup chicken broth

1/4 cup hoisin sauce

1 tablespoon packed brown sugar

1 tablespoon ketchup

2 teaspoons soy sauce

1 tablespoon vegetable oil

2 scallions, sliced thin on a bias

1 teaspoon sesame seeds, toasted

Pound the pork tenderloins between two sheets of plastic wrap so that they are an even 1-inch in thickness. Pat the tenderloins dry with paper towels and then season them well with salt and pepper. Whisk the chicken broth, hoisin sauce, brown sugar, ketchup and soy sauce together in a medium bowl.

Heat the vegetable oil in a large nonstick skillet set over medium heat until the oil is shimmering. Cook the pork tenderloins until they are well browned on both sides and the meat registers 140 degrees on an instant read thermometer inserted into the tenderloins, about 7 to 9 minutes per side. Add the hoisin mixture to the skillet over the tenderloins and simmer the mixture until it is slightly thickened, about 3 to 5 minutes, making sure to turn the tenderloins to coat them in the glaze.

Remove the skillet from the heat and let the pork rest in the sauce for 5 minutes, then slice the tenderloins into 1/2-inch thick slices. Serve the tenderloins, drizzled with the hoisin glaze from the skillet and sprinkled with the scallions and toasted sesame seeds.

You get a really great glaze from the hoisin sauce, soy sauce, sugar and ketchup and the chicken broth helps from it getting too thick. I really liked the flavor of it and it gives the whole meal a great Asian-style flair to it, making this perfect to serve with some rice and maybe some quickly sautéed vegetables or just some steamed broccoli or cauliflower. You can put the whole meal together in about 20 minutes and have everything done very easily. If there are any leftovers you can always dice up the pork tenderloin, take some of the leftover rice and make yourself a simple and quick fried rice that is great for lunch or as a side dish for another meal later in the week.

That’s all I have for today. Check back next time for another recipe. until then, enjoy the rest of your day and enjoy your meal!

IMG_0692

 
Leave a comment

Posted by on September 29, 2014 in Cooking, Dinner, Pork, Sauce


Tags: , , , , ,

27 Boneless Skinless Chicken Breast Recipes – Bon Appétit

27 Boneless Skinless Chicken Breast Recipes – Bon Appétit.

Boneless, skinless chicken breasts are a staple in just about every home as part of a weekly meal. The problem is that they can get rather boring if you simply bake or saute them time after time and they may not have a lot of flavor to them. That’s why you can try to jazz things up a little bit so that you can have tasty, flavorful and not overcooked chicken each time you make it. Bon Appetit has put together 27 boneless, skinless chicken breast recipes that can give you all kinds of great ideas for weeknight meals or weekends. Check it out!


Leave a comment

Posted by on September 28, 2014 in Cooking, Cooking Websites, Dinner, Poultry


Tags: , , , , , , , ,

Saturday Takeout at Home – General Tso’s Chicken

Friday and Saturday nights all over seem to be the nights that people really go for takeout, at least in my neck of the woods. I think most people do not feel like cooking when it comes to the weekend after a long week of work, school, afterschool activities, chores and everything else you need to take care of on a daily basis. While simply calling the local pizza place or Chinese takeout is a great option that everyone turns to now and then, you can make some of your favorite takeout items right at home without spending a lot of time or money and they will taste even better than what you are paying for at a restaurant. One of my personal takeout favorites has always been General Tso’s chicken at the local Chinese restaurant here. You get the combination of a sweet and spicy glaze and sauce coating breaded chicken that tastes amazing and you would never think it is something you could duplicate at home – but you can quite easily. I found this recipe from Saveur for General Tso’s chicken that is easy to make and tastes just as good if not better than what comes in those little white containers.

General Tso’s Chicken

1 cup plus 2 tablespoons chicken stock

7 tablespoons cornstarch

6 tablespoons rice vinegar

6 tablespoons tomato paste

5 tablespoons light soy sauce

4 1/2 teaspoons dark soy sauce

2 1/4 pounds boneless, skinless chicken thighs, cut into 1 1/2-inch cubes

3 1/2 cups plus 9 tablespoons peanut, vegetable or canola oil

3 egg yolks

2 tablespoons minced ginger

2 tablespoons minced garlic

16 chiles de arbol

2 tablespoons toasted sesame oil

Thinly sliced scallions, to garnish

Whisk the chicken stock, 1 tablespoon of the cornstarch, the rice vinegar, tomato paste, 3 tablespoons of the light soy sauce, 1 teaspoon of the dark soy sauce and 3 tablespoons of water in a bowl; set the sauce aside.

Place the remaining cornstarch and both of the remaining soy sauces, the chicken pieces, 3 tablespoons of the oil and the egg yolks in a large bowl and toss them together. Pour 3 1/2 cups of the oil into a large skillet, flat-bottomed wok or Dutch oven. Heat the over medium-high heat until a deep-fry thermometer registers 375 degrees. Working in batches, add the chicken pieces, tossing them occasionally, until they are cooked through, about 4 to 5 minutes. Using a slotted spoon, transfer the chicken to paper towels to drain and set them aside. Repeat the process until all of the chicken is cooked. Discard the oil in the pan and wipe the pan clean.

Return the pan to high heat and add the remaining oil. Add the ginger, garlic and the chiles; fry, stirring constantly, until the mixture is fragrant and the chiles begin to change color, about 30 seconds. Add the reserved sauce; cook until the sauce is slightly reduced, about 5 minutes. Add the chicken and fry, tossing constantly, until the chicken pieces are evenly coated with the sauce, about 2 to 3 minutes. Remove the chicken from the heat and stir in the sesame oil. Transfer the chicken to a serving plate and top with the sliced scallions.

I have to say that the sauce was spot on as far as taste and texture. It was just like what you get with your takeout order, even though instead of chile de arbol, which I did not have on hand and rarely see around here, I used some Thai garlic chili sauce instead. I think you would get a more authentic flavor with the chile de arbol if you use them, but this was pretty close. The only difference I made from the recipe other than that was that I was using breaded chicken thigh pieces that I had left over from a meal earlier in the week so it was a bit of a cheat for me but I think it worked well. The difference with leftovers was that the coating of the chicken did not go all the way around the chicken pieces as it would if you followed this recipe exactly, but it was still good. Serve this with some white rice or fried rice and you have a great takeout meal all of your own.

That’s all I have for today. Check back next time for another recipe. Until then, enjoy the rest of your day and enjoy your meal!

IMG_0701


Leave a comment

Posted by on September 27, 2014 in Cooking, Dinner, Eating Out, Poultry, Sauce, Stir Fry


Tags: , , , , ,

 
National Day Calendar

Fun, unusual and forgotten designations on our calendar.

Jennifer Probst

a little bit naughty a little bit nice

Laissez Faire

Letting Life Lead

simple cooking recipes

a blog to share with you the best