RSS

Category Archives: Dinner

Cook’s Country Recipe Week Part 3 – Spicy Pork and Broccoli Stir Fry

For day three of using Cook’s Country recipes, I picked out this stir fry to give a try . I love making stir fry dinners since they are quick and easy and make good use of some  fresh vegetables. Don’t be put off by the name of this recipe; it is not very spicy at all and has great flavor to it. There aren’t a lot of ingredients in this one at all. The only item I had to go out and buy was the Asian chili-garlic sauce, and you could easily omit it or just use any chili sauce you would like as a substitute and I think it would be just fine.

Spicy Pork and Broccoli Stir Fry

3/4 cup chicken broth

2 tablespoons soy sauce

2 tablespoons cornstarch

1 tablespoon Asian chili-garlic sauce

1 teaspoon toasted sesame oil

1 (16-ounce) pork tenderloin, cut crosswise into 1/2-inch thick slices, each slice cut into 1/2-inch thick strips

3 tablespoons vegetable oil

1 pound broccoli florets cut into 1-inch pieces, stalks trimmed, peeled, and sliced 1/4-inch thick

1 tablespoon grated fresh ginger

1 garlic clove, minced

Whisk 1/2 cup of the chicken broth, soy sauce, 1 tablespoon of the cornstarch, chili-garlic sauce and the  sesame oil together in a bowl. set aside. Toss the pork, 1 tablespoon of vegetable oil and the remaining 1 tablespoon of the cornstarch together in a bowl. Heat 2 teaspoons of the vegetable oil in a large non-stick skillet over medium-high heat until just smoking. Brown half of the pork, about 3 to 5 minutes. Transfer the pork to a plate. Repeat the process with 2 teaspoons of vegetable oil and the remaining pork.

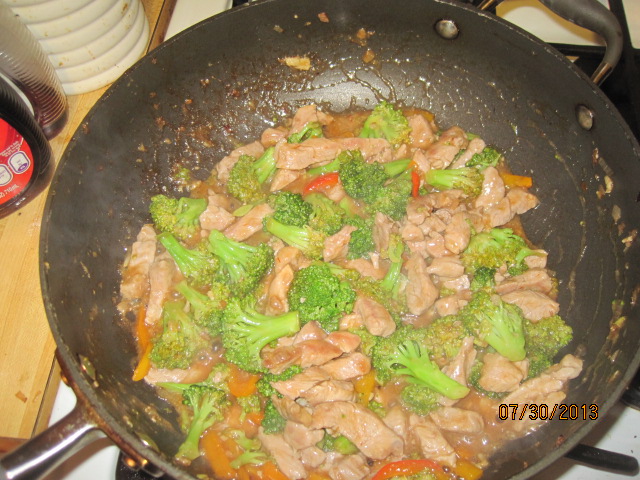
Heat the remaining 2 teaspoons of vegetable oil in a now-empty skillet until just smoking. Add the broccoli and cook until it turns bright green, about 1 minute. Add the remaining 1/4 cup of the chicken broth and cook, covered, until the broccoli is tender, about 3 minutes. Add the ginger and the garlic and cook until they are fragrant, about 30 seconds. Stir in the soy sauce mixture and cook until it is thickened, about 2 minutes. Return the pork and any accumulated juices to the skillet and cook until the pork is heated through, about 1 minute. Serve.

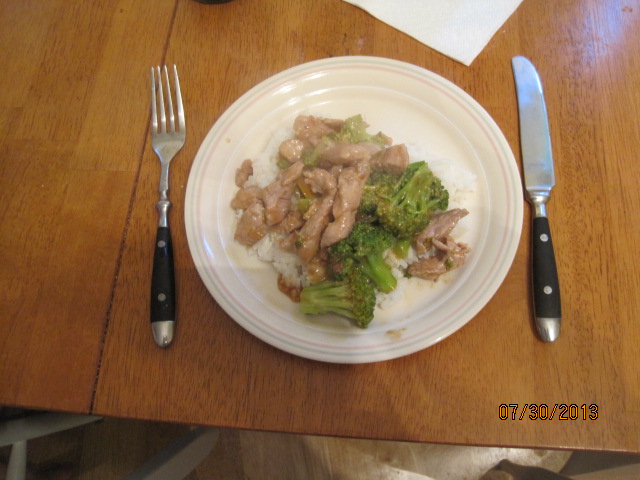
I did add some yellow, orange and red pepper and a shallot to the recipe, putting them in the skillet and cooking them for about a minute or two before I put the broccoli in the skillet. I think they added some nice color and flavor to the dish. The sauce adhered nicely to the pork thanks to the cornstarch and it had a good flavor with just a little kick to it. I served this dish with white rice and that was it. It is a great, simple dinner that you can have prepared and done in under 30 minutes so it is perfect for any weeknight meal.

That’s all I have for today. Check back next time for another Cook’s Country for this week. The next recipe up will be for some quick chicken Parmesan sub sandwiches that I am making tonight, so you want to check back for that one. I also have a recipe from Bon Appetit for a wonderful peach-blueberry ice cream pie that I made that I will be posting soon. You don’t want to miss that one. Until next time, enjoy the rest of your day and enjoy your meal!

IMG_1628 IMG_1626

 
Leave a comment

Posted by on July 31, 2013 in Cooking Tips, Dinner, One Pot Meals, Pork


Tags: , , , ,

Cook’s Country Recipe Week Part 2 – A Myriad of Meatballs and Marinara

I think everyone has their own meatball recipe that they love. Odds are it was something that was handed down from generation to generation and you have gotten so used to having it that way that you don’t really stray from the method. There’s nothing wrong with that – if it isn’t broken, don’t fix it. However, much like I am with my meatloaf recipes, I like to experiment with different meatball recipes. I am always on the lookout for something tastier when it comes to having a meatball. My experience very often with meatballs when I have had them out at various places is that they either have no flavor because they do not have much in the way of herbs and spices and are all breading, or they are soft and mushy because they have cooked in the sauce too long and no longer have flavor of their own. When I looked through Cook’s Country and saw this recipe, it sounded like a great one to try.

Meatballs and Marinara

For the Onion Mixture:

1/4 cup olive oil

1 1/2 pounds onions, chopped fine

8 garlic cloves, minced

1 tablespoon dried oregano

3/4 teaspoon red pepper flakes

For the Marinara:

1 (6-ounce) can tomato paste

1 cup dry red wine

4 (28-ounce) cans crushed tomatoes

1 ounce Parmesan cheese, grated (1/2 cup)

2 tablespoons chopped fresh basil

Salt

1-2 teaspoons sugar, as needed

For the Meatballs:

4 slices white sandwich bread

3/4 cup milk

1/2 pound sweet Italian sausage, casings removed

2 ounces Parmesan cheese, grated (1 cup)

1/2 cup chopped fresh parsley

2 eggs

2 garlic cloves, minced

1 1/2 teaspoons salt

2 1/2 pounds 80 percent lean ground beef

For the onion mixture, Heat the oil in a Dutch oven over medium-high heat until shimmering. Add the onions and cook until they are golden brown, about 10 to 15 minutes. Add the garlic, oregano, and pepper flakes and cook until fragrant, about 30 seconds. Transfer half of the onion mixture to a large bowl and set aside.

For the marinara: Add the tomato paste to the onion mixture remaining in the Dutch oven and cook until it is fragrant, about 1 minute. Add the wine and cook until slightly thickened, about 2 minutes. Stir in the crushed tomatoes and water and simmer over low heat until the sauce has thickened, about 45 to 60 minutes. Stir in the Parmesan cheese and basil. Season with salt and pepper to taste.

For the meatballs: Meanwhile, adjust an oven rack to the upper-middle position and heat the oven to 475 degrees. Mash the bread and the milk together in the bowl with the reserved onion mixture until it is thoroughly combined. Add the sausage, Parmesan cheese, parsley, eggs, garlic and salt and mash to combine. Add the beef and gently knead with your hands until combined (try not to overwork the mixture). Form the mixture into large meatballs (about 2 inches), place the meatballs on a rimmed baking sheet and bake until they are well browned, about 20 minutes.

Transfer the meatballs to the pot with the thickened sauce and simmer for 15 minutes before serving.

This recipe does not make quite a bit (the recipe says it serves 8), so you may want to freeze some to have on hand for future meals. The meatballs and sauce should freeze well and will keep for up to 1 month.  There are a few notes about this recipe. Browning the onions in the same pot you are going to make the sauce in saves you a few steps and gives great flavor to the sauce and the meatballs. Also, you want to make sure that you do add some water in when you add the crushed tomatoes. Without it, the sauce will over-reduce in 45 minutes and be too thick for your use. For the meatballs, making the mash of bread and milk (called a panade) will bind the meatballs better than any breadcrumb you buy at the store and with the onion mixture will have a lot more flavor. Using the Italian sausage, Parmesan garlic and parsley also help with the binding and they give the meatballs some great flavor. You want to make sure you do not overwork the mixture when you add the beef; just blend it gently until everything is mixed and you won’t end up with rubbery meatballs. I love baking the meatballs in the oven over the stove top because you seem to get better overall browning in the oven and it’s a lot neater than using oil or butter to brown them.

Naturally, you can serve this with pasta or make meatball subs (which I did for myself with some garlic bread since I don’t eat pasta). Michelle and Sean actually had theirs over cheese ravioli. Now I am no pasta expert, especially since I don’t eat it, but I do know how to cook it and there are a few tips you should follow. Make sure you salt the water to season the pasta properly. You want to be sure you stir the pasta as soon as you get it in the water to prevent it from sticking to the pot (I hate cleaning stuck pasta out of a pot!) and then stir it every few minutes as it cooks so it doesn’t all clump together. Adding oil to the water doesn’t really do anything; it won’t prevent the pasta from sticking and it will keep sauce from being absorbed. Also, you know how you  like your own pasta; don’t go by what the package says. Check it often to see if it is done to your liking by fishing a piece out and trying it yourself. Finally, even I as a non-pasta eater know you shouldn’t rinse off your pasta. It washes all the starch off the pasta that helps the sauce adhere nicely.

That’s all for today. Check back next time for another Cook’s Country recipe this week. Tomorrow you will find a recipe for a spicy pork and broccoli stir fry. It promises to be tasty, so come back and check it out. Until then, enjoy the rest of your day and enjoy your meal!

002 001


Leave a comment

Posted by on July 30, 2013 in Beef, Cooking, Dinner, Pasta, Sauce


Tags: , , , , ,

It’s A Cook’s Country Recipe Week, Part 1 – Grandma’s Roast Beef and Gravy

I have always been a fan of America’s Test Kitchen, Cook’s Illustrated and Cook’s Country. I follow them on Facebook and Twitter and have several of the cookbooks. I also recently started getting the Cook’s Country magazine via subscription and I have to say I really like it. The recipes are great with easy to follow steps and they give you all kinds of great cooking advice as far as techniques, pantry items and equipment. For this week, I decided to do some of the Cook’s Country recipes I have been trying lately. First up is the roast beef dinner I made last week. Luckily I picked one of the cooler days to give it a try so I could use the oven.

Grandma’s Roast Beef and Gravy

1 (4- to 5- pound) boneless top-round roast

Salt and pepper

1 tablespoon vegetable oil

4 tablespoons butter

2 carrots, peeled and cut into 2-inch pieces

1 onion, peeled and cut into 1/2-inch rounds

1 celery rib, cut into 2-inch pieces

1/2 cup all-purpose flour

1 teaspoon tomato paste

2 cans beef consomme

1 1/2 cups water

Pat the roast dry with paper towels and rub with 2 teaspoons of salt. Wrap the roast in plastic wrap and refrigerate at least 1 hour and up to 24 hours.

Adjust an oven rack to the middle position and heat the oven to 225 degrees. Pat the roast dry with paper towels and rub with 2 teaspoons of pepper. Heat the oil in a large, oven-safe skillet over medium-high heat until it is just smoking. Brown the roast all over on all sides, about 8 to 12 minutes; transfer the roast to a plate.

Pour off all but 2 tablespoons of the fat from the pan. Add the butter to the skillet and melt it over medium heat. Cook the carrots, onion and celery until they are lightly browned, about 6 to 8 minutes. Add the flour and the tomato paste and cook until the flour is golden and the paste begins to darken, about 2 minutes. Off the heat, push the vegetables to the center of the pan. Place the roast on top of the vegetables and transfer the skillet to the oven. Cook the roast until the meat registers 125 degrees (for medium-rare), about 2 1/2 to 3 1/2 hours. Transfer the roast to a carving board, tent with foil and allow the meat to rest for 20 minutes.

Meanwhile, keeping in mind that the skillet handle will still be quite hot, return the skillet with vegetables to medium-high heat and cook, stirring occasionally, until the vegetables are a deep golden brown, about 5 minutes. Slowly whisk in the consomme and water, scraping up any browned bits, and bring it to a boil. Reduce the heat to medium and simmer until the gravy is thickened, about 10 to 15 minutes. Strain the gravy through a fine mesh strainer into a serving bowl. Discard the vegetables. Season the gravy with salt and pepper to taste.

Thinly slice the roast crosswise against the grain and serve with the gravy.

Cooking the roast beef in this method made things much easier. You do a slow roasting and everything is done in just one pan, making cleanup even easier. Salting the meat helps a great deal in drawing out some of the moisture from the meat. Also, instead of flouring the meat beforehand and searing it, adding the flour to the vegetables instead helps you eliminate that pasty flavor a roast can get from raw flour and still lets you make a rich, dark gravy. You could certainly use water instead of the beef broth when making the gravy, but the broth really does help add another layer of flavor to the gravy, so I would use it. Of course, you also then have options with leftovers like making things such as open-faced roast beef sandwiches, French dip sandwiches or Philly cheesesteaks. I served the roast beef with mashed potatoes and some fresh corn on the cob and broccoli.

That’s all I have for today. Check back next time to see another Cook’s Country recipe. This time I will be making the meatballs and marinara recipe that appears in one of the issues I just received. Be sure to check that one out tomorrow. Until then, enjoy the rest of your day and enjoy your meal!

002


Leave a comment

Posted by on July 29, 2013 in Beef, Cooking, Dinner, Gravy


Tags: , , , ,

Tantalizing Tuscan-Style Steak with Crispy Potatoes

There are few things better than having a nice steak on the grill. This recipe, from Williams-Sonoma gives you a chance to make a basic steak and potatoes meal with some nice seasoning and not a lot of effort on your part. There are only 8 ingredients in the whole recipe and it doesn’t take much longer than 30 minutes to make the whole meal.

Tuscan-Style Steak with Crispy Potatoes

1 1/2 pounds baby waxy-skinned potatoes, such as Yukon Gold, scrubbed but skins left on, halved

4 tablespoons extra-virgin olive oil

Salt and freshly ground black pepper

2 teaspoons red wine vinegar

1 teaspoon fresh lemon juice

1 teaspoon minced fresh hot chile or a generous pinch of dried red pepper flakes

3 small fresh rosemary sprigs

2 bone-in Porterhouse steaks, about 1 pound each

Put the potatoes in a large saucepan and add water to cover the potatoes by 1 inch. Bring the water to a boil over high heat, then reduce the heat to medium-high and cook until the potatoes are almost tender, about 10 minutes. Drain and set aside.

In a large fry pan over medium heat, warm 2 tablespoons of the olive oil. When the oil is shimmering, add the potatoes and toss gently to coat them with the oil. Cook the potatoes without turning until they are nicely browned on the bottom, about 5 minutes. Sprinkle with 1/2 teaspoon of salt and pepper to taste, turn and cook, again without turning, until the potatoes are browned on the second side, 5 minutes longer.  Stir and cook for a few more minutes to finish browning the potatoes and crisping the edges.

Meanwhile, prepare a fire in a charcoal grill or preheat a gas grill to high. In a bowl, whisk together 2 tablespoons of olive oil, the red wine vinegar, lemon juice and chile. If you are using charcoal, spread the hot coals across one half of the bottom of the grill and leave the other half clear to create a cool zone.

Tie the rosemary sprigs together at one end, using kitchen string, to make a brush. Using the rosemary, brush the marinade all over the steaks on both sides. Sprinkle both sides of the steaks with salt. Arrange the steaks on the grill directly over the heat and sear for 2 minutes. Turn the steaks and sear for 2 minutes on the second side. If you are using charcoal, move the steaks to the indirect heat. If you are using gas, reduce the heat to medium and grill for about 8 minutes longer for medium-rare, turning once or twice and brushing again with the marinade as they cook. Transfer the steaks to a cutting board, tent with aluminum foil and let rest for 5 minutes. Divide each steak into two pieces and arrange on dinner plates with potatoes around the steak and serve.

Just a couple of things about this recipe. I did make a couple of substitutions and I think they both worked out well. I did use strip steaks instead of Porterhouse since there is a big price difference between the two. I also used a bundle of basil leaves instead of the rosemary since Michelle and Sean do not really eat rosemary. I liked the flavor that came from the fresh basil anyway. I also made a quick tomato salad to go along with the meal. Finally, I added some mushrooms and shallots to a small pan and sautéed them with a little bit of the leftover marinade to use to top the steak and it turned out great. It was a very quick meal that you can do any night of the week.

That’s all I have for today. We are going away to Saranac Lake for a few days so I won’t be back on until Sunday, so check back then for some new recipes. I am bringing some of the homemade bagels and some baked sausage and peppers with me for the weekend for everyone to have. Until next time, enjoy the rest of your day and enjoy your meal!001

 
Leave a comment

Posted by on July 25, 2013 in Beef, Cooking, Dinner, Grilling, Potatoes


Tags: , , ,

Beat the Heat with Grilled Chicken Tacos

After taking a few days off to do some fun family things, it’s back to blogging and back to the recipes. Thankfully the stifling heat we have been experiencing here in New York seems to have eased a bit the last couple of days, giving me a chance to do some cooking again and get some recipes ready to post. I still have a couple from last week that I made when it was really hot, including this easy recipe for grilled chicken tacos. This one is kind of a combination of recipes I got from America’s Test Kitchen and Bon Appetit, using the best of both them to make an easy meal that you can do on the grill or indoors.

Grilled Chicken Tacos

1/4 cup fresh lime juice

2 tablespoons minced fresh cilantro

2 teaspoons Worcestershire sauce

1/2 teaspoon brown sugar

1/2 tablespoon ground cumin

1 medium onion, sliced

2 garlic cloves, finely chopped

1 pound skinless, boneless chicken thighs

1 tablespoon vegetable oil

1 teaspoon kosher salt

1/2 teaspoon freshly ground black pepper

8 corn tortillas, warmed (for serving)

2 avocados, sliced (for serving)

Sliced radishes (for serving)

Homemade Tomato Salsa

Whisk together the lime juice, cilantro, Worcestershire sauce, brown sugar, cumin, vegetable oil, salt and pepper in a bowl until well combined. Toss the onion, garlic and chicken thighs until all are well coated. Prepare your grill for medium-high heat. Grill the onions and the chicken thighs until they are cooked through and lightly charred, about 4 minutes per side.

Let the chicken rest for about minutes before slicing. Serve the chicken and onions with the warmed corn tortillas, avocados, sliced radishes, the homemade salsa and some extra cilantro along with lime wedges and sour cream, allowing each person to build their own tacos how they like it.

The great thing about this meal is that it can take you no time at all to put it all together. You might actually spend more time getting the grill going then you will with actual preparation and cooking. In our house, there are rarely any leftovers when we make tacos or quesadillas. I served this alongside some black beans and rice that I made and the homemade salsa goes very well with this meal. You can also make some guacamole instead of just slicing the avocados if you prefer to have it that way.

That’s all there is for today. Just a very quick and simple recipe that is great for a summertime meal. Check back next time to see some other recipes that I have made recently, including a roast chicken and vegetables from Chef Marc Murphy. a roast beef recipe. some burgers with onion strings from Cook’s Country and more. I do have a few other recipes I’ll be trying out this week as well that I may get on here, so keep checking back. Until next time, enjoy the rest of your day and enjoy your meal!

001

 
1 Comment

Posted by on July 23, 2013 in Cooking, Dinner, Grilling, Poultry, Rice, Side Dishes


Tags: , , , , ,

Feeling For French Bread Pizza

It continues to be ridiculously hot here in New York. The temperature has been in the high 90’s all week with high humidity, making things quite unbearable and making me feel miserable and not much like cooking. We ate late night the last 2 nights just so it would be a little bit cooler when I cooked and I did turn the oven on. Here is one of the recipes I decided to try, just using leftovers and things we had in the pantry as my energy level was low. We had some leftover baguettes from dinner earlier in the week and I found this great recipe at Serious Eats for some French Bread Pizza.

French Bread Pizza

3 tablespoons butter

4 tablespoons extra-virgin olive oil, divided

4 cloves garlic, finely minced

Pinch red pepper flakes

1/2 teaspoon dried oregano

1/4 cup minced fresh parsley or basil leaves, or a mix

Kosher salt

1 large loaf French or Italian bread, split in half lengthwise

1 (14.5 ounce) can crushed tomatoes

8 ounces grated mozzarella cheese

2 ounces Parmigiano-reggiano

Adjust the oven rack to the upper position and preheat the oven to 425 degrees. Heat the butter and 3 tablespoons of the olive oil in a medium saucepan over medium-low heat until the butter is melted. Add the garlic, red pepper flakes, and oregano and cook, stirring occasionally, until the garlic is softened but not browned, about 2 minutes. Stir in half of the parsley/basil and a big pinch of salt. Remove from the heat.

Place the bread cut-side up on a clean work surface. Using a rimmed baking sheet, press down on the bread evenly until it is compressed to about 2/3 of its original height. Place the bread on top of the rimmed baking sheet. Using a pastry brush, brush half of the garlic mixture evenly over the cut surfaces of the bread, making sure to get plenty of bits of garlic and aromatics on the bread. Set aside.

Add the tomatoes to the remaining garlic mixture in the saucepan, stir to combine, increase the heat to medium. bring to a simmer, then reduce the heat to maintain a bare simmer. Cook, stirring occasionally, until the sauce is rich and reduced, about 15 minutes. Season to taste with salt.

While the sauce cooks, spread 1/4 of the mozzarella evenly over the surface of the bread and transfer the bread to the oven. Cook until the cheese is barely melted, about 8 minutes. Remove the bread from the oven and set it aside until the sauce is cooked.

Spread the cooked sauce evenly over the bread, then spread the remaining mozzarella on top of the sauce.Transfer the bread to the oven and bake until the cheese is melted and is just starting to brown, about 10 minutes. Remove the bread from the oven and immediately sprinkle it with the Parmigiano-reggiano, the remaining parsley/basil and the remaining tablespoon of extra-virgin olive oil. Allow the pizza to cool slightly before serving.

These pizzas are better than anything you will remember having as a kid out of your freezer. You do want to make sure you let them cool slightly before you eat them so as not to burn the rook of your mouth off on the hot cheese. I loved the taste of what is basically garlic bread serving as the base for your pizza. I used some sautéed shallots along with some leftover Italian sausage we had on most of the pizzas and then I used some leftover diced chicken with some Buffalo wing sauce to make a couple of buffalo chicken varieties. Of course, you can top the pizzas with whatever you would like. The nice things is that they do not take long to cook so you won’t have a lot of heat in the kitchen. You can serve this with a simple side salad and you are all set for dinner.

That’s all I have for today. Check back next time to see what else comes along. I do still have a few new recipes to post that you will want to check out. Until next time, enjoy the rest of your day, stay cool and enjoy your meal!

IMG_1617

 
Leave a comment

Posted by on July 18, 2013 in Cooking, Dinner, Pizza


Tags: , ,

It’s Never Too Hot for Slow Cooker Pulled Pork

With the ungodly heat we have been experiencing here in the northeast part of the country, I have had to find some alternatives to using the oven. I had bought a large pork butt last week to make pulled pork, but there was no way I was turning the oven on if I could avoid it. Thankfully, I was able to pull out the trusty slow cooker and use this recipe from America’s Test Kitchen so I was able to make some tasty pulled pork sliders for dinner instead.

Slow Cooker Pulled Pork Sliders

Salt and pepper

6 tablespoons sugar

3 tablespoons plus 2 teaspoons liquid smoke

1 (5-pound) boneless pork butt roast

1/4 cup yellow mustard

2 tablespoons smoked paprika

1 teaspoon cayenne pepper

6 cups barbecue sauce

Cider vinegar

Hot sauce

Hamburger buns

Bread and butter pickles

For the pork: Dissolve 1/4 cup of salt, 1/4 cup sugar, and 3 tablespoons of liquid smoke in 2 quarts of cold water in a large container. Submerge the pork in the brine, cover and refrigerate for 1 1/2 to 2 hours.

While the pork brines, combine the mustard and remaining 2 teaspoons of liquid smoke in a bowl and set it aside. Combine 2 teaspoons of salt, 2 tablespoons of pepper, the remaining 2 tablespoons of sugar, paprika, and cayenne in a second bowl and set aside.

Remove the pork from the brine and thoroughly pat dry with paper towels. Rub the mustard mixture over the entire surface of the pork. Sprinkle the pork with the spice mixture to coat well.Place the pork in the slow cooker and pour the barbecue sauce over the pork, cover, and cook, on either low or high, until the pork is fork tender and falling apart, 10 to 11 hours on low or 7 to 8 hours on high.

Transfer the meat to a large bow and let cool. Let the cooking liquid settle for 5 minutes, then use a wide spoon to skin the fat off the surface. Season the sauce with the cider vinegar, hot sauce and salt and pepper to taste. When the meat is cool enough to handle, shred it using your fingers or two forks., discarding any extra fat or gristle.

Toss the shredded meat with 1 cup of the cooking sauce, adding more as needed to keep it moist. Serve, passing the remaining sauce separately, with hamburger buns and pickles to make the sliders.

You can use any store-bought barbecue sauce you like for this recipe, or you can quickly use this recipe below and triple it to make enough sauce for this pulled pork.

Barbecue Sauce

2 tablespoons vegetable oil

1 onion, minced

1 garlic clove, minced

1 teaspoon chili powder

1/4 teaspoon cayenne pepper

1 cup ketchup

5 tablespoons molasses

2 tablespoons cider vinegar

2 tablespoons Worcestershire sauce

2 tablespoons Dijon mustard

1 teaspoon hot sauce

Salt and pepper

Heat the oil in a large saucepan over medium heat until shimmering. Add the onion and cook until softened, about 5 minutes. Stir in the garlic, chili powder, and cayenne and cook until fragrant, about 15 seconds.

Stir in the remaining ingredients and simmer, stirring occasionally, until the sauce is thickened, about 25 minutes. Season with salt and pepper to taste. Cool to room temperature before serving, about 1 hour. The sauce can be refrigerated in an airtight container for up yo 1 week or frozen for up to 2 months.Bring it to room temperature before serving.

Of course, no pulled pork sandwich is complete without some coleslaw. I am always on the lookout for new coleslaw recipes that do not use mayonnaise so they are better for the summer. I found this one from Food Network and it tasted great.

Gourmet Cole Slaw

1 cup olive oil

1/2 cup red wine vinegar

3 ounces granulated sugar

1 teaspoon chopped garlic

1 teaspoon Dijon mustard

1 teaspoon chopped shallots

1/2 teaspoon fresh lemon juice

1/2 head green cabbage, julienned

1/4 head red cabbage, julienned

1/2 red bell pepper, julienned

1/2 green bell pepper, julienned

1/2 yellow bell pepper, julienned

1 carrot, peeled and julienned

1 green onion, green part only cut into 1-inch lengths

1 teaspoon dry oregano

Salt and pepper

Whisk all the vinaigrette ingredients into a bowl. Mix all the vegetables together in a large bowl. Pour the vinaigrette over the vegetables, toss and chill for 1 hour or until you are ready to serve.

It is simple and refreshing. You can always use a bag of coleslaw mix instead of handling all the vegetables yourself. I usually have a bag on hand during the summer so that is what I used this time and this recipe has a nice, light flavor to it that will go well with all types of sandwiches and dishes.

That’s all I have for today. Check back again next time to see what recipes come along. I have tried a few things out recently to post, such as a new roasted chicken recipe, french bread pizzas, a new burger recipe, and more. Check back and see what comes up next. until then, enjoy the rest of your day, try to stay cool and enjoy your meal!

002 001


1 Comment

Posted by on July 17, 2013 in Cooking, Dinner, Pork, Salad, Sauce, Slow Cooker Meals


Tags: , , , , , , ,

Simple Grilling to Beat the Heat: Grilled Sausages

It’s been really hot and humid here the last few days with no immediate end in sight, so that means finding dinner solutions that won’t overheat the whole house and make me a pile of sweat in the kitchen. it also means using the grill more and breaking the slow cooker out to do some cooking. For this particular meal, the grill came in handy for a very simple meal that I picked up from Bobby Flay on the Food Network. While this dish can work as a great party appetizer, we actually had it for dinner and it was quite filling.

Grilled Sausages with Grilled Shallot Relish with Ricotta and Toasted Baguette

1 pound Italian sweet sausage links

1/2 cup vegetable oil

Kosher salt and freshly ground black pepper

5 large shallots

1/2 cup balsamic vinegar

3 tablespoons honey, plus more for drizzling

2 teaspoons finely chopped fresh thyme

Pinch red pepper flakes

1/2 cup chopped fresh parsley

1 1/2 cups fresh ricotta cheese

2 baguettes, grilled

Extra-virgin olive oil, for drizzling

Heat a charcoal or gas grill to high for direct grilling. Brush the sausages with some of the vegetable oil, sprinkle with salt and pepper and grill, with the cover closed, until golden brown, slightly charred and just cooked through, about 10 minutes. Remove the sausages to a cutting board and let rest for 5 minutes before slicing,

While the sausages are grilling, halve the shallots, leaving the skin on, and toss with a few tablespoons each of the vegetable oil and balsamic vinegar. Sprinkle with salt and pepper. Put them on the grill and cook until charred and slightly softened. Cool the shallots slightly, then remove the skins and chop.

Heat the remaining vegetable oil in a saute pan on the grates of the grill until it begins to shimmer. Add the chopped shallots, remaining balsamic vinegar, honey, thyme and red pepper flakes and simmer, about 5 minutes. Season with salt and pepper and stir in the parsley.

Arrange the cut sausage on a platter with a bowl of the fresh ricotta cheese, the shallot relish and the toasted bread. Serve the bread topped with a dollop of the ricotta, a few pieces of sausage and a spoonful of the relish, drizzled with honey and olive oil. Serve warm or at room temperature.

This was a great meal or can make a great snack. We all loved the shallot relish and I can easily see using that on other dishes, either pork, beef or chicken. Even just having some of that alone on a piece of toasted baguette would be good for me. It was plenty filling with a simple side salad as a meal or as I said, I think it would make a great appetizer for a party as a buffet dish or for any barbecue. I would make this one again for sure.

That’s all I have for today. I do have some pork in the slow cooker today to make some slow cooker pulled pork sliders and a recipe for a no mayo coleslaw, so check back tomorrow for that one and see if you like it. Until then, enjoy the rest of your day, try to stay cool and enjoy your meal!

003 001

 
Leave a comment

Posted by on July 15, 2013 in Appetizers, Cooking, Dinner, Grilling, Pork, Side Dishes


Tags: , , , , ,

First Summer Barbecue, Part 1 – Easy Barbecue Chicken

Even though I am only allowed to have an electric grill here at our condo, I still try to do some grilling outdoors when I can. This past weekend was so hot I just couldn’t bring myself to turn the oven on and cook and this week does not promise to be much better. I want to try to grill at least twice a week during the summer to try some new grilling recipes out, and yesterday was the perfect day to start. I had picked up some chicken thighs and the store on Saturday and decided to barbecue them. I found this recipe from Williams-Sonoma that looked good, but I also wanted to try out a barbecue sauce recipe I had picked up from Food Republic, so I combined the two to make last night’s dinner.

Classic BBQ Chicken

For the basic poultry brine:

8 cups water

5 tablespoons kosher salt

2 tablespoons dried basil

2 tablespoons coriander seeds

1 tablespoon peppercorns

1 tablespoon yellow mustard seeds

1 teaspoon granulated garlic

2 bay leaves

1 chicken, about 4 pounds, neck and giblets removed, chicken cut into 4 pieces (or whatever assortment of chicken pieces you want to use totaling 4 pounds)

Freshly ground black pepper, for sprinkling

Granulated garlic, for sprinkling

1 recipe Tennessee Whiskey Barbecue Sauce (recipe to follow)

To make the brine, in a large bowl, combine the water, salt, basil. coriander seeds, peppercorns, mustard seeds, garlic and bay leaves and stir until the salt dissolves. Use immediately.

Place the chicken pieces in a large sealable plastic bag and pour in the brine. Seal the bag closed, squish the brine around the chicken and refrigerate overnight.

At least 30 minutes before you plan to begin grilling, remove the chicken from the refrigerator and remove the pieces from the brine. Discard the brine. Rinse the chicken pieces briefly in cold water and pat dry with paper towels. Lightly sprinkle the chicken on all sides with pepper and garlic.

Prepare a grill for indirect grilling over medium heat; the internal grill temperature should be about 350 degrees. If you are using charcoal, bank the lit coals on either side of the grill bed, leaving a strip in the center without heat, and place a drip pan in the center. If you are using gas, preheat the burners, then turn off 1 or more burners to create a cooler zone. Brush and oil the grill grate.

Place the chicken pieces on the grill over the direct-heat area and sear, turning once, for 2 minutes per side. Move the chicken pieces to the indirect-heat area, cover the grill and cook for 30 minutes. Now, start brushing the chicken with the barbecue sauce, turning and brushing the pieces every 5 minutes, for about 15 minutes more. The chicken is ready when it is firm to the touch and the juices run clear when a thigh or breast is pierced with a knife tip. Transfer the chicken pieces to a platter and serve immediately with the remaining sauce on the side.

Of course, you don’t have to brine the chicken if you don’t have the time or don’t want to do that, but I think it makes a big difference in the flavor. The brine infuses the chicken with some extra flavor and plumps the chicken up, helping it to make it juicier. You do need to watch the chicken  closely on the grill as the fat tends to cause flare-ups, which can cause you to burn the chicken before it is cooked all the way. Using the indirect heating method with a drip pan can really help you with this and the chicken in this recipe turned out perfectly.

The sauce was a great find and really added nicely to the chicken. I was intrigued as soon as I saw this recipe and knew I was going to make it.

Tennessee Whiskey Barbecue Sauce

1 tablespoon canola or vegetable oil

1/4 cup onion, finely minced

1/2 cup Jack Daniels or other whiskey

2/3 cup ketchup

1/2 cup cider vinegar

1 teaspoon Worcestershire sauce

1 tablespoon Tabasco or other hot sauce

A few drops of liquid smoke

Heat the oil in a medium saucepan over medium heat. Add the onion and saute, stirring frequently, until the onions are translucent, about 5 minutes. Deglaze the pan with the whiskey, stirring to scrape off any bits from the bottom of the pot, then add the rest of the ingredients and whisk together. Bring the mixture to a simmer, then reduce the heat to low and cook for 20 minutes. Remove the sauce from the heat, allow it to come to room temperature and transfer it to a container with a tight lid. It will keep in the refrigerator for up to 1 week.

The combination of the whiskey, liquid smoke and hot sauce is perfect. It was not too thick or too sweet and had an awesome flavor. i could see using this on ribs, chicken or pork without any trouble at all. I served some on the side so people could extra to their meal if they wanted to.

That’s all I have for today. Check back next time to see what recipes come up as I am trying out some new things this week. Until then, enjoy the rest of your day and enjoy your meal!

001

 
Leave a comment

Posted by on July 8, 2013 in Cooking, Dinner, Grilling, Poultry, Sauce


Tags: , , , , , , ,

A Double Dip: Chicken a la Vendemmia and Roasted Green Beans and Carrots

If you follow along with me on this blog, you know I tend to make a lot of chicken. This means I am always on the lookout for some new recipes on ways to make chicken, particularly when it comes to roasting or broiling. I came across this recipe one day while watching the Food Network and saw Michael Chiarello on the Barefoot Contessa preparing this dish. It looked wonderful and I knew I just had to give it a try.

Chicken a la Vendemmia

2 pounds seedless red grapes

4 large bone-in chicken breasts, skin on

Salt and freshly ground black pepper

2 teaspoons fennel spice

2 tablespoons extra-virgin olive oil

1/2 cup thinly sliced shallot

2 teaspoons minced fresh rosemary

1/2 cup chicken stock

Puree the grapes in a blender then strain them through a sieve, pressing on the solids to extract as much juice as possible. You should nave about 2 1/2 cups of juice when you are done.

Preheat the oven to 400 degrees. Season the chicken on all sides with salt, pepper and fennel spice. Heat a large ovenproof skillet over moderately high heat. When the skillet is hot, add the olive oil. Add the chicken breasts, skin side down, and brown well on all sides, about 7 minutes total. Transfer the skillet to the oven and cook until the chicken is done throughout, about 12 to 15 minutes.

Transfer the chicken to a serving platter and pour off all but 1 tablespoon of the fat in the skillet. Add the shallot to the skillet and return to moderate heat. Cook until softened, then add the rosemary and cook briefly to release its fragrance, about 30 to 60 seconds. Add 2 cups of the grape juice and simmer briskly until it is reduced by half. Add the chicken stock and any collected juices from the chicken platter and simmer until the mixture has reduced to a creamy, sauce-like consistency. The total volume of the sauce will be a little more than 1 cup.

Cut the chicken breasts in half with a heavy knife or cleaver and return them to the platter. Spoon the sauce over and around them.

During the program, Michael Chiarello also added 3 or 4 quartered fresh figs to the sauce after adding the grape juice and chicken broth just to warm them through for serving. I didn’t have any figs on hand, so I skipped this step. I have to say I loved the grape sauce that was made. It was wonderfully creamy and had a great taste to it with the chicken. I served the dish with white rice and the sauce added great flavor to the rice as well.I did cook the chicken for 2 or 3 minutes longer to really crisp up the skin and it was still nice and juicy, so cook the chicken to your liking and simply check the temperature with a thermometer.

I also served the chicken with some fresh green beans I had picked up at the farmer’s market. I wanted to be able to cook everything in the oven at once, so I found this recipe from Williams-Sonoma for roasting the green beans with carrots and onions.

Roasted Green Beans and Carrots with Red Onion

3/4 pound green beans, trimmed

1/2 pound carrots, peeled and cut diagonally, about 1/4– inch thick

1 red onion, sliced

2 large garlic cloves, very thinly sliced

1 1/2 tablespoons olive oil

1 teaspoon ground cumin

Salt and freshly ground black pepper, to taste

Preheat the oven to 350 degrees. Place an 8 x 11 heavy roasting pan or a very large, ovenproof fry pan on the rack in the oven to heat.

Bring a large saucepan three-fourths full of water to a boil over high heat. Add a pinch of salt and the green beans. Cook the beans until they turn bright green and are just tender, 1 to 2 minutes. The timing will depend on the age and size of the beans. Drain the beans and plunge them into a bowl of ice-cold water to stop the cooking and drain them again.

In a large bowl, toss together the beans, carrots, onion, garlic and olive oil. Sprinkle with the cumin, season with salt and pepper, and toss again to thoroughly combine. Transfer the vegetables to the preheated pan and spread them evenly. Roast, stirring occasionally, until the vegetables are tender and lightly browned, 45 to 55 minutes. Taste and adjust the seasonings with salt and pepper.

I actually cooked the vegetables for less time since I had them in the 400 degree oven with the chicken. They were actually done in about 25 to 30 minutes instead, which gave me enough time to make the sauce and the chicken to rest. I love roasted vegetables; the roasting really brings out the flavors of the vegetables and the mix of green beans, carrots and onion is great with just a touch of cumin added for heat and flavor.

That’s all I have for today. Check back next time for some more recipes of things I have tried recently. We have some events the next few days, so I won’t be doing much cooking, but I do have some things I have done recently or plan to do in the coming days, so check back and see what comes up. until then, enjoy the rest of your day, have a happy and safe 4th of July and enjoy your meal!

003

 
2 Comments

Posted by on July 4, 2013 in Cooking, Dinner, Poultry, Vegetables


Tags: , , , ,

 
National Day Calendar

Fun, unusual and forgotten designations on our calendar.

Jennifer Probst

a little bit naughty a little bit nice

Laissez Faire

Letting Life Lead

simple cooking recipes

a blog to share with you the best