RSS

Category Archives: Vegetables

Jazzing Up the Vegetables – Caramelized Cauliflower with Honey and Smoked Paprika

Cauliflower is in season this time of year so it is often on sale around here now, making it a good time to get some if you like it. I have to admit, I like cauliflower, but I often find it quite bland as far as taste. it is one of Michelle’s favorite vegetables, so I thought I would get some fresh cauliflower while it was a good price but I wanted to do something with it that would really bring out some flavor in the dish. I came across this recipe from Williams-Sonoma for a caramelized cauliflower with honey and smoked paprika to really punch up the flavor some.

Caramelized Cauliflower with Honey and Smoked Paprika

3 tablespoons extra-virgin olive oil

2 tablespoons butter

1 large cauliflower, about 3 pounds, cut into 1-inch florets

Salt, to taste

1 shallot, minced

1/4 teaspoon red pepper flakes

1/2 teaspoon smoked sweet paprika

2 tablespoons honey

2 tablespoons water

1/2 lemon

Freshly ground black pepper, to taste

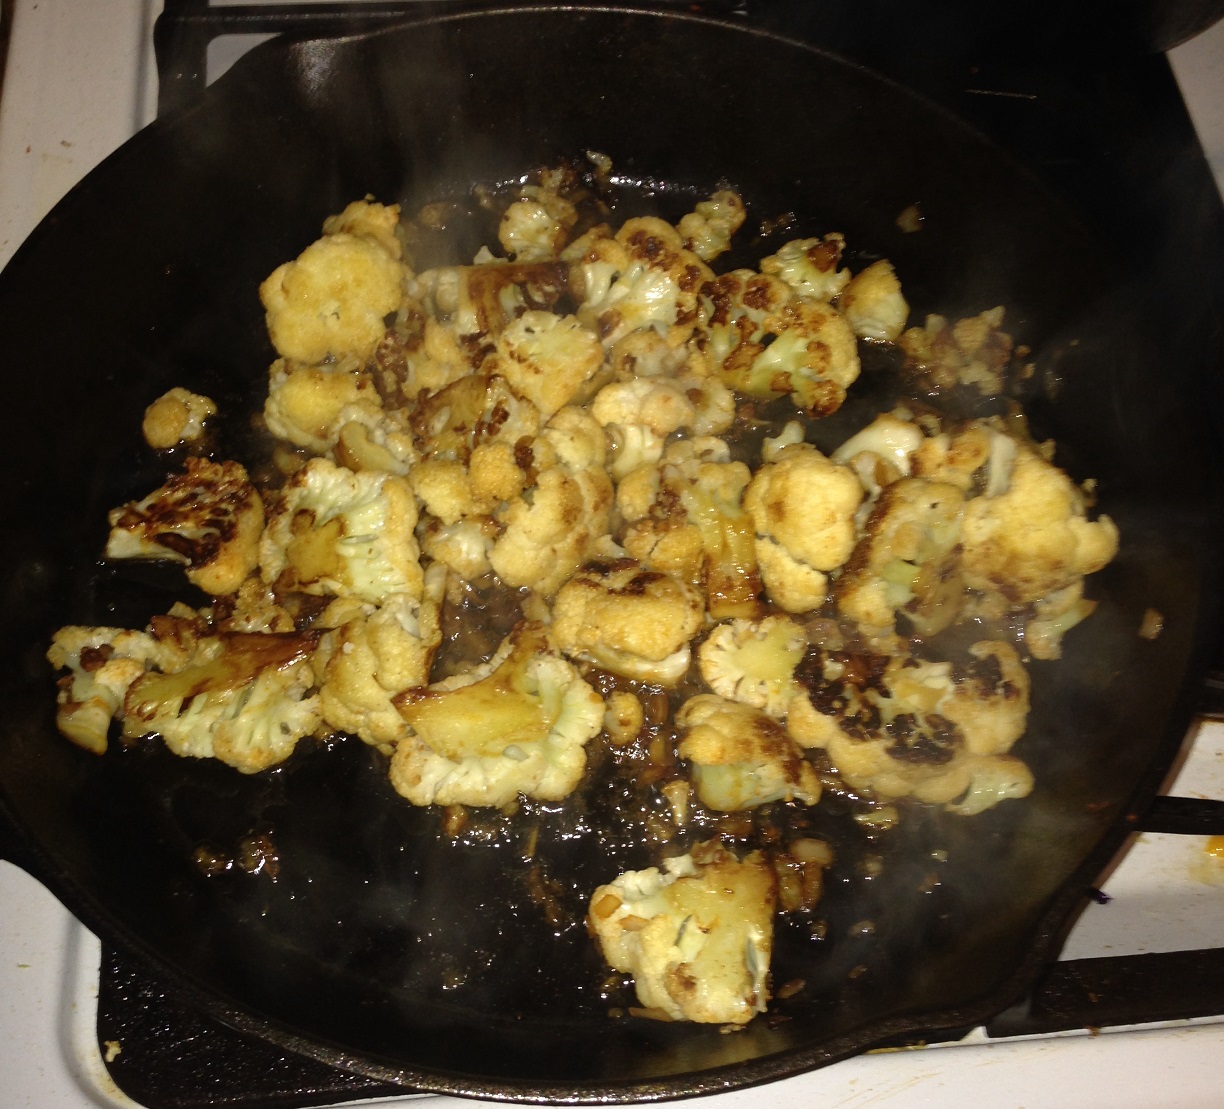
In a large fry pan or skillet set over medium heat, warm 2 tablespoons of the olive oil and melt the butter. Add the cauliflower florets, sprinkle them with a generous pinch of salt and toss the florets to gently coat them with the oil and butter mixture. Spread the florets into a single layer and cook, without stirring the cauliflower, until the undersides are lightly browned, about 3 to 4 minutes. Flip each cauliflower piece over and continue cooking, undisturbed, until each piece is evenly browned, about another 3 to 4 minutes. Repeat the process until all sides of the cauliflower florets are evenly browned, about another 3 to 5 minutes more.

Add the remaining 1 tablespoon of olive oil, the shallot, the red pepper flakes and the smoked paprika to the pan. Cook, stirring occasionally, until the shallot is softened, about 2 to 3 minutes. Add the honey and the water and saute until the liquid reduces to a glaze, about 2 to 3 minutes. Squeeze the juice of the half a lemon over the cauliflower, stir the vegetables to combine them well and cook them for 30 seconds. Remove the pan from the heat. Taste the vegetables and adjust the seasonings with salt and pepper as appropriate.

Transfer the cauliflower to a warmed bowl and serve immediately.

It is a very easy side dish to make and tastes great with the paprika, pepper flakes and the honey glaze on the cauliflower. In my opinion it gives the cauliflower a lot more flavor than it ever had before without having to smother it in cheese and it just uses a few simple ingredients. I will surely remember this one again as it gives a nice option for a vegetable we do not have that often.

That’s all I have for today. Check back tomorrow for another recipe. I have a few new ones I have tried recently, including a new ribs recipe and some things we made for Mardi Gras, including gumbo, red rice, sweet potato cornbread and banana’s Foster parfaits. It was all pretty delicious and I think you will like them. until next time, enjoy the rest of your day and enjoy your meal!

IMG_0450

 
Leave a comment

Posted by on March 6, 2014 in Cooking, Vegetables


Tags: , , , , ,

Who Needs Take Out? Homemade Mu Shu Chicken

As much as we all love Chinese takeout, let’s face it – it can get expensive if you eat it too often and there are times that even when you get food from your favorite takeout place that the meal seems less than inspiring when you eat it. With that in mind, why not try to make some of your favorite meals right at home? Very often they are a lot easier to do than you think and even with all of the ingredients may cost less than what it would cost to get it from a takeout place. When I saw this Guy Fieri recipe for Mu Shu chicken, I wasn’t sure if I could pull it off since it involves making your Chinese pancakes, which are basically like crepes. As intimidating as the thought was, the reality seemed much easier and I wanted to give it a try.

Mu Shu Chicken

1/3 cup hoisin sauce, plus more for serving
3 tablespoons  soy sauce
2 tablespoons mirin
1 1/2 tablespoons sesame oil
3 tablespoons peeled and minced fresh ginger
1 tablespoon minced garlic
Kosher salt and freshly ground black pepper
1 pound boneless, skinless chicken thighs, sliced
3 tablespoons vegetable oil
1 red pepper, seeded, membrane removed, julienned
1/2 yellow onion, thinly sliced
1/2 medium head green cabbage, finely shredded
1/2 medium head purple cabbage, finely shredded
1/2 cup julienned carrots
1 cup sliced button mushrooms
1/4 cup shaved bamboo shoots, drained
1/4 cup sliced water chestnuts, drained
4 eggs, beaten
2 recipes Chinese Crepes, recipe follows
3 tablespoons toasted sesame seeds, optional
1 small bunch scallions, finely sliced, optional
Fresh cilantro leaves, for serving, optional
Sriracha, for serving, optional
For the Chinese Crepes:
3/4 cup all-purpose flour
1/4 cup rice flour
1/2 teaspoon salt
1/8 teaspoon toasted sesame oil
2 eggs

For the Mu Shu chicken: Whisk the hoisin, soy sauce, mirin, sesame oil, garlic and ginger in a mixing bowl. Season with salt and pepper. Add the sliced chicken thighs and toss them  to coat them evenly with the marinade. Marinate the chicken, covered, at room temperature for 20 to 30 minutes.

Once 5 minutes of marinating time remains, heat a large skillet over high heat and add 2 tablespoons of the vegetable oil to heat. Using a slotted spoon, strain the chicken and  add it to the very hot skillet. Cook, allowing the chicken to brown, stirring occasionally, about 2 minutes. Add the red bell pepper and the onion slices, allowing them to soften, and cook for another minute. Next, add the cabbages and carrots and cook, stirring occasionally, until just browning, about 2 minutes. Push the chicken and vegetables to the side of the skillet and stir in the mushrooms, bamboo shoots and water chestnuts. Remove the skillet from the heat and set it aside, keeping the contents warm.

Place a nonstick skillet over medium heat and add the remaining 1 tablespoon of vegetable oil. Add the beaten eggs to the skillet, allowing them to scramble, about 2 to 3 minutes. Once cooked, break up the eggs with a rubber spatula and add them to the chicken. Toss the mixture to combine.

Spread about 1 tablespoon of hoisin sauce on each Chinese Crepes. Top with some mu shu chicken, sesame seeds and scallions. Add the cilantro leaves if desired. Roll up the crepe and serve with Sriracha if desired.

For the Chinese Crepes

:
In a medium glass mixing bowl, whisk the flours, salt, 1 cup of water, the sesame oil and the eggs; the batter should be smooth and free of lumps.

Heat a 8-inch nonstick skillet over medium heat. Very lightly coat the skillet with nonstick cooking spray. Ladle in 1/4 cup of the batter. Gently rotate the skillet for a few seconds, swirling the batter to create a thin, even layer over the bottom. Cook the pancake until the underside is pale and just firmed up, about 1 minute.

Flip the pancake over and cook for another 30 seconds. Remove it from the skillet and transfer it to a plate and cover with a kitchen towel. Continue with the rest of the batter until all the pancakes have been made. Keep the pancakes warm until ready to serve.

This was a very tasty dish that was easy to make. Granted, there are a lot of ingredients involved and you need to leave yourself some time for some prep work to get everything together and ready to go so you can just cook. This is what you should do for every stir fry dish anyway because the actual cooking time is pretty small, usually smaller than the prep time. The taste of the sauce is fantastic and really adds to the chicken and there are tons of great vegetables in this dish. The crunch from the cabbage and the water chestnuts go great with the carrots and mushrooms and the chicken. As for the crepes, they were not hard to make at all. I only tore one in making them, and it was the first one I made. After that, I got the hang of it and make sure you let it cook the full minute before you try to flip it to make sure it flips nicely. Guy actually adds some sliced scallions to his crepes while they cook but I left them out this time since I was just trying to get them cooked successfully. I think they came out well and everyone seemed to enjoy them. I would definitely try making this one again.

That’s all I have for today. Check back next time for another great recipe. Until then, enjoy the rest of your day and enjoy your meal!

IMG_0438 IMG_0437


Leave a comment

Posted by on February 26, 2014 in Cooking, Dinner, One Pot Meals, Poultry, Vegetables


Tags: , , , ,

Another Easy Awesome Side Dish – Whiskey Glazed Carrots

You can never have too many options when it comes to making side dishes. I am always looking for something different to do with vegetables. They can get kind of boring if you just do the same thing over and over again. After awhile you start to feel as if you don’t even want to have certain vegetables because you get tired of having them the same way all the time. I think this happened to me with carrots for a bit and for a time I rarely made them at all unless they were just an added component of another part of the dish. I am trying to get them back into my vegetable rotation now because they are great for you, are inexpensive and actually quite versatile in what you can do with them since you can make them so many ways. Such is the case with this recipe I came across not that long ago for whiskey glazed carrots. I got this one from a cookbook I received for Christmas this year called “The Complete Irish Pub Cookbook.” If you are looking for some new Irish recipes to try, this is the book for you. This choice is a very easy one and simple to make and you could certainly omit the whiskey if you prefer not to have it, but it gives a decidedly Irish touch and flavor to the dish.

Whiskey Glazed Carrots

1 teaspoon sugar

1/2 teaspoon black pepper

Pinch of salt

1/4 cup vegetable or peanut oil

3 tablespoons butter

4 carrots (about 1 pound) diagonally sliced into 1/2-inch circles

3/4-inch piece fresh ginger, sliced into matchstick strips

2 tablespoons Irish whiskey

1/2 cup chicken broth or water

Combine the sugar, pepper and salt in a small bowl and set aside.

Heat the vegetable oil and half of the butter in a large skillet set over medium heat. Add the carrots in a single layer and sprinkle them with the sugar mixture. Cook the carrots over medium-high heat for 3 minutes, then start turning the slices with tongs and reduce the heat if necessary to prevent them from burning. When the carrots are slightly browned on both sides and starting to blacken at the edges, transfer the carrots to a plate.

Clean the skillet with paper towels. Add the ginger to the now-empty skillet and cook it over medium-high heat for 1 to 2 minutes until it is golden. Remove the ginger from the skillet and add it to the carrots.

Add the remaining butter, the Irish whiskey and the chicken broth or water to the skillet. Bring the mixture to a boil and then allow it to simmer for 3 minutes or until it begins to thicken and turn syrupy. Return the carrots and ginger to the skillet and swirl the carrots with the syrup for 1 minute. Serve.

Very quick and easy to do and they taste great. The syrup really helps to bring out the sweetness of the carrots and adds a really nice glaze to the dish. These are perfect to serve with any type of meat, pork or poultry dish and I think the whiskey adds just a hint of flavor without overpowering the carrots at all. It is a good quick dish to keep in mind for St. Patrick’s Day as well.

That’s all I have for today. Check back next time for some more recipes. I have plenty of entrees that I have tried lately that are great to try for weeknights or weekends. until next time, enjoy the rest of your day and enjoy your meal!

005

 
1 Comment

Posted by on February 23, 2014 in Cooking, Side Dishes, Vegetables


Tags: , , , , ,

An Easy, Awesome Side Dish – Roasted Asparagus with Lemon

One way to know for sure that spring is around the corner besides the facts that the weather might be getting warmer (hopefully) and the daylight hours are longer (for sure) is that you will find asparagus more plentiful and on sale this time of year.It really reaches its peak between March and May, but it has been on sale in my area for that last week or so and it always one of our favorite vegetables to eat with just about any meal. There are several good ways to make asparagus, but one of my favorites and one of my favorites to do any vegetable is by roasting it. This recipe from Williams-Sonoma is a very easy one to make with just a few ingredients that you can enjoy during the weeknight or with a more elegant dinner.

Roasted Asparagus with Lemon

2 pounds asparagus, tough ends trimmed and stems peeled

1/4 cup extra-virgin olive oil

2 garlic cloves, minced

Zest of 1 lemon

Salt and freshly ground pepper, to taste

1 lemon, cut into 8 wedges

Position an oven rack in the upper third of the oven and preheat the oven to 450 degrees.

Arrange the asparagus in a single layer on a rimmed baking sheet.

In a small bowl, whisk together the olive oil, minced garlic and the lemon zest. Brush the asparagus evenly with the oil mixture, turning the spears to make sure each one gets coated well, and then season the asparagus generously with salt and freshly ground black pepper. Arrange the lemon wedges around the asparagus on the baking sheet.

Roast the asparagus until it is tender and just starting to turn a golden color, about 6 to 8 minutes. Transfer the asparagus to a warmed serving platter and drizzle it with any pan juices before serving.

Just a couple of things about asparagus in general. When you buy it from the store, you want to be sure that you choose spears that have bright green stalks and just a hint of purple color in the tips. If the tips are already starting to brown or the asparagus feels limp, choose another batch. If you are not planning to cook the asparagus that same day you need to make sure you store it properly so it doesn’t go bad on you. You can simply stand the spears upright in a pan filled with about 1 inch of water and refrigerate them until you are ready to cook them. They need the water to stay fresh and you should see them in water at the grocery store or on ice to keep them fresh. When you trim them, just make sure you cut off far enough to get rid of the woody stem at the bottom. Thicker asparagus does tend to need to be peeled so they cook more evenly, but if you buy thin asparagus you can get away without peeling them. This simple dish gives you great lemon flavor with the hint of garlic that goes so well with asparagus and it takes less than 10 minutes to make so you can do this one any night of the week.

That’s all I have for today. Check back next time for another recipe. Until then, enjoy the rest of your day and enjoy your meal!

01115b0c4962fc39a6ff19d3c86c04d12f35233605

 
3 Comments

Posted by on February 22, 2014 in Cooking, Cooking Tips, Vegetables


Tags: , , , ,

Martha My Dear – Martha Stewart’s Braised Chicken Thighs with Winter Vegetables

When I was looking for something to do recently with some of the chicken thighs that I had purchased, I was searching around for a new recipe and I came across this one from Martha Stewart. I don’t use a lot of her recipes very often but this one fit in perfectly with what I wanted to make and actually made use of the exact ingredients I wanted to use. I had some cabbage on hand along with some apples and I wanted to try to find a way to incorporate it all into my meal. This recipe, for braised chicken thighs with winter vegetables, is the perfect one pot meal to get everything done in one pan for easy clean up while still having great flavor.

Braised Chicken Thighs with Winter Vegetables

1 tablespoon extra-virgin olive oil

4 skinless chicken thighs (about 2 pounds), patted dry

Salt and ground black pepper

3 slices bacon, diced medium

4 garlic cloves, smashed and peeled

1 onion, cut into 3/4-inch wedges

1 russet potato, peeled and cut into 1-inch pieces

4 carrots, cut into 1/2-inch pieces

1/4 small green cabbage, cored and thick ribs removed, cut into 1/2-inch strips

1 apple, peeled and cut into 1/2-inch pieces

1/4 teaspoon red pepper flakes

2 cups chicken broth

2 tablespoons Dijon mustard

Preheat the oven to 375 degrees. In a large ovenproof pan, heat the olive oil over medium-high heat. Season the chicken thighs with salt and pepper and cook until they are browned on both sides, about 8 minutes per side. Transfer the chicken to a plate. Reduce the heat to medium and add the bacon and garlic. Cook until the bacon fat is rendered, about 5 minutes. Add the onion, potato and carrots and season the vegetables with salt and pepper. Transfer the pan to the oven and bake for 20 minutes.

Remove the pan from the oven and stir in the cabbage, apple, red pepper flakes, chicken broth and Dijon mustard. Add the chicken thighs, nestling them into the vegetables and return the pan to the oven. Bake the chicken and vegetables until the chicken is cooked through and an instant-read thermometer inserted into one of the chicken thighs registers 165 degrees, about 20 to 25 minutes. Stir the vegetables halfway through the cooking time to ensure they cook evenly.

The great thing about this meal, besides that it is all in one dish, is the great flavors that all work together in this one. You get a touch of smokiness from the bacon to go along with the great flavors from all of the vegetables, especially the cabbage. The apple also adds a nice tartness to the meal as well and you get just a hint of heat from the red pepper flakes. Best of all is you do not have to make any other side dishes to go along with the meal and you only have one pan to clean when everything is done. I don’t make enough use of cabbage and it is one of favorite vegetables so I hope to be using more of it in more recipes. In fact I just bought a red cabbage and a green cabbage today and have a plan to try a Mu Shu Chicken meal this weekend, so we’ll see how it goes. Anyway, this one was certainly a winner and you could just as easily do this with chicken drumsticks or breasts if you wanted to, though if you use bone-in breasts you may need to alter your cooking time slightly.

That’s all I have for today. Check back next time for another recipe. There’s still lots of good stuff to come. Until then, enjoy the rest of your day and enjoy your meal!

002


Leave a comment

Posted by on February 21, 2014 in Cooking, Dinner, One Pot Meals, Poultry, Vegetables


Tags: , , , , , ,

Romance in the Air and On the Plate, Part 2 – Garlic-Thyme Smashed Potatoes and Sauteed Spinach with Garlic

A nice romantic meal needs some good side dishes, but you also want to keep in mind that you want the meal to be elegant but easy too. It’s not much fun if you have to spend hours in the kitchen cooking and then by the time you eat you are too exhausted to enjoy it. That’s why these sides were great to make. They go perfectly with the beef we had for the meal (recipe to come tomorrow) and both were made very easily. The first is for garlic-thyme smashed potatoes that you can do simply on the stove top with just a few ingredients.

Garlic-Thyme Smashed Potatoes

2 tablespoons butter

1 tablespoon olive oil

1 pound baby Yukon Gold potatoes, each about 1-inch in diameter

1 cup water

Kosher salt and freshly ground black pepper

1 teaspoon minced garlic

1 teaspoon chopped fresh thyme

In a large nonstick skillet set over medium-high heat, melt the butter with the olive oil. Add the potatoes and water and season the potatoes generously with the kosher salt and ground black pepper. Cover the skillet and cook until the potatoes are tender, about 20 minutes.

Remove the skillet from the heat and smash the potatoes lightly with a spatula or potato masher. Return the skillet to medium-high heat and cook, uncovered, until the potatoes are beginning to brown underneath, about 2 to 3 minutes. Add the garlic and thyme and cook, stirring constantly, until the herbs are fragrant, about 1 minute. Adjust the seasoning with salt and pepper and serve.

The potatoes get a great crust on them that make them nice and crunchy and the taste of the garlic and thyme goes perfectly with the rest of the meal. You can make these any time and I think they would go perfectly with any beef, pork or poultry meal.

The next dish was a very easy sautéed spinach with garlic. We make spinach pretty often and this is probably my favorite way to have it. You can cook this in under 5 minutes and have it on the table and it is a great, fresh alternative for a vegetable that night.

Sautéed Spinach with Garlic

2 tablespoons olive oil

2 garlic cloves, thinly sliced

1 1/2 pounds fresh spinach, trimmed and washed

Kosher salt, to taste

In a large nonstick skillet over medium heat, warm the olive oil until it is shimmering. Add the sliced garlic and cook, stirring constantly, until the garlic is fragrant, about 30 seconds. Add the spinach in batches and cook until it is wilted, about 2 to 3 minutes. Season with salt to taste and serve.

A couple of things about the spinach. Make sure you wash it in a salad spinner or rinse it off before you cook it. Even the stuff that comes in a bag and says it is washed can still be gritty, so it never hurts to give it an extra rinse and dry it off. You also want to make sure you stir the garlic well when you put it in so it does not brown, burn and get bitter. It might not seem like all of the spinach will fit in one pan but spinach cooks down very quickly so you should have no problem. Spinach and garlic go together really well so this is the perfect side dish any night of the week, and is a classic side dish with steak or beef.

That’s all I have for today. Check back next time for another recipe. I’ll be highlighting the main point of our Valentine’s Day dinner, the rib-eye steak and the broiled lobster tails. Until next time, enjoy the rest of your day and enjoy your meal!

007 005


Leave a comment

Posted by on February 16, 2014 in Cooking, Dinner, Holidays, Potatoes, Side Dishes, Vegetables


Tags: , , , , ,

It’s a Chicken Invasion, Part 2 – Pan Seared Chicken Breast with Herb Jus and Potato Vegetable Hash

For the next chicken meal for the week I decided again to try to keep something simple and different. I find I don’t but chicken breasts very often, but I saw some on sale recently and picked up a package because it was on sale. Usually the bone-in chicken breasts are pretty large and end up cutting them in half so we get more meals out of them. That is what I did this time and then I decided I was going to try this recipe that I saw from Robert Irvine of the Food Network. it is for a simple pan seared chicken breast with herb jus and a really tasty potato vegetable hash. it’s a simple recipe that’s easy enough to make during the week for a nice dinner.

Pan Seared Chicken Breast with Herb Jus and Potato-Vegetable Hash

For the Chicken:

2 tablespoons vegetable oil

2 skin-on, bone-in chicken breasts, cut in half

Salt and freshly ground black pepper

1 cup dry white wine

1 clove garlic, minced

1 tablespoons minced fresh thyme leaves

1 teaspoon chopped rosemary leaves

1 teaspoon chopped fresh parsley leaves

2 tablespoons butter

1 tablespoon minced fresh chives

For the Potato-Vegetable Hash:

1 potato

1 zucchini

1 yellow squash

1 small red onion, thinly sliced

1 egg, beaten

2 tablespoons all-purpose flour

1 clove garlic, minced

1 teaspoon minced fresh thyme leaves

1 teaspoon minced fresh tarragon leaves

1 teaspoon Cajun spice

Vegetable oil

Salt

For the chicken, heat a large saute pan over high heat and add the vegetable oil. Heat the vegetable oil until it is shimmering. Season both sides of the chicken breasts with salt and pepper to taste. Sear the chicken, skin side down, until the skin is a golden brown, about 5 to 6 minutes. Reduce the heat to medium, flip the chicken breasts over, cover the pan and cook on the second side for 7 to 8 minutes.

After the second side has been cooked, add the white wine, the garlic, thyme, rosemary and parsley and continue to cook the chicken until the liquid is reduced by half, about 7 minutes. Transfer the chicken to a serving platter and cover it loosely with aluminum foil to allow it to rest.

Remove the saute pan from the heat and whisk in the butter, scraping up any browned bits from the bottom of the pan.

For the potato-vegetable hash, using a box grater, shred the potato, zucchini and yellow squash and add them to a large bowl. Stir in the red onion, egg, flour, garlic, thyme, tarragon and the Cajun spice. Blend the mixture well and add more flour if the mixture seems too wet. The mixture should hold its shape when it is squeezed.

Heat a large saute pan over medium heat and add two tablespoons of vegetable oil. Heat the oil just until it is shimmering and portion the potato mixture into cakes, gently patting and forming them in your hands. Cook the cakes until they are golden brown on one side, about 2 to 3 minutes. Flip the cakes over and cook until the other side is browned, about another 3 minutes. Remove the cakes from the pan and set them on a paper towel-lined plate and season with salt to taste.

Serve the potato vegetable hash warm with a chicken breast piece on time and some of the herb jus sauce.

This was a very simple meal that makes good use of the white meat of the chicken if you need a new recipe. Sean is a big white meat-eater so he really liked this meal. The sauce for me was the winner as it had great flavor and everyone really liked the potato-vegetable hash, which was the real hit of the meal. The combination of the potato, zucchini and squash was perfect with the herbs and spices and it wasn’t cooked so long that it got all dried out. It was nice and flavorful from the vegetables with some crispness. It was definitely one I would make again.

That’s all I have for today. Check back next time for the next chicken recipe. I have some fried chicken sandwiches, an oven roasted turkey breast, a skillet roasted chicken and more still to come. Until next time, enjoy the rest of your day and enjoy your meal!

003 002

 
Leave a comment

Posted by on January 29, 2014 in Cooking, Dinner, Poultry, Sauce, Vegetables


Tags: , , , , , ,

Another Soup (Sans Picture) – French Onion Soup

It really bothers me now when I make something and forget to take a picture of it. It doesn’t happen nearly as often as it did when I first started the  blog, but it still happens on occasion. It’s easy when you caught up in cooking and trying to get the meal on the table and you’re talking about homework, what happened at school, work or anything else going on and sometimes by the time I remember there is nothing left to take a picture of. Such is the case when I made French onion soup not that long ago. French onion soup is a personal favorite of Michelle’s and there are lots of recipes out there for it, but this one from America’s Test Kitchen is our personal favorite. It takes longer to cook, but it is so worth it to get the deep, rich onion flavor that you get from cooking the onions this way.

French Onion Soup

3 tablespoons butter, cut into 3 pieces
6 large yellow onions (about 4 pounds), halved and cut pole to pole into 1/4-inch-thick slices 
Table salt
2 cups water, plus extra for deglazing
1/2 cup dry sherry
4 cups chicken broth 
2 cups beef broth
6 sprigs fresh thyme, tied with kitchen twine
1 bay leaf
Ground black pepper
1 small baguette, cut into 1/2-inch slices
8 ounces shredded Gruyère cheese (about 2 1/2 cups)
Adjust an oven rack to the lower-middle position and heat the oven to 400 degrees. Generously spray the inside of a heavy-bottomed large (at least 7-quart) Dutch oven with nonstick cooking spray. Place the butter in the pot and add the onions and 1 teaspoon of salt. Cook, covered, for 1 hour (the onions will be moist and slightly reduced in volume). Remove the pot from the oven and stir the onions, scraping the bottom and sides of the pot. Return the pot to the oven with the lid slightly ajar and continue to cook until the onions are very soft and golden brown, about 1 1/2 to 1 3/4 hours longer, stirring the onions and scraping the bottom and sides of the pot after 1 hour.
 Carefully remove the pot from the oven and place it over medium-high heat. Using oven mitts to handle the pot, cook the onions, stirring frequently and scraping the bottom and the sides of pot, until the liquid evaporates and the onions brown, about 15 to 20 minutes, reducing the heat to medium if the onions are browning too quickly. Continue to cook, stirring frequently, until the pot bottom is coated with dark crust, about 6 to 8 minutes, adjusting the heat as necessary. Scrape any fond that collects on the spoon back into the onions. Stir in 1/4 cup water, scraping the pot bottom to loosen the crust, and cook until the water evaporates and the pot bottom has formed another dark crust, about 6 to 8 minutes. Repeat the process of deglazing 2 or 3 more times, until the onions are very dark brown. Stir in the sherry and cook, stirring frequently, until the sherry evaporates, about 5 minutes.
Stir in  the chicken and beef broths, 2 cups of water, thyme, bay leaf, and 1/2 teaspoon of salt, scraping up any final bits of browned crust on the bottom and sides of the pot. Increase the heat to high and bring the mixture to simmer. Reduce the heat to low, cover, and simmer for 30 minutes. Remove and discard the herbs, then season with salt and pepper.
 While the soup simmers, arrange the baguette slices in a single layer on a baking sheet and bake in a 400-degree oven until the bread is dry, crisp, and golden at the edges, about 10 minutes. Set the bread aside.
To serve, adjust an oven rack 6 inches from the broiler element and heat the broiler. Set individual broiler-safe crocks on a baking sheet and fill each with about 1 3/4 cups of soup. Top each bowl with 1 or 2 baguette slices (do not overlap slices) and sprinkle evenly with the Gruyère cheese. Broil the soup until the cheese is melted and bubbly around the edges, about 3 to 5 minutes. Let the soup cool  for 5 minutes before serving.
Admittedly, making the onions this way is a much longer process than some other recipes but I think the flavor you get out of them is worth it. I have had French onion soup before where you can tell the onions were not cooked long enough and taste bitter. That won’t happen with this recipe. You want to make sure that the crocks you use are safe for the broiler to avoid any broken glass in the oven. You could also do all of this in advance if you want to use the soup for a dinner party. The soup will actually have better flavor if it sits for a day or two. You then just need to put it in the crocks under the broiler with the bread and cheese to finish it off. I used homemade broth in mine because I had some around, but if you want to use store-bought it will work just as well here. The flavor for this one is coming mostly from the onions.
That’s all I have for today. Check back next time for another recipe, and I promise to have a picture of it for sure. Until then, enjoy the rest of your day and enjoy your meal!


Tags: , , , ,

A Classic Side Dish From a Master – Alton Brown’s Best Ever Green Bean Casserole

You wouldn’t think there would be too much that you can actually do to change up this holiday classic, so when I noticed Alton Brown’s recipe for green bean casserole I had to check out what makes it so different from the classic you see on holiday tables each year. The biggest difference really is that everything is made from scratch. No canned fried onions, no cream of mushroom soup, no canned french green beans. I have nothing against the traditional way many people make this dish, but for me personally if you can use all fresh ingredients without preservatives and such that go into canned products, you are much better off and the taste will be a lot better. I made this dish for our Christmas meal and it was well worth the extra effort to put into it.

Alton Brown’s Best Ever Green Bean Casserole

For the topping:

2 medium onions, thinly sliced

1/4 cup all-purpose flour

2 tablespoons panko bread crumbs

1 teaspoon kosher salt

Nonstick cooking spray

For the beans and sauce:

2 tablespoons plus 1 teaspoon kosher salt, divided

1 pound fresh green beans, rinsed, trimmed and halved

2 tablespoons butter

12 ounces mushrooms, trimmed and cut into 1/2-inch pieces

1/2 teaspoon freshly ground black pepper

2 cloves garlic, minced

1/4 teaspoon freshly ground nutmeg

2 tablespoons all-purpose flour

1 cup chicken broth

1 cup half-and-half

Preheat the oven to 475 degrees. Combine the onions, flour, panko bread crumbs, and salt in a large mixing bowl and toss to combine. Coat a sheet pan with nonstick cooking spray and evenly spread the onions on the pan. Place the pan on the middle rack of the oven and bake until they are golden brown, about 30 minutes. Toss the onions 2 or 3 times during the cooking process to ensure they brown evenly. Once they are done, remove the onions from the oven and set them aside so that they are ready to use. Turn the oven down to 400 degrees.

While the onions are cooking, prepare the green beans. Bring a gallon of water and 2 tablespoons of kosher salt to a boil in an 8-quart saucepan. Add the green beans and blanch the beans for 5 minutes. Drain the beans in a colander and immediately plunge the beans into a large bowl of ice water to stop the cooking. Drain the beans and set them aside.

Melt the butter in a large cast-iron skillet set over medium-high heat. Add the mushrooms, 1 teaspoon of kosher salt and pepper and cook, stirring occasionally, until the mushrooms begin to release some of their liquid, about 4 to 5 minutes. Add the garlic and nutmeg and continue to cook for another 1 to 2 minutes. Sprinkle the flour over the mixture and stir to combine. Cook the mixture for 1 minute. Add the chicken broth and simmer for 1 minute. Decrease the heat to medium-low and add the half-and-half. Cook until the mixture thickens, stirring occasionally, about 6 to 8 minutes.

Remove the mixture from the heat and stir in 1/4 of the onions and all of the green beans. Top with the remaining onions. Place the skillet in the oven and bake until the casserole is bubbly, about 15 minutes. Remove the casserole from the oven and serve.

I have tried different recipes for this casserole before, but I think this one had the freshest taste of any I have made. I have never been a big fan of the canned condensed soups, so I was glad for the fresh mushrooms and half-and-half. I think this recipe had much better flavor than any others i have tried and it was definitely worth a little extra effort. Making your onions was quick and easy and they tasted great. The onions would be ideal just for burgers, let alone this casserole. I will definitely make this again, and not just for holiday meals.

That’s all I have for today. Check back next time for some more recipes. Until then, enjoy the rest of your day and enjoy your meal!

011

 
2 Comments

Posted by on January 2, 2014 in Cooking, Holidays, Side Dishes, Vegetables, Vegetarian


Tags: , , , , ,

Help Me, I’m Melting (Potatoes)!

When we decided to make the prime rib dinner this past Christmas, the natural inclination would seem to go with mashed potatoes as a standard side dish. I wanted to try something a little different with the starch we were going to serve and try to keep things easy at the same time. I love mashed potatoes, but unless you make them ahead of time and re-heat them they can be a chore during holiday cooking when you have to stop and mash them perfectly. I thought a roasted potato would be just perfect and then I found in the same issue of Cook’s Country that I found the prime rib recipe this wonderfully easy recipe for melting potatoes, which are roasted potatoes that are popular in the United Kingdom and sometimes called fondant potatoes.

Melting Potatoes

3 pounds Yukon Gold potatoes, peeled

6 tablespoons butter, melted

1 tablespoon minced fresh thyme

1 teaspoon salt

1/2 teaspoon pepper

1 1/2 cups chicken broth

2 garlic cloves, lightly crushed and peeled

Adjust an oven rack to the upper-middle position and heat the oven to 500 degrees. Square off the ends of the potatoes and cut them crosswise into 1-inch thick disks. Toss the potatoes with the melted butter, the thyme salt and pepper. Arrange the potatoes in a single layer in a 13 by 9-inch baking pan.

Roast the potatoes until the bottoms are beginning to brown around the edges, about 15 minutes. Remove the pan from the oven. Using a flat metal spatula and tongs, loosen the potatoes from the bottom of the pan and flip them. Return the potatoes to the oven and continue to roast them until they are browned on the second side, about 15 minutes longer.

Remove the pan from the oven and flip the potatoes once more. Add the chicken broth and the garlic to the pan. Return the potatoes to the oven and roast until the potatoes are tender and the sauce has reduced slightly, about 15 minutes. Baste the potatoes with some of the sauce before serving.

This is a great side dish not just for the holidays but for anytime you want potatoes. I did alter things slightly. Since I had the roast out resting for an hour and was already roasting vegetables at 425 degrees, I put the potatoes in as well and let them cook for a few minutes longer to make up for the temperature difference. They may not have been the super crispy that is described in the recipe but they were still very crispy and the sauce had thickened nicely around the potatoes. They were a great brown color and the ideal compliment to the prime rib and roasted vegetables. I think they would just as well with any other type of roast or poultry and I plan to give them a try when it is just the three of us for a meal and see how it goes.

That’s all I have for today. Check back next time for another recipe from our holiday meal. There is still lots to come as we had appetizers, sides and desserts galore to choose from and I had made some things just before the holidays that I haven’t even gotten to yet. Until next time, enjoy the rest of your day and enjoy your meal!

013

 
Leave a comment

Posted by on December 29, 2013 in Cooking, Holidays, Potatoes, Vegetables


Tags: , , , , , ,

 
National Day Calendar

Fun, unusual and forgotten designations on our calendar.

Jennifer Probst

a little bit naughty a little bit nice

Laissez Faire

Letting Life Lead

simple cooking recipes

a blog to share with you the best