RSS

Monthly Archives: December 2013

Simple, One Dish Italian Dinners, Part 1 – Lasagna

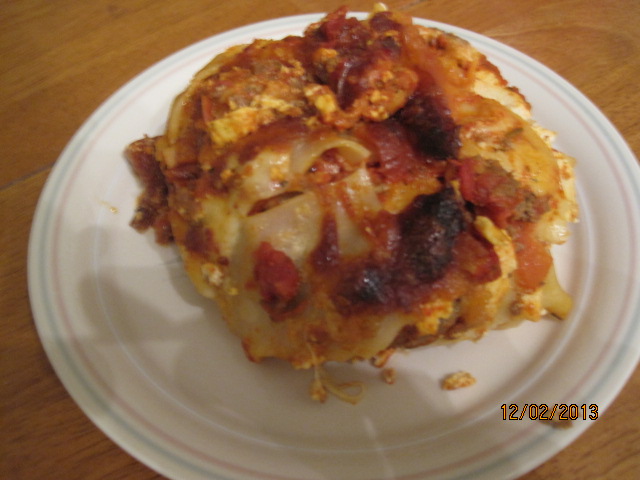
Okay, anyone who knows me personally know I don’t eat pasta or cheese, but that does not mean I won’t make it for someone else to enjoy. Michelle and Sean both really like lasagna, and since we had Sean’s birthday meal not that long ago, he decided that he wanted to have some lasagna for his dinner. For me, this needs to be as simple of a recipe as it can be, and Cook’s Illustrated gave me just that in their cookbook with a straightforward meat lasagna with not a lot of ingredients that was easy to make.

Meat Lasagna

Tomato Meat Sauce:

1 tablespoon olive oil

1 onion, chopped fine

6 garlic cloves, minced

1 pound ground beef

1/2 teaspoon salt

1/2 teaspoon pepper

1/4 cup heavy cream

1 (28-ounce) can tomato puree

1 (28-ounce) can diced tomatoes, drained

Cheese Filling:

14 ounces (1 3/4 cups) ricotta cheese

2 1/2 ounces (1 1/4 cups) Parmesan cheese, grated

1/2 cup chopped fresh basil

1 egg

1/2 teaspoon salt

1/2 teaspoon pepper

16 ounces mozzarella cheese, shredded (4 cups)

12 no-boil lasagna noodles

For the sauce: Heat the olive oil in a Dutch oven over medium heat until shimmering. Add the onion and cook, stirring occasionally, until softened, about 5 minutes. Stir in the garlic and cook until it is fragrant, about 30 seconds. Stir in the ground beef, salt, and pepper, increase the heat to medium-high and cook, breaking up any large pieces with a wooden spoon, until the meat is no longer pink, about 3 minutes. Add the heavy cream and bring the mixture to a simmer, and cook, stirring occasionally, until the liquid evaporates and only rendered fat remains, about 4 minutes. Stir in the tomato puree and the diced tomatoes, bring to a simmer, and cook until the flavors meld, about 3 minutes. Set the sauce aside.

For the cheese filling: Adjust an oven rack to the middle position and heat the oven to 375 degrees. Combine the ricotta cheese, 1 cup of the Parmesan cheese, the basil, egg, salt and pepper in a bowl.

Spread 1/4 cup of the meat sauce evenly over the bottom of a 13-inch by 9-inch baking dish. Arrange 3 lasagna noodles in a single layer on top of the meat sauce. Spread each noodle evenly with 3 tablespoons of the ricotta cheese mixture and sprinkle the entire layer with 1 cup of the mozzarella cheese. Spoon 1 1/2 cups of meat sauce over the top. Repeat the layering of the noodles, ricotta cheese mixture, mozzarella cheese and the meat sauce 2 more times. For the final layer, arrange the remaining 3 noodles on top and cover the top completely with the remaining meat sauce.. Sprinkle the top with the remaining 1 cup of mozzarella cheese then sprinkle it with the remaining 1/4 cup of Parmesan cheese.

Cover the dish tightly with aluminum foil that has been sprayed with nonstick cooking spray. Bake for 15 minutes, then remove the aluminum foil and continue to bake until the cheese is spotty brown and the edges are just bubbling, about 25 to 30 minutes longer. Cool the lasagna for 15 minutes before serving.

It was much easier to make this way using the no-boil noodles, but if you prefer to make your own noodles then you should go right ahead. I know everyone has their own family lasagna recipe, but if you are making your own for the first time and need one to start with then this one is pretty good to use because it is easy to follow and gives you good results. you can serve this with a simple side salad and some homemade garlic bread and you are good to go for the night. I know we’ll be making it again since Sean and Michelle love it so much.

That’s all I have for today.Check back next time for another recipe and see what comes along. I still have lots to choose from. Until next time, enjoy the rest of your day and enjoy your meal!

006 005


7 Comments

Posted by on December 13, 2013 in Beef, Cooking, Dinner, One Pot Meals, Pasta, Uncategorized


Tags: , , ,

Chicken Thigh Recipes Slideshow – Bon Appétit

Chicken Thigh Recipes Slideshow – Bon Appétit.

Chicken thighs are my favorite piece of the chicken to make. They seem to have the most flavor and there are so many different things you can do with them, whether you have bone-in, boneless, skim-on or skinless. Bon Appetit offers up 16 great ways to make chicken thighs. Give one or two or ten a try and see how they go. Check it out!

 
Leave a comment

Posted by on December 12, 2013 in Cooking, Cooking Websites, Dinner, Poultry


Tags: , , ,

It’s My Birthday (Cake)! – Bananas Foster Cake

Today is my birthday and since it falls in the middle of the week this year we decided to have my birthday dinner this past weekend. We made some pulled pork, homemade cole slaw,German potato salad and some barbecued baked beans for the meal itself. The only new recipe there is for the baked beans, which I will post tomorrow. For dessert, Michelle had asked me what kind of cake I would like. Normally, I would have selected a Black Forest cake as it is one of my all-time favorite desserts and takes some time to make so I don’t get it very often. However, I saw this cake in the last issue of Cook’s Country and knew right away that I had to try this one for my birthday. It is for a Bananas Foster Cake and just the look and the description of the cake made it sound wonderful.

Bananas Foster Cake

For the Cake:

4 eggs, room temperature

1/2 cup milk, room temperature

2 teaspoons vanilla extract

1 3/4 cups cake flour

1 1/2 cups granulated sugar

2 teaspoons baking powder

3/4 teaspoon salt

16 tablespoons (2 sticks) butter,cut into 16 pieces and softened

For the Filling and Frosting:

3/4 cup dark rum

1/2 cup packed dark brown sugar

Salt

2 tablespoons butter, chilled, plus 20 tablespoons (2 1/2 sticks) softened

4 ripe bananas

1/8 teaspoon ground cinnamon

2 1/2 cups confectioners’ sugar

1 teaspoon vanilla extract

For the cake: Adjust an oven rack to the lower-middle position and heat the oven to 350 degrees. Grease two 9-inch or three 8-inch round cake pans, line them with parchment paper, grease the parchment and the flour pans.

Whisk the eggs, milk and vanilla together in a bowl. Using a stand mixer fitted with a paddle, mix the cake flour, granulated sugar, baking powder and salt on low-speed until combined. Add the butter, 1 piece at a time, until only pea-size pieces remain, about 1 minute.

Add half of the egg mixture, increase the speed to medium-high, and beat the mixture until it is light and fluffy, about 1 minute. Reduce the speed to medium-low, add the remaining egg mixture and beat until it is incorporated, about 30 seconds. The batter may look slightly curdled. Give the batter a final stir by hand.

Divide the batter evenly among the prepared cake pans and smooth the tops with a rubber spatula. Bake until the tops are light golden and a toothpick inserted into the center comes out clean, about 18 to 22 minutes for 8-inch pans and 20 to 25 minutes for 9-inch pans, rotating the pans halfway through the baking process. Let the cakes cool in the pans on a wire rack for 10 minutes. Remove the cakes from the pans, discarding the parchment paper, and let them cool completely on the rack, about 2 hours.

For the caramel: Cook 1/2 cup of the dark rum, the brown sugar and a pinch of salt in a large skillet over medium-low heat, stirring frequently, until the spatula leaves a 2-second trail when dragged through the sauce, about 7 to 10 minutes. Remove the caramel from the heat. Whisk 3 tablespoons of the caramel and 2 tablespoons of the chilled butter together in a small bowl until combined; set both caramels aside and let the mixed caramel cool completely.

For the filling: Peel and cut 2 of the bananas into 1/4-inch-thick slices. Add the sliced bananas and the cinnamon to the remaining warm caramel in the skillet and stir gently to combine. Set this aside and let it cool completely.

For the frosting: Using a stand mixer fitted with a whisk, mix the remaining 20 tablespoons of softened butter and 1/8 teaspoon of salt on medium-low speed until it is smooth, about 10 seconds. Slowly add the confectioners’ sugar and continue to mix until the mixture is smooth, about 2 minutes. Add the remaining 1/4 cup of dark rum and the vanilla and mix until incorporated, about 1 minute, scraping down the bowl as needed. Increase the speed to medium-high and whip the frosting until it is light and fluffy, about 5 minutes.

To assemble the cake: Place 1 cake layer on a cake plate or pedestal. Spread half of the banana filling over the cake. Top with the second cake layer and the remaining filling. Top with the final layer of cake and frost he top and the sides of the cake. Just before serving, peel and cut the remaining 2 bananas into 1/4-inch-thick slices and shingle them around the top edge of the cake. Pour the reserved caramel-butter mixture over the bananas, allowing the excess to drip down the sides of the cake. Serve.

All I can say about this cake is that it tastes amazing! If you like bananas foster, and I love it, then this is the cake for you. you get great banana flavor from the filling of the cake and the frosting is out of this world with the rum in it. The caramel just tops everything off, adding amazing texture and flavor to the whole thing. This is my new favorite cake and I would have it again and again (and I have for dessert the last few nights). The only change we made is that we did two 9-inch layers instead of the three 8-inch layers. Other than that, we followed along and did everything. You absolutely must try this cake out!

That’s all I have for today. Check back again next time for some more recipes. Until then, enjoy the rest of your day and enjoy your meal!

005 004


6 Comments

Posted by on December 11, 2013 in Cakes, Cooking, Dessert


Tags: , , , ,

A Simple Side for Your Burgers and Sandwiches – Beer Battered Onion Rings

I love onion rings. Admittedly, they are not the healthiest  choice when it comes to things to make. The frozen ones, even when baked in the oven, are not the best thing for you but I still love them. I have tried a few times to make my own and have made them by baking them in the oven and by frying them, but I had never really tried a beer batter recipe before. I cam across this one in Saveur Magazine not long ago and had been waiting for the right opportunity to make them. I made some burgers for dinner one night last week and the onion rings were just the perfect accessory for the burgers.

Beer Battered Onion Rings

1 3/4 cups all-purpose flour

1/2 cup cornstarch

1 1/2 teaspoons paprika

1 teaspoon dry mustard

1 tablespoon baking powder

1 tablespoon kosher salt, plus more to taste

2 teaspoons honey

12 ounces lager-style beer

Vegetable or canola oil, for frying

2 large onions, cut crosswise into 1/2-inch thick slices and separated into rings

In a large bowl, whisk together the flour, cornstarch, paprika, dry mustard, baking powder and salt. Add the honey and the beer and whisk the mixture until it is smooth.. Allow the mixture to sit for 10 minutes.

Pour the vegetable or canola oil to a depth of 2 inches in a Dutch oven or large skillet with high sides and heat the pan over medium-high heat until the temperature of the oil registers 375 degrees on a candy or deep-fry thermometer. Working in batches, dip the onion rings into the batter, shaking off any excess, and lower them into the oil. Fry the onion rings, flipping once, until they are golden brown, about 3 minutes total. Transfer the onion rings to a paper towel lined plate to drain briefly and season with more salt. Cover the onion rings and repeat the process with any remaining onion rings until they are all fried. Serve immediately.

The batter was a lot thicker than I thought it was going to be and it made for an excellent crust on the onion rings. You got some really great flavor from the mix of the beer, honey and paprika and they were done quite quickly. We all loved the taste of them and devoured all the onion rings with our burgers pretty quickly. These would be great to make with any burgers or other sandwiches like a chicken sandwich or even with some corned beef or pastrami. They would also make an awesome appetizer or snack when you are watching a football game or having some friends over for a party. I’ll definitely be trying this recipe again.

That’s all I have for today. Check back tomorrow for another recipe. Tomorrow is my birthday, so I will be posting the recipe Michelle used for my wonderful birthday cake that she made. Check back tomorrow to see what it is. Until then, enjoy the rest of your day and enjoy your meal!

003


Leave a comment

Posted by on December 10, 2013 in Appetizers, Cooking, Picnic Fare, Side Dishes, Snacks


Tags: , , , ,

Sean’s Birthday Cake – Peppermint Mocha Cupcakes

Sean’s birthday was last week (he is officially a teenager now) and he invited a few of his friends over this past weekend to hang out and have some snacks and then have some cake. Since he did not want a traditional birthday cake while his buddies were here, he decided he would like some cupcakes instead. I went about trying to find something special when I came across this wonderful recipe on Sally’s Baking Addiction for these peppermint mocha cupcakes. They were the perfect thing for some teenage boys looking for a tasty and sweet snack and it fits the holiday season as well.

Peppermint Mocha Cupcakes

Cupcakes:

1/2 cup butter

2 ounces semisweet baking chocolate

1 heaping tablespoon instant coffee

1/2 cup unsweetened cocoa powder

3/4 cup all-purpose flour

12 teaspoon baking soda

3/4 teaspoon baking powder

1/4 teaspoon salt

2 eggs, room temperature

1/2 cup granulated sugar

1/4 cup light brown sugar

1 teaspoon vanilla extract

1/2 teaspoon peppermint extract

1/2 cup buttermilk

Peppermint Vanilla Frosting:

1 cup butter, softened to room temperature

3 to 4 cups confectioners’ sugar

1/4 cup heavy cream

1 teaspoon vanilla extract

1/4 teaspoon peppermint extract

Salt, to taste

Cupcake Decor:

4 ounce semisweet baking chocolate,melted

Crushed candy canes

For the cupcakes: preheat the oven to 350 degrees. Line a 12-cup cupcake pan with cupcake liners and set it aside.

Melt the butter and the chocolate together in the microwave. Microwave in 30 second increments, stirring between each time. You may also melt the butter and chocolate over low heat on the stove top. Stir until the mixture is combined, then mix in the instant coffee. Set the mixture aside to cool slightly.

In a medium bowl, toss the  cocoa powder, all-purpose flour, baking soda, baking powder, and salt together until thoroughly combined. Set this bowl aside. In a large bowl, whisk the eggs, granulated sugar, brown sugar, vanilla extract and peppermint extract together until it is smooth. Add the cooled butter/chocolate and whisk it together until smooth. Add half of the flour mixture, then half of the buttermilk. repeat until everything is added together. Stir until it is just combined; do not overmix. The batter will be very thick, like pudding.

Divide the batter between the 12 cupcake liners in the cupcake pan. Bake the cupcakes for 18 minutes, or until a toothpick inserted into the center of a cupcake comes out clean. Allow he cupcakes to cool completely before frosting.

For the frosting: Beat the softened butter on kedium speed with an electric or stand mixer. Beat for about 3 minutes until it is smooth and creamy. Add the powdered sugar, heavy cream, vanilla extract and peppermint extract with the mixer running. Increase the mixer to high-speed and beat for 3 full minutes. The longer you beat the mixture, the creamier the frosting will be. Add more powdered sugar if the frosting is too thin or more cream if the frosting is too thick. Add the salt if the frosting is too sweet (about 1/4 teaspoon).

Decorate the cupcakes: Frost the cooled cupcakes. There may be leftover frosting depending on how much you use on each cupcake. Drizzle the cupcakes with the melted chocolate and top with the crushed candy canes.

I really liked the flavor of the cupcakes. The hint of coffee with the peppermint may this cupcake delicious. This recipe does make a lot of frosting, so if you have something else you can use it for, go right ahead or make some extra cupcakes and you will be able to frost them. The frosting has a great mint flavor and adding the drizzled chocolate and the candy canes just topped everything off, literally. The boys really enjoyed them and each had at least one and we still had some leftover for the next day. i would make this again for sure. They are great for a party and would be perfect for a Christmas or holiday party as well.

That’s all I have for today. Check back next time for more recipes. I have a huge backlog of recipes I have made to post and not enough time to post them as I have been busy with work and Christmas stuff, but I will try my best to get everything on here. Until next time, enjoy the rest of your day and enjoy your meal!

001


Leave a comment

Posted by on December 9, 2013 in Cakes, Cooking, Cooking Websites, Dessert, Holidays


Tags: , , ,

I Promise, My Last Turkey Recipe for a While – Turkey Pot Pie with Stuffing Crust

You have my word that this will be the last turkey recipe I post for a while. We are working on a lot of other things right now, trying to get Christmas organized, the tree up, Sean’s birthday and it seems like and endless amount of other things but I will get to some new recipes next week, I promise. Anyway, this is a new recipe and was one I had never tried before that makes good use of cooked turkey or chicken. I got this recipe from Cook’s Country and it is for a very simple turkey pot pie with a stuffing crust.

Turkey Pot Pie with Stuffing Crust

3 tablespoons butter

1 onion, chopped

1 celery rib, chopped

2 tablespoons all-purpose flour

2 cups chicken or turkey broth

1/2 cup heavy cream

1 cup frozen vegetables, thawed, or leftover vegetables

4 cups shredded cooked turkey

3 cups prepared stuffing or leftover stuffing

1 egg, lightly beaten

Adjust an oven rack to the upper middle position and heat the oven to 475 degrees. Melt the butter in a large oven-safe skillet over medium-high heat. Cook the onion and the celery until they are soft, about 4 to 5 minutes. Stir in the flour and cook until the flour is lightly browned, about 1 minute. Slowly whisk in the chicken or turkey broth and the cream and simmer until the mixture is thickened, about 5 to 7 minutes. Add the frozen or leftover vegetables and the turkey and cook until the mixture is heated through, about 2 minutes.

Meanwhile, combine the stuffing and the egg in a large bowl. Place the stuffing mixture between pieces of parchment paper and roll it into an 11-inch circle. Remove the top layer of the parchment paper and cut the stuffing into 6 wedges. Arrange the wedges evenly over the filling and bake until the stuffing is golden and crisp, about 12 to 15 minutes. Serve.

Instead of cutting the wedges, which seemed like some unnecessary work to me, I just spread the stuffing on top of the turkey mixture and baked it this way. I really liked the way it all came out and it made great use of all of the leftovers we had from our turkey meal. If you don’t have any leftover stuffing, you can easily just use some boxed stuffing for this recipe and make it the same way. I used all kinds of leftover vegetables in this one, like peas, carrots and Brussels sprouts. Everything thickened up really nicely and it made for a great one pot meal that was done quickly.

That’s all I have for today. Check back next time for some more recipes. we’ll be trying some new things out this weekend, including some cupcakes, a cake, baked ziti and more so I will lots of recipes to post to go along with those I haven’t gotten to yet. until next time, enjoy the rest of your day and enjoy your meal!

002


Leave a comment

Posted by on December 6, 2013 in Cooking, Dinner, Leftovers, One Pot Meals, Poultry, Turkey


Tags: , , , ,

How About Some Turkey Soup?

I know, I know, we are all sick of turkey recipes at this point and everyone is busy thinking about Christmas cookies and your Christmas meal at this point. However, I still have a couple of recipes leftover of things I made with turkey so I thought I would put them out here. These recipes are for a very simple turkey stock that I made and then I used most of that stock to make a wonderful turkey soup from some of the leftovers we had of turkey. You could easily substitute some chicken for the turkey in the soup or the stock and get good results from both. First, the turkey stock.

Turkey Stock

1 leftover turkey carcass from a 10 to 15-pound turkey, including the neck, wing and leg bones

4 or 5 onions, quartered

2 large carrots, peeled and cut into chunks

4 large celery ribs, cut into chunks

2 cups white wine

2 large garlic cloves, smashed and peeled

4 sprigs fresh thyme

2 bay leaves

1 teaspoon black peppercorns

Kosher salt

Heat the oven to 450 degrees. Using a sturdy knife or your hands, cut or tear the turkey carcass into large pieces. Arrange the pieces in a single layer in a roasting pan and roast until the pieces are brown and sizzling, about 20 to 25 minutes.

Remove the pieces from the oven and transfer them to a stockpot. Add the onions, carrots and celery to the empty roasting pan and place it over medium heat. Saute them briefly, just to loosen the crusty turkey bits in the bottom of the pan. Return the pan to the oven and cook until the vegetables are browned around the edges, about 20 to 25 minutes. Remove the pan from the oven and place it back over medium heat. Add the white wine and cook, stirring, until the wine is reduced to a syrup, about 3 minutes.

Add the wine-vegetable mixture to the stockpot with the turkey pieces. Add the garlic, thyme, bay leaves, black peppercorns and stir. Add 6 quarts of water and place the pot over medium-high heat just until the mixture comes to a boil. Immediately reduce the heat to low, skim any foam floating on the top and simmer, skimming as needed, for about 3 hours. Add 1 teaspoon of salt and taste. If the stock tastes too watery, keep simmering until the stock is flavorful. Taste for salt again and add more if needed.

Strain the stock through a sieve into a large container or containers. Discard all the solids. Let the stock cool slightly and the refrigerate or freeze it.

It’s a simple method that takes some time but gets maximum turkey flavor out of the carcass and what is left over. You get a wonderful roasted flavor into the stock that gives it a great addition. I froze some and used some for this soup recipe from Michael Chiarello.

Turkey Soup

8 cups turkey stock

3 cups diced turkey meat, white and dark meat

1 carrot, peeled and minced

1 celery stalk, minced

1 onion, peeled and minced

2 cloves garlic, smashed

2 tablespoons olive oil

3 cups leftover cooked vegetables (Brussels sprout, sweet potatoes, green beans)

1 tablespoon chopped sage

In a large soup pot, heat the garlic in the olive oil over medium heat. Allow it to brown slightly, about 3 minutes. Add the minced carrots, celery and onions. Sweat the vegetables over medium-low heat until softened, about 7 to 8 minutes.

Dice the leftover vegetables. Add the sage to the soup pot along with the turkey stock and 1 bay leaf. Bring the stock to a simmer. When the pot is simmering, add the Brussels sprouts, green beans and diced turkey meat to the soup. Bring the mixture back up to a simmer. Add the sweet potatoes to the center of the soup and gently push them down. Turn the heat off and cover the pot. Allow the soup to sit and steam, about 5 to 7 minutes. let the soup simmer for 5 more minutes before serving.

It is a quick and easy way to make good use of turkey meal leftovers or any chicken meal leftovers. it’s a simple soup that you can put together for a weeknight meal that will taste great and it makes for even better lunches the next day or two. I also added some frozen peas to the mix just to round everything out.

That’s all I have for today. Check back next time for some more recipes. Until then, enjoy the rest of your day and enjoy your meal!

002 001


Tags: , , , , ,

A Return to the Kitchen After Holidays, Birthdays and More – A Leftover Recipe

I took a few days off from blogging to spend some time with the family over Thanksgiving weekend and it was my Sean’s birthday this weekend as well, so it got my away from the computer for a few days, which is not always a bad thing. I know many of you are probably beyond the leftovers from Thanksgiving, but this leftover dish I prepared for breakfast on Sean’s birthday can really work any time of the year when you have leftover turkey or really any leftover poultry at all. It is a simple turkey has that you can put together quite easily and make use of some of your leftovers.

Turkey Hash

4 tablespoons butter

3 strips bacon, chopped

1 large onion, chopped

1 red bell pepper, seeded and chopped

Salt and freshly ground black pepper

1 pound red potatoes, cut into 1 1/2 – 2 inch cubes (about 4 large potatoes)

1 tablespoon chopped thyme

3 cloves garlic, chopped

2 cups cooked turkey, shredded into 1 – 2 inch chunks

1/2 cup chicken stock

1/4 cup cream

1 teaspoon Worcestershire sauce

2-3 dashes hot sauce

1 tablespoon dry sherry

4 fried eggs (optional)

Heat a cast iron skillet over medium-high heat. Add 2 tablespoons of butter and the bacon, and cook until the bacon is brown and crisped, about 5 minutes. Add the onion and the peppers and cook until they are lightly softened, about 12 minutes. Stir in the potatoes, thyme, garlic and the turkey and season with salt and pepper. Cook, stirring occasionally, until the potatoes begin to brown, about 15 minutes. Whisk together the chicken stock, cream, Worcestershire sauce, hot sauce and the sherry in a separate bowl and then pour it evenly over the hash. Mash the mixture together lightly and press it firmly into the skillet. Cook until the hash is well browned on the bottom and the hash holds together in a loose cake, about 25 to 30 minutes. Place a large plate over the skillet and invert the hast onto the plate; set the plate aside.

Melt the remaining butter in the skillet, scraping up any browned bits, and return the hash to the skillet, uncooked-side down. Cook until the has is browned on the bottom and the potatoes are tender, about 10 minutes more. Cut the hash into quarters and top each quarter with a fried egg.

You have lots of options with this particular recipe. If you have other vegetables that are leftover that you might like to use in the hash, like squash or Brussels sprouts, by all means throw them in. They will add some nice flavor to the hash. You can always place the skillet in a 350 degree oven after the first initial frying instead of trying to flip it over if you are worried about how that might go. You just want to leave the hash in the oven long enough to crisp up the top and the potatoes get crunchy but tender. We actually didn’t serve this with the eggs since it was Sean’s birthday breakfast; he wanted pancakes instead so we all had hash and pancakes as our meal. I thought it was pretty tasty and the turkey went nicely with everything else and the hot sauce added a nice little kick to the hash. I think you could easily make this with any leftover poultry or meat and it would turn out just as well.

That’s all I have for today. Check back next time for some more recipes. I have a number of things to share that we have made recently, including a turkey pot pie, some lasagna, fettuccine alfredo and we have lots more still coming up, so check back to see what is next. Until next time, enjoy the rest of your day and enjoy your meal!

004


Leave a comment

Posted by on December 3, 2013 in Breakfast, Cooking, Holidays, Leftovers, Poultry, Turkey


Tags: , , ,

 
National Day Calendar

Fun, unusual and forgotten designations on our calendar.

Jennifer Probst

a little bit naughty a little bit nice

Laissez Faire

Letting Life Lead

What To Have For Dinner Tonight

Simple and delicious dinner inspiration