RSS

Category Archives: Cooking

Great Fall Soups #2 – Classic Corn Chowder

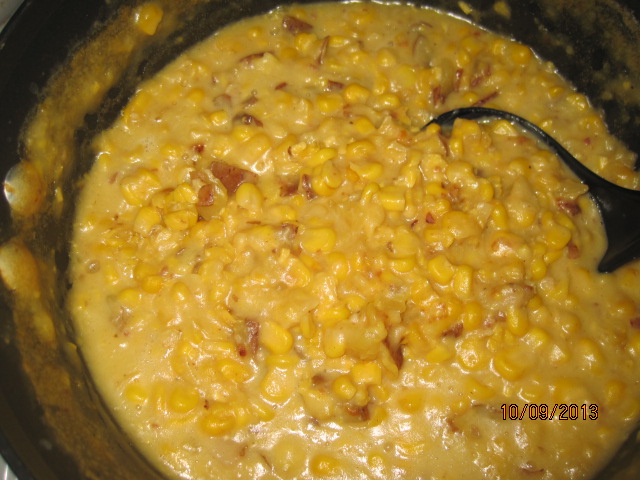
We had made a couple of different soups this week that were great for dinner and lunches. Yesterday. I posted the recipe for the bean and barley soup we made. Today, it is the classic corn chowder we made for dinner one night. This recipe comes from the Cook’s Illustrated Cookbook, but I did modify it slightly to fit a little better with ingredients we had on hand and make things a little easier. While you can still get fresh corn on the cob this time of year, it is not as good as the nice local corn we see in the summertime months here in New York. We  used a combination of fresh and frozen instead, even though the recipe calls for all fresh. We also used bacon instead of salt pork mainly because that is what we had on hand. I think the taste worked out just as well anyway.

Classic Corn Chowder

10 ears corn, husks and silks removed ( or three 1-pound bags frozen corn kernels)

3 ounces salt pork, rind removed, cut into two 1-inch cubes (or 3 slices bacon, diced)

1 tablespoon butter

1 large onion, chopped fine

2 garlic cloves, minced

3 tablespoons all-purpose flour

3 cups chicken broth

12 ounces red potatoes, cut into 1/4-inch cubes

2 cups milk

1 teaspoon minced fresh thyme

1 bay leaf

1 cup heavy cream

2 tablespoons minced fresh parsley

Salt and pepper

Using a paring knife, cut the kernels from 4 ears of corn. You should have about 3 cups of kernels. Grate the kernels from the remaining 6 ears of corn on the large holes of a box grater into a bowl, then firmly scrape the pulp remaining on the cobs with the back of a butter knife or vegetable peeler. You should have about 2 cups of grated kernels and corn pulp.

Saute the salt pork in a Dutch oven over medium-high heat, turning with tongs and pressing down on the pieces to render the fat, until the cubes are crisp and golden brown, about 10 minutes. If you are using bacon, saute the bacon until it is crisp and then remove it from the pot and reserve. Reduce the heat to low. Stir in the butter and onion, cover, and cook until the onion is softened, about 12 minutes. Remove the salt pork and reserve. Add the garlic and saute until fragrant, about 1 minute. Whisk in the flour and cook, stirring constantly, about 2 minutes. Whisking constantly, gradually add the chicken broth. Add the grated corn and the corn pulp, potatoes, milk, thyme, bay leaf and reserved salt pork or bacon and bring to a boil. Reduce the heat to medium low and simmer until the potatoes are almost tender, about 8 to 10 minutes. Add the reserved corn kernels and heavy cream and return it to a simmer. Simmer until the corn kernels are tender and yet still slightly crunchy, about 5 minutes. Discard the bay leaf and salt pork. Stir in the parsley, season with salt and pepper to taste, and serve immediately.

Since we used mostly frozen corn, here is what we did with the first step. We 2 cups of the frozen corn and about 1/4 cup of water and ran it through the food processor for about 30 seconds to create the corn pulp and juice that is used in the recipe. We then used the rest of the frozen corn kernels in place of the corn taken off the cobs. We also used the immersion blender towards the end of the cooking to blend up some of the soup itself to make it a bit smoother while still retaining much of the corn itself. I think it turned out very well and we got a bit of a thicker chowder, which I really liked. It was even better the next day for lunches.

That’s all I have for today. Check back next time for more recipes. I have some beer braised chicken, a London broil with horseradish sauce and some homemade Parker House rolls still to come, among many other recipes. Until then, enjoy the rest of your day and enjoy your meal!

IMG_1699


Leave a comment

Posted by on October 13, 2013 in Cooking, Dinner, One Pot Meals, Soups & Stews


Tags: , , ,

A Great Fall Soup in the Slow Cooker – Slow Cooker Bean and Barley Soup

With the cooler weather coming upon us now, that means more of an opportunity to make soups and make some good use of the slow cooker. We made a couple of different soups this week, and the first one allowed me to use some of the dried beans I had picked up that were on sale this past week. I had picked up bags of black beans, Great Northern beans, navy beans and lentils, so I had plenty to work with as I looked for a recipe where I could use different types in one soup. I came upon this recipe from the Food Network for a bean and barley soup in the slow cooker and it sounded perfect.

Slow-Cooker Bean and Barley Soup

1 cup dried multi-bean mix or Great Northern Beans, picked over and rinsed

1/2 cup pearl barley

3 cloves garlic, smashed

2 medium carrots, roughly chopped

2 ribs celery, roughly chopped

1/2 medium onion, roughly chopped

1 bay leaf

Kosher salt

2 teaspoons dried Italian seasoning herb blend

Freshly ground black pepper

1/2 ounce dried porcini mushrooms, crumbled if large (optional)

One 14-ounce can whole tomatoes, with juice

3 cups cleaned baby spinach leaves

1/4 cup freshly grated Parmesan cheese

Balsamic vinegar, for drizzling

Extra-virgin olive oil, for drizzling

Put 6 cups of water, all of the beans, the barley, garlic, carrots, celery, onions, bay leaf, 1 1/2 teaspoons kosher salt, Italian seasoning, pepper and porcini mushrooms, if using, in a slow cooker. Squeeze the tomatoes through your hands over the slow cooker to break them down, and add them with their juices. Cover the slow cooker and cook on high until the beans are tender and the soup is thick, about 8 hours.

Add the spinach and Parmesan cheese, and stir until the spinach wilts, about 5 minutes. Remove the bay leaf and season with salt and pepper to taste.

Ladle the soup into warmed bowls and drizzle each serving with balsamic vinegar and olive oil.

I love a hearty bean soup and this one, with the different beans in, has awesome flavor. It was nice and thick with very flavorful broth from all the vegetables. Adding the spinach and cheese towards the end is a great way to add flavor and make it even more flavorful, but if you wanted to leave them out and just have the bean and barley soup I think it would be just as good. Serve it with some nice crunchy bread and you have a great vegetarian or meatless meal. The soup itself tasted even better the next day after it has had a chance to set and the flavors have melded together even more than the first day, so it has made for some great lunches as well.

That’s all I have for today. Check back next time for another soup recipe as I will go over the nice corn chowder that we made this week. Until next time, enjoy the rest of your day and enjoy your meal!

003


Tags: , , , , ,

Another Oktoberfest Recipe: Balsamic-Braised Sausages with Grapes and Watercress

I had seen this Oktoberfest recipe when I got the others from Williams-Sonoma and just recently got around to making this one. I did alter the idea slightly as the original recipe that I will post has this as something of a salad with a nice shallot vinaigrette. I didn’t have any watercress, or any lettuce at all as a matter of fact, in the house when I made this so I simply made the dish and served it over rice instead. I think it came out just as well and makes good use of the slow cooker for this meal.

Balsamic-Braised Sausages with Grapes and Watercress

1 1/2 pounds fresh sweet or hot Italian pork sausages

1 large shallot, finely chopped

1/2 fennel bulb, cored and finely chopped

1 celery stalk, finely chopped

5 garlic cloves, smashed

1/2 teaspoon salt

Freshly ground pepper, to taste

2/3 cup chicken stock

3 tablespoons balsamic vinegar

2 tablespoons white wine

2 1/2 cups seedless red or green grapes, halved

1 bunch watercress, tough stems removed

For the Shallot Vinaigrette:

1 teaspoon Dijon mustard

1 small shallot, minced

3 tablespoons red wine vinegar

1/4 teaspoon salt

Freshly ground black pepper, to taste

1/4 cup extra-virgin olive oil

Preheat a broiler. Arrange the sausages on a rack set on a rimmed baking sheet. Broil, turning as needed, until the sausages are a golden brown all over, about 8 to 9 minutes total. Transfer the sausages to a plate.

In a slow cooker, stir together the shallot, fennel, celery, garlic, salt and several grinds of pepper. Top with the broiled sausages and add the chicken stock, balsamic vinegar and white wine. Cover and cook for 2 1/2 hours on the high setting or 5 1/2 hours on the low setting, turning the sausages halfway through if possible. The sausages should be tender and cooked through.

To make the vinaigrette, in a bowl, combine the grapes and watercress. In a small bowl, whisk together the mustard, shallot, red wine vinegar, salt and a few grinds of pepper. Whisk in the olive oil until the vinaigrette is emulsified; you will need about 1/3 cup of vinaigrette for this recipe; reserve the rest for another use. Drizzle the grapes and watercress with enough of the vinaigrette to coat lightly and toss to coat everything evenly.

Divide the sausages among warm individual plates, spoon some of the braising liquid around the sausages, and top with the grapes and watercress. Serve.

All three of us loved the flavor of the sausages and the braising liquid. This is one of the few meals where we actually didn’t have any leftovers as the sausages went quite quickly. Browning the sausages before putting them in the slow cooker makes them nice and meaty and the slow cooking makes them very tender, so it is a great combination. I really liked the flavor of the braising liquid with the shallot and fennel and the balsamic vinegar really adds a lot to the dish as well. I think this would go very nicely with the grapes and watercress, and I did make the shallot vinaigrette anyway to have as a salad dressing for another day and even put a bit on my rice with this meal for some added flavor. Sean has already asked me to make this one again, so I think it’s going to be a favorite.

That’s all I have for today. Check back next time for another recipe that I have tried recently. I still have a bunch that I want to try out in the coming weeks, so there is still lots of good stuff to come, including some Halloween ideas and somethings to think about as possible Thanksgiving dishes. Until next time, enjoy the rest of your day and enjoy your meal!

001

 
Leave a comment

Posted by on October 11, 2013 in Cooking, Dinner, Pork, Salad, Sauce, Slow Cooker Meals


Tags: , , , , ,

An Abundance of Apples Means Homemade Apple Pie

It is one of the classic recipes that most people love to try at home in the Fall whether it is for a holiday, a Sunday dessert or just because they love it. Of course, I am talking about apple pie. I love apple pie myself and could eat a lot more of it if I had the chance. Since this is apple season and we live in the Hudson Valley in New York, apples are everywhere right now. There are many great local orchards here where you can get fantastic apples to use for all kinds of cooking, baking and just plain eating. We had picked up some apples recently and Michelle knew right away that she wanted to make apple pie, which made Sean and me quite happy. I love the smell of the pie just cooking in the oven and the taste is always fantastic. There are many different pie dough recipes out there, so use the one you like best or use store-bought pie dough if that’s what you have time for. Michelle tried this recipe from the Cook’s Illustrated Cookbook.

Classic Apple Pie

1 recipe for double-crust pie dough or 2 store-bought pie doughs

3/4 cup plus 1 tablespoon sugar

2 tablespoons all-purpose flour

1 teaspoon grated lemon zest plus 1 tablespoon juice

1/4 teaspoon salt

1/4 teaspoon ground nutmeg

1/4 teaspoon ground cinnamon

1/8 teaspoon ground allspice

2 pounds Empire or Cortland apples, peeled, cored and sliced 1/4-inch thick

1 1/2 pounds Granny Smith apples, peeled, cored and sliced 1/4-inch thick

1 large egg white, lightly beaten

Roll 1 disk of pie dough into a 12-inch circle on a lightly floured counter. Loosely roll the dough around the rolling pin and gently unroll it into a 9-inch pie plate.,letting the excess hang over the edge. Ease the dough into the pie plate by gently lifting the edge of the dough with 1 hand while pressing the dough into the plate bottom with the other hand. Leave any dough that overhangs the plate in place. Wrap the dough-lined pie plate loosely in plastic wrap and refrigerate until the dough is firm, about 30 minutes. Roll the other disk of dough into a 12-inch circle on a lightly floured counter, then transfer it to a parchment paper-lined baking sheet. Cover it with plastic wrap and refrigerate for 30 minutes.

Adjust an oven rack to the lowest position, place a rimmed baking sheet on the rack and heat the oven to 500 degrees.

Mix 3/4 cup of sugar, the flour, lemon zest, salt, nutmeg, cinnamon and allspice together in a large bowl. Add the lemon juice and apples and toss until combined. Spread the apples with their juices into the dough-lined pie plate, mounding them slightly in the middle. Loosely roll the remaining dough round around the rolling pin and gently unroll it onto the filling. Trim the overhang to 1/2 inch beyond the lip of the pie plate. Pinch the edges of the top and bottom crusts firmly together. Tuck the overhang under itself; the folded edge should be flush with the edge of the plate. Crimp the dough evenly around the edge of the pie using your fingers. Cut four 2-inch slits in the top of the dough. Brush the surface with the beaten egg white and sprinkle the surface evenly with the remaining 1 tablespoon of sugar.

Place the  pie on the heated baking sheet, reduce the oven temperature to 425 degrees, and bake until the crust is light golden brown, about 25 minutes. Reduce the oven temperature to 375 degrees, rotate the baking sheet, and continue to bake until the juices are bubbling and the crust is a deep golden brown, about 30 to 35 minutes longer. Let the pie cool on a wire rack to room temperature, about 4 hours, before serving.

Now I know everyone has their own pie recipe that their family has used for generations and may have their own particular way of making apple pie. If you like what you have, stick to it and use that. If you are looking for something new to try or have never made one before, this is a good recipe to try out. The pie came out perfectly with the crust a great color and cooked well on the top and bottom. Heating the baking sheet before putting the pie in helps to make sure the bottom crust is cooked. You also want to try to use a mix of apples to get a good blend of sweet and tart for great flavor. Again, use the apples you like best, but the pie experts we know seem to recommend Empires and Cortlands as the best to go with.

That’s all I have for today. Check back again for some more recipes. There’s always lots more to come, including two recipes I just made for some different soups we tried here at home, a beer braised chicken thighs recipe, sausages, and more. Until next time, enjoy the rest of your day and enjoy your meal!

002


Leave a comment

Posted by on October 10, 2013 in Cooking, Dessert, Pie


Tags: , , , ,

Let’s Go Bananas! Ultimate Banana Bread

Banana bread is one of my favorite snacks. I love a slice with a cup of coffee in the morning. It just seems like a great way to start the day. I have tried several recipes for banana bread before and most of them have been pretty good and tasty. I have yet to come across one that makes dry, crumbly bread that you wouldn’t want to eat. When I saw this recipe from America’s Test Kitchen for the Ultimate Banana Bread, I knew I was going to have to check it out and give it a try to see if it really lives up to all the hype.

Ultimate Banana Bread

1 3/4 cups all-purpose flour

1 teaspoon baking soda

1/2 teaspoon table salt

6 large very ripe bananas, peeled

8 tablespoons (1 stick) butter, melted and cooled slightly

2 large eggs

3/4 cup packed light brown sugar

1 teaspoon vanilla extract

1/2 cup walnuts, toasted and coarsely chopped (optional)

2 teaspoons granulated sugar

Adjust an oven rack to the middle position and heat the oven to 350 degrees. Spray a loaf pan with nonstick cooking spray. Whisk the flour, baking soda, and salt together in a large bowl.

Place 5 bananas in a microwave-safe bowl; cover the bowl with plastic wrap and cut several steam vents in the plastic wrap with a paring knife. Microwave on high power until the bananas are soft and have released liquid, about 5 minutes. Transfer the bananas to a fine-mesh strainer placed over a medium bowl and allow them to drain, stirring occasionally, for 15 minutes. You should have about 1/2 to 3/4 cup of liquid.

Transfer the liquid to a medium saucepan and cook over medium-high heat until reduced to 1/4 cup, about 5 minutes. Remove the pan from the heat, stir the reduced liquid into the bananas, and mash the bananas with a potato masher until they are fairly smooth. Whisk in the butter, eggs, brown sugar and vanilla.

Pour the banana mixture into the flour mixture and stir until just combined with some streaks of flour remaining. Gently fold in the walnuts, if using. Scrape the batter into the prepared loaf pan. Slice the remaining banana diagonally into 1/4-inch-thick slices. Shingle the banana slices on top of either side of the loaf, leaving about an 1 1/2 inch space down the center of the loaf to ensure an even rise. Sprinkle the granulated sugar evenly over the loaf.

Bake the loaf until a toothpick inserted into the center of the loaf comes out clean, about 55 to 75 minutes. Cool the bread in the pan on a wire rack for 15 minutes, then remove the loaf from the pan and continue to cool it on a wire rack. Serve warm or at room temperature.

Now calling it the ultimate banana bread may be bragging a little on their part, but it is a pretty darn good bread. it has some of the best banana flavor in bread that I have had in a while and I do like the bananas on top of the bread too. With the sugar they almost caramelized and candied a bit, making them quite tasty.Microwaving the bananas and getting the liquid out of them really helps to give the flavor and keeps the bread from getting too mushy with this many bananas in the recipe. Both Sean and Michelle agreed it was one of the best banana breads, so I’ll be making this one again.

That’s all for today. Check back next time for another recipe. I have a bunch of new ones to choose from, so we’ll see what comes up next. Until then, enjoy the rest of your day and enjoy your meal!

001

 
1 Comment

Posted by on October 8, 2013 in Breads, Cooking, Fruit


Tags: , , ,

22 Recipes Everyone Should Know How to Cook – Bon Appétit

22 Recipes Everyone Should Know How to Cook – Bon Appétit.

This is a fantastic article from Bon Appetit that gives you some of the basic recipes that everyone should learn when working in the kitchen. These are all things that you probably make often or want to make but haven’t wanted to give it a try. Whether you are a novice cook or a seasoned one, these are great tips and recipes for basics like tomato soup, mashed potatoes, fried rice, spaghetti and meatballs and more. Check it out!

 
Leave a comment

Posted by on October 7, 2013 in Cooking, Cooking Tips, Cooking Websites, Dinner


Tags: , , , ,

Sunday Dinner on a Saturday, Part 2 – Braised Cauliflower and Yorkshire Pudding

To go along with the slow-roasted chuck roast dinner I made this past Saturday I chose a couple of new side dishes to give a try. The first comes from the Cook’s Illustrated Cookbook and is for a browned and braised cauliflower with garlic, ginger and soy. Cauliflower is in season right now so the price is not bad for a fresh head if you can get one. I like fresh much better than frozen as the frozen seems to get very limp and soggy quickly while if you cook the fresh right it was stay nice and crisp. This is a very easy recipe that only takes a few minutes to put together.

Browned and Braised Cauliflower with Garlic, Ginger and Soy

1 1/2 tablespoons vegetable oil

1 head cauliflower (about 2 pounds), cored and cut into 1-inch florets

2 tablespoons grated fresh ginger

2 garlic cloves, minced

1 teaspoon toasted sesame oil

1/4 cup water

2 tablespoons soy sauce

2 tablespoons rice vinegar

1 tablespoon dry sherry

2 scallions, minced

Pepper

Heat the vegetable oil in a large skillet over medium-high heat until just smoking. Add the cauliflower and cook, stirring occasionally, until it is beginning to brown, about 6 to 8 minutes.

Clear the center of the skillet and add the ginger, garlic and sesame oil. Cook, mashing the mixture into the pan, until it is fragrant, about 1 minute. Stir the ginger mixture into the cauliflower and cook for 30 seconds more. Reduce the heat to low and add the water, soy sauce, rice vinegar and sherry. Cover the skillet and cook until the florets are tender but still offer some resistance when they are poked with a paring knife, about 4 to 5 minutes. Add the scallions and toss lightly to distribute. Season with pepper to taste and serve.

I really enjoyed the Asian flavor that this dish had. The ginger and soy really come through nicely and the garlic adds just the right touch, making this a great side dish. I would use this side again, perhaps with a chicken dish next time as I think it would lend itself quite nicely to that type of meal.

I also decided to take a shot at making Yorkshire pudding. Now I can remember having this as a kid and it was pretty good, but I had never attempted to make it before myself. I saw various recipes out there to give it a try, but I decided to go with this one from Alton Brown. It seemed the most basic and the one that I could least screw up, so I figured I would give it a shot. The worst that could happen is that I ended up throwing everything away. Thankfully, it all turned okay.

Yorkshire Pudding

2 cups all-purpose flour

1 1/2 teaspoons kosher salt

4 large eggs, room temperature

2 cups milk, room temperature

1/4 cup beef drippings, divided

Preheat the oven to 400 degrees. Leave 2 tablespoons of the beef drippings in the pan and place it in the oven.

Place the flour, salt, eggs, milk and the remaining 2 tablespoons of drippings into the bowl of a food processor or blender and process for 30 seconds. Pour the batter into the hot roasting pan and bake for 35 to 40 minutes or until it is puffed and golden brown. While the pudding is cooking, carve the roast and then serve the pudding with the roast.

For my first try at this, I think it went okay. The taste was there as I remembered it, but it did not puff up nearly as high as I thought it would. Everyone else thought it was okay, but I think I will need to try this one again at some point to try for better results. It could be that my oven temperature is a little off and that made the difference in the height of the puff. Whatever the case, it still turned out okay.

That’s all I have for today. Check back next time for some more recipes. I still have a sausage in the slow cooker recipe I tried, Michelle’s apple pie that she made this weekend, a new banana bread recipe and a few other things to try out this week. until next time, enjoy the rest of your day and enjoy your meal!

007 004


3 Comments

Posted by on October 7, 2013 in Cooking, Dinner, Side Dishes, Vegetables


Tags: , , , , ,

Sunday Dinner on a Saturday, Part 1 – Sunday Slow-Roasted Chuck Roast

For many families, having a roast on Sunday is something of a tradition. I can remember having the meal as a child either at my parents’ home or at my grandparents’ home fairly regularly. Unfortunately, really good cuts of beef for roasts have gotten very expensive, making the roast something that does not happen very often. Even just getting a cut like an eye round or top sirloin can be quite expensive unless it happens to be on a good sale. The chuck eye roast is not one I typically buy because it is quite fatty. it’s fine if you are going to cube it up for a beef stew or even use it to grind for your own hamburgers, but it can be tough to turn a quality roast dinner into this cut of beef. That is why when I saw this recipe in the latest issue of Cook’s Country magazine, it intrigued me enough to want to give it a try. They take the chuck roast and transform it into a tender roast fit for a Sunday meal.

Slow-Roasted Chuck Roast

1 (5- to 6-pound) center-cut boneless beef chuck-eye roast

5 teaspoons kosher salt

2 teaspoons pepper

2 teaspoons onion powder

2 teaspoons granulated garlic

2 tablespoons vegetable oil

1/4 cup all-purpose flour

1/2 cup red wine

1 1/2 cups beef broth

1 1/2 cups chicken broth

1/2 cup heavy cream

1/2 cup sour cream

1/3 cup prepared horseradish, drained

1 tablespoon Dijon mustard

1 garlic clove, minced

1/2 teaspoon pepper

Pat the roast dry with paper towels. Separate the roast into two pieces along the natural seam of the roast and trim the fat to 1/4-inch thickness. Tie kitchen twine around the larger roast at 1-inch intervals. Cut the smaller roast into 1-inch cubes. Combine the salt, pepper, onion powder, and granulated garlic in a bowl. Rub the surface of the tied roast evenly with half of the spice mixture and wrap it in plastic wrap. Transfer the beef cubes to a 1-gallon zipper-lock bag; add the remaining spice mixture to the bag, seal, and toss to coat the beef cubes. Refrigerate the tied roast and the beef cubes for at least 6 hours and up to 24 hours.

Adjust an oven rack to the lower-middle position and heat the oven to 300 degrees. Heat 1 tablespoon of vegetable oil in a large non-stick skillet over medium-high heat until just smoking. Brown the tied roast on all sides, about 10 to 12 minutes total; transfer to a plate.

Return the now-empty skillet to medium-high heat, add the remaining 1 tablespoon of vegetable oil and heat until just smoking. Add the cubed beef and brown on all sides, about 10 to 12 minutes. Sprinkle the flour over the meat and cook, stirring constantly, until the beef is evenly coated, about 1 minute. Add the wine and cook until the pan is dry, about 1 minute. Add the beef and chicken broths and bring to a boil, scraping up any browned bits. Cover, transfer the skillet to the oven and cook for 1 hour.

Uncover the skillet and place the browned roast on top of the cubed meat. Return the skillet to the oven and continue to cook, uncovered, until the cubed meat is fork tender and the roast registers about 150 degrees, about 1 hour longer. Transfer the roast to a carving board, tent loosely with aluminum foil and allow to rest for 20 to 30 minutes.

Using a potato masher, mash the cubed meat until it is shredded into rough 1/2-inch pieces. Transfer the shredded and gravy to a separate dish to cool completely and use for another meal.

While the roast is resting, make the horseradish sauce. Whisk together the heavy cream, sour cream, horseradish, Dijon mustard, garlic and pepper until it is smooth.

Remove the twine from the roast and slice thin. Serve the roast with the horseradish sauce.

There are a couple of things about this recipe. The cubed meat and gravy can be used for another recipe that I plan to make tomorrow that is included with this recipe in Cook’s Country. It is for roast beef po’boys and is simple to make. I did save 4 tablespoons of the drippings and also used that to make a side dish of Yorkshire pudding, the recipe I will post tomorrow. Even at rest at 150 degrees, the roast when sliced was still pink in the center and juicy and flavorful. While this is a little bit hotter temperature than usual for a medium-rare, with this cut of beef it does help to make the beef flavorful and not chewy. The twine does help to hold it together for slicing nice roast slices instead of it falling apart.It is a nice Sunday recipe to try with an inexpensive cut of beef to help save you some money and you do get extra meals out of it as well. I served this with a braised cauliflower, roasted potatoes and the Yorkshire pudding. I’ll be posting the recipes for the cauliflower and Yorkshire pudding tomorrow.

That’s all I have for today. Sadly, I forgot to take a picture of the roast after I took it out and sliced it, so I don’t have one of it to show. I apologize for that. Check back next time for the other recipes from this meal. Until then, enjoy the rest of your day and enjoy your meal!


Leave a comment

Posted by on October 6, 2013 in Beef, Cooking, Dinner, Sauce


Tags: , , ,

Thanksgiving Lite – Roasted Turkey Breast with Creamy Gravy

Even though it is only just October, before you know it we will all be thinking about Thanksgiving dinner and the different dishes we are going to prepare. The great thing about this time of year is that turkey becomes not only more available, but more affordable. For the rest of the year, the price can seem quite high for a turkey. Right about now you will start to see the price creep down little by little and you may also see the availability of different turkey parts for sale as well. I came across this half a turkey breast in the store on Monday and couldn’t pass it up. It was 2 1/2 pounds, but it only cost $4.00 and we will get a dinner and lunches out of it, so it’s a great deal. I then went looking for a recipe and found this one from Rachel Ray. I did modify it somewhat, as in the recipe she makes a cranberry pomegranate sauce and had neither cranberries nor pomegranates, so I eliminated that end of it. She also makes the recipe with two split turkey breasts and since I only had one, I had to scale things down a bit. I am posting the entire recipe she uses here for you to try.

Roasted Turkey Breast with Creamy Gravy and Cranberry Pomegranate Sauce

For the Turkey Breast:

1 full or 2 split boneless, skin-on turkey breasts

2 cloves garlic, grated or pasted

1 stick butter, softened

1/4 cup fresh herbs, such as parsley, chives, thyme, tarragon or rosemary

1 tablespoon lemon juice

Salt and black pepper

For the Cranberry Pomegranate Sauce:

One 12-ounce bag fresh cranberries

1 cup sugar

Pinch salt

1 cinnamon stick

1 strip orange rind

1 pomegranate

For the Creamy Gravy:

2 tablespoons all-purpose flour

1 1/2 cups chicken stock

1 tablespoon Worcestershire sauce

Salt and black pepper

1/3 cup heavy cream

1/4 cup freshly grated Parmigiano-Reggiano (optional)

For the roasted turkey breast: Preheat the oven to 350 degrees. Place the turkey breast on a baking rack over a baking sheet. Combine the garlic and softened butter with the herbs and lemon juice. Slather about 5 tablespoons of the garlic-herb butter over the turkey breast and sprinkle liberally with salt and pepper., reserving the remaining garlic-herb butter for the gravy. Roast the turkey in the oven for 45 minutes.

For the cranberry pomegranate sauce: Place the cranberries in a medium saucepan with the sugar, salt, cinnamon stick, orange rind and 1 cup of water. Bring the mixture to a boil and cook until all the berries pop and the sauce thickens, about 15 minutes. Cool and remove the rind and the cinnamon stick. Peel the pomegranate in a bowl of water, separating the seeds, and drain. Add the pomegranate seeds into the sauce.

For the creamy gravy: Right before serving the turkey, melt the remaining garlic-herb butter over medium heat in a saucepan. Whisk in the flour until blended, followed by the chicken stock, to thicken. Whisk in the Worcestershire sauce and season with salt and pepper to taste. Stir in the heavy cream and the cheese (if using) and keep the gravy warm until you are ready to serve.

Slice the roasted turkey breast and serve with room temperature cranberry pomegranate sauce and the warm gravy.

A couple of things about this recipe. I left the cheese out of the gravy since I don’t really care for cheese that much and I just didn’t think it went well with the dish. I think the gravy turned out fine without it, but if you want the added creaminess from the cheese, go for it. This recipe makes a lot of turkey, which is one of the reasons I cut it in half. The one split turkey breast was more than enough for the three of us and we had plenty of leftovers as well. I liked the flavor you get from the garlic-herb butter on the turkey and in the gravy and it did help to crisp up what little skin there was on the turkey. I served this with smashed potatoes (they weren’t mashed too much; I just used a potato masher for a bit on them) and some pan roasted asparagus. It was a nice meal that you can do in under an hour and satisfy that early season turkey craving.

That’s all I have for today. Check back next time for another recipe. I still have my Oktoberfest sausage to make tonight, a roast beef recipe for this weekend, and some other things to try like a new soup recipe and a new one for banana bread. Keep checking back to see what comes up next. Until next time, enjoy the rest of your day and enjoy your meal!

001

 
2 Comments

Posted by on October 4, 2013 in Cooking, Dinner, Gravy, Poultry, Sauce, Turkey


Tags: , , , , , ,

Comfort Food For Fall Weeknights – Chicken Pot Pie

We all love the classic comfort food dishes but sometimes we just don’t have the time to put in to make them during the week. Who wouldn’t love a nice pot roast dinner on a weeknight? Unfortunately, few of us have the time to pull that off unless you want to give it a try in the slow cooker. I did come across a great comfort food recipe from Williams-Sonoma the other day that you can make even easier by making use of some leftovers or store-bought items. This recipe for chicken pot pie has you making your own crust. If you don’t have time to do it, you can always use a store-bought crust to do that and save yourself even more time.

Chicken Pot Pie

For the Pie Dough:

1 1/2 cups all-purpose flour

Salt

6 tablespoons cold vegetable shortening

2 tablespoons cold butter

About 1/3 cup cold water

For the Filling:

Salt and freshly ground black pepper

1 cup sliced carrots

1 cup fresh or frozen peas

1 cup corn kernels (from 2-3 ears)

2 tablespoons butter

4 skinless, boneless chicken thighs, cut into bite-sized chunks

2 tablespoons chopped shallot

1/4 cup all-purpose flour

1 1/2 cups chicken broth

1/2 cup dry white wine

1/2 cup half-and-half

1 tablespoon chopped fresh parsley

1 egg yolk beaten with 1 teaspoon water

To make the dough, stir together the flour and 1/2 teaspoon of salt. Using a pastry blender, cut in the shortening and butter until a coarse meal starts to form. Toss with a fork while adding enough water for the dough to clump together. Form the dough into a disk, wrap it in plastic wrap, and refrigerate it for 30 minutes.

Meanwhile, preheat the oven to 400 degrees. Bring a saucepan of salted water to a boil. Add the carrots and peas and cook until tender-crisp, about 3 to 5 minutes. Using a slotted spoon, transfer the vegetables to a colander and drain, then transfer them to a bowl. Repeat the process with the corn, cooking it for 1 minute.

In a large skillet, melt the butter over medium-high heat. Add the chicken and cook, stirring occasionally, until it is browned on all sides, about 8 minutes. Add the shallot and cook, stirring, until softened, about 2 minutes. Sprinkle in the flour and stir well. Stir in the broth, wine, half-and-half and parsley and bring the mixture to a simmer. Cover, reduce the heat to low, and simmer for 10 minutes. Stir in the carrots, peas and corn. Season with salt and pepper. Transfer the mixture to a 9-inch pie plate.

On a floured work surface, roll out the dough into a round about 1/8 inch thick and large enough to fit over the pie plate. Brush some of the egg yolk mixture in a 1-inch border around the edge of the round. Place the round, egg side down, over the filling, and press the dough to the rim of the dish. Crimp or trim any overhanging dough and brush the surface lightly with the remaining egg yolk mixture. Cut a few slits in the center of the top of the pie to vent the steam.

Place the pie plate on a baking sheet and bake until the crust is golden brown, about 30 minutes. Remove from the oven and serve.

Just a few notes about this recipe. You can always use store-bough pie dough for this to save you time. I keep a package of pie dough on hand regularly in case I want to make a quick pie or something like this. You can also use frozen or leftover vegetables in this dish and vary things up, using whatever vegetables you have on hand. I put some green beans in with mine. As for the chicken, if you have leftover cooked chicken already you can save yourself another step and just heat it through in the skillet before adding the flour. You can use a rotisserie chicken instead if you have one of those as well. The meat from the chicken thighs is great for this because it is flavorful and tender, but use what you have to make things easier for you. Sean really liked this recipe and had 3 plates of it for dinner that night. The gravy created for the chicken and vegetables has really good flavor to it. By the way, I omitted the wine (I usually do in recipes) and used extra chicken broth instead and it turned out just fine.The leftovers were great for lunches too.

That’s it for today. Check back next time for some more recipes. I still have a roast beef recipe to try, Another Oktoberfest recipe using sausages, and I picked up a turkey breast the other day so I need to do something with that as well. Check back and see what comes along. Until next time, enjoy the rest of your day and enjoy your meal!

001

 
Leave a comment

Posted by on October 3, 2013 in Cooking, Dinner, Leftovers, One Pot Meals, Poultry


Tags: , , ,

 
National Day Calendar

Fun, unusual and forgotten designations on our calendar.

Jennifer Probst

a little bit naughty a little bit nice

Laissez Faire

Letting Life Lead

simple cooking recipes

a blog to share with you the best