RSS

Category Archives: Dessert

Christmas Cookie Idea, Part Two – The Easiest Peanut Butter Cookie Ever

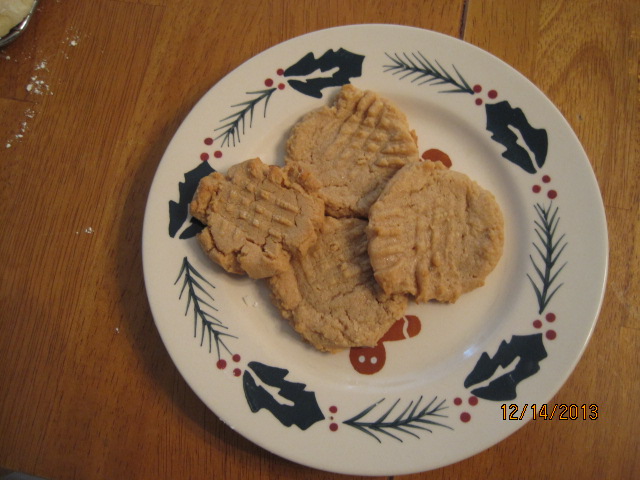
Continuing along with the Christmas cookie theme when we had made cookies this past weekend, Michelle opted to go for a peanut butter cookie. She and Sean both love these cookies, and even though I am not a big fan, they are always a big favorite whenever they are made. Now there are lots of peanut butter cookie recipes out there and most of them are not very difficult to do anyway, but this one seems to be the easiest one I have ever come across. All you really need to do is put the ingredients together in a bowl, give it a mix, portion out the cookies, bake and you are done. This particular recipe makes use of Bisquick to help it do everything and make it even faster.

Easy Bisquick Peanut Butter Cookies

1 cup smooth peanut butter

1/4 cup butter, softened to room temperature

1/2 cup granulated sugar

1/2 cup packed light brown sugar

1/3 cup boiling water

2 cups Bisquick

Preheat the oven to 400 degrees. Line some cookie sheets with parchment paper and spray the paper with nonstick cooking spray. In a large bowl of a standing mixer fitted with a paddle attachment, combine the peanut butter, butter, granulated sugar, brown sugar, water and Bisquick. Mix all of the ingredients on medium-low speed until everything is well combined and dough begins to form, about 2 to 3 minutes.

Using a small cookie scoop or tablespoon, scoop rounded mounds of the cookie dough onto the parchment paper-lined cookie sheets. Using the back of a fork, lightly press into the cookie dough mounds to flatten slightly and make a pattern into the cookie dough. Place the cookie trays in the oven and bake the cookies for until they are a lightly golden brown, about 8 to 10 minutes, rotating the cookie sheets about halfway through the baking process. Allow the  cookies to cool on the cookie sheets for about 2 to 3 minutes. Transfer the cookies to a wire cooling rack and allow them to cool completely.

This recipe generally makes 2 to 3 dozen cookies in total, depending on how big of a cookie you like to have. Michelle and Sean gobbled these up and loved the rich peanut butter flavor. it turns out to be a rather dense cookie in my opinion, which I attribute to using Bisquick in the recipe, but if you like that kind of cookie than this one is certainly for you. The best part is that the recipe requires very few ingredients, most which people usually have on hand (which was perfect for snowstorm weather) so you can really make them any time. Michelle actually makes these often when she makes cookies.

That’s all I have for today. Check back next time when I will feature the cookie recipe that I made that day. It is another easy one and a take on the classic gingersnap cookie, always one of my personal favorites. I also have some other recipes that I have tried recently to share, including a baked ziti, a roasted boneless leg of lamb, some quick biscuits you can make any time in a snap, and more. I also have my Christmas menu planned so I will get to share that with you as well. Until next time, enjoy the rest of your day and enjoy your meal!

004

 
1 Comment

Posted by on December 19, 2013 in Cookies, Cooking, Dessert, Holidays


Tags: , , , , ,

A Christmas Cookie Idea, Part One: Lemon Crinkle Cookies

After taking a couple of days off while a stomach virus ran rampant through our household, I am back with a new post. This past weekend while we were snowed in on Saturday we each decided we were going to make a Christmas cookie of our own. All three of us scoured recipes to try to find one that we would like to make while using only the ingredients we had in the house already since we were being pelted with snow. The first one to come up with one was Sean, who found this recipe online for lemon crinkle cookies. It’s a very straightforward recipe that produced some very yummy results.

Lemon Crinkle Cookies

1/2 cup butter, softened

1 cup granulated sugar

1/2 teaspoon vanilla extract

1 egg

1 teaspoon lemon zest

1 tablespoon fresh lemon juice

1/4 teaspoon salt

1/4 teaspoon baking powder

1/8 teaspoon baking soda

1 1/2 cups all-purpose flour

1/2 cup confectioners’ sugar

Preheat the oven to 350 degrees. Grease light-colored baking sheets with nonstick cooking spray or cover them in sheets of parchment paper and set them aside.

In a large bowl, cream the butter and the granulated sugar together until the mixture is light and fluffy. Whip in the vanilla, the egg, the lemon zest and the lemon juice. Scrape the sides of the bowl and mix again until everything is well incorporated. Stir in the salt, baking powder, baking soda and flour slowly until it is all just combined. Scrape down the sides of the bowl and mix everything together again briefly. Pour the confectioners’ sugar onto a separate plate. Roll a heaping tablespoon of the cookie dough into a ball and then roll it in the confectioners’ sugar to coat. Place the cookie on a baking sheet and repeat the process with all of the remaining dough.

Place the cookie sheets in the oven and bake the cookies for 9 to 11 minutes or until the bottoms of the cookies begin to barely brown and the cookies look like they have a matte finish, not melted or shiny. Remove the cookies from the oven and allow them to cool for about  3 minutes on the trays before transferring them over to a wire cooling rack to cool completely.

This recipes makes about two to three dozen cookies, so you should get plenty from them. I really enjoyed the lemon flavor of these cookies. It is subtle and not overpowering like some lemon cookies can be and it combined nicely with the sweetness of the sugar. Best of all, it was really simple to make and doesn’t require a lot of ingredients. For most people, it may be things you already have on hand all the time so you could easily make these any time of year, not just for the holidays. We were all quite pleased with the results of this one and Sean was very happy that he made such a good cookie himself.

That’s all I have for today. Check back next time for another cookie recipe from our cookie day. Next up will be Michelle’s choice of cookie. Until then, enjoy the rest of your day, and enjoy your meal!

003

 
1 Comment

Posted by on December 17, 2013 in Cookies, Cooking, Dessert, Holidays


Tags: , , ,

It’s My Birthday (Cake)! – Bananas Foster Cake

Today is my birthday and since it falls in the middle of the week this year we decided to have my birthday dinner this past weekend. We made some pulled pork, homemade cole slaw,German potato salad and some barbecued baked beans for the meal itself. The only new recipe there is for the baked beans, which I will post tomorrow. For dessert, Michelle had asked me what kind of cake I would like. Normally, I would have selected a Black Forest cake as it is one of my all-time favorite desserts and takes some time to make so I don’t get it very often. However, I saw this cake in the last issue of Cook’s Country and knew right away that I had to try this one for my birthday. It is for a Bananas Foster Cake and just the look and the description of the cake made it sound wonderful.

Bananas Foster Cake

For the Cake:

4 eggs, room temperature

1/2 cup milk, room temperature

2 teaspoons vanilla extract

1 3/4 cups cake flour

1 1/2 cups granulated sugar

2 teaspoons baking powder

3/4 teaspoon salt

16 tablespoons (2 sticks) butter,cut into 16 pieces and softened

For the Filling and Frosting:

3/4 cup dark rum

1/2 cup packed dark brown sugar

Salt

2 tablespoons butter, chilled, plus 20 tablespoons (2 1/2 sticks) softened

4 ripe bananas

1/8 teaspoon ground cinnamon

2 1/2 cups confectioners’ sugar

1 teaspoon vanilla extract

For the cake: Adjust an oven rack to the lower-middle position and heat the oven to 350 degrees. Grease two 9-inch or three 8-inch round cake pans, line them with parchment paper, grease the parchment and the flour pans.

Whisk the eggs, milk and vanilla together in a bowl. Using a stand mixer fitted with a paddle, mix the cake flour, granulated sugar, baking powder and salt on low-speed until combined. Add the butter, 1 piece at a time, until only pea-size pieces remain, about 1 minute.

Add half of the egg mixture, increase the speed to medium-high, and beat the mixture until it is light and fluffy, about 1 minute. Reduce the speed to medium-low, add the remaining egg mixture and beat until it is incorporated, about 30 seconds. The batter may look slightly curdled. Give the batter a final stir by hand.

Divide the batter evenly among the prepared cake pans and smooth the tops with a rubber spatula. Bake until the tops are light golden and a toothpick inserted into the center comes out clean, about 18 to 22 minutes for 8-inch pans and 20 to 25 minutes for 9-inch pans, rotating the pans halfway through the baking process. Let the cakes cool in the pans on a wire rack for 10 minutes. Remove the cakes from the pans, discarding the parchment paper, and let them cool completely on the rack, about 2 hours.

For the caramel: Cook 1/2 cup of the dark rum, the brown sugar and a pinch of salt in a large skillet over medium-low heat, stirring frequently, until the spatula leaves a 2-second trail when dragged through the sauce, about 7 to 10 minutes. Remove the caramel from the heat. Whisk 3 tablespoons of the caramel and 2 tablespoons of the chilled butter together in a small bowl until combined; set both caramels aside and let the mixed caramel cool completely.

For the filling: Peel and cut 2 of the bananas into 1/4-inch-thick slices. Add the sliced bananas and the cinnamon to the remaining warm caramel in the skillet and stir gently to combine. Set this aside and let it cool completely.

For the frosting: Using a stand mixer fitted with a whisk, mix the remaining 20 tablespoons of softened butter and 1/8 teaspoon of salt on medium-low speed until it is smooth, about 10 seconds. Slowly add the confectioners’ sugar and continue to mix until the mixture is smooth, about 2 minutes. Add the remaining 1/4 cup of dark rum and the vanilla and mix until incorporated, about 1 minute, scraping down the bowl as needed. Increase the speed to medium-high and whip the frosting until it is light and fluffy, about 5 minutes.

To assemble the cake: Place 1 cake layer on a cake plate or pedestal. Spread half of the banana filling over the cake. Top with the second cake layer and the remaining filling. Top with the final layer of cake and frost he top and the sides of the cake. Just before serving, peel and cut the remaining 2 bananas into 1/4-inch-thick slices and shingle them around the top edge of the cake. Pour the reserved caramel-butter mixture over the bananas, allowing the excess to drip down the sides of the cake. Serve.

All I can say about this cake is that it tastes amazing! If you like bananas foster, and I love it, then this is the cake for you. you get great banana flavor from the filling of the cake and the frosting is out of this world with the rum in it. The caramel just tops everything off, adding amazing texture and flavor to the whole thing. This is my new favorite cake and I would have it again and again (and I have for dessert the last few nights). The only change we made is that we did two 9-inch layers instead of the three 8-inch layers. Other than that, we followed along and did everything. You absolutely must try this cake out!

That’s all I have for today. Check back again next time for some more recipes. Until then, enjoy the rest of your day and enjoy your meal!

005 004


6 Comments

Posted by on December 11, 2013 in Cakes, Cooking, Dessert


Tags: , , , ,

Sean’s Birthday Cake – Peppermint Mocha Cupcakes

Sean’s birthday was last week (he is officially a teenager now) and he invited a few of his friends over this past weekend to hang out and have some snacks and then have some cake. Since he did not want a traditional birthday cake while his buddies were here, he decided he would like some cupcakes instead. I went about trying to find something special when I came across this wonderful recipe on Sally’s Baking Addiction for these peppermint mocha cupcakes. They were the perfect thing for some teenage boys looking for a tasty and sweet snack and it fits the holiday season as well.

Peppermint Mocha Cupcakes

Cupcakes:

1/2 cup butter

2 ounces semisweet baking chocolate

1 heaping tablespoon instant coffee

1/2 cup unsweetened cocoa powder

3/4 cup all-purpose flour

12 teaspoon baking soda

3/4 teaspoon baking powder

1/4 teaspoon salt

2 eggs, room temperature

1/2 cup granulated sugar

1/4 cup light brown sugar

1 teaspoon vanilla extract

1/2 teaspoon peppermint extract

1/2 cup buttermilk

Peppermint Vanilla Frosting:

1 cup butter, softened to room temperature

3 to 4 cups confectioners’ sugar

1/4 cup heavy cream

1 teaspoon vanilla extract

1/4 teaspoon peppermint extract

Salt, to taste

Cupcake Decor:

4 ounce semisweet baking chocolate,melted

Crushed candy canes

For the cupcakes: preheat the oven to 350 degrees. Line a 12-cup cupcake pan with cupcake liners and set it aside.

Melt the butter and the chocolate together in the microwave. Microwave in 30 second increments, stirring between each time. You may also melt the butter and chocolate over low heat on the stove top. Stir until the mixture is combined, then mix in the instant coffee. Set the mixture aside to cool slightly.

In a medium bowl, toss the  cocoa powder, all-purpose flour, baking soda, baking powder, and salt together until thoroughly combined. Set this bowl aside. In a large bowl, whisk the eggs, granulated sugar, brown sugar, vanilla extract and peppermint extract together until it is smooth. Add the cooled butter/chocolate and whisk it together until smooth. Add half of the flour mixture, then half of the buttermilk. repeat until everything is added together. Stir until it is just combined; do not overmix. The batter will be very thick, like pudding.

Divide the batter between the 12 cupcake liners in the cupcake pan. Bake the cupcakes for 18 minutes, or until a toothpick inserted into the center of a cupcake comes out clean. Allow he cupcakes to cool completely before frosting.

For the frosting: Beat the softened butter on kedium speed with an electric or stand mixer. Beat for about 3 minutes until it is smooth and creamy. Add the powdered sugar, heavy cream, vanilla extract and peppermint extract with the mixer running. Increase the mixer to high-speed and beat for 3 full minutes. The longer you beat the mixture, the creamier the frosting will be. Add more powdered sugar if the frosting is too thin or more cream if the frosting is too thick. Add the salt if the frosting is too sweet (about 1/4 teaspoon).

Decorate the cupcakes: Frost the cooled cupcakes. There may be leftover frosting depending on how much you use on each cupcake. Drizzle the cupcakes with the melted chocolate and top with the crushed candy canes.

I really liked the flavor of the cupcakes. The hint of coffee with the peppermint may this cupcake delicious. This recipe does make a lot of frosting, so if you have something else you can use it for, go right ahead or make some extra cupcakes and you will be able to frost them. The frosting has a great mint flavor and adding the drizzled chocolate and the candy canes just topped everything off, literally. The boys really enjoyed them and each had at least one and we still had some leftover for the next day. i would make this again for sure. They are great for a party and would be perfect for a Christmas or holiday party as well.

That’s all I have for today. Check back next time for more recipes. I have a huge backlog of recipes I have made to post and not enough time to post them as I have been busy with work and Christmas stuff, but I will try my best to get everything on here. Until next time, enjoy the rest of your day and enjoy your meal!

001


Leave a comment

Posted by on December 9, 2013 in Cakes, Cooking, Cooking Websites, Dessert, Holidays


Tags: , , ,

Thanksgiving Dessert Recipes – CHOW

Thanksgiving Dessert Recipes – CHOW.

CHOW has some wonderful ideas for your Thanksgiving Day dessert table. If you are looking to do something a little different than the usual pumpkin pie or apple pie, check out these suggestions and give one a try this year!

 
Leave a comment

Posted by on November 27, 2013 in Cakes, Cookies, Cooking, Cooking Websites, Dessert, Holidays, Pie


Tags: , ,

A Throwback Dessert for the Holidays: Pineapple Upside-Down Cake

Pineapple upside-down cake is not something I would think of making very often. Let’s be honest – most of us who are old enough probably associate it with seeing it at parties our parents had when we were growing up in the seventies. You may not even have a good memory of it thanks to the tinny taste of the pineapple from the can and the super-sweet juice that came with it. All of that being said, Michelle had said to me not the long ago that she might want to give the dessert a try. As fate would have, when I walked into the grocery store last week fresh pineapples were on sale. I bought one and set about finding a recipe, and this one from Cook’s Illustrated seemed to be the best to use and the easiest to make.

Pineapple Upside-Down Cake

Pineapple Topping:

1 medium fresh pineapple (about 4 pounds), peeled, cored and cut into 1/2-inch pieces

1 cup firmly packed light brown sugar

3 tablespoons butter

1/2 teaspoon vanilla extract

Cake:

1 1/2 cups all-purpose flour

1 1/2 teaspoons baking powder

1/2 teaspoon salt

8 tablespoons butter, softened but still cool

3/4 cup granulated sugar

1 teaspoon vanilla extract

2 eggs at room temperature

1 egg white at room temperature

1/3 cup milk at room temperature

Lightly spray a 9-inch round cake pan with nonstick cooking spray and set it aside.

For the pineapple topping, combine the pineapple and brown sugar in a large skillet and cook over medium heat, stirring occasionally during the first five minutes until the pineapple is translucent and has a light brown hue, about 15 to 18 minutes. Empty the fruit and the juices into a mesh strainer or colander set over a medium bowl. Return the juices to the skillet, leaving the pineapple in the strainer. You should have about 2 cups of cooked fruit. Simmer the juices over medium heat until it is thickened and beginning to darken and the mixture forms large bubbles, about 6 to 8 minutes, adding any more juices released by the fruit to the skillet after about 4 minutes. Off the heat, whisk in the butter and the vanilla. Pour the caramel mixture into the prepared cake pan. Set it aside while preparing the cake batter.

For the cake, adjust an oven rack to the lower-middle position and heat the oven to 350 degrees. Whisk the flour, baking powder and salt in a medium bowl and set it aside.

In the bowl of a standing mixer fitted with a flat beater, cream the butter and the sugar at medium-high speed until it is light and fluffy, about 3 to 4 minutes. Reduce the speed to medium, add the vanilla and beat to combine. One at a time, add the whole eggs and then the egg white, beating well and scraping down the bowl after each addition. Reduce the speed to low; add about 1/3 of the flour mixture and beat until it is incorporated. Add half of the milk and beat until it is incorporated; repeat the process, adding half of the remaining flour mixture and the remaining milk, and finish with the remaining flour. Give a final stir with a rubber spatula, scraping the bottom and sides of the bowl to ensure that the batter is combined. The batter will be thick.

To bake the cake, working quickly, distribute the cooked pineapple in the cake pan in an even layer, gently pressing the fruit into the caramel. Using a rubber spatula, drop mounds of the batter over the fruit, then spread the batter over the fruit and to the sides of the pan. Tap the pan lightly against the work surface to release any air bubbles. Bake until the cake is golden brown and a toothpick inserted into the center comes out clean, about 45 to 50 minutes. Cool for 10 minutes on a wire rack, then place an inverted serving platter over the cake pan. Invert the cake pan and platter together and lift off the cake pan to release the cake. Cool the cake to room temperature for about 2 hours, then cut into pieces and serve.

Taking the time to peel, core and chop a fresh pineapple is very worth it for this recipe and makes all the difference. The fresh pineapple taste and smell, to me, is so much better than what you get from a can and preparing the pineapple only takes a few minutes. The rest of the recipe is very easy and produces great results. You get the nice caramelized pineapple with a light cake and it was much better than any of us remembered it. I actually did the whole recipe in my trusty cast iron skillet. I cooked the pineapple and the caramel in it, cooled the pan with the caramel, pressed in the pineapple and poured in the batter. I think it came out just as well as it would in a cake pan, saved me a little cleaning and came out of the pan just as easily as it would a cake pan.

That’s all I have for today. Check back next time for another recipe. I tried out a couple of more Thanksgiving recipes yesterday, so I will post those before the big day on Thursday. Until next time, enjoy the rest of your day and enjoy your meal!

001

 
1 Comment

Posted by on November 24, 2013 in Cakes, Cooking, Dessert


Tags: , , ,

What’s a Birthday Without a Cake? Lemon Layer Cake for Michelle

Let me start off by saying that I feel I have never been much of a baker. It is only until recently that I have begun to try my hand at baking bread, and I like doing it, it comes out better (most of the time) than what you can buy in the store and it is a heck of a lot cheaper than buying bread at the store. That being said, I have never been much of one to make things like pastries, cookies or cakes. However, I did decide that this year I was going to give one a try to see if I could make a cake for Michelle’s birthday. She likes lemon cakes, so I thought I would try this one that I saw in Saveur magazine for a lemon layer cake. It seemed easy enough to try for my first foray into the land of cakes.

Lemon Layer Cake

For the Cake and Syrup:

16 tablespoons unsalted butter, softened, plus more for pans

2 1/2 cups cake flour, plus more for pans, sifted

2 1/2 teaspoons baking powder

1 teaspoon kosher salt

1/2 cup milk

1 teaspoon vanilla extract

1 3/4 cup sugar

1 tablespoon lemon zest

4 eggs

1/3 cup fresh lemon juice

For the Frosting:

1 1/2 cups sugar

1/4 cup cornstarch

1/4 cup lemon zest

1 teaspoon kosher salt

10 egg yolks

1 cup fresh lemon juice

1 1/2 cups unsalted butter, softened

1 teaspoon vanilla extract

For the cake: heat the oven to 350 degrees. Butter and flour two 9-inch cake pans and set them aside. Whisk together the cake flour, baking powder, and salt in a large bowl; set the bowl aside. Whisk together the milk and vanilla in a bowl and set it aside. in the bowl of a stand mixer fitted with a paddle, cream the butter, 1 1/2 cups of sugar and the lemon zest on medium-high speed until it is pale and fluffy, about 3 minutes. Add the eggs, one at a time, beating well after each addition. On low speed, alternately add the dry ingredients in 3 batches and the wet ingredients in 2 batches. Increase the speed to high and beat the mixture until the batter is smooth, about 5 seconds. Divide the batter between the prepared pans and smooth the tops with a rubber spatula; drop the pans lightly on a counter to expel any large air bubbles. Bake the cakes until a toothpick inserted into the middle comes out clean, about 30 minutes. Let the cakes cool for 20 minutes in the pans; invert the pans onto wire racks and let the cakes cool. Using a serrated knife, halve each cake horizontally to produce four layers; set the cakes aside. Bring the remaining sugar and lemon juice to a boil in a small saucepan over high heat. Remove the syrup from the heat and set it aside.

For the frosting: Whisk together the sugar, cornstarch, lemon zest and salt in a large saucepan. Add the yolks and whisk the mixture until it is smooth; stir in the lemon juice. Stirring often, bring the mixture to a boil over medium heat; cook, stirring constantly, until it is very thick, about 3 minutes. Remove it from the heat, allow it to cool and transfer it to a bowl; chill the lemon curd. In the bowl of a stand mixer fitted with a paddle, beat the butter and 1/4 of the lemon curd on medium-high speed until it is fluffy and smooth, about 1 minute. Add half of the remaining lemon curd, beating the mixture until it is smooth, and then add the remaining lemon curd and vanilla. Increase the speed of the mixer to high; beat the frosting until it is pale and fluffy, about 3 minutes.

To assemble the cake, place one cake layer on a cake stand and drizzle it with 2 tablespoons of the syrup and spread it with 3/4 cup of frosting; top this with another layer of cake, drizzle it with 2 tablespoons of the syrup and spread it with another 3/4 cup of frosting. Place another cake over the frosting, drizzle it with 2 tablespoons of the syrup and spread it with another 3/4 cup of the frosting; top this with the remaining layer of cake and drizzle this with the remaining syrup. Cover the top and the sides with the remaining frosting. Chill the cake to firm the frosting then serve the cake at room temperature.

I do have to say for my first time out of making a cake that it turned out pretty well. Granted, there are people who are much better at making and decorating cakes than I am, but for a novice dad trying to make a cake I think it turned out pretty well. The frosting was fluffy and smooth and there was great lemon flavor throughout the cake thanks to the zest in the batter, the syrup drizzled over the cakes and the lemon curd frosting, which I really liked. Could it have been better? Probably, but I’ll cut myself some slack and say it will look and taste even better next time around. All in all, I think this was a pretty easy one to start with and those who ate cake seemed to enjoy it.

That’s all I have for today. Check back next time for some more recipes. I still have lots to share, including some Thanksgiving ideas as well as some every day dinners to try. I just got the latest issue of Cook’s Country, and that always inspires some to try some of their ideas, so look out for those. Until next time, enjoy the rest of your day and enjoy your meal!

IMG_0379 IMG_0378

 
Leave a comment

Posted by on November 18, 2013 in Cakes, Cooking, Dessert


Tags: , ,

Homemade Peanut Butter Cups with a Kick

I am not much of a candy eater myself and I don’t go crazy over chocolate, so I rarely have the occasion to actually make any candy. However, with Halloween just happening, there was a huge influx of candy recipes all over the place to take a look at. I saw a couple that actually interested me, including this one from Food Republic for some homemade peanut butter cups. This version does taste a lot like the famous Reese’s version that you have come to know and love for generations, with one important difference. This recipes is not for the kids as it does make use of some bourbon, albeit a small amount.

Homemade Peanut Butter Cups with Bourbon

1 1/2 packages (11 1/2 ounces) milk or dark chocolate chips

1 shot bourbon

1 cup creamy peanut butter

3 tablespoons vegetable shortening, softened

1/4 cup butter

1 1/2 cups confectioner’s sugar

1/2 teaspoon salt

Line a 12-cup muffin tin with paper liners. in a saucepan, add the shot of bourbon and the shortening to the chocolate chips and place over very low heat.

Stir the ingredients until the mixture becomes very smooth. Make sure to add the alcohol to the chocolate when the chocolate is still solid, as adding liquid to already melted chocolate will make it seize up. Allow the mixture to cool slightly, but make sure the mixture is still pourable.

Spoon 1 tablespoon of the chocolate inside the paper cups, covering the bottom half of each cup. Chill the chocolate for 30 minutes, or until cool.

In a bowl, combine the confectioners’ sugar, peanut butter, salt and butter until it is well incorporated. Spoon 2 heaped tablespoons of the peanut butter mixture over the chocolate cups and press down firmly to smooth the peanut butter layer.

Spoon another tablespoon of the melted chocolate mixture over the top of the peanut butter, allowing the chocolate to completely cover the peanut butter layer. If the chocolate mixture is cold and no longer pourable, return the saucepan to the stove over low heat for 1 minute until it is smooth and pourable again.

Chill the peanut butter cups for 3 hours or until firm.

I have to say that this recipe does taste just like a Reese’s peanut butter cup but the bourbon adds a really nice flavor to the entire mix. The recipe makes 12 rather large peanut butter cups and I think you could easily make many small ones on a parchment paper-lined baking sheet if you wanted smaller ones. The one catch is that the paper liners for the muffin tins help to give a nice shape to the candy, which you would lose if you did them free-form. In either case, it is a very easy treat to make that might be great for a party or if you are making some things for a homemade gift basket for the holidays. Most of the time for the recipe is just chilling the candy so it sets well.

That’s all I have for today. Check back again for some more great recipes. There’s still lots more to come as I am trying new things all the time. Until then, enjoy the rest of your day and enjoy your meal!

006

 
Leave a comment

Posted by on November 1, 2013 in Candy, Cooking, Dessert, Snacks


Tags: , , ,

A Weekend Treat: Cinnamon Buns

Ever since I got the issue of Cook’s Country magazine with the cinnamon buns on the cover I have been wanting to give the recipe a try. Granted, it’s not something we eat very often, but they just looked so delicious and the recipe seemed so simple that I just had to give it a try. I had always thought that making them would take a long time and I think a lot of people just find it easier to get the prepackaged rolls with the little glaze packet and make those instead. I can tell you that the time it takes to make these is relatively quick, well worth the effort and cheaper than it costs for a package of those rolls.

Quick Cinnamon Buns

Filling:

3/4 cup packed light brown sugar

1/4 cup granulated sugar

1 tablespoon ground cinnamon

1/8 teaspoon salt

2 tablespoons butter, melted

1 teaspoon vanilla extract

Dough:

1 1/4 cups milk, room temperature

4 teaspoons instant or rapid-rise yeast

2 tablespoons granulated sugar

2 3/4 cups all-purpose flour

3/4 teaspoon salt

6 tablespoons butter, melted

Glaze:

3 ounces cream cheese, softened

2 tablespoons butter, melted

2 tablespoons milk

1/2 teaspoon vanilla extract

1/8 teaspoon salt

1 cup confectioners’ sugar. sifted

For the filling: Combine the brown sugar, granulated sugar, cinnamon, and salt in a bowl. Stir in the melted butter and vanilla until the mixture resembles wet sand; set aside.

For the dough: Grease a 9-inch round cake pan, line it with parchment paper and then grease the parchment paper. pour 1/4 cup of milk in a small bowl and microwave it to 110 degrees, about 15 to 20 seconds. Stir in the yeast and 1 teaspoon of sugar and the mixture sit until it is bubbly, about 5 minutes.

Whisk the flour, baking powder, salt and the remaining 5 teaspoons of granulated sugar together in a large bowl. Stir in 2 tablespoons of the melted butter, the yeast mixture, and the remaining 1 cup of milk until the dough forms. The dough will be sticky. Transfer the dough to a well-floured counter and knead it until a smooth ball forms, about 2 minutes.

Roll the dough into a 12 by 9-inch rectangle with the long side parallel to the counter edge. Brush the dough all over with 2 tablespoons of the melted butter, leaving a 1/2-inch border on the far edge. Sprinkle the dough evenly with the filling, then press the filling firmly into the dough. Using a bench scraper or metal spatula, loosen the dough from the counter. Roll the dough away from you into a tight log and pinch the seam to seal it.

Roll the log seam side down and cut it into 8 equal pieces. Stand the buns on their ends and gently re-form the ends that were pinched during the cutting. Place 1 bun in the center of the prepared pan and the others around the perimeter of the pan, seam sides facing in. Brush the tops of the buns with the remaining 2 tablespoons of melted butter. Cover the buns loosely with plastic wrap and let them rise for 30 minutes. Adjust an oven rack to the middle position and heat the oven to 350 degrees.

Discard the plastic wrap and bake the buns until the edges are well browned, about 23 to 25 minutes. Loosen the buns from the sides of the pan with a paring knife and let cool for 5 minutes. Invert a large plate over the cake pan. Using potholders, flip the plate and the pan upside down; remove the pan and the parchment paper. Re-invert the buns onto a wire rack and set the wire rack inside a parchment-lined rimmed baking sheet and let them cool for 5 minutes.

For the glaze: Place the cream cheese in a large bowl and whisk in the butter, milk, vanilla and salt until it is smooth. Whisk in the sugar until smooth. Pour the glaze evenly over the tops of the buns, spreading the glaze with a spatula to cover the buns.

While the total time of the recipe is about 1 1/2 hours, this is a lot quicker than other traditional cinnamon bun recipes that can take up to 3 hours to complete. I think you get the same great results from this recipe and the buns were very tender and tasted great. They smelled awesome the whole time they were cooking and everyone couldn’t wait for them to come out of the oven. Of course, the three of us split a warm one with glaze on it right away and it was wonderful. I would make this again for a dessert or even as a great brunch item when you may have a brunch party.

That’s all I have for today. Check back next time for another recipe. I still have a bunch of new ones to try and I am always finding some new and fun things to do. I may even do a few Halloween themed recipes this week that might be fun. Until next time, enjoy the rest of your day and enjoy your meal!

006 001

 
4 Comments

Posted by on October 26, 2013 in Biscuits, Breads, Dessert


Tags: , , ,

An Abundance of Apples Means Homemade Apple Pie

It is one of the classic recipes that most people love to try at home in the Fall whether it is for a holiday, a Sunday dessert or just because they love it. Of course, I am talking about apple pie. I love apple pie myself and could eat a lot more of it if I had the chance. Since this is apple season and we live in the Hudson Valley in New York, apples are everywhere right now. There are many great local orchards here where you can get fantastic apples to use for all kinds of cooking, baking and just plain eating. We had picked up some apples recently and Michelle knew right away that she wanted to make apple pie, which made Sean and me quite happy. I love the smell of the pie just cooking in the oven and the taste is always fantastic. There are many different pie dough recipes out there, so use the one you like best or use store-bought pie dough if that’s what you have time for. Michelle tried this recipe from the Cook’s Illustrated Cookbook.

Classic Apple Pie

1 recipe for double-crust pie dough or 2 store-bought pie doughs

3/4 cup plus 1 tablespoon sugar

2 tablespoons all-purpose flour

1 teaspoon grated lemon zest plus 1 tablespoon juice

1/4 teaspoon salt

1/4 teaspoon ground nutmeg

1/4 teaspoon ground cinnamon

1/8 teaspoon ground allspice

2 pounds Empire or Cortland apples, peeled, cored and sliced 1/4-inch thick

1 1/2 pounds Granny Smith apples, peeled, cored and sliced 1/4-inch thick

1 large egg white, lightly beaten

Roll 1 disk of pie dough into a 12-inch circle on a lightly floured counter. Loosely roll the dough around the rolling pin and gently unroll it into a 9-inch pie plate.,letting the excess hang over the edge. Ease the dough into the pie plate by gently lifting the edge of the dough with 1 hand while pressing the dough into the plate bottom with the other hand. Leave any dough that overhangs the plate in place. Wrap the dough-lined pie plate loosely in plastic wrap and refrigerate until the dough is firm, about 30 minutes. Roll the other disk of dough into a 12-inch circle on a lightly floured counter, then transfer it to a parchment paper-lined baking sheet. Cover it with plastic wrap and refrigerate for 30 minutes.

Adjust an oven rack to the lowest position, place a rimmed baking sheet on the rack and heat the oven to 500 degrees.

Mix 3/4 cup of sugar, the flour, lemon zest, salt, nutmeg, cinnamon and allspice together in a large bowl. Add the lemon juice and apples and toss until combined. Spread the apples with their juices into the dough-lined pie plate, mounding them slightly in the middle. Loosely roll the remaining dough round around the rolling pin and gently unroll it onto the filling. Trim the overhang to 1/2 inch beyond the lip of the pie plate. Pinch the edges of the top and bottom crusts firmly together. Tuck the overhang under itself; the folded edge should be flush with the edge of the plate. Crimp the dough evenly around the edge of the pie using your fingers. Cut four 2-inch slits in the top of the dough. Brush the surface with the beaten egg white and sprinkle the surface evenly with the remaining 1 tablespoon of sugar.

Place the  pie on the heated baking sheet, reduce the oven temperature to 425 degrees, and bake until the crust is light golden brown, about 25 minutes. Reduce the oven temperature to 375 degrees, rotate the baking sheet, and continue to bake until the juices are bubbling and the crust is a deep golden brown, about 30 to 35 minutes longer. Let the pie cool on a wire rack to room temperature, about 4 hours, before serving.

Now I know everyone has their own pie recipe that their family has used for generations and may have their own particular way of making apple pie. If you like what you have, stick to it and use that. If you are looking for something new to try or have never made one before, this is a good recipe to try out. The pie came out perfectly with the crust a great color and cooked well on the top and bottom. Heating the baking sheet before putting the pie in helps to make sure the bottom crust is cooked. You also want to try to use a mix of apples to get a good blend of sweet and tart for great flavor. Again, use the apples you like best, but the pie experts we know seem to recommend Empires and Cortlands as the best to go with.

That’s all I have for today. Check back again for some more recipes. There’s always lots more to come, including two recipes I just made for some different soups we tried here at home, a beer braised chicken thighs recipe, sausages, and more. Until next time, enjoy the rest of your day and enjoy your meal!

002


Leave a comment

Posted by on October 10, 2013 in Cooking, Dessert, Pie


Tags: , , , ,

 
National Day Calendar

Fun, unusual and forgotten designations on our calendar.

Jennifer Probst

a little bit naughty a little bit nice

Laissez Faire

Letting Life Lead

simple cooking recipes

a blog to share with you the best