RSS

Category Archives: Rice

Eat Your Peas and Carrots (Risotto)!

I have a lot of arborio rice on hand, which is the rice you want to use for risotto, and we all love risotto here, but it can be a bit of a chore to make. You need to commit to the constant stirring and adding of stock and then more stirring to make sure it comes out correctly, so it is not something I make very often. That being said, when I came across this recipe from Kitchen Daily the other day it seemed too good not to try and I liked the idea of it. The original recipe is for a fresh carrot risotto that makes use of carrot juice. Now, I don’t have carrot juice on hand nor do I have juicer. Remember, walk-in closet in my bedroom is as big as my kitchen, and neither is very big. So I decided to make a little bit of a change and call it a peas and carrots risotto. I swapped out the 2 cups of carrot juice for 4 large carrots instead and made it that way. I’ll include both options in the recipe so the choice is yours.

Peas and Carrots Risotto

4 cups chicken stock

2 cups fresh carrot juice (if using)

2 tablespoons extra-virgin olive oil

1 shallot, finely chopped

4 large carrots, peeled and finely diced (if using)

1 1/2 cups arborio rice

1/2 cups dry white wine

2 1/2 tablespoons white wine vinegar

1/2 cup freshly grated Parmigiano-Reggiano cheese

2 tablespoons butter

Salt and freshly ground black pepper

1 cup frozen peas

In a medium saucepan over medium heat, bring the chicken stock and carrot juice, if using, to a simmer. Keep the pan warm.

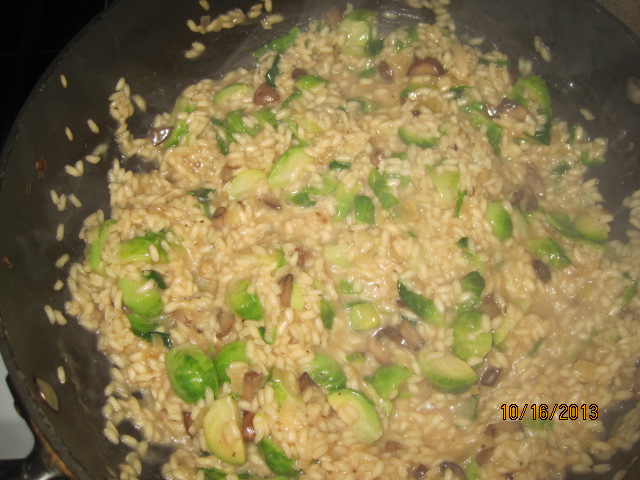
In a large saucepan over medium heat, heat the olive oil until shimmering. Add the shallot and carrots, if using, and cook over moderate heat, stirring, until the shallots are softened and the carrots are crisp-tender, about 4 to 5 minutes. Add the arborio rice and cook, stirring the rice, until it turns slightly milky colored, about 1 minute. Add the white wine and 2 tablespoons of white wine vinegar and cook, stirring, until the liquid is absorbed. Stir in the hot stock mixture, 1 cup at a time, stirring constantly and adding more stock once it has been absorbed, about 20 minutes in total; the rice should be al dente and suspended in a thick, creamy sauce. Add the Parmigiano-Reggiano cheese and 1 tablespoon of the butter, season with salt and pepper to taste and stir until the mixture is creamy.

In a medium skillet, melt the remaining 1 tablespoon of butter. Add the peas and season them with salt and pepper and cook over medium-high heat until the peas are warmed through, about 1 to 2 minutes. Add the remaining 1/2 tablespoon of white wine vinegar to the peas, then fold the peas into the risotto. Serve.

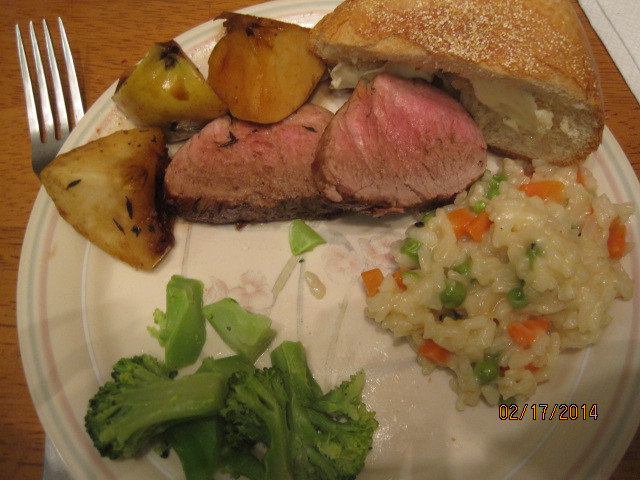
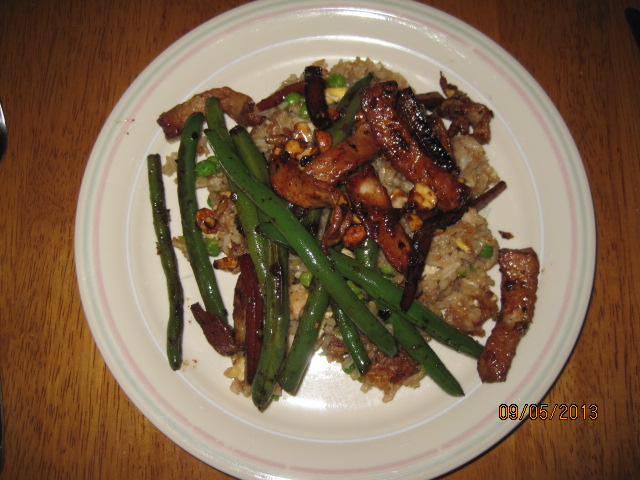
Admittedly the stirring is something of a pain but the end result is very worth it. You get a nice creamy risotto and this one has the great flavors of the peas and carrots. I can imagine that using the carrot juice would add even more flavor to the risotto. Since I didn’t use the carrot juice, I used 2 cups of stock in its place to make sure there was enough liquid to get the texture I wanted and we all really liked the taste with the peas and carrots. This one is definitely worth making again and you could certainly just eat the risotto as a meal on its own, but I served this with the glazed pork tenderloin that I  posted the recipe for yesterday to make a really nice meal.

That’s all I have for today. Check back next time for another recipe as there is plenty still to come. Until then, enjoy the rest of your day and enjoy your meal!

004 002

 
Leave a comment

Posted by on February 25, 2014 in Cooking, Dinner, Rice


Tags: , , , ,

Sidle Up for Side Dishes – Dominican-Style Yellow Rice and Creamy Buttermilk Coleslaw

With all of the different main dishes that I have made lately, I have been making some news sides to go along with some of them. Two in particular really stood out for me anyway. The first was one that I made to go along with the pork tacos we had for dinner. It is a recipe from Bon Appetit for Dominican-style yellow rice. it is a very simple rice dish with some vegetables and spices that are great unique flavor to it.

Dominican-Style Yellow Rice

1/4 cup vegetable oil

1/2 cup red onion, chopped

1/2 red or yellow pepper, seeded and chopped

1 celery stalk, chopped

2 scallions, white and light green parts only, sliced 1/2-inch thick

2 garlic cloves, finely chopped

1 bay leaf

1 teaspoon cumin seeds

1 teaspoon ground turmeric

1/4 teaspoon cayenne pepper

1 cup long-grain rice

2 cups chicken broth

1/2 teaspoon kosher salt

2 tablespoons chopped fresh cilantro

2 tablespoons chopped fresh parsley

Heat the oil in a medium saucepan over medium-high heat. Add the onion, bell pepper, celery and scallions and cook, stirring often, until the vegetables are softened, about 5 minutes. Add the garlic, bay leaf, cumin seeds, turmeric and cayenne pepper and cook, stirring, until the mixture is fragrant, about 2 minutes. Add the rice and stir to coat the rice, then add the chicken broth and the salt. Bring the mixture to a boil, stir it once, and the cover the pan. Reduce the heat to low and cook until the rice is tender and all of the liquid has been absorbed, about 15 to eighteen minutes. Allow the ride to stand in the pot for 10 minutes, covered. Uncover the pot and fluff the rice with a fork. Stir in the cilantro and parsley and serve.

The rice had great color from the turmeric and other spices and the flavor was very good. The combination of the peppers and onion with the rice was just perfect for me. I can see using this side dish with any chicken meal that you make or with pork and I think it would be great.

On the night where I made the fried chicken biscuits, I also tried a new recipe for some coleslaw. I have a bunch of different coleslaw recipes and I am always trying something a little different. This time, since I had some buttermilk on hand I thought I would try out this buttermilk coleslaw recipe from Cook’s Country. it uses a couple of ingredients to make it really creamy without being too watery.

Creamy Buttermilk Coleslaw

1 medium head green cabbage, cored and chopped fine

2 carrots, peeled and shredded with a box grater

Salt

2/3 cup buttermilk

1/2 cup mayonnaise

1/4 cup sour cream

8 scallions, chopped fine

2 tablespoons sugar

1 teaspoon Dijon mustard

1/4 teaspoon ground black pepper

Toss the shredded cabbage and the carrots with 1 teaspoon of salt in a colander set over a medium bowl. Allow the vegetables to stand until they are wilted, about 1 hour. Rinse the cabbage and carrots under cold water, drain, dry well with paper towels and transfer the vegetables to a large bowl.

Stir in the buttermilk, mayonnaise, sour cream, scallions, sugar, mustard and pepper plus some salt to taste. Refrigerate the coleslaw until it is chilled, about 15 minutes. Adjust the seasonings and serve.

I liked this coleslaw because salting the cabbage helps to draw a lot of the moisture out of it so there is not too much water or moisture. Then the buttermilk adds some great tangy flavor to the mix and the sour cream, mayonnaise and mustard each help to add flavor and body to the mix so you get a nice, thick, creamy sauce. If I am going to make a recipe using mayonnaise, I think this is the best one I have tried so far. Of course it is great with any sandwich or along side of burgers, ribs, hot dogs or really just about anything else.

That’s all I have for today. Check back next time for some more recipes. Until then, enjoy the rest of your day and enjoy your meal!

013 002

 
Leave a comment

Posted by on February 4, 2014 in Cooking, Rice, Salad, Side Dishes


Tags: , , , , , ,

It’s Never Too Cold For Barbecued Baked Beans

I have actually made this recipe a few times over the last several weeks because we like it so much. Even though it may seem like a good summer side dish, I think good baked beans can go well with any type of beef or pork dish at all. I actually made these as part of my birthday dinner when we made pulled pork and I made them again just this past weekend for a family party we were going to. The recipe is from Cook’s Illustrated and you do not need a ton of ingredients. All you really need is a lot of time in the oven or you can make them ahead of time if you know you have any occasions and refrigerate and reheat them.

Barbecued Baked Beans

4 slices bacon, chopped fine

1 onion, minced

4 cloves garlic, minced

1 pound dried small white beans (2 cups), rinsed and picked over

8 cups water

1 cup black coffee

1/2 cup barbecue sauce, plus extra for seasoning

1/4 cup packed dark brown sugar

4 1/2 teaspoons brown mustard

1 tablespoon molasses

Tabasco sauce or hot sauce, for seasoning

Adjust an oven rack to the lower-middle position and heat the oven to 300 degrees. Cook the bacon in a large Dutch oven over medium heat until it is beginning to crisp, about 5 minutes. Stir in the onion and cook until the onion is softened, about 5 minutes.

Stir in the garlic and cook until the garlic is fragrant, about 15 seconds. Stir in the beans, the water, the coffee, the barbecue sauce, the dark brown sugar, the mustard, the molasses, 1/2 teaspoon of Tabasco or hot sauce, and 1 1/4 teaspoons of salt. Bring the entire mixture to a boil,scraping up any browned bits. Cover the pot and transfer it to the oven. Bake, stirring every hour, until the beans are tender, about 4 hours.

Remove the lid from the Dutch oven and continue to bake, uncovered, until the liquid has thickened to a syrupy consistency, about 1 to 1 1/2 hours. Season the beans with additional barbecue sauce, Tabasco or hot sauce, and salt and pepper to taste before serving.

This makes a lot of beans, with the serving recommendations of 6 to 8 people, but I think it can easily feed more than that, so if you know you are having a crowd than this is a great side dish you can plan on using. I think it goes great with pulled pork, ribs, hamburgers and hot dogs, steak or even just is a great side for sandwiches. I used Navy beans for the recipe, but any white bean here will do and make sure you use dried beans for this and not canned. The canned beans will just turn to mush because of the long cooking. You do not need to pre-soak the beans either for this recipe since they are cooking for such a long time and will get tender on their own.

That’s all I have for today. Check back next time for some more recipes to try. With the new year creeping up on us, I will have lots of new things to try out and share along the way. Thanks for following along and reading. Enjoy the rest of your day and enjoy your meal!

002

 
4 Comments

Posted by on December 30, 2013 in Cooking, Rice, Side Dishes


Tags: , , , ,

Meals with Family and Friends, Part 3 – Fall Vegetable Risotto

As I have said in previous posts, we did some entertaining over the last couple of weeks so it gave me the opportunity to try out some new recipes. One thing I made when we had a friend over for dinner was a nice gluten-free dish of Fall vegetable risotto. I have gotten more ambitious lately in trying to make risotto and I think for the most part it has turned out pretty well with good results. There is some work and care that needs to go into the dish, but the results are quite worth it. This original recipe is from Williams-Sonoma, though I did alter it slightly and omitted the blue cheese from the recipe and substituted Parmesan cheese instead. We’re not big blue cheese eaters here in our house, but I have included it in the original recipe here.

Fall Vegetable Risotto

5 cups chicken or vegetable broth

10 ounces Brussels sprouts, ends trimmed, quartered lengthwise

2 tablespoons olive oil

1 large onion, finely chopped

1/4 pound shitake mushrooms, stems removed, sliced

Coarse kosher salt and freshly ground black pepper

1 1/2 cups arborio rice

1/2 cup dry white wine

1/2 cup gorgonzola or other blue cheese, crumbled

1/2 cup walnut pieces, toasted (optional)

in a saucepan, bring the chicken or vegetable broth to a boil. Add the Brussels sprouts and cook until they are a bright green color and almost tender, about 4 minutes. Using a slotted spoon, transfer the Brussels sprouts to a bowl and set aside. Reduce the heat on the broth to low.

In a heavy medium saucepan over medium-high heat, warm the olive oil. Add the onion and saute until it is a golden brown, about 5 minutes. Add the mushrooms, sprinkle with salt and pepper, reduce the heat to medium, and cook, stirring frequently, until they begin to soften, about 3 minutes. Add the arborio rice and stir until the rice turns opaque, about 1 minute. Add the wine and stir until it is absorbed. Add about 3/4 cup of the warmed broth and adjust the heat so the liquid bubbles and is absorbed slowly. Cook, stirring frequently, until all the liquid is absorbed. Continue cooking, adding the broth about 3/4 cup at a time and stirring frequently until the rice is just tender but slightly firm in the center and the mixture is creamy, about 20 minutes. Mix in the Brussels sprouts, blue cheese and a generous amount of pepper. Taste and adjust the seasoning as necessary.

Spoon the risotto into warmed shallow bowls or plates, sprinkle with the walnuts (if using), and serve.

A couple of notes about this recipe. As I stated, I used Parmesan instead of a blue cheese and I think the results were fine. I also omitted the walnuts as well but feel free to add them in if you like them and want the added crunchy texture. I also substituted water for the white wine in the recipe and it was fine. Finally, I could not get my hands on any shitake mushrooms locally so I just used sliced white mushrooms instead. I think they worked out well though if you can get shitakes, I would use them as I like the look and flavor of them myself. The risotto came out nicely and was very creamy. I loved the flavor of the Brussels sprouts in the mix and everyone seemed to enjoy the dish, I actually used this as a side dish to the meal, but this  could be a meal all on its own if you were going for a meat free meal and just serve this with a salad on the side and I think it would be nice. It could then be vegetarian if use vegetable broth and gluten-free.

That’s all I have for today. Check back next time for another recipe. There is still plenty more to come, as always. Thanks for following along and if you ever have any questions or comments, feel free to leave a comment here, or send me a message on Facebook or Twitter or at my email address of IguanaFlats@msn.com. Until next time, enjoy the rest of your day and enjoy your meal!

002

 
Leave a comment

Posted by on October 19, 2013 in Cooking, Dinner, One Pot Meals, Rice, Vegetarian


Tags: , , ,

Start of the Week With Some Quick Chicken Chimichangas

I had actually intended to make enchiladas this weekend, but Michelle thought she might like to have chimichangas instead. In reality, I was going to take as many shortcuts as possible whatever I was cooking because I had bought a rotisserie chicken to use for something, even if it was just rotisserie chicken for dinner. I got this recipe from Food Network, though I did alter it slightly to fit our family wants from the meal. Since I don’t eat cheese, I eliminated the cheese from the ones I made for myself. Also, Michelle and Sean would not go for the green chile sauce in the recipe, so though I included it in this recipe, I didn’t actually make it myself.

Chicken Chimichangas

2 tablespoons butter

4 tablespoons vegetable oil

1 onion, chopped

3 cloves garlic, chopped

1 jalapeno pepper, diced (you can take the seeds out if you want less heat)

1 1/2 teaspoons chili powder

1/2 teaspoon ground cumin

1/4 teaspoon ground cinnamon

Kosher salt

1 tomato, chopped, plus more for topping

2 tablespoons chopped fresh cilantro

2 1/2 cups shredded rotisserie chicken

1/4 cup sour cream

1 15-ounce can refried beans

4 10-inch flour tortillas

1 cup shredded Monterey Jack cheese, plus more for topping

Shredded lettuce, for topping

Mexican rice, for serving

Green chile sauce, for topping (see recipe)

Green Chile Sauce:

1/2 cup chopped onion

2 garlic cloves, chopped

1 tablespoon vegetable oil

Pinch chili powder

Pinch cumin

Pinch granulated sugar

Pinch Kosher salt

2 4-ounce cans chopped green chiles, drained and rinsed

1 cup chicken broth

1/4 cup chopped fresh cilantro

Preheat the oven to 450 degrees. Melt the butter with 2 tablespoons of the vegetable oil in a skillet; transfer the butter mixture to a bowl. Heat the remaining 2 tablespoons of vegetable oil in the skillet. Add the onion, garlic and jalapeno and cook until soft, about 3 minutes. Add the chili powder, cumin, cinnamon and 1 teaspoon of kosher salt.; toast the spices for about 30 seconds. Add the tomato and cilantro and cook until slightly dry, about 2 minutes. Stir in the rotisserie chicken and sour cream and warm through. Remove the skillet from the heat.

Brush a rimmed baking sheet with some of the reserved butter-oil mixture. Spread 2 tablespoons of refried beans down the center of each flour tortilla, leaving a 2-inch border on both ends. Top the beans with 1 cup of the chicken mixture and 1/4 cup of cheese. Fold in the ends and roll up the tortilla.

Put the chimichangas seam-side down on the baking sheet; brush the chimichangas with the butter-oil mixture. Bake for 8 to 10 minutes per side, brushing the chimichangas again after you flip them. Top with the green sauce, more cheese, lettuce and tomato. Serve with the Mexican rice and any leftover refried beans.

For the Green Chile Sauce: Saute the onions and chopped garlic cloves in a skillet with the vegetable oil. Add a pinch of chili powder, cumin, sugar and kosher salt; cook for 30 seconds. Stir in the two cans of drained, rinsed and chopped green chiles; cook for 2 minutes. Add the chicken broth and simmer until the sauce thickens, then puree the sauce in a blender or with a stick blender. Stir in the chopped cilantro and serve over the chimichangas.

Not only was this recipe very easy to make at the very last minute (made easier by the rotisserie chicken), it tasted great. The blend of spices with the chicken really was very nice. Personally, I think it would have been even better with the green chile sauce and plan to make it next time around. Of course, you could easily make your own chicken by simply sauteing a couple of boneless chicken breasts or baking them in the oven and use the chicken meat that way.

That’s all I have for today. Check back next time for some more recipes. I made a couple of homemade snacks yesterday that I will post recipes for and am planning on a nice vegetable chowder for dinner tonight that I will post this week as well. Until next time, enjoy the rest of your day and enjoy your meal!

002

 
Leave a comment

Posted by on September 16, 2013 in Cooking, Dinner, Poultry, Rice, Sauce


Tags: , , , , ,

Keep it Simple – Pork Stir-Fry with Green Beans and Peanuts

Stir fry is a great weeknight meal. You can plan everything out, make use of any vegetables you may have around, any protein that you want to use or any sauce you want to create. You can really do anything you want with them. I had some pork chops that I wasn’t sure how I wanted to cook so I did some searching and found this recipe from Bon Appetit for a very simple pork stir fry that tasted great.

Pork Stir-Fry with Green Beans and Peanuts

12 ounces pork tenderloin, trimmed, cut into 1-inch strips

4 tablespoons soy sauce

1 1/2 tablespoons honey

2 garlic cloves, minced

1/4 teaspoon dried crushed red pepper

1 pound green beans, trimmed, cut into 1 1/2-inch lengths

1 cup matchstick-size strips peeled carrots (about 2 medium carrots)

2 tablespoons vegetable oil

1 large red bell pepper, cut into 1 1/2-inch strips

1 tablespoon minced peeled fresh ginger

3 green onions, thinly sliced

1/4 cup finely chopped lightly salted dry-roasted peanuts

Mix the pork, 1 tablespoon of the soy sauce, 1 tablespoon of the honey, half of the garlic, and the crushed red pepper in a medium bowl. Mix the remaining 3 tablespoons of soy sauce and the remaining 1/2 tablespoon of honey in a small bowl and set aside.

Cook the green beans in a large saucepan of boiling salted water until they are crisp-tender, about 3 minutes. Add the carrots to the green beans in the water; cook for 1 minute. Drain the carrots and the green beans. Heat 1 tablespoon of the vegetable oil in a large non-stick skillet over high heat.

Add the pork mixture and stir-fry for 1 minute. Transfer the pork to a separate dish. Add the remaining 1 tablespoon of vegetable oil to the skillet; add the red bell pepper and stir-fry for 1 minute. Add the green beans, the carrots, the ginger, and the remaining garlic; stir-fry for 1 minute. Return the pork to the skillet along with the reserved soy sauce-honey mixture. Stir everything well until it is heated through, about 1 minute. Season to taste with salt and pepper. Transfer the stir fry to a bowl. Sprinkle the stir fry with the sliced green onions and the chopped peanuts and serve.

This is very simple to make and you will likely spend more time preparing everything than you actually will cooking. The green beans are nice and crisp and pick up a little bit of the soy sauce and honey flavor from the pork. If you don’t want to add the peanuts or have nut allergies, you can certainly leave them out of the dish altogether.

I made this dish with some homemade fried rice since we had some leftover rice to work with. I used a recipe from America’s Test Kitchen that I have used before and was able to use a lot of leftovers we had like the rice, a leftover pork chop from the other night and some frozen peas. All in all it was a very simple meal that you can make anytime and easily substitute out other ingredients if you wish.

That’s all I have for today. Check back next time to see what other recipes come along. I still have the homemade Shake N’ Bake pork chops and I am planning to make the lemon icebox pie this weekend, so check back for those. Until then, enjoy the rest of your day and enjoy your meal!

003 001 002

 
Leave a comment

Posted by on September 6, 2013 in Cooking, Dinner, Pork, Rice


Tags: , , ,

A Quick Dinner of Beef Tacos

I am always on the lookout for quick weeknight meals that taste great. Sean had requested we have tacos for dinner a few nights ago. I like to make taco dinners because they are simple to make and clean up from and always taste great. The nice things about tacos are that, like fajitas, you can use any protein you like best for your main component. I have made and posted fish taco recipes before, but this time I thought I would keep it simple and use the ground beef we had on hand to make some beef tacos using this recipe from America’s Test Kitchen.

Beef Tacos

1 tablespoon vegetable oil

1 onion, minced

3 garlic cloves, minced

2 tablespoons chili powder

1 teaspoon cumin

1 teaspoon coriander

1/2 teaspoon oregano

1/4 teaspoon cayenne pepper

1 pound ground beef

1/2 cup tomato sauce

1/2 cup chicken broth

2 teaspoons cider vinegar

1 teaspoon light brown sugar

Taco shells

Heat the vegetable oil in a medium skillet over medium heat until shimmering. Add the onion and cook until it is softened, about 5 minutes. Stir in the garlic, spices, and 1 teaspoon of salt and cook until fragrant, about 30 seconds.

Stir in the ground beef and cook, breaking it up with a wooden spoon, until it is no longer pink,about 5 minutes. Stir in the tomato sauce, broth, vinegar and brown sugar and simmer until the mixture is thickened, about 10 minutes. Season with salt to taste.

Divide the filling evenly among the taco shells and serve, putting out any toppings or accompaniments that you wish.

If you have ever bought any of those packaged taco kits, you know that they come with a seasoning packet. Perhaps you have even bought a packet separately to use to make tacos. Do yourself a favor and just use the spice mix listed here in this recipe. It tastes a lot better than anything you will buy. Also, instead of adding the water like the packet asks you to do, you can add the tomato sauce and broth used here and get much better results and flavor.

I always serve tacos with some homemade salsa, sour cream, shredded cheese and lettuce for toppings. Very often I also have guacamole to serve as well, which I did not have this time. I made some Mexican rice to go along with it, which makes an excellent side dish for tacos.

That’s all I have for today. it’s just a simple and quick recipe today. Check back next time as I will have a recipe for london broil with herb butter that sounds pretty tasty. I also hope to have some other recipes this weekend that I have been promising to make but just haven’t had the time to get to yet. You’ll want to check back for those as the lemon icebox pie looks great and I am anxious to try making the ciabatta bread. Until then, enjoy the rest of your day and enjoy your meal!

010


1 Comment

Posted by on August 29, 2013 in Beef, Cooking, Dinner, Rice


10 Ideas For Dinner Tonight: Rice | Food Republic

10 Ideas For Dinner Tonight: Rice | Food Republic.

We make a lot of rice in our house so it is always good to try and come up with some new ideas of this to make that incorporate rice into the meal well. Here’s some great ideas from Food Republic with 10 different rice uses in your meal. You can always use some new ways to make rice. Check it out!

 
Leave a comment

Posted by on August 19, 2013 in Cooking, Cooking Websites, Dinner, Rice


Tags: , , ,

Beat the Heat with Grilled Chicken Tacos

After taking a few days off to do some fun family things, it’s back to blogging and back to the recipes. Thankfully the stifling heat we have been experiencing here in New York seems to have eased a bit the last couple of days, giving me a chance to do some cooking again and get some recipes ready to post. I still have a couple from last week that I made when it was really hot, including this easy recipe for grilled chicken tacos. This one is kind of a combination of recipes I got from America’s Test Kitchen and Bon Appetit, using the best of both them to make an easy meal that you can do on the grill or indoors.

Grilled Chicken Tacos

1/4 cup fresh lime juice

2 tablespoons minced fresh cilantro

2 teaspoons Worcestershire sauce

1/2 teaspoon brown sugar

1/2 tablespoon ground cumin

1 medium onion, sliced

2 garlic cloves, finely chopped

1 pound skinless, boneless chicken thighs

1 tablespoon vegetable oil

1 teaspoon kosher salt

1/2 teaspoon freshly ground black pepper

8 corn tortillas, warmed (for serving)

2 avocados, sliced (for serving)

Sliced radishes (for serving)

Homemade Tomato Salsa

Whisk together the lime juice, cilantro, Worcestershire sauce, brown sugar, cumin, vegetable oil, salt and pepper in a bowl until well combined. Toss the onion, garlic and chicken thighs until all are well coated. Prepare your grill for medium-high heat. Grill the onions and the chicken thighs until they are cooked through and lightly charred, about 4 minutes per side.

Let the chicken rest for about minutes before slicing. Serve the chicken and onions with the warmed corn tortillas, avocados, sliced radishes, the homemade salsa and some extra cilantro along with lime wedges and sour cream, allowing each person to build their own tacos how they like it.

The great thing about this meal is that it can take you no time at all to put it all together. You might actually spend more time getting the grill going then you will with actual preparation and cooking. In our house, there are rarely any leftovers when we make tacos or quesadillas. I served this alongside some black beans and rice that I made and the homemade salsa goes very well with this meal. You can also make some guacamole instead of just slicing the avocados if you prefer to have it that way.

That’s all there is for today. Just a very quick and simple recipe that is great for a summertime meal. Check back next time to see some other recipes that I have made recently, including a roast chicken and vegetables from Chef Marc Murphy. a roast beef recipe. some burgers with onion strings from Cook’s Country and more. I do have a few other recipes I’ll be trying out this week as well that I may get on here, so keep checking back. Until next time, enjoy the rest of your day and enjoy your meal!

001

 
1 Comment

Posted by on July 23, 2013 in Cooking, Dinner, Grilling, Poultry, Rice, Side Dishes


Tags: , , , , ,

Quick and Easy One Pot Chicken and Rice

As the weather starts to warm up and we move closer and closer to summertime, not only will more people be grilling and cooking out, but you also want to make meals that are quick and easy to cook and can all be done in one pot or pan. I’ve made chicken and rice before in different ways but I came across this recipe in the Cook’s Illustrated Cookbook and saw how easy it was and thought it would make a great weeknight meal. Dinner for anyone during the week can get a little hectic, so if you have a recipe like this in your arsenal that you can pull out any time you have some chicken, it can make things a lot easier. While this particular recipe uses a whole chicken, I actually substituted since I only had chicken thighs on hand and used them exclusively.

Chicken and Rice With Tomatoes, White Wine, and Parsley

1 (3 1/2 to 4-pound) whole chicken, cut into 8 pieces (4 breast pieces, 2 drumsticks, 2 thighs)
Salt and pepper
2 tablespoons olive oil
1 onion, chopped fine
3 garlic cloves, minced
1 1/2 cups long-grain white rice
2 cups water
1 (14.5-ounce) can diced tomatoes, drained with 1/2 cup of juice reserved
1/2 cup dry white wine
1/3 cup chopped fresh parsley

Pat the chicken dry with paper towels and season well with salt and pepper. Heat the oil in a Dutch oven over medium-high heat until just smoking. Place the chicken skin side down in the pot and cook until it is well browned, about 6 to 8 minutes, reducing the heat if the pan begins to scorch. Flip the chicken skin side up and continue to cook until lightly browned on the second side, about 3 minutes; transfer to a plate.

Pour off all but 2 tablespoons of fat from the pot, add the onion, and cook over medium heat, stirring often, until softened, about 5 minutes. Stir in the garlic and cook until it is fragrant, about 30 seconds. Add the rice and cook, stirring frequently, until it is well coated and glistening, about 1 minute. Stir in the water, tomatoes with the reserved juice, white wine, and 1 teaspoon of salt, scraping up any browned bits. Nestle the chicken thighs and legs into the pot and bring it to a boil. Reduce the heat to low, cover, and simmer gently for 15 minutes. Nestle the chicken breast pieces into the pot and stir the ingredients gently until the rice is thoroughly mixed; cover and simmer until both the rice and the chicken are tender, about 10 to 15 minutes longer. Stir in the parsley, cover, and allow the dish to sit for 5 minutes.

One of the things you want to be sure of is that you stir the rice as the dish goes along. When you cook a meal of this nature, some of the rice tends to get undercooked if you just leave it alone without mixing it up as you go along.The recipe actually puts the breasts in after the other chicken has started cooking so they do not dry out and get overcooked while the dark meat pieces cook.There are many different variations you can try on this – if you want to change it around every time you make it. You could certainly add different spices such as paprika, cilantro, saffron, cumin or even things such as bell peppers, peas, chili peppers, olives, anchovies or some lemon or lime juice. The combinations seem nearly endless depending on what exactly you want to go for. As I said before, you can use whatever pieces of chicken you happen to have on hand if you do not have a whole chicken. The meal only took about a half an hour to cook and clean up was a breeze since everything was done all in one pot.

That’s all I have for today. Check back again later on in the week as I’ll have some of the recipes of things I have cooked recently or things I am planning for later on in the week. I already made some chicken sandwiches, Alton Brown’s potato salad recipe and some braised pork chops with cherries, among other things. Until next time, enjoy the rest of your day and enjoy your meal!

001

 
Leave a comment

Posted by on June 12, 2013 in Cookbooks, Cooking, Dinner, One Pot Meals, Poultry, Rice


Tags: , , ,

 
National Day Calendar

Fun, unusual and forgotten designations on our calendar.

Jennifer Probst

a little bit naughty a little bit nice

Laissez Faire

Letting Life Lead

simple cooking recipes

a blog to share with you the best