RSS

Category Archives: Sauce

Steak in a Snap – Cook’s Country Strip Steaks with Sauteed Onion and Mushrooms

Now that the Easter holiday is over and a couple of really big work projects are out of the way for me, hopefully I can get back to doing some more regular posts here on my cooking blog. I have made a few different things recently, with a number of them coming out of the last issue of Cook’s Country magazine. They was have some good choices and therefore meals that have recipes that are easy to follow and make use of some basic ingredients. I particularly like their recipe card dinners that can be done in under 30 minutes or so. That is the case with this particular recipe for a strip steaks with sautéed onion and mushrooms. I had just happened to get some New York strip steaks on sale last week and saw it was a great opportunity to give this easy recipe a try. It makes use of just a few ingredients and makes a really nice and flavorful sauce to go along with the steak, mushrooms and onions.

Strip Steaks with Sautéed Onion and Mushrooms

2 (one-pound) boneless strip or rib-eye steaks, 12 1 1/2 inches thick

Salt and pepper

2 tablespoons vegetable oil

8 ounces mushrooms, trimmed and sliced thin

one onion, halved and sliced thin

2 garlic cloves, minced

1/4 cup balsamic vinegar

3 tablespoons chopped fresh chives

2 Tablespoons Butter

Pat the steaks dry with paper towels and season each steak well with salt and pepper. Heat 1 tablespoon of the vegetable oil in a large cast-iron or stainless steel skillet set over medium-high heat until the oil is just smoking. Cook the steaks until they are well browned and the meat registers 125° on an instant read thermometer inserted into the center of the steak (for medium rare), about 5 minutes per side. Transfer the steaks to a carving board and tent it loosely with aluminum foil and allow the steaks to rest for about 5 minutes.

Heat the remaining 1 tablespoon of vegetable oil in the now empty skillet over medium-high heat until the oil is just smoking. Add the mushrooms, onion 1/2 teaspoon of salt and 1/2 teaspoon of pepper and cook until the vegetables are well browned, about 5 minutes. Add the minced garlic and cook until the garlic is fragrant, about 30 seconds.

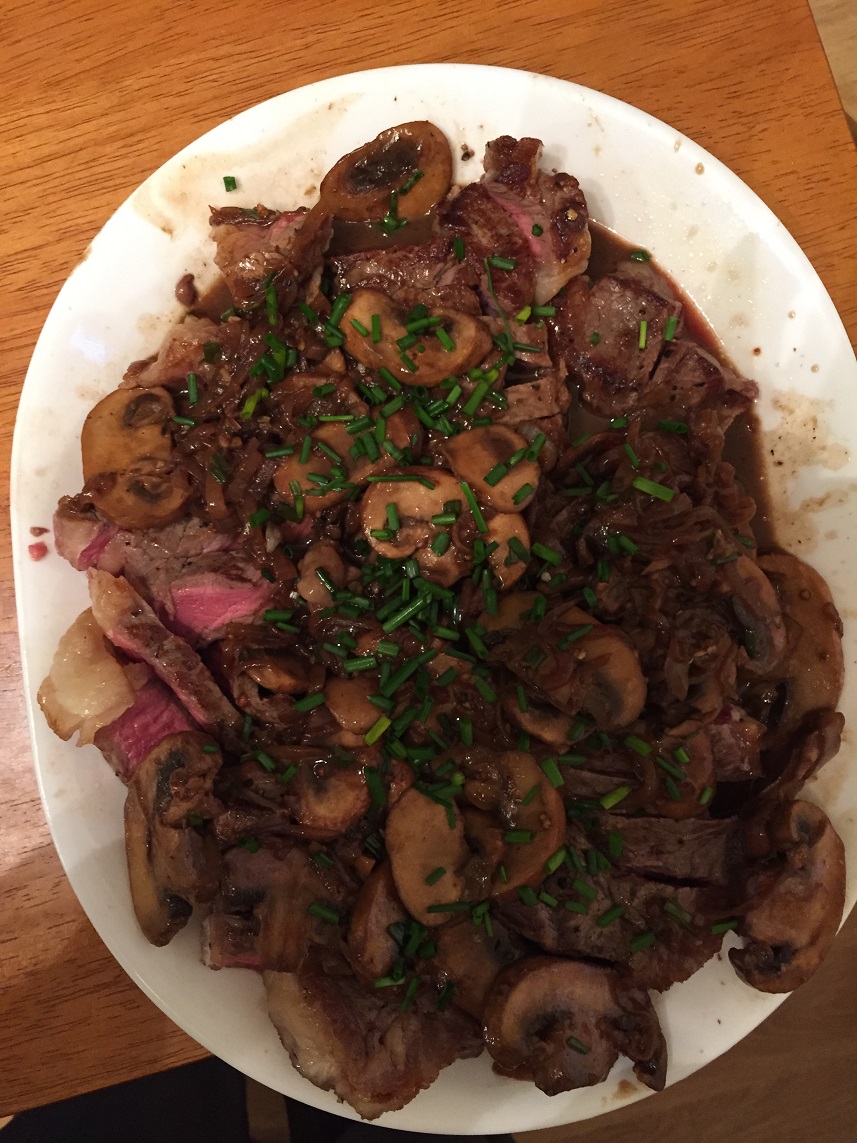
Stir the balsamic vinegar and any accumulated beef juices into the skillet and simmer, scraping up any browned bits in the pan, until the sauce has thickened, about 1 to 2 minutes. Take the skillet off the heat and stir in 2 tablespoons of the chives and the 2 tablespoons of butter. Season the sauce with salt and pepper to taste. Slice the steaks and transfer them to a platter. Top the steaks with the sauce and sprinkle the steaks with the remaining 1 tablespoon of chives and serve.

It might be hard for you to get a recipe that is much easier than that and supplies you with such great flavor. The mix of the balsamic vinegar with the mushrooms, onions and garlic really provide great flavor for the steaks. I made some mashed potatoes to go along with it and the sauce was just as great on the potatoes as it was on the steak. The steak was cooked perfectly to medium rare (that is the way we prefer it anyway) but if you like it cooked a little more well you could always cook it for an extra minute or 2 to get the doneness that you prefer. You get a great sear on the steaks and a nice sauce to go with them and mushrooms and onions go with steak so well that it seemed perfect together.

That’s all I have for today. Check back next time for another recipe. Until then, enjoy the rest of your day and enjoy your meal!

stripssteakswithonionandmushrooms


Leave a comment

Posted by on April 6, 2015 in Beef, Cooking, Dinner, Sauce


Tags: , , , ,

A Perfect Play on a One Pot Meal – Cook’s Country One-Pan Pork Chop Dinner

One pot meals are the dream of any busy home cook. You love to have a meal that tastes great, gets everything together in one dish and has easy clean up and cooking time. it may not always be as easy as it sounds and I am always on the lookout for different variations on the one pot meal. It is not often you see one involving pork that doesn’t involve a stir fry, so when I saw this recipe listed in the latest issue of Cook’s Country I was intrigued. It roasts the vegetables and the pork chops together, not something you often see because pork chops, even really think ones, do not take the same amount of time to roast as most of your vegetables do. I was wondering just how the chops would get nicely browned without doing them on the stovetop and still have everything roasted together in one pan.

One-Pan Pork Chop Dinner

4 (10-ounce) bone-in center-cut pork chops, 1 to 1 1/4 inches thick, trimmed

1/3 cup extra-virgin olive oil

Kosher salt and black pepper

1 teaspoon paprika

1 teaspoon ground coriander

1 pound Yukon Gold potatoes, unpeeled, halved lengthwise and cut crosswise into 1/2-inch thick slices

1 pound carrots, peeled and cut into 3-inch lengths, thick ends quartered lengthwise

1 fennel bulb, stalks discarded, bulb halved, cored and cut into 1/2-inch thick wedges

10 garlic cloves, peeled

2 teaspoons minced fresh rosemary

2 tablespoons minced fresh parsley

1 small shallot, minced

4 teaspoons red wine vinegar

1/8 teaspoon sugar

Adjust an oven rack to the upper-middle position and heat the oven to 450 degrees.Pat the pork chops dry with paper towels and rub each chop with 1 teaspoon of the olive oil. Combine 2 teaspoons of the kosher salt, 1 teaspoon of black pepper, the paprika and the coriander together in a small bowl. Season the pork chops all over with the spice mixture and set the pork chops aside.

Toss the potatoes, carrots, fennel, garlic cloves, rosemary, 1 tablespoon of the olive oil, 1 1/2 teaspoons of kosher salt and 1/4 teaspoon of the black pepper together in a large bowl until the vegetables are well coated. Spread the vegetables in a single layer on a rimmed baking sheet. Roast the vegetables until they are just tender, about 25 minutes.

Carefully place the pork chop on top of the vegetables and return the baking sheet to the oven. Roast the pork chops until they register 140 degrees on an instant read thermometer inserted into the thickest part of the pork chops and the vegetables are fully tender, about 10 to 15 minutes longer, rotating the baking sheet halfway through the roasting process.

Meanwhile, combine the parsley, shallot, red wine vinegar, sugar, 1/2 teaspoon of kosher salt, 1/4 teaspoon of black pepper and the remaining 1/4 cup of olive oil together in a bowl.Transfer the vegetables and the pork chops to a platter and drizzle with the vinaigrette before serving.

The chops and the vegetables both were nicely browned and had great flavor. the spice run on the chops really helped them to brown nicely and provide just the flavor they needed for the dish and roasting the pork chops on top of the vegetables added some extra flavor to the veggies as well. Since the vegetables were nice and hot when I added the pork they helped to cook the pork nicely as well. The vinaigrette was a nice finish to the dish but I think it tasted great without it as well and we just passed the vinaigrette on the side for those that might want it on their meal. I love roasted carrots and throw in the potatoes, garlic and fennel (I added an onion too to the dish; who doesn’t love roasted onion?)and the flavors were phenomenal. Best of all, of course is that there was only one pan to clean up when dinner was done. It makes for a great weeknight meal in one dish that you can do in under 45 minutes.

That’s all I have for today. Check back next time for another recipe. Until then, enjoy the rest of your day and enjoy your meal!

onepanporkchopdinner


Tags: , , , , ,

Checking in With a Classic – Chicken Marsala

There’s been a lot of work coming my way lately, which is a good thing because it keeps me working, but it also keeps me from doing extra things like blogging. After spending 10-12 hours a day on the computer writing it is hard to find the energy to get back on and write for the blog. Today I have a little bit of a break during the day so I have time to share a recipe I recently tried out at home. Sometimes it is nice to get back to the classics for recipes and I had wanted to make chicken Marsala for a while now and had just not gotten around to it. I finally happened to be down near our local liquor store the other day and made the conscious effort to go in and get a bottle of Marsala wine so that I could make the chicken. I decided to try out this recipe from America’s Test Kitchen, which strays from a number of other recipes in that they do not make use of chicken broth in the recipe. I figured I would give it a try to see how it came out.

Chicken Marsala

4 boneless, skinless chicken breasts 

1 cup all-purpose flour

Table salt

Ground black pepper

2 tablespoons vegetable oil

2 1/2 ounces pancetta or bacon (about 3 slices), cut into pieces 1 inch long and 1/8 inch wide

8 ounces white mushrooms, sliced (about 2 cups)

1 medium clove garlic, minced (about 1 teaspoon)

1 teaspoon tomato paste

1 1/2 cups Marsala wine 

1 1/2 tablespoons lemon juice from 1 small lemon

4 tablespoons butter cut into 4 pieces, softened

2 tablespoons chopped fresh parsley leaves

Adjust an oven rack to the lower-middle position and place a large heatproof dinner plate on the oven rack, and heat the oven to 200 degrees. Heat  a 12-inch heavy-bottomed skillet over medium-high heat until it is very hot (you can hold your hand 2 inches above the pan surface for 3 to 4 seconds), about 3 minutes. Pat the chicken breasts dry with paper towels. Halve the chicken breasts horizontally and then cover the chicken halves with plastic wrap and pound the chicken to an 1/4-inch thickness with a meat pounder. Meanwhile, place the flour in a shallow baking dish or pie plate. Season both sides of the chicken with salt and pepper; working one piece at a time, dredge the chicken in the flour to coat both sides. Lift the chicken piece from the tapered end and shake it to remove any excess flour; transfer the piece to a large plate and repeat the process with the remainder of the chicken. Heat 2 tablespoons of the oil in the heated skillet until it is shimmering. Place the floured cutlets in a single layer in the skillet and cook the chicken until it is golden brown on the first side, about 3 minutes. Using tongs, flip the cutlets and cook them on the second side until they are golden brown and no longer pink, about 2 to 3 minutes longer. Transfer chicken to heated plate and repeat the process with any remaining chicken pieces. When all of the chicken is cooked, return the plate to the oven.

Cook the pancetta or bacon in the now-empty skillet over low heat, stirring occasionally and scraping up any browned bits, until it is crisp, about 5 minutes. Remove the pancetta with a slotted spoon and transfer it to a paper towel-lined plate. Add the mushrooms to the now-empty skillet, increase the heat to medium-high and cook, stirring occasionally, until the mushrooms are softened and lightly browned, about 8 minutes. Stir in the garlic, tomato paste and the crisp pancetta or bacon and cook until the tomato paste begins to brown, about 1 minute. Take the skillet off the heat and stir in the Marsala wine, scraping up any browned bits. Return the skillet to the heat and bring the mixture to a vigorous simmer and cook, stirring occasionally, until the sauce is thickened and measures about 1 1/4 cups, about 5 minutes. Off the heat, stir in the lemon juice and any accumulated chicken juices. Whisk in the butter, 1 piece at a time. Stir in the parsley and season the sauce with salt and pepper to taste. Pour the sauce over the chicken and serve.

I have to say I have had chicken Marsala a number of times and very often the chicken is overcooked and the mushrooms are slimy and the sauce is watery. none of those things occurred with this dish. the chicken was tender with great flavor and the sauce came out perfectly. The mushrooms were not overcooked or watery and came out perfectly and the pancetta (or bacon, which I used this time) was a nice touch to the dish. I served this with noodles for Michelle and Sean and had it over rice myself and it was done perfectly. I even had some leftovers the next day for lunch and it was delicious. I would use this recipe again to make this classic. It is not one I had made in a long time so it was nice to try it again.

That’s all I have for today. Check back next time for another recipe. Until then, enjoy the rest of your day and enjoy your meal!

chickenmarsala1

 
Leave a comment

Posted by on March 13, 2015 in Cooking, Dinner, Poultry, Sauce


Tags: , , , , , ,

Take a Turn at Teriyaki Pork Stir Fry

When you need a fast and easy dinner it has not to think of making a stir fry. It does not matter what type of protein you have on hand (or none at all if you want a nice vegetable stir fry), all you need is a good sauce to use and some vegetables and you are good to go. I have always found that sir fry dinners work really well with leftover vegetables much like it is when you want to make a hash. At any rate, since Mondays are hectic days around here (although lately they all seem pretty hectic), a stir fry was a very easy way to go for dinner that could be done quickly. I had a pork tenderloin on hand and decided this would be the perfect foil for a nice stir fry meal so I found this recipe at food.com for a simple pork teriyaki stir fry, rounded up my ingredients and went ahead with the recipe.

Teriyaki Pork Stir Fry

2/3 cup soy sauce

1/4 cup brown sugar

1 tablespoon cornstarch

2 teaspoons fresh ginger, grated

2 garlic cloves, minced

1/4 teaspoon red pepper flakes

1 pound boneless pork loin chop or 1 pound pork tenderloin

1 red, yellow or orange pepper, cut into thin 1-inch strips

6 ounces snow peas

4 green onions, chopped

1 teaspoon sesame oil

1 (8-ounce) can bamboo shoots, drained

White or brown rice, for serving

In a medium bowl or large measuring cup, whisk together the soy sauce, brown sugar and cornstarch until the mixture is smooth and well blended. Add the ginger, garlic and red pepper flakes and whisk again to blend the ingredients. Cut the pork into thin strips and add it to the soy sauce mixture. Toss the pork to coat it well in the sauce and cover and refrigerate the pork for at least 15 minutes.

Meanwhile, make the white or brown rice according to the package directions and set the rice aside.

Heat 1/2 teaspoon of the sesame oil in a large skillet or wok over high heat until it is smoking. Remove the pork from the marinade and add the pork strips to the skillet, reserving the marinade for later. Stir fry the pork for 2 to 3 minutes until it is no longer pink. Remove the pork from the skillet with a slotted spoon to a bowl and cover the bowl to keep the pork warm. Add the remaining sesame oil to the skillet. Add the bell pepper, snow peas and green onions and stir fry the vegetables for 2 to 3 minutes until they are crisp-tender. Return the pork to the skillet with the vegetables and stir in the reserved marinade and the bamboo shoots. Bring the mixture to a boil and cook for 1 to 2 minutes or until the sauce has thickened. Remove the stir fry to a large bowl or platter and serve with the warm rice.

Of course the great thing about a stir fry is that you can use any vegetables you have on hand. I had some multi-color peppers so I went with red, yellow and orange and I also had a pack of frozen stir fry vegetables on hand that I added to the vegetables at well to make it a full meal. the sauce was perfect for the pork and the vegetables and everything smelled great and tasted even better. As a matter of fact, there was very little left over from the meal, just enough for Michelle to take for lunch with her. it’s a fast one pot meal (well 2 with the rice) that you can have made in under 30 minutes for any night of the week.

That’s all I have for today. Check back next time for another recipe. Until then, enjoy the rest of your day and enjoy your meal!

teriyakiporkstirfry


Tags: , , , , , , , ,

A Sweet Treat for Dinner – Pineapple Sweet Ribs

Ribs are always one of my favorite meals no matter what time of year it may be around here. many people may equate making ribs for dinner along with the summer time and barbecues, but most of the time I make my ribs in the oven anyway so I can just as easily make some ribs in February as I can in August. When I saw some baby back ribs on sale at the store recently I picked some up and then set about trying to find a good recipe to do something a little different. I had also picked up a fresh pineapple that same day and was looking for a way where I could combine some of the flavors and came across this recipe from Taste Book for pineapple sweet ribs. Their recipe makes the ribs over a grill so I adapted the recipe to fit into my use in the oven and I went about making some fine tasting ribs.

Pineapple Sweet Ribs

2 racks baby back ribs

1/2 cup beef stock

For the Dry Rub:

2 tablespoons dark brown sugar

2 tablespoons paprika

1 tablespoon garlic salt

1 1/2 teaspoons onion salt

1 1/2 teaspoons chili powder

3/4 teaspoon black pepper

1/2 teaspoon cayenne pepper

1/4 teaspoon dried oregano

1/4 teaspoon cumin

For the Glaze:

1 cup pineapple juice

1 tablespoon dry rub mix

1 1/2 teaspoons balsamic vinegar

1 1/2 teaspoons minced garlic

1 cup barbecue sauce

To make the dry rub, combine the brown sugar, paprika, garlic salt, onion salt, chili powder, black pepper, cayenne pepper, oregano and cumin together in a small bowl and mix well. Set aside 1 tablespoon of the dry rub mix for the glaze mixture and apply the remaining rub generously to the front and the back side of the ribs. Pat the rub gently to ensure that the rub adheres well to the meat. Marinate for at least one hour at room temperature or up to overnight covered in the refrigerator.

Heat the oven to 300 degrees. Place the ribs in a large baking or roasting pan along with the beef stock and cover the pan tightly with aluminum foil. Bake the ribs for 3 to 3 1/2 hours in the oven until they are tender.

While the ribs are cooking, make the glaze. In a small saucepan, add the pineapple juice, 1 tablespoon of dry rub mix, balsamic vinegar, minced garlic and barbecue sauce until it is well blended. Heat the mixture over medium heat, bring it to a simmer and turn the heat down to low and allow the glaze to simmer for about 5 minutes until it thickens.

Remove the baking pan from the oven and take the foil cover off of the ribs. Brush all sides of the ribs with the glaze until they are well coated. Place the ribs bake in the baking pan and turn on the broiler. Broil the ribs to caramelize the glaze on the ribs, about 2 to 3 minutes. Remove the ribs from the oven and place them on a cutting board. Cut the ribs into single or double portions and place them on a platter and serve with any of the remaining glaze.

I really liked the sweetness of the pineapple to go along with the glaze and the balsamic really helped to top things off. The ribs came out perfectly and were falling off the bone, just the way I like them. The combination of pineapple and pork goes so well together that it makes a great glaze that would probably work well on pork chops as well. I actually served some diced pineapple along as one of the side dishes with some baked beans, corn and boiled potatoes. it was a nice meal that made us think of the summertime as we freeze here in February.

That’s all I have for today. Check back next time for another recipe. Until then, enjoy the rest of your day and enjoy your meal!

pineapplebbqribs

 
Leave a comment

Posted by on March 3, 2015 in Cooking, Dinner, Pork, Sauce


Tags: , , , , , , ,

Fresh Market + Geoffrey Zakarian = Awesome Spaghetti and Meatballs

I am always on the lookout for a good deal when it comes to grocery shopping. If I can get a bargain that we can get a few meals out of that is even better and I am willing to drive a little bit if I have to get there. That is why I buy a lot of my meat and produce from Adam’s Farms, which is a good 20 mile drive for me but well worth it. I had also forgotten that we have a Fresh Market that is about the same distance away from here and I always found good stuff when I would go there when visiting my family in North Carolina so I signed up to get their emails and see what kinds of deals they might have. It turns out on Thursdays they do a store special called the Little Big Deal where you get the ingredients for a dinner to feed a family of f our all for the cost of twenty dollars. The run the special every Thursday and this month’s special was a spaghetti and meatballs dinner, where they included a pound of whole wheat pasta, a pound of lean ground sirloin or ground turkey or a beef-free substitute, a jar of tomato sauce, a bag of salad and a family size fruit tub all for twenty dollars. It seemed like a good deal and I had been playing to make a new spaghetti and meatballs recipe I got from Geoffrey Zakarian so I thought I would adapt these ingredients from Fresh Market into the recipe and see what I came out with.

Geoffrey Zakarian’s Spaghetti and Meatballs

5 tablespoons panko breadcrumbs, finely processed

6 ounces heavy cream (as needed to soak the breadcrumbs)

1 tablespoon vegetable or canola oil

1/2 cup diced onions

1 clove garlic, chopped

1/2 tablespoon chopped fresh rosemary

8 ounces ground pork

8 ounces sweet pork sausage, no casing

8 ounces ground veal

5 ounces Parmesan cheese, grated, plus more for garnish

1/4 cup finely minced fresh parsley, plus more for garnish

1 egg

Kosher salt

Basic Tomato Sauce recipe, to follow

1 pound spaghetti

Freshly cracked black pepper

For the Basic Tomato Sauce:

2 tablespoons olive oil

4 leaves fresh basil

1 clove garlic, chopped

Pinch red pepper flakes

One 32-ounce can San Marzano tomatoes, drained and processed in a food mill or food processor

Soak the breadcrumbs in the heavy cream in a medium bowl. Heat a large saute pan over medium heat and add the oil. Saute the onions and the garlic until the onions are translucent, about 3 to 4 minutes. Add the rosemary, remove the pan from the heat and then chill the mixture thoroughly in the refrigerator, about 30 minutes.

Combine the breadcrumb mixture, the onion mixture, pork, sausage, veal, Parmesan cheese, parsley and the egg in a large bowl. Using an electric mixer on low-speed, mix until all of the ingredients are well incorporated, about 1 to 2 minutes. Alternatively, mix all the ingredients by hand until everything is well incorporated, then add some salt for seasoning.

Heat a small saute pan to cook a sample of the mixture. Taste the mixture for seasoning and make any necessary adjustments. Form the meatballs into the desired size and shape and place them on a wire rack placed inside a rimmed baking sheet. Chill the meatballs for about 1 hour so they have a chance to set.

Preheat the oven to 425 degrees. Bake the meatballs until they are browned, about 20 to 25 minutes. Bring the Basic Tomato Sauce to a simmer in a large pot or Dutch oven. Transfer the meatballs to the pot with the tomato sauce and allow the mixture to simmer until the meatballs are tender and cooked through, about 30 minutes.

Bring a large pot of salted water to a boil. Boil the spaghetti until al dente per the package instructions. transfer the cooked spaghetti to the sauce with the meatballs and toss. Add some black pepper, garnish with Parmesan cheese and parsley and serve.

To make the Basic Tomato Sauce, heat a saucepan over medium heat. Add the olive oil, basil, garlic and the red pepper flakes and cook until the garlic begins to soften, about 3 minutes. Add the tomatoes, bring the mixture to a simmer and cook for 1 minute. Use the sauce right away or chill the sauce until you are ready to use it.

Okay, I did make a couple of changes to fit some of the ingredients I had from the Fresh Market. First, for the meatballs I used a mix of meatloaf mix and he ground sirloin I had on hand instead of just pork and veal. For the tomato sauce, I did a mix of making the basic sauce and using the jar of sauce I had purchased, which was an organic tomato and basil sauce, so it all worked out very well. I have to say I was a little concerned about the meatballs because I didn’t think they would have much flavor and it looked like a lot of breadcrumbs in the mix that had set with the heavy cream, but I was pleasantly surprised. the meatballs turned out to be very tender and had great flavor to them. Michelle even commented that she thought they were the best meatballs she had ever had, so that was pretty high praise. We even had enough leftover so we will get another meal or some lunches out of it, so that twenty dollars is going to go pretty far. We served the meal with the salad that came with the deal (it was a Caesar salad and quite tasty) and I had made a baguette so it was a nice meal and the fruit was a great way to top it all off. Both the recipe and the deal from Fresh Market are definitely worth checking out.

That’s all I have for today. Check back next time for another recipe. Until then, enjoy the rest of your day and enjoy your meal!

gzspaghettiandmeatballs

 
4 Comments

Posted by on February 27, 2015 in Beef, Cooking, Dinner, Pasta, Pork, Sauce


Tags: , , , , , , ,

Manic Mealtime? Make Lime and Garlic Barbecue Chicken

As I noted yesterday, Mondays are a particularly hectic day around here because it is usually my busiest day of the week for work. Since I start working at 5:30 AM, sometimes Monday run until 5 PM, not leaving me much time to plan for dinner or anything else for that matter. That is why usually on Mondays I try to find a recipe I can put together rather easily and in under an hour, preferably even in under 30 or 40 minutes if possible. I am usually too tired by that point to go all out for a big meal so something simple often works well. This week I decided to take a turn out using some of the chicken thighs I had on and tried out this recipe I got from CafeDelites.com. The original recipe is for a lime and garlic barbecue chicken salad, but I decided to adopt it and make it my own and turn it into a chicken dish without the salad component.

Lime and Garlic Barbecue Chicken

7-8 tablespoons of your favorite barbecue sauce

1 tablespoon olive oil

2 tablespoons soy sauce

2 tablespoons Worcestershire sauce

1 1/2 teaspoons minced garlic (or 2 garlic cloves, minced)

1/2 lime, juiced

1 cup fresh or canned diced pineapple

4 bone-in, skinless chicken thighs

In a large bowl whisk together the barbecue sauce, olive oil, soy sauce, Worcestershire sauce, garlic and lime juice. Add the chicken thighs to the marinade and toss the chicken thighs to make sure they are coated well and evenly. Allow the chicken to marinade at room temperature for about 15 minutes.

Heat a large oven-safe skillet or cast-iron pan over medium heat. Add a drizzle of olive oil to the pan and heat until the oil is smoking. Add the marinated chicken thighs to the pan, along with any excess marinade, and cook the chicken until it is browned on each side, about 4 to 5 minutes per side. Add the pineapple to the pan, reduce the heat to low, and cover the pan, cooking the chicken  until it is cooked through, about 15 to 20 minutes, turning the chicken about halfway through the cooking process, and the pineapple is nicely caramelized. remove the chicken and pineapple from the pan to a large platter and serve.

You get all kinds of great flavor to the chicken from the marinade, including the nice combination of the lime juice with the soy sauce, but I really liked what the pineapple brings to the dish most of all. You get the great sweetness of the pineapple throughout he dish and it seems to go very well overall with the chicken. I served this very simply with some rice and some fresh green beans and it made a great meal. You could use any chicken pieces that you like with the marinade – drumsticks, wings, breasts or boneless breasts – and I think it would turn out just as well, you would just have to adjust your cooking times accordingly for the pieces that you were using.

That’s all I have for today. Check back next time for another recipe. Until then, enjoy the rest of your day and enjoy your meal!

limegarlicbbqchicken

 
Leave a comment

Posted by on February 24, 2015 in Cooking, Cooking Websites, Dinner, Fruit, Poultry, Sauce


Tags: , , , , , ,

Smash it Up – Copycat Classic Smashed Cheeseburger and Secret Sauce

I freely admit that I love a good burger but I personally have never been to a Smashburger in my life. I have heard of them before but the nearest one to me here where I live in New York is almost twenty miles away so unless I happen to be driving by one and saw it I don’t think I would go out of my way just to find the burger. Though to hear people talk about how great the burgers can be there, maybe it would be worth the trip. With all of hubbub surrounding the burgers they have to offer I wondered if there was a copycat recipe floating around on the Internet where I could just try to make one of my own just like they do there. I was not very surprised when I found one pretty quickly through Epicurious. Upon taking a look at the recipe it seems as though they use ground brisket as part of their recipe, something I am not likely to find here unless I asked a butcher to do it for me specifically. I opted to use ground chuck instead and the rest of the meat involves ground sirloin, which I don’t typically buy because it does tend to cost more but for this occasion of testing a recipe I figured it was worth a shot. So then I set about trying to make the Smashburger.

Copycat Classic Smashburger and Secret Sauce

For the Burgers:

3/4 pound freshly ground sirloin

1/4 pound ground chuck

2 tablespoons butter, plus more if needed

4 potato rolls

2 tablespoons vegetable oil

Kosher salt, to taste

Freshly ground black pepper, to taste

4 slices American cheese

Four 1/4-inch-thick tomato slices

4 burger-sized pieces green-leaf lettuce

Secret Sauce, recipe to follow

For the Secret Sauce

1/4 cup mayonnaise

1 1/2 teaspoons pickle juice

1 1/2 teaspoons ketchup

1 teaspoon yellow mustard

1/4 teaspoon smoked paprika

1/4 teaspoon garlic powder

1/4 teaspoon onion powder

To make the secret sauce, stir the mayonnaise, pickle juice, ketchup, mustard, paprika, garlic powder and onion powder together in a medium bowl. Taste and adjust the seasoning as necessary and then set the sauce aside.

For the burgers, in a large bowl, use your hands to gently combine the ground sirloin and ground chuck (or ground brisket if you can find it or make it yourself). Divide the mixture into four equal-sized, loosely meat pucks about 2 1/2 inches thick. Place the patties on a plate lined with plastic wrap or parchment paper. Transfer the plate to the freezer and freeze the patties for 15 minutes. Do not exceed the freezing time.

Meanwhile, heat a griddle, large cast-iron skillet or large stainless-steel skillet over medium-high heat. Melt 2 tablespoons of butter in the skillet and place the potato rolls, cut side down, in the pan. Cook the rolls until the cut sides are golden brown, about 2 minutes. You may need to do this in batches depending on how big of a cooking space you have and use additional butter if needed. Place the toasted buns on four plates and reserve the griddle or skillet.

Remove the patties from the freezer. Increase the heat under the skillet to high and add 2 tablespoons of vegetable oil to the skillet. Heat until the oil begins to smoke. Working one at a time, add a patty to the skillet and immediately press a large spatula flat on top of the patty. Use the handle of another large spatula to hammer the first spatula down, smashing the patty until is about 1/2-inch thick. you will have to hammer longer and harder than you might originally think to do this right. Press down and slide the spatula to remove it without tearing the patty. Generously season the patty with salt and pepper. Repeat the smashing process with the remaining hamburger patties.

Flip each patty when the first side is deeply browned and crisp with craggly edges, about 2 minutes long for medium doneness. Season the cooked side generously with salt and pepper, then add a slice of American cheese and continue to cook the patty until the cheese has melted, about 2 minutes longer. Transfer the cooked patties to the bottom of the burger rolls. Top each burger with the tomato slices and the lettuce. Spread the tops of the buns with the Secret Sauce and place the top bun on the burger and serve.

Cast iron will serve you really well here if you have it as you can get that great sear and crust on the burgers when you smash them. I did find you had to press down and hammer pretty strongly to get the desired effect, but if you like your burgers crispy in that way this is a good way to try them. They do come out nicely and I did like the sauce you add to them rolls as it does lend some great flavor. According to the website, potato rolls are also a must here and they do seem to add something to the dish. I put some bacon on Sean’s because that is the way he likes them and I served these with some very easy homemade oven fries, which I will be sharing the recipe for tomorrow. It’s a pretty good burger and if you are hung up on the Smashburger flavor it’s worth a try to make one yourself.

That’s all I have for today. Check back next time for another recipe. Until then, enjoy the rest of your day and enjoy your meal!

copycatsmashburger

 
Leave a comment

Posted by on February 20, 2015 in Beef, Cooking, Dinner, Lunch, Sandwiches, Sauce


Tags: , , , , , , ,

Fast, Easy and Delicious – Pork Tenderloin with Date and Cilantro Relish

Quick weeknight meals have been becoming more and more important around here lately. With Michelle away on business or working late, Sean’s schoolwork and involvement in the school play and my work it has been a crunch to try to get a meal on the table some nights. That means I have been turning more and more to quick and easy ideas for dinner that I can put together in under 40 minutes so we can eat at a reasonable time and not have to turn to fast food or convenience food too often. I do try to mix things up so we’re not eating the same things all of the time (Sean does tend to complain if we are eating too much chicken). I had picked up a pork tenderloin at the store on sale a few days ago and then I saw this recipe on Epicurious for pork tenderloin with date and cilantro relish that sounded tasty and different. it only has a few ingredients to it and can come together in under 45 minutes, so I thought I would give it a try.

Pork Tenderloin with Date and Cilantro Relish

3 tablespoons olive oil, divided

1 pork tenderloin (about 1 1/2 pounds)

Kosher salt

Freshly ground black pepper

2/3 cup dates (about 4 ounces), cut into small pieces

2 tablespoons orange juice

3 tablespoons chopped fresh cilantro plus leaves for serving

Preheat the oven to 425 degrees. Heat 1 tablespoon of the olive oil in a large ovenproof skillet or cast iron pan over medium-high heat. Season the pork tenderloin with salt and pepper and place it in the skillet and cook, turning the tenderloin occasionally until it is browned on all sides, about 6 to 8 minutes. Transfer the skillet to the oven tenderloin until the temperature of the pork registers 140 degrees on an instant-read thermometer inserted into the thickest portion of the tenderloin, about 12 to 15 minutes. Transfer the pork to a cutting board and allow the tenderloin to rest for at least 5 minutes before slicing it. Set aside the pan drippings from the skillet.

Toss the dates, orange juice, reserved pan drippings, 3 tablespoons of the chopped cilantro and the remaining 2 tablespoons of the olive oil together in a small bowl. Season the mixture with salt and pepper to taste. Spoon the relish over the pork slices and top with the cilantro leaves.

I did make a small change to the recipe as I went along. It seemed to me that the dish needed a little extra crunch so I added a sliced carrot to the skillet along with some pearl onions with the pork and cooked them in the oven as well. Both vegetables picked up some of the juices from the pork and seem to add a nice touch to the relish as well in terms of color and flavor. I have to admit I do not have a lot of experience using dates or cooking with them, and Sean seemed to shy away from them in the dish, but I really enjoyed the flavor they added overall to the relish and it went really nicely with the pork. I did notice in reviews of the recipe that some people added things like cranberries or walnuts to the relish as well to give it some extra flavor and take some of the sweetness of the dates. I think if you didn’t want to use dates you could easily use prunes or even grapes as a replacement and it would work just as well. I served this with some broccoli and white rice and it was a nice meal that was done quickly with easy clean up.

That’s all I have for today. Check back next time for another recipe. Until then, enjoy the rest of your day and enjoy your meal!

porktenderloinwithdates1 porktenderloinwithdates2

 
Leave a comment

Posted by on February 19, 2015 in Cooking, Dinner, Pork, Produce, Sauce, Vegetables


Tags: , , , ,

Let’s Strip! – New York Strip That is… Grilled New York Strip Steak with Five-Peppercorn Sauce

There’s nothing like a good quality steak every once in a while to make for a really great meal. Unfortunately in the world we live in today most steak is pretty darn expensive so it is something I make very often at home, saving it for special occasions. When Valentine’s Day rolled around this year and Michelle was coming home that day after 3 weeks on the road, that was all special enough for me and I went in search for some good steak. Nothing against the big local supermarkets, but I prefer to use a smaller butcher shop for good steaks. For me, they are usually a better cut of meat and very often the price is better than want I find in the supermarket. Such was the case when I picked up three 3 New York strip steaks and got them for $5 less a pound than they were at the supermarket. I sorted out among the recipes I had and decided to give this one from Guy Fieri a try for some grilled New York strip steaks with a creamy five-peppercorn sauce. I busted out the grill pan and went to work.

Grilled New York Strip Steak with Five-Peppercorn Sauce

4 cups beef stock

Four 16-ounce New York strip steaks

1 teaspoon kosher salt

1 teaspoon freshly ground black pepper

4 tablespoons butter

2 shallots, minced

2 tablespoons fresh cracked five-peppercorn blend

1/2 cup brandy

1/2 cup red wine

1/2 cup heavy cream

2 tablespoons minced fresh parsley

Bring the beef stock to a boil in a medium saucepan set over medium-high heat. Immediately lower the stock to a simmer and cook the stock until it is reduced to about 1/2 cup, about 45 minutes. Set the stock aside.

Preheat a grill or grill pan to medium-high heat. Sprinkle the New York strip steaks with kosher salt and black pepper and allow them to sir for about 15 minutes.

Place the steaks on the grill or grill pan, evenly spaced, and grill the steaks for about 2 1/2 minutes. Rotate the steaks a quarter-turn and cook them for another 2 1/2 minutes to create crosshatch sear marks on the steaks. Flip the steaks over and repeat the process on the reverse side of the steaks. Remove the steaks to a baking sheet and allow them to rest for 5 to 10 minutes.

While the steaks are resting, combine 2 tablespoons of the butter, the shallots and the five-peppercorn blend together in a medium saucepan set over medium heat. Cook until the shallots and peppercorns are fragrant and the butter is beginning to bubble, about 2 minutes. Off the heat, add the brandy and the red wine. Carefully place the saucepan back on the burner (at this point you could flame the mixture if you want, provided you safely have the room to do so in your kitchen and are familiar with the process; I skipped this in might tight-quartered kitchen). Add the reduced beef stock and the heavy whipping cream, bring the mixture to a boil and immediately lower it to a simmer. Cook until the liquid has reduced by about two-thirds, about 8 to 10 minutes. Prior to serving the sauce, whisk in the remaining 2 tablespoons of butter into the sauce, then remove the sauce from the heat.

With a sharp knife, slice the steaks into 1/2-inch thick slices, cutting on the bias. Transfer the steak slices to a large serving platter and spoon over the five-peppercorn sauce. Garnish with minced parsley and serve, passing the reserved sauce on the side.

To me there is nothing like a steak that is cooked perfectly to medium or medium-rare. You get the softness of the meat with that nice pink color and the flavor burst in your mouth. Add in this peppercorn sauce, which has a nice mix of red wine, brandy and the peppercorns to add a nice little bite and you have perfect steaks for the night. I forgot to take a picture of the sauce itself but it came out nicely. I served the steaks with some sautéed mushrooms, roasted Brussels sprouts and a recipe for pan-fried fingerling potatoes and leeks with a honey-lemon sauce that I will share with you tomorrow. Overall it was a very nice meal and a good way to cap off Valentine’s Day and Michelle coming home.

That’s all I have for today. Check back next time for another recipe. Until then, enjoy the rest of your day and enjoy your meal!

grilled NY strip steaks

 
1 Comment

Posted by on February 17, 2015 in Beef, Cooking, Dinner, Grilling, Sauce


Tags: , , , , , , , ,

 
National Day Calendar

Fun, unusual and forgotten designations on our calendar.

Jennifer Probst

a little bit naughty a little bit nice

Laissez Faire

Letting Life Lead

What To Have For Dinner Tonight

Simple and delicious dinner inspiration