RSS

Category Archives: Snacks

Need Wings for the Big Game? Buffalo and Ginger-Soy Wings

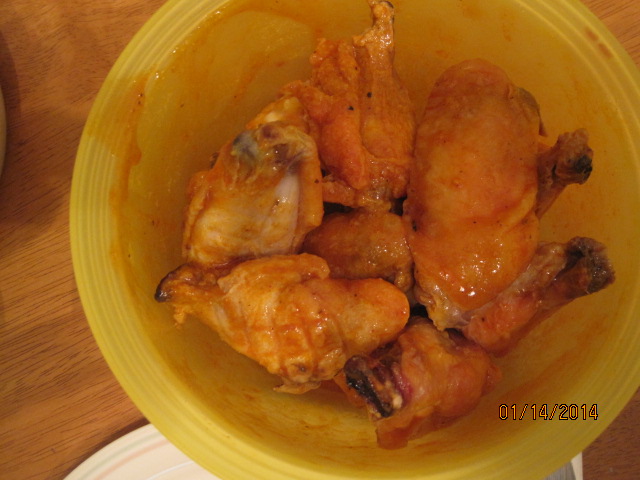
Wings are great any time as a snack, appetizer or even for dinner, but having them as something for snacking during the football game is like a national pastime now. I have a standard wing recipe that I use most of the time and often just toss them with some hot sauce and I am done, but I decided to incorporate that wing recipe with a couple of sauces and glazes that I saw from Bon Appetit to change things up a little bit and to give an option to those who may not like the spiciness of the Buffalo wings that I like to make. These at least give you a little bit of a choice when making your wings.

Crispy Baked Chicken Wings

For the wings:

5 pounds chicken wings, tips removed, drumettes and flats separated

2 tablespoons baking powder

1 teaspoon kosher salt

1/2 teaspoon freshly ground black pepper

For the Buffalo Sauce:

1 tablespoon butter, melted

1/4 teaspoon cayenne pepper

1/4 teaspoon freshly ground black pepper

1/4 teaspoon kosher salt

1/4 cup hot pepper sauce

For the Ginger-Soy Glaze:

1/4 cup honey

2 tablespoons soy sauce

3 large garlic cloves, crushed

1 2-inch piece of ginger, peeled and sliced

Adjust two oven racks to the upper-middle and the lower-middle positions and heat the oven to 250 degrees. Set  a wire rack in an aluminum foil–lined rimmed baking sheet. Pat the chicken wings dry with paper towels and transfer them to  a large 1-gallon zipper-lock bag. Combine the baking powder, salt and pepper, add these to the wings, seal the bag, and toss the wings to evenly coat them.

Arrange the wings, skin side up, in a single layer on the prepared wire rack. Bake the wings on the lower-middle oven rack for 30 minutes. Move the wings to the upper-middle rack, increase the oven temperature to 425 degrees, and roast until the wings are golden brown and crispy, about 40 to 50 minutes longer, rotating the baking sheet halfway through the baking process.

While the wings are baking, prepare the sauces. For the Buffalo sauce, mix the melted butter, cayenne pepper, black pepper and kosher salt in a medium saucepan over low heat. Allow the mixture to stand for 5 minutes. Whisk in the hot sauce and keep the mixture warm until you are ready to coat the wings. For the ginger-soy glaze, combine the honey, soy sauce, garlic cloves and ginger with 1/4 cup of water in a small saucepan and bring the mixture to a boil, stirring to dissolve the honey. Reduce the heat to low and simmer, stirring occasionally, until the mixture is reduced to 1/4 cup, about 7 to 8 minutes. Strain the glaze into a medium bowl and allow it to sit for 15 minutes to thicken slightly.

After 40 minutes, remove the baking sheet from the oven and let the wings stand for 5 minutes. Line another rimmed baking sheet with foil and top with a wire rack. Add half of the wings to the ginger-soy glaze and toss them evenly to coat. Place these wings in a single layer on the prepared rack and bake until the glaze is glossy and lightly caramelized, about 8 to 10 minutes. Toss the remaining half of the wings in the bowl with the Buffalo sauce toss to coat, and serve.

Making the wings this way lets the wings get a nice crunchy coating to them thanks to the baking powder. I think you get the same kind of crunch as you do as when you fry them and you don’t have to deal with the mess of frying and all that oil. The Buffalo sauce is my favorite since I like the hot wings, but the ginger-soy glaze has great flavor as well thanks to the combination of the honey, ginger and soy. Sean really liked these and gobbled them up pretty quickly when we had them so it gives you a nice choice when making wings.

That’s all I have for today. Check back next time for some more recipes. I have been trying a few new things lately so I’ll have even more to share with everyone. Until next time, enjoy the rest of your day, stay warm (it is snowing here right now) and enjoy your meal!

008 006

 
Leave a comment

Posted by on January 21, 2014 in Appetizers, Cooking, Poultry, Sauce, Snacks


Tags: , , , , , ,

Another Game Day (or Anytime) Snack – Marcus Samuelsson’s Swedish Meatballs

Just before Christmas I was walking through Home Goods through the aisle where they have spices, sauces and jellies of all kinds and I saw a jar of lingonberry preserves. It’s not something you see at all around this area at any time and I did pick it up and put it in my cart but then upon second thought I put it back .I kept thinking I was never going to use this very often and didn’t really want to spend the extra money on it. Upon hindsight I should have made the purchase when we decided we wanted to make Swedish meatballs on Christmas Eve as an appetizer and I wanted to make them as authentic as possible. I found this recipe from Marcus Samuelsson of Food Network and Red Rooster fame and since he was from Sweden I figured he knew what he was talking about. I ended up having to make a substitution for the lingonberry preserves (more on that later), but the recipe still turned out really well.

Marcus Samuelsson’s Swedish Meatballs

For the meatballs:

1/2 cup fine dry bread crumbs

1/4 cup heavy cream

2 tablespoons olive oil

1 medium red onion, finely chopped

1/3 pound ground chuck or sirloin

1/2 pound ground veal

1/2 pound ground pork

2 tablespoons honey

1 egg

3 tablespoons butter

For the sauce:

1 cup chicken stock

1/2 cup heavy cream

1/4 cup lingonberry preserves

2 tablespoons pickle juice

To garnish:

Lingonberry preserves

Quick pickled cucumbers

Combine the bread crumbs and the heavy cream in a small bowl, stirring with a fork until all the crumbs are moistened. Set the bowl aside.

Heat the olive oil in a small skillet over medium heat. Add the red onion and saute for about 5 minutes, until the onion is softened. Remove the skillet from the heat.

In a large bowl, combine the ground beef, ground veal, ground pork, the sautéed red onion, the honey and the egg and mix everything well with your hands. Season with salt and pepper to taste.

Add the bread crumb and cream mixture to the beef mixture and mix together well. Using wet hands to keep the mixture from sticking to your fingers and hands, shape the mixture into meatballs the size of a golf ball, placing them on a plate lightly moistened with water. When you are done rolling you should have about 24 meatballs in total.

Melt the butter in a large skillet over medium-high heat. Add the meatballs, in batches if necessary, and cook, turning frequently, for about 7 minutes until they are browned on all sides and cooked through. transfer the meatballs to a plate and drain off all but 1 tablespoon of fat from the skillet.

Return the skillet to the heat, whisk in the chicken stock, heavy cream, lingonberry preserves and the pickle juice and bring it to a simmer. Season to taste with salt and pepper. Add the meatballs to the sauce, reduce the heat to medium and simmer for about five minutes until the sauce thickens slightly and the meatballs are heated through.

Okay, a few things about this recipe. I was kicking myself over the lingonberry preserves and did some research online as to what I could use for a substitute. The best recommendation I saw was to try using cranberry preserves, which I was able to get, and I think they added a really nice flavor to the dish. I purchased a package of meatloaf mix that had the ground beef, pork and veal in it already to make the meatballs and everything else I had on hand so we were good to go. Marcus Samuelsson explains in his description of the recipe that comes from his grandmother that the meatballs that she always made were not the perfectly round and shaped meatballs you find in most places but were kind of lumpy and misshapen. This made me feel better because that is just how mine looked. I think because the mixture is moist and sticky it is hard to shape them perfectly but the taste is sure there. I will definitely be making these again. Unfortunately, I was so busy trying to put it together on Christmas Eve that I never got a picture of them, but I will try to get them next time. Trust me, they are good. I think these would be great as a meal with mashed potatoes or rice.

That’s all I have for today. Check back next time for some more recipes. It has been so cold here lately we have been making a lot of soups, so I have some other soup recipes to share with everyone. Until next time, enjoy the rest of your day and enjoy your meal!


2 Comments

Posted by on January 8, 2014 in Appetizers, Beef, Cooking, Dinner, Sauce, Snacks


Tags: , , ,

A Great Game Day (or Any Day) Snack – Homemade Pizza Rolls

Okay, Sean has been asking me to make these for almost a year now and I was finally able to get around to making them not that long ago. I had gotten the recipe from America’s Test Kitchen a long time ago and have wanted to give it a try but it does take a little bit of work. Lots of people love to snack on pizza rolls at a party or while watching a football game. They make a great easy snack that you can pop in the oven quickly, but why not try to make some at home without all the added preservatives and ingredients that are in the ones you buy at the store? This recipe covers all of that. I did change one thing along the way. I opted not to fry these and simply baked them in a 400 degree oven for 25 minutes and I think they turned out just fine. I have included the frying instructions with the recipe, so the choice is yours as to how you want to make them.

Homemade Crispy Pizza Rolls

3 tablespoons cornstarch

2 tablespoons extra-virgin olive oil

3 tablespoons tomato paste

4 garlic cloves, minced

1/2 teaspoon dried oregano

1/2 teaspoon ground fennel

1/4 teaspoon red pepper flakes

1 (14-ounce) can diced tomatoes, drained well, chopped fine, juice reserved

2 cups shredded Italian blend cheese

3 tablespoons minced fresh basil

Salt and pepper

2 (12-ounce) packages wonton wraps

3 quarts vegetable oil for frying

Line a rimmed baking sheet with parchment paper. Use a fine sieve to dust evenly with about half of the cornstarch. Set a wire rack inside a second baking sheet. Heat the olive oil in a large nonstick skillet over medium heat until it is shimmering. Add the tomato paste and cook, stirring constantly, until the paste is a deep rust color, about 3 minutes. Stir in the garlic, oregano, fennel and red pepper flakes and cook until the mixture is fragrant, about 30 seconds.

Stir in the tomatoes and the reserved juice, bring to a simmer and cook over medium heat, stirring occasionally, until thickened and reduced to 1 cup, about 9 to 11 minutes. Scrape the mixture into a large bowl and refrigerate until it is cold, about 30 minutes. The mixture can be made, refrigerated until cold and covered for up to 2 days at this point.

Stir the cheese and basil into the tomato mixture to combine and season with salt and pepper to taste. Working with 4 to 6 wonton wrappers at a time, place 1 level teaspoon of filling in the center of each wrapper and press down to flatten. Lightly brush all sides of one wonton wrapper with water to moisten the edges. Fold the bottom half of the wrapper over the filling, then fold the wrapper again and roll it so the seam is down. Press the wonton around the filling to squeeze out the air, then press the edges firmly to seal the wonton.

Transfer the wonton seam side down to the prepared baking sheet. Repeat the process with more wonton wrappers and filling until all of the filling is used. Continue to fill the baking sheet and place another piece of parchment paper dusted with cornstarch over those already done to create a second layer. Freeze the pizza rolls until they are firm, about 30 to 60 minutes. The pizza rolls can be wrapped tightly with plastic wrap and frozen for up to 1 month at this point.

Add the vegetable oil to a large Dutch oven until it measures 2 inches and heat the oil over medium-high heat until it registers 375 degrees on a candy thermometer. Transfer 14 to 16 pizza rolls to the oil and cook, stirring and flipping occasionally, until they are golden brown, adjusting the heat as necessary to maintain the oil temperature between 350 and 375 degrees, about 1 to 2 minutes. Transfer the pizza rolls to a wire rack. Return the oil to 375 degrees and repeat with the remaining pizza rolls. Alternatively, heat the oven to 400 degrees. Place the pizza rolls on baking sheets lined with parchment paper and bake until they are golden brown, about 20 to 30 minutes. Let the pizza rolls cool for 5 minutes and serve with warm marinara sauce, if desired.

If you have had pizza rolls before, you know they are lava hot right out of the oven so make sure you resist the temptation and let them cool for a few minutes before eating. These did have a little bit of a bite to them because of the red pepper flakes, so you may want to cut back or eliminate them if you don’t want the heat. You could also mix things up and add things like some sautéed diced onions, peppers, bits of cooked Italian sausage, pepperoni or just about anything else. They were pretty tasty and I think they came out fine with baking instead of frying. You can avoid using all that oil and get good results this way.

That’s all I have for today. Check back next time for another recipe. until then, enjoy the rest of your day, stay warm and enjoy your meal!

009

 
Leave a comment

Posted by on January 7, 2014 in Appetizers, Cooking, Pizza, Snacks


Tags: , , , ,

A Great New Year’s Eve Snack – Pulled Pork Nachos

This snack is actually great for all kinds of occasions, but it seemed like a pretty good one to make for New Year’s Eve as well if you want something different for your party guests or for yourself. Ideally, you would want to make the pulled pork well ahead of time so you have it on hand and ready to go. When I made these, I had some leftover pulled pork that I used from the dinner we had and it fit perfectly with the nachos. If you want to try the recipe and find you do not have the time to make the pulled pork yourself, you can always try buying pulled pork that has been pre-made and heating it up for use. It may not taste as good, but it will get the job done. My recommendation is if you have the time, go for it. If you can’t do it for this New Year’s Eve, keep it in mind for football playoff games, Super Bowl parties or they next time you just want a really good snack and what to take your nachos dish to the next level. I got this recipe from Food Republic, but you can certainly do different variations on this, as I did.

Pulled Pork Nachos

For the Pork Rub:

1/4 cup smoked paprika


1/4 cup kosher or sea salt
1/4 cup brown sugar 
1/4 cup chili powder
1/4 cup ground cumin
2 teaspoons ground black pepper

For the Pork:

1 4-5 pound pork shoulder or butt

1 bottle of your favorite beer

For the Barbecue Sauce:

2 cups ketchup

1 cup whole-grain mustard

1/2 cup apple cider vinegar

1/4 cup bourbon

1/4 cup reserved pork rub

For the Nachos:

1 bag tortilla chips

1 can black beans, drained and rinsed

shredded Monterrey jack
red onion, sliced or diced
thinly sliced scallion
thinly sliced Fresno or other mildly hot peppers

For the barbecue sauce: Combine all your ingredients in a small pot, and whisk them for a bit to get everything incorporated together. Put the pot on the stove over medium heat, and wait for the sauce to start bubbling, stirring occasionally.Let it bubble for about a minute (while stirring a little bit), and then pull it off the heat and set aside, or refrigerate if making ahead.

For the pulled pork: Preheat the oven to 300 degrees, and then combine all the dry ingredients for your pork rub, making sure you mix the ingredients well so that everything is evenly distributed. Rub down your pork. There’s a possibility you’ll have more rub than you need depending on how big your pork butt is, but that’s more good news than bad and you can always store it for another use.

Place the pork in a baking dish and pour in the beer. Cover with foil and place it in the oven. Every hour after the first couple of hours you can go in and baste it a little. Depending on your oven and the size of your pork it will take about 5 to seven hours to cook completely.

Pull the pork out of the oven and let it cool off a bit before you start pulling it apart with your fingers and removing any unsavory bits such as any bones or large pieces of fat. Mix the pulled pork with enough barbecue sauce (reheated if made ahead) to coat to your liking.
To assemble the nachos:  Preheat the oven to 350 degrees, then arrange a thick layer of tortilla chips on a foil-wrapped cookie sheet or in a pie plate, spreading the chips out for as close to 100% cookie sheet or pie plate coverage as possible.

Top your nachos in this order, or choose however you like them best:

  • Pork
  • Red onion
  • Beans
  • Jack cheese
  • Scallions
  •  Peppers

Once the cheese is fully melted and just starting to crisp the nachos should be done. Bake for about 20 to 30 minutes to achieve a nice, crispy level. Serve with salsa, sour cream and guacamole.

You can use all kinds of cheese when making these nachos; it is really up to you as far as preference. You can also make some changes and add things like tomato or black olives or even try making it with some barbecue baked beans for a really different flavors. They are nachos after all, so it is pretty hard to go wrong with them. The plate I made was on a pie plate so I had layered everything a couple of times before putting it in the oven. Needless to say, there weren’t any left after I put them out; they went pretty quickly.

That’s all I have for today. Check back again for more new recipes. I hope everyone has a safe New Year’s Eve and enjoy wherever you are going to be and whomever you are going to ring in the new year with. Thanks for making 2013 such a great year for my blog. it has blown up to be a lot bigger than I had ever thought it would get and I am so glad so many people enjoy sharing the recipes and fun with me. I am looking forward to an even better and more fun 2014. Enjoy the rest of your day and enjoy your meal! Happy New Year!

006


1 Comment

Posted by on December 31, 2013 in Cooking, Holidays, Leftovers, Pork, Snacks


Tags: , , , , ,

A Simple Side for Your Burgers and Sandwiches – Beer Battered Onion Rings

I love onion rings. Admittedly, they are not the healthiest  choice when it comes to things to make. The frozen ones, even when baked in the oven, are not the best thing for you but I still love them. I have tried a few times to make my own and have made them by baking them in the oven and by frying them, but I had never really tried a beer batter recipe before. I cam across this one in Saveur Magazine not long ago and had been waiting for the right opportunity to make them. I made some burgers for dinner one night last week and the onion rings were just the perfect accessory for the burgers.

Beer Battered Onion Rings

1 3/4 cups all-purpose flour

1/2 cup cornstarch

1 1/2 teaspoons paprika

1 teaspoon dry mustard

1 tablespoon baking powder

1 tablespoon kosher salt, plus more to taste

2 teaspoons honey

12 ounces lager-style beer

Vegetable or canola oil, for frying

2 large onions, cut crosswise into 1/2-inch thick slices and separated into rings

In a large bowl, whisk together the flour, cornstarch, paprika, dry mustard, baking powder and salt. Add the honey and the beer and whisk the mixture until it is smooth.. Allow the mixture to sit for 10 minutes.

Pour the vegetable or canola oil to a depth of 2 inches in a Dutch oven or large skillet with high sides and heat the pan over medium-high heat until the temperature of the oil registers 375 degrees on a candy or deep-fry thermometer. Working in batches, dip the onion rings into the batter, shaking off any excess, and lower them into the oil. Fry the onion rings, flipping once, until they are golden brown, about 3 minutes total. Transfer the onion rings to a paper towel lined plate to drain briefly and season with more salt. Cover the onion rings and repeat the process with any remaining onion rings until they are all fried. Serve immediately.

The batter was a lot thicker than I thought it was going to be and it made for an excellent crust on the onion rings. You got some really great flavor from the mix of the beer, honey and paprika and they were done quite quickly. We all loved the taste of them and devoured all the onion rings with our burgers pretty quickly. These would be great to make with any burgers or other sandwiches like a chicken sandwich or even with some corned beef or pastrami. They would also make an awesome appetizer or snack when you are watching a football game or having some friends over for a party. I’ll definitely be trying this recipe again.

That’s all I have for today. Check back tomorrow for another recipe. Tomorrow is my birthday, so I will be posting the recipe Michelle used for my wonderful birthday cake that she made. Check back tomorrow to see what it is. Until then, enjoy the rest of your day and enjoy your meal!

003


Leave a comment

Posted by on December 10, 2013 in Appetizers, Cooking, Picnic Fare, Side Dishes, Snacks


Tags: , , , ,

An Easy Holiday Appetizer – Broccoli Dip in a Bread Bowl

You want to try to remember to have some appetizers on hand for your holiday or Thanksgiving meal to keep everyone happy before the big meal comes out. There are lots of things that you can do that are easy, like making a simple antipasto platter, some shrimp cocktail, crackers and cheese or even just some onion dip and chips. One thing that can be a little different and look fancy is this recipe I got from Cook’s Country for broccoli dip in a bread bowl. It is really easy to make and you can make the dip a day or two in advance and then just put it all together right before you serve it.

Broccoli Dip in a Bread Bowl

12 ounces broccoli, florets cut into 1-inch pieces, stalks peeled and cut into 1/2-inch pieces

2/3 cup mayonnaise

1/4 cup grated Parmesan cheese

2 tablespoons minced shallot

1 garlic clove, minced

1/2 teaspoon salt

1/4 teaspoon pepper

1/8 teaspoon cayenne pepper

2/3 cup whole Greek yogurt

1 (8-inch) round bread (whatever type you like)

Combine the broccoli stalks and 1 tablespoon of water in a bowl. Cover the bowl and microwave it until the stalks are tender, about 5 minutes. Transfer the stalks to a colander, rinse under cold water, and drain thoroughly. Transfer the stalks to a clean dish towel and pat dry. Combine the broccoli florets and 1 tablespoon of water in the same now-empty bowl. Cover the florets and microwave until just tender, about 3 minutes.Transfer the florets to a colander, rinse them under cold water and allow them to drain thoroughly. Transfer the florets to a clean dish towel and pat them dry. Keep the stalks and the florets separate.

Combine the stalks, mayonnaise, Parmesan cheese, shallot, garlic, salt, pepper and cayenne pepper in a food processor and process until the mixture is finely ground, about 30 seconds., scraping down the sides of the bowl as needed. Add the florets and pulse until the florets are finely chopped, about 4 pulses. Transfer the mixture to a bowl, stir in the Greek yogurt, and refrigerate the dip for at least 30 minutes or up to 24 hours.

Using a paring knife, cut into the top of the loaf of bread at a 45-degree angle, about 1 1/2 inches from the edge. Continue to slice around the bread at a 45-degree angle in approximately a 5-inch circle. Remove the cut top of the bread and cut it into bite size pieces. Make vertical slices through the perimeter of the bread bowl at 1 1/2-inch intervals, stopping just shy of the bottom crust. Transfer the broccoli dip to the bread bowl. Serve, using bread pieces and crudites to dip.

I did make one slight change to the recipe itself. Instead of using mayonnaise I used some sour cream and I think it came out just fine. The slices into the bread bowl allow people to pull out pieces of the bread to dip into the dip itself. The goal is that you won’t actually have anything leftover from the whole set up, though I did have some extra broccoli dip left that did not fit into the bread bowl, so we have been able to have that with some cut-up vegetables like carrots, celery, peppers and the like. I think you could also easily substitute spinach for the broccoli in this if you prefer to have a spinach dip to serve. In either case, I really liked the texture thanks to the yogurt and the flavor of the broccoli and shallots was great. You really do need to blanch the broccoli for this to work out well. Raw broccoli would be too woody and I think frozen broccoli is just too mushy to use.

That’s all I have for today. Check back next time for some more recipes. There’s still lots to come that you can use to help plan your Thanksgiving. Until next time, enjoy the rest of your day and enjoy your meal!

002

 
Leave a comment

Posted by on November 14, 2013 in Appetizers, Cooking, Holidays, Snacks, Vegetables, Vegetarian


Tags: , , , , ,

Homemade Peanut Butter Cups with a Kick

I am not much of a candy eater myself and I don’t go crazy over chocolate, so I rarely have the occasion to actually make any candy. However, with Halloween just happening, there was a huge influx of candy recipes all over the place to take a look at. I saw a couple that actually interested me, including this one from Food Republic for some homemade peanut butter cups. This version does taste a lot like the famous Reese’s version that you have come to know and love for generations, with one important difference. This recipes is not for the kids as it does make use of some bourbon, albeit a small amount.

Homemade Peanut Butter Cups with Bourbon

1 1/2 packages (11 1/2 ounces) milk or dark chocolate chips

1 shot bourbon

1 cup creamy peanut butter

3 tablespoons vegetable shortening, softened

1/4 cup butter

1 1/2 cups confectioner’s sugar

1/2 teaspoon salt

Line a 12-cup muffin tin with paper liners. in a saucepan, add the shot of bourbon and the shortening to the chocolate chips and place over very low heat.

Stir the ingredients until the mixture becomes very smooth. Make sure to add the alcohol to the chocolate when the chocolate is still solid, as adding liquid to already melted chocolate will make it seize up. Allow the mixture to cool slightly, but make sure the mixture is still pourable.

Spoon 1 tablespoon of the chocolate inside the paper cups, covering the bottom half of each cup. Chill the chocolate for 30 minutes, or until cool.

In a bowl, combine the confectioners’ sugar, peanut butter, salt and butter until it is well incorporated. Spoon 2 heaped tablespoons of the peanut butter mixture over the chocolate cups and press down firmly to smooth the peanut butter layer.

Spoon another tablespoon of the melted chocolate mixture over the top of the peanut butter, allowing the chocolate to completely cover the peanut butter layer. If the chocolate mixture is cold and no longer pourable, return the saucepan to the stove over low heat for 1 minute until it is smooth and pourable again.

Chill the peanut butter cups for 3 hours or until firm.

I have to say that this recipe does taste just like a Reese’s peanut butter cup but the bourbon adds a really nice flavor to the entire mix. The recipe makes 12 rather large peanut butter cups and I think you could easily make many small ones on a parchment paper-lined baking sheet if you wanted smaller ones. The one catch is that the paper liners for the muffin tins help to give a nice shape to the candy, which you would lose if you did them free-form. In either case, it is a very easy treat to make that might be great for a party or if you are making some things for a homemade gift basket for the holidays. Most of the time for the recipe is just chilling the candy so it sets well.

That’s all I have for today. Check back again for some more great recipes. There’s still lots more to come as I am trying new things all the time. Until then, enjoy the rest of your day and enjoy your meal!

006

 
Leave a comment

Posted by on November 1, 2013 in Candy, Cooking, Dessert, Snacks


Tags: , , ,

31 Awesome Dips for Football Noshing – Bon Appétit

31 Awesome Dips for Football Noshing – Bon Appétit.

If you are going to have chips while you watch the game, or are having a party or just one a great snack, then you need to make sure you have a good dip on hand. Sure, you can buy stuff from the store and go with that, by what not get much better flavor and control the content yourself and put some time in to make your own. Most of these dips from Bon Appetit are really easy to make and you can find yourself making your own dip all the time with little effort. Check it out!

 
Leave a comment

Posted by on September 28, 2013 in Appetizers, Cooking, Picnic Fare, Sauce, Snacks


Tags: , , ,

Football Snack – Very Easy Basic Buffalo Wings

There are fewer snacks that are better for watching football games than Buffalo wings. Sure having chips and dip are great, but when you bring out the wings then you know it is football time. it’s so easy for most of us just to order wings from somewhere and pick them up or have them delivered or just buy the frozen packages of buffalo wings already. The problem is a lot of times the wings you order are overcooked and swimming in sauce and the frozen wings just don’t give you the crunch and flavor. Why not put in a few minutes of your time and make your own wings? This basic wing recipe is from Food Republic and doesn’t get much easier than this one.

Basic Buffalo Wings

3/4 cup all-purpose flour

1/2 teaspoon cayenne pepper

1/2 teaspoon garlic powder

1/2 teaspoon salt

20 chicken wings, tips removed and wings separated at the joint

1/2 cup melted butter

1/2 cup hot sauce or wing sauce (your choice, whatever you like best)

Line a baking sheet with aluminum foil and lightly spray the sheet with non-stick cooking spray. Mix the flour, cayenne pepper and garlic powder in a medium bowl.Dip each wing piece into the mixture and coat completely. Place the wings on the baking sheet and repeat the process until all of the wings are coated. Cover the baking sheet with the wings in plastic wrap and place it in the refrigerator for at least 1 hour.

Preheat the oven to 400 degrees. In a small bowl, whisk the melted butter and the hot sauce until blended. Dip the wings into the hot sauce mixture to coat the wings and place the wings back on the baking sheet. Bake the wings for 45 to 55 minutes, turning the wings once after 20 minutes of baking so that each side gets crispy. Remove from the oven and serve with bleu cheese dressing, ranch dressing, extra hot sauce and cut-up vegetables like celery and carrots.

Of course, you don’t have to coat all the wings in hot sauce if you prefer something else. You can always make a quick mix of your favorite barbecue sauce and some honey or just barbecue sauce, maybe some teriyaki sauce or just have them plain if that’s what you like. Personally I like the Buffalo wings and I really liked this recipe. The flour helped to give the wings a nice crunch when they were baked. Placing them in the refrigerator for an hour or so also helps them to dry out some and get rid of some of the moisture that can make them soggy. This is also a much better alternative to deep-frying, which is not the best for you where health is concerned with all that oil and it leaves quite a mess to clean up. I think this recipe is a great alternative and makes some great wings.

That’s all I have for today. Check back next time for another recipe. I have tried some soups this week, so I’ll be posting recipes for those as the week goes on. Check back and see what comes up next. Until next time, enjoy the rest of your day and enjoy your meal!

001

 
Leave a comment

Posted by on September 24, 2013 in Appetizers, Cooking, Poultry, Snacks


Tags: , , ,

A Ballpark Treat at Home – Homemade Soft Pretzels

Sean has been asking me to try to make my own pretzels for a while now. I had seen a bunch of recipes and I was always a little reluctant to try it. A lot of them seemed pretty time-consuming and called for a lot of space for rolling out dough, which I do not have. I finally came across one recipe that seemed easy enough to try. This one is from Chuck Hughes on the Cooking Channel and also includes a recipe for a cheese sauce. I personally didn’t make the cheese sauce, but I’ll include it here if you want something to go along with the pretzels.

Homemade Soft Pretzels

1 1/2 cups warm water (110 to 115 degrees)

1 tablespoon sugar

2 teaspoons kosher salt

2 teaspoons dry active yeast

3 cups flour, plus more for dusting

2 tablespoons melted butter

Vegetable oil

2/3 cup baking soda

2 egg yolks beaten with 1 tablespoon water

Coarse salt

Cheese Sauce:

1 bottle beer

2 cups grated sharp Cheddar cheese

1 tablespoon flour

1 cup cream cheese, diced and softened

1 clove garlic, minced

1/2 jalapeno, minced

Salt and pepper

Combine the warm water, sugar and kosher salt in the bowl of a stand mixer and sprinkle the dry yeast on the top. Let the mixture sit until it begins to foam, about 5 minutes. Add the flour and butter. Using the dough hook attachment for the mixer, mix on low-speed until everything is well combined. Change the speed to medium and knead until the dough is smooth and pulls away from the sides of the bowl, about 5 minutes. You can also knead the dough by hand.

Remove the dough from the bowl, clean the bowl and then oil the bowl with the vegetable oil. Return the dough to the bowl, toss the dough so it gets oiled, and cover the bowl with plastic wrap and allow it to sit in a warm location until the dough has doubled in size, approximately one hour.

Line a baking tray with parchment paper and lightly brush the parchment with vegetable oil. Set the tray aside.

When the dough is ready, lightly flour your working surface and divide the dough into 8 equal pieces. Roll out each piece of dough into a 24-inch rope. Make a U shape with the rope and, holding the two ends, cross them over each other and  press onto the bottom of the U in order to form the shape of a pretzel. Place the pretzels on the baking tray and leave it at room temperature for 1 hour. This helps to dry out the surface of the pretzels and makes them easier to handle.

Preheat the oven to 450 degrees.

In an 8-quart saucepan, bring 10 cups of water to a boil. Lower the heat and slowly begin to add the baking soda to prevent overflowing. Bring the water back to a boil and add the pretzels, one at a time, to the boiling water for 30 seconds. Remove the pretzels from the water using a large flat spatula or a spider and put them back on the tray. Repeat the process with the remaining pretzels. The boiling will help to create a shiny, brown crunchy pretzel shell.

Beat the egg yolks with 1 tablespoon of water and brush the top of each pretzel. Sprinkle he pretzels with coarse salt. Bake the pretzels until they are a dark, golden brown, about 12 to 14 minutes. Transfer the pretzels to a cooling rack for at least 5 minutes before serving.

For the cheese sauce, in a saucepan over medium heat, bring the beer to a simmer. In a separate bowl, mix the Cheddar cheese and the cream cheese with the flour. Add the cheese mixture to the beer with the remaining ingredients. Stir until all the cheese has melted and the texture is smooth, about 5 minutes. Keep the sauce warm until you are serving.

I have to say the pretzels took a little bit of extra work, but they were worth it. The first batch I tried I had the water too warm, killed the yeast, and had to start over. The second batch I ended up having to add more flour to, about 2/3 of a cup, to get a dough that held together well. Once I did that, everything else went along according to the recipe. The pretzels came out great with a really good flavor that we all enjoyed. The recipe only makes 8 pretzels, so if you were planning for a party, you might have to double the recipe. As for the cheese sauce, I didn’t make it myself but it would seem to me that it would be a good sauce to use not just for pretzels, but for vegetables like broccoli or cauliflower, for tacos, nachos or any other time you want a cheese sauce. You could also use other things instead of salt to cover the pretzels, like a  cinnamon sugar, or some Parmesan cheese if you desire.

That’s all I have for today. Check back next time for some more recipes. I’ll be trying out some new slow cooker recipes this week, so keep an eye out for those. Until next time, enjoy the rest of your day and enjoy your meal!

002 001

 
4 Comments

Posted by on September 22, 2013 in Cooking, Sauce, Snacks


Tags: , , , ,

 
National Day Calendar

Fun, unusual and forgotten designations on our calendar.

Jennifer Probst

a little bit naughty a little bit nice

Laissez Faire

Letting Life Lead

simple cooking recipes

a blog to share with you the best