Okay, I know I just posted a braised chicken thighs recipe the other day, but I decided to make another one for dinner on Monday anyway because we had a lot of chicken thighs on hand and because the recipe sounded too good to let go by. I found this one from Williams-Sonoma and saw that it was simple to make and looked like it would taste great so I gave it a try. What was even better about this one is that it is basically a one pot meal so you have everything together in one dish for easy preparation and clean up.
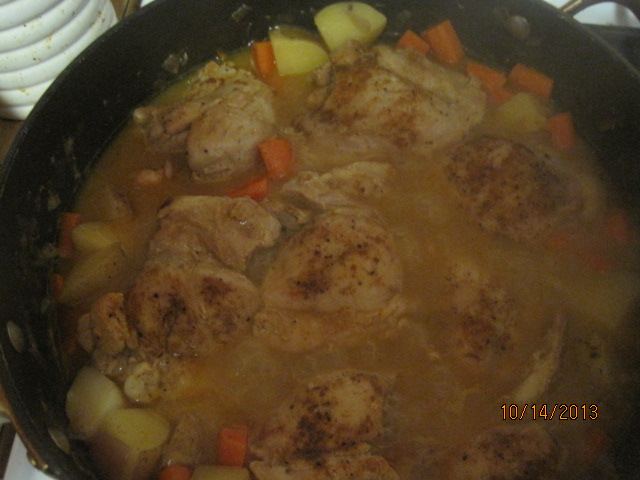
Braised Chicken Thighs with Carrots, Potatoes and Thyme
1 1/2 pounds skinless, boneless chicken thighs, fat trimmed
Kosher salt and freshly ground pepper
Sweet paprika
2 tablespoons olive oil
1 red onion, finely chopped
1 pound red-skinned potatoes, quartered
8 carrots, halved lengthwise and then cut into 1 1/2-inch pieces
1 tablespoon plus 1 teaspoon flour
1 1/3 cups chicken broth
1/3 cup dry vermouth or dry white wine
1 1/2 tablespoons minced fresh thyme
Season the chicken lightly with salt and pepper and then generously with paprika. In a heavy large frying pan or skillet over medium-high heat, warm the olive oil. Add the chicken and cook until brown, about 2 minutes on each side. Transfer the chicken to a plate. Add the onion to the frying pan and stir. Add the potato quarters and the carrots. Sprinkle the vegetables with salt and pepper and saute them until the vegetables are beginning to brown, about 5 minutes. Add the flour mix and stir the vegetables to coat them well. Gradually mix in the broth and vermouth or wine, stirring as you add the liquid. Bring the mixture to a boil and continue to stir frequently. Return the chicken to the pan and bring everything to a boil.
Cover the pan, reduce the heat to medium-low, and simmer until the chicken and vegetables are cooked through, stirring and turning the chicken occasionally, about 25 minutes. Mix in the thyme. Taste and adjust the seasoning. Divide the chicken and vegetables among 4 warmed plates and serve.
I did make a couple of substitutions in this recipe. i did not have any red potatoes on hand, so I used some Yukon Gold potatoes instead and I think they turned out just as well. Also, I rarely use wine or vermouth when cooking unless I think it will really make a difference, so I just used chicken broth where the recipe called for the wine and I think it turned out quite well. You can also use gluten-free flour where the flour is called for in this recipe if you want to make it a gluten-free meal. One thing to consider when trying to make gluten-free is that if you are using store-bought broth, check the ingredients to make sure there is no flour or other gluten products in the broth; many broths do use them so you want to be sure. I loved the sauce that went with the chicken in this meal and the paprika gave the chicken great flavor with a little bit of a kick to it. The whole meal was done in under 40 minutes, which made it even better.
That’s all I have for today. Check back again to see some more recipes. I promise, I am making other things this week besides braised chicken thighs. I have a couple of new recipes I am trying out tonight, so check for those in the coming days. Until next time, enjoy the rest of your day and enjoy your meal!