RSS

Tag Archives: americas test kitchen

A Moment for Maple-Glazed Pork Tenderloin

It was a cool and rainy day here in our part of New York yesterday. I know parts north of here actually got snow, which sounds ridiculous for Memorial Day weekend, but it did happen. I’m sure that had something of an influence in the type of dinner I decided to make last night. I chose this recipe from America’s Test Kitchen for a maple-glazed pork tenderloin. It was very quick to make and would be excellent for a weeknight meal and the time of the year.

Maple-Glazed Pork Tenderloin

3/4 cup maple syrup
1/4 cup molasses, light or mild
2 tablespoons bourbon or brandy
1/8 teaspoon ground cinnamon
Pinch ground cloves
Pinch cayenne pepper
1/4 cup cornstarch
2 tablespoons sugar
1 tablespoon salt
2 teaspoons ground black pepper
2 pork tenderloins (1 1/4 to 1 1/2 pounds each)
2 tablespoons vegetable oil
1 tablespoon whole-grain mustard

Adjust an oven rack to the middle position and heat the oven to 375°. Stir 1/2 cup of maple syrup, molasses, bourbon, cinnamon, cloves, and cayenne together in a 2-cup liquid measure; set aside. Whisk the cornstarch, sugar, salt, and black pepper in a small bowl until combined. Transfer the cornstarch mixture to a rimmed baking sheet. pat the tenderloins dry with paper towels, then roll them in the cornstarch mixture until they are evenly coated on all sides. Thoroughly pat off any excess cornstarch mixture.

Heat the oil in a large, heavy-bottomed nonstick skillet over medium-high heat until just beginning to smoke. Reduce the heat to medium and place both tenderloins in the skillet, leaving at least 1 inch in between them. Cook until they are well browned on all sides, about 8 to 12 minutes. Transfer the tenderloins to a wire rack set inside a rimmed baking sheet.

Pour off any excess fat from the skillet and return it to medium heat. Add the syrup mixture to the skillet, scraping up any browned bits with a wooden spoon, and cook until the mixture is reduced to 1/2 cup, about 2 minutes. Transfer 2 tablespoons of the glaze to a small bowl and set aside. Using the remaining glaze, brush each tenderloin with approximately 1 tablespoon of glaze. Roast the tenderloins until an instant-read thermometer inserted in the thickest part of the tenderloins registers 130°, about 12 to 20 minutes. Brush each tenderloin with another tablespoon of glaze and continued to roast until an instant-read thermometer inserted in the thickest part of the tenderloins registers 135 to 140°, about 2 to 4 minutes longer. Remove the tenderloins from the oven and brush each with the remaining glaze; allow to rest, uncovered, for about 10 minutes.

While the tenderloins rest, stir the remaining 1/4 cup of maple syrup and mustard into the reserved 2 tablespoons of glaze. Brush each tenderloin with 1 tablespoon of the mustard glaze. Transfer the meat to a cutting board and slice into 1/4-inch-thick pieces. Serve, passing the extra mustard glaze at the table.

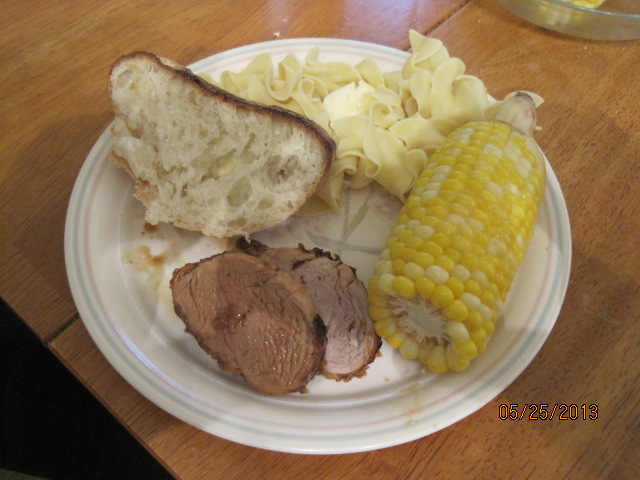
Rolling the tenderloins in the cornstarch mixture really did make a difference in making sure that the coating and glaze adhered well to the meat. It also helped to give a nice crunch to the outer coat of the meat and glaze. Make sure you use real maple syrup and not the imitation stuff most of us use on pancakes and waffles. The imitation will be way too sweet for this type of recipe. I love the way it all came out and that it did have a little bit of sweetness to it because of the syrup and molasses and you could even taste a little bit of the bourbon in the recipe. I served this with noodles and corn on the cob.

That’s all there is for today. I’ll have some more recipes this week, including a few desserts that we made for a classic pound cake and Michelle’s famous oatmeal cookies. We also did a nice homemade breakfast today that included some nice home fries, some sausage and scrambled eggs, a basic breakfast but it was all homemade. Check back later in the week for all of that. Until then, enjoy the rest of your day today and enjoy your meal!002

 
Leave a comment

Posted by on May 26, 2013 in Cooking, Dinner, Pork


Tags: , , ,

Cinco de Mayo Feast

I wanted to make something for Cinco de Mayo today that was different for me at least without it taking me hours in the kitchen or having something that is smothered in cheese (I am not a fan of all things cheesy). I looked around this past week and saw some great recipes in a few places and decided to give them a try. The bulk of them came from America’s Test Kitchen, including this one for Mexican Pulled Pork, or Carnitas.

Mexican Pulled Pork (Carnitas)

1 (3 1/2 to 4-pound) boneless pork butt, fat cap trimmed to 1/8 inch thick, cut into 2-inch chunks

Salt and ground black pepper

1 teaspoon ground cumin

1 small onion, peeled and halved

2 bay leaves

1 teaspoon dried oregano

2 tablespoons juice from 1 lime

2 cups water

1 medium orange, halved

Tortillas

Lime wedges

Minced red onion

Fresh cilantro leaves

Thinly sliced radishes

Sour cream

Guacamole (recipe to follow)

Salsa

Adjust an oven rack to the lower-middle position and heat the oven to 300 degrees. Combine the pork, 1 teaspoon of salt, 1/2 teaspoon of pepper, cumin, onion, bay leaves, oregano, lime juice and water in a large Dutch oven. The liquid should just barely cover the meat. Juice the orange into a medium bowl and remove any seeds. You should have about 1/3 a cup of juice. Add the juice and the spent orange halves to the pot. Bring the mixture to a simmer over medium-high heat, stirring occasionally. Cover the pot and transfer it to the oven; cook until the meat is soft and falls apart when prodded with a fork, about 2 hours, flipping pieces of meat once during the cooking process.

Remove the pot from the oven and turn the oven to broil. Using a slotted spoon, transfer the pork to a bowl; remove the orange halves, onion, and bay leaves from the cooking liquid and discard. Do not skim the fat from the liquid. Place the pot over high heat and simmer the liquid, stirring frequently, until thick and syrupy. A heat-safe spatula should leave a wide trail when dragged through the glaze. The process should take 8 to 12 minutes. You should have about 1 cup of reduced liquid when done.

Using two forks, pull each piece of pork in half. Fold in the reduced liquid; season with salt and pepper to taste. Spread the pork in an even layer on a wire rack set inside a rimmed baking sheet or on a broiler pan. The meat should cover almost the entire surface of the pan. Place the baking sheet on the lower-middle rack and broil until the top of the meat is well browned but not charred and the edges are slightly crisp, about 5 to 8 minutes. Using a wide metal spatula, flip the pieces of meat and continue to broil until the top is well browned and edges are slightly crisp, about 5 to 8 minutes longer. Serve immediately with warm tortillas and any garnishes that you like.

All 3 of us loved this pork. These tacos were easily some of the best I had made. The pork just melted in your mouth and was cooked perfectly. You could easily use this pork in other ways for other Mexican meals if you wanted, such as burritos, enchiladas or tamales, but I think they worked great as a taco myself. We did have some good leftovers which I am looking forward to having for lunch this week.

As a good side dish to go along with this, I decided to make a Cuban-Style Black Beans and Rice (Moros y Cristianos). I thought it would make a nice accompaniment to the pork and I got the recipe from America’s Test Kitchen as well.

Cuban-Style Black Beans and Rice (Moros y Cristianos)

Salt

1 cup dried black beans, rinsed and picked over

2 cups chicken broth

2 cups water

2 large green peppers, halved and seeded

1 large onion, halved at the equator and peeled, root end left intact

1 head garlic, 5 medium cloves removed and minced, remaining head halved at the equator with skin left intact

2 bay leaves

1 1/2 cups long grain white rice

2 tablespoons olive oil

6 ounces lean salt pork, cut into 1/4 inch dice

1 tablespoon minced fresh oregano leaves

4 teaspoons ground cumin

2 tablespoons red wine vinegar

2 medium scallions, sliced thin

1 lime, cut into 8 wedges

Dissolve 1 1/2 tablespoons salt in 2 quarts of cold water in a large bowl. Add the beans and soak at room temperature for at least 8 hours and up to 24 hours. Drain and rinse well.

In a large Dutch oven with a tight-fitting lid, stir together the drained beans, broth, water, 1 pepper half, 1 onion half (with root end), halved garlic head, bay leaves and 1 teaspoon salt. Bring to a simmer over medium-high heat, cover, and reduce the heat to low. Cook until the beans are just soft, about 30 to 40 minutes. Using tongs, remove discard the pepper, onion, garlic and bay leaves. Drain the beans in a colander set over a large bowl, reserving 2 1/2 cups of the bean cooking liquid. If you don’t have enough bean cooking liquid left, add some water to equal 2 1/2 cups. Do not wash out the Dutch oven.

Adjust an oven rack to the middle position and heat the oven to 350 degrees. Place the rice in a large fine-mesh strainer and rinse under cold running water until the water runs clear, about 1 1/2 minutes. Shake the strainer vigorously to remove all excess water; set the rice aside. Cut the remaining peppers and onion into 2-inch pieces and process them in a food processor until broken into rough 1/4-inch pieces, about eight 1-second pulses, scraping down the sides of the bowl as necessary; set the vegetables aside.

In the now-empty Dutch oven, heat 1 tablespoon of oil and the salt pork over medium-low heat; cook, stirring frequently until lightly browned and rendered, about 15 to 20 minutes. Add the remaining oil, chopped peppers and onion, oregano, and cumin. Increase the heat to medium and continue to cook, stirring frequently, until the vegetables are softened and beginning to brown, about 10 to 15 minutes longer. Add the minced garlic and cook, stirring constantly, until fragrant, about 1 minute. Add the rice and stir to coat, about 30 seconds.

Stir in the beans, reserved bean cooking liquid, vinegar and 1/2 teaspoon of salt. Increase the heat to medium-high and bring to a simmer. Cover and transfer to the oven. Bake until the liquid is absorbed and the rice is tender, about 30 minutes. Fluff with a fork and let rest, uncovered, for 5 minutes. Serve, passing the scallions and lime wedges separately.

A few things about this recipe. First, I did not use salt pork. I had bacon on hand, so that is what I used. If you are using bacon, you only need to cook it for about 4 to 8 minutes instead of the 15 to 20 for the salt pork. If you want a more vegetarian version of the recipe, eliminate the pork altogether and use water instead of the chicken broth. You could also add a little tomato paste when cooking the vegetables for some more body and flavor. Lastly, although a traditional sofrito calls for green peppers, green peppers upset my stomach and Michelle’s, so I went for red pepper instead. I actual like the flavor better and the color of the final product. This recipe makes a lot of rice and could easily feed 8 people, so you may want to cut it down to half if you have a smaller table to feed. Overall, I thought it was a very nice side dish and I could use the leftovers with a wide variety of other dishes.

I also made the fresh salsa that I usually make, which is America’s Test Kitchen as well if you want to check it out. I also made the guacamole I had made in the past as well if you want to see that recipe. The entire meal turned out great and we had a very relaxing late lunch/early dinner for the day.

I do have several other recipes to share for this week, including the dessert I made for tonight of a Mango-Pineapple Fruit Salad. I also have recipes this week for chicken, crab cakes, griddle cakes and a few others since I didn’t get to share any this past week. Check back and see if you like anything you see. Until then, enjoy the rest of your day and enjoy your meal!010 007 008 009


Tags: , , , , , , , , , ,

Monday’s Simple Stir Fry

For most people, Monday turns out to be the one day of the week where you really don’t want to do any cooking. It’s back to the weekly routine of school, work, after school activities and by the end of the day, you’re too exhausted to even think about having to cook something for dinner. That’s why Monday makes the perfect day to do something like a stir-fry  It’s quick, easy and gives you the chance to use either leftovers or any abundance of vegetables that you may have lying around the house. For me, yesterday turned out to be one of those days. I happen to have just a small package of beef in the freezer so it lent itself perfectly to this stir-fry recipe I found at America’s Test Kitchen for stir-fried beef and broccoli with oyster sauce.

Stir – Fried Beef and Broccoli With Oyster Sauce

1 pound flank steak, cut into 2 inch wide strips with the grain, then sliced across the grain into 1/8 inch thick slices
3 tablespoons soy sauce
1 tablespoon dry sherry
2 tablespoons chicken broth
5 tablespoons oyster sauce
1 tablespoon light brown sugar
1 teaspoon sesame oil
1 teaspoon cornstarch
6 medium cloves garlic, pressed through a garlic press or minced (about 2 tablespoons)
1 inch piece fresh ginger, minced (about 1 tablespoon)
3 tablespoons vegetable oil
1 1/4 pounds broccoli, florets cut into bite-size pieces, stems trimmed, peeled, and cut on diagonal into 1/8 inch thick slices
1/3 cup water
1 small red bell pepper, cored, seeded, and cut into 1/4 inch pieces
3 medium scallions, sliced half-inch thick on diagonal

Combined the beef and the soy sauce in a medium bowl; cover with plastic wrap and refrigerate for at least ten minutes or up to one hour, stirring once. Meanwhile, whisk the sherry, chicken broth, oyster sauce, brown sugar, sesame oil, and cornstarch in a measuring cup. Combine the garlic, ginger, and 1 1/2 teaspoons of vegetable oil in a small bowl.

Drain the beef and discard the liquid. Heat 1 1/2 teaspoons of vegetable oil in a large nonstick skillet over high heat until smoking. Add half of the beef to the skillet and break up any clumps; cook, without stirring, for one minute, then stir and cook until the beef is browned around the edges, about thirty seconds. Transfer the beef to a medium bowl. Heat 1 1/2 teaspoons of the vegetable oil in a skillet, and repeat with the remaining beef.

Add 1 tablespoon of vegetable oil to the now empty skillet; heat until just smoking. Add the broccoli and cook for thirty seconds; and the water, cover the pan, and lower the heat to medium. Steam the broccoli until tender – crisp, about two minutes; transfer to a paper towel – lined plate. Add the remaining 1 1/2 teaspoons of vegetable oil to the skillet; increase the heat to high and heat until just smoking. Add the bell pepper and cook, stirring frequently, until spotty brown, about 1 1/2 minutes. Clear the center of the skillet; add the garlic and ginger to the clearing and cook, mashing the mixture with the spoon, until fragrant, about 15 to 20 seconds, then stir the mixture into the peppers. Return the beef and broccoli to the skillet and toss to combine. Whisk the sauce to recombine, then add it to the skillet; cook, stirring constantly, until the sauce is thickened and evenly distributed over the beef and broccoli, about thirty seconds. Transfer to a serving platter, and sprinkle with scallions and serve.

As with most stir-fried dishes, I served this one with white rice. Of course you could easily substitute brown rice for the white if that is what you prefer. Also, I did not have any fresh broccoli on hand; however, I did have a package of mixed frozen vegetables in the freezer which were ideal for a stir-fry  I try to keep one of these on hand to make a quick stir-fry whenever we need an easy meal and it worked last night. This bag in particular had broccoli, water chestnuts, snap peas, and carrots. It was a very simple meal, the sauce tasted great and I was all done with the cooking within fifteen minutes. It is a perfect meal for a day on the run.

That’s the only recipe for today. Tonight I have the fish tacos planned, which I have posted on here before. If you want to check the recipe for that, you can always check out the previous post I did. I do have a couple of other meals planned for later on in the week, including one for a fried chicken sandwich with spicy slaw and mayonnaise. We are also planning on having some chicken salad sandwiches later on in the week and I am looking to see if there is something new like can do with them or something new and interesting for a side dish. We’ll have to see what I can come up with. Until next time, enjoy the rest of your day and enjoy your meal!


002 001

 
Leave a comment

Posted by on April 23, 2013 in Beef, Cooking, Dinner, One Pot Meals, Vegetables


Tags: , , ,

Sunday Chicken and Strawberry Rhubarb Pie


I decided to get back to making a regular Sunday dinner and this week as I hadn’t done it a couple of weeks. I had picked up some chicken earlier in the week and a whole chicken makes great Sunday meal. I wanted to find a recipe that would make things a little different and I had seen this one on the Food Network about a week or so ago and thought I would give it a try. It is Garlic Chicken with Israeli Couscous. I had never made it before and it looked good on the TV so we figured what the head lets give it a try.

Garlic Chicken with Israeli Couscous

For the Chicken:
2 whole garlic bulbs
1 lemon, zest stayed and juice
1 large bunch fresh thyme, leaves only
1 tablespoon cumin seeds, toasted and ground
Pinch crushed red pepper flakes
Kosher salt
Extra virgin olive oil
1 4 to 5 pound chicken, cut into eight parts

Couscous:
Kosher salt
2 cups medium size Israeli couscous
Extra virgin olive oil
3 ribs celery, sliced thin
1 large onion, sliced
Pinch crushed red pepper flakes
1 1/2 cups dry white wine
3 tablespoons tomato paste
Large pinch saffron
2 zucchini, cut into 1/2-inch dice
2 to 3 cups chicken stock
1/2 cup pine nuts, toasted (optional)
3 scallions, white and green, sliced thin

For the garlic chicken: preheat the oven to 350°. Put the garlic bulbs straight on the oven rack and roast them until they are soft when squeezed, about thirty minutes. Remove them from the oven and allow them to cool. Turn the oven up to 375°.

While the garlic is roasting, prepare the chicken. In a food processor or bowl, add the lemon zest and juice and set aside. When the garlic bulbs are cool, slice the tops off and squeeze out the roasted garlic into the bowl or food processor along with the thyme, cumin, crushed red pepper and salt to taste. Add a little olive oil and purée or mash into a loose paste. Massage the mixture all over the chicken pieces and allow it to sit for at least one hour.

For the couscous: bring a pot of well salted water to a boil over medium heat. Add the couscous and cook until it is about two-thirds of the way cooked through, approximately 5 to 6 minutes. Drain and set aside.

Coat a large sauté pan with olive oil and heat over medium high heat. Add the chicken to the pan and brown it on all sides. Remove it to a plate, drain the fat and add the celery and onions. Season with salt and crushed red pepper. Deglaze the pan with the white wine, scraping up all the bits on the bottom of the pan, and cook for 7 to 8 minutes. Stir in the tomato paste and cook for another two minutes. Add in the saffron, zucchini, cooked couscous and chicken stock. Stir well to combine, and then taste and adjust the seasonings if needed.

Transfer the mix to a ovenproof dish. Nestle the chicken, skin side up, in the couscous and add some more chicken stock, if needed, to keep things moist and cover the pan with foil. Add some more chicken stock to keep everything moist. Sprinkle with pine nuts, if using, and cover the pan with foil. Place the baking dish on a sheet pan. Roast the chicken for approximately 20 minutes, and then remove the foil and roast for another 10 to 15 minutes. Remove the chicken from the oven and top with this scallions before serving.

The chicken came out very moist and had a nice flavor to it because of the garlic paste that was used. I had never made couscous before, so it was little different for me, but I think it came out okay. I don’t think I put enough salt in the water when I was preparing it initially because it tasted like it could use a little more seasoning. Use your best judgment and see what works well for you. I also did not use the pine nuts as they are quite expensive and not something I normally use at all so I just left them out of the recipe. Overall I think it turned out pretty well and if you didn’t want to use couscous I think you could easily substitute white rice or brown rice and this recipe and it would turn out just fine.

Earlier in the week, Sean had asked me to get some strawberries and make something for dessert with them. Of course, this time of year the first thing I thought of was strawberry rhubarb pie. I love the taste of the fresh strawberries with the rhubarb and I hadn’t made this pie before so I had to scour around for a recipe to use. I found one at Williams – Sonoma and I also found one through America’s Test Kitchen. I liked aspects of each one, although the one from America’s Test Kitchen did not include any rhubarb so I sort of combine the two recipes and used the best of both to see how it would come out.

Strawberry – Rhubarb Pie

Two rolled out rounds of basic pie dough, or store-bought pie dough
4 pints (about 3 pounds) fresh strawberries, gently rinsed and dried, hulled and quartered lengthwise
3/4 cup sugar
2 tablespoons cornstarch
1 1/2 teaspoons low sugar or no sugar pectin
Generous pinch table salt
1 tablespoon juice from one lemon
3 cups rhubarb, trimmed and sliced half-inch thick (four or five stalks)
1 tablespoon cold butter, cut into small pieces

Preheat the oven to 350°.

For the filling: Select 6 ounces misshapen, underripe or otherwise unattractive strawberries, halving those that are large; you should have about 1 1/2 cups. In a food processor, process the berries until they are a smooth purée, about 20 to 30 seconds, scraping down the sides of the bowl as needed. You should have about 3/4 cup of purée when you are done.

Whisk the sugar, cornstarch, pectin, and salt in a medium saucepan. Stir in the berry purée, making sure to scrape the corners of the pan. Cook over medium-high heat, stirring constantly with a heatproof rubber spatula, and bring to a full boil. Boil, scraping the bottom and sides of the pan to prevent scorching, for two minutes to ensure that the cornstarch is fully cooked (the mixture will appear frothy when it first reaches a boil, then will darken and thicken with further cooking). Transfer to a large bowl and stir in the lemon juice. Allow to cool to room temperature.

Meanwhile, pick over the remaining strawberries and halve any that are still large. Mix the berries and the rhubarb into the bowl with the glaze and fold gently with a rubber spatula until everything is coated evenly. Place one dough round in the bottom of the pie plate and pat it firmly into the bottom and up the sides of the dish. Transfer the berry mixture to the dough-lined pan. Dot the fruit mixture with the butter. Place the second dough round carefully over the top of the filled pie. Trim the edges neatly, leaving a slight overhang and crimp the edges to seal the pie. Brush the top crust with one lightly beaten egg. Using a small knife, cut five or six slits into the top crust to allow steam to escape during baking.

Place the pie in the oven and bake until the crust is golden and the filling is thick and bubbling, approximately 50 to 60 minutes. Transfer to a wire rack and allow the pie to cool completely to set. Serve at room temperature or re-warm in a 350° oven for 10 to 15 minutes just before serving.

I think the pie turned out great myself. It was still just a little bit runny but not much. I think using the pectin instead of tapioca did seem to really help, and it gave the strawberry pie a nice strawberry jam-like flavor to it. I think once it has been sitting in the refrigerator overnight it will have set up even more and taste even better. Of course, you want to serve this with fresh whipped cream or ice cream on the side.

That’s all there is for today. I do have a few recipes planned out for the week, so we’ll see what we can get to as far as what we want to put up here. I do know I am making fish tacos this week at some point and I have posted a couple of different recipes for them on the air, so it is likely I’ll be using one of those if you want to check out and see what the recipe is like. I do also have a recipe I want to try this week for chicken sandwiches and will have to see what else comes along during the week. Until then, enjoy the rest of your day and enjoy your meal!

002


I forgot to take a picture of the chicken to go along with this. Sorry about that 🙂


6 Comments

Posted by on April 22, 2013 in Cooking, Dessert, Dinner, Pasta, Pie, Poultry


Tags: , , , , , , , ,

A Star’s Brownies with a Side of Cole Slaw

I thought I would just post a few simple recipes that I’ve made in the past week for today. The first is one that I came across in The New York Times and it is a recipe that I’ve seen in other places on the Internet. I am sure many people are familiar with Katherine Hepburn’s brownie recipe and may have seen it in other places. I thought it would be a nice simple dessert to make for one evening so we gave it a try.

Katherine Hepburn’s Brownies

1/2 cup cocoa
1 stick butter
2 eggs
1 cup sugar
1/4 cup flour
1 cup chopped walnuts or pecans (optional)
1 teaspoon vanilla
pinch of salt

Preheat the oven to 325°. Melt the butter in a saucepan with the cocoa and stir until smooth. Remove the saucepan from the heat and allow it to cool for a few minutes. Mix in the eggs one at a time. Add the sugar, flour, nuts (if using), vanilla and salt. Pour the mixture into a greased 8 x 8 square pan. Bake for forty minutes. Do not overbake as the brownies should be gooey on the inside. Let the brownies cool completely and cut into bars.

It was a very simple recipe that took no time at all to prepare. This makes it great as an option to make for a quick dessert as you may have the items around the house had any time. I am not a big brownie fan myself, but I have to admit that they came out quite nice. They were nice and crisp on the top and soft and chewy on the inside. You could serve them with a bit of vanilla ice cream on the side or just some simple homemade whipped cream and you have a complete dessert in no time at all.

The second recipe I have for today is one I am made when I had made Sloppy Joes was earlier in the week. I wanted to make a side dish to go along with them and I felt like having some coleslaw, but I wanted to try a little bit of a different recipe. I found this one through Williams – Sonoma on their website and it sounded pretty good to me. I try not to make a lot of coleslaw recipes that use mayonnaise, only because it seems to me that they tend to use a lot of it and it waters down the side dish. This one doesn’t used to much, and I actually cut down the amount in the recipe itself anyway.

Williams – Sonoma Coleslaw

1 head green cabbage, cored, quartered and thinly sliced
1 1/2 tablespoons kosher salt, plus more, to taste
half cup mayonnaise
1 1/2 tablespoons granulated sugar
1 tablespoon fresh lemon juice
1 teaspoon celery seed
2 tablespoons cider vinegar
Freshly ground black pepper, to taste
2 carrots, peeled and julienned

Place the cabbage in a large bowl, sprinkle with the 1 1/2 tablespoons of kosher salt and toss well. Transfer the cabbage to a colander and let drain for thirty minutes. In a large bowl, whisk together the mayonnaise, granulated sugar, lemon juice, celery seed and vinegar, and season with the salt and black pepper. Add the drained cabbage and carrots and toss to coat them evenly with the dressing. Cover and refrigerate for 2 to 3 hours before serving.

As I said, I have made a few adjustments to this recipe. First, I used a bag of coleslaw mix that included the green cabbage, red cabbage and julienned carrots already done so I did not have to deal with the slicing. However, I did salt the cabbage ahead of time to help draw out some of the moisture. Instead of using the half cup of mayonnaise, I only used a quarter cup and I think the recipe turned out just fine. I liked it a lot better without all the mayonnaise and it does cut down on some of the fat involved in the recipe itself. It makes great side dish for nearly anything, such as hamburgers, hot dogs, barbecued spare ribs, chicken, pulled pork or any type of sandwich that you may be making.

That’s all there is to the recipes I have for today. I do plan to go shopping this weekend to get some things in for some new recipes I would like to try this week. I have picked up some recipes from The New York Times, Williams – Sonoma, Cook’s Illustrated, America’s Test Kitchen, The Food Network and some others sources, so I have a lot to draw from right now of meals that we can choose. I do hope to get some new things up but more blog within the coming days. Check back and see what’s going on and see if there’s anything that you like. As always, if there is anything you would like to see, or have any requests of recipes, just drop me a note in the comments section or you can send me an email and I’ll be happy to get back to you. Until then, enjoy the rest of your spring weekend and enjoy your meal!

001

 
3 Comments

Posted by on April 13, 2013 in Cooking, Dessert, Salad, Side Dishes


Tags: , , , , , , , , ,

It’s About Time For A Home Cooked Meal

Between my being sick and then Sean being sick, I haven’t had much time to do any real meals during the week, let alone doing any blogging about the meals. Since we are all finally starting to feel better around here, I though today would be a good day to try and get things back to normal around here and cook some good meals. I have had some flounder in the freezer and was looking for something to do with it when I came across this recipe in America’s Test Kitchen’s cookbook “Quick Family Cookbook.” I like this cookbook because it gives me some good meal options that can all be made in under 45 minutes, which make thhem great for any weeknight meal when you may not have a lot of time or energy to put into your meal but still want something made at home. This is a simple fried fish with Southwestern corn, though to be honest I eliminated a lot of the heat from this meal since Sean and Michelle both don’t really care for spicy food. Nonetheless, it’s a good recipe that you can play around with and use a variety of fish with if you have some on hand.

Cornmeal Fried Fish and Southwestern Corn

2 tablespoons butter

8 ounces chorizo sausage, chopped

1 red bell pepper, stemmed, seeded and chopped fine

1 jalapeno chile, stemmed, seeded and minced

1 shallot, minced

1 garlic clove, minced

Salt and pepper

4 cups frozen corn

2 teaspoons minced fresh cilantro

1/2 cup all-purpose flour

1/2 cup cornmeal

2 (12 ounce) skinless flounder fillets, cut in half lengthwise

1 cup vegetable oil

Melt the butter in a large nonstick skillet over medium-high heat. Add the chorizo and cook until lightly browned, about 2 minutes. Stir in the bell pepper, jalapeno, shallot, garlic and 1/2 teaspoon of salt and cook until the bell pepper begins to brown, about 5 minutes. Stir in the corn and cook until heated through, about 2 minutes. Stir in the cilantro and season with salt and pepper to taste. Transfer to a bowl and cover.

Meanwhile, mix the flour and cornmeal together in a shallow dish. Pat the flounder dry with paper towels and season with salt and pepper., then dredge the fish in the cornmeal mixture, pressing gently so it adheres to the fish.

Wipe out the now-empty skillet with paper towel, add the vegetable oil and return to medium-high heat until the oil is shimmering. Lay the fillets in the skillet and cook until golden on both sides, about 2 minutes per side. Transfer the fish to a paper towel-lined plate. Let the fish drain briefly, then serve with the corn.

You could really use any fish fillets you like for this meal – catfish, sole, tilapia, trout, snapper – you name it. Ialso added some other colored peppers to the corn to make the meal look a little more festive since I wasn’t using the chorizo or the jalapeno. You could serve this white rice or brown rice and you would have quite a nice meal.

A nice simple meal that is great for any dinner. We are getting back to the meal plan this week after I go shopping tomorrow. We have gotten away from it lately and haven’t been planning things out and I feel we actually eat better from a health standpoint when everything is planned out for the week, so we are going to try and get back to it and try to get back to one meatless meal for the week, one fish meal, one stir fry, one chicken and one lean meat. I’ll have to see how things go at the market tomorrow to see what I can pick up and go with it, so check back tomorrow and see what we have for the week. until then, have a great day and enjoy your meal!

 
Leave a comment

Posted by on February 25, 2013 in Cookbooks, Cooking, Dinner, Seafood


Tags: , , , , ,

Best 5 Manual Coffee and Espresso Makers | The Feed

Best 5 Manual Coffee and Espresso Makers | The Feed.

I love my coffee but like everyone else I try to limit the amount I have each day so it doesn’t get to me. I have been using a Keurig for several years now and have some mixed opinions on it as they don’t seem to hold up very well even though mine only gets used once or twice a day. Anyway, here are some inexpensive manual coffee maker alternatives for those who like a a deeper, richer flavor to their coffee. America’s Test Kitchen tested and rated these. I may just have to check one out myself and see how well it actually works. Let me know if you have these or any others that you think work well.

 
Leave a comment

Posted by on February 15, 2013 in Beverages, Cooking Websites, Equipment


Tags: , ,

Ultra-Romantic and Hassle-Free Valentine’s Day Menu and Recipes | Shine Food – Yahoo! Shine

Ultra-Romantic and Hassle-Free Valentine’s Day Menu and Recipes | Shine Food – Yahoo! Shine.

Still need some menu ideas for Valentine’s Day? These quick and easy recipes from America’s Test Kitchen can help you out without you having to spend a ton of time in the kitchen. They are all pretty simple yet elegant recipes that can be made in under 45 minutes. They come from their cookbook “America’s Test Kitchen Quick Family Cookbook,” which I have and use for some great weeknight meals without any fuss. Check it out and enjoy your day with your sweetie!

 
Leave a comment

Posted by on February 13, 2013 in Cookbooks, Cooking, Cooking Websites, Holidays


Tags: , , ,

Quick Skillet Salmon

Since Michelle and I both have pretty busy schedules, I am always looking for meals that can be prepared easily and quickly. One of the cookbooks I got this Christmas is from America’s Test Kitchen called the “Quick Family Cookbook,” with recipes that can be prepared in under 45 minutes and are perfect for families who need some weeknight meals without having a lot of unusual ingredients that you may not typically have around the house. It seems like a really good book and since I love the cookbooks from them I am sure I will use it a lot.

That being said, this recipe for Skillet Salmon is actually from the Food Network. I came across it a few days ago and we just happened to pick up some wild salmon, which was on sale for a really good price. Michelle only likes the wild salmon as the farm-raised often does not have the same good flavor that you get with wild salmon. Wild salmon, on the other hand, is often pretty expensive, except this time of year when you can often find it for a good price. I got mine here at Adams Farms for $9.99 a pound. Still pricey, but much cheaper for wild salmon. Anyway, I had everything else on hand for this recipe, so it was quick and easy.

Hoisin Skillet Salmon

One 15.5 ounce can black beans, drained and rinsed (I actually used dried beans instead of canned and did a quick soak to get them ready)

2 tablespoons hoisin sauce

1/4 teaspoon red pepper flakes

2 cloves garlic, crushed

4 cups broccoli florets

Four 5-ounce salmon fillets, skin removed

Juice of 1/2 a lemon

2 tablespoons roughly chopped fresh cilantro, optional

Kosher salt

Combine the beans, 3/4 cup of water, hoisin sauce, red pepper flakes and garlic in a large skillet. Top with the broccoli and nestle the salmon into the broccoli. Bring the skillet to a simmer over medium heat. Once it is simmering, cover the skillet and cook until the salmon is flaky and just cooked through and the broccoli is crisp-tender, about 5 to 6 minutes. Drizzle with lemon juice and sprinkle with cilantro, if using (I skipped the cilantro, my family are not big fans of it). Add salt to taste and serve.

That’s all there was to it. I did add some white rice to the meal to round it out, but you don’t really need it with the black beans. I particularly love quick meals you can do all in one pot. It makes for super easy clean up when all is done.

Just a quick recipe for today. I do have a pork tenderloin I am cooking tonight, beef stew tomorrow, and then a frenched pork roast on Thursday, so I’ll be posting some recipes for those things along the way the rest of the week. I am also scouting around for some new lunch recipes as Michelle is looking  for different things to bring for lunch that are quick and healthy without using any bread, We’ll see how it goes and what I can find. If you have any suggestions, please pass them along. Until next time, enjoy the rest of your day and enjoy your meal today!


001

 
Leave a comment

Posted by on January 8, 2013 in Cookbooks, Cooking, Cooking Websites, Dinner, Seafood


Tags: , , , , ,

A Thanksgiving Day Soup

Since I posted what I plan to do with the turkey and stuffing on Thanksgiving in yesterday’s post, I thought I would put down today the soup I plan to make as well. I had planned to make a butternut squash soup all along, and I have several recipes that I like, so I was trying to decide which one would be the best to go with. I finally settled on this one from America’s Test Kitchen and am combining it with some others I have seen to sort of make my own. This recipe also uses some Cinnamon-Sugar Croutons, which are a nice little touch at the end.

Butternut Squash Soup

4 tablespoons butter

2 medium shallots, minced

3 pounds butternut squash, peeled, seeded and cut into 1 1/2-inch chunks

5 cups chicken broth

2 sprigs thyme

Pinch of nutmeg

1/2 cup heavy cream

Salt and pepper

Melt the butter in a large Dutch oven over medium heat. Add the shallots and cook until softened, about 3-4 minutes. Stir in the squash, broth, thyme and nutmeg. Bring to simmer, cover and cook until the squash is tender, 20 to 25 minutes.

Remove the thyme sprigs and puree the soup in batches in a blender or food processor until smooth. Return the pureed soup to the pot. Stir in the cream. Bring to a brief simmer, then remove it from the heat. if the soup seems too thick, thin it out with additional broth or water. Season it with salt and pepper to taste before serving. Sprinkle individual servings with nutmeg, if desired.

You can make this soup ahead of time, which I plan to do, right through the puree step, and cool, cover and refrigerate it for up to 3 days or frozen for up to 2 months. Just re-heat the soup over low heat, adding additional water or broth to adjust the consistency before proceeding with adding the cream.

There are a number of things you can top this soup with to suit your tastes. You could use the nutmeg, or paprika, a little balsamic vinegar, some crumbled bacon, slices of crispy prosciutto or even slices of apple or pear. I saw this quick little recipe for CInnamon Sugar Croutons from America’s Test Kitchen, so I am going to try that one.

Cinnamon-Sugar Croutons

4 slices white sandwich bread, cut into 1/2-inch cubes with the crusts removed

2 tablespoons melted butter

4 teaspoons sugar

1 teaspoon ground cinnamon

Adjust an oven rack to the middle position and heat the oven to 350 degrees. Toss the bread cubes with the melted butter in a medium bowl. In a small bowl, combine the cinnamon and sugar; sprinkle over the bread cubes and toss to combine.

Spread the bread cubes in a single layer on a parchment paper-lined baking sheet until crisp, 8 to 10 minutes. The croutons can be stored in an airtight container for several days. Sprinkle over the soup just before serving.

I think they will add a nice flavor and crunch to the soup. Overall, I think it is the perfect opening course to Thanksgiving dinner.

Okay, so we have the turkey, stuffing and soup taken care of, so tomorrow I will talk about some of the side dishes I am planning, which are a slow cooker version of the classic green bean casserole and a sweet potato casserole. Check back and see if you like them. I plan to post pictures of everything after I cook it all on Thursday, so check back for that as well. Until then, enjoy your day and enjoy your meal!

 
2 Comments

Posted by on November 19, 2012 in Cooking, Dinner, Holidays, Soups & Stews


Tags: , , , ,

 
National Day Calendar

Fun, unusual and forgotten designations on our calendar.

Jennifer Probst

a little bit naughty a little bit nice

Laissez Faire

Letting Life Lead

What To Have For Dinner Tonight

Simple and delicious dinner inspiration