RSS

Tag Archives: williams-sonoma

Last-Minute Thanksgiving Dishes | Williams-Sonoma Taste

Last-Minute Thanksgiving Dishes | Williams-Sonoma Taste.

More last minute Thanksgiving dish ideas from Williams-Sonoma to make use of things you may already have in the house but aren’t sure what to do with or you need that sudden dish to bring somewhere. Give a look and see what you can do. Check it out!

 
Leave a comment

Posted by on November 28, 2013 in Cooking, Cooking Websites, Holidays


Tags: , , ,

Meals with Family and Friends, Part 3 – Fall Vegetable Risotto

As I have said in previous posts, we did some entertaining over the last couple of weeks so it gave me the opportunity to try out some new recipes. One thing I made when we had a friend over for dinner was a nice gluten-free dish of Fall vegetable risotto. I have gotten more ambitious lately in trying to make risotto and I think for the most part it has turned out pretty well with good results. There is some work and care that needs to go into the dish, but the results are quite worth it. This original recipe is from Williams-Sonoma, though I did alter it slightly and omitted the blue cheese from the recipe and substituted Parmesan cheese instead. We’re not big blue cheese eaters here in our house, but I have included it in the original recipe here.

Fall Vegetable Risotto

5 cups chicken or vegetable broth

10 ounces Brussels sprouts, ends trimmed, quartered lengthwise

2 tablespoons olive oil

1 large onion, finely chopped

1/4 pound shitake mushrooms, stems removed, sliced

Coarse kosher salt and freshly ground black pepper

1 1/2 cups arborio rice

1/2 cup dry white wine

1/2 cup gorgonzola or other blue cheese, crumbled

1/2 cup walnut pieces, toasted (optional)

in a saucepan, bring the chicken or vegetable broth to a boil. Add the Brussels sprouts and cook until they are a bright green color and almost tender, about 4 minutes. Using a slotted spoon, transfer the Brussels sprouts to a bowl and set aside. Reduce the heat on the broth to low.

In a heavy medium saucepan over medium-high heat, warm the olive oil. Add the onion and saute until it is a golden brown, about 5 minutes. Add the mushrooms, sprinkle with salt and pepper, reduce the heat to medium, and cook, stirring frequently, until they begin to soften, about 3 minutes. Add the arborio rice and stir until the rice turns opaque, about 1 minute. Add the wine and stir until it is absorbed. Add about 3/4 cup of the warmed broth and adjust the heat so the liquid bubbles and is absorbed slowly. Cook, stirring frequently, until all the liquid is absorbed. Continue cooking, adding the broth about 3/4 cup at a time and stirring frequently until the rice is just tender but slightly firm in the center and the mixture is creamy, about 20 minutes. Mix in the Brussels sprouts, blue cheese and a generous amount of pepper. Taste and adjust the seasoning as necessary.

Spoon the risotto into warmed shallow bowls or plates, sprinkle with the walnuts (if using), and serve.

A couple of notes about this recipe. As I stated, I used Parmesan instead of a blue cheese and I think the results were fine. I also omitted the walnuts as well but feel free to add them in if you like them and want the added crunchy texture. I also substituted water for the white wine in the recipe and it was fine. Finally, I could not get my hands on any shitake mushrooms locally so I just used sliced white mushrooms instead. I think they worked out well though if you can get shitakes, I would use them as I like the look and flavor of them myself. The risotto came out nicely and was very creamy. I loved the flavor of the Brussels sprouts in the mix and everyone seemed to enjoy the dish, I actually used this as a side dish to the meal, but this  could be a meal all on its own if you were going for a meat free meal and just serve this with a salad on the side and I think it would be nice. It could then be vegetarian if use vegetable broth and gluten-free.

That’s all I have for today. Check back next time for another recipe. There is still plenty more to come, as always. Thanks for following along and if you ever have any questions or comments, feel free to leave a comment here, or send me a message on Facebook or Twitter or at my email address of IguanaFlats@msn.com. Until next time, enjoy the rest of your day and enjoy your meal!

002

 
Leave a comment

Posted by on October 19, 2013 in Cooking, Dinner, One Pot Meals, Rice, Vegetarian


Tags: , , ,

Meals with Family and Friends, Part 1 – Parker House Rolls

I have been doing some special cooking over the last week since we had some family staying with us and a friend over for dinner. I didn’t make anything too fancy, but I did try a few new things. The downside for me about doing cooking like this is that I very often forget to take pictures of what I have made so I don’t have any photos to share of some of the things I have made recently. I did remember to take a couple of pictures of some of the side dishes, so I have those, but I forgot pictures of the main meals themselves so we’ll have to do without photos of them when I post those recipes. Sorry about that. Anyway, one thing I made the last week to go along with the London broil meal we made was Parker House dinner rolls. This is a variation on the original recipe that dates back to the 1800’s from the Parker House Hotel in Boston and from the Fannie Farmer cookbook of that time period. The recipe I used I actually got from Willams-Sonoma and looks more like traditional dinner rolls instead of the half-ovals that the traditional Parker House rolls look like.

Parker House Rolls

1 1/2 cups milk

8 tablespoons (1 stick) butter, cut into 8 pieces, plus 2 tablespoons melted butter

4 1/2 teaspoons active dry yeast

4 cups all-purpose flour, plus more for dusting

3 tablespoon sugar

1 tablespoon kosher salt

1 1/2 teaspoons sea salt

1/2 teaspoon garlic flakes

1 teaspoon white sesame seeds

In a small saucepan over medium heat, combine the milk and the 8 tablespoons of butter. Heat until the butter is melted, about 7 minutes. Remove the saucepan from the heat and allow the mixture to cool to 105 degrees to 115 degrees. Add the yeast and stir until it is dissolved. Let the mixture stand for 10 minutes.

In the bowl of an electric mixer fitted with the dough hook attachment, combine the 4 cups of flour, the sugar and the  kosher salt and beat on low-speed until combined, about 30 seconds. Add the cooled milk mixture and knead until the dough forms into a ball, about 1 minute. Increase the speed to medium-low and knead until the dough is smooth and elastic, about 4 to 5 minutes. Remove the dough from the mixer bowl, oil the inside of the bowl and return the dough to the bowl. Cover the bowl tightly with plastic wrap and let the dough rise in a warm place until it has doubled in volume, about 1 hour. Divide the dough in half.

Grease a 13-by-9-inch baking pan. on a lightly floured work surface, roll each piece of dough into a log about 12 inches long. Using a bench scraper, divide each log into 12 equal pieces. Using the cupped palm of your hand, roll and shape each piece into a taut ball.

Arrange the dough balls in the prepared baking pan so there are 4 rows of 6. Cover the pan tightly with plastic wrap and let the dough rise in a warm place for 30 minutes. in a small bowl, mix the sea salt,garlic flakes and sesame seeds.

Preheat the oven to 375 degrees. Remove the plastic wrap from the baking pan. Brush the tops of the rolls with the 2 tablespoons of melted butter and sprinkle the tops with the sea salt mixture. Bake the rolls in the oven until the rolls are golden and an instant-read thermometer inserted into the center of a roll registers 190 degrees, about 18 to 20 minutes. Invert the rolls onto a wire rack, then turn them right side up onto another rack. Let the rolls cool slightly before serving.

Wow, these rolls were good and very easy to make. They were the perfect size dinner rolls and came out nice and brown and crunchy on the top and soft and buttery in the middle. Everyone gobbled them up and I only had 3 left after the meal, just enough for Michelle, Sean and I to have for dinner the next day with our meal. The other great thing I noticed about these rolls is that they would be perfect to use as slider rolls for sliders as an appetizer, snack or meal. I will definitely be making these again as they did not take very long to do and you get a good amount out of the recipe, so you can always throw a bunch in the freezer and just re-heat them for your meal as you want them.

That’s all I have for today. Check back next time for some more recipes. I still have the London broil with creamy horseradish sauce, a pan-seared rib eye with red wine sauce, simple sautéed spinach, a wonderful fall vegetable risotto and more. Until next time, enjoy the rest of your day and enjoy your meal!

IMG_0346


Leave a comment

Posted by on October 17, 2013 in Biscuits, Breads, Cooking, Side Dishes


Tags: , , ,

You Can Never Have Enough Chicken Recipes – Braised Chicken Thighs with Carrots, Potatoes and Thyme

Okay, I know I just posted a braised chicken thighs recipe the other day, but I decided to make another one for dinner on Monday anyway because we had a lot of chicken thighs on hand and because the recipe sounded too good to let go by. I found this one from Williams-Sonoma and saw that it was simple to make and looked like it would taste great so I gave it a try. What was even better about this one is that it is basically a one pot meal so you have everything together in one dish for easy preparation and clean up.

Braised Chicken Thighs with Carrots, Potatoes and Thyme

1 1/2 pounds skinless, boneless chicken thighs, fat trimmed

Kosher salt and freshly ground pepper

Sweet paprika

2 tablespoons olive oil

1 red onion, finely chopped

1 pound red-skinned potatoes, quartered

8 carrots, halved lengthwise and then cut into 1 1/2-inch pieces

1 tablespoon plus 1 teaspoon flour

1 1/3 cups chicken broth

1/3 cup dry vermouth or dry white wine

1 1/2 tablespoons minced fresh thyme

Season the chicken lightly with salt and pepper and then generously with paprika. In a heavy large frying pan or skillet over medium-high heat, warm the olive oil. Add the chicken and cook until brown, about 2 minutes on each side. Transfer the chicken to a plate. Add the onion to the frying pan and stir. Add the potato quarters and the carrots. Sprinkle the vegetables with salt and pepper and saute them until the vegetables are beginning to brown, about 5 minutes. Add the flour mix and stir the vegetables to coat them well. Gradually mix in the broth and vermouth or wine, stirring as you add the liquid. Bring the mixture to a boil and continue to stir frequently. Return the chicken to the pan and bring everything to a boil.

Cover the pan, reduce the heat to medium-low, and simmer until the chicken and vegetables are cooked through, stirring and turning the chicken occasionally, about 25 minutes. Mix in the thyme. Taste and adjust the seasoning. Divide the chicken and vegetables among 4 warmed plates and serve.

I did make a couple of substitutions in this recipe. i did not have any red potatoes on hand, so I used some Yukon Gold potatoes instead and I think they turned out just as well. Also, I rarely use wine or vermouth when cooking unless I think it will really make a difference, so I just used chicken broth where the recipe called for the wine and I think it turned out quite well. You can also use gluten-free flour where the flour is called for in this recipe if you want to make it a gluten-free meal. One thing to consider when trying to make gluten-free is that if you are using store-bought broth, check the ingredients to make sure there is no flour or other gluten products in the broth; many broths do use them so you want to be sure. I loved the sauce that went with the chicken in this meal and the paprika gave the chicken great flavor with a little bit of a kick to it. The whole meal was done in under 40 minutes, which made it even better.

That’s all I have for today. Check back again to see some more recipes. I promise, I am making other things this week besides braised chicken thighs. I have a couple of new recipes I am trying out tonight, so check for those in the coming days. Until next time, enjoy the rest of your day and enjoy your meal!

001


Leave a comment

Posted by on October 16, 2013 in Cooking, Dinner, One Pot Meals, Poultry


Tags: , , , , ,

Another Oktoberfest Recipe: Balsamic-Braised Sausages with Grapes and Watercress

I had seen this Oktoberfest recipe when I got the others from Williams-Sonoma and just recently got around to making this one. I did alter the idea slightly as the original recipe that I will post has this as something of a salad with a nice shallot vinaigrette. I didn’t have any watercress, or any lettuce at all as a matter of fact, in the house when I made this so I simply made the dish and served it over rice instead. I think it came out just as well and makes good use of the slow cooker for this meal.

Balsamic-Braised Sausages with Grapes and Watercress

1 1/2 pounds fresh sweet or hot Italian pork sausages

1 large shallot, finely chopped

1/2 fennel bulb, cored and finely chopped

1 celery stalk, finely chopped

5 garlic cloves, smashed

1/2 teaspoon salt

Freshly ground pepper, to taste

2/3 cup chicken stock

3 tablespoons balsamic vinegar

2 tablespoons white wine

2 1/2 cups seedless red or green grapes, halved

1 bunch watercress, tough stems removed

For the Shallot Vinaigrette:

1 teaspoon Dijon mustard

1 small shallot, minced

3 tablespoons red wine vinegar

1/4 teaspoon salt

Freshly ground black pepper, to taste

1/4 cup extra-virgin olive oil

Preheat a broiler. Arrange the sausages on a rack set on a rimmed baking sheet. Broil, turning as needed, until the sausages are a golden brown all over, about 8 to 9 minutes total. Transfer the sausages to a plate.

In a slow cooker, stir together the shallot, fennel, celery, garlic, salt and several grinds of pepper. Top with the broiled sausages and add the chicken stock, balsamic vinegar and white wine. Cover and cook for 2 1/2 hours on the high setting or 5 1/2 hours on the low setting, turning the sausages halfway through if possible. The sausages should be tender and cooked through.

To make the vinaigrette, in a bowl, combine the grapes and watercress. In a small bowl, whisk together the mustard, shallot, red wine vinegar, salt and a few grinds of pepper. Whisk in the olive oil until the vinaigrette is emulsified; you will need about 1/3 cup of vinaigrette for this recipe; reserve the rest for another use. Drizzle the grapes and watercress with enough of the vinaigrette to coat lightly and toss to coat everything evenly.

Divide the sausages among warm individual plates, spoon some of the braising liquid around the sausages, and top with the grapes and watercress. Serve.

All three of us loved the flavor of the sausages and the braising liquid. This is one of the few meals where we actually didn’t have any leftovers as the sausages went quite quickly. Browning the sausages before putting them in the slow cooker makes them nice and meaty and the slow cooking makes them very tender, so it is a great combination. I really liked the flavor of the braising liquid with the shallot and fennel and the balsamic vinegar really adds a lot to the dish as well. I think this would go very nicely with the grapes and watercress, and I did make the shallot vinaigrette anyway to have as a salad dressing for another day and even put a bit on my rice with this meal for some added flavor. Sean has already asked me to make this one again, so I think it’s going to be a favorite.

That’s all I have for today. Check back next time for another recipe that I have tried recently. I still have a bunch that I want to try out in the coming weeks, so there is still lots of good stuff to come, including some Halloween ideas and somethings to think about as possible Thanksgiving dishes. Until next time, enjoy the rest of your day and enjoy your meal!

001

 
Leave a comment

Posted by on October 11, 2013 in Cooking, Dinner, Pork, Salad, Sauce, Slow Cooker Meals


Tags: , , , , ,

Comfort Food For Fall Weeknights – Chicken Pot Pie

We all love the classic comfort food dishes but sometimes we just don’t have the time to put in to make them during the week. Who wouldn’t love a nice pot roast dinner on a weeknight? Unfortunately, few of us have the time to pull that off unless you want to give it a try in the slow cooker. I did come across a great comfort food recipe from Williams-Sonoma the other day that you can make even easier by making use of some leftovers or store-bought items. This recipe for chicken pot pie has you making your own crust. If you don’t have time to do it, you can always use a store-bought crust to do that and save yourself even more time.

Chicken Pot Pie

For the Pie Dough:

1 1/2 cups all-purpose flour

Salt

6 tablespoons cold vegetable shortening

2 tablespoons cold butter

About 1/3 cup cold water

For the Filling:

Salt and freshly ground black pepper

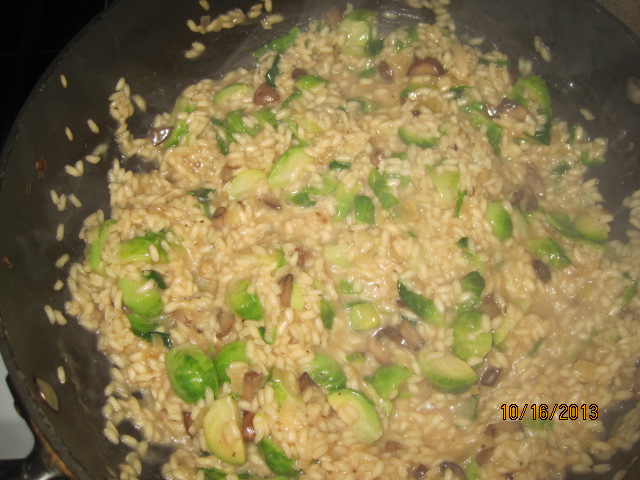
1 cup sliced carrots

1 cup fresh or frozen peas

1 cup corn kernels (from 2-3 ears)

2 tablespoons butter

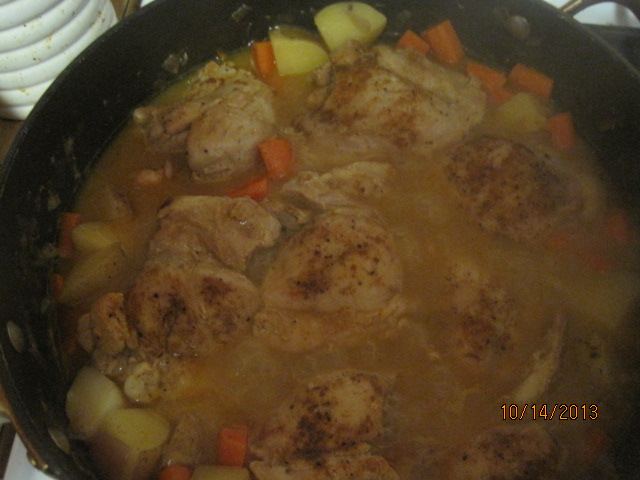
4 skinless, boneless chicken thighs, cut into bite-sized chunks

2 tablespoons chopped shallot

1/4 cup all-purpose flour

1 1/2 cups chicken broth

1/2 cup dry white wine

1/2 cup half-and-half

1 tablespoon chopped fresh parsley

1 egg yolk beaten with 1 teaspoon water

To make the dough, stir together the flour and 1/2 teaspoon of salt. Using a pastry blender, cut in the shortening and butter until a coarse meal starts to form. Toss with a fork while adding enough water for the dough to clump together. Form the dough into a disk, wrap it in plastic wrap, and refrigerate it for 30 minutes.

Meanwhile, preheat the oven to 400 degrees. Bring a saucepan of salted water to a boil. Add the carrots and peas and cook until tender-crisp, about 3 to 5 minutes. Using a slotted spoon, transfer the vegetables to a colander and drain, then transfer them to a bowl. Repeat the process with the corn, cooking it for 1 minute.

In a large skillet, melt the butter over medium-high heat. Add the chicken and cook, stirring occasionally, until it is browned on all sides, about 8 minutes. Add the shallot and cook, stirring, until softened, about 2 minutes. Sprinkle in the flour and stir well. Stir in the broth, wine, half-and-half and parsley and bring the mixture to a simmer. Cover, reduce the heat to low, and simmer for 10 minutes. Stir in the carrots, peas and corn. Season with salt and pepper. Transfer the mixture to a 9-inch pie plate.

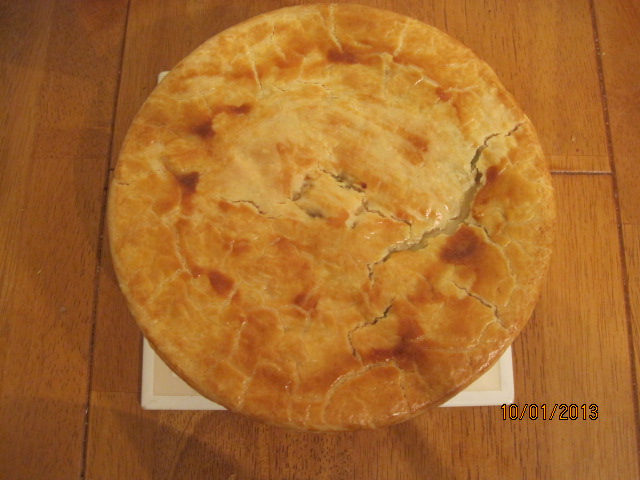
On a floured work surface, roll out the dough into a round about 1/8 inch thick and large enough to fit over the pie plate. Brush some of the egg yolk mixture in a 1-inch border around the edge of the round. Place the round, egg side down, over the filling, and press the dough to the rim of the dish. Crimp or trim any overhanging dough and brush the surface lightly with the remaining egg yolk mixture. Cut a few slits in the center of the top of the pie to vent the steam.

Place the pie plate on a baking sheet and bake until the crust is golden brown, about 30 minutes. Remove from the oven and serve.

Just a few notes about this recipe. You can always use store-bough pie dough for this to save you time. I keep a package of pie dough on hand regularly in case I want to make a quick pie or something like this. You can also use frozen or leftover vegetables in this dish and vary things up, using whatever vegetables you have on hand. I put some green beans in with mine. As for the chicken, if you have leftover cooked chicken already you can save yourself another step and just heat it through in the skillet before adding the flour. You can use a rotisserie chicken instead if you have one of those as well. The meat from the chicken thighs is great for this because it is flavorful and tender, but use what you have to make things easier for you. Sean really liked this recipe and had 3 plates of it for dinner that night. The gravy created for the chicken and vegetables has really good flavor to it. By the way, I omitted the wine (I usually do in recipes) and used extra chicken broth instead and it turned out just fine.The leftovers were great for lunches too.

That’s it for today. Check back next time for some more recipes. I still have a roast beef recipe to try, Another Oktoberfest recipe using sausages, and I picked up a turkey breast the other day so I need to do something with that as well. Check back and see what comes along. Until next time, enjoy the rest of your day and enjoy your meal!

001

 
Leave a comment

Posted by on October 3, 2013 in Cooking, Dinner, Leftovers, One Pot Meals, Poultry


Tags: , , ,

Oktoberfest Meals, Part 2 – Pork Chops with Cider Glaze

It’s time for the next recipe I tried that was part of Williams-Sonoma and their post about Oktoberfest recipes. Pork is a mainstay when it comes to Oktoberfest and German cooking, and this recipe is a very simple one that makes great use of three great pieces of this type of cooking – pork chops, cabbage and apples. This one is a pork chops with cider glaze recipe that you can prepare and have on the table in under 30 minutes. If you want to take the time to brine your pork chops ahead of time, you could do that overnight and have some really flavorful chops when you are done. I’ll post the brine recipe after this recipe.

Pork Chops with Cider Glaze

4 bone-in, center-cut pork chops, each about 3/4 inch thick

Salt and freshly ground pepper, to taste

2 tablespoons olive oil

1 head red cabbage, halved, cored and thinly sliced crosswise

2 1/2 cups apple cider or apple juice

1 tablespoon apple cider vinegar

1 tablespoon fresh thyme leaves

Season the pork chops generously with salt and pepper. In a large skillet over medium-high heat, warm the olive oil. Add the pork chops and cook, turning them once, until they are golden brown, about 5 minutes total. Transfer the chops to a plate.

Add the cabbage to the skillet and cook, stirring frequently, until the cabbage is softened, about 3 to 4 minutes.

Increase the heat of the skillet to high, pour the cider and vinegar over the cabbage, and boil until the liquid is reduced to about 1 cup, about 8 to 10 minutes. Stir in the thyme leaves.

Return the pork chops to the skillet and any accumulated juices from the plate and spoon the glaze over the chops. Cover the skillet, reduce the heat to medium-low, and simmer until the pork chops are tender and barely pink inside, about 5 minutes.

Arrange the cabbage and pork chops on a platter, top them with the glaze and serve immediately.

I have to tell you that you really do need a large skillet for this if you are going to make a whole head of cabbage. I only used half of a cabbage and it more than filled the skillet I chose to use. I also added a couple of apples to the cabbage as it was cooking for even more apple flavor to the dish. I served this with just some plain white rice, but it would go well with some noodles or even some German potato salad.

If you want to make some brine for these pork chops, here is a very quick brine recipe you can put together to give some great flavor.

Pork Chop Brine

4 cups apple cider

3 cups water

1/2 cup salt

5 whole peppercorns

2 cinnamon sticks

Combine all the brine ingredients in a large bowl and stir. Immerse the pork chops in the liquid, cover and refrigerate for at least 6 hours or preferably overnight.

Brining really does make the meat more moist and adds great flavor, so if you have the time and are planning ahead, you might want to give it a try. I loved the apple flavor that permeated the chops and the cabbage in this dish and it was very easy to make.

That’s all I have for today. Check back again for more recipes I’ll be trying out. I do have some new choices for a roast beef, a roasted chicken and a whole bunch of other recipes I am planning to try. Until next time, enjoy the rest of your day and enjoy your meal!

001

 
Leave a comment

Posted by on October 1, 2013 in Cooking, Dinner, Pork


Tags: , , , , ,

Oktoberfest Meals, Part 1 – Pork Shoulder with Sauerkraut and Apples

Even if you are not a beer lover or beer fan, there is some great food that goes along with a Oktoberfest celebration. Of course there are lots of meals involving sausages and wursts of various kinds, but there are also lots of uses for things like pork and cabbage. Williams-Sonoma posted some great recipes a little over a week ago that concentrated on the Oktoberfest meals and what you can make at home and I recently tried out a couple of them. The first one I tried was a nice meal of pork shoulder with sauerkraut and apples. I had picked up a very large pork shoulder on sale, cut it into two roasts, removed the bone and froze half of it. I used the other half for this recipe.

Pork Shoulder with Sauerkraut and Apples

1 boneless pork shoulder roast, about 4 to 5 pounds

Salt and freshly ground black pepper

2 tablespoons butter

2 tablespoons vegetable oil

1 onion, thinly sliced

3 Golden Delicious apples, peeled, halved and cored

1 tablespoon fresh thyme

1/2 cup dry white wine

2 pounds sauerkraut, squeezed dry

1/4 cup firmly packed brown sugar

1 tablespoon caraway seeds (optional)

Lay the pork flat, boned side up, on a cutting board. Using a sharp knife, trim away any large pockets of fat. Starting at the thinner end of the meat, roll up the pork and securely tie the roll at regular intervals with kitchen twine. Season the pork generously with salt and pepper.

In a fry pan over medium-high heat, melt the butter with the vegetable oil. Add the pork and cook, turning frequently, until it is well browned on all sides, about 10 minutes. Transfer the  pork to a platter.

Return the pan to medium-high heat, add the onion, apples and thyme, and saute until the onion and apples are lightly browned, about 5 minutes. Transfer the apple mixture to a bowl.

Pour off the fat from the pan. Return the pan to medium-high heat, add the wine and de-glaze the pan, stirring with a wooden spoon to scrape up any browned bits from the bottom of the pan.

Pre-heat the oven to 325 degrees. Cover the bottom of a large Dutch oven with the sauerkraut. Sprinkle the sauerkraut with the brown sugar and caraway seeds, if using. Place the pork on top of the sauerkraut and surround it with the apple mixture. Pour in the wine mixture. Cover, transfer to the heated oven and cook until the pork is fork-tender and shreds easily, about 4 to 5 hours.

Transfer the pork to a carving board. Using a sharp knife, cut the pork crosswise into slices about 1/2 inch thick, removing the twine from the pork as you slice. Place the sauerkraut on a large platter and top with the pork slices. Surround the pork with the apples and serve immediately.

This dish also lends itself very well to cooking in the slow cooker. All you need to do is cover the bottom of the slow cooker with the sauerkraut and sprinkle the brown sugar on top of it. Place the pork on top of the sauerkraut and surround it with the apple mixture. Pour in the wine mixture, cover, and cook on low until the pork is fork-tender, about 8 to 10 hours.

I did change a couple of things about this recipe. I did not use the caraway seeds myself. I also substituted chicken broth for the white wine. You could just as easily use water instead of wine or broth if you like. Finally, I only used 1 pound of sauerkraut and then substituted some shredded red cabbage for the rest of it to give things a bit of a different look and flavor. The 5 hour cooking time gives the cabbage and the pork incredible flavor. The meat falls and shreds much like pulled pork would but you get a nice bite of the vinegar in the sauerkraut and the taste of the apples. I think it’s a great dish. I served this with some wild rice and applesauce.

That’s all I have for today. Check back tomorrow for another Oktoberfest recipe I just tried for pork chops with a cider glaze. It was also a great recipe to try out this time of year. Until next time, enjoy the rest of your day and enjoy your meal!

002 001


Leave a comment

Posted by on September 30, 2013 in Cooking, Dinner, Pork, Slow Cooker Meals


Tags: , , ,

Side Dish or Main Dish – Polenta with Roasted Vegetables

I saw this recipe from Williams-Sonoma about 2 weeks ago and knew I wanted to give it a try. I have been trying to introduce more things polenta into our meals to cut back on starches like potatoes, bread and white rice. Sean isn’t exactly thrilled with it so far, so I try to do things with it to make it a little more palatable to him. This recipe could easily be a main course on its own if you wanted a vegetarian meal or you can use it as a side dish for a meal, which is what I did.

Polenta with Roasted Vegetables

3 tablespoons olive oil, plus more for the pans

1 small eggplant, cunt into 3/4-inch pieces

2 small zucchini, cut into 3/4-inch pieces

2 small yellow squash, cut into 3/4-inch pieces

1/2 red onion, cut into 3/4-inch pieces

1 orange bell pepper, seeded and cut into 3/4-inch pieces

Salt and freshly ground black pepper

1 cup stone ground cornmeal (polenta)

2 tablespoons butter

1 cup grated Parmesan cheese

Pre-heat the oven to 450 degrees. Oil a rimmed baking sheet and an 8-inch baking dish with olive oil

In a large bowl, combine the eggplant, zucchini, summer squash, red onion and bell pepper. Drizzle with the 3 tablespoons of olive oil, season with salt and pepper, and toss to combine. Arrange the vegetables in a single layer on the prepared baking sheet. Roast, tossing once, until the vegetables are caramelized, about 20 to 25 minutes. Set the vegetables aside and reduce the oven temperature to 350 degrees.

Meanwhile, in a heavy saucepan, bring 4 cups of salted water to a boil over medium heat. Stirring constantly, very slowly add the polenta. Cook, stirring constantly, until the polenta begins to thicken, about 5 minutes. Reduce the heat to low and continue cooking the polenta, stirring frequently, until the polenta is soft, about 25 minutes. Add the butter and Parmesan  cheese and stir until the cheese has melted. Pour the polenta into the prepared baking dish and smooth the top.

Bake the polenta just until it begins to set, about 15 minutes. Remove the dish from the oven and top the polenta evenly with the roasted vegetables. Place the polenta back in the oven and continue to bake it until the vegetables are heated through, about 15 minutes. Serve the polenta directly from the dish.

I did change a few things about the original recipe. The original recipe also calls for 2 cups of Fontina cheese to be added at the same time as the Parmesan. I did not have any on hand, so I just used the Parmesan instead and I think it turned out fine. Since I am not a cheese eater, this was more than enough for me but you may like it even better with the Fontina. Also, I did not use the eggplant or the pepper. Michelle and Sean are not big eggplant fans, so I omitted it from the recipe and used extra zucchini and squash instead. I also did not have an orange pepper so I added a diced carrot instead for similar color. You could easily make this as a main course for a meal and it would be quite filling. We have leftovers to use as side dishes for other meals this week. I loved the creaminess of the polenta and the vegetables added just the right texture and flavor to the dish.

That’s all I have for today. Check back next time for some more recipes I have been working on. Until then, enjoy the rest of your day and enjoy your meal!

004


1 Comment

Posted by on September 5, 2013 in Cooking, Dinner, Side Dishes, Vegetables, Vegetarian


Tags: , , ,

Tantalizing Tuscan-Style Steak with Crispy Potatoes

There are few things better than having a nice steak on the grill. This recipe, from Williams-Sonoma gives you a chance to make a basic steak and potatoes meal with some nice seasoning and not a lot of effort on your part. There are only 8 ingredients in the whole recipe and it doesn’t take much longer than 30 minutes to make the whole meal.

Tuscan-Style Steak with Crispy Potatoes

1 1/2 pounds baby waxy-skinned potatoes, such as Yukon Gold, scrubbed but skins left on, halved

4 tablespoons extra-virgin olive oil

Salt and freshly ground black pepper

2 teaspoons red wine vinegar

1 teaspoon fresh lemon juice

1 teaspoon minced fresh hot chile or a generous pinch of dried red pepper flakes

3 small fresh rosemary sprigs

2 bone-in Porterhouse steaks, about 1 pound each

Put the potatoes in a large saucepan and add water to cover the potatoes by 1 inch. Bring the water to a boil over high heat, then reduce the heat to medium-high and cook until the potatoes are almost tender, about 10 minutes. Drain and set aside.

In a large fry pan over medium heat, warm 2 tablespoons of the olive oil. When the oil is shimmering, add the potatoes and toss gently to coat them with the oil. Cook the potatoes without turning until they are nicely browned on the bottom, about 5 minutes. Sprinkle with 1/2 teaspoon of salt and pepper to taste, turn and cook, again without turning, until the potatoes are browned on the second side, 5 minutes longer.  Stir and cook for a few more minutes to finish browning the potatoes and crisping the edges.

Meanwhile, prepare a fire in a charcoal grill or preheat a gas grill to high. In a bowl, whisk together 2 tablespoons of olive oil, the red wine vinegar, lemon juice and chile. If you are using charcoal, spread the hot coals across one half of the bottom of the grill and leave the other half clear to create a cool zone.

Tie the rosemary sprigs together at one end, using kitchen string, to make a brush. Using the rosemary, brush the marinade all over the steaks on both sides. Sprinkle both sides of the steaks with salt. Arrange the steaks on the grill directly over the heat and sear for 2 minutes. Turn the steaks and sear for 2 minutes on the second side. If you are using charcoal, move the steaks to the indirect heat. If you are using gas, reduce the heat to medium and grill for about 8 minutes longer for medium-rare, turning once or twice and brushing again with the marinade as they cook. Transfer the steaks to a cutting board, tent with aluminum foil and let rest for 5 minutes. Divide each steak into two pieces and arrange on dinner plates with potatoes around the steak and serve.

Just a couple of things about this recipe. I did make a couple of substitutions and I think they both worked out well. I did use strip steaks instead of Porterhouse since there is a big price difference between the two. I also used a bundle of basil leaves instead of the rosemary since Michelle and Sean do not really eat rosemary. I liked the flavor that came from the fresh basil anyway. I also made a quick tomato salad to go along with the meal. Finally, I added some mushrooms and shallots to a small pan and sautéed them with a little bit of the leftover marinade to use to top the steak and it turned out great. It was a very quick meal that you can do any night of the week.

That’s all I have for today. We are going away to Saranac Lake for a few days so I won’t be back on until Sunday, so check back then for some new recipes. I am bringing some of the homemade bagels and some baked sausage and peppers with me for the weekend for everyone to have. Until next time, enjoy the rest of your day and enjoy your meal!001

 
Leave a comment

Posted by on July 25, 2013 in Beef, Cooking, Dinner, Grilling, Potatoes


Tags: , , ,

 
National Day Calendar

Fun, unusual and forgotten designations on our calendar.

Jennifer Probst

a little bit naughty a little bit nice

Laissez Faire

Letting Life Lead

What To Have For Dinner Tonight

Simple and delicious dinner inspiration