RSS

Tag Archives: williams-sonoma

First Summer Barbecue, Part 1 – Easy Barbecue Chicken

Even though I am only allowed to have an electric grill here at our condo, I still try to do some grilling outdoors when I can. This past weekend was so hot I just couldn’t bring myself to turn the oven on and cook and this week does not promise to be much better. I want to try to grill at least twice a week during the summer to try some new grilling recipes out, and yesterday was the perfect day to start. I had picked up some chicken thighs and the store on Saturday and decided to barbecue them. I found this recipe from Williams-Sonoma that looked good, but I also wanted to try out a barbecue sauce recipe I had picked up from Food Republic, so I combined the two to make last night’s dinner.

Classic BBQ Chicken

For the basic poultry brine:

8 cups water

5 tablespoons kosher salt

2 tablespoons dried basil

2 tablespoons coriander seeds

1 tablespoon peppercorns

1 tablespoon yellow mustard seeds

1 teaspoon granulated garlic

2 bay leaves

1 chicken, about 4 pounds, neck and giblets removed, chicken cut into 4 pieces (or whatever assortment of chicken pieces you want to use totaling 4 pounds)

Freshly ground black pepper, for sprinkling

Granulated garlic, for sprinkling

1 recipe Tennessee Whiskey Barbecue Sauce (recipe to follow)

To make the brine, in a large bowl, combine the water, salt, basil. coriander seeds, peppercorns, mustard seeds, garlic and bay leaves and stir until the salt dissolves. Use immediately.

Place the chicken pieces in a large sealable plastic bag and pour in the brine. Seal the bag closed, squish the brine around the chicken and refrigerate overnight.

At least 30 minutes before you plan to begin grilling, remove the chicken from the refrigerator and remove the pieces from the brine. Discard the brine. Rinse the chicken pieces briefly in cold water and pat dry with paper towels. Lightly sprinkle the chicken on all sides with pepper and garlic.

Prepare a grill for indirect grilling over medium heat; the internal grill temperature should be about 350 degrees. If you are using charcoal, bank the lit coals on either side of the grill bed, leaving a strip in the center without heat, and place a drip pan in the center. If you are using gas, preheat the burners, then turn off 1 or more burners to create a cooler zone. Brush and oil the grill grate.

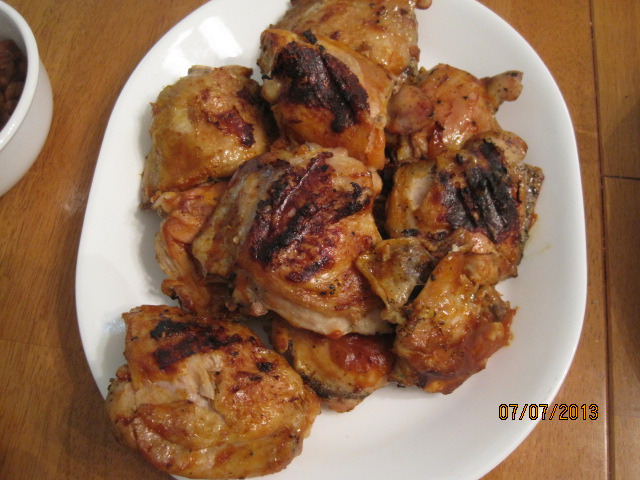
Place the chicken pieces on the grill over the direct-heat area and sear, turning once, for 2 minutes per side. Move the chicken pieces to the indirect-heat area, cover the grill and cook for 30 minutes. Now, start brushing the chicken with the barbecue sauce, turning and brushing the pieces every 5 minutes, for about 15 minutes more. The chicken is ready when it is firm to the touch and the juices run clear when a thigh or breast is pierced with a knife tip. Transfer the chicken pieces to a platter and serve immediately with the remaining sauce on the side.

Of course, you don’t have to brine the chicken if you don’t have the time or don’t want to do that, but I think it makes a big difference in the flavor. The brine infuses the chicken with some extra flavor and plumps the chicken up, helping it to make it juicier. You do need to watch the chicken  closely on the grill as the fat tends to cause flare-ups, which can cause you to burn the chicken before it is cooked all the way. Using the indirect heating method with a drip pan can really help you with this and the chicken in this recipe turned out perfectly.

The sauce was a great find and really added nicely to the chicken. I was intrigued as soon as I saw this recipe and knew I was going to make it.

Tennessee Whiskey Barbecue Sauce

1 tablespoon canola or vegetable oil

1/4 cup onion, finely minced

1/2 cup Jack Daniels or other whiskey

2/3 cup ketchup

1/2 cup cider vinegar

1 teaspoon Worcestershire sauce

1 tablespoon Tabasco or other hot sauce

A few drops of liquid smoke

Heat the oil in a medium saucepan over medium heat. Add the onion and saute, stirring frequently, until the onions are translucent, about 5 minutes. Deglaze the pan with the whiskey, stirring to scrape off any bits from the bottom of the pot, then add the rest of the ingredients and whisk together. Bring the mixture to a simmer, then reduce the heat to low and cook for 20 minutes. Remove the sauce from the heat, allow it to come to room temperature and transfer it to a container with a tight lid. It will keep in the refrigerator for up to 1 week.

The combination of the whiskey, liquid smoke and hot sauce is perfect. It was not too thick or too sweet and had an awesome flavor. i could see using this on ribs, chicken or pork without any trouble at all. I served some on the side so people could extra to their meal if they wanted to.

That’s all I have for today. Check back next time to see what recipes come up as I am trying out some new things this week. Until then, enjoy the rest of your day and enjoy your meal!

001

 
Leave a comment

Posted by on July 8, 2013 in Cooking, Dinner, Grilling, Poultry, Sauce


Tags: , , , , , , ,

Your Personal Blueberry-Lemon Cakes

Blueberries are in season right now and you can get them at a really great price. Not only are they great in things like fruit salads or your morning oatmeal, but you can do many different desserts with them. While I do love to make blueberry pie, I was looking for something a little bit different recently to make with some of the fresh blueberries I got. I came across this recipe from Williams-Sonoma and it sounded pretty good so I thought I would give it a try and see how they came out.

Individual Blueberry-Lemon Cakes

2 cups blueberries

1/4 cup plus 6 tablespoons sugar

1/3 cup water

1 teaspoon cornstarch

3/4 cup all-purpose flour

1 teaspoon baking powder

1/2 teaspoon salt

1 egg

1/4 cup buttermilk

5 tablespoons butter, melted and cooled slightly

1/2 teaspoon finely grated lemon zest

2 tablespoons fresh lemon juice

Preheat the oven to 375 degrees. Grease the inside of 6 small ramekins with butter. In a small saucepan over medium heat, combine the blueberries and the 1/4 cup of sugar and cook, stirring until the sugar is mostly dissolved, about 3 to 4 minutes. in a small bowl, whisk together the water and cornstarch and it into the saucepan. Bring it to a simmer and cook, stirring occasionally, until the mixture is thickened, about 5 minutes. Remove the mixture from the heat.

In a bowl, whisk together the flour, baking powder, salt and 6 tablespoons of sugar. In a large bowl, whisk together the egg, buttermilk, butter, lemon zest and lemon juice. Add the flour mixture, whisking until the batter is just combined.

Spoon 1 tablespoon of the blueberry mixture into the bottom of each ramekin. Top each with 1/4 cup of the batter and then 1 tablespoon of the blueberry mixture. Place the ramekins on a rimmed baking sheet. Bake until the tops of the cakes are lightly golden and a toothpick inserted into the center of the cakes comes out clean, about 20 to 25 minutes. Let the cakes cool completely in the ramekins before serving.

These cakes came out great. The blend of the blueberries with the lemony flavor of the cake is wonderful. You could easily double this recipe to make more if you want to make some for a larger crowd or even place them in larger ramekins if you want bigger portions. You can dust the tops with some confectioner’s sugar and serve them with some fresh whipped cream or some vanilla ice cream. in any case, it makes for a quick and easy dessert that you can make in no time at all.

That’s all I have for today. Check back again next time for some more recipes, including another blueberry recipe I just tried from Bon Appetit for blueberry hand pies. It’s very easy to make and they taste great too.I also have some other recipes I have tried recently for a new roasted chicken, braised short ribs, some roasted green beans, watermelon agua fresca and more, so keep checking in to see what’s next. Until next time, enjoy the rest of your day and enjoy your meal!

002 001

 
Leave a comment

Posted by on July 3, 2013 in Cakes, Cooking, Dessert, Fruit


Tags: , , ,

It’s Cherry Season – Braised Pork Chops with Cherries

Cherry season really only comes around for a couple of months and I do try to advantage when they are around and get some in. They make a great snack or an addition to a fruit salad, and of course you can make great things like a cherry pie or cherry turnovers, which are both awesome. You can also try incorporating them into your entrée to give some amazing flavor to your weeknight meals. I came across this recipe from Williams-Sonoma a couple of weeks back and knew I just had to give it a try to jazz up the usual pork chop dinner.

Braised Pork Chops with Cherries

4 bone-in, center-cut pork loin chops, each about 1 inch thick

Salt and freshly ground black pepper

1 tablespoon minced fresh rosemary

3 tablespoons butter

2 leeks, white and pale green parts only, halved lengthwise and thinly sliced

1 cup chicken broth

1/4 cup Port wine

2 tablespoons balsamic vinegar

1 cup fresh pitted cherries, halved or 1/2 cup dried cherries

Season the pork chops with salt and pepper and sprinkle with the rosemary., patting the seasonings firmly so they adhere to the meat well. In a large saute pan with a lid, melt 2 tablespoons of the butter over medium-high heat. Add the pork chops and cook, turning once, until the chops are golden brown on both sides, about 6 minutes. Transfer the chops to a plate.

In the same pan, melt the remaining 1 tablespoon of butter over medium heat. Add the leeks sand saute until they are softened and beginning to brown, about 3-4 minutes. Stir in the broth, stir to scrape up any browned bits on the bottom of the pan, and cook for 1 minute. Stir in the Port wine, vinegar and cherries.

Return the pork chops to the pan along with any accumulated juices and spoon the liquid over the chops. Cover the pan, reduce the heat to medium-low and simmer until the pork is tender and barely pink in the center, about 15 minutes. Divide the chops among the plates, spoon the cherry mixture over the tops of the chops and serve.

I love the flavor the cherries give to the entire dish. They make the braising liquid taste great and they add some extra flavor to the pork chops themselves. Not everyone has Port wine around the house and it may seem expensive to go out and buy if you only need 1/4 of a cup and don’t drink port. It does add a lot of flavor to the mixture and goes well with the balsamic vinegar, so if you have some you should use it or just buy a very small bottle to use. If not, I think you can simply omit it from the recipe altogether. I served the dish with some corn on the cob, wild rice and some nice, crusty bread.

That’s all I have for today. Check back again for some other recipes in the coming days, including a high-roasted chicken recipe, a stir fry 101 primer, and a pork tenderloin recipe, among others I am looking to try. The local farmer’s market has started up again for the summer so I plan on going tomorrow to see what I can get as far as some fresh fruit and vegetables. That should affect what I make for dinner next week so check back and see what I come up with. Until then, enjoy the rest of your day and enjoy your meal!

005 004

 
Leave a comment

Posted by on June 20, 2013 in Cooking Tips, Dinner, Fruit, Pork, Sauce


Tags: , , , ,

Weekend Entertaining: Father’s Day Barbecue | Williams-Sonoma Taste

Weekend Entertaining: Father’s Day Barbecue | Williams-Sonoma Taste.

Looking for a great barbecue meal for the weekend for Father’s Day? Williams-Sonoma has this post to help you with all the planning and the menu from appetizers and drinks to the entree, sides and desserts. Check it out and give it a try!


Tags: , , , ,

Bring On the Baby Back Ribs

I love making ribs of all kinds no matter what time of year it is, but as the summer approaches it gets to be more and more the type of thing that people want to cook on the grill. Unfortunately, living in a condominium here in New York limits the grilling that we can do since we can’t have a charcoal or gas grill here. This means that I have to try to find ways to do this type of cooking indoors. I am always on the lookout for new recipes for ways to make spare ribs or baby back ribs (which are my personal favorite) and I came across this one from Williams-Sonoma on their website so I thought I would give it a try.

Baby Back Ribs

2 racks baby back ribs (about 5 pounds total)
2 teaspoons kosher salt
1 teaspoon smoked paprika
1 teaspoon dried oregano
1 teaspoon dried thyme
1/2 teaspoon granulated garlic
1/2 teaspoon onion powder
1/2 teaspoon freshly ground pepper
1/2 cup ketchup-style chili sauce
1/2 cup peach or apricot preserves
2 tablespoons dark molasses
1 tablespoon cider vinegar
1 tablespoon Dijon mustard
1/2 teaspoon hot pepper sauce

Preheat the oven to 350°. Cut each rib rack into 2 or 3 sections. Mix together the salt, paprika, oregano, thyme, granulated garlic, onion powder and pepper. Sprinkle the mixture on both sides of the ribs and rub it into the meat.

Arrange the ribs, overlapping slightly if necessary, in a large roasting pan. Cover the pan tightly with aluminum foil, place in the oven and cook for 30 minutes. Remove the foil, turn the ribs and return them to the oven. Continue cooking until the ribs are tender and browned, about 30 minutes more.

Meanwhile, make the sauce. In a small saucepan, stir together the chili sauce, peach preserves, molasses, vinegar, mustard and hot pepper sauce and bring to a simmer over medium-low heat. Remove from the heat and set aside.

If you are you using a grill, prepare the grill for direct-heat cooking over medium-high heat. Lightly oil the cooking grate. Brush both sides of the ribs with the sauce. Place on the grill, cover and cook, turning once, until shiny and glazed, about 3 minutes per side. Alternatively, if you are planning to use the oven, increase the oven temperature to 425°. Pour off the fat in the roasting pan, then return the ribs to the pan. Brush the ribs with some of the sauce and cook until the ribs are shiny and glazed, about 5 minutes. Turn, brush the ribs with more of the sauce and cook to glaze the other side, about 5 minutes more.

Transfer the ribs to a carving board and let stand for 5 minutes. Cut between the bones into individual ribs, heap on a platter and serve with any of the remaining sauce.

You could easily use spare ribs for this recipe instead of the baby back ribs. Just keep in mind that the spare ribs tend to be larger and a little tougher than the baby back ribs so they will take more time to cook. You should allow for about 45 minutes of covered baking, another 45 minutes uncovered and then 15 minutes after you put the sauce on for glazing. I think they came out great cooked just in the oven but if you have the opportunity to put them on the grill after starting them in the oven I think you could get nice flavor from that as well. I like the glaze and the combination of the apricot preserves (which is what I had on hand), the chili sauce, the mustard and the hot pepper sauce. It made a nice combination and gave a great flavor to the ribs. I served this with sweet potatoes and corn on the cob, although you could easily do it with coleslaw and potato salad, which go great with things like ribs.

That’s all there is for today. Check back again next time and see which recipes that I will post. I tried a new method for burgers yesterday and made my own homemade hamburger rolls and a special ketchup, both recipes that I got from Marc Murphy, and I think they turned out great. Check in next time and I’ll be posting those recipes. I am also planning a few other things for the coming days and weeks so you want to keep checking back and see what comes along. Until then, enjoy the rest of your day and enjoy your meal!002

 
Leave a comment

Posted by on May 30, 2013 in Cooking, Dinner, Grilling, Pork


Tags: , , ,

Sunday Chicken and Strawberry Rhubarb Pie


I decided to get back to making a regular Sunday dinner and this week as I hadn’t done it a couple of weeks. I had picked up some chicken earlier in the week and a whole chicken makes great Sunday meal. I wanted to find a recipe that would make things a little different and I had seen this one on the Food Network about a week or so ago and thought I would give it a try. It is Garlic Chicken with Israeli Couscous. I had never made it before and it looked good on the TV so we figured what the head lets give it a try.

Garlic Chicken with Israeli Couscous

For the Chicken:
2 whole garlic bulbs
1 lemon, zest stayed and juice
1 large bunch fresh thyme, leaves only
1 tablespoon cumin seeds, toasted and ground
Pinch crushed red pepper flakes
Kosher salt
Extra virgin olive oil
1 4 to 5 pound chicken, cut into eight parts

Couscous:
Kosher salt
2 cups medium size Israeli couscous
Extra virgin olive oil
3 ribs celery, sliced thin
1 large onion, sliced
Pinch crushed red pepper flakes
1 1/2 cups dry white wine
3 tablespoons tomato paste
Large pinch saffron
2 zucchini, cut into 1/2-inch dice
2 to 3 cups chicken stock
1/2 cup pine nuts, toasted (optional)
3 scallions, white and green, sliced thin

For the garlic chicken: preheat the oven to 350°. Put the garlic bulbs straight on the oven rack and roast them until they are soft when squeezed, about thirty minutes. Remove them from the oven and allow them to cool. Turn the oven up to 375°.

While the garlic is roasting, prepare the chicken. In a food processor or bowl, add the lemon zest and juice and set aside. When the garlic bulbs are cool, slice the tops off and squeeze out the roasted garlic into the bowl or food processor along with the thyme, cumin, crushed red pepper and salt to taste. Add a little olive oil and purée or mash into a loose paste. Massage the mixture all over the chicken pieces and allow it to sit for at least one hour.

For the couscous: bring a pot of well salted water to a boil over medium heat. Add the couscous and cook until it is about two-thirds of the way cooked through, approximately 5 to 6 minutes. Drain and set aside.

Coat a large sauté pan with olive oil and heat over medium high heat. Add the chicken to the pan and brown it on all sides. Remove it to a plate, drain the fat and add the celery and onions. Season with salt and crushed red pepper. Deglaze the pan with the white wine, scraping up all the bits on the bottom of the pan, and cook for 7 to 8 minutes. Stir in the tomato paste and cook for another two minutes. Add in the saffron, zucchini, cooked couscous and chicken stock. Stir well to combine, and then taste and adjust the seasonings if needed.

Transfer the mix to a ovenproof dish. Nestle the chicken, skin side up, in the couscous and add some more chicken stock, if needed, to keep things moist and cover the pan with foil. Add some more chicken stock to keep everything moist. Sprinkle with pine nuts, if using, and cover the pan with foil. Place the baking dish on a sheet pan. Roast the chicken for approximately 20 minutes, and then remove the foil and roast for another 10 to 15 minutes. Remove the chicken from the oven and top with this scallions before serving.

The chicken came out very moist and had a nice flavor to it because of the garlic paste that was used. I had never made couscous before, so it was little different for me, but I think it came out okay. I don’t think I put enough salt in the water when I was preparing it initially because it tasted like it could use a little more seasoning. Use your best judgment and see what works well for you. I also did not use the pine nuts as they are quite expensive and not something I normally use at all so I just left them out of the recipe. Overall I think it turned out pretty well and if you didn’t want to use couscous I think you could easily substitute white rice or brown rice and this recipe and it would turn out just fine.

Earlier in the week, Sean had asked me to get some strawberries and make something for dessert with them. Of course, this time of year the first thing I thought of was strawberry rhubarb pie. I love the taste of the fresh strawberries with the rhubarb and I hadn’t made this pie before so I had to scour around for a recipe to use. I found one at Williams – Sonoma and I also found one through America’s Test Kitchen. I liked aspects of each one, although the one from America’s Test Kitchen did not include any rhubarb so I sort of combine the two recipes and used the best of both to see how it would come out.

Strawberry – Rhubarb Pie

Two rolled out rounds of basic pie dough, or store-bought pie dough
4 pints (about 3 pounds) fresh strawberries, gently rinsed and dried, hulled and quartered lengthwise
3/4 cup sugar
2 tablespoons cornstarch
1 1/2 teaspoons low sugar or no sugar pectin
Generous pinch table salt
1 tablespoon juice from one lemon
3 cups rhubarb, trimmed and sliced half-inch thick (four or five stalks)
1 tablespoon cold butter, cut into small pieces

Preheat the oven to 350°.

For the filling: Select 6 ounces misshapen, underripe or otherwise unattractive strawberries, halving those that are large; you should have about 1 1/2 cups. In a food processor, process the berries until they are a smooth purée, about 20 to 30 seconds, scraping down the sides of the bowl as needed. You should have about 3/4 cup of purée when you are done.

Whisk the sugar, cornstarch, pectin, and salt in a medium saucepan. Stir in the berry purée, making sure to scrape the corners of the pan. Cook over medium-high heat, stirring constantly with a heatproof rubber spatula, and bring to a full boil. Boil, scraping the bottom and sides of the pan to prevent scorching, for two minutes to ensure that the cornstarch is fully cooked (the mixture will appear frothy when it first reaches a boil, then will darken and thicken with further cooking). Transfer to a large bowl and stir in the lemon juice. Allow to cool to room temperature.

Meanwhile, pick over the remaining strawberries and halve any that are still large. Mix the berries and the rhubarb into the bowl with the glaze and fold gently with a rubber spatula until everything is coated evenly. Place one dough round in the bottom of the pie plate and pat it firmly into the bottom and up the sides of the dish. Transfer the berry mixture to the dough-lined pan. Dot the fruit mixture with the butter. Place the second dough round carefully over the top of the filled pie. Trim the edges neatly, leaving a slight overhang and crimp the edges to seal the pie. Brush the top crust with one lightly beaten egg. Using a small knife, cut five or six slits into the top crust to allow steam to escape during baking.

Place the pie in the oven and bake until the crust is golden and the filling is thick and bubbling, approximately 50 to 60 minutes. Transfer to a wire rack and allow the pie to cool completely to set. Serve at room temperature or re-warm in a 350° oven for 10 to 15 minutes just before serving.

I think the pie turned out great myself. It was still just a little bit runny but not much. I think using the pectin instead of tapioca did seem to really help, and it gave the strawberry pie a nice strawberry jam-like flavor to it. I think once it has been sitting in the refrigerator overnight it will have set up even more and taste even better. Of course, you want to serve this with fresh whipped cream or ice cream on the side.

That’s all there is for today. I do have a few recipes planned out for the week, so we’ll see what we can get to as far as what we want to put up here. I do know I am making fish tacos this week at some point and I have posted a couple of different recipes for them on the air, so it is likely I’ll be using one of those if you want to check out and see what the recipe is like. I do also have a recipe I want to try this week for chicken sandwiches and will have to see what else comes along during the week. Until then, enjoy the rest of your day and enjoy your meal!

002


I forgot to take a picture of the chicken to go along with this. Sorry about that 🙂


6 Comments

Posted by on April 22, 2013 in Cooking, Dessert, Dinner, Pasta, Pie, Poultry


Tags: , , , , , , , ,

A Star’s Brownies with a Side of Cole Slaw

I thought I would just post a few simple recipes that I’ve made in the past week for today. The first is one that I came across in The New York Times and it is a recipe that I’ve seen in other places on the Internet. I am sure many people are familiar with Katherine Hepburn’s brownie recipe and may have seen it in other places. I thought it would be a nice simple dessert to make for one evening so we gave it a try.

Katherine Hepburn’s Brownies

1/2 cup cocoa
1 stick butter
2 eggs
1 cup sugar
1/4 cup flour
1 cup chopped walnuts or pecans (optional)
1 teaspoon vanilla
pinch of salt

Preheat the oven to 325°. Melt the butter in a saucepan with the cocoa and stir until smooth. Remove the saucepan from the heat and allow it to cool for a few minutes. Mix in the eggs one at a time. Add the sugar, flour, nuts (if using), vanilla and salt. Pour the mixture into a greased 8 x 8 square pan. Bake for forty minutes. Do not overbake as the brownies should be gooey on the inside. Let the brownies cool completely and cut into bars.

It was a very simple recipe that took no time at all to prepare. This makes it great as an option to make for a quick dessert as you may have the items around the house had any time. I am not a big brownie fan myself, but I have to admit that they came out quite nice. They were nice and crisp on the top and soft and chewy on the inside. You could serve them with a bit of vanilla ice cream on the side or just some simple homemade whipped cream and you have a complete dessert in no time at all.

The second recipe I have for today is one I am made when I had made Sloppy Joes was earlier in the week. I wanted to make a side dish to go along with them and I felt like having some coleslaw, but I wanted to try a little bit of a different recipe. I found this one through Williams – Sonoma on their website and it sounded pretty good to me. I try not to make a lot of coleslaw recipes that use mayonnaise, only because it seems to me that they tend to use a lot of it and it waters down the side dish. This one doesn’t used to much, and I actually cut down the amount in the recipe itself anyway.

Williams – Sonoma Coleslaw

1 head green cabbage, cored, quartered and thinly sliced
1 1/2 tablespoons kosher salt, plus more, to taste
half cup mayonnaise
1 1/2 tablespoons granulated sugar
1 tablespoon fresh lemon juice
1 teaspoon celery seed
2 tablespoons cider vinegar
Freshly ground black pepper, to taste
2 carrots, peeled and julienned

Place the cabbage in a large bowl, sprinkle with the 1 1/2 tablespoons of kosher salt and toss well. Transfer the cabbage to a colander and let drain for thirty minutes. In a large bowl, whisk together the mayonnaise, granulated sugar, lemon juice, celery seed and vinegar, and season with the salt and black pepper. Add the drained cabbage and carrots and toss to coat them evenly with the dressing. Cover and refrigerate for 2 to 3 hours before serving.

As I said, I have made a few adjustments to this recipe. First, I used a bag of coleslaw mix that included the green cabbage, red cabbage and julienned carrots already done so I did not have to deal with the slicing. However, I did salt the cabbage ahead of time to help draw out some of the moisture. Instead of using the half cup of mayonnaise, I only used a quarter cup and I think the recipe turned out just fine. I liked it a lot better without all the mayonnaise and it does cut down on some of the fat involved in the recipe itself. It makes great side dish for nearly anything, such as hamburgers, hot dogs, barbecued spare ribs, chicken, pulled pork or any type of sandwich that you may be making.

That’s all there is to the recipes I have for today. I do plan to go shopping this weekend to get some things in for some new recipes I would like to try this week. I have picked up some recipes from The New York Times, Williams – Sonoma, Cook’s Illustrated, America’s Test Kitchen, The Food Network and some others sources, so I have a lot to draw from right now of meals that we can choose. I do hope to get some new things up but more blog within the coming days. Check back and see what’s going on and see if there’s anything that you like. As always, if there is anything you would like to see, or have any requests of recipes, just drop me a note in the comments section or you can send me an email and I’ll be happy to get back to you. Until then, enjoy the rest of your spring weekend and enjoy your meal!

001

 
3 Comments

Posted by on April 13, 2013 in Cooking, Dessert, Salad, Side Dishes


Tags: , , , , , , , , ,

Game-Day Celebration | Williams-Sonoma

Game-Day Celebration | Williams-Sonoma.

If you are still looking for same game day snacks before the game starts, Williams-Sonoma has a good list of things you can make that will be perfect not just for today’s game, but for any kind of sports party you might be having. There’s a little something for everyone listed here. Check it out and enjoy the game today!


Tags: , , ,

4 Ways With Mussels

4 Ways With Mussels.

I love mussels myself. They are great in a paella, served over rice or just by themselves. I have seen them for some pretty good prices lately and you can get them pretty much year-round now. They may a great appetizer or a great entree. Don’t shy away from them and think they are too hard to cook or tough to make. It just takes a little bit of prep work and cleaning on your part and just a bit of cooking and they will taste great. Williams-Sonoma posted this on their blog about, cleaning, serving and storing mussels along with a few simple recipes. Check it out!


Tags: , , , , ,

Ideas for Christmas Leftovers

Ideas for Christmas Leftovers.

It’s always good to have a few ideas available for Christmas day leftovers or any holiday leftovers really. While I didn’t cook dinner on Christmas myself, here are some good ideas from Williams-Sonoma about things you can do with a few different ingredients that you may have leftover from the holiday. Check it out!

 
Leave a comment

Posted by on December 26, 2012 in Cooking Websites, Holidays, Leftovers


Tags: , , ,

 
National Day Calendar

Fun, unusual and forgotten designations on our calendar.

Jennifer Probst

a little bit naughty a little bit nice

Laissez Faire

Letting Life Lead

What To Have For Dinner Tonight

Simple and delicious dinner inspiration