RSS

Monthly Archives: August 2013

Meat Loaf in a Loaf

Finding new recipes to use to make meat loaf has proven to be pretty easy. Everyone seems to have their own variation on a meat loaf recipe depending on how they like it or what they grew up with. I try to make it a little different each time I make it, trying out a new spice or herb or blend of meat. This time, I turned to a recipe I had used a long time ago and haven’t tried in quite a while. It takes the meat loaf and places it inside a loaf of bread.

Meat Loaf in a Loaf

1 pound meatloaf mix (this is a mix of beef, pork and veal that you can get at most grocery stores)

1 teaspoon dry mustard

1 teaspoon celery salt

2 teaspoons Worcestershire sauce

1/4 teaspoon dried oregano

1/4 teaspoon pepper

1 teaspoon onion powder (or you could use 1 onion, chopped fine and sautéed)

3/4 cup fresh breadcrumbs (or dried, if you’re using store-bough)

1 large egg

1/2 cup ketchup

Tomato paste

1 loaf of French or Italian bread

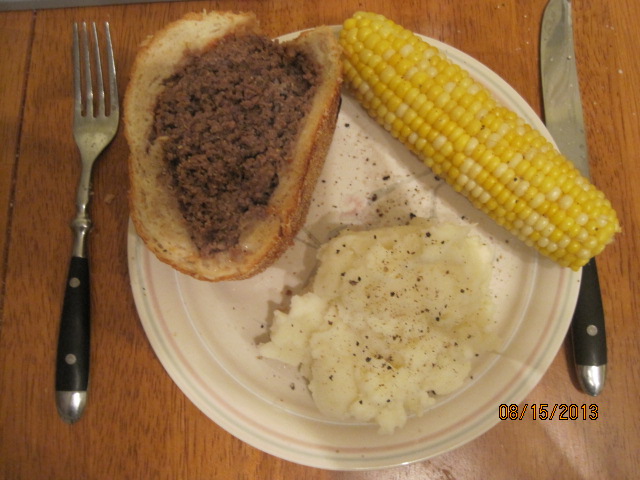
Adjust an oven rack to the middle position and heat the oven to 350 degrees. Mix the meatloaf mix, dry mustard, celery salt, Worcestershire, oregano, pepper and onion powder  until evenly blended. Add in the breadcrumbs and egg and mix again until blended, then add in the ketchup and mix again (I mix this all by hand to really work things in. It’s messy, but the results are worth it). Form the mixture into a free-form loaf.Coat the mixture with tomato paste (as much or as little as desired. I use more to get a nice coating on it). Slice the loaf of bread in half lengthwise. Using your hands hollow out the bottom and top halves of the bread to make room for the meat loaf. Place the meat loaf on the bottom half of the bread and cover it with the top half. Wrap the entire loaf well in foil and place it on a rimmed baking sheet. Bake the loaf until it reaches an internal temperature of 160 degrees, about an hour and 15 minutes to 1 1/2 hours. Place the wrapped loaf on a cutting board and allow it to rest for 5 minutes. Unwrap the foil from around the loaf and slice into individual portions and serve.

One thing you can certainly do is take the bread you have hollowed out from the loaf and mash it with a little milk and use that as your binder instead of the breadcrumbs in this recipe. You can use any meatloaf recipe you like really and just hollow out the bread and make it that way. I love the way it comes out with the nice, crunchy bread around the loaf, almost like you have a small meatloaf sandwich with each slice. I served this with mashed potatoes and corn on the cob, but your really could make it like a warm meatloaf sandwich and make a little beef gravy to go along with the sandwich and the potatoes.

That’s all I have for today. I’ll be away all week starting tomorrow as we are vacationing in the Outer Banks, so my posts are going to be posts and links to other sites that have some recipes I like for the week. You can check back during the week to see what comes up. Until the next time, enjoy the rest of your day and enjoy your meal!

IMG_1646 IMG_1644

 
Leave a comment

Posted by on August 16, 2013 in Beef, Cooking, Dinner


Tags: , ,

Jazzing Up Baby Back Ribs with Espresso Barbecue Sauce

AS I was going through the freezer this week to try to just use what I had in the house for meals to avoid shopping before our vacation, I came across some baby back ribs that were perfect to make. Yesterday was a nice cool day here in the Northeast so it was perfect to be able to use the oven in summertime. I came across this recipe from the Cooking Channel and Michael Chiarello for a very simple recipe that makes an outstanding sauce.

Baby Back Ribs with Espresso Barbecue Sauce

2 racks baby back ribs

Salt

Freshly Ground Black Pepper

Espresso Barbecue Sauce, recipe follows

Espresso Barbecue Sauce:

4 tablespoons minced garlic

4 tablespoons extra-virgin olive oil

1 cup cider vinegar

1/2 cup soy sauce

2 cups ketchup

2 cups honey

Salt

1/2 cup strong coffee or instant espresso

Preheat the oven to 325 degrees. Cut each rack of ribs in half along the bone so they can be easily stacked. Lay them out on parchment paper for easy clean up.

Salt and pepper liberally on both sides of the ribs and pat the spices into the meat. Make sure to season both sides and all over the ribs because part of the rub may inevitably come off in the pan during cooking. On a cookie sheet lined with aluminum foil, stack the ribs close together, about 3 layers high. Place the ribs in the oven and bake for 2 hours, shifting the bottom layer of ribs every 30 minutes until they are tender and almost falling off the bone.

Meanwhile, make the espresso barbecue sauce. Add the olive oil to a preheated saute pan. Add the minced garlic and saute until it gets light brow, about 1 minute. Add the cider vinegar, soy sauce, ketchup and honey and stir well. Add a pinch of salt then whisk in the coffee or espresso. Add the freshly ground black pepper to taste. Bring the mixture to a simmer and allow to simmer for 10 minutes until slightly thickened.

30 minutes before serving the ribs, transfer the ribs to a preheated grill. Brush the ribs with the espresso barbecue sauce and close the grill. Continue to turn and brush the ribs with barbecue sauce every 10 minutes, about 3 more times, before serving.

Once the barbecue sauce has cooled, you can store it in the refrigerator and use it for about another 2 weeks. It would be great on other pieces of pork or as a condiment for burgers or any barbecue items. I loved the flavor that the espresso gives the sauce mixed with the honey. It is not too thick but just the right consistency. it’s a great sauce for ribs. I served the ribs with some baked sweet potatoes, fresh corn on the cob and some bread and I also had some of the no-mayo coleslaw left over to use as well. Overall, I think it was a pretty good meal.

That’s all I have for today. Check back next time for another recipe. I do have a special meatloaf recipe planned for tonight, so you can check back for that one as it will be my last recipe posted before we go on vacation. Check it out tomorrow and see if you will like it. Until next time, enjoy the rest of your day and enjoy your meal!

IMG_1643

 
1 Comment

Posted by on August 15, 2013 in Cooking, Dinner, Grilling, Pork, Sauce


Tags: , , , , ,

A Week of Quick Meals: Easy Chicken Teriyaki and No-Mayo Slaw

I am trying to get everything together this week so that we can go away on vacation on Saturday, and Michelle is working late most of the week, so that means trying to make, quick, easy meals with whatever we happen to have around the house. Last night, the quick meal was a fast chicken teriyaki recipe that I found in Cook’s Country. The original recipe serves it with pineapple rings, but since I didn’t have any pineapple around, they got left out of this one.

Grilled Chicken Teriyaki with Pineapple

1/3 cup soy sauce

1/4 cup sugar

2 tablespoons mirin

1 tablespoon grated fresh ginger

1 teaspoon cornstarch

3 pounds bone-in chicken thighs, trimmed

1 pineapple, peeled, cored and cut into 1/2-inch-thick rings

Whisk the soy sauce, sugar, mirin, ginger and cornstarch together in a small saucepan. Bring the mixture to a boil over medium-high heat and cook until it is thickened, about 2 minutes.

Grill the chicken skin side up over a medium-hot fire, covered, until the underside is browned, about 8 to 10 minutes. Flip the chicken and grill, covered, until the skin is well browned and the meat registers 175 degrees on an instant-read thermometer, about another 6 to 8 minutes. Brush the chicken all over with half of the sauce and continue to grill, uncovered and flipping often, until the sauce begins to caramelize, about 2 minutes. Transfer the chicken to a serving platter and tent loosely with aluminum foil.

Brush the pineapple rings with half of the remaining sauce and grill, uncovered, until lightly charred on both sides, about 1 to 2 minutes per side. transfer to the same platter as the chicken. Pour the remaining sauce over the chicken and pineapple and serve.

I served this with a simple white rice and some broccoli. I also had made a quick recipe for a no-mayo coleslaw, which I like better this time of year for barbecues and parties because you don’t have to worry about it sitting out in the sun or anything. This one just uses a few ingredients and can be made in minutes if you choose to use a bag of coleslaw mix instead of shredding cabbage and carrots yourself. I always keep a bag of coleslaw mix around as it makes a great quick side dish that you can throw together fast.

No-Mayo Coleslaw

1/4 small red cabbage

1/2 small green cabbage

1/2 carrot, peeled and shredded

zest of 1/2 lemon

1/4 cup fresh lemon juice

1/4 cup olive oil

1 tablespoon honey

1 teaspoon salt

1/4 teaspoon freshly ground black pepper

Remove any of the tough outer leaves from both of the heads of cabbage. Trim the core and any tough stems from the cabbage and thinly slice to shred it. Add the cabbage to a bowl with the shredded carrot, lemon zest, lemon juice, olive oil, honey, salt and black pepper. Toss well to combine.

Serve right away for more of a salad dish or store in the refrigerator overnight for a coleslaw that is more pickled.

As I said, I skipped the first couple of steps and used coleslaw mix and I think it turned out great. The coleslaw picture is actually one I took from lunch with a chicken salad sandwich. I loved the lemony flavor of the dish and the honey gives it just a hint of sweetness. it went really well with the chicken as well, and the glaze on the  chicken was quick and easy to make and tasted great. This is a great recipe for a weeknight when you need something done fast and I think you could do it just as well in the oven any time of year by putting the chicken in a 375 degree oven for 10 minutes or so before you start to glaze it.

That’s all I have for today. Check back again to see what else comes up this week. I am not quite sure what I will be making; it really depends on what I pull out of the freezer. I did take some ribs out for tonight and found a recipe for that, so you can check back tomorrow for that one. Until then, enjoy the rest of your day and enjoy your meal!

IMG_1640 IMG_1641 IMG_1642

 
3 Comments

Posted by on August 13, 2013 in Cooking, Dinner, Fruit, Grilling, Poultry, Sauce, Side Dishes


Tags: , , , , , , ,

What’s a Weekend Without a Pie? Cook’s Country Tar Heel Pie

This recipe was actually pictured on the front cover of the last issue of Cook’s Country Magazine. I really like this magazine as it has great recipes that are really easy to follow, along with some other great tips throughout. It was a toss-up yesterday to try making this pie or the lemon icebox pie that is on the cover of last month’s magazine and this one won out. I’ll be making the lemon pie later on this week, so for today we can talk about the Tar Heel Pie, a North Carolina favorite for many years that combines a great fudgy flavor of a brownie into pie form.

Tar Heel Pie

1 (9-inch) single-crust pie dough

1 cup (6 ounces) semisweet chocolate chips

4 tablespoons butter

1/4 cup vegetable oil

2 tablespoons unsweetened cocoa powder

3/4 cup packed dark brown sugar

2 eggs

1 tablespoon vanilla extract

3/4 teaspoon salt

1/4 cup all-purpose flour

1 1/4 cups pecans, toasted and chopped coarse

Adjust an oven rack to the lower-middle position and heat the oven to 375 degrees. Roll the dough into a 12-inch circle on a lightly floured counter. Loosely roll the dough around the rolling pin and gently unroll it onto a 9-inch pie plate., letting the excess dough hang over the edge. Ease the dough into the plate by gently lifting the edge of the dough with one hand while pressing into the plate bottom with your other hand. Leave any dough that overhangs the plate in place. Trim the overhang to 1/2 an inch beyond the lip of the pie plate. Tuck the overhang under itself; the folded edge should be flush with the edge of the pie plate. Crimp the dough evenly around the edge of the plate using your fingers. Wrap the dough-lined pie plate loosely in plastic wrap and place it in the freezer until the dough is fully chilled and firm, about 15 minutes.

Line the  chilled pie plate with two 12-inch squares of parchment paper, letting the parchment lie over the edges of the dough, and fill the pie with pie weights.Bake the pie shell until it is lightly golden brown on the edges, about 18 to 25 minutes. Carefully remove the parchment paper and the pie weights, rotate the pie shell and continue to bake until the center of the pie shell begins to look opaque nd slightly drier, about 3 to 6 minutes. Allow the pie shell to coll completely.

Reduce the oven temperature to 325 degrees. Microwave 2/3 cup of the chocolate chips and the butter in a bowl, stirring often, until softened, about 60 to 90 seconds. Whisk in the oil and cocoa until smooth.

In a separate bowl, whisk the sugar, eggs, vanilla extract, and salt together until smooth. Whisk the chocolate mixture into the sugar mixture until it is incorporated. Stir in the flour and the remaining 1/3 cup of chocolate chips until just combined.

Spread the pecans in the bottom of the pie shell, then pour the batter over the top, using a spatula to level the batter. Bake the pie until a toothpick inserted into the center of comes out with a thin coating of batter attached, about 30 to 35 minutes. Let the pie cool on a wire rack until barely warm, about 1 1/2 hours. Serve. The pie can be re-heated, uncovered, in a 300 degree oven until warm throughout, about 10 to 15 minutes.

A couple of things about this recipe. I left the pecans out this time since we were bringing it over to someone’s house and I didn’t want to take a chance on any nut allergies and such. It came out fine without the pecans, but I think it would be even better with them in the pie. It was a very chocolate center, almost exactly like a brownie should be, with the added taste of a nice pie crust to go with it. We served it with some homemade whipped cream to top off each slice. As far as the pie weights, I personally do not have any in the house, but you can use many different things as a substitute. If you have any marbles around, these will work great as that is essentially what pie weights are anyway. I used some dried beans that I had on hand and they work just fine. Just remember that you can’t use the beans for cooking after that, but you can re-use them as pie weights in the future.

That’s all I have for today. Check back during the week for some more recipes. I do plan to try a few things out this week, including the lemon icebox pie and making my own ciabatta bread, so keep checking back to see those recipes. Until next time, enjoy the rest of your day and enjoy your meal!

IMG_1639

 
3 Comments

Posted by on August 11, 2013 in Cooking, Dessert, Pie


Tags: , , , ,

Get Your Hot Dogs Here! (And Some Good Toppings Too!)

I think the hot dog gets a pretty bad rap. Granted, it may not be the healthiest alternative when it comes to something to eat, but there are some hot dogs that just taste downright delicious. I can be pretty fussy about the brand of hot dog I have, but there is something about eating a hot dog at a cookout or barbecue that makes it so it doesn’t seem to matter that much what brand it may be. When I am at home, I personally prefer a Sabrett hot dog or a Nathan’s. The other requirement I have is that they need to be hot dogs with the skin on. There is something about biting into a hot dog and getting that snap that makes it just right. Anyway, I didn’t think there would be much in the way of recipes for hot dogs, and there may not be a lot of variations in the way you cook them, but there are countless toppings you can try. This recipe, from Bobby Flay, tries to make these hot dogs just like one you could get on the streets of New York with some great toppings.

New York Street Cart Dogs with Onion Sauce and Red Pepper Relish

Onion Sauce:

2 tablespoons vegetable oil

2 large onions, halved and thinly sliced

2 teaspoons ancho chile powder

1/2 teaspoon ground cinnamon

1/2 cup ketchup

1/4 teaspoon hot sauce

1/2 teaspoon kosher salt

1/4 teaspoon freshly ground black pepper

Grilled Pepper Relish:

6 cloves roasted garlic, coarsely chopped

3 grilled red peppers, peeled, seeded and diced

3 tablespoons extra-virgin olive oil

2 tablespoons red wine vinegar

3 tablespoons finely chopped fresh flat-leaf parsley, plus leaves for garnish

Kosher salt and freshly ground black pepper

Grilled Hot Dogs:

8 all-beef kosher hot dogs

Vegetable oil

Freshly ground black pepper

Hot dog buns

Mustard

For the onion sauce: heat the oil in a medium saucepan over medium heat. Add the onions and cook until soft, about 5 minutes. Stir in the chile powder and  cinnamon and cook for 1 minute. Add 1 cup of water, the ketchup, the hot sauce, salt and black pepper and bring the mixture to a simmer. Cook until it is thickened and the onions are very soft, adding more water if needed, about 25 minutes. Transfer to a bowl and allow the mixture to cool to room temperature before serving.

For the grilled pepper relish: Combine the garlic, peppers, oil, red wine vinegar and parsley in a bowl and season with salt and pepper. Cover and allow the mixture to sit at room temperature for at least 30 minutes before serving.

For the hot dogs: heat a grill to high heat for direct grilling. Brush the hot dogs with oil and sprinkle them with pepper. Grill the hot dogs until slightly charred and golden brown on all sides, about 6 minutes. put the hot dogs in the buns and top with mustard, onion sauce and the grilled pepper relish.

I did make a few alterations to this recipe. First, we were having pretty heavy rain and thunderstorms yesterday, so there was no grilling involved at all for me. I roasted the peppers and garlic in the oven and made the relish indoors. It also meant cooking the hot dogs inside, but instead of frying them or boiling them, I like them steamed. You get a much better snap from the hot dogs when you steam them. Just put about an inch of water in a large saucepan and bring it to a boil. Then insert a steamer basket into the pan, put the hot dogs in the basket and allow them to steam for about 3 minutes. They come out much more like a hot dog cart hot dog than grilling, in my opinion. I also added some yellow and orange pepper into the pepper relish for more color and flavor.

The onion sauce really does take like the onion sauce you can buy in the stores or get from a vendor. It was sweet with a little heat and tasted great with the mustard. The same goes for the pepper relish. You can really taste the garlic in this one, so you may even want to cut back a bit on the garlic to get more pepper flavor.

That’s all I have for today. Check back next time for another recipe. I just made the Tar Hell Pie in the latest issue of Cook’s Country magazine, so you can check back for that recipe tomorrow and see how it came out. Until next time, enjoy the rest of your day and enjoy your meal!

IMG_1638 IMG_1637

 
Leave a comment

Posted by on August 10, 2013 in Beef, Cooking, Dinner, Grilling, Sauce, Side Dishes


Tags: , , , , , , , ,

Breakfast For Dinner Redux – Pancakes and Hash Browns

One of the favorite meals around our household is the breakfast for dinner concept. I have posted different breakfasts we have used on here before, and one of the most common things we eat are pancakes. Of course, there are varied ways and recipes you can use to make pancakes, including using tried and true methods such as Bisquick to help you along way. There’s nothing wrong with Bisquick; we use it around here when we feel like having some easy pancakes or biscuits without any fuss. That being said, there is nothing quite like having some homemade pancakes that are cooked just right. You love them when they are fresh off the griddle with a little bit of butter and lots of syrup. I love fruit pancakes like blueberry or banana, but this time we kept it simple with just some regular pancakes.

Pancakes

2 cups all-purpose flour

2 tablespoons sugar

2 teaspoons baking powder

1/2 teaspoon baking soda

1/2 teaspoon salt

1 egg

3 tablespoons butter, melted

2 cups buttermilk

1 to 2 teaspoons vegetable oil

Pre-heat the oven to 200 degrees so you have a place to keep your pancakes warm while you cook more. Set a wire cooling rack over a baking sheet and set it aside.

Whisk together the flour, sugar, baking powder, baking soda, and salt in a large bowl. In a separate bowl, whisk together the egg, melted butter and then the buttermilk. Make a well in the center of the dry ingredients, pour the buttermilk mixture into the well, and whisk very gently until the buttermilk mixture is just incorporated. A few lumps should remain in the batter. Be careful not to overmix the batter.

Heat a large, non-stick skillet over medium heat for 3 to 5 minutes. Brush the bottom of the skillet with 1 teaspoon of the vegetable oil. Using 1/4 cup of batter per pancake, add the batter to the skillet. Only 2 or 3 pancakes are likely to fit in the skillet at one time. Cook until large bubbles begin to appear, about 2 minutes. Flip the pancakes and cook until they are golden brown on the second side, about 1 to 2 minutes longer. Spread the pancakes out over the wire rack on the baking sheet and hold them in the warm oven. Repeat the process with the remaining batter, remembering to brush the bottom of the skillet with oil for each batch you make.

Pancakes freeze pretty well, so you can make a big batch and have them as leftover breakfast during the week if you like. Just defrost them overnight in the refrigerator and throw them in a 350 degree oven for 5 minutes and you can have them for breakfast. They should last for about a week in the freezer.

Since we had pancakes already, I wanted something extra to go with it since this was dinner. I have had a hankering for some hash browns lately and I saw this simple recipe from America’s Test Kitchen and decided to give it a try. This was much easier to do with the food processor, but if you don’t have one, you can use a box grater (just watch your knuckles!).

Hash Browns

1 pound russet potatoes (2 medium potatoes), peeled

2 tablespoons grated onion

1 tablespoon minced fresh parsley (optional)

1/4 teaspoon salt

1/8 teaspoon pepper

1 tablespoon butter

Grate the potatoes using either the large holes of a box grater or the shredder attachment of a food processor. You should end up with about 1 1/2 cups of shredded potatoes. Wrap the grated potatoes in a kitchen towel and squeeze thoroughly of any excess moisture, then toss the potatoes with the onion, parsley (if using), salt and pepper.

Melt 1/2 tablespoon of the butter in a non-stick skillet over medium-high heat until it begins to brown, swirling to coat the entire pan. Scatter the potatoes evenly into the skillet and press down on them firmly to form a cake. Reduce the heat to medium and continue to cook the potatoes until they are dark golden brown and crisp on the first side, about 8 minutes.

Slide the hash brown cake onto a large plate, then invert it onto a second plate so that the browned side is facing up. Add the remaining 1/2 tablespoon of butter to the skillet and melt, swirling to coat the pan. Slide the hash brown cake back into the pan, browned-side up, and continue to cook it over medium heat until the second side is also golden and crisp, about 5 minutes longer. Slide the hash brown cake onto a plate or cutting board and cut it into wedges.

Using a non-stick skillet here really makes a big difference in making your life easier and flipping the hash browns over. With this method, they come out crisp and delicious and are easy to serve and they have great flavor. I also had some sausage links we made to go along with everything.

That’s all I have for today. Check back to see what recipes come up next. We’ll be out for the evening tonight, so no cooking for me, but I’ll be back with some more recipes to try out, including a hot dog recipe with onion sauce and pepper relish, lemon icebox pie, Tar Heel pie, roasted chicken from Marc Murphy and more. Check back and see what is next. until next time, enjoy the rest of your day and enjoy your meal!

IMG_1636

 
3 Comments

Posted by on August 8, 2013 in Breakfast, Cooking, Dinner, Potatoes


Tags: , , , , ,

A Batch of Beer Battered Fish (and Roasted Fries)

This recipe is actually one that Sean picked out a while back and had not had the opportunity to make it until just a few days ago. It’s not often that he picks out a fish recipe for us to try, so I was more than willing to give it a shot, especially because I had just picked up some cod on sale. The timing for it was perfect and the recipe, from Bobby Deen, is actually one that is lighter than what often comes from Deen family recipes. This one uses very little oil in cooking and roasts the fries instead of frying them in oil.

Beer Battered Fish and Roasted Fries

Roasted Fries:

4 medium sweet potatoes, skin-on, cut into French fry strips

2 teaspoons vegetable oil

1 teaspoon paprika

1 teaspoon salt

1/4 teaspoon black pepper

Zest of 1 orange

Beer Battered Fish:

One 12-ounce bottle beer

1 1/4 cups all-purpose flour

1/4 teaspoon salt

1/4 teaspoon garlic powder

1/4 teaspoon pepper

1 1/2 pounds cod fillets, skin and bones removed, cut diagonally into 4-inch long, 1-inch wide strips

2 tablespoons vegetable oil

1/2 teaspoon salt for sprinkling (optional)

For the fries: Preheat the oven to 400 degrees. Place the potatoes in a medium bowl. Whisk together the vegetable oil, paprika, salt, pepper and orange zest and toss with the potatoes to evenly coat. Place the potatoes in a single layer on a parchment paper-lined baking sheet and roast until the potatoes are tender and starting to brown, about 40 to 45 minutes.

Turn the oven up to 450 degrees and continue roasting until the potatoes get crispy around the edges, about another 5 minutes longer. Reduce the oven temperature to 200 degrees and hold the potatoes in the oven to keep them warm while you prepare the fish.

For the beer battered fish: Pour the beer into a large bowl. Sift the flour over the beer, whisking gently until it is just combined. Pat the fish fillets dry with paper towels and sprinkle on both sides with the salt, garlic powder and pepper. Coat the fish in the beer batter.

Heat the vegetable oil in a large, non-stick skillet until it is very hot. Remove the fish from the batter using tongs and allow any excess batter to drip off. Place the fish in the hot oil and fry it in batches so as not to crowd the pan. Fry the fish until it is a deep golden brown and cooked through, turning once, about 2 minutes per side. Transfer the fish to a paper towel-lined baking sheet and keep it warm in the oven. Repeat the process with the remaining pieces of fish. While the fish is still hot, sprinkle it with salt, if using, and drizzle with a little fresh lemon juice (optional). Serve with the roasted sweet potato fries.

It is a very simple and light meal that tastes great. I would recommend using a light-colored or light beer for the batter. This way the beer itself will not impart any flavors directly onto the fish (unless of course you want that and in that case you may want to choose a stronger flavored beer). The fries were perfectly cooked and tasted great. They would be an excellent side replacement for French fries with any sandwich or meal. Sean and Michelle both loved the lightness and crispness of the fish as well. I’ll be glad to make this one again for dinner anytime as it was easy to make and everyone liked it. One thing to remember is that you don’t want to cook the fish too long. Fish takes just minutes to cook and will get very rubbery if you overcook it, so be careful.

That’s all I have for today. Check back next time for some more recipes. I do have one I tried last night when we had breakfast for dinner for pancakes and homemade hash browns. I also have one for tonight that we are trying from Bobby Flay for New York-style street hot dogs with onion sauce and a pepper relish that promises to be tasty. There are lots more to come, so keep checking back. Until next time, enjoy the rest of your day and enjoy your meal!

IMG_1635

 
Leave a comment

Posted by on August 7, 2013 in Cooking, Dinner, Potatoes, Seafood


Tags: , , , ,

Sweet as Grilled Honey-Glazed Pork Chops and Peaches

I opened up the freezer on Sunday night looking for things I could use to make for dinner this week and I was able to come up with a few ideas for some meals, including this one I found Cook’s Country. I am always a little leery of doing pork chops on the grill because if you don’t watch them closely you end up with burnt shoe leather as your meal. This recipe lays everything out quite easily and is a fast meal, so you can grill this up any night of the week for dinner with just a few ingredients.

Grilled Honey-Glazed Pork Chops

4 (10-ounce) bone-in pork rib or center-cut chops, about 1-inch thick, trimmed

1/4 cup sugar

1 teaspoon salt

1 teaspoon pepper

2 tablespoons cider vinegar

1/2 teaspoon cornstarch

1/4 cup honey

1 1/2 tablespoons Dijon mustard

1/2 teaspoon minced fresh thyme

1/8 teaspoon cayenne pepper

Cut 2 slits about 2 inches apart through the fat and connective tissue around the outside of each pork chop. Combine the sugar, salt, and pepper in a bowl. Pat the chops dry with paper towels and rub all over with the sugar mixture.

Whisk the vinegar and cornstarch together in a small saucepan until there are no lumps remaining. Stir in the honey, mustard, thyme and cayenne pepper and bring the mixture to a boil. Reduce the heat to medium-low and simmer until the glaze is reduced to about 1/4 cup, about 5 to 7 minutes.

If you are using a charcoal grill, open the bottom vent completely. Light a chimney starter filled with charcoal briquettes. When the top coals are partially covered with ash, pour two-thirds of the coals evenly over the grill, then pour the remaining coals over half the grill. Set the cooking grate in place, cover and open the lid vent completely. Heat the grill until it is hot, about 5 minutes.

If you are using a gas grill, turn on all the burners and set them to high, cover the grill and heat the grill until it is hot, about 15 minutes. Leave the primary burner on high and the other burner(s) to medium-low.

Clean and oil the  cooking grate. Place the chops on the cool part of the grill and cook (covered if you are using a gas grill) until the meat registers 140 degrees, about 3 to 5 minutes per side. Brush the tops of the pork chops with the glaze and grill, glazed side down, over the hot part of the grill until it is caramelized, about 1 minute. Repeat the process with the second side of the pork chops. Transfer the chops to a platter, tent loosely with aluminum foil, and rest for five to ten minutes.

While the pork chops are resting, there is no better way to make use of some of those peaches you have in season this time of year by grilling them up. Grilled peaches test phenomenal and take just a few minutes to cook, so this gives you the perfect opportunity to throw a couple on the grill.

Grilled Peaches

4 ripe medium peaches

1/4 cup brown sugar

1/4 cup pure maple syrup

Cut the peaches in half and remove the pit. Drizzle each half with the maple syrup and sprinkle with the brown sugar. Grill skin side up for 3 minutes until the peaches have begun to caramelize and soften.

Of course, you don’t have to serve the peaches with your meal. You could make them for dessert and serve them with some ice cream or yogurt and you have a nice dessert. To me, they went quite nicely with the pork chops though. The chops were great and using the sugar mixture on them before putting any glaze on them really helped to keep the glaze in place and helped to brown the chops nicely. I served this dish with some green beans, wild rice, the peaches and I even toasted up a little garlic bread on the grill as well.

That’s all I have for today. Check back again later in the week for some more recipes. I’ll be posting a lighter version of a beer battered fish with roasted sweet potato fries, I plan to try my hand at some ciabatta bread if I get the time, and I also have the recipe for a wonderful looking lemon icebox pie to try out. Check back and see what comes up next. Until then, enjoy the rest of your day and enjoy your meal!

005

 
Leave a comment

Posted by on August 6, 2013 in Cooking, Dinner, Fruit, Grilling, Pork


Tags: , , ,

Feeling Peachy with Peach-Blueberry Ice Cream Pie

After taking the weekend off for some family fun, it’s back to the recipes today. Here today is long promised recipe for peach-blueberry ice cream pie. I got this recipe from a recent issue of Bon Apettit magazine and when I saw the picture of it, I knew it was going to be delicious. Of course, when I first saw the picture, I figured that this must be difficult to make, but much to my surprise this was a very easy dessert to put together and is perfect for the summertime for a barbecue or party.

Peach-Blueberry Ice Cream Pie

6 ounces gingersnap cookies

2 tablespoons butter, melted

1 tablespoon heavy cream

2 cups fresh blueberries, divided

1/3 cup sugar

1/4 cup fresh lemon juice

1 pint peach ice cream, softened in the refrigerator for 20 minutes

2 cups whipped cream (made from 1 cup of heavy cream)

1/4 cup chopped crystallized ginger

Finely grind the cookies in a food processor. You should have about 1 1/3 cups when you are done. Transfer the crumbs to a medium bowl. Add the butter and the heavy cream; stir to coat. Press the mixture firmly onto the bottom and up the sides of a 9-inch pie dish. Chill until it is firm, at least 30 minutes.

Toss 1 3/4 cups of blueberries, the sugar, and the lemon juice in a medium bowl. Allow the blueberries to macerate at room temperature for at least 1 hour.

Transfer the blueberry mixture to a large, heavy saucepan and cook over medium heat until the berries soften and the juices are released, about 10 to 15 minutes. Strain the berries through a fine-mesh sieve into a medium bowl. Cover and chill the juices and the berries separately until they are cold.

Mix the softened peach ice cream with the chilled cooked blueberries. Scrape the ice cream mixture into the crust and smooth the top. Freeze until it is firm, at least 6 hours. (You can make the pie 2 days ahead of time if you wish. Just cover it and keep it frozen)

Soften the pie in the refrigerator for 10 minutes before serving. Top the pie with the whipped cream; scatter the remaining 1/4 cup of blueberries over the top. Garnish the top with the crystallized ginger. Drizzle each slice with some of the reserved blueberry juices.

The taste of the blueberries mixed in with the peaches and ice cream are delightful. I also loved the flavor the ginger snaps give the crust and the nice complement of the crystallized ginger on the top of the pie. Drizzling the blueberry sauce over each piece is the crowning touch, and the extra sauce is also great over other ice cream or even or something like pancakes or waffles.

That’s all I have for today. Check back next time to see some more new recipes. I do have one I tried recently for a grilled hone glazed pork chops, along with a beer battered fish recipe and I think I am going to try one this week where I can make my own ciabatta bread. We’ll see how that one comes along. Keep checking back to see what comes up. If you ever have any questions, comments or a recipe you might like to see, feel free to leave a comment in the comments section here or catch up with me on Facebook or Twitter. Until next time, enjoy the rest of your day and enjoy your meal!

002 001

 
2 Comments

Posted by on August 5, 2013 in Cooking, Dessert, Pie


Tags: , , ,

Cook’s Country Recipe Week Part 5 – Pan Roasted Chicken and Vegetables

If you follow along regularly with this blog, then you likely know that not only do we eat a lot of chicken, but also that I love to make roast chicken in various ways. I am always on the lookout for a new roast chicken recipe to try and when this one came along in Cook’s Country magazine, I knew right away that I would be giving it a try. The only thing that makes this recipe even better is that you can do the whole meal in just one pan and have it done perfectly in under an hour.

Pan-Roasted Chicken and Vegetables

3/4 pound Brussels sprouts, trimmed and halved

3/4 pound red potatoes, cut into 1-inch pieces

1/2 pound shallots, peeled and halved

4 carrots, peeled and cut into 2-inch pieces, thick ends halved lengthwise

6 garlic cloves, peeled

4 teaspoons minced fresh thyme

1 tablespoon vegetable oil

2 teaspoons minced fresh rosemary

1 teaspoon sugar

Salt and pepper

2 tablespoons butter, melted

3 1/2 pounds bone-in chicken pieces (2 split breasts cut in half crosswise, 2 drumsticks, 2 thighs), trimmed

Adjust an oven rack to the upper-middle position and heat the oven to 475 degrees. Toss the Brussels sprouts, potatoes, shallots, carrots, garlic, 2 teaspoons of thyme, oil, 1 teaspoon of rosemary, sugar, 3/4 teaspoon of salt and 1/4 teaspoon of pepper together in a bowl. Combine the butter, the remaining 2 teaspoons of thyme, the remaining 1 teaspoon of rosemary, 1/4 teaspoon of salt and 1/8 teaspoon of pepper in a second bowl; set aside.

Pat the chicken dry with paper towels and season with salt and pepper. Place the vegetables in a single layer on a rimmed baking sheet, arranging the Brussels sprouts in the center. Place the chicken, skin side up, on top of the vegetables, arranging the breast pieces in the center and the leg and thigh pieces around the perimeter of the baking sheet.

Brush the chicken with the herb butter and roast until the breasts register 160 degrees and the drumsticks and thighs register 175 degrees, about 35 to 45 minutes, rotating the pan about halfway through the cooking process. Transfer the chicken to a serving platter and tent loosely with aluminum foil and let it rest for 5 to 10 minutes. Toss the vegetables in the pan juices and transfer them to the platter with the chicken. Serve.

There are a few things about this recipe you want to keep in mind. Here is one time where it really pays to have a good, large rimmed baking sheet. You want a big one that will hold everything well without overcrowding so that everything roasts well instead of steams in the baking sheet. You also want one that will hold up well under high heat and not warp at all. The high heat used in the recipe lets you cook everything in under an hour, gives you great caramelization on the vegetables and makes the chicken skin crispy and perfect. Adding the herb butter the chicken really helps to give it extra flavor and crisp the skin too. The vegetables get a lot of great flavor from the drippings of the chicken. Having the Brussels sprouts in the middle of the pan makes a difference here too. Since they tend to cook faster than the carrots and potatoes, you want them in the middle and the other vegetables on the outer part of the sheet where there is more heat. Same goes for the chicken breasts. Keeping it in the cooler part of the sheet helps everything be at the right temperature at the same time.

That’s all I have for today. I hoped you liked the Cook’s Country recipes for this week. Check back tomorrow for the peach-blueberry ice cream pie recipe I have been promising all week. I am also planning some recipes for next week as well, so we’ll see what I can come up with and decide to make. until next time, enjoy the rest of your day and enjoy your meal!

IMG_1632

 
2 Comments

Posted by on August 2, 2013 in Cooking, Dinner, One Pot Meals, Poultry, Vegetables


Tags: , , , ,

 
National Day Calendar

Fun, unusual and forgotten designations on our calendar.

Jennifer Probst

a little bit naughty a little bit nice

Laissez Faire

Letting Life Lead

What To Have For Dinner Tonight

Simple and delicious dinner inspiration