RSS

Category Archives: Breads

Try it Out Tuesday – Cook’s Country Almost No-Knead Bread

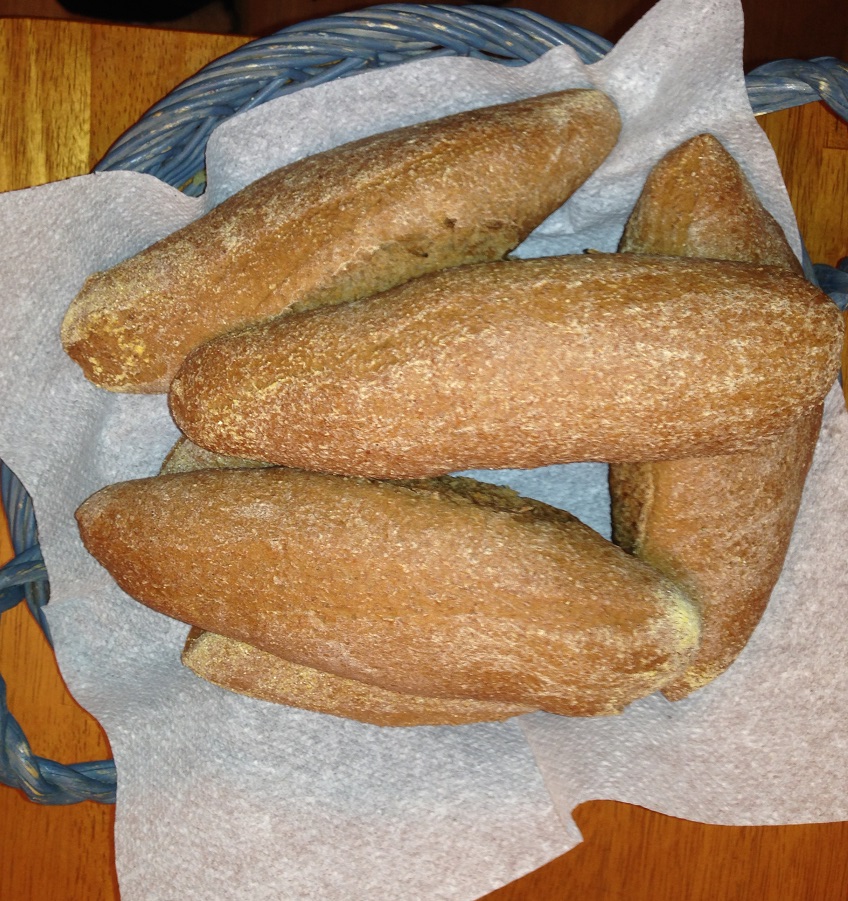
Up until about a year ago I had never made any bread at all before. I finally decided I wanted to give it a try after seeing how much even a small loaf of bread can be at the local markets and figured I needed to try it out just to see if I could save some money and have fresh bread. Turns out it was a lot easier than I always though it would be and I make all kinds of breads now. Some of the recipes take a day or more to do because you need to make a starter while others can be done in a few hours. Then there are those that you do all in a stand mixer and others need some kind of kneading by hand. I have also found a number of recipes, including this one from Cook’s Country, that require practically no kneading at all and produce a great crunchy loaf of bread that is perfect for any meal, sandwich, soup, toast or just to snack on. This one requires about a day in advance, but it is well worth the wait.

Almost No-Knead Bread

3 cups all-purpose flour

1 1/2 teaspoons salt

1/4 teaspoon instant or rapid-rise yeast

3/4 cup plus 2 tablespoons water, room temperature

6 tablespoons mild-flavored lager beer

1 tablespoon distilled white vinegar

Vegetable oil spray

Whisk the flour, salt, and yeast together in a large bowl. Add the water, lager and the vinegar. Using a rubber spatula, fold the mixture, scraping up the dry flour from the bottom of the bowl, until a shaggy bowl forms. Cover the bowl with plastic wrap and allow it to sit at room temperature for at least 8 hours or up to 18 hours.

Lay an 18-inch by 12-inch sheet of parchment paper on the counter and spray it with the vegetable oil spray. Transfer the dough to a lightly floured work surface and knead the dough 10 to 15 times. Shape the dough into a ball by pulling the edges of the dough into the middle. Transfer the dough, seam side down, to the center of the oiled parchment paper and spray the surface of the dough with the vegetable oil spray. Pick up the dough by lifting the parchment paper overhang and lower it into a heavy-bottomed Dutch oven. Let any excess parchment paper hang out over the edge of the pot. Cover the pot loosely with plastic wrap and allow the dough to rise at room temperature until it has doubled in size and does not readily spring back when poked with a finger, about 2 hours.

Adjust an oven rack to the middle position. Remove the plastic wrap from the pot. Lightly flour the top of the dough and using a sharp knife or a razor blade, make one 6-inch long, 1/2-inch deep slit along the top of the dough. Cover the pot and place it in the oven. Heat the oven to 425 degrees. Bake the bread for 30 minutes.

Remove the lid from the pot and continue to bake the bread until the loaf is a deep brown and registers 210 degrees on an instant-read thermometer inserted into the bread, about 20 to 30 minutes longer. Using the parchment paper overhang, carefully remove the bread from the pot. Transfer the loaf to a wire rack and allow it to cool completely, about 2 hours.

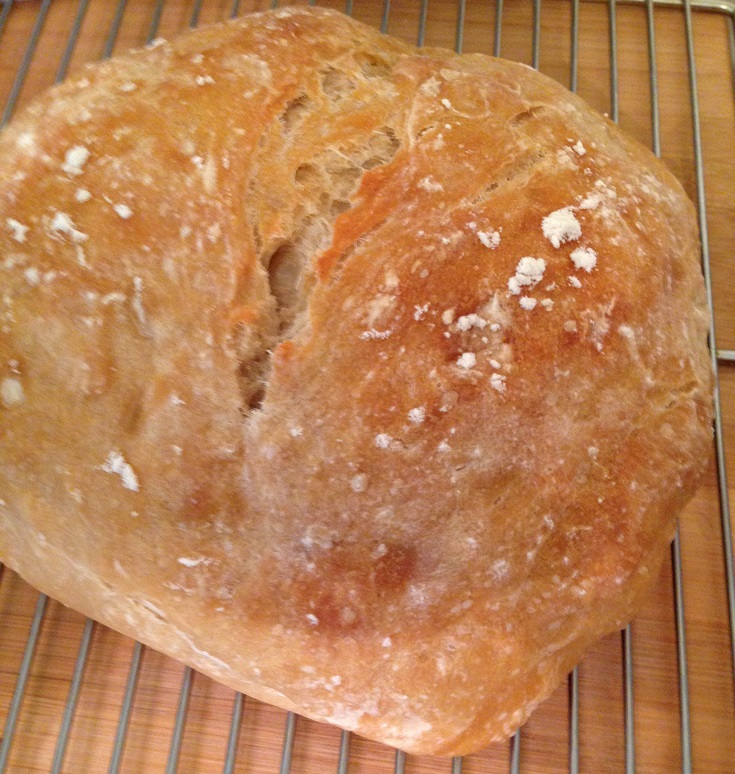
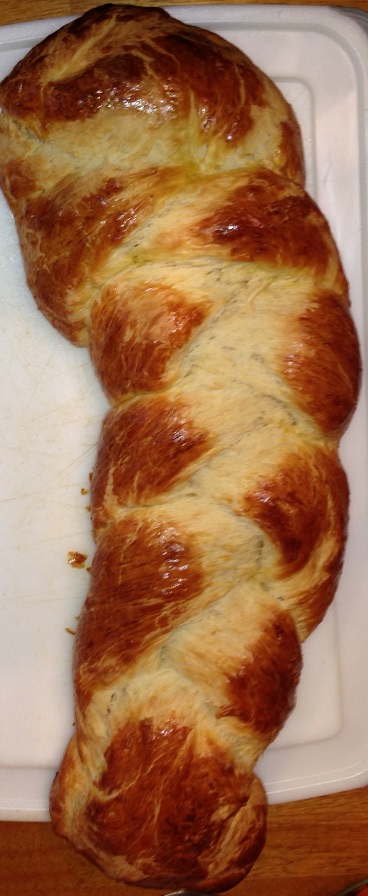
A couple of things about this recipe. First, Cook’s Country recommends using a mild-flavored lager like Budweiser, which I never have in the house and do not like. I used a Samuel Adams Boston Lager and I think the bread came out great.The beer and the vinegar basically act as the fermented starter that is used in many breads and you can easily use your own starter if you have one already. you also want to make sure to put the bread into the cold oven in this recipe and start your 30 minute timer right then, not waiting until the oven preheats. This will help prevent the bread from burning. I have to say that this was one of the best bread recipes I have ever made. It makes a large, sizable loaf that I used when I made our filet mignon dinner. The bread was wiped out and we had none leftover, which is great and I think this particular bread is probably best eaten the same day anyway, though Cook’s Country says it will keep when stored in foil for about 2 days. in any case, this is definitely a bread recipe I will turn to again as everyone liked the crunch, texture and flavor.

That’s all I have for today. Check back next time for another recipe. Until then, enjoy the rest of your day and enjoy your meal!

IMG_0694

 
Leave a comment

Posted by on September 30, 2014 in Breads, Cooking


Tags: , , , ,

Great for Any Time of Day – English Muffin Bread

My family loves English muffins. Of course, we all grew up eating the English muffins from the store and they are fantastic as a breakfast alone, with some eggs and bacon and are especially great with a hamburger for lunch or dinner. I have even made some Homemade English Muffins that were great and easy to make. When I came across this recipe from America’s Test Kitchen for English muffin bread, I was a little skeptical myself. I didn’t really see how a simple recipe like this would turn out and taste like an English muffin, but I was very pleasantly surprised. This is one of the easiest bread recipes you will come across and it is a great one to make for any occasion. This recipe makes 2 loaves of bread so you can always freeze one for another day.

English Muffin Bread

Cornmeal

5 cups bread flour

4 1/2 teaspoons instant or rapid-rise yeast

1 tablespoon sugar

2 teaspoons salt

1 teaspoon baking soda

3 cups milk, heated to 120 degrees

Grease two 8 1/2 by 4 1/2-inch loaf pans and dust each pan with cornmeal. Combine the bread flour, yeast, sugar, salt and baking soda in a large bowl. Stir in the hot milk and mix until everything is combined, about 1 minute. Cover the dough with greased plastic wrap and let the dough rise in a warm place for about 30 minutes or until the dough is bubbly and has doubled in size.

Stir the dough and divide it evenly between the two prepared loaf pans, pushing the dough into the corners with a greased rubber spatula. The loaf pans should be about two-thirds full when you are done. Cover the loaf pans with greased plastic wrap and let the dough rise in a warm place until it reaches the edge of the loaf pans, about 30 minutes. Meanwhile, adjust an oven rack to the middle position and preheat the oven to 375 degrees.

Discard the greased plastic wrap and transfer the loaf pans to the heated oven. Bake in the oven until the bread is well browned and registers 200 degrees on an instant-read thermometer inserted into the loaf, about 30 minutes, rotating and switching the pans halfway through the baking process. Turn the bread out onto a wire rack and allow it to cool completely, about 1 hour. Slice the bread and toast and serve or just slice and serve.

With just a few ingredients you can get a great loaf of bread. I have to say the texture of the bread is very much like that of an English muffin and while it may not have the nooks and crannies you love in an English muffin, everything else about it is perfect. The bread has great flavor and I served it with our dinner last night and then had some toasted this morning with my coffee and it was spectacular. This would be ideal to serve with a breakfast or brunch buffet or just to have when you feel like having a simple bread with any meal.

That’s all I have for today. Check back next time for another recipe. Until then, enjoy the rest of your day and enjoy your meal!

IMG_0662 IMG_0661


Leave a comment

Posted by on August 27, 2014 in Breads, Cooking


Tags: , , ,

Take Your Burgers to Pretzel Heaven with These Pretzel Bread Rolls

One of the things I always seem to buy when I go to the farmer’s market is pretzel rolls. There is just something about these rolls with their great pretzel flavor, crusty top and the pretzel salt that just make them fantastic for all kinds of sandwiches and burgers. That being said, I decided that they shouldn’t be that hard to make on my own and wanted to give it a shot for when we were having burgers the other night. I found this recipe on Food Republic that was a pretty easy recipe, only used a few ingredients and looked pretty easy to do, so I thought I would give it a shot. This recipe actually makes 35 small dinner rolls, but I halved the recipe and made larger rolls and got 9 good-sized rolls out of it. This is the original recipe posted on Food Republic, so you can adjust it to fit your needs if you want.

Pretzel Bread Rolls

6 teaspoons active dry yeast

2 1/2 cups warm water

3/4 cup plus 1 teaspoon granulated sugar

7 cups all-purpose flour

2 1/4 teaspoons kosher salt, plus more for sprinkling

2 tablespoons canola or vegetable oil

1/4 cup baking soda

2 cups warm water

In a mixer fitted with a dough hook attachment, briefly blend the yeast, warm water and 1 teaspoon of the granulated sugar. Let the mixture rest about 10 minutes so it can bloom to activate the yeast.

After the yeast has activated, add the flour, the remaining sugar, the kosher salt and the oil. Mix for 5 minutes or until a smooth, dense dough has formed. Remove the dough from the mixer and transfer it to a greased medium-sized bowl. Let the dough rise in a warm place for 2 hours or until the dough has just about doubled in size.

Line a baking sheet with parchment paper and spray it with some nonstick cooking spray. Divide the dough into 3 equal pieces and roll out each piece into a rope that is about 2 inches in diameter. Cut each rope into 1-inch pieces (larger if you are looking for bigger rolls). This should give you roughly about 35 small dinner rolls. Place the rolls on the prepared baking sheet about 2 inches apart. Cover the rolls with a clean dishcloth and let them rise again for about 30 minutes.

Heat the oven to 425 degrees. in another bowl, combine the baking soda and the 2 cups of warm water. Transfer the baking soda solution to a spray bottle and spray the rolls generously with the solution. Sprinkle the rolls with some extra kosher salt if desired. Bake the rolls for 15 minutes until the rolls are a dark brown all over. Remove the rolls from the oven and allow them to cool on the baking sheet before serving.

It is a very easy recipe, easier than some of the pretzel recipes I have seen, and it yields great results. The rolls were nice and crunchy on the outside and warm and sweet on the inside, just like a pretzel. They were perfect for the burgers that night and we used the extras for sandwiches for the rest of the week as well. I will certainly make this one again since it was so easy to do.

That’s all I have for today. Check back next time for another recipe. Until then, enjoy the rest of your day and enjoy your meal!

IMG_0573


Leave a comment

Posted by on June 23, 2014 in Breads, Cooking


Tags: , , , ,

A Classic Steakhouse Meal – Steak with Maitre D’Hotel Butter and Mock Frites

I would love to have a great steakhouse meal now and then, but the steakhouses in New York City (which is about 45 miles away from us) are just too expensive and there just are not very many quality steakhouses in the area that we live that are affordable to the average family anymore. Sure, it’s a treat to go out and have a nice dinner once in a while, but it is also great if you make something similar to that experience all on your own at home and without the benefit of having a gas or charcoal grill to use. Even with a good grill, you never are really going to get the same type of steak you get at a good steakhouse unless you are spending a fortune for some quality aged beef and have a professional-grade oven that can get the heat cranked up to 800 degrees to get that great sear you need. So for the rest of us, there are still options to get a great meal for yourself. The New York Times recently had an article in their dining section regarding making a good steak at home and it can be a lot easier than you think with this recipe. It just takes some time and paying attention and you can make your own great steak and potato meal.

Steak with Maitre D’Hotel Butter and Mock Frites

For the Potatoes:

Kosher salt

8-12 new or baby potatoes

3 tablespoons canola oil

For the Maitre D’Hotel Butter:

6 tablespoons butter

2 teaspoons fresh thyme leaves, minced

1 small shallot, peeled and minced

1 teaspoon freshly squeezed lemon juice

Splash of Champagne or white wine vinegar

For the Steak:

2 pounds beef steak, such as boneless rib-eye, approximately 1-inch thick

Kosher salt and freshly ground black pepper

1 tablespoon canola oil

Preheat the oven to 450 degrees. Set a large pot filled with salted water on the stove. Add the potatoes, turn the heat to high and cook, gently boiling, until the potatoes are softened, about 12 to 15 minutes. Drain the potatoes and dry them well.

Oil a sheet pan with half of the canola oil and put the potatoes in the pan in a single layer. Using a potato masher or the bottom of a heavy glass, gently smash each potato, pressing it down to a thickness of less than 1 inch. Drizzle the rest of the canola oil over the smashed potatoes and place the sheet pan on the top rack in the oven and allow them to roast until the exteriors are golden and crunchy, about 20 to 25 minutes. Add salt to taste.

For the butter, place the butter on a cutting board and, using a fork, cut the thyme, shallot, lemon juice and vinegar into the butter until the butter is creamy and smooth. Scrape the butter together with a chef’s knife and form it into a rough log. Roll the butter tightly into a sheet of plastic wrap and refrigerate until you are ready to use it.

As the potatoes finish crisping, make the steaks. Set a heavy-bottomed skillet (or 2 if your steaks are very large) over high heat and let the skillet sit for a few minutes until it gets very hot.Pat the steaks dry with paper towels to absorb any exterior moisture. Shower the steaks aggressively with salt and pepper on both sides. Add the canola oil to the pan and shake the pan to distribute the oil evenly. The oil should almost immediately begin to smoke to let you know the pan is ready. Place the steaks in the skillet and allow them to sear, unattended, for 4 minutes, until they have developed a good crust on one side. Turn the steaks over and cook for an additional 3 to 6 minutes for medium-rare. Remove the steaks to a warm platter to rest. Top each steak with a tablespoon of the compound butter.

Remove the potatoes from the oven and season them with salt and pepper to taste. Place 2 or 3 potatoes on each plate alongside a steak. Top each steak with pats of the butter and serve.

You really need to make sure your pan is very hot before you put the steaks in to make sure you can get a good crust. You also want to make sure you have gotten rid of any surface moisture from the steaks so they are not just steaming in the skillet but cooking to get a good sear. The steaks came out perfectly (of course you can always cook them longer to your particular liking, just keep a close eye on them so they don’t overcook) and the potatoes were perfect, crisp and crunchy just the way I like them. I used New York strip steaks since that is what was on sale when I got steaks and they worked out well. You can serve this with any traditional steakhouse recipe, like creamed spinach or asparagus, and having some nice bread to go along with it or some dinner rolls can really round it out for you. I made some corn on the cob and sautéed some mushrooms and onions to go along with the meal and used some of the steakhouse bread I had in the freezer. The butter is great not just on the steaks but on everything else you might serve as well.

That’s all I have for today. Check back next time for another recipe. Until then, enjoy the rest of your day and enjoy your meal!

IMG_0548 IMG_0546 IMG_0547

 
Leave a comment

Posted by on May 27, 2014 in Beef, Breads, Cooking, Dinner, Potatoes, Side Dishes


Tags: , , , , , ,

How About Some More Bread? Go Down Under for Homemade Honey-Wheat Bread

Since I have some whole wheat flour on hand I decided I wanted to try to make some good use of it and have been looking around for some recipes to try beyond just making some wheat bread or even a wheat bread crust pizza. Both would be fine, but I wanted something a little different. Then I remembered just how much Sean has always liked the bread that you get when you go to Outback for dinner. They serve these little dark loaves of bread that are warm and tasty to go along with your meal and I figured that they had to use some type of wheat flour in them, so I went searching on the Internet and came across a number of recipes that offer different ways of making a copycat of just that bread. I pulled a few together and tweaked them slightly to fit what I thought would work and the results were pretty good.

Homemade Honey Wheat Bread

1 1/4 cups warm water (at 105-110 degrees)

2 teaspoons sugar

1 package active dry yeast

2 cups bread flour

1 3/4 cups whole wheat flour

1 tablespoon cocoa powder

2 teaspoons instant coffee granules

1 teaspoon salt

2 tablespoons butter, softened

1/4 cup honey

2 tablespoons molasses

Cornmeal, for dusting

Measure the warm water into a 2-cup measuring cup. Add the sugar and the yeast and stir the mixture until the sugar and yeast dissolve. Let the yeast mixture proof for 5 minutes until it begins to bubble.

Mix the bread flour, wheat flour, cocoa powder, coffee granules and the salt together in a large bowl with a whisk. Using your fingers, incorporate the softened butter into the flour mixture until it is well blended. Make a well in the center of the dry flour mixture and add the honey, molasses and the yeast mixture. Stirring from the middle, bring the dry ingredients gradually into the wet ingredients. You can start mixing with a spoon or spatula, but at some point you are better off doing this with your hands to bring the dough together nicely.

Turn the rough dough out onto a lightly floured work surface. Knead the dough for about 10 minutes, adding small amounts of flour to the kneading surface only if needed. Let the dough rest for a few minutes while you wash and dry the bowl you were originally mixing everything in. Spray the inside of the bowl with cooking spray and place the dough into the bowl top side down and then turn it over so that the top is lightly coated with some of the cooking spray. Cover the bowl with plastic wrap and place the bowl in a warm, dry spot to rise. Let the dough rise for 1 to 1 1/2 hours until it has doubled in size.

When the dough has doubled in size, cut it into 6 portions. Form each portion into a 6-inch log or any other shape that you would like the bread to be in. Pour a small amount of cornmeal onto your work surface, moisten each dough portion lightly by wetting your hands with water, removing most of the water and rubbing your hands over the dough. Roll the lightly moistened loaves in the cornmeal to coat the loaves. Gently pat each loaf to remove any excess cornmeal.

Place the loaves on a lightly oiled baking sheet and cover them with plastic wrap and set them aside to rise for another 1 hour or until they have doubled in size.

Preheat the oven to 350 degrees. Uncover the loaves of dough and place them in the oven to bake for 35 to 40 minutes. Remove the bread from the oven and allow the loaves to cool for 10 to 15 minutes before serving.

Just a couple of things about this recipe. As far as taste, these loaves taste great and very much like the ones that you will get at Outback or other steakhouses. However, they are not going to be the same dark color that you get from the loaves at Outback. If you want that really dark brown color, all of the recipes I came across said you can add food coloring to achieve it, but to me it just isn’t worth it only so you can get that look. I can live with the lighter brown color instead of the dark, but if you want it combine 1 1/4 teaspoons of red food coloring with 1 teaspoon each of yellow and blue food coloring and stir it into the water when you are adding the yeast and you can get the dark brown. In any case, the taste was great and you can get a few mini loaves out of one recipe. I made the six loaves and froze a bunch of them just so we can have one to pull out of the freezer and bake when we feel like having one with our meal. It’s an easy recipe you can do once a week and then have bread any time you would like it without having to go out for dinner for it.

That’s all I have for today. Check back next time for another recipe. Until then, enjoy the rest of your day and enjoy your meal!

IMG_0528


3 Comments

Posted by on May 13, 2014 in Breads, Cooking


Tags: , , , ,

A Breakfast Treat – Homemade Whole-Wheat English Muffins

English muffins has always been one of those things that you love to have but never even consider making at home on your own. it just seems like they would be complicated and difficult to make and they probably would not taste as good if you made them yourself. When I saw this recipe in the New York Times a few weeks back, I could not believe how simplistic it seemed and it almost seemed like there was no way these were going to be anywhere close to the English muffins you get so used to having at diners or buying in the store. The fact is that they are really is to make, only take a few ingredients and not a lot of time or effort and you can have you own English muffins whenever you want them.

Homemade Whole-Wheat English Muffins

2 teaspoons active dry yeast

4 tablespoons butter

1/2 cup plain yogurt

1/2 cup warm milk

1/2 tablespoon honey

1 teaspoon salt

1 cup whole wheat flour

1 cup all-purpose flour

1/2 teaspoon baking soda

Cornmeal, as needed

In a small bowl, combine the yeast and 1/3 cup of warm water (registering 105 to 115 degrees) and let it rest until the yeast has dissolved, about 5 minutes.

Melt 2 tablespoons of the butter and put it in a large bowl. Whisk in the plain yogurt, milk, honey, salt and the yeast mixture. Add the whole wheat flour and all-purpose flour and the baking soda to the bowl and beat the mixture thoroughly with a spoon or rubber spatula until it is well combined. Cover the bowl with a damp towel and allow it to rest in a warm spot for 1 to 1 1/2 hours, or until the dough has doubled in size.

Heat the oven to 350 degrees. Lightly dust a small baking sheet with some of the cornmeal.

Place a large skillet over medium heat and melt 1 tablespoon of the butter. Using a large ice cream scoop or a 1/2 measuring cup, drop the batter into the skillet to form round muffins about 4 inches in diameter, mounding the batter in the center. you may have to use your fingers to help get the dough out of the scoop or cup, so be careful around the hot pan and don’t worry if they do not come out perfectly circular (English muffins aren’t perfect circles most of the time). Repeat the process until you have three muffins in the skillet, leaving the rest of the batter for a second batch. Reduce the heat to low. Cover the skillet with a lid or a baking sheet and cook the muffins for 3 to 5 minutes, until the bottoms are a golden brown. Watch them carefully to make sure they do not burn.

Uncover the skillet and flip the muffins using a spatula. Cover the skillet again and cook the muffins for 2 to 4 minutes longer or until the other sides are also golden brown. Place the muffins on the prepared baking sheet. Repeat the process using the remaining batter and another tablespoon of the butter.

Bake the muffins in the oven for 6 to 9 minutes, or until the muffins are puffed and cooked through. Split the muffins with a fork and toast before eating.

As I said, I was skeptical at first but these English muffins come out great. They are so easy to make and taste fantastic you can easily find yourself saying you will never have to buy English muffins again. You get a much better tasting muffin than what you get in the package. It is certainly fresher, comes out crisper and has a nice yeast taste to it. I am going to experiment and try making them just with all-purpose flour next time to see how they come out, but the whole wheat ones are phenomenal and it really takes no effort at all to make them. With the cost of a package of 6 English muffins between two and three dollars a pack, I made eight of my own for a fraction of that and used ingredients I have around the house. It is definitely worth making and trying these on your own.

That’s all I I have for today. Check back next time for another recipe. until then, enjoy the rest of your day and enjoy your meal!

IMG_0537


5 Comments

Posted by on May 12, 2014 in Breads, Breakfast, Cooking


Tags: , , , , , ,

For a Fun Side, Try This Caramelized Onion Focaccia

Focaccia bread is one of the great additions to all kinds of meals or it can be perfect for you to use for sandwiches of all kinds. There are lots of different ways you can make it, from having a plain and simple bread to one loaded with all kinds of toppings. There are lots of different things I would like to try on focaccia but I was looking for something pretty simple to start with for my first time out giving this type of bread a try. I found this recipe on Williams-Sonoma’s website and the original recipe calls for a bacon, Gruyère and caramelized onion focaccia, so I decided just to go with the caramelized onions as a topping as I thought it would be a nice side for the pork dinner I was making that night anyway. It gave me a good starting recipe that if I liked I could use again as the basis for one with other toppings.

Caramelized Onion Focaccia

1 package (2 1/4 teaspoons ) active dry yeast

2 teaspoons firmly packed light brown sugar

1 cup warm water (110°F/43°C)

3 cups all-purpose flour

6 tablespoons olive oil, plus more for brushing

1 teaspoon kosher salt

2 yellow onions, halved and thinly sliced

In the bowl of a stand mixer, dissolve the yeast and 1 teaspoon of the brown sugar in the warm water. Let the mixture stand until it is foamy, about 10 minutes. Add the flour, 4 tablespoons of the olive oil and the salt. Attach the dough hook to the stand mixer and knead on medium-low speed until the dough is smooth and elastic, about 10 minutes. Form the dough into a ball, put it back into the bowl, and cover the bowl with plastic wrap. Let the dough rise in a warm, draft-free spot until it doubles in size, about 1 hour.

 Meanwhile, in a large cast-iron frying pan add 1 tablespoon of butter and melt it over medium heat. Add the onions and saute over medium-low heat until they start to wilt, about 3 minutes. Stir in the remaining 1 teaspoon of the brown sugar and a pinch of salt and continue to cook until the onions are golden brown and caramelized, about 20 minutes. Remove the onions from the heat and allow them to cool.

 Oil a rimmed baking sheet with the remaining 2 tablespoons of olive oil. Dump the dough onto the prepared pan and press it into a rough rectangle. Using your fingers, stretch the dough into a rectangle about 10 by 14 inches Cover the dough loosely with a kitchen towel and let it rise in a warm, draft-free place until it is puffy, about 1 hour.

 Position a rack in the middle of the oven and preheat the oven to 425 degrees. Dimple the surface of the dough with your fingertips. Gently brush the dough with olive oil, then sprinkle the dough evenly with the onion mixture. Bake until the bread is golden, about 15 to 18 minutes. Cut the focaccia into squares and serve them while warm.

This bread is perfect as a side dish for any meal, or as an appetizer before the meal. If you want to add the cheese and bacon, add the Gruyère into mixture when you add the olive oil and salt when you are making the dough. The bacon can be added when you are sauteing the onions and added as a topping. You could certainly add some extra cheese as a topping as well if you wanted. I thought it was perfect with just the onions this time and it was great to use the squares for sandwiches later on for lunches.

That’s all I have for today. Check back next time for another recipe. until then, enjoy the rest of your day and enjoy your meal!

IMG_0518

 
1 Comment

Posted by on May 3, 2014 in Breads, Cooking


Tags: , , , ,

Sunday Breakfast with Alton & Bobby – Southern Biscuits and Sausage Gravy

I’ve had a craving for biscuits and gravy lately and yesterday stopped over at Adam’s Farms and got some of their homemade bulk breakfast sausage so I could make some this morning for our Sunday breakfast. Sunday breakfast is usually the only day during the week where Sean, Michelle and I get to eat breakfast together, so we try to make it something different and special each week. I was looking for something quick and easy to use for the sausage gravy and for the biscuits, but I wanted homemade biscuits, not the stuff you get out of the refrigerated can. I turned to Food Network and found a good biscuit recipe from Alton Brown for southern biscuits to go alongside of the sausage gravy recipe I got from Bobby Flay. Both are really easy to make so you can get a different taste for breakfast in no time at all.

Alton Brown’s Southern Biscuits

2 cups flour
4 teaspoons baking powder
1/4 teaspoon baking soda
3/4 teaspoon salt
2 tablespoons butter
2 tablespoons shortening
1 cup buttermilk, chilled

Preheat the oven to 450 degrees.

In a large mixing bowl, combine the flour, baking powder, baking soda and salt. Using your fingertips, rub the butter and shortening into the dry ingredients until the mixture looks like crumbs.Try to do this quickly so that the fat does not completely melt. Make a well in the center of the mixture and pour in the chilled buttermilk. Stir just until the dough comes together. The dough will be very sticky.

Turn the dough onto a floured surface, dust the top of the dough with flour and gently fold the dough over on itself 5 or 6 times. Press into a 1-inch thick round. Cut out the biscuits with a 2-inch cutter, being sure to push straight down through the dough. Place the biscuits on baking sheet so that they just touch. Reform the scrap dough, working it as little as possible and continue cutting. 

Bake until the biscuits are tall and light gold on top, about 15 to 20 minutes.

Bobby Flay’s Sausage Gravy and Biscuits

1 1/2 pounds bulk breakfast sausage or mixture of hot and mild bulk sausage
4 tablespoons flour
1/2 gallon milk
Salt
Pepper
Biscuits, store-bought or homemade (see Alton Brown’s Southern Biscuit recipe above)

In a large pot, add the sausage and cook until it is browned and cooked through. Drain the grease and add the flour to the sausage. Cook the sausage in the flour over medium-high heat until the sausage is well-coated with the flour. Add the milk and stir until the gravy has the  desired thickness and add salt and pepper, to taste. Serve with the biscuits.


I did change up the sausage gravy recipe a little and did not use the 1/2 gallon of milk. I only use about 3/4 of a cup along with a 1/4 cup of heavy cream because we like a gravy that is much thicker for the sausage, and it turned out perfect. The real star here though is the biscuits. These are really easy to make, smell great and taste awesome. You could use these for all kinds of breakfast sandwiches that you like if you didn’t want the sausage gravy, like bacon, eggs, ham or anything else. They are also a great dinner biscuit and I plan to use the rest to go along with dinner tonight. You could even just have one warm with some butter to go with your tea or coffee in the morning and you would be all set.

That’s all I have for today. Check back next time for another recipe. Until then, enjoy the rest of your day and enjoy your meal!

IMG_0506 IMG_0505

 
4 Comments

Posted by on April 13, 2014 in Biscuits, Breads, Breakfast, Cooking, Gravy, Pork


Tags: , , , , , , , , , , ,

Holla for Some Challah!

Sean has been asking me to try to make challah bread for a long time and I have avoided doing it because I couldn’t find a recipe where everything seemed easy enough to follow that I would not have a problem with it. The recipe itself is not that difficult; I was always a little intimidated by the whole braiding aspect of the bread. Finally, Michelle said to me “It’s just like braiding a girl’s hair,” something I haven’t even tried since I was younger and my younger sisters needed someone to help them with hair when no one else was around. Anyway, I decided to give it a try and got this recipe from Williams-Sonoma to try it out. There are only a few ingredients involved in the bread and it is the perfect time of year to give this one a try with Easter and Passover right around the corner.

Challah Bread

2 packages (5 teaspoons) active dry yeast
1 cup warm water (105° to 115°F)
1/2 cup sugar
3 eggs, plus 1 egg, beaten, for glaze
5 cups all-purpose flour
2 teaspoons salt
8 tablespoons (1 stick) butter, at room temperature

1 tablespoon poppy seeds or sesame seeds (optional)

Directions:

To make the dough by hand, in a large bowl, dissolve the yeast in the warm water and let it stand until it is foamy, about 5 minutes. Using a wooden spoon, stir in the sugar, 3 eggs, 4 1/2 cups of the flour, the salt and the butter until the dough comes together in a sticky mass. Turn the dough out onto a lightly floured surface and knead, working in the remaining flour as necessary to keep the dough from being too sticky, until the dough is smooth and elastic, 5 to 7 minutes. Do not be tempted to add too much flour. The dough should stay soft and will become less sticky with kneading.

To make the dough with a stand mixer, in the 5-quart bowl of a mixer, dissolve the yeast in the warm water and let it stand until it is foamy, about 5 minutes. Add the sugar, 3 eggs, 4 1/2 cups of the flour, the salt and butter. Place the bowl on the mixer, attach the dough hook and knead on low-speed, working in the remaining flour as necessary to keep the dough from being too sticky, until the dough is smooth and elastic, 5 to 7 minutes. Do not be tempted to add too much flour. The dough should stay soft and will become less sticky with kneading. Remove the dough from the bowl.

Form the dough into a ball and transfer it to a lightly oiled bowl. Cover the bowl with a damp kitchen towel and let the dough rise in a warm, draft-free spot until it doubles in bulk, about 2 hours.

Line a sheet pan or rimless baking sheet with parchment paper. Punch down the dough. Using a pastry scraper, scrape the dough out onto a clean work surface. To make a 4-strand braid, cut the dough into 4 equal pieces with a sharp knife or a bench scraper. Using your palms, and starting in the center and working outward, elongate 1 piece by rolling it gently against the work surface with even pressure until you have formed a rope as long as the prepared pan. Repeat with the remaining 3 pieces.

Line up the 4 strands in front of you horizontally. Cross the strand farthest from you across the other 3 strands so that it is nearest you. Cross the strand that is now next to it across the other 2 strands away from you. Position the outside strands so that they are away from the center ones, and position the center 2 strands perfectly horizontal. Bring the strand nearest you down between the 2 horizontal strands. Bring the strand farthest from you up and across to the opposite side. Again, bring the strand farthest from you down between the 2 straight strands. Bring the strand nearest you up and across to the opposite side. Starting from the strand nearest you, repeat the braiding until you reach the ends of the ropes. Pinch them together at the top and at the bottom, and tuck the strands under at the ends.

Alternatively, to make one large 3-strand braid, cut the dough into 3 equal pieces with a sharp knife or a bench scraper. Follow the directions for rolling out the ropes for the 4-strand braid. Line the 3 strands up straight so that they are in front of you vertically. Cross the right strand over the middle strand, then cross the left strand over the middle strand. Keep going back and forth, crossing left over right, then right over left, until you reach the ends of the ropes. Pinch them together at the top and at the bottom, and tuck the strands under at the ends.

Place the braided loaf on the prepared pan, cover it with a dry kitchen towel, and let it rise again in a warm, draft-free spot until the loaf doubles in size and is spongy to the touch, about 45 to 60 minutes.

Position a rack in the lower third of an oven and preheat the oven to 350°F.

Brush the braid gently with the beaten egg and sprinkle it with the seeds, if using. Bake the braid until it is nicely browned and sounds hollow when tapped on the bottom, about 30 to 35 minutes. Transfer the bread to a wire rack and let cool completely.

It really is very easy to make, I think I just got a little confused by the braiding instructions and ended up doing it as Michelle suggested. I went with the 3-braid variation of this recipe and I can say that it makes a giant loaf of bread, which made Sean very happy because he loves it for sandwiches and we are already planning to use it to make French toast this weekend as well. It has the wonderful sweetness and cake-like quality you expect in challah bread. I’ll be making this one again for sure now that I know I can handle it.
That’s all I have for today. Check back next time for another recipe. Until then, enjoy the rest of your day and enjoy your meal!
IMG_0502
 
2 Comments

Posted by on April 10, 2014 in Breads, Cooking


Tags: , ,

A Bevy of Bountiful Beauty – Banana-Blueberry Buttermilk Bread

While I am not a big breakfast eater myself, I do like to have something around once in a while that goes nicely with my coffee in the morning. Very often I will make an easy banana bread, which is tasty, but I was looking for something a little bit different to try to that had some different flavor to it but would still be easy to make. I was also looking for a use for some of the whole wheat flour I had bought to make brown bread for St. Patrick’s Day. So I was quite fortunate when I came across this recipe from Kitchen Daily for a tasty banana-blueberry buttermilk bread that was simple to make.

Banana-Blueberry Buttermilk Bread

¾ cup nonfat or low-fat buttermilk
¾ cup packed light brown sugar
¼ cup vegetable oil
2 eggs
3 mashed ripe bananas
1 ¼ cup whole-wheat flour
1 cup all-purpose flour
1 ½ teaspoons baking powder
¾ teaspoon ground cinnamon
½ teaspoon baking soda
½ teaspoon salt
¼ teaspoon ground nutmeg
1 ¼ cups blueberries, fresh or frozen

Preheat the oven to 375°F. Coat a 9-by-5-inch loaf pan with cooking spray.
Whisk the buttermilk, brown sugar, vegetable oil and eggs in a large bowl. Stir in the mashed bananas.
Whisk the whole-wheat flour, all-purpose flour, baking powder, cinnamon, baking soda, salt and nutmeg in a medium bowl.
Fold the dry ingredients into the wet ingredients and stir until they are just combined. Fold in the blueberries. Transfer the batter to the prepared pan.
Bake the bread until the top is golden brown and a wooden skewer inserted in the center of the bread comes out clean, about 50 to 60 minutes. Cool the bread in the pan for 10 minutes, then turn it out onto a wire rack. Let the bread cool for about 2 hours before slicing.
You could also make these as muffins if you prefer to have muffins instead. For the muffin variation, preheat the oven to 400°F. Coat 12 (1/2 cup) muffin cups with cooking spray or line the cups with paper liners. Divide the batter among the muffin cups (they will be full). Bake the muffins until the tops are golden brown and a wooden skewer inserted in the center of a muffin comes out clean, about 20 to 25 minutes. Cool the muffins in the pan for 10 minutes, then remove the muffins and let them cool on a wire rack for at least 5 minutes more before serving.

One other note about this recipe. the original recipe calls for whole-wheat pastry flour instead of just whole wheat flour, which I did not have. The whole wheat pastry flour has less protein than regular whole wheat flour, so you will get less gluten in the results and it will make for a more tender bread or muffin. If you would prefer to go that way, then use the pastry flour instead. I think the results came out just fine with the regular whole wheat flour. I liked the flavor to go along with the mix of the bananas and blueberries and it was great as a breakfast with my coffee in the morning. it gives a nice, different and easy option for something like this or to make quickly when you are having guests at the last-minute or need something to bring to someone’s home.

That’s all I have for today. Check back next time for another recipe. until then, enjoy the rest of your day and enjoy your meal!

IMG_0482


Leave a comment

Posted by on April 5, 2014 in Breads, Breakfast, Cakes, Dessert


Tags: , , , , ,

 
National Day Calendar

Fun, unusual and forgotten designations on our calendar.

Jennifer Probst

a little bit naughty a little bit nice

Laissez Faire

Letting Life Lead

simple cooking recipes

a blog to share with you the best