RSS

Category Archives: Dinner

When Michelle’s Away the Bacon Will Play – Bacon-Wrapped Meatloaf

Okay, this recipe is definitely not for the health-conscious, but it is for the bacon lover in all of us. Sean had seen this recipe in my recent issue of Cook’s Country and knowing his love for all things bacon asked when I was going to make it. The problem is that Michelle and bacon don’t always play nicely together, so I really needed to wait for her to be away on business before I could break out the recipe and give it a try. When she went away recently, the first night she was gone Sean asked me if I was going to make this. I broke out the recipe for bacon-wrapped meatloaf and gave it a try. This recipe seems a lot like a standard meatloaf recipe, with the addition of bacon in, on and around the meatloaf itself.

Bacon-Wrapped Meatloaf

1/4 cup your favorite bottled barbecue sauce, plus extra for serving

1 tablespoon cider vinegar

1 tablespoon Worcestershire sauce

1 tablespoon spicy brown mustard

17 square or 19 round saltine crackers, crushed (about 2/3 cup)

4 slices coarsely chopped bacon, plus 8 whole slices

1 onion, chopped coarse

3 garlic cloves, minced

1/2 cup milk

2 eggs plus 1 egg yolk

1/3 cup minced fresh parsley

3/4 teaspoon salt

1/2 teaspoon pepper

1 1/2 pounds 90 percent lean ground beef

Adjust an oven rack to the upper-middle position and heat the oven to 375 degrees. Line a rimmed baking sheet with aluminum foil and set a wire rack in the baking sheet. Whisk the barbecue sauce, Worcestershire sauce, cider vinegar and mustard together in a bowl. Set aside the glaze.

Process the saltines in a food processor until they are finely ground, about 30 seconds,; transfer the ground crackers to a large bowl. Pulse the chopped bacon and the chopped onion in the now-empty food processor until both are coarsely ground, about 10 pulses. Transfer the bacon mixture to a large non-stick skillet and cook over medium heat until the onion is soft and translucent, about 5 minutes. Add the minced garlic and cook until the garlic is fragrant, about 30 seconds. Set the mixture aside off the heat.

Add the milk, eggs and egg yolk, parsley, salt, pepper and 2 tablespoons of the glaze to the saltines and mash the ingredients together with a fork until a chunky paste forms. Stir in the bacon mixture until everything is well combined. Add the ground beef and knead with your hands until the ingredients are blended.

Lightly spray an 8 1/2 by 4 1/2-inch loaf pan with vegetable oil spray, Line the pan with a large sheet of plastic wrap with some extra plastic wrap hanging over the edges of the pan. Push the plastic wrap into the corners and up the sides of the pan. Line the pan crosswise with the remaining 8 bacon slices, overlapping them slightly and letting the excess hang over the edges of the pan. You should have at least 1/2-inch of overhanging bacon. Brush the bacon with 3 tablespoons of the glaze. Transfer the meatloaf mixture to the bacon-lined pan and press the mixture firmly into the pan. Fold the bacon slices over the mixture.

Using a metal skewer or the tip of a paring knife, poke 15 holes in one 14 by 3-inch piece of foil. Center the foil rectangle on top of the meatloaf. Carefully flip the meatloaf onto the wire rack set in the baking sheet so the foil is on the bottom and the bacon is on the top. Gripping the plastic, gently lift and remove the pan from the meatloaf. Discard the plastic. Gently press the meatloaf into a 9 by 5-inch rectangle.

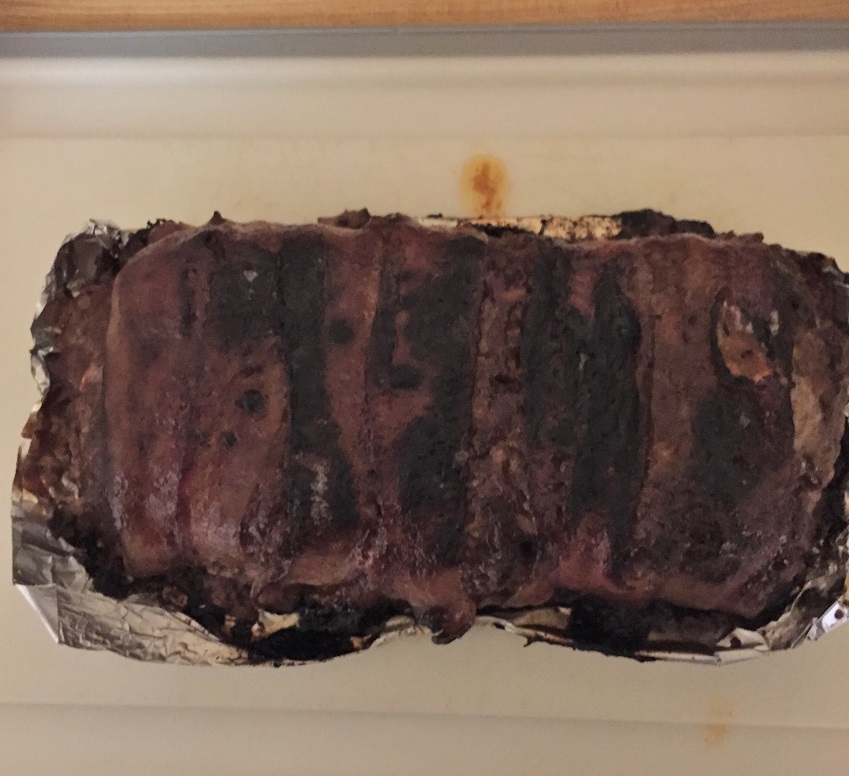
Bake the meatloaf in the oven until the bacon is browned and the meatloaf registers 150 degrees on an instant-read thermometer inserted into the center of the meatloaf, about one hour. Remove the meatloaf from the oven and heat the broiler. Brush the top and sides of the meatloaf with the remaining 2 tablespoons of the glaze. Broil the meatloaf until the glaze begins to char and the meatloaf registers 160 degrees, about 3 to 5 minutes. Using the foil as a sling, transfer the meatloaf to a cutting board and let it rest for 15 minutes before slicing. Serve with the extra barbecue sauce.

While it may seem like a bit of work to create the loaf itself, it really doesn’t take that long and it makes a difference in getting the right shape and having a way for some of the fat to drain off the meatloaf while it cooks. The meatloaf gets great flavor from the bacon both inside and outside, but to me the real winner of the meatloaf recipe is in the glaze. You get this really great smoky flavor to the meatloaf that makes it extra-special. You can use whatever barbecue sauce you like for this one and I actually added 1/2 teaspoon of liquid smoke to the glaze to enhance it a little more. I also put the meatloaf in the pan and then refrigerated it for about 15 minutes to let the shape set more before I flipped it out onto the wire rack prior to baking. It seemed to help in having the meatloaf hold its shape better. The other thing to remember is that you will get better slices of meatloaf if you allow it to sit and rest after taking it out of the oven. I often wait up to 30 minutes before slicing it to get the best slices. I can see using this glaze on other meatloaf recipes even without all of the bacon in and out to get the flavor. Sean and I both liked the meatloaf and he loved it with all of the bacon and the bacon in the meatloaf does add extra smokiness but I can see where this can be bacon overload for some people.

That’s all I have for today. Check back next time for another recipe. Until then, enjoy the rest of your day and enjoy your meal!

baconwrappedmeatloaf

 
2 Comments

Posted by on February 15, 2015 in Beef, Cooking, Dinner, Sauce


Tags: , , , ,

Valentine’s Day – NYT Cooking

Valentine’s Day – NYT Cooking.

Valentine’s Day is tomorrow and if you are still looking for some ideas of what to make for you and your special someone, the New York Times has put together a great list of recipes for your dinner, chocolate, desserts, cocktails and more so that you can have a nice romantic meal right at home. Check it out!


Tags: , , , , , ,

Romantic Dinners for Two | Epicurious.com

Romantic Dinners for Two | Epicurious.com.

With Valentine’s Day this weekend, you might be looking for some ideas to make a nice, romantic meal at home instead of spending time at a noisy restaurant perhaps not getting as a good of a meal as you can make on your own. Epicurious has some great ideas for a romantic dinner for two followed by some nice chocolate dessert ideas as well to cover everything you need. Get yourself a nice bottle of wine and cook at home to enjoy some quiet time with your sweetie. Check it out!


Tags: , , ,

Kicking Some Chicken – Open-Face Buffalo Chicken Sub Sandwiches with Ranch Slaw

Since Sean and I have been on our own for the last couple of weeks while Michelle is away on business, we have been trying to make dinners a little simpler than normal since it is just the 2 of us. This means making a lot of much smaller meals and a few things that we might not make all the time because they may not necessarily be among Michelle’s favorites. I had a bunch of chicken I had purchased recently and was looking for something easy to do with it when I decided to make some chicken sandwiches. At the same time, I have been craving Buffalo chicken ever since the Super Bowl and was looking for a way where I could combine the 2 into a nice sandwich. I came across this particular recipe at Kitchen Daily for an open-face Buffalo chicken sub sandwich with a very simple ranch slaw dressing that makes use of yogurt instead of mayonnaise. It does take a little bit of planning ahead to cook the chicken and then shred it for the sandwiches but it is still quite easy to put together.


Open-Face Buffalo Chicken Sub Sandwiches with Ranch Slaw

1 1/2 pounds boneless skinless chicken thighs

2 tablespoons olive oil

1 1/2 cups chicken broth

1 cup beer, your choice (you can also use an additional cup of chicken broth in place of the beer)

1 1/4 cup Buffalo wing sauce

2 cups very thinly sliced green cabbage

2 ribs celery, julienned

1 medium carrot, julienned (or shaved with a vegetable peeler)

1/4 red onion, very thinly sliced

1/2 cup non-fat Greek yogurt

1/4 teaspoon dried parsley, crushed

1/8 teaspoon garlic powder

1/8 teaspoon onion powder

1/8 teaspoon dried dill weed

1/8 teaspoon black pepper

1/8 teaspoon salt

Grinder or submarine sandwich rolls

1/2 cup crumbled blue cheese (optional)

To prepare the chicken, pat the chicken thighs dry with paper towels and season both sides with salt and freshly ground black pepper. In a Dutch oven or a medium saucepan, heat the olive oil over high heat. When the oil is hot, add the chicken thighs and cook for about 3 minutes on each side until the chicken is golden brown. Add the chicken broth and the beer and reduce the heat to low. Cover the pan and continue cooking the chicken for one hour.

While the chicken is simmering, begin to prepare the ranch slaw. In a large bowl, combine the cabbage, celery, carrot and red onion. Briefly set the bowl aside. For the ranch dressing, in a small bowl, combine the Greek yogurt, dried parsley, garlic powder, onion powder, dill weed, black pepper and salt. Pour the ranch dressing over the vegetable mixture and toss the vegetables to coat them well. Cover and refrigerate the slaw until you are ready to serve.

After one hour, transfer the chicken thighs to a cutting board and shred them with 2 forks. Discard the cooking liquid. Return the shredded chicken to the Dutch oven and set the pan over low heat. Add the Buffalo wing sauce and stir until the chicken is well coated. Keep the chicken warm. Halve the rolls you are using and place them on a baking sheet. Place the rolls under the broiler for about 2 minutes until they are lightly toasted. You could also use a toaster oven for this step if you prefer.

To assemble the sandwiches, divide the Buffalo chicken among the 4 grinder or sub roll halves. Top each half with plenty of ranch slaw and 2 tablespoons of the blue cheese crumbles, if using. Serve the sandwiches with additional ranch slaw on the side.


You have a lot of choices when it comes to making the sandwiches. You could use the boneless chicken thighs or you can use boneless chicken breasts if you prefer to have white meat or that is what you happen to have on hand that day. You can use any Buffalo wing sauce that you like, but you want to remember that you are using the wing sauce and not just regular hot sauce. Wing sauce is a little bit thicker than traditional hot sauce and does not have the high concentration of heat that just hot sauce has. I know Frank’s makes a good brand of wing sauce and I personally like Sweet Baby Ray’s myself, but you could naturally use any kind that you like. You could even make your own by combining some hot sauce, melted butter and cayenne pepper if you prefer to go that route. I left the blue cheese off the particular sandwiches I was making but they would go well since it is a Buffalo sandwich. As for the slaw, I thought it came out great. The dressing is much thicker than what you would find in a traditional mayonnaise-based coleslaw, which to me really helped to make it great. You get good ranch flavor thanks to all the spices that use and the nice mix of the cabbage, celery, carrot and red onion really helped to make it stand out. This would be a good coleslaw recipe to use for just about any sandwich that you like. I would definitely make these sandwiches again as they came together pretty quickly. Poaching them in the chicken broth and beer not only gave them great flavor but made the much easier to shred and pull apart.


That’s all I have for today. Check back next time for another recipe. Until then, enjoy the rest of your day and enjoy your meal!

buffalochickensub ranchslaw


2 Comments

Posted by on February 11, 2015 in Cooking, Dinner, Dressings, Lunch, Poultry, Salad, Sandwiches, Side Dishes


Tags: , , , , , ,

Serve Up Some Sicilian-Style Thick Crust Pizza

I know yesterday was National Pizza Day, but Monday is always my busiest day with work so I knew I was going to have time to post a new pizza recipe that I had tried out. I have made lots of different pizzas, sometimes with making my own dough and sometimes with store-bought dough and they have all turned out pretty well, though some are always better than others. Not long ago Sean had asked me if I ever thought about trying to make a Sicilian pizza instead of just regular pizza. I hadn’t had Sicilian pizza in quite a long time and had never made it myself before, but I was always willing to try and was waiting for the right recipe to come along to inspire me. Then along came this recipe from Cook’s Illustrated for Sicilian-style thick crust pizza and it seemed just right. I did have to pick up a couple of things I don’t normally have around, namely semolina flour and anchovies, but other than that I had everything else ready to go and gave it a try.

For the Dough:

2 1/4 cups (11 1/4 ounces) all-purpose flour

2 cups (12 ounces) semolina flour

1 teaspoon sugar

1 teaspoon instant or rapid-rise yeast

1 2/3 cups (13 1/3 ounces) ice water

3 tablespoons extra-virgin olive oil

2 1/4 teaspoons salt


For the Sauce:

1 (28-ounce) can whole peeled tomatoes, drained

2 teaspoons sugar

1/4 teaspoon salt

1/4 cup extra-virgin olive oil

3 garlic cloves, minced

1 tablespoon tomato paste

3 anchovy fillets, rinsed, patted dry, and minced

1 teaspoon dried oregano

1/4 teaspoon red pepper flakes


For the Pizza:

1/4 cup extra-virgin olive oil

2 ounces Parmesan cheese, grated (1 cup)

12 ounces whole-milk mozzarella, shredded (3 cups)

For the pizza dough: Using a stand mixer fitted with a dough hook, mix the all-purpose flour, semolina flour, sugar, and yeast on low speed until the ingredients are combined, about 10 seconds. With the machine running, slowly add the ice water and oil until the dough forms and no dry flour remains, about 1 to 2 minutes. Cover the bowl with plastic wrap and let the dough stand for 10 minutes.

 Add the salt to the dough and mix the dough on medium speed until the dough forms a satiny, sticky ball that clears the sides of bowl, about 6 to 8 minutes. Remove the dough from the bowl and knead it briefly on a lightly floured counter until it is smooth, about 1 minute. Shape the dough into a tight ball and place it in a large, lightly oiled bowl. Cover the bowl tightly with plastic wrap and refrigerate it for at least 24 hours or up to 48 hours.

 To make the sauce, process the tomatoes, sugar, and salt in a food processor until the mixture is smooth, about 30 seconds. Heat  the olive oil and garlic in a medium saucepan set over medium-low heat, stirring occasionally, until the garlic is fragrant and just beginning to brown, about 2 minutes. Add the tomato paste, anchovies, oregano, and pepper flakes and cook until the mixture is fragrant, about 30 seconds. Add the tomato mixture and cook, stirring occasionally, until the sauce measures 2 cups, about 25 to 30 minutes. Transfer the sauce to a bowl, let it cool, and refrigerate the sauce until it is needed.

 To make the pizza, one hour before baking the pizza, place a baking stone on the upper-middle rack and heat the oven to 500 degrees. Spray a rimmed baking sheet (including the rim) with vegetable oil spray, then coat the bottom of the pan with oil. Remove the dough from the refrigerator and transfer it to a lightly floured counter. Lightly flour the top of the dough and gently press it into a 12 by 9-inch rectangle. Using a rolling pin, roll the dough into a 18 by 13-inch rectangle. Transfer the dough to a prepared baking sheet, fitting the dough into the corners. Spray the top of the dough with vegetable oil spray and lay a sheet of plastic wrap over the dough. Place a second baking sheet on the dough and let it stand for 1 hour.

 Remove the top baking sheet and the plastic wrap. Gently stretch and lift the dough to fill the pan. Using the back of a spoon or ladle, spread the sauce in an even layer over the surface of the dough, leaving a 1/2-inch border. Sprinkle the Parmesan evenly over the entire surface of the dough to the edges followed by the mozzarella.

Place the pizza on the baking stone; reduce the oven temperature to 450 degrees and bake the pizza until the bottom crust is evenly browned and the cheese is bubbly and browned, about 20 to 25 minutes, rotating the pizza halfway through the baking process. Remove the pan from the oven and let it cool on a wire rack for 5 minutes. Run a knife around the rim of the pan to loosen the pizza. Transfer the pizza to a cutting board, cut it into squares, and serve.

You do need to plan this one a day or two ahead of time so he dough has a chance to rest properly. The two different flours do make a difference here as you get the thick crust that is more cake-like than chewy like you get with a thin crust. The anchovy adds some great flavor to the pizza sauce and overall the combination of the crust and sauce made this a really perfect pizza and one of the better Sicilian pies I have tried. It is worth the work to put into it if you like this type of pizza and don’t want to spend $20 on one from a pizza place. Unfortunately the pictures I took of the pizza seem to have gotten lost in cyberland somewhere between my phone and computer and I cannot find them anywhere, but if I do find it I will post them here. trust me, it looked really good.

That’s all I have for today. Check back next time for another recipe. Until then, enjoy the rest of your day and enjoy your meal!


Leave a comment

Posted by on February 10, 2015 in Cooking, Dinner, Pizza


Tags: , , , , , ,

39 Delicious Things You Can Make In A Skillet

39 Delicious Things You Can Make In A Skillet.

Skillet cooking is a great way to make use of that cast-iron skillet or stainless steel skillet and make a whole meal right in one pan on many occasions. Buzz Feed has put together 39 great skillet recipes to cover everything that you like and more to make delicious, easy meals. Check it out!


Tags: , , , , , , ,

A Heartwarming Winter Meal – Chicken Thigh and Italian Sausage Cacciatore

It doesn’t seem like it could actually get much colder or more miserable around this winter and February has only just begun. We have had enough snow already with more in the forecast for this week to go along with pretty frigid temperatures pretty much every day of the week for the last two weeks. When the weather gets like this, the thoughts of cooking meals, for me at least, turn to things that are warm, rustic and comforting. You want a meal that is going to make you feel warm all over when you eat it. This is the time of year when things like stews and soups are great, and this particular recipe turned out to be somewhat like a stew. I had seen the recipe from Guy Fieri on the Food Network not long ago and it made use of some of the basics around the house to produce a nice chicken thigh and sausage cacciatore so I thought I would give it a try.

Chicken Thigh and Italian Sausage Cacciatore

2 tablespoons olive oil

1 pound sweet Italian Sausage, cut into large pieces

6 chicken thighs, bone-in and skin-on

Kosher salt and freshly ground black pepper

1 cup sliced cremini mushrooms

1 cup frozen pearl onions, thawed

1 cup diced red bell peppers

1 head garlic, roasted

1/2 teaspoon red pepper flakes

1 cup dry red wine

1 cup chicken stock

1 cup marinara sauce

4 sprigs fresh thyme

2 sprigs fresh rosemary

2 tablespoons fresh flat-leaf parsley leaves

Preheat the oven to 350 degrees. Add the olive oil to a large Dutch oven set over medium-high heat and add the sausage pieces, searing them until they are browned all over, about 3 to 4 minutes. Remove the sausages to a plate and set them aside. Sprinkle the chicken thighs on both sides with salt and pepper, then sear the chicken in the Dutch oven, 4 to 5 minutes per side. Remove the chicken thighs to a plate and set it aside.

Add the mushrooms, pearl onions, red peppers, roasted garlic and the red pepper flakes to the pot and season them with salt and pepper. Saute the mixture until the vegetables are softened and the pearl onions become translucent, about 4 minutes. Add the red wine and bring the mixture to a boil, and then simmer for 5 minutes, deglazing the pan and scraping up any bits on the bottom of the pan.

In a large roasting pan add the browned sausages and the chicken thighs, the sautéed vegetables and the chicken stock and marinara sauce. Tie the thyme and rosemary into a bundle using butcher’s twine or kitchen twine and add it to the pan. Stir all of the ingredients together and transfer the roasting pan to the oven. Cook until the chicken thighs are cooked through and tender and the sauce has thickened, about 35 to 45 minutes. Remove the herb bundle and serve the cacciatore on a large serving platter, garnished with the parsley.

I did make a couple of changes to the recipe as I went along. I removed the skin from the chicken thighs as I thought it would get flabby during the cooking even after searing it and there was already enough fat in the dish from the sausage. I also used a mix of different colored peppers, using red, yellow and orange peppers. Finally I added some grape tomatoes along with the marinara sauce to give the dish a little more flair and fresh flavor. I loved the mix of the chicken and sausage and all of the vegetables together and I served this over rice and it was delicious. I think you could also serve this with pasta, noodles or even a risotto and it would be just as good and the leftovers tasted even better the next day for lunch with the flavors having a chance to meld even more.

That’s all I have for today. Check back next time for another recipe. Until then, enjoy the rest of your day and enjoy your meal!

chickenandsausagecacciatore


6 Comments

Posted by on February 7, 2015 in Cooking, Dinner, One Pot Meals, Poultry, Sausage


Tags: , , , , ,

21 Sandwiches for Your Game Day Spread | Serious Eats

21 Sandwiches for Your Game Day Spread | Serious Eats.

I have been really busy work and stuff around the house this week with Michelle leaving on a business trip so I haven’t had much time for blogging the last few days. I should be able to get back into a rhythm next week, but for now here are some more great Super bowl party ideas. If you are looking to try some great sandwiches for the big game, Serious Eats has put together 21 sandwich recipes to wow your crowd. Try them on game day or any time, because a good sandwich is always a great option. Check it out!


Tags: , , , , ,

A Week of Side Dishes, Part Two – Creamed Spinach

Okay, I know not everyone likes spinach and maybe you have tried to avoid it like the plague since you were a kid, but in my opinion I would much rather have spinach as a vegetable than a side of kale. I know it seems sacrilegious to say that about kale today since it is a “super food” and all, but there is just something about kale that I makes me rather have something else – like spinach. Surprisingly, we never had a problem getting Sean to eat spinach either and it ranks among the family favorites in vegetables. Besides, you can do a lot of things with it besides just steaming it. It is great raw in a salad or on sandwiches instead of lettuce and of course, one of the favorites around the holidays is always creamed spinach, which is the recipe I am posting today. I actually made this right around the holidays and forgot to post about it, but here it is today and it is easy enough where you can really make this any time of the year. This particular recipe comes from the Food Network’s Sunny Anderson and comes together pretty quickly in the oven and makes use of frozen spinach.

Creamed Spinach

4 tablespoons butter, plus more for the pan

1/2 red onion, chopped

Kosher salt and freshly ground black pepper

2 cloves garlic, minced

2 teaspoons red chili flakes

1 3/4 cups heavy cream

1 cup shredded Parmesan cheese

1 teaspoon ground nutmeg

1/2 cup sour cream

2 (10-ounce) packages frozen chopped spinach, thawed and squeezed dry

1/2 cup packaged fried onions

Preheat the oven to 375 degrees. Butter and 8 by 8-inch baking dish. Melt the butter in a large skillet set over medium-high heat. Add the chopped red onion and a pinch of salt. Saute the onion for about 3 minutes, then add the minced garlic and the red chili flakes and saute the mixture for 2 minutes more. Add the heavy cream, Parmesan cheese and the nutmeg. heat the mixture until the cream is just beginning to bubble, stirring often, about 3 to 4 minutes. Turn the burner off and stir in the sour cream and the spinach. Adjust the seasoning with salt and pepper as needed to taste. Pour the mixture into the prepared baking dish and sprinkle the top evenly with the fried onions. Bake the spinach until the top is golden and bubbly, about 15 to 20 minutes.

Granted this may not be the healthiest version of eating spinach out there but it does taste pretty good. It does seem a lot like the typical green bean casserole that you might also find around the holidays and the flavors will remind you of that. One thing you want to remember is to make sure to thaw and dry the frozen spinach as much as you can to get as much liquid out as possible otherwise you will end up with a very runny dish. I did leave out the red chili flakes in my recipe but if you like a little added heat to your dish you should put it in. You end up with a very creamy, tasty side dish that goes really well with just about any type of beef, poultry and pork meal. this also works well if you need to bring a side dish to a party or buffet dinner. Unfortunately, this is also one of those dishes that I neglected to take a picture of so I don’t have one to share with you as to how it came out. Sorry about that. I am trying better, I promise.

That’s all I have for today. Check back next time for another recipe. Until then, enjoy the rest of your day and enjoy your meal!

 
Leave a comment

Posted by on January 27, 2015 in Cooking, Dinner, Holidays, Side Dishes, Vegetables


Tags: , , , , , ,

A week of Side Dishes, Part One – Roasted Asparagus with Balsamic Glaze and Lemon Zest

As the snow starts to fall here as we get pummeled with the 1st blizzard of 2015 in my area of New York, I have been going through some of the recipes of things I have made lately and I realize I have a lot of side dishes that I have done recipes for that I have not posted on here yet. So I decided for this week I will post a different side recipe each day to give you some ideas of different things that you can try with your main dishes. The first one, from Williams-Sonoma, is for a roasted asparagus with balsamic glaze and lemon zest. Asparagus is one of our favorite vegetables around here so we do try to make use of it quite often and I have found that roasting it is one of my favorite ways to make it. The great thing about asparagus is that you can use it in a bunch of different ways and for several different kinds of meals. This one in particular can go pretty well with just about anything and is really simple to make any night of the week.


Roasted Asparagus with Balsamic Glaze and Lemon Zest

20 to 25 asparagus spears, tough ends removed

1/3 cup balsamic vinegar

1 tablespoon olive oil

1/2 teaspoon salt

1/2 teaspoon freshly ground black pepper

2 teaspoons grated lemon zest

Preheat the oven to 450°. Spread the asparagus in a baking dish large enough to hold them in a single layer. Drizzle the asparagus with the balsamic vinegar and the olive oil, and sprinkle them with salt and pepper. Turn the asparagus spears several times to make sure they are all coated evenly. Roast the asparagus for 10 minutes, turning them from time to time. Remove the asparagus from the oven, sprinkle the asparagus with the lemon zest and turn the spears several times. Return the asparagus to the oven and continue to roasted until the spears are crisp-tender and the color has darkened slightly, about 5 to 7 minutes more. Transfer the asparagus to a platter and serve immediately. Or, let the asparagus cool, then cover with aluminum foil and allow it to stand at room temperature for up to one hour before serving.


I find that when you roast asparagus it really brings out the great flavor of the vegetable and with this recipe the balsamic vinegar in the lemon zest really add some extra punch to the dish. I think this side dish goes really well with just about any type of beef that you might serve, but it also would work great with poultry, pork or fish. Many people often serve asparagus as part of an appetizer before the meal if you are serving a more elegant dinner or even serve asparagus as part of a brunch, and this recipe could work well for either situation. 25 asparagus spears might sound like a lot, but it really does not go very far and this recipe is perfect for 3 or 4 people. We did not even have any leftovers when I served this one myself. You can serve the asparagus warm right out of the oven or let it cool to room temperature, which is the way a lot of people like it. Personally I prefer it hot but it tastes great either way.


That’s all I have for today. Check back next time for another recipe. Until then, enjoy the rest of your day, stay warm and out of the snow, and enjoy your meal!

roastedasparagus


Tags: , , , , ,

 
National Day Calendar

Fun, unusual and forgotten designations on our calendar.

Jennifer Probst

a little bit naughty a little bit nice

Laissez Faire

Letting Life Lead

simple cooking recipes

a blog to share with you the best