RSS

Category Archives: Dinner

Jazzing up the Weeknight Burgers: Gourmet Diner Burgers

I make burgers about once a week, usually on Wednesday nights/ Wednesday is our busy day around here so it is a fast and easy meal that we all seem to like, but I have to admit that it can get a little boring after having it every week. I went looking for some ways to shake burger night up a little bit and then I came across this recipe from Giada De Laurentiis of the Food Network for some Gourmet Diner Burgers with some extra fixings.

Gourmet Diner Burgers

Zucchini Pickles:

1 pound zucchini, sliced into 1/4-inch thick rounds

3 sprigs fresh oregano

2 cups apple cider vinegar

1/3 cup sugar

2 teaspoons black peppercorns

1 teaspoon kosher salt

1 teaspoon fennel seed

1/2 teaspoon red pepper flakes

1 bay leaf

Parmesan Frico:

1 cup coarsely grated Parmesan cheese

1 tablespoon all-purpose flour

1/4 teaspoon freshly ground black pepper

Roasted Garlic Mayo:

1 garlic bulb

1 teaspoon olive oil

1 teaspoon kosher salt

1 cup mayonnaise

6 cloves roasted garlic

2 tablespoons lemon juice

2 teaspoons freshly chopped parsley

1 teaspoon freshly chopped oregano

1/2 teaspoon kosher salt

1/4 teaspoon freshly ground black pepper

Burger Patties:

1 1/2 pounds ground beef

1/2 pound ground lamb

1 tablespoon kosher salt

1 teaspoon freshly ground black pepper

3 tablespoons olive oil

Burgers:

6 hamburger rolls, halved

Extra-virgin olive oil, for drizzling

Roasted Garlic Mayo

6 Burger Patties

12 zucchini pickle slices

6 Parmesan Frico rounds

6 slices bacon

1 onion, diced and sautéed

For the pickles: Place the zucchini slices and oregano in a large jar or heat-safe container. Heat the apple cider vinegar, sugar, peppercorns, salt, fennel seed, red pepper flakes and bay leaf in a medium saucepan, stirring until the sugar and salt have dissolved, about 2 minutes. Pour the pickling liquid and spices into the jar over the zucchini slices. Let the mixture cool completely, uncovered. Cover and place the container in the refrigerator for at least 24 hours and store for up to 6 weeks.

For the Parmesan frico: Place an oven rack in the center of the oven and heat the oven to 375 degrees. Line a baking sheet with parchment paper. Toss the Parmesan cheese, flour and pepper together in a large bowl, making sure the flour is evenly distributed throughout the cheese. Arrange mounds of 2 tablespoons of the cheese about 4 inches apart on the baking sheet and flatten each mound slightly with a spatula to form a 3-inch round. Bake the frico in the oven until they are golden brown, about 10 minutes, rotating the baking sheet halfway through the baking process. Cool the frico on the baking sheet for 2 minutes, then gently transfer to a wire rack to cool completely.

For the Roasted garlic mayonnaise: Preheat the oven to 400 degrees. Cut the garlic bulb in half cross wise and place the halves on a sheet of aluminum foil. Drizzle each side with 1 teaspoon of olive oil and sprinkle with 1 teaspoon of kosher salt. Fold up the foil around the garlic halves and then seal the foil into an airtight package. Roast the garlic until it is golden and soft, about 1 hour.

Stir together the mayonnaise, roasted garlic cloves, lemon juice, parsley, oregano, salt and pepper until well blended.

For the patties: In a large bowl, combine the beef, lamb, salt and pepper. Form the mixture into six 4-inch diameter patties, each about 1/2-inch thick. Drizzle the patties with olive oil. Place a grill pan or skillet over medium-high heat. Grill the patties until they are cooked through, about 4 to 5 minutes per side. Allow the patties to rest for 5 minutes.

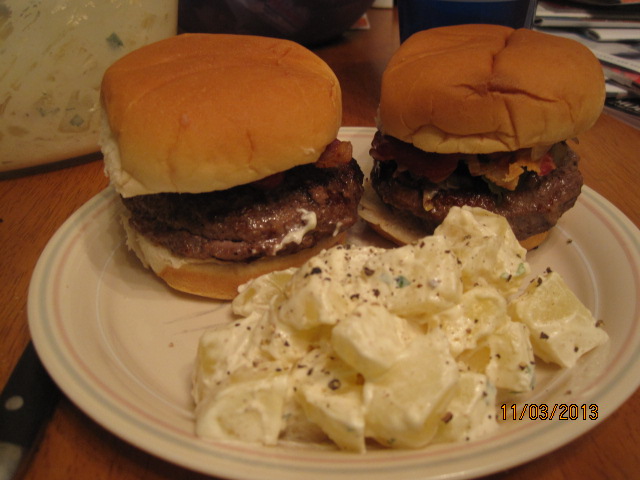
To assemble the burgers: Drizzle the cut side of the hamburger rolls with olive oil and lightly toast on the grill pan, about 1 to 2 minutes. Spread the garlic mayo over the bottom halves of the rolls. Place the burger patties on the rolls and top each patty with 4 pickle slices, 1 frico round, the sautéed onions and a slice of bacon.

There is some prep work ahead of time that you can do for these if you want the zucchini pickles, and they do taste good, but if you don’t want to put the time into them you can just use regular store-bought pickles instead. Sean and Michelle absolutely loved the Parmesan frico and thought it was great with the burgers and without them. I think it would make a nice appetizer or side for a lot of other meals. As for the burgers themselves, I really liked the flavor and texture you get from having the beef mixed with the lamb. The burgers had a nice, unique flavor and I made some extra and froze them so we can have them again another night. I served the burgers with some homemade potato salad, which is always a favorite around here.

That’s all I have for today. Check back next time for some more recipes. I have been gathering lots of Thanksgiving sides and ideas to make, so keep watching for them. Until next time, enjoy the rest of your day and enjoy your meal!

006 004 005

 
Leave a comment

Posted by on November 5, 2013 in Beef, Cooking, Dinner, Grilling, Side Dishes


Tags: , , , , , , , ,

An Alton Brown Special – Slow Cooker Pepper Pork Chops

Alton Brown’s recipes are always among my favorites. He seems to take the time to make sure everything is going to be cooked just right so that you get the best taste and flavor out of your dish. This was particularly true of the dinner I made last night that uses his recipe for slow cooker pepper pork chops. Granted, part of the dish is actually made on the stove top before it makes its way over to the slow cooker, but this helps you to get great browning for the pork chops and onions before they go into the slow cooker to get that falling-off-the-bone flavor and texture to them. There is some prep work that needs to go into this one beforehand, which includes brining the pork chops for 24 hours, but it is well worth the effort.

Slow Cooker Pepper Pork Chops

2 cups vegetable broth or water

1/2 cup kosher salt

1/2 cup light brown sugar

2 tablespoons black peppercorns, slightly crushed

1 pound ice

4 (1 to 1 1/2-inch thick) bone-in pork chops

2 teaspoons kosher salt

1/3 cup dried apple slices

2 tablespoons olive oil

1 large onion, julienned

1 1/2 cups chicken broth

1 tablespoon coarsely ground black pepper

1 teaspoon dried thyme

Combine the vegetable broth, 1/2 cup of kosher salt, brown sugar and the crushed peppercorns in a medium saucepan and set it over medium-high heat. Cook just until the salt and sugar have dissolved then remove the mixture from the heat and add the ice to the saucepan. Place the pork chops in a large zip-top plastic bag along with the mixture and seal the bag. Place the bag in a plastic container and refrigerate the pork chops overnight.

Remove the chops from the brine, rinse and pat them dry. Season both sides of the chops with kosher salt and set them aside.

Place the apple slices in the slow cooker. Heat 1 1/2 tablespoons of the olive oil in a large saute pan or skillet over medium-high heat. Saute the pork chops on both sides until they are golden brown, about 5 to 6 minutes per side. Once they are browned, place the pork chops into the slow cooker on top of the apple slices.

Add the remaining 1/2 tablespoon of olive oil to the saute pan followed by the onions ans saute the onions until the begin to brown, about 3 to 4 minutes. Add the chicken broth to the pan to deglaze. Add the black pepper and the dried thyme and stir the mixture to combine. Transfer the entire mixture to the slow cooker, set the slow cooker to high, cover and cook for 1 1/2 hours. Decrease the heat to low and continue cooking for another 4 1/2 hours or until the pork is tender and falling away from the bone. Serve.

The brine really helps to add some great flavor to the pork. If you aren’t a big fan of pepper, you might want to skip this one because the pepper flavor from the brine certainly permeates the pork well. I thought it had fantastic flavor and loved the taste of the pepper with the onions and apples. I served this with some simple white rice and I also made a mashed butternut squash, which was a great side dish for the pork and one that you can easily use as a side dish for your Thanksgiving plans. I’ll be posting the recipe for that dish tomorrow.

That’s all I have for today. Check back next time for more recipes. I am working on a lot of things, including a bunch of dishes that are perfect for Thanksgiving that I will be highlighting throughout the month of November. Michelle’s birthday is at the end of this coming week, so we’ll be doing some Thanksgiving dishes for her birthday since I am not cooking at home this holiday. I’ll also be trying my hand at her birthday cake this year, so we’ll see how that turns out as well. Keep checking to see what is next. Until next time, enjoy the rest of your day and enjoy your meal!

001

 
2 Comments

Posted by on November 2, 2013 in Cooking, Dinner, Pork, Slow Cooker Meals


Tags: , , , ,

A Chinese Takeout Classic at Home – Gong Bao Chicken with Peanuts

Let’s face, we all love the convenience and taste of most Chinese takeout. There is nothing quite like getting an egg roll, some fried rice and one of a dozen or so classic Chinese takeout meals to make things easy and tasty on a weeknight or weekend. I admit we get Chinese takeout about once a month now, mainly because I have found that anything that we really like I can make at home and have it cost a lot less and often times taste better and fresher.I had come across this recipe in the New York Times a while back for a classic Chinese menu meal of Gong Bao chicken with peanuts. This one is so easy to make and only takes a few minutes of your time and you can have a meal that tastes better than your favorite takeout.

Gong Bao Chicken with Peanuts

For the Chicken:

2 boneless, skinless chicken breasts

3 garlic cloves

1-inch section of fresh ginger, peeled

5 scallions, white parts only

4-6 dried chiles

2 tablespoons vegetable oil

1 teaspoon Sichuan pepper

1/3 cup roasted peanuts

For the Marinade:

1/2 teaspoon salt

2 teaspoons light soy sauce

1 teaspoon dry sherry or dry vermouth

1 1/2 teaspoons cornstarch

For the Sauce:

1 tablespoon sugar

3/4 teaspoon cornstarch

1 teaspoon dark soy sauce

1 teaspoon light soy sauce

1 tablespoon balsamic vinegar

1 teaspoon sesame oil

1 tablespoon chicken stock or water

Cut the chicken as evenly as possible into half-inch strips, then cut the strips into small cubes. Place the chicken in a small bowl. Add all of the marinade ingredients and 1 tablespoon of water to the bowl with the chicken. Mix well and set the bowl aside.

Peel and thinly slice the garlic and the ginger. Chop the scallions into chunks as long as the chicken cubes so they match in diameter. Snip the chiles in half or into sections, discarding the seeds.

In a small bowl, combine all the sauce ingredients and mix well.

Heat a large skillet over high heat. Add the vegetable oil, chiles and Sichuan pepper and stir-fry briefly until the chiles are darkening but not burned. Remove the skillet from the heat if necessary to prevent the pan from overheating.

Quickly add the chicken and stir-fry it over high heat, stirring frequently. As soon as the chicken cubes have separated, add the ginger, garlic and scallions and continue to stir-fry everything until the garlic and ginger are fragrant and the chicken is just cooked through, about 2 or 3 minutes. You can test one of the larger pieces of chicken to be sure it is done.

Give the sauce a stir and add it to the ingredients in the skillet, continuing to stir and toss the mixture. As soon as the sauce has become thick and shiny, add the peanuts, stir into the mixture and remove the skillet from the heat. Serve.

There are a few things about this dish. First, if you can’t find Sichuan pepper (and it may not be readily available), there is a Sichuan oil that you can get instead to use. It doesn’t add any heat to the dish but has a lemony flavor to it. you can always omit it from the dish if you can’t locate anything else. The peppercorns are often used in Chinese five spice powder. The same goes for the dried chiles. My family does not like things very hot, so I simply went with red bell peppers and added some chili oil for a little bit of heat. One thing you do need in this dish is the peanuts. Michelle and I both agreed the peanuts made the dish. They add great crunch and flavor. You can buy already roasted peanuts in the store or you can roast your own in a 250 degree oven for 15 to 20 minutes. Just watch them closely because they can burn pretty easily. I stir-fried some green beans, mushrooms and carrots in a separate skillet so we had some vegetable with the meal and also served it with white rice. I loved the flavor of the sauce and marinade and the peanuts really gave a lot to the dish.

That’s all I have for today. Check back next time for some more recipes. I had hoped to get some Halloween stuff together, but it just didn’t happen with other things going on around here, so maybe next time. however, I did make some homemade peanut butter cups which I will share next time. Until then, enjoy the rest of your day and enjoy your meal and have a happy Halloween!

004 003


Leave a comment

Posted by on October 31, 2013 in Cooking, Dinner, One Pot Meals, Poultry, Sauce


Tags: , , , ,

More Fun With Homemade Pizza Dough – Stromboli and Breadsticks

I still had some pizza dough leftover from what I made recently and decided to put it to use last night. I had made a pot of turkey chili, one of Michelle’s favorites but one of Sean’s least favorites. Michelle and I both like it but Sean is not a big fan and was looking for something else to eat. I decided to make use of some leftover items such as the pizza dough and sausage and make a stromboli. I have made one before using Scott Conant’s recipe and it was very good, but I decided to try something a little different this time and gave this one from Emeril Lagasse a shot.

Stromboli

1 pizza dough portion from the Food Processor Pizza Dough recipe

1/4 pound sweet or hot Italian sausage, removed from casings and crumbled

1/2 cup sliced onions

1/4 cup thinly sliced red bell peppers

1/4 cup thinly sliced yellow bell peppers

1 tablespoon minced garlic

1/2 teaspoon Italian seasoning

1/4 pound sliced ham

1/4 pound thinly sliced pepperoni

1 cup grated mozzarella cheese

1 cup finely grated Parmesan cheese

1 large egg, beaten with 1 tablespoon of water

Preheat the oven to 375 degrees. Oil a large baking sheet or place a baking stone in the oven to heat.

In a large skillet, cook the sausage over medium-high heat until browned and the fat is rendered, about 5 minutes. Remove the sausage with a slotted spoon and drain well on paper towels. Discard all but 1 tablespoon of the fat from the skillet. Add the onions and bell peppers and cook, stirring, until very soft, about 4 to 5 minutes. Add the garlic and Italian seasoning and cook, stirring, for 1 minute. Remove the skillet from the heat and allow the mixture to cool.

Punch down the dough and on a lightly floured surface roll the dough out into a large rectangle, about 10 inches by 14 inches. Spread the cooled sausage mixture across the dough, leaving a 1-inch border on the edges. Overlapping slightly, layer the ham, pepperoni, mozzarella and half of the Parmesan cheese over the top of the sausage mixture. Using a pastry brush, paint the border of 1 long edge with the egg wash. Starting at the opposite long end without the egg wash, roll up the dough into a cylinder, pinching the edges to seal. Place on the prepared baking sheet and allow the dough to rise for 20 minutes.

Brush the top of the stromboli with the egg wash. Bake until nearly golden brown and starting to crisp, about 20 minutes. Sprinkle the top of the stromboli with the remaining Parmesan cheese and return it to the oven until the cheese is melted and the dough is golden brown, about 5 minutes. Remove from the oven and allow the stromboli to stand for 10 minutes. Slice thickly and serve.

The great thing about stromboli is that you can really put anything inside it. Sean is not a big fan of the peppers, so I left them out and put some extra ham and cheese inside instead. You could just as easily put leftover chicken in there or any other vegetables you may like and have on hand. You can even just do vegetables and cheese if that is what you prefer. I am guessing Sean liked it since he devoured it.

Since I still had a little bit of pizza dough left, I decided to make some small breadsticks with what I had leftover. This is a very simple way to make use of some leftover pizza dough if you happen to have some around.

Homemade Breadsticks

1 portion pizza dough from the Food Processor Pizza Dough recipe

1 tablespoon olive oil

1/2 teaspoon Italian seasoning

1/4 cup grated Parmesan cheese

Place the pizza dough on a lightly floured surface. Line a baking sheet with parchment paper and spray it with cooking spray. Preheat the oven to 425 degrees.

Roll the dough into a rectangle and cut the dough into 12 to 15 thin strips. Place the strips on the baking sheet and cover the dough with a towel and allow it to rise for 20 minutes.

Sprinkle the olive oil over the dough to coat the breadsticks. Sprinkle the breadsticks with the Italian seasoning and the Parmesan cheese and bake in the oven until they are golden brown, about 10-12 minutes.

You can use the breadsticks to go along with any type of meal, like spaghetti and meatballs or any other dish that you like. Michelle and I used them with our chili and they were quite tasty. They came out perfectly with just the right amount of seasoning.

That’s all I have for today. Check back next time for some more recipes to try. Until then, enjoy the rest of your day and enjoy your meal!

003 001 002


Leave a comment

Posted by on October 29, 2013 in Breads, Cooking, Dinner, One Pot Meals, Pizza, Side Dishes


Tags: , , , , , ,

Outrageous Oven-Baked Spare Ribs with Porter Beer Mop

Spare ribs are one of my favorite things to make no matter what time of year it may be. If the weather doesn’t cooperate or it’s too cold to use the grill outside, baking ribs in the oven can be just as good, if not better, than grilled ribs. I found this recipe from the Food Network’s Amy Thielen, who does a show called “Heartland Table,” for a very unique style of making ribs in the oven with a different glaze to them. I have made ribs in the oven many times in different ways, but this particular glaze she uses really intrigued me so I thought I would give it a try.

Oven-Baked Spare Ribs with Porter Beer Mop

6 pounds spare ribs, on the bone

1 teaspoon salt

1 teaspoon ground black pepper

1 teaspoon dried thyme

4 dried red chiles

1-inch knob fresh ginger root

1/2 to 1 fresh Serrano chile (depending on the amount of heat you desire), stem discarded

1/2 medium onion, cubed

4 inches fresh ginger root, peeled and sliced

1 teaspoon salt

2 tablespoons butter

1 bottle porter beer

1/4 cup molasses

1/4 cup brown sugar

2 tablespoons maple syrup

2 tablespoons minced fresh cilantro

Zest and juice of 1 lime

For the ribs, preheat the oven to 325 degrees.

Trim any gristle from the ribs and cut them into two-rib portions. Rub each piece with salt, and sprinkle with black pepper and thyme. Arrange the ribs in a large roasting pan, add 1/4 cup of water, the dried chiles, and the ginger, cover the pan tightly with aluminum foil and bake until the ribs are tender when poked with a fork, about 3 hours.

For the porter beer mop, in a food processor, combine the Serrano chile, onions, ginger and salt and process until the mixture is smooth.

Heat a large saute pan over medium heat and add the butter. Add the onion mixture to the pan and cook, stirring often, until it is caramelized, a shade darker and fragrant, about 10 minutes. Add the porter beer, molasses, brown sugar and maple syrup and cook at a simmer until the mixture thickens but is still saucy, about 10 to 15 minutes. Add the cilantro, lime zest and lime juice and stir.

To glaze the ribs, raise the oven temperature to 450 degrees. Brush the mop on both sides of the ribs and re-apply the mop until you have used it all and the ribs are well coated with a shiny black glaze. Bake uncovered for about 10 minutes before serving.

A couple of things about this recipe. You could use beef or pork ribs for this recipe depending on what you have on hand or prefer. I used pork ribs even though the recipe called for beef and I think they turned out great. Also, if you don’t want the added heat of the dried chiles or the Serrano chile, you could easily omit them or substitute a milder pepper that you prefer. I actually used chili powder in with the ribs instead of the dried chiles and used a jalapeno in the mop and everything was fine with me. You can really get a nice taste from the ginger baking with the ribs and the ginger in the mop and you can certainly taste the beer in the mop as well, so if you like the flavor of a good porter than this one is for you. I served this simply with some white rice and steamed green beans, but some homemade baked beans or cornbread would go really well with this meal as well. I would certainly use this recipe again. One more thing – the recipe is to serve 8 so it is a lot of ribs. You could cut down the portions accordingly to fit a smaller group if you like, or just have lots of leftovers for another meal.

That’s all I have for today. Check back next time for some more recipes. I have a bunch of things lined up for this week, including a couple of Halloween ideas for snacks and food, so watch for those. Until next time, enjoy the rest of your day and enjoy your meal!

002 001

 
Leave a comment

Posted by on October 28, 2013 in Cooking, Dinner, Pork, Sauce


Tags: , , , , , ,

Better Than Delivery: Food Processor Pizza Dough and a Couple of Pizzas

Very often when I make pizza at home I use a store-bought dough to make life a little bit easier for me. I have bought the dough and sometimes a pre-made pizza crust so we can have a quick meal. Recently I came upon recipes both from Williams-Sonoma and America’s Test Kitchen that made pizza dough right in the food processor with minimal ingredients and no real kneading at all, making it very easy to make your own dough at home. I actually ended up combining the two recipes somewhat to make my own pizza dough for this one. The America’s Test Kitchen recipe used bread dough, which I liked, but made too many pizza crusts for me, so I combined it with the Williams-Sonoma recipe to get what I wanted.

Food Processor Pizza Dough

1 tablespoon active dry yeast
1 teaspoon sugar
1 cup warm water (105° to 115°F)
3 cups bread flour
1 teaspoon salt
2 tablespoons extra-virgin olive oil

In a small bowl, dissolve the yeast and sugar in the warm water and let stand until foamy, about 5 minutes.

In the bowl of a food processor fitted with the dough blade, combine the flour and salt and process with 3 or 4 pulses. With the motor running, slowly add the yeast mixture, allowing each addition to be absorbed before adding more. Continue processing until the dough forms a ball and cleans the sides of the bowl, about 1 minute, then process for 1 minute more.

Coat the inside of a large bowl with the olive oil and place the dough in the bowl. Cover with a clean kitchen towel and let the dough rise in a warm place until doubled in size, about 1 1⁄2 hours. Divide the dough in half and roll out as directed in the pizza recipe.

This recipe makes two 12-inch pizzas, which was perfect for my needs. It was very simple and didn’t take long at all. I was then able to move on to the pizzas. The first pizza I made was a simple cheese pizza, since that is all Sean really likes anyway.
Classic Cheese Pizza
1 Food processor pizza dough
Flour for the counter
1 recipe Pizza Sauce (to follow)
1 cup mozzarella cheese, shredded
1 tablespoon Parmesan cheese
Adjust an oven rack to the lower-middle position, place a baking stone on the rack and heat the oven to 500 degrees. Let the baking stone heat for at least 30 minutes.
Meanwhile, turn the dough out onto a lightly floured counter and shape it into a smooth, round ball and cover it with plastic wrap. Allow it to rest at room temperature for 20 to 30 minutes.
Uncover the ball of dough and stretch and shape the dough into a 12-inch round on a piece of parchment paper. Spread 1 cup of pizza sauce over the dough, leaving a 1/2-inch edge of dough uncovered. Sprinkle the mozzarella cheese and the Parmesan across the pizza to cover it. Lightly brush the edges of the pizza dough with some olive oil.
Slide the parchment paper and pizza onto a rimless or inverted baking sheet, then slide it onto the hot baking stone. Bake until the crust edges brown and the cheese is golden in spots, about 8 to 13 minutes.
Transfer the pizza to a cutting board, discarding the parchment paper. Cut the pizza into 6 or 8 wedges and serve.
I rolled out he pizza dough with a rolling pin instead of working it by hand. I just seem to have better luck working with the dough this way so I went with it, but do what you are most comfortable with. The crust came out great, though I probably kept the cheese pizza in for a minute or two too long as it browned a bit more than I would have liked, but Sean didn’t seem to care since he devoured all of the pizza. The pizza sauce recipe itself is quite simple:
Basic Pizza Sauce
2 tablespoons extra-virgin olive oil
2 garlic cloves, minced
1 (28-ounce) can crushed tomatoes
Salt and pepper
Heat the oil and garlic in a medium saucepan over medium heat until the garlic is sizzling, about 1 1/2 minutes. Stir in the tomatoes and simmer until the sauce is thickened, about 15 minutes. Season with salt and pepper to taste.
I made a second pizza, but decided to try things a little bit differently and went for a sausage and pepper pan pizza instead of using the baking stone.
Sausage and Pepper Pan Pizza
1 Food processor pizza dough
2 links Italian sausage, cooked and sliced 
1 yellow bell pepper, seeded and cored, sliced thin
1 cup Basic tomato sauce
1 cup mozzarella cheese, shredded
1 teaspoon dried oregano
Adjust an oven rack to the lower-middle position and preheat the oven to 400 degrees. Lightly coat a 9-inch cake pan with 1 tablespoon of olive oil or coat the bottom of an ovensafe skillet with 1 tablespoon of olive oil.
Lightly roll the dough into a smooth ball. Roll and shape the dough into a 9-inch round and press it into the oiled pan or skillet. Cover the pan with plastic wrap and set it in a warm spot (not in the oven) until puffy and slightly risen, about 20 minutes.
Remove the plastic wrap from the dough and ladle the tomato sauce on the pizza dough, leaving a 1/2-inch border around the edges. Sprinkle the pizza with the mozzarella cheese and then top it with the sliced Italian sausage and the bell pepper. Sprinkle the top with the dried oregano. Bake the pizza in the oven until the cheese is melted and the sausage is browning around the edges, about 20 minutes. Remove the pizza from the oven and allow it to rest for 1 minute in the pan. Using a spatula, transfer the pizza to a cutting board and slice into the desired amount of wedges.
I really liked the thick crust that came out with the pan pizza and I love the sausage and peppers on a pie, so it worked out well for me. I actually used red, yellow and orange pepper on my pizza since I had some small sweet peppers on hand. Since Sean was full from eating the other pizza, There was plenty leftover so I can have some for lunch today.
That’s all I have for today. Check back next time for some more recipes. There is still plenty to come – a classic Chinese chicken takeout recipe, some oven barbecued ribs, cinnamon buns, and more. Until next time, enjoy the rest of your day and enjoy your meal!
002 001
 
6 Comments

Posted by on October 25, 2013 in Cooking, Dinner, Pizza


Tags: , , , , , , , ,

Swift and Simple Glazed Salmon

Salmon is one of those meals I don’t make very often but I really should make more of it. It is very good for you, but Michelle really only likes the Wild salmon, which does have a different taste and look than that of farm-raised salmon and tends to cost quite a bit more. For this reason, I really only get some when I notice it on sale and looking particularly good. This was the case recently when I saw some at Adam’s Farm and picked up a pound for us to have for dinner. The great thing about fish meals is that they take almost no time at all to prepare, and this simple dish from Cook’s Illustrated is no exception and gives the salmon a great Asian flavor.

Glazed Salmon

1 teaspoon packed light brown sugar

1/2 teaspoon kosher salt

1/4 teaspoon cornstarch

1 (1 1/2 – 2-pound)skin-on salmon fillet

Pepper

1 teaspoon vegetable oil

1 recipe Asian Barbecue Glaze (to follow)

Asian Barbecue Glaze:

2 tablespoons ketchup

2 tablespoons hoisin sauce

2 tablespoons rice vinegar

2 tablespoons packed light brown sugar

1 tablespoon soy sauce

1 tablespoon toasted sesame oil

2 teaspoons Asian chili-garlic sauce

1 teaspoon grated fresh ginger

For the Asian barbecue glaze, whisk all the ingredients together in a small saucepan. Bring the mixture to a boil over medium-high heat; simmer until it is thickened, about 3 minutes. Remove from the heat and cover the saucepan to keep the glaze warm until use.

For the salmon, adjust an oven rack to the middle position and preheat the oven to 300 degrees. Combine the brown sugar, kosher salt and cornstarch together in a small bowl. Use a sharp knife to remove any whitish fat from the belly of the salmon and then cut the fillet into 4 equal portions. Pat the fillets dry with paper towels and season with pepper. Sprinkle the brown sugar mixture evenly over the top of the flesh side of the salmon fillets, rubbing it to distribute it evenly.

Heat oil in a large, oven-safe nonstick skillet over medium-high heat until it is just smoking.  Place the salmon, flesh side down, in the skillet and cook until it is well browned, about 1 minute. Using tongs, carefully flip the salmon and cook it on the skin side for about 1 minute.

Remove the skillet from the heat and spoon the Asian barbecue glaze evenly over all the salmon fillets. Transfer the skillet to the oven and cook until the fillets register 125 degrees (for medium-rare) and are still translucent when cut into with a paring knife, about 7 to 10 minutes. Transfer the fillets to a serving platter or individual plates and serve.

The brown sugar on the salmon helps it develop a nice crust when you first sear it while the cornstarch helps the glaze to adhere nicely to the fish. You end up with a beautiful pink salmon with just a nice crust and a great glaze to top it off. The whole meal can be cooked in about 20 minutes. I served this with white rice and spinach, though I also had a bit of the leftover Fall vegetable risotto with mine instead of the white rice. It was very good and simple enough to make anytime you have salmon and just want a quick and easy meal.

That’s all I have for today. Check back next time for some more recipes. Until then, enjoy the rest of your day and enjoy your meal!

001

 
Leave a comment

Posted by on October 22, 2013 in Cooking, Dinner, Sauce, Seafood


Tags: , , ,

Meals with Family and Friends Part 4 – Pan-Seared Rib Eye Steaks with Red Wine Sauce

One of my favorite meals to eat is just a simple steak dinner. Of all the cuts, I have to say that I think my favorite of all is the rib eye. it has a little more fat than some other cuts, but this does help to give it tremendous flavor and when it is cooked just right it melts when you cut it. Serve it with a nice pan sauce and a couple of good sides and you can have an elegant meal any night of the week. I made some steaks last night when we had a friend visiting and chose to make some nice rib eye steaks I had picked up at. I just followed this simple recipe from Cook’s Illustrated and made a nice pan sauce to go on the side.

Simple Pan-Seared Steaks

1 tablespoon vegetable oil

4 (8 to 10-ounce) boneless strip steaks or rib eye steaks, 1 to 1 1/4 inches thick

Salt and pepper

1 pan sauce recipe (to follow)

Heat the vegetable oil in a large skillet over medium-high heat until just smoking. Meanwhile, pat the steaks dry with paper towels and season both sides of the steaks with salt and pepper.

Lay the steaks in the pan, leaving 1/4 inch between them. Cook, without moving the steaks, until they are well browned, about 4 minutes. Using tongs, flip the steaks and continue to cook until the meat registers 115  to 120 degrees (for rare) or 120 to 125 degrees (for medium-rare), about 3 to 7 minutes. Transfer the steaks to a serving platter and tent them loosely with aluminum foil to rest while you prepare the pan sauce, if using.

Very, very simple. My preference is always to cook the steaks to about medium so they are still nice and pink inside. Letting them rest while you make the pan sauce will help them come up to just the right temperature and doneness. This particular sauce I made does require a little preparation beforehand, so you can make the wine reduction earlier before you cook the steaks.

Red Wine Pan Sauce

Wine Reduction:

1 small carrot, peeled and chopped fine (about 2 tablespoons)

1 small shallot, minced (about 2 tablespoons)

2 medium white mushrooms, chopped fine (about 3 tablespoons)

1 bay leaf

1 tablespoon chopped fresh parsley

1 cup red wine

Sauce:

1 medium shallot, minced (about 2 tablespoons)

1/2 cup chicken broth

1/2 cup beef broth

3 tablespoons butter, cut into 6 pieces

1/2 teaspoon fresh thyme leaves

Ground black pepper

Salt

For the red wine reduction, heat the carrot, shallot, mushrooms, bay leaf, parsley and wine in a large nonstick skillet over low heat; cook, without simmering (the liquid should be steaming but not bubbling) until the entire mixture is reduces to 1 cup, about 15 to 20 minutes. Strain the mixture through a fine-mesh strainer and return the liquid (about 1/2 cup) to a clean skillet. Continue to cook the liquid over low heat, without simmering, until the liquid is reduced to 2 tablespoons, about 15 to 20 minutes longer. Transfer the reduction to a bowl.

For the sauce, follow the recipe for the Pan-Seared Steaks, transferring the plate with the steaks to a 200 degree oven to keep them warm. To the same skillet used to make the steaks (do not clean the skillet or discard any accumulated fat), add the shallot and cook over low heat until softened, about 1 minute. Turn the heat to high; add the chicken and beef broths. Bring the mixture to a boil, scraping up any browned bits on the pan bottom with a wooden spoon until the liquid is reduced to about 2 tablespoons, about 6 minutes. Turn the heat to medium-low, gently whisk in the reserved wine reduction and any accumulated juices from the plate with the steaks. Whisk in the butter, one piece at a time, until it is melted and the sauce is thickened and glossy; add the thyme and season with salt and pepper to taste. Spoon the sauce over the steaks and serve.

The red wine sauce for the steaks turned out very nice and adds some great flavor to the steaks. Of course, you can always skip the sauce completely and just go with the steaks, but I think it added something quite nice to the meal. I served the steaks with the fall vegetable risotto recipe I posted last week and some pan roasted asparagus and sautéed spinach,  a recipe I will post later this week. For dessert that night, we also had the fallen chocolate cake that we have made before to completely round out the meal.

That’s all I have for today. Check back next time for some more recipes. I raided the freezer this weekend and took some things out to make this week, so look for recipes using wild salmon, pizza dough, Italian sausages, boneless chicken breasts and some spare ribs, among others. Until next time, enjoy the rest of your day and enjoy your meal!

001

 
2 Comments

Posted by on October 21, 2013 in Beef, Cooking, Dinner, Sauce


Tags: , , , , , , ,

Meals with Family and Friends, Part 3 – Fall Vegetable Risotto

As I have said in previous posts, we did some entertaining over the last couple of weeks so it gave me the opportunity to try out some new recipes. One thing I made when we had a friend over for dinner was a nice gluten-free dish of Fall vegetable risotto. I have gotten more ambitious lately in trying to make risotto and I think for the most part it has turned out pretty well with good results. There is some work and care that needs to go into the dish, but the results are quite worth it. This original recipe is from Williams-Sonoma, though I did alter it slightly and omitted the blue cheese from the recipe and substituted Parmesan cheese instead. We’re not big blue cheese eaters here in our house, but I have included it in the original recipe here.

Fall Vegetable Risotto

5 cups chicken or vegetable broth

10 ounces Brussels sprouts, ends trimmed, quartered lengthwise

2 tablespoons olive oil

1 large onion, finely chopped

1/4 pound shitake mushrooms, stems removed, sliced

Coarse kosher salt and freshly ground black pepper

1 1/2 cups arborio rice

1/2 cup dry white wine

1/2 cup gorgonzola or other blue cheese, crumbled

1/2 cup walnut pieces, toasted (optional)

in a saucepan, bring the chicken or vegetable broth to a boil. Add the Brussels sprouts and cook until they are a bright green color and almost tender, about 4 minutes. Using a slotted spoon, transfer the Brussels sprouts to a bowl and set aside. Reduce the heat on the broth to low.

In a heavy medium saucepan over medium-high heat, warm the olive oil. Add the onion and saute until it is a golden brown, about 5 minutes. Add the mushrooms, sprinkle with salt and pepper, reduce the heat to medium, and cook, stirring frequently, until they begin to soften, about 3 minutes. Add the arborio rice and stir until the rice turns opaque, about 1 minute. Add the wine and stir until it is absorbed. Add about 3/4 cup of the warmed broth and adjust the heat so the liquid bubbles and is absorbed slowly. Cook, stirring frequently, until all the liquid is absorbed. Continue cooking, adding the broth about 3/4 cup at a time and stirring frequently until the rice is just tender but slightly firm in the center and the mixture is creamy, about 20 minutes. Mix in the Brussels sprouts, blue cheese and a generous amount of pepper. Taste and adjust the seasoning as necessary.

Spoon the risotto into warmed shallow bowls or plates, sprinkle with the walnuts (if using), and serve.

A couple of notes about this recipe. As I stated, I used Parmesan instead of a blue cheese and I think the results were fine. I also omitted the walnuts as well but feel free to add them in if you like them and want the added crunchy texture. I also substituted water for the white wine in the recipe and it was fine. Finally, I could not get my hands on any shitake mushrooms locally so I just used sliced white mushrooms instead. I think they worked out well though if you can get shitakes, I would use them as I like the look and flavor of them myself. The risotto came out nicely and was very creamy. I loved the flavor of the Brussels sprouts in the mix and everyone seemed to enjoy the dish, I actually used this as a side dish to the meal, but this  could be a meal all on its own if you were going for a meat free meal and just serve this with a salad on the side and I think it would be nice. It could then be vegetarian if use vegetable broth and gluten-free.

That’s all I have for today. Check back next time for another recipe. There is still plenty more to come, as always. Thanks for following along and if you ever have any questions or comments, feel free to leave a comment here, or send me a message on Facebook or Twitter or at my email address of IguanaFlats@msn.com. Until next time, enjoy the rest of your day and enjoy your meal!

002

 
Leave a comment

Posted by on October 19, 2013 in Cooking, Dinner, One Pot Meals, Rice, Vegetarian


Tags: , , ,

Meals with Family and Friends, Part 2 – London Broil with Creamy Horseradish Sauce

This was actually a meal we made while my family was here visiting last week and it was the one I forgot to take a picture of. I wanted to make an easy dinner that could easily feed a crowd, and my brother generously offered up a couple of London broils he had in the freezer for us to use for dinner that night. I found this very easy recipe from Food Republic that is a very basic recipe with a nice marinade and it makes a great horseradish sauce to serve alongside the beef.

London Broil with Creamy Horseradish Sauce

For the London Broil:

3 cloves garlic, minced

2 teaspoons lemon juice

3 tablespoons balsamic vinegar

2 tablespoons Worcestershire sauce

1/2 cup red wine

1 tablespoon soy sauce

1 teaspoon honey

Salt and freshly ground black pepper

2 to 2 1/2 pounds top round London broil or flank steak

For the Creamy Horseradish Sauce:

1/4 cup prepared horseradish

1/2 cup sour cream

1 tablespoon Dijon mustard

Dash of Worcestershire sauce

1/4 cup red wine

1 tablespoon cider vinegar

Salt and freshly ground black pepper to taste

1 teaspoon finely chopped fresh chives

To make the London broil, Mix together all of the ingredients except for the meat. Place the meat in a shallow dish and cover it with the marinade. Cover the meat with plastic wrap and refrigerate for at least 4 hours but no more than 24 hours.

Remove the meat from the refrigerator and bring it to room temperature before cooking. Preheat a grill to high, oil the grate, and set it 5 to 6 inches above the coals. If you are cooking the meat indoors, preheat the broiler to high and set a rack 5 to 6 inches below the heat source.

Remove the meat from the marinade and discard the marinade. Pat the steak dry with paper towels. Grill (or broil on a broiler pan) on each side for 6 minutes for rare or 7 to 9 minutes for medium-rare. Transfer the meat to a carving board and allow it to rest for 8 to 10 minutes. Slice the meat at a 45-degree angle across the grain and serve with the horseradish sauce.

For the horseradish sauce, Whisk all the ingredients together until the mixture is smooth and creamy. Place the sauce in the refrigerator for at least 4 hours to allow the flavors to meld. Serve in a ramekin beside the meat.

This is a very simple recipe that produces a great tasting steak. The marinade really helps to break down some of the toughness of the meat and gives it fantastic flavor. I also really liked the horseradish sauce as a side dish and it goes really well with any kind of steak or beef meal that you make. We served this with mashed potatoes and asparagus, but baked potatoes would go really well with this as well and any steamed vegetable would be an ideal side. I wish I had remembered to take a picture of this one as it was a good one that is easy to make for any night of the week.

That’s all I have for today. Check back next time for another recipe. I still have a simple pan seared rib eye steak with a nice red wine sauce, some fall vegetable risotto, and a simple sautéed spinach among other recipes to share. Until next time, enjoy the rest of your day and enjoy your meal!


Leave a comment

Posted by on October 18, 2013 in Beef, Cooking, Dinner, Grilling, Sauce


Tags: , , , , ,

 
National Day Calendar

Fun, unusual and forgotten designations on our calendar.

Jennifer Probst

a little bit naughty a little bit nice

Laissez Faire

Letting Life Lead

simple cooking recipes

a blog to share with you the best