RSS

Category Archives: Dinner

Sunday Chicken and Strawberry Rhubarb Pie


I decided to get back to making a regular Sunday dinner and this week as I hadn’t done it a couple of weeks. I had picked up some chicken earlier in the week and a whole chicken makes great Sunday meal. I wanted to find a recipe that would make things a little different and I had seen this one on the Food Network about a week or so ago and thought I would give it a try. It is Garlic Chicken with Israeli Couscous. I had never made it before and it looked good on the TV so we figured what the head lets give it a try.

Garlic Chicken with Israeli Couscous

For the Chicken:
2 whole garlic bulbs
1 lemon, zest stayed and juice
1 large bunch fresh thyme, leaves only
1 tablespoon cumin seeds, toasted and ground
Pinch crushed red pepper flakes
Kosher salt
Extra virgin olive oil
1 4 to 5 pound chicken, cut into eight parts

Couscous:
Kosher salt
2 cups medium size Israeli couscous
Extra virgin olive oil
3 ribs celery, sliced thin
1 large onion, sliced
Pinch crushed red pepper flakes
1 1/2 cups dry white wine
3 tablespoons tomato paste
Large pinch saffron
2 zucchini, cut into 1/2-inch dice
2 to 3 cups chicken stock
1/2 cup pine nuts, toasted (optional)
3 scallions, white and green, sliced thin

For the garlic chicken: preheat the oven to 350°. Put the garlic bulbs straight on the oven rack and roast them until they are soft when squeezed, about thirty minutes. Remove them from the oven and allow them to cool. Turn the oven up to 375°.

While the garlic is roasting, prepare the chicken. In a food processor or bowl, add the lemon zest and juice and set aside. When the garlic bulbs are cool, slice the tops off and squeeze out the roasted garlic into the bowl or food processor along with the thyme, cumin, crushed red pepper and salt to taste. Add a little olive oil and purée or mash into a loose paste. Massage the mixture all over the chicken pieces and allow it to sit for at least one hour.

For the couscous: bring a pot of well salted water to a boil over medium heat. Add the couscous and cook until it is about two-thirds of the way cooked through, approximately 5 to 6 minutes. Drain and set aside.

Coat a large sauté pan with olive oil and heat over medium high heat. Add the chicken to the pan and brown it on all sides. Remove it to a plate, drain the fat and add the celery and onions. Season with salt and crushed red pepper. Deglaze the pan with the white wine, scraping up all the bits on the bottom of the pan, and cook for 7 to 8 minutes. Stir in the tomato paste and cook for another two minutes. Add in the saffron, zucchini, cooked couscous and chicken stock. Stir well to combine, and then taste and adjust the seasonings if needed.

Transfer the mix to a ovenproof dish. Nestle the chicken, skin side up, in the couscous and add some more chicken stock, if needed, to keep things moist and cover the pan with foil. Add some more chicken stock to keep everything moist. Sprinkle with pine nuts, if using, and cover the pan with foil. Place the baking dish on a sheet pan. Roast the chicken for approximately 20 minutes, and then remove the foil and roast for another 10 to 15 minutes. Remove the chicken from the oven and top with this scallions before serving.

The chicken came out very moist and had a nice flavor to it because of the garlic paste that was used. I had never made couscous before, so it was little different for me, but I think it came out okay. I don’t think I put enough salt in the water when I was preparing it initially because it tasted like it could use a little more seasoning. Use your best judgment and see what works well for you. I also did not use the pine nuts as they are quite expensive and not something I normally use at all so I just left them out of the recipe. Overall I think it turned out pretty well and if you didn’t want to use couscous I think you could easily substitute white rice or brown rice and this recipe and it would turn out just fine.

Earlier in the week, Sean had asked me to get some strawberries and make something for dessert with them. Of course, this time of year the first thing I thought of was strawberry rhubarb pie. I love the taste of the fresh strawberries with the rhubarb and I hadn’t made this pie before so I had to scour around for a recipe to use. I found one at Williams – Sonoma and I also found one through America’s Test Kitchen. I liked aspects of each one, although the one from America’s Test Kitchen did not include any rhubarb so I sort of combine the two recipes and used the best of both to see how it would come out.

Strawberry – Rhubarb Pie

Two rolled out rounds of basic pie dough, or store-bought pie dough
4 pints (about 3 pounds) fresh strawberries, gently rinsed and dried, hulled and quartered lengthwise
3/4 cup sugar
2 tablespoons cornstarch
1 1/2 teaspoons low sugar or no sugar pectin
Generous pinch table salt
1 tablespoon juice from one lemon
3 cups rhubarb, trimmed and sliced half-inch thick (four or five stalks)
1 tablespoon cold butter, cut into small pieces

Preheat the oven to 350°.

For the filling: Select 6 ounces misshapen, underripe or otherwise unattractive strawberries, halving those that are large; you should have about 1 1/2 cups. In a food processor, process the berries until they are a smooth purée, about 20 to 30 seconds, scraping down the sides of the bowl as needed. You should have about 3/4 cup of purée when you are done.

Whisk the sugar, cornstarch, pectin, and salt in a medium saucepan. Stir in the berry purée, making sure to scrape the corners of the pan. Cook over medium-high heat, stirring constantly with a heatproof rubber spatula, and bring to a full boil. Boil, scraping the bottom and sides of the pan to prevent scorching, for two minutes to ensure that the cornstarch is fully cooked (the mixture will appear frothy when it first reaches a boil, then will darken and thicken with further cooking). Transfer to a large bowl and stir in the lemon juice. Allow to cool to room temperature.

Meanwhile, pick over the remaining strawberries and halve any that are still large. Mix the berries and the rhubarb into the bowl with the glaze and fold gently with a rubber spatula until everything is coated evenly. Place one dough round in the bottom of the pie plate and pat it firmly into the bottom and up the sides of the dish. Transfer the berry mixture to the dough-lined pan. Dot the fruit mixture with the butter. Place the second dough round carefully over the top of the filled pie. Trim the edges neatly, leaving a slight overhang and crimp the edges to seal the pie. Brush the top crust with one lightly beaten egg. Using a small knife, cut five or six slits into the top crust to allow steam to escape during baking.

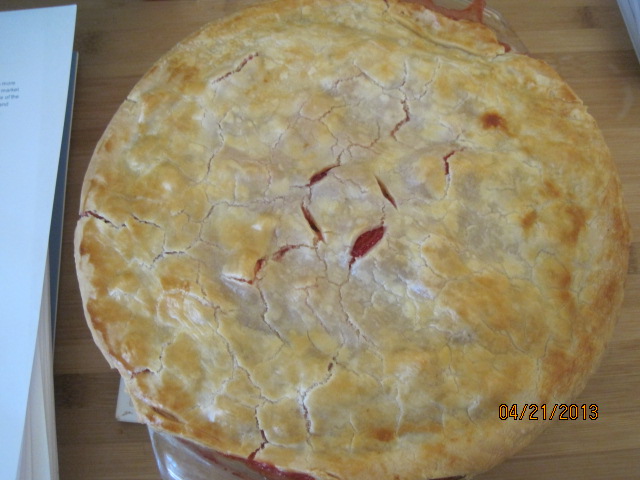
Place the pie in the oven and bake until the crust is golden and the filling is thick and bubbling, approximately 50 to 60 minutes. Transfer to a wire rack and allow the pie to cool completely to set. Serve at room temperature or re-warm in a 350° oven for 10 to 15 minutes just before serving.

I think the pie turned out great myself. It was still just a little bit runny but not much. I think using the pectin instead of tapioca did seem to really help, and it gave the strawberry pie a nice strawberry jam-like flavor to it. I think once it has been sitting in the refrigerator overnight it will have set up even more and taste even better. Of course, you want to serve this with fresh whipped cream or ice cream on the side.

That’s all there is for today. I do have a few recipes planned out for the week, so we’ll see what we can get to as far as what we want to put up here. I do know I am making fish tacos this week at some point and I have posted a couple of different recipes for them on the air, so it is likely I’ll be using one of those if you want to check out and see what the recipe is like. I do also have a recipe I want to try this week for chicken sandwiches and will have to see what else comes along during the week. Until then, enjoy the rest of your day and enjoy your meal!

002


I forgot to take a picture of the chicken to go along with this. Sorry about that 🙂


6 Comments

Posted by on April 22, 2013 in Cooking, Dessert, Dinner, Pasta, Pie, Poultry


Tags: , , , , , , , ,

Grilled New York Strip Steaks and Sweet Pea Risotto

As promised, I did try a couple of new recipes last night for dinner. The first was from Williams – Sonoma and covered the main entrée for the evening, which was grilled steaks with cherry tomatoes and basil. It was pretty easy to make, although using the indoor grill pan always causes a problem around here with the smoke detector. After a few minutes of wrangling with this smoke detector, everything else was just fine.

Grilled Steaks with Cherry Tomatoes and Basil

1 teaspoon vegetable oil
1/2 teaspoon garlic powder
1/2 teaspoon onion powder
1/4 teaspoon paprika
1/4 teaspoon dried oregano
1/4 teaspoon freshly ground pepper, plus more, to taste
2 teaspoons kosher salt, plus more, to taste
2 New York strip steaks, each about 1 1/4 pound and 1 1/2 inches thick
8 ounces grape or cherry tomatoes
2 tablespoons olive oil
1 1/2 teaspoons red wine vinegar
2 tablespoons chopped fresh basil

Brush a cast-iron grill pan with the oil and heat over medium high heat until hot. Meanwhile, in a small bowl, combine the garlic powder, onion powder, paprika, oregano, the 1/4 teaspoon pepper and the 2 teaspoons of salt. Rub the spice mixture evenly onto both sides of the steaks. In another bowl, combine that tomatoes, olive oil, vinegar and basil. Season with salt and pepper to taste.

Place the steaks on the grill pan and cook, turning once, until nicely grill marked, approximately 4 to 5 minutes per side for medium rare, or a grill in till they are done to your specific liking. Add the tomato mixture to the pan during the last two minutes of cooking. Transfer the steaks to a carving board and let rest for five minutes. Transfer of the tomatoes to what warmed platter. Cut the steak crosswise into 1/4 inch strips and arrange on the platter with that tomatoes.

This would be a good meal for you to cook on your outdoor grill as well. If you have the proper tools to cook that tomatoes right on the grill you can do them outside as well. I cooked the steaks to him about medium, which is the way we prefer to have it. These spice rub that is applied to the steaks adds great flavor and seems to go very well with the tomatoes and basil.

As a side dish, I decided I wanted to make some risotto. I looked around for a few different recipes, and I wanted to try to find one that would make good use of some of the spring vegetables that are around right now. The best one I found came from Marcus Samuelsson on his website at Food Republic. It was for a spring peak risotto and sounded really good.

Spring Pea Risotto

1 tablespoon butter
1 tablespoon olive oil
1 cup arborio rice
1/2 cup white wine
5 to 6 cups chicken stock
1 large shallot, minced
1/2 bunch asparagus stalks, cut into 1 inch pieces
1/2 cup fresh peas, shelled
1 teaspoon lemon zest
1/4 cup fresh mint, chopped
1/3 cup grated Parmesan cheese
Salt and pepper, to taste

In a small sauce pan, heat the chicken stock to a warmed simmer. In a large stock pot, or any heavy bottomed pot, melt the butter and olive oil over medium low heat. Add the minced shallots and a pinch of salt, and sauté until the shallots are translucent. Add the rice, stir for about one minute until the grains begin to become translucent around the edges.

Pour in the wine and stir until the liquid is absorbed. Add one ladle of stock at a time, stirring frequently until all the liquid is absorbed. Add another ladle of stock, and stir frequently until liquid is absorbed again. Repeat this process until almost all the stock has been used in the rice is cooked but still al–dente. The entire process should take about twenty minutes.

About five minutes before the rice is done cooking, stir in the asparagus and the peas. Add more chicken stock as necessary to continue cooking the rice. Once the rice has achieved the desired texture, stir in the Parmesan cheese, lemon zest, and fresh mint. Season with salt and pepper and serve immediately.

Admittedly, making risotto is a lot of work. It requires constant attention and stirring on the stove. While it can be taxing, it is certainly worth the work that you put into it. I especially liked this recipe because of the fresh peas and asparagus that are used. It is the perfect time of year to try to incorporate some of the your spring vegetables into a dish like this and they tasted great. I would certainly make this dish again.

Those of the recipes for today. Tonight, I do plan to make some type of chicken and I have a couple of different recipes to choose from. Check back tomorrow and see which one I have decided to go with and see if you like the recipe yourself. I do have a couple of recipes for later on in the week that I plan to make. One is for another chicken dish, the other is for a strawberry rhubarb pie. I think both will be pretty good. Until then, enjoy the rest of your day and enjoy your meal!

004 001 002 003

 
2 Comments

Posted by on April 16, 2013 in Beef, Cooking, Cooking Websites, Dinner, Grilling, Rice, Vegetables


Tags: , ,

Simple Margherita Pizza

We were all feeling kind of lazy yesterday. I normally cook a big meal on Sunday for dinner but I just didn’t feel up to it yesterday so we were looking for something simple. Sean actually suggested Margherita pizza, which I had not made before but it sounded like a good idea so I decided to go for it. I looked around for a good recipe and I found this simple one online at Food.com so I decided to go with this one.

Margherita Pizza

1 12-inch thin pizza crust

1 tablespoon extra virgin olive oil

2 garlic cloves, finely chopped

3-4 large basil leaves,cut into strips

2 small tomatoes, cut thinly

4 ounces mozzarella cheese, shredded

2 tablespoons Parmesan cheese

Salt and pepper, to taste

Crushed red pepper flakes, to taste (optional)

Preheat the oven to 450 degrees. Drizzle the olive oil over the pizza crust. Use a brush to spread it around evenly to make sure it covers all of the crust. Disperse the finely chopped garlic evenly over the crust. Spread the mozzarella cheese throughout the top of the crust, trying to keep the layers of cheese as thin as possible. Place the thinly sliced tomatoes across the entire pizza. Lightly salt and pepper the tomatoes. Spread the fresh basil leaves over the pizza crust, making sure to cover some of the tomatoes and some on just the cheese itself. Cook the pizza in the oven for 10 to 12 minutes or until crispy and the cheese is melted to your specific liking. Add the Parmesan cheese and crushed red pepper, if using. Slice and serve.

Just a few things about this recipe. I used Boboli crust since one, I had some on hand, and two, I don’t usually make my own pizza dough. You could easily substitute your own pizza dough or any store-bought dough in this recipe if that is what you prefer. I also put mine on a pizza stone in the oven and I really think it makes a big difference. The crust comes out much crisper, which I personally prefer. We also made a sausage pizza to go along with this one and had a side salad to round out the meal.

You can’t get much simpler than that and it does taste great. The fresh tomatoes, the olive oil, the garlic and fresh basil really made it for me. I just love the smell of fresh basil and the kitchen smelled great while it was cooking. Using a really good olive oil seemed to make a good difference too, so if you have a good one, this is a good recipe to use it on.

I do have a few recipes planned out for this week, including the one I am making tonight of indoor grilled steaks with tomato and basil and some sweet pea risotto. Check back tomorrow to see the recipes and how they came out. Until then, enjoy the rest of your day and enjoy your meal!001

 
4 Comments

Posted by on April 15, 2013 in Cooking, Cooking Websites, Dinner, Pizza


Tags: , ,

Butterflied Leg of Lamb and Braised Potatoes

So last night for dinner I made something I typically do not make during the week. We had got a leg of lamb before Easter when the prices were quite reasonable and I decided to make it last night for dinner. I wanted to try something a little different with it as I have made it a couple of different ways before and we felt like trying something new. I found this recipe from Cook’s Illustrated and it sounded like something that was pretty easy to do and like it would be worth giving a try. The only part of it I was a little reluctant with was actually butterflying the leg of lamb, which I had never really done before. I think it turned out pretty well though all things considered.

Roast Butterflied Leg of Lamb with Coriander, Cumin, and Mustard Seeds

1 (6 to 8 pound) butterflied leg of lamb
Kosher salt
1/3 cup vegetable oil
3 shallots, sliced thin
4 garlic cloves, peeled and smashed
1(1 inch) piece ginger, sliced into half-inch thick rounds and smashed
1 tablespoon coriander seeds
1 tablespoon cumin seeds
1 tablespoon mustard seeds
3 bay leaves
2 (2 inch) strips lemon zest
1/3 cup chopped fresh mint
1/3 cup chopped fresh cilantro
1 shallot, minced
2 tablespoons lemon juice
Salt and pepper, to taste

For the lamb, place the lamb on a cutting board with the fat Facing down. Using a sharp knife, trim any pockets of fat and connective tissue from the underside of the lamb. Flip the lamb over, and trim the fat cap so it is between 1/8 and 1/4 inch thick. Pound the roast to an even 1 inch thickness. Cut slits, spaced a half-inch apart, in the fat In a crosshatch pattern, being careful to cut down but not into the meat. Rub 2 tablespoons of salt over the entire roast and into the slits. Let stand, uncovered, at room temperature for one hour.

Meanwhile, adjust the oven racks 4 to 5 inches from the broiler element and to the lower middle position and heat the oven to 250°. Stir together the oil, shallots, garlic, ginger, coriander seeds, cumin seeds, mustard seeds, bay leaves, and lemon zest on a rimmed baking sheet and bake on the lower middle rack until the spices are softened and fragrant and the shallots and garlic turn golden, about one hour. Remove the sheet from the oven and discard the bay leaves.

Thoroughly pat the lamb dry with paper towels and transfer, fat side up, to the sheet directly on top of the spices. Roast on the lower middle rack until the lamb registers 120°, approximately 30 to 40 minutes. Remove the sheet from the oven and heat the broiler. Broil the lamb on the upper rack until the surface is well browned and charred in spots and the lamb registers 125°, approximately 3 to 8 minutes for medium rare. Remove the sheet from the oven and, using two pairs of tongs, transfer the lamb to a carving board. Some spices will cling to the bottom of the roast. Tent loosely with aluminum foil and let rest for twenty minutes.

Meanwhile, carefully pour pan juices through a fine mesh strainer into a medium bowl, pressing on the solids to extract as much liquid as possible; discard the solids. Stir in the mint, cilantro, shallot and lemon juice. Add any other accumulated lamb juices to the sauce and season with salt and pepper to taste.

With the long side facing you, sliced lamb with the grain into three equal pieces. Turn each piece and slice across the grain into 1/4 inch thick slices. Serve with the sauce.

Admittedly, I looked at a couple of videos online to see what the best way would be to butterflied leg of lamb. It wasn’t as difficult as I thought it would be and the bones actually remove quite easily. You can then trim up the roast by eliminating any excess fat that you find. If you like to meet more well done, you could roast the lamb at a higher temperature does start with and then simply broil for the last couple of minutes to get the nice crust on the outside. I thought that the lamb itself came out quite nicely and you get a very good flavor from all the spices that have bloomed in the oven before you added the lamb.

To go along with the lamb, I wanted to make some potatoes but I didn’t want to just serve the basic roast potatoes were boiled potatoes. Luckily, my new issue of Cook’s Illustrated happened to arrive yesterday morning, and they even had a new recipe in there for braised potatoes.

Braised Red Potatoes with Lemon and Chives

1 1/2 pounds small red potatoes, unpeeled, halved
2 cups water
3 tablespoons butter
3 garlic cloves, peeled
3 sprigs fresh thyme
3/4 teaspoon salt
1 teaspoon lemon juice
1/4 teaspoon pepper
2 tablespoons minced fresh chives

Arrange the potatoes in a single layer, cut side down, in a large nonstick skillet. Add the water, butter, garlic, thyme and salt and bring to a simmer over medium high heat. Reduce the heat to medium, cover, and simmer until the potatoes are just tender, about fifteen minutes.

Remove the lid and use a slotted spoon to transfer the garlic to a cutting board; discard the thyme sprigs. Increase the heat to medium-high and vigorously simmer, swirling the pan occasionally, until the water evaporates and the butter starts to sizzle, about 15 to 20 minutes. When it is cool enough to handle, mince the garlic to a paste. Transferred the paste to a bowl and stir in the lemon juice and the pepper.

Continue to cook the potatoes, swirling the pan frequently, until the butter browns and the cut sides of the potatoes turn spotty brown, about 4 to 6 minutes longer. Off they heat add the garlic mixture and that chives and tossed to thoroughly coat.

I thought the potatoes turned out great. You do have to keep a close eye on them once the water evaporates to make sure that they do not burn or stick to the pan. Using a nonstick pan for this is really a pretty good idea. They also have a variation where you can substitute 2 teaspoons of Dijon mustard for the lemon juice and used tarragon instead of chives if you want a little bit of a different flavor. I think in banks a pretty good side – and a nice variation for potatoes, giving you that roasted feel without having to roast them.

That’s all I have for today as far as recipe ideas. Tonight I think we are having Sloppy Joe’s for dinner tonight. I have posted a recipe for this before if they want to check it out and see what it’s like. I did add something new to it this time with a new recipe for coleslaw that I tried. I may post that recipe tomorrow along with one Michelle used for brownies that she made this weekend which everyone seemed to love. Check back tomorrow and see what we have. Until then, enjoy this beautiful spring day and enjoy your meal!

 
Leave a comment

Posted by on April 9, 2013 in Cooking, Dinner, Lamb, Potatoes


Tags: , , ,

Fish Sticks and Sweet Potato Fries

I know it’s been a while since I’ve done a post on this blog, and my other blog as well. I apologize for the lapse in time but life has a way of getting in the way more often than I would like some times and had just haven’t had the time and energy to keep up with the blogs is much as I would like to. Anyway, I am going to make a concerted effort to try to do better as far as posting recipes on here and other posts on by personal blog if you follow that one as well. For now I’ll try to go back and cover some recipes that I’ve done in the past few weeks that I haven’t had a chance to write about on here. We’ll start off with a nice easy recipe that I tried not that long ago that I picked up from Cooks Country. It’s a recipe for fish sticks with tartar sauce.

Fish Sticks with Tartar Sauce

4 slices of white bread, torn into large pieces
16 Saltine crackers
1/2 cup all-purpose flour
2 large eggs
1 cup mayonnaise
2 pounds skinless cod or other thick white fish, cut into 1 inch thick strips
1/4 cup finely chopped dill pickles, plus 1 tablespoon pickle juice
1 tablespoon capers, minced
1 cup vegetable oil

Adjust an oven rack to the middle position and heat the oven to 200°. Pulse the bread and the saltines in a food processor until they are fine crumbs; transfer the mixture to a shallow dish Place the flour in a second shallow dish. Beat the eggs with 1/4 cup of the mayonnaise in a third shallow dish.

Pat the fish dry with paper towels and season well with salt and pepper. Taking one piece at a time, coat the fish strips lightly with the flour, then into the egg mixture, and then dredge in the crumbs, pressing on both sides to make sure the crumbs adhere properly. Transfer the breaded fish to a clean plate. Combine the remaining mayonnaise, pickles, pickle juice, and capers in a small bowl and set aside.

Heat 1/2 cup of the oil in a large nonstick skillet over medium heat until just smoking. Fry half of the fish strips until a deep golden brown and crisp, about two minutes per side. Drain the fish on a paper towel lined plate and transfer them to the oven to keep them warm. Discard the oil, wipe out the skillet, and repeat the process with the remaining oil and fish. Serve with that tartar sauce on the side.

I have to admit I was a little skeptical whether or not Sean and Michelle would like this particular recipe. Fish sticks are not always the most popular thing in any home. I think too many of us are used to growing up with what would come out of the box in the freezer and the taste that went along with these particular fish sticks. I can remember most of the time that they weren’t that great, but this recipe using the fresh fish and the saltines in the breadcrumbs really seem to come out nice crunchy and have great flavor. If you are not a big fan of tartar sauce, you can always eliminate that or make a simple cocktail sauce with some ketchup and with horseradish if that is something you prefer.

The next recipe is also quite a simple one. I got this one from the March issue of Bon Appétit magazine. They have a bunch of recipes in there that are great for family dinners, including the one I posted a while back for a shrimp fried rice. This one in particular is for sweet potato wedges with lime mayonnaise, although I did not make the lime mayonnaise as it didn’t seem like something the rest of the family would go for.

Sweet Potato Wedges with Lime Mayo

3 sweet potatoes, peeled, each cut lengthwise into eight wedges
2 tablespoons vegetable oil
Kosher salt and freshly ground pepper
1/3 cup mayonnaise
1/4 teaspoon finely grated lime zest
2 teaspoons fresh lime juice
Chopped fresh cilantro (for serving)

Preheat the oven to 450°. Toss the sweet potatoes and oil on a foil lined large rimmed baking sheet; season the potatoes with salt and pepper to taste. Roast the potatoes, turning once, until golden brown and crisp, approximately 25 to 30 minutes.

Meanwhile, whisk the mayonnaise, lime zest, and juice in a small bowl. Season the fries with salt, top with those cilantro, and serve with the lime Mayo for dipping.

I think the fries tasted just fine without the lime mayo, and we used ketchup as a replacement without any problem at all. All you need to round out this meal is a fresh vegetable to complete the meal, such as broccoli, asparagus, or some roasted carrots. You could even just go with a nice side salad and I think everything would be fine.

That’s the recipe for today. I am planning on making a lamb tonight. I should be able to get the recipe up for that either tonight or tomorrow. I have posted lamb recipes before, but I think I’m going to try something new as I have gotten a couple of new recipes lately for a few different things. I also have some other recipes that we have done in the last few weeks that I think would be good to post. Unfortunately I do not have pictures of a lot of the things I have made lately, but I hope to get back into that tonight with the lamb and keep going from there. Thanks for stopping by and checking out the blog and sticking with it. I hope you enjoy the recipes and get to try out some things on your own. If you ever have any recipes you would like to share, please feel free to leave a note in the comments section below with your email address and I would be happy to get back to you about posting the recipe or even doing a guest blog post on your own if you would like to do that. Thanks again, enjoy the rest of your day, and enjoy your meal!

 
Leave a comment

Posted by on April 8, 2013 in Cooking, Dinner, Potatoes, Seafood


Tags: , , , ,

It’s About Time For A Home Cooked Meal

Between my being sick and then Sean being sick, I haven’t had much time to do any real meals during the week, let alone doing any blogging about the meals. Since we are all finally starting to feel better around here, I though today would be a good day to try and get things back to normal around here and cook some good meals. I have had some flounder in the freezer and was looking for something to do with it when I came across this recipe in America’s Test Kitchen’s cookbook “Quick Family Cookbook.” I like this cookbook because it gives me some good meal options that can all be made in under 45 minutes, which make thhem great for any weeknight meal when you may not have a lot of time or energy to put into your meal but still want something made at home. This is a simple fried fish with Southwestern corn, though to be honest I eliminated a lot of the heat from this meal since Sean and Michelle both don’t really care for spicy food. Nonetheless, it’s a good recipe that you can play around with and use a variety of fish with if you have some on hand.

Cornmeal Fried Fish and Southwestern Corn

2 tablespoons butter

8 ounces chorizo sausage, chopped

1 red bell pepper, stemmed, seeded and chopped fine

1 jalapeno chile, stemmed, seeded and minced

1 shallot, minced

1 garlic clove, minced

Salt and pepper

4 cups frozen corn

2 teaspoons minced fresh cilantro

1/2 cup all-purpose flour

1/2 cup cornmeal

2 (12 ounce) skinless flounder fillets, cut in half lengthwise

1 cup vegetable oil

Melt the butter in a large nonstick skillet over medium-high heat. Add the chorizo and cook until lightly browned, about 2 minutes. Stir in the bell pepper, jalapeno, shallot, garlic and 1/2 teaspoon of salt and cook until the bell pepper begins to brown, about 5 minutes. Stir in the corn and cook until heated through, about 2 minutes. Stir in the cilantro and season with salt and pepper to taste. Transfer to a bowl and cover.

Meanwhile, mix the flour and cornmeal together in a shallow dish. Pat the flounder dry with paper towels and season with salt and pepper., then dredge the fish in the cornmeal mixture, pressing gently so it adheres to the fish.

Wipe out the now-empty skillet with paper towel, add the vegetable oil and return to medium-high heat until the oil is shimmering. Lay the fillets in the skillet and cook until golden on both sides, about 2 minutes per side. Transfer the fish to a paper towel-lined plate. Let the fish drain briefly, then serve with the corn.

You could really use any fish fillets you like for this meal – catfish, sole, tilapia, trout, snapper – you name it. Ialso added some other colored peppers to the corn to make the meal look a little more festive since I wasn’t using the chorizo or the jalapeno. You could serve this white rice or brown rice and you would have quite a nice meal.

A nice simple meal that is great for any dinner. We are getting back to the meal plan this week after I go shopping tomorrow. We have gotten away from it lately and haven’t been planning things out and I feel we actually eat better from a health standpoint when everything is planned out for the week, so we are going to try and get back to it and try to get back to one meatless meal for the week, one fish meal, one stir fry, one chicken and one lean meat. I’ll have to see how things go at the market tomorrow to see what I can pick up and go with it, so check back tomorrow and see what we have for the week. until then, have a great day and enjoy your meal!

 
Leave a comment

Posted by on February 25, 2013 in Cookbooks, Cooking, Dinner, Seafood


Tags: , , , , ,

The Dinner Kit Is Served – NYTimes.com

The Dinner Kit Is Served – NYTimes.com.

This is an interesting article in the New York Times today regarding these home delivery services that allow you to get an entire meal delivered. All of the ingredients and the recipes are included with the meal and everything is packed fresh and delivered to you. You just need to prepare the meal yourself. I do find this as an interesting alternative for some people who would like to make their own dinner but may not have the time to put in to get all the ingredients or find the recipes on their own. I was wondering if anyone out there may have given this a try before and what they thought of it? Feel free to leave your comments on what you think of the process and if you have tried it, how has it worked out for you.

My personal opinion on it is kind of split. While I do think it gives some people a chance to eat a home cooked meal instead of getting take out or dining out all the time, I think there are a few flaws in the services. From what I can tell, there does not seem to be much of an option if you are cooking for a child. This seems to me to be a service designed for a single person or a couple where both partners work but still want the home cooked meal. The meal choices seem somewhat limited and lacking. While it’s true that I am lucky enough to have the time to prepare meals on my own for my family, not everyone has this luxury so I can see the appeal. I also think it is a bit pricey for what you get. If you had the time, you could get the ingredients on your own and probably for a better price. Personally, that would be the way I would go, but I do enjoy the entire cooking process and some people may just want it streamlined for them so it can be easier.

I think it presents an interesting option for people who want a meal at home but feel pressed for time. What do you think? Check it out.

 
Leave a comment

Posted by on February 13, 2013 in Cooking, Cooking Websites, Dinner


Tags: , ,

Cooking a Valentine’s Day Meal at Home – NYTimes.com

Cooking a Valentine’s Day Meal at Home – NYTimes.com.

With Valentine’s Day coming next week, many people are looking to make a nice romantic meal at home. The New York Times put out this quick and easy menu as a suggestion of a nice steak, potatoes, salad and a one ingredient chocolate mousse. Check it out and see if it is something you might like to try!


Tags: , , ,

Super Simple Stromboli for Sunday

With the big game coming on Sunday, many people are having different types of parties. I have posted different snacks that are good for football parties in previous posts, but this is something I just made this week for dinner but would also be great not just for football parties, but for any party. The basis of the recipe is from Scott Conant of Scarpetta restaurants and Food Network’s Chopped. I found this stromboli recipe on Food Network’s site and altered it a bit to fit what I had on hand. In his recipe, he makes the pizza dough himself. I don’t have the time or space to make dough, so I used store-bought pizza dough and I think it turned out fine, so do what you like best. You could use any pizza dough recipe you have I think and get good results.

Stromboli

1 pound store-bought or homemade pizza dough

2 cups mozzarella cheese

1/2 bunch fresh basil, chopped

1 teaspoon garlic powder

Freshly ground black pepper

4 meatballs, pre-cooked and sliced

2 Italian sausage links, cooked through and sliced

1 small onion, sliced and sautéed until soft

Extra-virgin olive oil

Salt

1/4 pint cherry tomatoes, halved

Tomato sauce, warmed, for dipping

Preheat the oven to 375 degrees. Remove the dough from the refrigerator and allow it to come to room temperature. Lightly brush a baking sheet with olive oil. Lightly flour your countertop and the pizza dough and roll the dough to a rectangle.

Place half the cheese, the basil, garlic powder, pepper, meatballs, sausage and onion in the middle of the surface of the dough. Fill two-thirds of the surface, leaving the bottom third and a little of the sides empty. Top with the remaining cheese and salt to taste. Roll the sides of the dough over the filling and then seal the ends and edges with your palms to make a loaf. Transfer to the oiled tray. Rub a little olive oil over the top of the dough. Place the tomatoes, salt and pepper on the top. Cover the tray with plastic and let it sit for 15 minutes to rest.

Place the tray in the oven and bake for a total of 45 minutes. After 20 minutes, turn the pan 180 degrees. Bake another 20 minutes, then turn the pan again and bake the remaining 5 minutes. Remove from the oven and transfer to a cutting board to allow the loaf to cool. Slice and serve with tomato sauce on the side for dipping.

There are dozens of different ways you can go with this recipe. You can fill the stromboli with anything you like really. You can use different meats, vegetables or cheeses depending on what is to your liking. I saw many recipes that use salami, provolone, eggplant, peppers and more, so use whatever you like best.

It can make a nice dinner with a simple salad or will be great for any party that you may have. It is even better as something to bring to party you are going to.

That’s it for today. As I have said, I do have a stockpile of recipes of things I have made recently that I have not had a chance to post, so I hope to get to some of them over the coming days. until next time, enjoy the rest of your day and enjoy your meal!


003

 
Leave a comment

Posted by on February 2, 2013 in Appetizers, Breads, Cooking, Dinner, Pizza, Snacks


Tags: , , , , ,

Oven Roasted Rack of Pork

This week was mostly a week of meals I had already posted recipes for, so I really didn’t have anything new to write about other than this one meal that I made. I had gone shopping at Adam’s last week and they had a center cut rack of pork on sale for a really good price. I had never made one before, the rack only cost about $5.00 and would more than feed the three of us, so I figured what the heck and I bought one. Then I had to try to find a recipe to use to make it. I looked around at all the usual places I got on the Internet for recipes, but I didn’t really see what I liked, so I put my faith in Google and went looking there. That is where I turned up this recipe, on a website called A Culinary Journey With Chef Dennis. The recipe sounded good, it was easy, and I had all the ingredients, so it was the winner.

Oven Roasted Rack of Pork

1 8 bone center cut rack of pork, frenched

Olive oil

Salt and pepper

2 tablespoons Montreal Steak Seasoning

2 carrots, chopped roughly

1 onion, chopped roughly

2 stalks of celery, chopped roughly

6 cloves of garlic, peeled

Preheat the oven to 450 degrees. In a roasting pan, add the rough cut vegetables. Rinse the rack of pork and pat it dry with paper towels. Place the rack, fat side up, on top of the vegetables in the pan. Apply a liberal amount of olive oil to the pork, rubbing it into the meat. Sprinkle the entire rack with salt and pepper, and then coat with the Montreal Steak Seasoning (use more if you want more of coating to form a crust). Place the pan in the oven and roast for 15 minutes.

After 15 minutes, reduce the oven temperature to 325 degrees and continue roasting for approximately 2 hours or until the internal temperature on the outside of the rack has reached 160 degrees. This will ensure that the outside of the pork is well done while the center cuts are not quite as cooked.

Remove the rack from the oven and place it on a cutting board and tent loosely with aluminum foil. Allow the pork to rest for 10 minutes before slicing. While the rack is resting, place 2 cups of water in the roasting pan and place on the stovetop over medium-high heat. With a spoon, loosen all the baked meat scraps from the pan to help make a pan gravy. Allow to cook and reduce for 10 minutes. Strain out all the vegetable pieces.

Cut the rack along the bones, making even portions of pork and serve with the pan gravy.

It was very simple and made for a nice, elegant meal. This one might be better served for a weekend  when you have more time to cook it instead of a weeknight meal, but it is quite delicious. I served it with some wild rice and brussels sprouts and it was all very good and looked great on the plate.

Another easy meal for your arsenal! We’re going shopping so I still haven’t planned out the meals for next week yet, so we’ll have to see what comes along and is on sale for next week to make. Check back and see what I can come up with. Until next time, enjoy your evening and enjoy your meal!

003 002

 
Leave a comment

Posted by on January 18, 2013 in Cooking, Cooking Websites, Dinner, Pork


Tags: , , ,

 
National Day Calendar

Fun, unusual and forgotten designations on our calendar.

Jennifer Probst

a little bit naughty a little bit nice

Laissez Faire

Letting Life Lead

simple cooking recipes

a blog to share with you the best