RSS

Category Archives: Lunch

Pick This Pickleback Slaw as a Side Dish for Summer

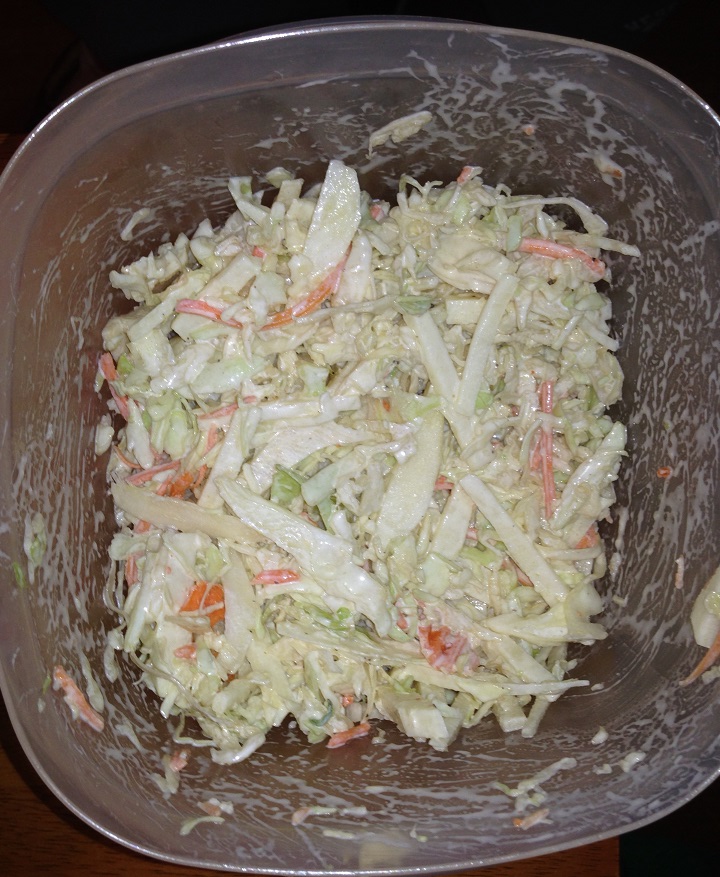
There are so many different variations of coleslaw that it seems you can try it in just about any manner with any kind of ingredient. As long as it has some form of cabbage in it, slaw seems to be fair game today. For me, I love to have a slaw that is crispy and wet and soggy and full of mayonnaise. Don’t get me wrong – I like a  coleslaw that uses mayo but I don’t want the vegetables swimming in it. It takes away from the flavors of the cabbage and other vegetables and it isn’t very practical as a summer side dish if you use a lot of mayo and can’t leave the dish out for a bit on a table. This particular recipe I picked up from the New York Times and Sam Sifton and it makes use of an item that you probably throw away most of the time – pickle juice.

Pickleback Slaw

1 small head green cabbage

1 small head red cabbage

2 carrots, peeled and grated

2 apples, such as Granny Smith, peeled and cut into matchsticks

1/2 cup mayonnaise

3 tablespoons juice from a pickle jar or pickle relish jar

1 tablespoon Dijon mustard

1 tablespoon cider vinegar

2 teaspoons hot sauce

Kosher salt

Ground black pepper

Cut the green and red cabbages in half and remove the core from each of the sides. Cut each half of cabbage in half again and slice each quarter of cabbage into very thin ribbons. Mix the red and green cabbages with the grated carrots and sliced apples in a large, non-reactive bowl.

In a separate bowl, whisk together the mayonnaise, pickle juice,Dijon mustard, cider vinegar,hot sauce, kosher salt and black pepper until well blended.

Pour the dressing over the cabbage mixture and toss the cabbage well to coat it. Season the slaw with salt and pepper to taste. The coleslaw may be covered with plastic wrap and refrigerated until you are ready to serve it. Toss the coleslaw again before serving.

Alternatively to slicing the heads of cabbage and grating the carrots yourself you could just as easily use a bag of coleslaw mix that already has all of this done for you. Choose some apples that have good flavor to them and you get even a little bit more taste into the slaw. This slaw has just the right bite to it from the pickle juice and the hot sauce and I loved the way it all mixed with the cabbages and apples. It only seemed to get better after a day or two in the fridge as well, making a great side dish for all kinds of burgers, hot dogs, ribs, sandwiches and more. of all of the coleslaw dishes I have made recently, this one seems to be one of the best choices and I have made it a couple of times since I tried the original.

That’s all I have for today. Check back again next time for another recipe. Until then, enjoy the rest of your day and enjoy your meal!

IMG_0567

 
1 Comment

Posted by on June 19, 2014 in Cooking, Dinner, Lunch, Salad, Side Dishes, Vegetables


Tags: , , , , ,

Wow the Crowd with This Zesty Potato Salad

Summer side dishes can seem limited at times and you might get tired of having the same old options of potato, coleslaw, salad, baked beans and the like. Everyone once in a while you just want to try to spice things up a little bit and try some new twists on old favorites so you can experience some new flavors and get ideas for future meals. Potato salad is one of those things that every family seems to have a basic recipe that they fall back on and pass down from person to person. I know I have made the same potato salad for years and was looking for a new way to spice things up a little bit and add some great flavor to this dish when I was making burgers the other night. I came upon this recipe in searching the Internet from a blog called Pass the Sushi and saw a posting for whiskey burgers and zesty potato salad. I decided to give both a try, and I am posting the zesty potato salad recipe first for you to take a look at.

Zesty Potato Salad

2 1/2 pounds small red potatoes, quartered

3 cloves garlic, smashed

Kosher salt

6 slices bacon, chopped

2 tablespoons extra-virgin olive oil

1 red onion, diced

3 stalks celery, diced

1/2 cup red wine vinegar

1 1/2 cups mayonnaise

1/2 cup Dijon mustard

Place the potatoes and the smashed garlic in a large stock pot. Fill the pot with water to about 2 inches above the potatoes and generously salt the water with the kosher salt. Bring the water to a boil over high heat. Reduce the heat to medium and simmer the potatoes until they are fork tender, about 10 to 12 minutes.

Meanwhile, heat the olive oil in a large skillet set over medium heat. Cook the bacon, stirring occasionally, until the bacon is browned and crispy, about 10 minutes. Remove the skillet from the heat and stir in the red onion, diced celery and the red wine vinegar. Season the mixture with salt to taste.

Drain the cooked potatoes from the stock pot and transfer them to a large bowl. Remove the garlic and throw it away. Add the bacon mixture to the hot potatoes and toss the mixture with the potatoes until the potatoes are well coated. Gently fold in the mayonnaise and the Dijon mustard until they are blended well into the potato salad. Refrigerate the potato salad until it is cold and serve.

To me, this is very close to have a colder version of German potato salad with the mix of the bacon, onions and vinegar with the potatoes, but you also get the flavors of the Dijon mustard and the mayonnaise added to it as well for some extra tang. The potato salad was very good, but it got even better the longer it sat in the refrigerator. We had some again with lunch the next day and it tasted even better than the first time. I really liked this recipe and I will definitely be using it again for barbecues or summer parties, though it does need to be refrigerated because of the mayonnaise so you need to be careful about leaving it out.

That’s all I have for today. Check back next time for another recipe. Until then, enjoy the rest of your day and enjoy your meal!

IMG_0568

 
Leave a comment

Posted by on June 13, 2014 in Cooking, Lunch, Potatoes, Salad, Side Dishes


Tags: , , ,

Meatballs Run Amok! Pizza Bianca with Kale and Turkey Meatballs

You would think we would have gotten sick of meatballs by now, wouldn’t you? Surprisingly enough we managed to keep on with our meatball theme this week, using another recipe from Giada di Laurentiis that makes use of the classic Italian turkey meatballs I made earlier in the week. For this recipe, just like the one yesterday for meatball paninis, we kept it very easy and decided to go the pizza route. This one is for pizza Bianca, which is a white pie without any red sauce, perfect for those who may not like the acidity or flavor of tomato sauce. You can use some of the meatballs from the original recipe that have not been put into sauce, or just take some of the sauced meatballs and cut them up if you want just a hint of the sauce flavor. In either case, it is a very flavorful pizza.

Pizza Bianca with Kale and Turkey Meatballs

For the Sauce:

2 tablespoons butter, at room temperature
2 tablespoons all-purpose flour
1 cup milk
1/8 teaspoon ground nutmeg
1 bay leaf
1 clove garlic, smashed and peeled
1/4 teaspoon kosher salt
1/8 teaspoon freshly ground black pepper

For the Pizza:
Extra-virgin olive oil, for oiling the baking sheet and for drizzling
One 1-pound ball pizza dough (store-bought or homemade, such as Food Processor Pizza Dough), at room temperature
3/4 cup coarsely grated mozzarella
8 Classic Italian Turkey Meatballs, halved
1/2 cup finely grated Parmesan
2 medium leaves kale, ribs removed, coarsely chopped
1/2 teaspoon kosher salt

For the sauce: In a heavy small saucepan, melt the butter over medium heat. Add the flour and stir constantly for 1 minute. Gradually add the milk, whisking constantly. Add the nutmeg, bay leaf and garlic. Whisk the mixture over medium heat until the mixture thickens to sauce consistency and is smooth, about 2 to 5 minutes. Stir in the salt and pepper.

Remove and discard the bay leaf and the garlic.

For the pizza: Preheat the oven to 450 degrees F. Oil a heavy nonstick 16- by 10-inch baking sheet with olive oil.

Using your fingers, spread the dough over the prepared baking sheet into a rectangle shape. Drizzle the dough with olive oil. Spoon the sauce on top and spread the sauce evenly across the dough, leaving a 1-inch border around the dough. Sprinkle the mozzarella on top. Arrange the meatballs, cut-side down, on top of the mozzarella and sauce. Sprinkle the pizza with the Parmesan cheese. Bake the pizza for 15 minutes. Remove the baking sheet from the oven and add the kale in an even layer on top of the meatballs. Drizzle the kale with olive oil and sprinkle the top with salt. Bake the pizza until the kale is crispy, about 10 minutes longer.

Cut the pizza into squares and serve.

One thing I did differently with this recipe, since I did not have any kale on hand, was that I used some spinach instead. Sean and Michelle both like spinach better anyway so this worked well for us, but if you really want the kale I would think it would turn out nice and crispy and taste great on the pizza. Everyone loved this pizza, not just because of the meatballs but because of the white sauce as well. The sauce had just that hint of nutmeg to give it a really unique flavor and it just seemed to go really well with the meatballs and spinach. Sean asked that I make this one again and maybe try another pizza combination with the sauce from this recipe, which sounded like a good idea to me.

That’s all I have for today. Check back next time for another recipe. Until then, enjoy the rest of your day and enjoy your meal!

IMG_0562


Tags: , , , , , , , ,

Meatball Frenzy Week Continues – Turkey Meatball Panini

So now that I had all of these meatballs I needed to find things to do with them. Luckily, Giada didn’t let me down and I supplied several other recipes in ways that you could use these great turkey meatballs. The best part about all of them is that they con convert into really easy meals that only take a few minutes to create and you have something entirely new to enjoy for the night. The first up was this really simple meatball panini recipe. I have a panini maker, but you can just as easily do this with a grill, grill pan or skillet with a little bit of effort and it will come out great too. This recipe makes use of the meatballs and a few other simple ingredients to make awesome paninis for the family to enjoy.

Turkey Meatball Panini

1 red onion, peeled, cut into eight 1/4 -to 1/2-inch-thick rounds

2 tablespoons olive oil, plus extra for drizzling

1/4 teaspoon kosher salt

1/4 teaspoon freshly ground black pepper

4 ciabatta rolls, halved horizontally (or other bread of your choice)

1 cup tomato sauce (homemade or your favorite jarred brand)

1 teaspoon red pepper flakes, optional

1 1/3 cups arugula

12 Classic Italian Turkey Meatballs, halved

8 thin slices prosciutto

8 slices provolone cheese

Preheat a grill pan or a panini maker. Brush the red onion slices on both sides with the olive oil. Sprinkle the onions with kosher salt and black pepper. Grill the onion slices until they are tender and lightly browned, about 3 to 4 minutes per side. Set the onions aside to cool

Pull out and remove some of he bread from the ciabatta rolls from each half of the rolls. This will give the meatballs a better place to sit in the sandwich. Spoon half of the tomato sauce over the bottom halves of each of the rolls. Sprinkle the sauce with red pepper flakes, if using. Add the arugula, the turkey meatballs, the prosciutto slices, grilled onions and the remaining sauce to each sandwich. Top each sandwich with two pieces of cheese. Add the tops of the rolls and drizzle the tops with olive oil. Using a pastry brush, brush the olive oil evenly over the tops of the rolls.

Place the sandwiches in the panini maker and lower the press and cook until the cheese has melted and the meatballs are heated through, about 5 minutes. Alternatively, place the sandwiches on a grill pan or in a heated skillet and place a cast-iron pan or other heavy pot (anything heavy will really do) to press the sandwiches down and cook through until the cheese is melted and the meatballs are heated through.

Cut the panini in half and serve.

The great thing about paninis, or any sandwich really, is that you can put whatever you like best on them. If you don’t like provolone, use your favorite cheese on it instead or no cheese at all (which is how I eat it). If you don’t have prosciutto, use any type of ham that you like (which I did for Sean; I used Black Forest Ham). you can use any type of other toppings that you really like or use different meatballs and still get good results (those these meatballs are really good and you should try them out). I had mine with just the grilled onions, meatballs, red pepper flakes and arugula. Michelle had hers with the meatballs, arugula, grilled onions and provolone. Sean had his with the meatballs, Black Forest Ham and prosciutto, no onions or arugula. They all looked really good and everyone really enjoyed the sandwiches. It was a great way to re-purpose some of the meatballs for a quick meal.

That’s all I have for today. Check back next time for another recipe. Until then, enjoy the rest of your day and enjoy your meal!

IMG_0561 IMG_0559 IMG_0560


1 Comment

Posted by on June 5, 2014 in Cooking, Dinner, Lunch, Poultry, Sandwiches, Turkey


Tags: , , , , ,

A New Twist on Chicken Fingers – Pretzel-Crusted Chicken Fingers

I had made some classic chicken fingers not that long ago along with some homemade dipping sauces and the grocery store was having a really good sale on chicken tenderloins so I picked up another batch of them and was looking for something else to do. Sure, I could have just cut up the chicken and used it for something like a stir-fry or a warm chicken salad, but I wanted to try something else with chicken fingers again. Lo and behold along came the newest issue of Cook’s Country magazine in the mail shortly after and in it was a recipe for pretzel-crusted chicken fingers. I thought this was a good one to try to see if I could get some extra crunch and flavor out of the chicken. The recipe is very simple and only takes a few minutes to make, so you can easily make this anytime you want some chicken fingers.

Pretzel-Crusted Chicken Fingers

6 ounces thin pretzel sticks

1/2 cup all-purpose flour

2 eggs

2 tablespoons Dijon mustard

1 1/2 pounds chicken tenderloins, trimmed

Salt and pepper

6 tablespoons vegetable oil

Process the pretzel sticks in a food processor until they are finely ground, about 20 seconds. you should end up with about 1 1/2 cups of pretzel crumbs. Transfer the pretzel crumbs to a shallow dish. Spread the all-purpose flour in a second shallow dish. Beat the eggs and the Dijon mustard in a third shallow dish.

Pat the chicken dry with paper towels and season it well with salt and pepper. Dredge the chicken pieces in the flour, shaking off any excess. Then dip the chicken pieces in the egg mixture, allowing any excess to drip off. Finally, dip the chicken pieces in the pretzel crumbs, pressing on the chicken gently in the crumbs so the crumbs adhere well.

Heat 3 tablespoons of the vegetable oil in a large nonstick skillet over medium-high heat until the oil is shimmering. Cook half of the breaded chicken tenderloins until they are golden brown and cooked through, about 5 minutes per side. Adjust the heat along the way if the crust seems like it is beginning to burn. Transfer the chicken fingers to a paper towel-lined plate, discard the oil, and wipe out the skillet with paper towels. Repeat the process with the remaining 3 tablespoons of vegetable oil and the remaining chicken tenderloins. Serve the chicken fingers with your favorite dipping sauces.

You want to make sure you use the thin pretzel sticks for this recipe and not the thick pretzel rods. The thin pretzels will grind easier and are not as dense and hard as the rods, giving you better crumbs for the crust. You get a really nice flavor from the pretzel crust and just a hint of the Dijon mustard along the way to give them great flavor. This is a great recipe to offer up for the kids who love chicken fingers but want something a little different or as a quick dinner or to serve at a party. You can make large batches of them and freeze them cooked for later use at another time.

That’s all I have for today. Check back next time for another recipe. until then, enjoy the rest of your day and enjoy your meal!

pretzel crusted chicken fingers


1 Comment

Posted by on May 30, 2014 in Appetizers, Cooking, Dinner, Lunch, Picnic Fare, Poultry, Snacks


Tags: , , , , ,

A Treat for the Whole Family – Baked Honey Barbecue Chicken Fingers

For many adults, just hearing the words “chicken fingers” is enough to make them cringe. They immediately think back to the days when the only things their young children would eat were chicken fingers, tenders, McNuggets or whatever else that happened to be called that are sold in the frozen food aisle of your grocery store, at the local fast food restaurant or any of the dozens of family style convenience restaurants around today. While you may not be thrilled with the notion of what you get in those frozen bags, there are plenty of alternatives out there that you can try making on your own that taste good so that everyone in the family will enjoy them. This particular recipe, that I picked up from Sally’s Baking Addiction, covers just that, giving you a tasty chicken fingers alternative that get away from the frying and offer you a baked alternative that tastes great.

Baked Honey Barbecue Chicken Fingers

3/4 cup barbecue sauce (whatever your favorite may be)

1/4 cup honey

1/2 cup whole wheat or all-purpose flour

1 teaspoon salt

1/2 teaspoon black pepper

1/2 teaspoon smoked paprika

2 eggs, beaten

1 1/2 cups panko breadcrumbs (or more, if needed)

1 1/2 pounds boneless, skinless chicken breasts or chicken tenders

Nonstick cooking spray

Combine the barbecue sauce and the honey in a large bowl. If you are using chicken breasts, pound the chicken breasts between two sheets of plastic wrap to 1/4-inch thickness and cut the breasts into strips. If you are using chicken tenders, cut them in half lengthwise. Add the chicken strips to the bowl with the barbecue sauce and honey and stir so all of the chicken is evenly coated. Cover the bowl tightly and marinate the chicken in the refrigerator for at least 30 minutes and up to 6 hours. The longer you marinade, the more flavorful the chicken will be.

Preheat the oven to 400 degrees. Line a baking sheet with parchment paper or a silicon baking mat or coat the sheet with nonstick cooking spray.

Combine the flour. salt, pepper and the smoked paprika in a shallow dish. Pour the beaten eggs into another shallow dish. Pour the panko breadcrumbs into a third shallow dish. Coat each chicken strip with flour, shaking off any excess. Next. dip the floured chicken in the egg and allow any excess egg to drip off. Then roll the chicken strip in the panko breadcrumbs, coating completely before shaking off any excess. Place the chicken strips on the prepared baking sheet and repeat the process until all of the chicken has been coated. Spray each chicken strip with the nonstick cooking spray to help seal the breading to the chicken, preventing the breading from staying raw and allowing it to bake into the chicken strips.

Bake the chicken fingers in the preheated oven for 10 minutes. Turn each piece over and continue baking until the outside of the chicken is crisp and the centers of the chicken pieces are cooked through, about another 10 to 12 minutes. Serve the chicken fingers with extra barbecue sauce for dipping.

The great thing about this recipe is that you can make a large batch and freeze any extras that you may have to use when you need a quick dinner for the kids or yourself or just want an easy snack. These are perfect for a meal any night with some homemade fries (I made some homemade baked sweet potato fries with ours) or you can use these for any type of buffet when you are having a party and you know kids may be around. They are also great snacks for watching the game or when you have a crowd over. You get good crunch from the breadcrumb mixture and underneath is great flavor from the barbecue sauce and the honey. This is definitely one to remember and you can experiment with this also, perhaps making the chicken fingers ranch flavored instead of barbecue with some spices, or maybe even adding some Parmesan to the breadcrumbs, eliminating the barbecue sauce and substituting tomato sauce to have an Italian-style chicken fingers. There’s lots of room to use your imagination with this one and the best part is you have control over the ingredients so you know what goes into each one, and they are baked, making them a better choice for you.

That’s all I have for today. Check back next time for another recipe. Until then, enjoy the rest of your day and enjoy your meal!

IMG_0540


Tags: , , , , , , ,

Summer’s Coming! Make This Simple Creamy Cucumber Salad

It seems like summer is never going to get here. after a particularly long, cold and snowy winter here in New York, Spring has been pretty dreary with lots of rain and clouds. This can all be pretty depressing, but summer is only a little more than a month away and I cannot wait for it to get here. Summer means warmer weather, sunshine and the chance to make some great summer dishes. While I don’t so a lot of cooking out myself since we can’t have a good grill here at the condo, I do make a lot of different types of salads all summer long. I try to make salads that don’t use a lot of lettuce since Michelle is not a big fan of most lettuce, or at least a lot of lettuce. I had bought some English cucumbers last week and they were quite large, so I needed to try to come up with something great to make with them besides just slicing some up with some lettuce. I saw Ina Garten make this recipe on the Food Network one day and knew it was one I had to try. It is simple, easy, uses only a few ingredients, and tastes very refreshing. This recipe makes a large quantity, so I actually cut it in half when I made it but I am posting the original recipe here.

Creamy Cucumber Salad

4 hothouse cucumbers, thinly sliced (about 3 to 4 pounds of cucumbers)

2 small red onions, thinly sliced

Kosher salt

4 cups (32 ounces) plain whole-milk yogurt

1 cup (8 ounces) sour cream

2 tablespoons champagne vinegar or white wine vinegar

1/2 cup minced fresh dill

1 1/2 teaspoons freshly ground black pepper

Mix the sliced cucumbers, sliced red onions and 1 1/2 tablespoons of the kosher salt in a large bowl. pour the vegetables into a colander and suspend it over a bowl. Wrap the bowl and the colander with plastic wrap and place them in the refrigerator to drain. Leave in the refrigerator for at least 4 hours and  up to overnight. Discard any of the liquid that accumulates in the bowl.

Pour the yogurt into a fine mesh sieve lined with a paper towel or with cheesecloth and suspend the sieve over another bowl. Wrap the bowl and the sieve in plastic wrap and refrigerate them for at least 4 hours and up to overnight so the yogurt can drain and thicken. Discard the liquid that accumulates in the second bowl.

When the cucumbers are ready, roll them up in paper towels or a dry kitchen towel and press the towel lightly to remove most of the liquid from the vegetables. Place the cucumbers and the drained yogurt together in a large bowl with the sour cream, the vinegar, fresh dill, 2 teaspoons of salt and the black pepper. Toss the mixture well and refrigerate the salad for a few hours to allow all of the flavors to blend together. Sprinkle the salad with 1/2 teaspoon of salt and 1/2 teaspoon of pepper and serve it chilled.

Granted, it may take up a lot of refrigerator space while everything drains (at least it did in my small refrigerator) but it is worth it. You will be surprised just how much moisture comes out of both the salted vegetables and the yogurt. The yogurt comes out nice and thick and creamy. Pressing the cucumbers in a towel removes even more liquid to help keep them from getting too soggy. The yogurt and cucumbers and red onions go so nicely together and it may even remind you a bit of tzatziki sauce from Greek food. It is a great salad that will be perfect for summer parties and barbecues to give you something different from the typical coleslaw or potato salad. This is a great side dish that goes really well with chicken, ribs, pork or beef so you can use it for all kinds of meals.

That’s all I have for today. Check back next time for another recipe. Until then, enjoy the rest of your day and enjoy your meal!

IMG_0542


Leave a comment

Posted by on May 16, 2014 in Cooking, Dinner, Lunch, Salad, Side Dishes


Tags: , , , ,

Use Up Those Easter Eggs in a Classic Cobb Salad

If you are like our home you ended up with at least a dozen brightly colored hard-boiled eggs after Sunday and needed to try to find a way to use them all this week. Sure, you can make the standard egg salad for lunches or even just enjoy a hard-boiled egg for breakfast or as a snack during the day, but you can also make good use of them in an easy meal. Cobb salad has always been one of my favorite and I have ordered it out a number of times for a meal when I want something a little different. It is the perfect combination of vegetables, protein and some nice additions like avocado, egg and blue cheese. First made at the Brown Derby restaurant in Los Angeles by the owner, Robert Cobb, I got this recipe from Saveur magazine. While this recipe has the traditional dressing recipe along with it, I actually made my own dressing, which I will share following the recipe for the salad.

Classic Cobb Salad

FOR THE DRESSING:


¾ cup vegetable or canola oil
¼ cup extra-virgin olive oil
¼ cup red wine vinegar
1 tablespoon fresh lemon juice
¾ teaspoon dry mustard
½ teaspoon Worcestershire sauce
¼ teaspoon sugar
1 clove garlic, minced
Kosher salt and freshly ground black pepper, to taste

FOR THE SALAD:


½ head iceberg lettuce, cored and shredded
½ head romaine lettuce, chopped
½ bunch watercress, some of the stems trimmed, chopped
2 ounces blue cheese, crumbled
6 strips cooked bacon, roughly chopped
3 hard-boiled eggs, peeled and cut into ½ inch cubes
2 medium tomatoes, peeled, seeded, and cut into ½ inch cubes
1 boneless skinless chicken breast, cooked and cut into ½ inch cubes
1 avocado, peeled, pitted, and cut into ½ inch cubes
Kosher salt and freshly ground black pepper, to taste
2 tablespoons minced chives

To make the dressing: Combine the vegetable or canola oil, olive oil, red wine vinegar, lemon juice, dry mustard, Worcestershire sauce, sugar, and garlic in a blender. Purée the ingredients to make a smooth dressing and season with salt and pepper to taste. Set the dressing aside (or refrigerate, covered, for up to 1 week).

To make the salad: On a large platter, combine the iceberg and romaine lettuces along with the watercress. Arrange the blue cheese, bacon, eggs, tomatoes, chicken, and avocado on top of the greens in neat rows. To serve, drizzle the salad with dressing, season with salt and pepper, and top with the chives. Alternatively, toss everything together in a bowl.

It is very quick and easy and tastes great. I actually added some black olives to the one I made along with some sliced English cucumber and red onion to help round things out. I also used mozzarella and Monterey Jack cheese instead of the blue cheese since we did not have any on hand and Michelle and Sean are not big fans. Instead of using the traditional dressing, I opted to make my own buttermilk ranch dressing using another recipe I got from Saveur magazine. It is a simple way to make your own dressing, tastes better than most of the things you can get in a bottle and costs less for you to make.

Buttermilk Ranch Dressing

1 cup mayonnaise
1 teaspoon onion salt
1⁄4 teaspoon dried chives
1⁄4 teaspoon dried parsley
1⁄4 teaspoon garlic powder
1⁄4 teaspoon salt
1⁄4 teaspoon freshly ground white pepper
Pinch ground dried oregano
1 cup buttermilk

Put the mayonnaise, onion salt, chives, parsley, garlic powder, salt, pepper, and oregano into a medium mixing bowl and stir to combine. Beat the mayonnaise mixture with an electric mixer on low-speed for about 5 seconds, then increase the speed to medium and beat until the mixture is smooth, about 20 seconds. Scrape the dressing down the sides of the bowl with a rubber spatula. Increase the speed to high and gradually add the buttermilk, beating constantly until all the buttermilk is incorporated and the dressing is very smooth, about 2 minutes more.

Cover the dressing and refrigerate the dressing for at least 12 hours. Stir the dressing well before serving. The dressing will keep, refrigerated in a cover container, for up to 2 weeks.

It has great flavor thanks to the spices and I thickened it up a little bit by adding some plain yogurt to it as well. You could easily use this as a dip as well if you wanted to or as a flavoring for other meals, like a topping for burgers.

That’s all I have for today. Check back next time for another recipe. until then, enjoy the rest of your day and enjoy your meal!

IMG_0514 IMG_0513

 
1 Comment

Posted by on April 23, 2014 in Cooking, Dinner, Dressings, Leftovers, Lunch, Salad


Tags: , , , , , , ,

Easter Brunch Recipes – Bon Appétit

Easter Brunch Recipes – Bon Appétit.

Having a brunch on Easter is always a great idea for a special family meal that you can do early in the day, giving everyone time to relax and enjoy each other’s company. Bon Appetit has 21 great Easter brunch recipes here for you to try that can help to round out your meal with a little bit of everything. Check it out!


Tags: , , ,

Step Up the Burrito a Notch with These Surf and Turf Burritos

Burritos are one of those things that are great for breakfast, lunch or dinner because you can really put anything you want inside one to make it work for you. They are easy to make and take no time at all and you can even make them ahead of time and reheat them if you need a quick meal. I decided to jazz up our burritos meal last night by making some surf and turf burritos, not using lobster meat and filet mignon of course, but opting for shrimp and some skirt steak that I had placed in some carne asada marinade. The simple marinade makes a big difference with the skirt steak as it adds great flavor to the meat and helps to break it down some to make it easier to slice and eat. If you are going to use a skirt steak or flank steak for this, you want to make sure you use a marinade along the way.

Carne Asada Marinade

1/2 cup orange juice

1/4 cup fresh lemon juice

1/4 cup fresh lime juice

2 cloves garlic, minced

1/3 cup soy sauce

1 teaspoon finely chopped canned chipotle pepper

1/2 tablespoon chili powder

1/2 tablespoon ground cumin

1/2 tablespoon paprika

1/2 teaspoon dried oregano

1/2 tablespoon black pepper

1/2 bunch cilantro, chopped

1/4 cup olive oil

2 pounds skirt or flank steak

Combine the orange juice, lemon juice and lime juice in a large bowl along with the garlic, soy sauce, chipotle pepper, chili powder, cumin, paprika, dried oregano, black pepper and the cilantro. Slowly whisk in the olive oil until all of the marinade is well combined.

Place the steak between two sheets of plastic wrap on a solid, level surface and firmly pound the steak with the smooth side of a meat mallet so that is a thickness of about 1/4-inch. After pounding the meat, poke the steak all over with a fork. Add the meat to the marinade in the large bowl, cover the bowl and allow the steak to marinade in the refrigerator for 24 hours.

Heat a grill pan or cast iron skillet over medium high heat and lightly oil the surface with vegetable oil or olive oil.

Remove the steak from the marinade and cook until your desired doneness, about 4 to 5 minutes per side for medium-rare. Discard the used marinade. When the meat is cooked to your liking, remove the steak from the grill pan or skillet and let it rest for 2 to 3 minutes before slicing thinly across the grain.

You could simply serve the meat this way with a couple of nice side dishes and you would have a great meal, but I decided to incorporate the steak into our surf and turf burritos for an extra special treat for dinner.

Surf and Turf Burritos

6 large, 10-inch flour tortillas

1 cup sour cream

1 cup guacamole or 1 avocado, peeled, pitted and sliced thinly

1 cup shredded Mexican blend cheese

2 pounds Carne Asada, sliced thinly (see above recipe)

1 pound medium shrimp, peeled, deveined and cooked, chopped

1 cup salsa or pico de gallo

On a flour tortilla, spread a layer of sour cream, then a layer of guacamole or sliced avocado and then layer liberal amounts of cheese, carne asada, shrimp and salsa or pico de gallo. With wet fingertips, fold over the sides of the tortilla and roll it up. Repeat the process until you have filled 6 tortillas.

Place the rolled burritos in a hot skillet or on a medium-hot grill. Cook the burritos until they are golden brown on both sides, about 6 minutes total.

These were really good and very filling. The great flavors of everything combined were awesome and you can make a fancy sounding and great tasting meal in just minutes with this recipe. Of course, you could probably use filet mignon and lobster if you really wanted to, but for burritos this is ideal and tastes great. I also made some Tex-Mex rice and beans to go along with the meal and I will post the recipe for them tomorrow. This recipe is definitely one we will be having again since we all loved it.

That’s all I have for today. Check back next time for another recipe. Until then, enjoy the rest of your day and enjoy your meal!

IMG_0510 IMG_0509


3 Comments

Posted by on April 18, 2014 in Beef, Cooking, Dinner, Lunch, Sandwiches, Sauce, Seafood


Tags: , , , , , , ,

 
National Day Calendar

Fun, unusual and forgotten designations on our calendar.

Jennifer Probst

a little bit naughty a little bit nice

Laissez Faire

Letting Life Lead

simple cooking recipes

a blog to share with you the best