RSS

Category Archives: Sauce

Superb and Scrumptious – Curried Chicken Salad Sandwich with Peach Chutney

It’s no big secret that I love sandwiches. I am pretty sure I could just eat different sandwiches for meals all the time and be quite happy with it. I am always looking for new ideas for sandwiches and Michelle and I were watching “Diners, Drive-ins and Dives” a few nights ago when we saw this sandwich being made at the Leaping Lizard Cafe in Virginia Beach, Virginia. it was for a chicken salad sandwich with peach chutney that looked amazing. We both immediately wanted to have one and since driving to Virginia Beach at that time wasn’t very practical, I decided we would be better off making it ourselves. They were not real specific about amounts for the ingredients and it took some searching online before I finally found a posting at Group Recipes for one that seems pretty darn close to what they made.

Curried Chicken Salad Sandwich with Peach Chutney

1 rotisserie chicken, dark and white meat picked and pulled

1 cup plain yogurt

1/2 cup mayonnaise

1 to 2 teaspoons curry powder (to taste)

4 scallions, sliced – white and green parts sliced into 1/2-inch pieces

1/3 cup toasted almond slices

For the Peach Chutney:

1 can sliced peaches in natural juices (16 ounces), drained but not rinsed

3/4 cup diced red pepper

3/4 cup diced onion

1/4 cup raisins

1 teaspoon ground cinnamon

1/4 teaspoon ground cloves

1/2 teaspoon ground ginger

1/4 cup cider vinegar

1/4 cup sugar

1 1/2 cups water

Salt and pepper to taste

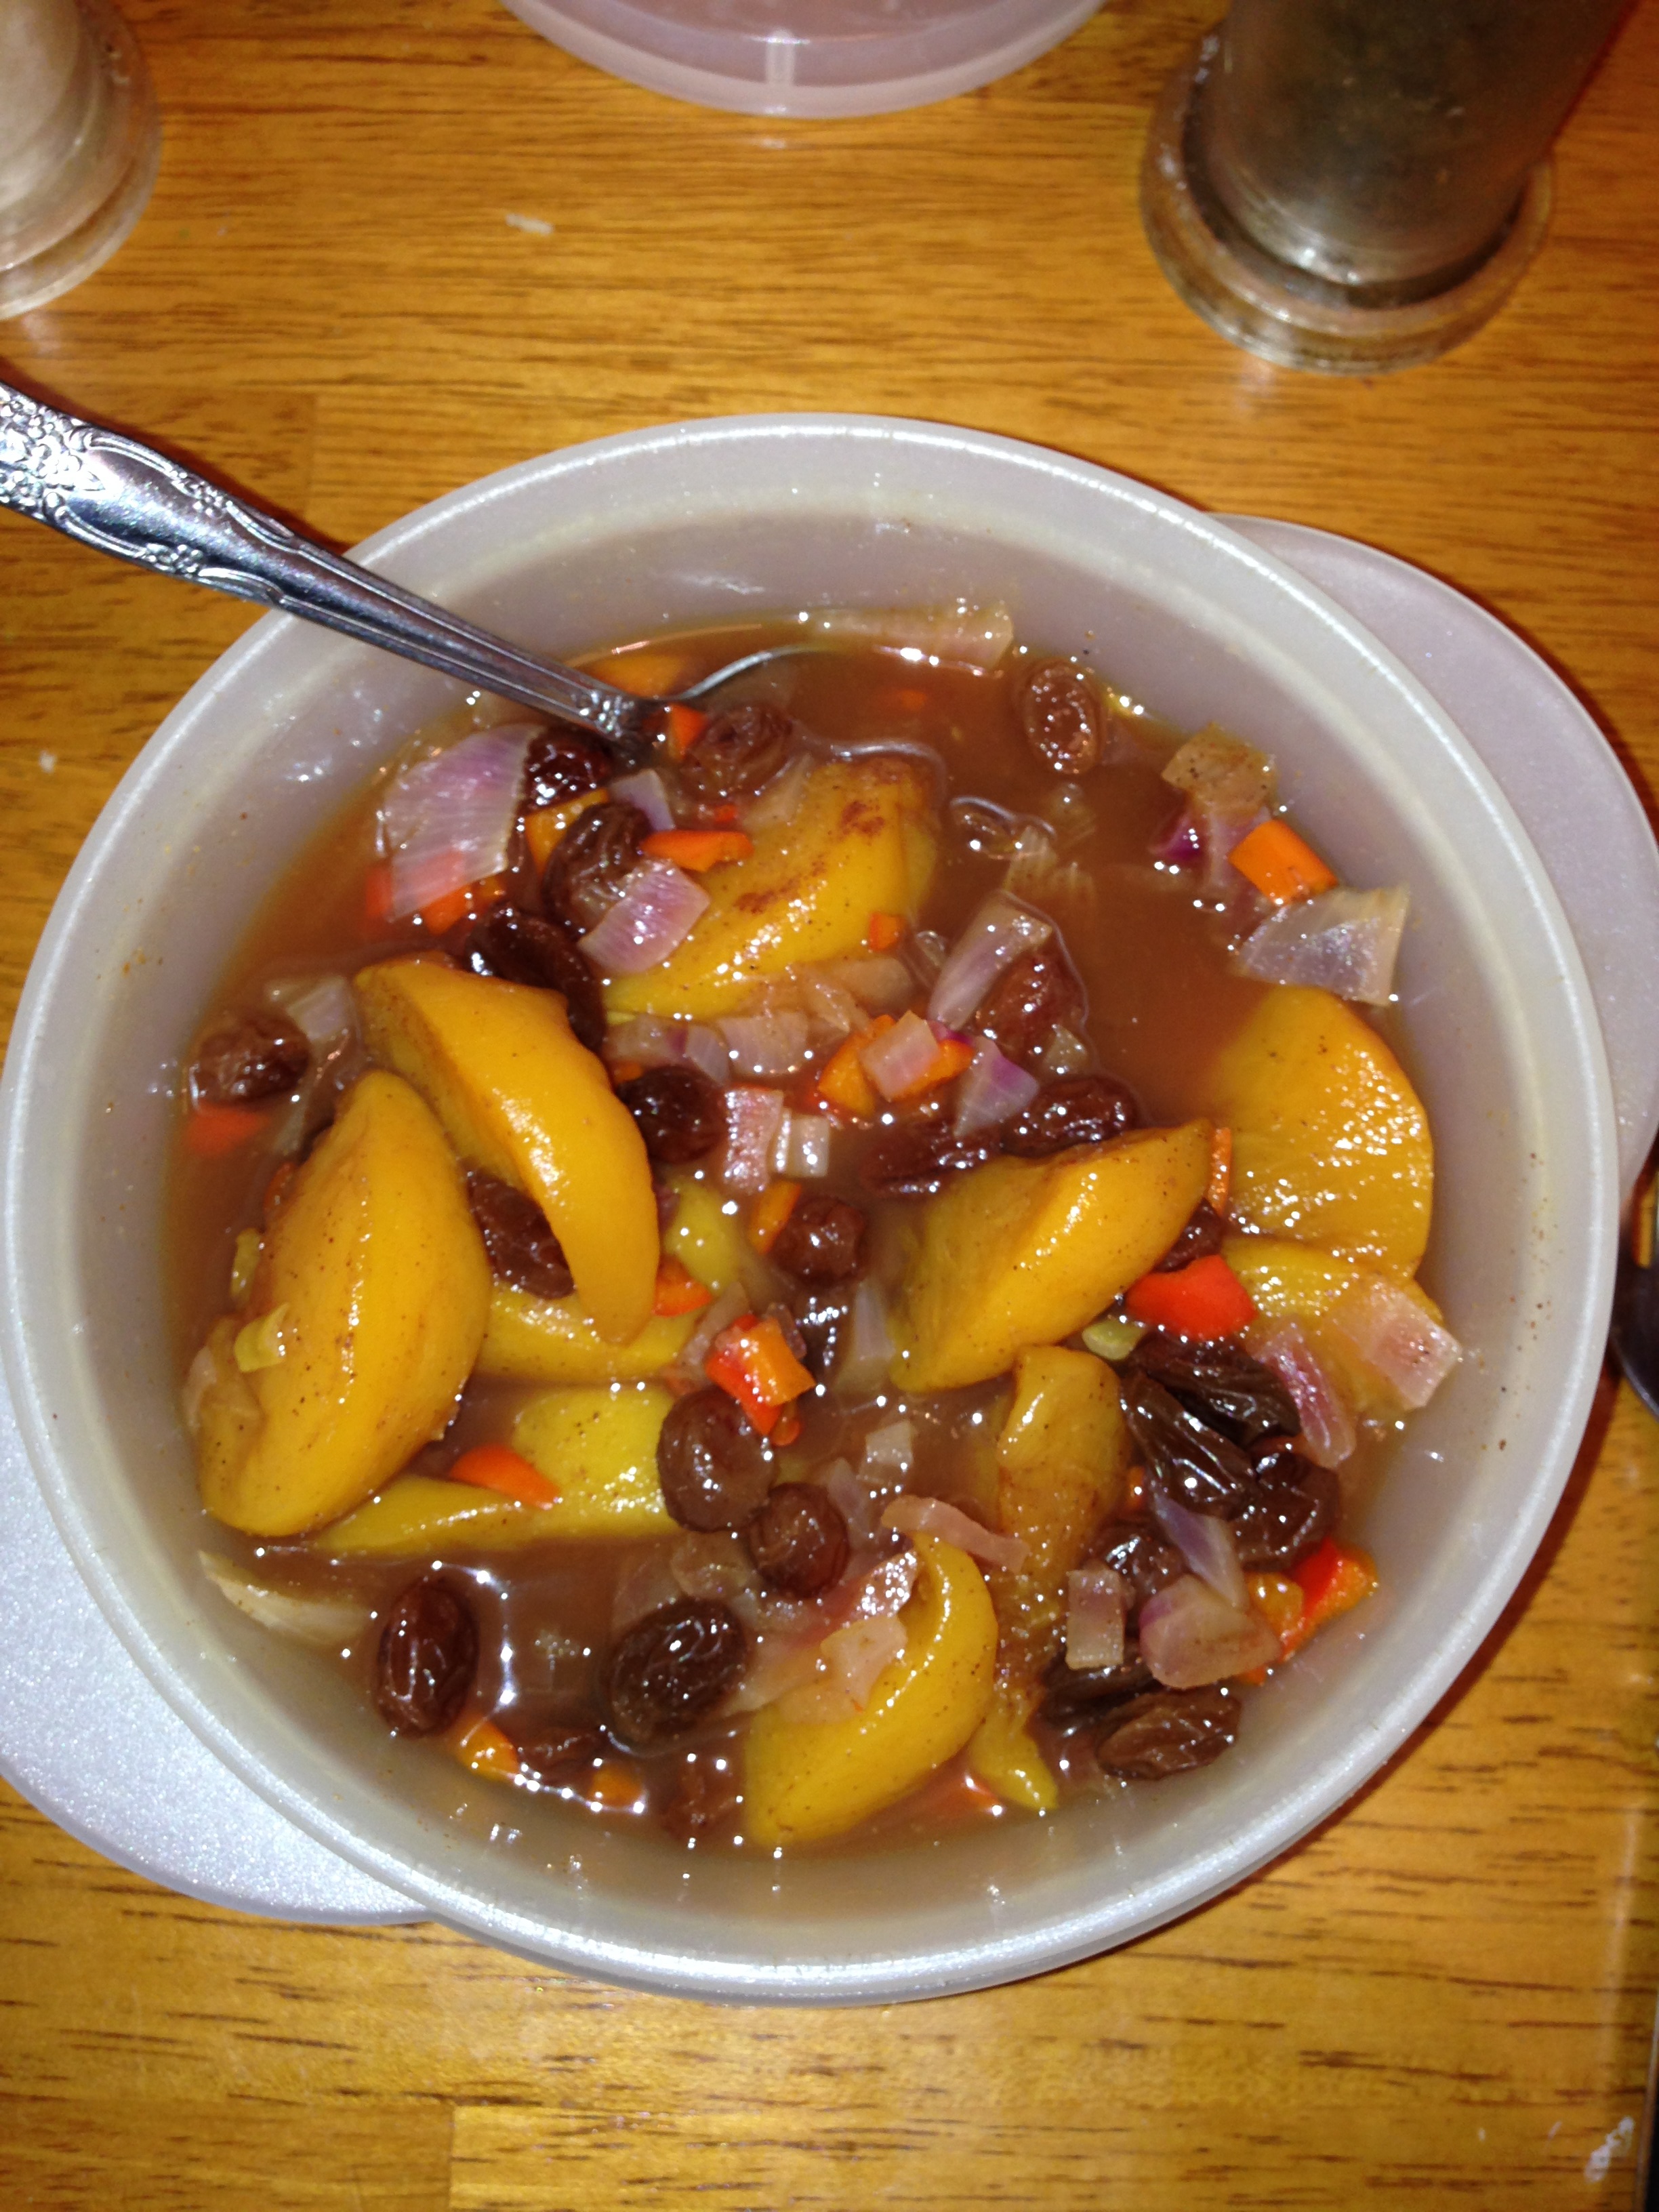
For the chutney, combine the peaches, red pepper, onion, raisins, cinnamon, ground cloves, ground ginger, cider vinegar, sugar and water together in a medium saucepan over medium heat. Bring the mixture to a boil and then turn the heat down so the mixture is at a simmer. Simmer the chutney until the liquid is reduced by 2/3, about 15 to 20 minutes. Cool the chutney to room temperature.

For the chicken salad, whisk the yogurt, mayonnaise and curry powder together in a medium bowl until well blended. Set the dressing aside for the flavors to meld, about 15 minutes.

Take about 1/3 of the picked chicken and place it in the food processor. Pulse briefly in the food processor until the chicken is finely ground. Combine the ground chicken, the remaining shredded chicken and the mayonnaise mixture. Toss in the sliced scallions and almonds and mix gently to fold in the chicken. Toss in 1/2 cup of the cooled chutney with the chicken and blend well.

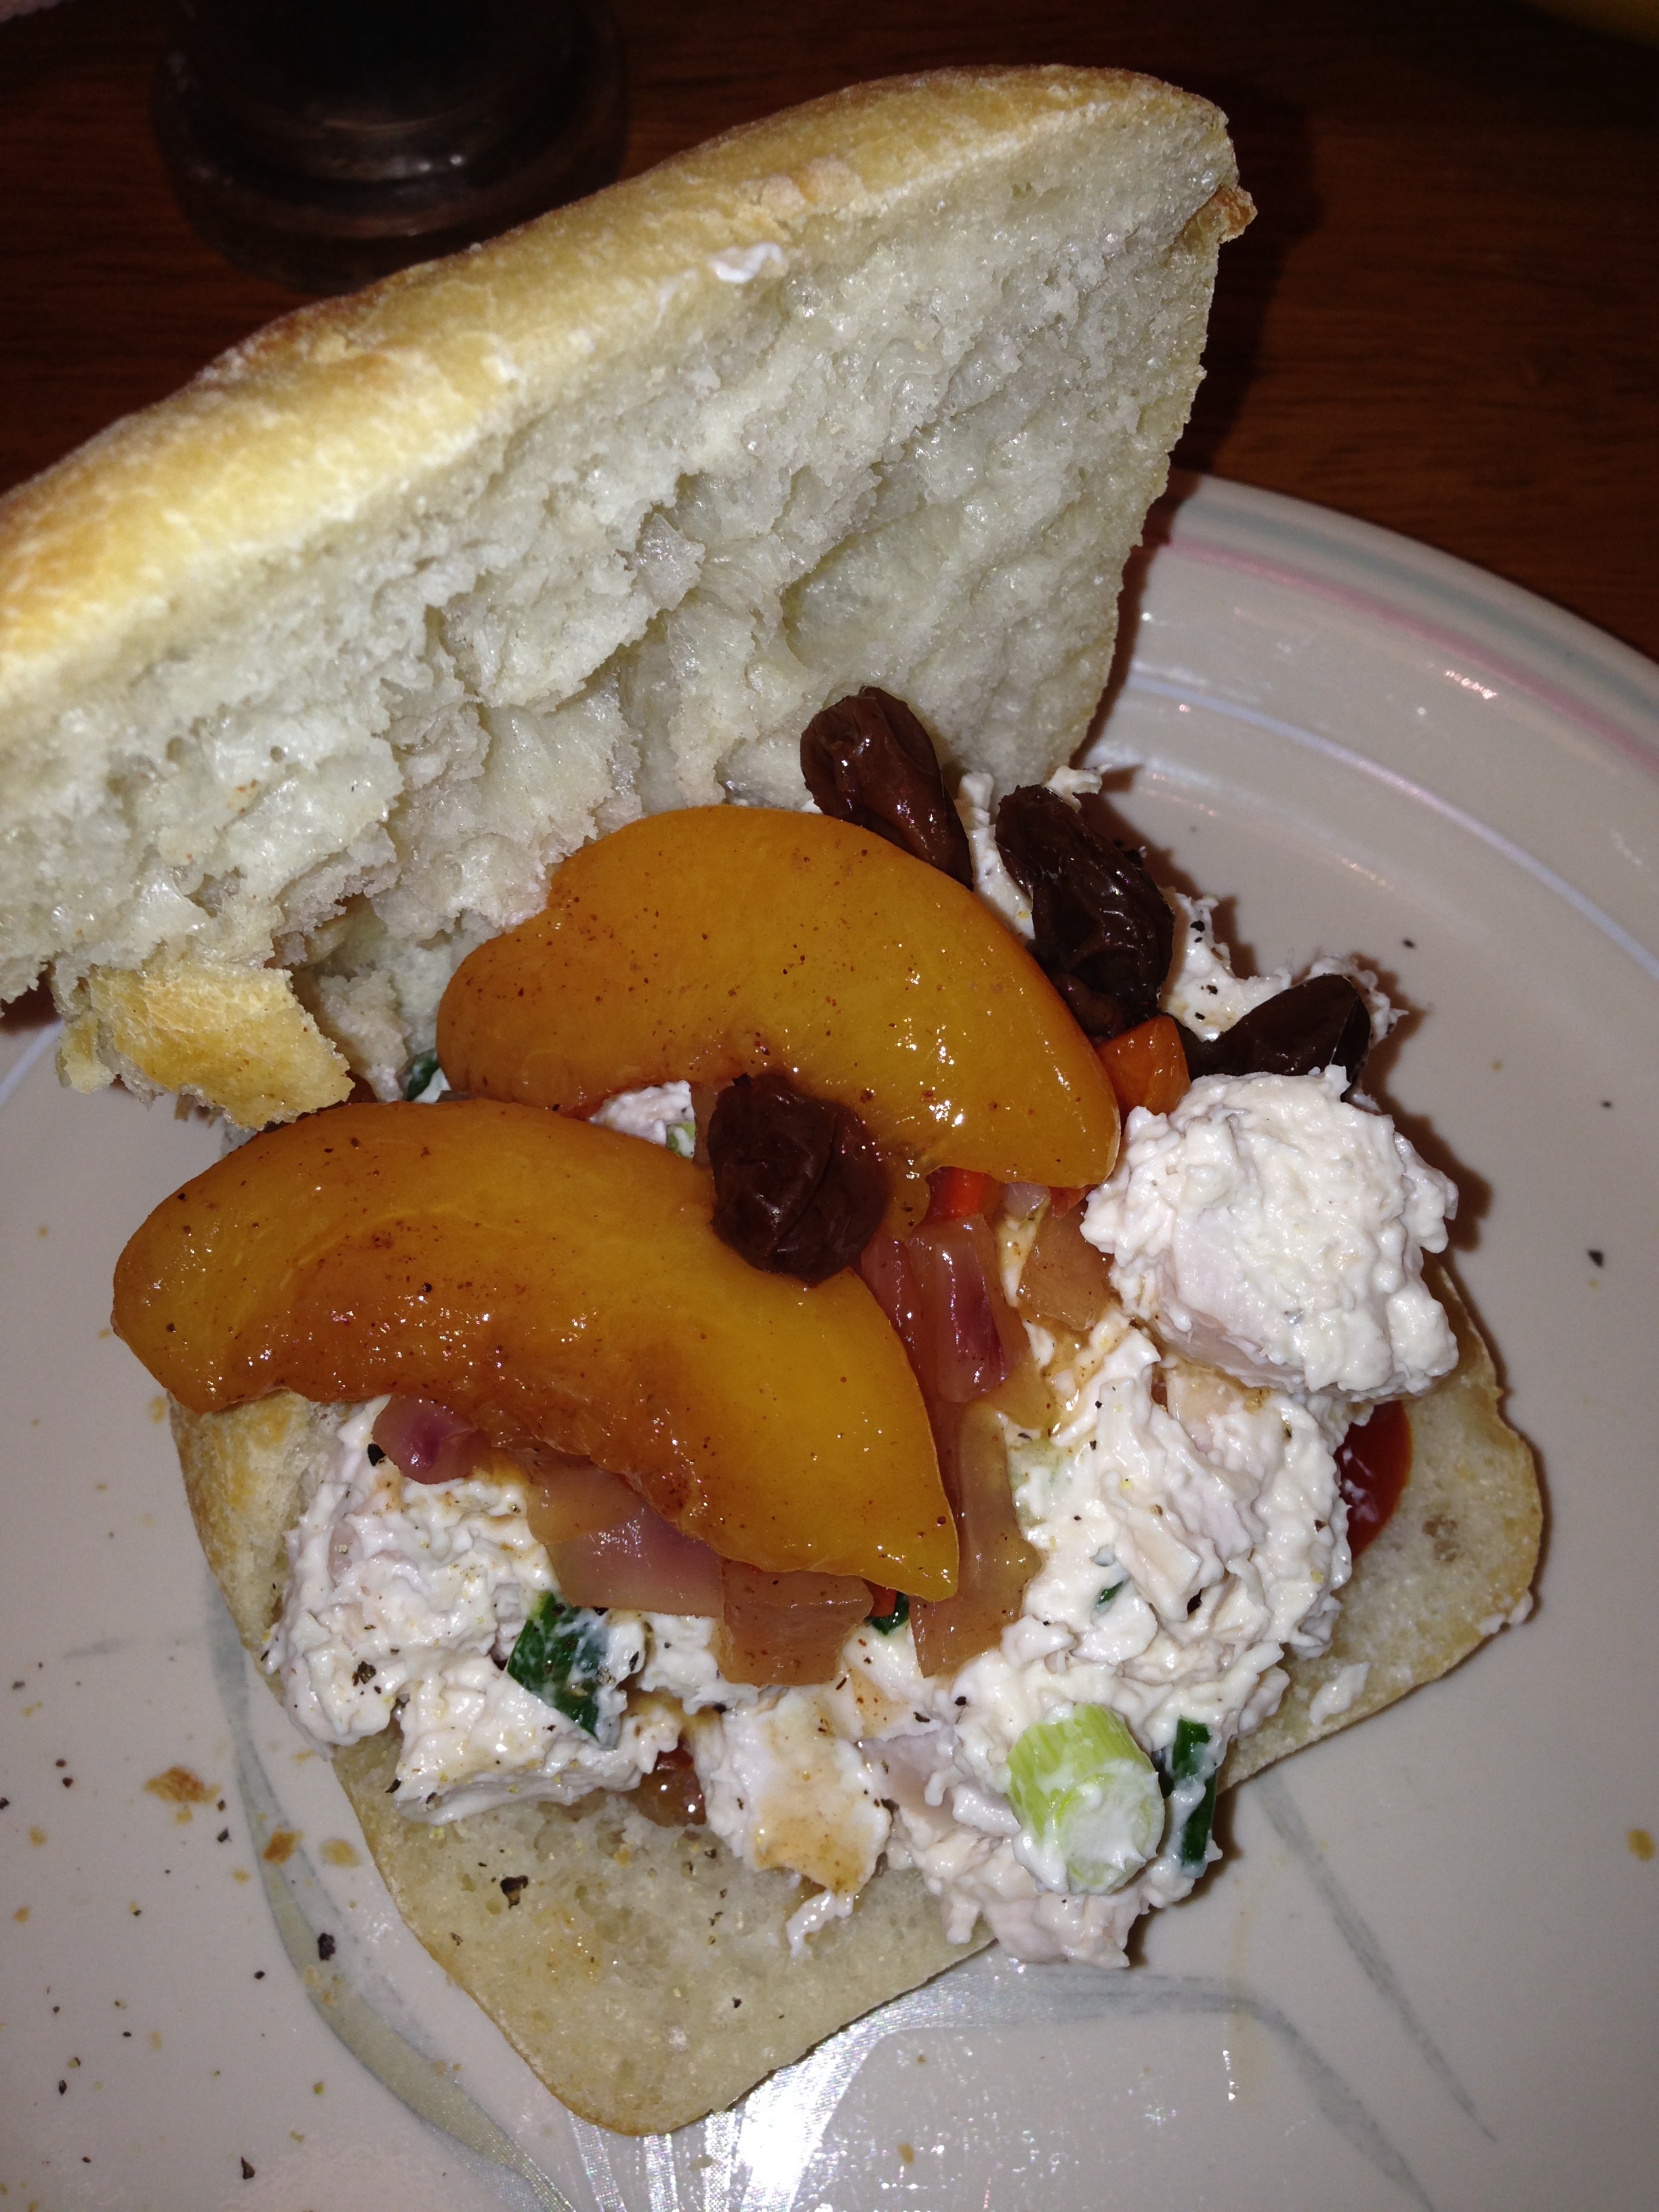
To make the sandwich, take two slices of preferred bread and place sliced tomatoes on half of the bread. Spread the chicken salad over the tomatoes and top with lettuce or other leafy greens. If you desire, place the sandwich on a panini press to toast it lightly; do not press down on the sandwich while it is in the panini press. Slice the sandwich and serve.

This chicken salad was delicious and made a great sandwich. I loved the mix of the chutney with the peaches and raisins and what it added to the sandwich and the curry in the chicken salad was not overpowering at all and added some great flavor. The sandwich had everything you could want – great taste, vegetables, fruit and some crunch. I would definitely make it again and had leftovers for lunches for days and had the chutney with a bunch of other meals as well.

That’s all I have for today. Check back next time for another recipe. until then, enjoy the rest of your day and enjoy your meal!

IMG_0447 IMG_0446


2 Comments

Posted by on March 5, 2014 in Cooking, Lunch, Poultry, Sandwiches, Sauce


Tags: , , , , , ,

Never Mind the McRib! Try This Smoky BBQ Riburger on Cheesy Garlic Bread

I can honestly say that I have never had the McRib sandwich, as un-American as that may sound. The whole idea of it kind of grosses me out, so I have stayed away from it, however I do like the idea of having a rib sandwich. As much as I would like a rib sandwich, I don’t know if I want to go through all of the trouble of cooking boneless ribs for hours just for a sandwich either, saw when I saw this recipe from Jeff Mauro, the Sandwich King on Food Network, I thought it sounded good and was certainly worth a try. He calls it a smoky barbecued riburger that uses a homemade barbecue sauce and some ground pork to make a burger-type sandwich. Put it on some garlic bread and you seem to have something pretty irresistible to me.

Smoky BBQ Riburger on Cheesy Garlic Bread

For the Chipotle Pineapple BBQ Sauce:
1 tablespoon vegetable oil
1 clove garlic, grated
1/2 medium onion, minced
2 cups ketchup
1/2 cup crushed pineapple with juice
3 tablespoons molasses
3 tablespoons apple cider vinegar
2 tablespoons light brown sugar
2 tablespoons Dijon mustard
2 tablespoons Worcestershire sauce
2 chipotle peppers in adobo
For the Ground Pork BBQ Riburger:
2 pounds ground pork
Kosher salt
For the Garlic Bread:
1 stick melted butter (1/2 cup)
2 tablespoons minced garlic
One 32-inch French loaf, split and halved
3 cups grated fresh mozzarella
Dill pickles, sliced on the bias or to your liking, for garnish

For the barbecue sauce: Heat the vegetable oil in a medium saucepan over medium heat. Add the garlic and the onions and saute until they are soft, about 4 minutes. Add the ketchup, crushed pineapple, molasses, vinegar, sugar, mustard, Worcestershire and the chipotles. Simmer uncovered, stirring often, until the mixture is thickened, about 15 to 20 minutes. Remove the sauce from the heat and blend it with an immersion blender until it is mostly smooth. Reserve.

For the pork burgers: Preheat a grill pan or skillet to medium-high to high heat.

Form the ground pork into long and rectangular patties that fit the shape of the bread, keeping in mind that there will be 2 patties per half of bread. Sprinkle the exterior of the patties with salt and place them on a hot grill top for 3 minutes. Flip the patties and cook them for another 3 minutes. Turn off the heat and baste the patties generously with the barbecue sauce. Flip the patties and continue cooking for about 2 or 3 more minutes, continuously flipping and basting the burgers.

For the garlic bread: Place a rack in the middle of the oven and set the oven to broil. Mix the melted butter with the garlic and brush the mixture on the cut sides of the bread. Top with the mozzarella cheese and place the bread under the broiler just until the edges are lightly crisped, about 2 minutes.

For the sandwich build: After your garlic bread is done, place 2 burgers on each bottom half of bread. Top the burgers with some pickles and the top half of the garlic bread. Slice each portion in half, yielding 4 sandwiches. Serve with the remaining BBQ sauce on the side.

These burgers were very easy to make and tasted great. They offer a nice change from a traditional burger and the barbecue sauce had a nice flavor with the mix of pineapple, molasses, Worcestershire and chipotles. You could certainly skip making the barbecue sauce and use your own favorite bottled sauce instead if that is what you are going for. We all really enjoyed having the burgers on the garlic bread, which seemed to make them even better and I had enough sauce leftover that I can use it for other things like ribs. It’s definitely a recipe worth giving a try. I served the sandwiches with some German potato salad and a new coleslaw recipe I tried, which I will be sharing tomorrow.

That’s all I have for today. Check back tomorrow as I will be sharing a couple of side dishes I made with burgers this week – a buttermilk coleslaw with bacon and cornmeal crusted onion rings, both very tasty and easy to do. Until then, enjoy the rest of your day and enjoy your meal!

IMG_0445 IMG_0441 IMG_0443

 
Leave a comment

Posted by on March 2, 2014 in Breads, Cooking, Dinner, Grilling, Pork, Sauce


Tags: , , , ,

Time for Some Pork – Roasted Pork Tenderloin with Apricot-Orange Glaze with Black Bean and Corn Relish

I love to make pork tenderloin because they can be made pretty quickly and easily during a weeknight and it feels like you are eating an elegant meal. I try to buy them when they are on sale, take one tenderloin out(they are almost always two to a package) and freeze the other for another night. When I went to make this one recently, I found two recipes I actually liked so I ended up combining their ideas into one singular recipe. I took a recipe idea from America’s Test Kitchen along with one from Every Day Health and came up with this roast pork tenderloin with an apricot-orange glaze and black bean and corn relish.

Roast Pork Tenderloin with Apricot-Orange Glaze with Black Bean and Corn Relish

1 pound pork tenderloin, trimmed

Salt and pepper

1 tablespoon vegetable oil

1 cup apricot preserves

1/2 cup orange juice

1/4 cup dried apricots, quartered

3 tablespoons fresh lemon juice

1 15-ounce can black beans, drained and rinsed

2 cups frozen corn kernels

1 15-ounce can diced tomatoes, drained

2 cloves garlic

1/2 cup red onion, diced

1 small red, yellow or orange bell pepper, seeded and diced

1/4 cup chopped fresh parsley

Adjust an oven rack to the lower-middle position and preheat the oven to 450 degrees. Pat the pork tenderloin dry with paper towels, then season it with salt and pepper. Heat the vegetable oil in a large, oven-safe skillet over medium-high heat until it is just smoking. Brown the tenderloin on all sides, reducing the heat if the fat begins to smoke, about 10 minutes. Transfer the tenderloin to a plate and set it aside.

Combine the apricot preserves, orange juice, dried apricots and lemon juice in a bowl. Pour off all the fat from the skillet that held the tenderloin. Add the apricot mixture to the pan. scrape up any browned bits and simmer until the mixture is slightly thickened and fragrant, about 3 minutes. Return the tenderloin to the skillet and coat it well with the glaze on all sides.. Roast the tenderloin in the oven until the center of the pork registers 135 degrees on an instant read thermometer, about 15 to 18 minutes, turning the tenderloin halfway through the cooking time.

While the tenderloin is roasting, in a small saucepan over medium heat, add 1 tablespoon of vegetable oil and heat until shimmering. Add the red onion and the pepper and saute until the vegetables are soft, about 2 to 3 minutes.Add the black beans, frozen corn, garlic and drained tomatoes and bring the mixture to a simmer. Heat just until the corn is cooked through, about 4 minutes. Toss in the  chopped parsley and mix and the refrigerate the relish for 30 minutes to blend the flavors.

Remove the tenderloin from the oven and transfer it to a cutting board. Tent the tenderloin with aluminum foil and let it rest until the pork reaches an internal temperature of 145 to 150 degrees before slicing, about 10 minutes. Slice the tenderloin and place it on a serving platter and then drizzle it with any remaining glaze that may be in the skillet. Serve the tenderloin with the black bean relish.

This is a very easy dinner that you can make in under an hour and it tastes great and looks like you put a lot of work into it. The glaze on the pork is super with the apricots and orange juice. I even added an apple to the glaze and baked it over the pork for some extra flavor. We all loved the black bean relish as well. It had incredible flavor and would be perfect as a side for a summer barbecue with ribs, hamburgers or even just as a great side for some Mexican food or even sandwiches. We ate the leftovers several times with other meals. You could use fresh corn for this as well and not cook anything in the recipe and simply combine all of the ingredients until they are well mixed if you wanted it that way or even give it a little heat by using hotter peppers in the relish instead of bell peppers. I also made some asparagus and rice to round out the meal.

That’s all I have for today. Check back next time for another recipe. As usual there is always plenty more to come. If you ever have any recipes you might like to share, feel free to drop me a note in the comments section, send me an email at IguanaFlats@msn.com or send me a message on Facebook or Twitter. Until next time, enjoy the rest of your day and enjoy your meal!

004


4 Comments

Posted by on February 19, 2014 in Cooking, Dinner, Pork, Sauce, Side Dishes


Tags: , , , , , , , ,

It’s a Snack Attack, Part 3 – Pork Dumplings

Okay, here is the last of the snacks I made this past week. This one also comes from Kelsey Nixon of the Cooking Channel and is for pork dumplings. Sean has been asking me to make these for quite a while now and I finally had some ground pork and wonton wrappers on hand so I thought I would give it a try. There are only a few ingredients to these and they are very simple to make as an easy snack or appetizer if you are planning an Asian-style meal for dinner or just feel like having some kind of a snack.

Pork Dumplings

For the Pork Dumplings:

1 tablespoon minced garlic

2 teaspoons minced ginger

2 teaspoons sesame oil

1 small bunch, scallions, white and green parts, chopped

12 ounces ground pork

3 tablespoons hoisin sauce

2 teaspoons soy sauce

1 teaspoon Chinese five-spice powder

1 egg

1 package dumpling or wonton wrappers

1 tablespoon vegetable oil, for frying

For the Dipping Sauce:

1 cup soy sauce

2 1/2 tablespoons Sriracha sauce

Juice of 3 lemons

For the dipping sauce, combine the soy sauce, Sriracha and lemon juice in a bowl and set the sauce aside until you are ready to serve the dumplings.

For the pork dumplings, heat a large nonstick skillet over medium-high heat. Add the garlic, ginger, sesame oil and scallions and cook until the mixture is fragrant, about 1 to 2 minutes. Remove the skillet from the heat and allow the mixture to cool for about 1 minute.

Combine the cooked garlic, ginger and scallions with the ground pork, hoisin sauce, soy sauce, Chinese five-spice powder and the egg in a large bowl.

Working with the dumpling wrappers, start with the floured surface of the wrappers facing down. Place about 1 1/2 teaspoons of the filling in the center of a wrapper. Wet the edge of the dumpling with water, using your  finger, and fold the dumpling in half without sealing it, like a taco. Pinch one end closed. Create the pleats of the dumpling on one side using your thumb and forefinger, pressing against the other flat edge to seal the dumpling as you go. Flatten the bottoms so that the bottom surface of the dumpling can get a good sear on it when you pan fry them. Repeat the process until all the dumplings are filled. Keep the dumplings on a lightly-floured sheet tray to keep them from sticking and cover the dumplings with a slightly damp towel to keep them from drying out while you make the rest of the batch.

Heat the vegetable oil over high heat in a large nonstick skillet. Working in batches, pan fry the dumplings by placing them bottom-side down and frying them until they are golden brown, about 1 to 2 minutes.

Once the dumplings are golden brown, working carefully, pour 1/2 cup of water into the skillet to cover the dumplings halfway. Immediately cover the skillet with a lid, leaving a small crack for steam to escape. Cook the dumplings until the water has evaporated, about 5 to 7 minutes. Transfer the dumplings to a paper towel-lined plate to soak up any excess oil and repeat the process with the remaining dumplings.

I can tell you that this recipe makes a lot of dumplings, so you can certainly freeze them and heat them up any time you want to have a little snack. We all enjoyed the dumplings as they had some great flavor with the ginger, scallions and hoisin sauce. They were pretty easy to make and while the recipe calls for round dumpling wrappers, i only had square wonton wrappers and I think they worked out just fine for my purposes. It is a perfect party snack you can make pretty easily and I think you could substitute out the pork for beef, chicken, turkey, shrimp or even just vegetables and get great results.

That’s all I have for today. Check back next time for another recipe. I have some other great recipes we have tried lately and I still have my recipes I am making on Valentine’s Day this year to share as well. Until next time, enjoy the rest of your day and enjoy your meal!

004

 
2 Comments

Posted by on February 12, 2014 in Appetizers, Cooking, Pork, Sauce, Snacks


Tags: , , , , ,

It’s a Snack Attack, Part 1 – Southwestern Egg Rolls with Avocado-Ranch Dipping Sauce

Since I spent most of the weekend working I did not have a chance to do any posting on here. However I did find the time to try out some new snack recipes that I had been wanting to make for a while and we all sat down and tested them out last night to see how they were. This first one I think was the real hit and turned out the best. It is a take on Chili’s Southwestern eggrolls  recipe. If you have ever eaten at Chili’s or many other places just like it now, you have likely seen this one listed on their menu and perhaps have tried it out. It has always been one of Michelle’s favorites and when I came across it at Chef’s Catalog website I knew I had to give it a try and see how it was. Though they might seem complicated to make, they are actually pretty easy and I think worth the time to put into it.

Southwestern Eggrolls

1 boneless, skinless chicken breast

1 tablespoon vegetable oil

2 tablespoons minced red bell pepper

2 tablespoons minced green onion

1/3 cup frozen corn kernels

1/4 cup canned black beans, rinsed and drained

2 tablespoons frozen spinach, thawed and drained

2 tablespoons diced jalapeno peppers

1/2 tablespoon minced fresh parsley

1/2 teaspoon cumin

1/2 teaspoon chili powder

1/4 teaspoon salt

Dash cayenne pepper

3/4 cup shredded Monterey Jack cheese

5 7-inch flour tortillas

1 egg, beaten

6 cups vegetable oil, for frying

For the Avocado-Ranch Dipping Sauce:

1/4 cup fresh avocado, smashed (about half an avocado)

1/4 cup mayonnaise

1/4 cup sour cream

1 tablespoon buttermilk

1 1/2 teaspoons white vinegar

1/8 teaspoon salt

1/8 teaspoon dried parsley

1/8 teaspoon onion powder

Dash dried dill weed

Dash garlic powder

Dash pepper

Heat a large skillet over high heat with 1 tablespoon of the vegetable oil until it is shimmering. Saute the chicken breast until it is cooked through, about 4 to 5 minutes per side. Set the chicken aside until it cools down enough for you to handle. Wash and dry the skillet to use for the next step.

In the now-empty skillet, heat 1 tablespoon of vegetable oil over medium-high heat until it is shimmering. Add the red pepper and the green onions and saute for 2 to 3 minutes until the vegetables are tender. Dice the cooked and cooled chicken into small cubes and add it to the pan. Add the frozen corn, black beans, spinach, jalapeno peppers, parsley, cumin, chili powder, salt and cayenne pepper to the pan and mix thoroughly. Saute the mixture until it is heated through, about 4 to 5 minutes. Stir the mixture well so that the spinach breaks up and is incorporated into the mixture. Remove the pan from the heat and add the Monterey Jack cheese. Stir until the cheese has melted into the mixture.

Wrap the flour tortillas in a moist cloth and microwave them on high for 1 1/2 minutes or until they are hot. Spoon approximately 1/5 of the mixture into the center of a warm tortilla. Fold in the ends of the tortilla and then roll the tortilla over the mixture. Roll the tortilla very tightly but before you finish rolling brush some of the beaten egg on the inside edge of the tortilla. Finish rolling the eggroll, then set the eggroll with the “glued” seam facing down until the egg sets. Repeat the process with the remaining tortillas and filling until you have five large eggrolls. Arrange the eggrolls on a plate with the sealed edges facing down, cover the plate with plastic wrap and freeze for at least 4 hours or overnight.

While the eggrolls freeze, prepare the avocado-ranch dipping sauce by combining the avocado, mayonnaise,, sour cream, buttermilk, white vinegar, salt, dried parsley, onion powder, dill weed, garlic powder and pepper in a small bowl and mixing until everything is well combined. Refrigerate the dipping sauce until you are ready to serve the eggrolls.

Preheat the 6 cups of vegetable oil in a deep cast iron pan or Dutch oven until the temperature reaches 350 degrees. Deep fry the eggrolls, in batches if necessary, in the hot oil for 8 to 10 minutes until they are golden brown. Remove the eggrolls to a paper towel-lined plate or a cooling rack to drain for about 2 minutes. Slice each eggroll diagonally lengthwise and arrange them on a plate around a small bowl of the dipping sauce and serve.

Just a couple of quick notes about this recipe. If you don’t want to use the jalapenos, leave them out. I didn’t have any on hand when I made them and the final results were fine, but if you want more heat put them in. Also, I never use as much oil as they recommend when deep-frying. I just hate using that much oil and I try not to deep fry very often, but for something like this I think they came out much better than if we tried them in the oven first. We all loved the results of this recipe. It tastes a lot like what you get at the restaurant and was not hard to make at all. Letting them freeze really does help things to set up nicely and you get a nice dark color when they are deep-fried because of it, but to be honest I only froze them for a little over and hour and I think they turned out fine with that little time. Five may not sound like a lot to get but they are a decent size. If you are making these for a crowd you may want to make a double batch, though I actually got 7 out of the filling I made, so it really depends on how you want to go about it. Michelle has always loved the avocado ranch sauce they serve and this home version did not disappoint. It has the nice mix of flavor you like in the sauce and is perfect not just for egg rolls but for anything else you may want to dip in there, like chips or vegetables. Overall, this recipe is definitely a keeper.

That’s all I have for today. Check back next time for another a recipe. I have a couple of more snack foods I just tried out that you may like to try and I do have some plans for a nice Valentine’s Day dinner involving some steak, lobster tails, a beet salad and molten lava cakes, so check back for those. Until next time, enjoy the rest of your day and enjoy your meal!

005


6 Comments

Posted by on February 10, 2014 in Appetizers, Cooking, Sauce, Snacks


Tags: , , , , ,

The Key to a Truly Great Chicken Wing – NYTimes.com

The Key to a Truly Great Chicken Wing – NYTimes.com.

Who doesn’t love chicken wings? Especially on Super Bowl Sunday? If you are still  looking for a good recipe for wings for tonight, Mark Bittman wrothe this great article for the New York Times a few months ago about how grilling your wings provides you with the best option in making great wings and gives you some great recipes and sauces to use so you can make all kinds of chicken wings when you want them. You can always break out the grill pan and give them a try or just fry them and try the different sauce recipes he offers. Check it out!

 
Leave a comment

Posted by on February 2, 2014 in Cooking, Cooking Websites, Grilling, Poultry, Sauce


Tags: , , , , , , ,

It’s a Chicken Invasion, Part 2 – Pan Seared Chicken Breast with Herb Jus and Potato Vegetable Hash

For the next chicken meal for the week I decided again to try to keep something simple and different. I find I don’t but chicken breasts very often, but I saw some on sale recently and picked up a package because it was on sale. Usually the bone-in chicken breasts are pretty large and end up cutting them in half so we get more meals out of them. That is what I did this time and then I decided I was going to try this recipe that I saw from Robert Irvine of the Food Network. it is for a simple pan seared chicken breast with herb jus and a really tasty potato vegetable hash. it’s a simple recipe that’s easy enough to make during the week for a nice dinner.

Pan Seared Chicken Breast with Herb Jus and Potato-Vegetable Hash

For the Chicken:

2 tablespoons vegetable oil

2 skin-on, bone-in chicken breasts, cut in half

Salt and freshly ground black pepper

1 cup dry white wine

1 clove garlic, minced

1 tablespoons minced fresh thyme leaves

1 teaspoon chopped rosemary leaves

1 teaspoon chopped fresh parsley leaves

2 tablespoons butter

1 tablespoon minced fresh chives

For the Potato-Vegetable Hash:

1 potato

1 zucchini

1 yellow squash

1 small red onion, thinly sliced

1 egg, beaten

2 tablespoons all-purpose flour

1 clove garlic, minced

1 teaspoon minced fresh thyme leaves

1 teaspoon minced fresh tarragon leaves

1 teaspoon Cajun spice

Vegetable oil

Salt

For the chicken, heat a large saute pan over high heat and add the vegetable oil. Heat the vegetable oil until it is shimmering. Season both sides of the chicken breasts with salt and pepper to taste. Sear the chicken, skin side down, until the skin is a golden brown, about 5 to 6 minutes. Reduce the heat to medium, flip the chicken breasts over, cover the pan and cook on the second side for 7 to 8 minutes.

After the second side has been cooked, add the white wine, the garlic, thyme, rosemary and parsley and continue to cook the chicken until the liquid is reduced by half, about 7 minutes. Transfer the chicken to a serving platter and cover it loosely with aluminum foil to allow it to rest.

Remove the saute pan from the heat and whisk in the butter, scraping up any browned bits from the bottom of the pan.

For the potato-vegetable hash, using a box grater, shred the potato, zucchini and yellow squash and add them to a large bowl. Stir in the red onion, egg, flour, garlic, thyme, tarragon and the Cajun spice. Blend the mixture well and add more flour if the mixture seems too wet. The mixture should hold its shape when it is squeezed.

Heat a large saute pan over medium heat and add two tablespoons of vegetable oil. Heat the oil just until it is shimmering and portion the potato mixture into cakes, gently patting and forming them in your hands. Cook the cakes until they are golden brown on one side, about 2 to 3 minutes. Flip the cakes over and cook until the other side is browned, about another 3 minutes. Remove the cakes from the pan and set them on a paper towel-lined plate and season with salt to taste.

Serve the potato vegetable hash warm with a chicken breast piece on time and some of the herb jus sauce.

This was a very simple meal that makes good use of the white meat of the chicken if you need a new recipe. Sean is a big white meat-eater so he really liked this meal. The sauce for me was the winner as it had great flavor and everyone really liked the potato-vegetable hash, which was the real hit of the meal. The combination of the potato, zucchini and squash was perfect with the herbs and spices and it wasn’t cooked so long that it got all dried out. It was nice and flavorful from the vegetables with some crispness. It was definitely one I would make again.

That’s all I have for today. Check back next time for the next chicken recipe. I have some fried chicken sandwiches, an oven roasted turkey breast, a skillet roasted chicken and more still to come. Until next time, enjoy the rest of your day and enjoy your meal!

003 002

 
Leave a comment

Posted by on January 29, 2014 in Cooking, Dinner, Poultry, Sauce, Vegetables


Tags: , , , , , ,

It’s a Chicken Invasion! Part One – Bourbon Glazed Chicken

It seems like every time I go to the grocery store lately for the last few weeks there is chicken on sale and I come home with a lot of it. We have been making a lot of chicken lately and cutting back on red meat where we can to try to be a little healthier and let’s face it – no matter where I seem to shop lately beef is very expensive so we may as well have some poultry. I have a lot of chicken recipes to use, so there is always plenty for me to try, so we’ll be doing chicken recipes all week this week. First up was a simple dish that I saw from Bon Appetit that they actually use for their wings but I simply adapted it to use with chicken thighs and drumsticks instead. It is for bourbon glazed chicken and the glaze tastes delicious.

Bourbon Glazed Chicken

2 tablespoons butter

1 cup chopped onion

3 garlic cloves, peeled, thinly sliced

1 cup bourbon, divided

1 cup ketchup

1/2 cup hot sauce

1/4 cup tomato paste

3 tablespoons packed light brown sugar

4 pounds bone-in chicken parts (thighs, drumsticks and wings)

Melt the butter in a large heavy saucepan over medium-high heat. Add the chopped onion and garlic and saute until golden brown, about 5 to 6 minutes. Add 3/4 of a cup of the bourbon and boil the mixture until most of the liquid is absorbed, about 6 to 8 minutes. Whisk in the remaining 1/4 cup of the bourbon, the ketchup, hot sauce, tomato paste, and the brown sugar until it is well blended. Reduce the heat and simmer until the sauce thickens slightly, stirring occasionally, about 10 minutes. Season the marinade with salt and pepper to taste. Remove the marinade from the heat and allow it to cool to room temperature.

Place the chicken parts in a large glass baking dish or roasting pan. Pour the marinade over the chicken parts and turn the chicken to well coat it. Cover the chicken and refrigerate it overnight.

Preheat the oven to 375 degrees. Line a baking sheet with foil or with parchment paper. Place a cooling rack on top of the prepared baking sheet. Arrange the chicken pieces on the cooling rack, spacing each piece slightly apart. Spread any of the remaining marinade from the dish over the chicken parts. Sprinkle the chicken with salt and pepper. Bake the chicken on the cooling rack in the baking sheet until the parts are cooked through and an instant read thermometer inserted into the thickest part of a thigh registers 165 degrees and the skin is browned, about 45 to 50 minutes. Transfer the chicken to a serving platter and serve.

I can see that this recipe would work really well with chicken wings and I think it tasted great with the chicken parts. The bourbon gave a nice sweetness and with the brown sugar, the ketchup and the hot sauce it was like a nice barbecue sauce with a little heat and sweetness. I would certainly use this recipe again for any chicken parts. It might even be better if you can use it on the grill. Marinading it really makes a big difference with this one as it really enhances the flavor, so let it sit overnight if you can. I served the chicken with some wild rice and fresh green beans.

That’s all I have for today. Check back next time to see the next chicken recipe. until then, enjoy the rest of your day and enjoy your meal!

007 006


4 Comments

Posted by on January 27, 2014 in Cooking, Dinner, Poultry, Sauce


Tags: , , , , ,

Need Wings for the Big Game? Buffalo and Ginger-Soy Wings

Wings are great any time as a snack, appetizer or even for dinner, but having them as something for snacking during the football game is like a national pastime now. I have a standard wing recipe that I use most of the time and often just toss them with some hot sauce and I am done, but I decided to incorporate that wing recipe with a couple of sauces and glazes that I saw from Bon Appetit to change things up a little bit and to give an option to those who may not like the spiciness of the Buffalo wings that I like to make. These at least give you a little bit of a choice when making your wings.

Crispy Baked Chicken Wings

For the wings:

5 pounds chicken wings, tips removed, drumettes and flats separated

2 tablespoons baking powder

1 teaspoon kosher salt

1/2 teaspoon freshly ground black pepper

For the Buffalo Sauce:

1 tablespoon butter, melted

1/4 teaspoon cayenne pepper

1/4 teaspoon freshly ground black pepper

1/4 teaspoon kosher salt

1/4 cup hot pepper sauce

For the Ginger-Soy Glaze:

1/4 cup honey

2 tablespoons soy sauce

3 large garlic cloves, crushed

1 2-inch piece of ginger, peeled and sliced

Adjust two oven racks to the upper-middle and the lower-middle positions and heat the oven to 250 degrees. Set  a wire rack in an aluminum foil–lined rimmed baking sheet. Pat the chicken wings dry with paper towels and transfer them to  a large 1-gallon zipper-lock bag. Combine the baking powder, salt and pepper, add these to the wings, seal the bag, and toss the wings to evenly coat them.

Arrange the wings, skin side up, in a single layer on the prepared wire rack. Bake the wings on the lower-middle oven rack for 30 minutes. Move the wings to the upper-middle rack, increase the oven temperature to 425 degrees, and roast until the wings are golden brown and crispy, about 40 to 50 minutes longer, rotating the baking sheet halfway through the baking process.

While the wings are baking, prepare the sauces. For the Buffalo sauce, mix the melted butter, cayenne pepper, black pepper and kosher salt in a medium saucepan over low heat. Allow the mixture to stand for 5 minutes. Whisk in the hot sauce and keep the mixture warm until you are ready to coat the wings. For the ginger-soy glaze, combine the honey, soy sauce, garlic cloves and ginger with 1/4 cup of water in a small saucepan and bring the mixture to a boil, stirring to dissolve the honey. Reduce the heat to low and simmer, stirring occasionally, until the mixture is reduced to 1/4 cup, about 7 to 8 minutes. Strain the glaze into a medium bowl and allow it to sit for 15 minutes to thicken slightly.

After 40 minutes, remove the baking sheet from the oven and let the wings stand for 5 minutes. Line another rimmed baking sheet with foil and top with a wire rack. Add half of the wings to the ginger-soy glaze and toss them evenly to coat. Place these wings in a single layer on the prepared rack and bake until the glaze is glossy and lightly caramelized, about 8 to 10 minutes. Toss the remaining half of the wings in the bowl with the Buffalo sauce toss to coat, and serve.

Making the wings this way lets the wings get a nice crunchy coating to them thanks to the baking powder. I think you get the same kind of crunch as you do as when you fry them and you don’t have to deal with the mess of frying and all that oil. The Buffalo sauce is my favorite since I like the hot wings, but the ginger-soy glaze has great flavor as well thanks to the combination of the honey, ginger and soy. Sean really liked these and gobbled them up pretty quickly when we had them so it gives you a nice choice when making wings.

That’s all I have for today. Check back next time for some more recipes. I have been trying a few new things lately so I’ll have even more to share with everyone. Until next time, enjoy the rest of your day, stay warm (it is snowing here right now) and enjoy your meal!

008 006

 
Leave a comment

Posted by on January 21, 2014 in Appetizers, Cooking, Poultry, Sauce, Snacks


Tags: , , , , , ,

Just Because It’s Winter Doesn’t Mean You Can’t Have Great Spare Ribs

I love spare ribs no matter what time of year it may happen to be and for me living in a condo, I can’t really do any grilling of ribs anyway so I turn to making them in the oven to get the best results. i have a standard recipe that I have used often but I was looking for something a little different this time to maybe get a  different flavor. I came across this recipe from theKitchn, a blog that I check out often. They offered up a very simple recipe for cooking great ribs indoors any time of year with a nice smoky flavor and a little zip to them.

Oven Baked Spare Ribs

4 to 5 pounds pork spare ribs or baby back ribs

1/4 cup Dijon mustard

2 teaspoons liquid smoke

1 cup dry spice rub

1 cup barbecue sauce, store-bought or homemade

Line a baking sheet with aluminum foil and set a rack on top of the foil on the baking sheet. Lay the ribs on top of the rack in a single layer. This will allow for the heat to better circulate on all sides of the ribs so they cook evenly.

Mix the Dijon mustard and the liquid smoke in a small bowl and brush the mixture on both sides of the ribs. Sprinkle the ribs with the dry rub and pat the ribs gently to make sure the rub adheres well to the rib meat. For an even deeper flavor, try doing this step a day ahead of time and wrapping the ribs in plastic wrap and refrigerate them until the next day.

Heat the broiler and place an oven rack a few inches right below the broiler heating element. Make the meaty side of the ribs is facing up. Broil the ribs for about 5 minutes, until the sugar in the dry rub is bubbling and the ribs are evenly browned.

Heat he oven to 300 degrees. Move the ribs to an oven rack set in the middle position of the oven. Roast the ribs for 2 1/2 to 3 hours for spare ribs or 1 1/2 to 2 hours for baby back ribs. Halfway through the cooking process, cover the ribs with aluminum foil to protect them from drying out.

Remove the foil from the ribs and brush the ribs with barbecue sauce. Place the ribs back in the oven and continue to cook them for another thirty minutes. The ribs are done when a knife slides easily into the thickest part of the rib meat. Allow the ribs to rest, covered with foil, for about ten minutes, and then cut between the bones to separate the individual ribs. Serve with extra barbecue sauce for dipping.

There are all kinds of spice rub recipes you can use for your ribs, and I have given the link to the one I use most often, but you can also buy some from the store if you have a personal favorite. I actually used a rub that was sent to me by Pepper Mary, who sells spices on her website. I used the Mesquite Blend, which was perfect for the ribs and added a nice mesquite wood flavor to the meat. This is a perfect spice blend for ribs or pulled pork if you are looking for something easy to use. Adding the liquid smoke makes a big difference in the smell and flavor as well. This recipe is very easy to do if you want ribs any time of year and don’t have a gas or charcoal grill to use. Any of the typical rib sides are perfect for this meal, such as baked beans, corn bread or cole slaw or even homemade fries.

That’s all I have for today. Check back next time for another recipe. Until then, enjoy the rest of your day and enjoy your meal!

005 004


1 Comment

Posted by on January 17, 2014 in Cooking, Dinner, Pork, Sauce, Spices


Tags: , , , , , , ,

 
National Day Calendar

Fun, unusual and forgotten designations on our calendar.

Jennifer Probst

a little bit naughty a little bit nice

Laissez Faire

Letting Life Lead

What To Have For Dinner Tonight

Simple and delicious dinner inspiration