RSS

Category Archives: Side Dishes

Fun and Frightful Halloween Recipes : Cooking Channel

Fun and Frightful Halloween Recipes : Cooking Channel.

Halloween is just around the corner and if you want to make some tasty treats that are fun and Halloween themed, Cooking Channel has put together 31 fun and frightful recipes perfect for Halloween fun.Check it out!


Tags: , , , , , , ,

Make It Easy with Low-Maintenance Risotto

I find that I have become a big fan of risotto. I really like the creamy texture and you can do so many different things with it, add in vegetables that you really like, poultry, seafood or really anything your heart desires. The big drawback for risotto is, of course, that it not only takes a bit to make it takes a lot of you being involved in the process. You need to make sure it is stirred so the broth, wine, or water is absorbed properly and added in the right amounts if you want the risotto to come out well. It can be a bit tricky and it can be a pain to cook with all of the constant stirring you have to do for 30 minutes or so. So when I saw this recipe from PureWow for a low maintenance risotto, I figured I would give it a try and see if it really was low-maintenance and came out nicely.

Low-Maintenance Risotto

2 tablespoons olive oil

1 onion, finely minced

1 garlic clove, finely minced

1 cup arborio rice

1/3 cup dry white wine

3 cups chicken or vegetable broth

4 tablespoons butter

1/2 cup grated Parmesan cheese

Salt and freshly ground black pepper

In a medium saucepan, heat the olive oil over medium heat until it is shimmering. Add the minced onion and garlic and cook until the onion softens and is translucent, about 4 to 5 minutes.

Add the arborio rice and stir to combine the rice with onion and to coat it, about 1 minute. Add the white wine and bring the mixture to a simmer over medium-low heat. Simmer until the liquid is nearly absorbed, about 6 to 8 minutes.

Add the broth to the mixture 1 cup at a time. Bring the first cup to a simmer and cook until the rice has nearly absorbed all of the liquid, about 10 to 12 minutes. Add the next cup of broth and allow it to simmer until it is nearly absorbed, about another 10 to 12 minutes. Repeat a third time with the last cup of broth and allow it to be absorbed, about another 10 to 12 minutes.

Add the butter and stir the rice vigorously until the mixture is well combined and the butter has melted. The vigorous stirring brings out the natural starches in the rice, which makes the risotto creamy.

Add the Parmesan cheese and mix well to combine. Season the risotto with salt and pepper to taste. To serve, spoon the risotto onto plates and top with any sautéed vegetables you like. Serve immediately.

I have to say that the risotto does turn out nicely and it is creamy and tasty. As far as the dish being low-maintenance, I guess it depends on your definition of low-maintenance. It’s true you do not have to constantly mix the risotto with this method and leave it to absorb the liquid, but you still must do vigorous stirring when the butter is added if you want it to be creamy. The recipe still takes just as long to cook as other risottos I have made, and you aren’t constantly stirring but there is still work involved. All in all, I think you could use this method or any other recipe and get quality results. Of course you can always add any vegetables or anything else you like at the end for added flavor.

That’s all I have for today. Check back next time for another recipe. Until then, enjoy the rest of the day and enjoy your meal!


Leave a comment

Posted by on October 14, 2014 in Cooking, Dinner, Rice, Side Dishes


Tags: , , , , ,

Back to Cooking with a Great Fall Side Dish – Cider-Glazed Root Vegetables

Now that my oven is up and running again I was able to do some actual cooking over the past weekend and a few different things that I can share on the blog. One of my favorite things about fall cooking is all of the great root vegetables that seem to go so well with fall meals come out. You can do great things with carrots, parsnips, sweet potatoes, turnips, beets and more and while I personally love to roast all kinds of vegetables, I also thought it would be great to bring all of these flavors together and use another great piece of fall produce – apples. Apples are pretty plentiful in this area of New York this time of year so it’s a great time to take advantage of them as well. This particular recipe for cider-glazed root vegetables was in the latest issue of Cook’s Country magazine and uses the cider to give the vegetables some added flavor and punch. The original recipe uses hard apple cider in it, which I did not have on hand. Instead I used some local apple cider as a substitute.

Cider-Glazed Root Vegetables

4 tablespoons butter

1 pound carrots, peeled and cut into 1/2-inch pieces

12 ounces parsnips, peeled and cut into 3/4-inch pieces

12 ounces turnips, peeled and cut into 3/4-inch pieces

3 shallots, peeled and halved

2 1/2 cups hard cider or regular cider

3 tablespoons sugar

Salt and freshly ground black pepper

1 apple, cored and cut into 1/2-inch pieces

2 tablespoons chopped fresh tarragon

2 teaspoons cider vinegar

Melt 1 tablespoon of the butter in a large skillet set over medium-high heat. Add the carrots, parsnips, turnips and shallots and cook until lightly browned, about 5 to 6 minutes. Add the apple cider, sugar, 1 1/2 teaspoons of salt and the remaining 3 tablespoons of the butter and bring the entire mixture to a boil. Reduce the heat to medium-low and cover the skillet. Cook the vegetables until they are just tender, about 7 to 10 minutes, stirring the vegetables occasionally.

Uncover the skillet and increase the heat to medium. Cook the vegetables until they are fully tender, about 13 to 15 minutes, stirring them occasionally. Stir in the apple and continue to cook the vegetables until the cider starts to become syrupy and the apple is just tender, about another 2 to 3 minutes. Take the skillet off the heat and stir in the chopped tarragon and the apple cider vinegar. Season the vegetables with salt and pepper to taste. Transfer the vegetables to a serving dish and pour any of the remaining glaze over the vegetables before serving.

Other than substituting regular apple cider for the hard apple cider, I also used golden beets instead of turnips since I already had the beets on hand. You can use pretty much root vegetables that you really like and I think they would work pretty well here. The original recipe as it is posted here is also designed to serve 8 people, so I cut the recipe in half when I actually made it for just the 3 of us and we still had plenty of leftovers. You get some really great flavor with all of the vegetables mixed together with the cider and the apple, though I have to admit that using the regular cider probably creates a bit of a weaker tasting glaze than if you use the hard cider, but it was still really good. I made this as a side dish to go with meat loaf, but I think it would go really well with any pork or poultry dish as well.

That’s all I have for today. Check back next time for another recipe. Until then, enjoy the rest of your day and enjoy your meal!

IMG_0715

 
Leave a comment

Posted by on October 13, 2014 in Cooking, Dinner, Side Dishes, Vegetables, Vegetarian


Tags: , , , , , ,

Pumpkinpalooza! 30 Days of Pumpkin Recipes | Williams-Sonoma Taste

Pumpkinpalooza! 30 Days of Pumpkin Recipes | Williams-Sonoma Taste.

It’s fall and the leaves are changing, the weather is getting crisper and Halloween is right around the corner. It also means the pumpkins come to the forefront of everyone’s mind for this time of year and there are some great pumpkin recipes you can try to incorporate pumpkins into your meals. Williams-Sonoma has put together 30 pumpkin recipes so you can try something different with pumpkins each day. Check it out!


Tags: , , , ,

Indoors or Out Enjoy Grilled NY Style Sausages with Balsamic Onion Sauce and Grilled Tomatoes

Not having a grill to use can be a detriment when I come across recipes that sound wonderful and would taste great. An electric grill just does not provide the same type of results and experience as a gas or charcoal grill, in my opinion, so when I see a grilling recipe I want to try I often try to adapt it to indoor cooking and use either a grill pan (much to the chagrin of my smoke alarm many times) or find a way to cook it in the oven. While the results may not be exactly the same for me, they can still get pretty close, or at least good enough for my purposes.. Such is the case of this recipe I saw from Bobby Flay for grilled New York-style sausages with a balsamic onion sauce and grilled tomatoes, a great alternative to the average hot dog on the grill. I am posting the grilling recipe that Bobby Flay uses even though I did everything indoors in cast iron pans or in the case of the sausages, in the oven.

Grilled NY Style Sausages with Balsamic Onion Sauce and Grilled Tomatoes

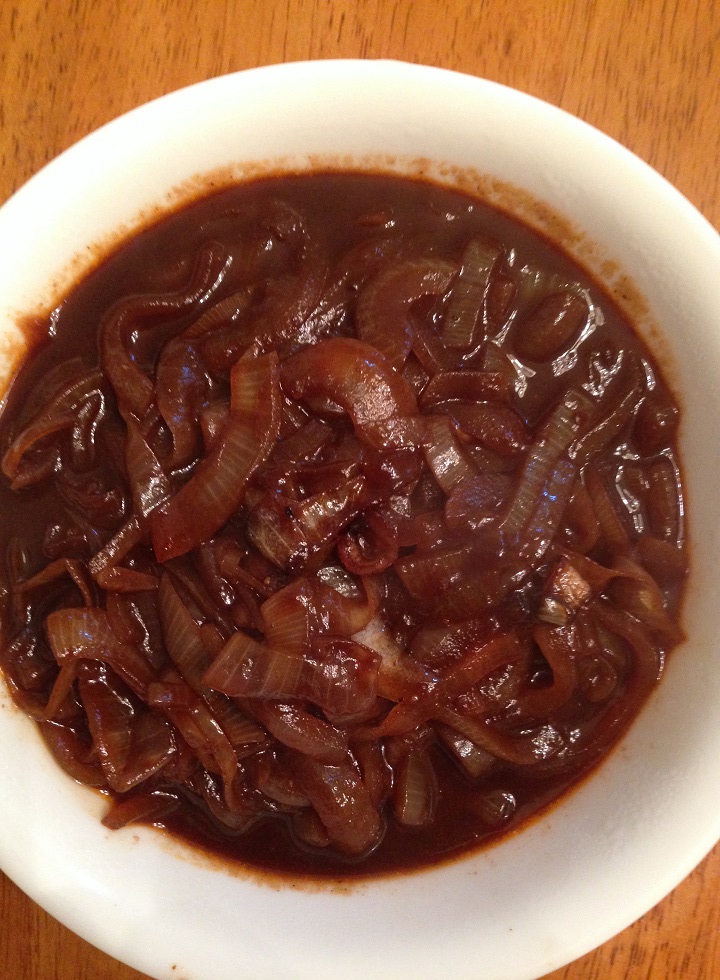
For the Balsamic Onion Sauce:

1/2 cup balsamic vinegar
2 tablespoons canola oil
2 large Spanish onions, halved and thinly sliced
Kosher salt and freshly ground black pepper
1 teaspoon ancho chile powder
1/2 teaspoon ground cinnamon
1/4 cup ketchup
1 teaspoon hot sauce

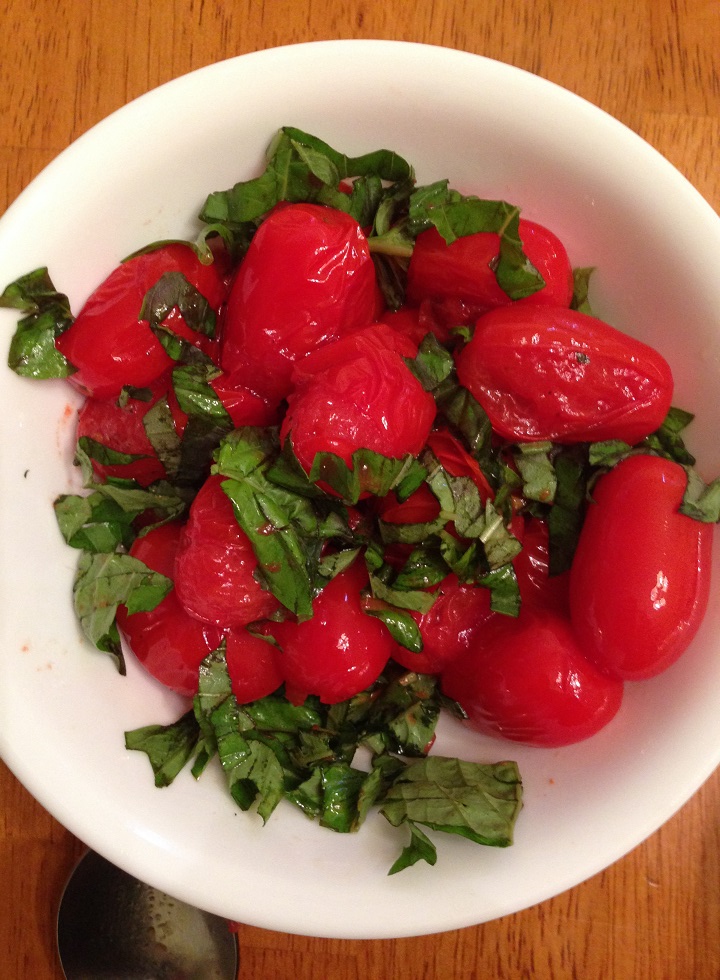
For the Grilled Cherry Tomatoes with Basil:

1 pint cherry tomatoes, cored
1 tablespoon canola oil
Kosher salt and freshly ground black pepper
2 tablespoons extra-virgin olive oil
2 tablespoons chopped fresh basil

For the Grilled Sausage:
4 hot Italian sausage links
4 sweet Italian sausage links
1 loaf seeded semolina bread, cut into thick slices

For the balsamic onions: Put the balsamic vinegar, oil, onions and some salt and pepper in a medium skillet over medium heat. Cook, stirring frequently, until the onions are very soft and soupy, about 15 minutes.

Stir in the chile powder and cinnamon and cook for 1 minute. Add the ketchup, 1/2 cup of water, the hot sauce, 1/2 teaspoon of salt and 1/4 teaspoon of black pepper, and bring to a simmer. Simmer, stirring occasionally, until the sauce has thickened, about 10 minutes. Transfer the onions to a bowl and cool to room temperature before serving.

For the grilled tomatoes: Heat the grill for high direct and indirect heat. Put the tomatoes in a bowl and toss them with the canola oil and some salt and pepper. Transfer the tomatoes to a grill basket and grill over direct heat, tossing occasionally, until the tomatoes are slightly charred all over and softened, about 5 minutes. Transfer the tomatoes to a bowl, drizzle them with the olive oil, and crush them lightly with a fork. Toss the tomatoes with the basil, then set them aside.

For the sausage: Put the sausages over the direct heat and cook until they are slightly charred on all sides, about 2 minutes per side. Move the sausages to the indirect heat, cover, and cook until they are just cooked through, about 10 minutes.

Transfer the sausage to a cutting board. Grill the bread over direct heat until it is lightly charred, about 15 seconds, then transfer the bread to a platter.

Slice the sausages about 1-inch thick. Top each slice of bread with some of the grilled tomatoes, a few slices of sausage and a dollop of the onion sauce.

As I stated, I made everything inside, using a cast iron skillet for the onion sauce, a grill pan for the tomatoes and the oven for the sausages. The onions were straightforward as I could follow the recipe. The tomatoes on the grill pan were cooked over low heat for about 4 minutes until they blistered and popped and then I took them off the pan and proceeded with the recipe. The sausages I baked in the oven for about 45 minutes in a 375 degree oven, half the time covered in foil and the other half without, allowing them to crisp up a bit. To me, this works out better than simply frying the sausages in a pan and you get better texture and pop. Overall, I loved the mix of the sausages with the tomatoes and the onion sauce. The onion sauce is the real winner, in my opinion, and we used it again on hamburgers and even as a topping on some pizza. It makes a great grilling alternative for you when you want something more than a hot dog or hamburger. I forgot to take a picture of the sausages, but I do have a picture of the onions and the tomatoes.

That’s all I have for today. Check back next time for another recipe. Until then, enjoy the rest of your day and enjoy your meal!

IMG_0672 IMG_0671

 
Leave a comment

Posted by on September 9, 2014 in Cooking, Dinner, Grilling, Pork, Side Dishes, Vegetables


Tags: , , , , , , , ,

Hold On to Summer with Tropical Slaw with Sweet and Sour Dressing

Even though everyone is back to work today and the kids are back to school this week around here, the weather has actually been a lot hotter the last few days than it has been all summer long. That makes you want to hold on to summer just a little bit longer and keep making some of those summer favorites that may not heat up the house and kitchen. Around here we have been having cold dinners the last few nights, including a sandwich night yesterday where I made some homemade potato salad and tried out a new coleslaw recipe that I found. This one is a very simple and refreshing recipe from Bobby Flay for a tropical slaw with a sweet and sour dressing so you can stay away from the typical mayo slaws and get something a little different to go with your meal.

Tropical Slaw with Sweet and Sour Dressing

1/4 cup apple cider vinegar

1/4 cup canola or vegetable oil

2 tablespoons sugar

Kosher salt and freshly ground black pepper

12 ounces fresh pineapple, cut into 1/2-inch cubes

1 large, ripe mango, cut into 1/2-inch cubes

1/2 head red cabbage, finely shredded

3 green onions, green and pale green parts only, thinly sliced

1/4 cup roughly chopped fresh cilantro leaves

Combine the apple cider vinegar, canola or vegetable oil, sugar and the kosher salt and black pepper (to taste) in a bowl and whisk the ingredients until the sugar has dissolved.

Combine the pineapple, mango and red cabbage in a large bowl. Season them with salt and pepper to taste; add the dressing to the fruit and cabbage and toss everything to coat it well with the dressing. Add the green onions and the cilantro and toss the ingredients again. Cover the slaw and refrigerate it for at least 1 hour before serving.

This is a very simple and refreshing alternative to traditional coleslaw recipes. You get great flavor from the pineapple and it seems to go very well with the red cabbage, green onions and cilantro. The dressing is light but adds just the right flavor and acidity to the slaw itself. I didn’t have any mango on hand when I made this salad so it is not in the one I did and I think it still turned out fine, though a nice, ripe mango in there would add even more to the dish. I also used pre-packaged shredded red cabbage instead of shredding it myself to save myself a step. This side dish would work really well with just about any type of sandwich meal and I think it would go really well with a pork dish like pulled pork or even just to have with sausages, hamburgers or hot dogs. I’ll definitely make this one again.

That’s all I have for today. Check back next time for another recipe. Until then, enjoy the rest of your day and enjoy your meal!

IMG_0666


Tags: , , , , , ,

31 Great Labor Day Grilling Recipes | Kitchen Daily

31 Great Labor Day Grilling Recipes | Kitchen Daily.

Planning on doing some grilling on Labor Day but what to go beyond the usual hamburgers and hot dogs? Kitchen Daily has put together 31 great grilling recipes for you that cover everything from your appetizers and main courses to side dishes and dessert so you can grill every part of your meal and make the most of that last unofficial day of summer. Check out the recipes and find one to try this weekend!


Tags: , , , , ,

Barbecue Side Dishes – Photo Gallery | SAVEUR

Barbecue Side Dishes – Photo Gallery | SAVEUR.

Even though Summer may be coming to a close soon for most of us, you can always use your grill and depending on where you are, outdoor grilling can go on all year round. Even though I am in New York, I still like to make barbecue food even if it is an indoors version, and you need to have great barbecue sides when you put a meal together. Saveur Magazine has these 35 great barbecue side dishes that are perfect for all of your grilling occasions to try. Check it out!

 
Leave a comment

Posted by on August 24, 2014 in Cooking, Cooking Websites, Grilling, Side Dishes


Tags: , , , , ,

Fast and Easy State Fair Salt Potatoes

Finding fast and easy recipes for potatoes can make cooking up a side dish simple for nearly any type of meal. Sure you could make some simple boiled potatoes easy enough, but you want to try to add a little something to them so you can get some great flavor out of the dish. Potatoes by themselves don’t have a tremendous amount of flavor so if you can add something to them you can really liven them up. I found this simple dish at the Cooking Channel website for State Fair salt potatoes that you can make in about 15 minutes and with just a few simple ingredients that you likely have on hand all of the time.

State Fair Salt Potatoes

2 pounds baby red or Yukon gold potatoes, scrubbed and halved

6 tablespoons butter

1/4 cup mixed chopped herbs, such as oregano, dill, thyme and parsley

Salt and freshly ground black pepper

Place the potatoes in a medium saucepan and cover them with cold water. Heavily salt the water, adding 1 tablespoon of salt per 1 cup of cold water used. Place the pot over high heat and bring the water to a boil. Cook the potatoes until they are fork tender, about 12 to 15 minutes. Drain the potatoes well in a colander. Return the potatoes to the pot and toss them with the butter and the chopped herbs of your choice. Adjust the seasoning with salt and pepper to taste and serve.

These are very easy to make and you get great taste from the salt and the herbs that you use. I chose to use oregano and dill and loved the flavor that came out of the mix. I served these as a side dish with the roasted chicken I made, but I think they would go really well with any pork, beef or chicken dish that you wanted to make. These are perfect for the small red potatoes, but I think you could really use any type of potato that you prefer for this one.

Just a quick recipe for today, but check back next time for another recipe. Until then, enjoy the rest of your day and enjoy your meal!

IMG_0652

 
Leave a comment

Posted by on August 22, 2014 in Cooking, Dinner, Potatoes, Side Dishes


Tags: , , , , , ,

Loving the Cold Lentil Salad with Cucumbers and Olives

Lentils are one of my favorites when it comes to beans. They are so versatile and add such great taste and texture to a wide variety of dishes. Of course, lentil soup is always a good choice, but I also like to make lentil salads. Lentil salad is a great summertime dish because you can serve them warm, room temperature or cold and they still taste great. I came across this recipe from The Kitchn not that long ago for a simple cold lentil salad with cucumbers and olives to give it a bit of a Mediterranean flair. you can make this one pretty quickly and it goes well with all kinds of dishes.

Cold Lentil Salad with Cucumbers and Olives

2 cups lentils

2 garlic cloves, smashed

2 bay leaves

1/2 tablespoon whole grain mustard

1/2 teaspoon salt

2 tablespoons sherry vinegar

6 tablespoons extra virgin olive oil

2 medium cucumbers, chopped into 1/2-inch pieces

1 cup pitted Kalamata olives, roughly chopped

3/4 cup loosely packed fresh mint, roughly chopped

1 cup ricotta or feta cheese (optional)

Combine the lentils, smashed garlic and the bay leaves in a large pot and cover the ingredients with water by 2 inches. Bring to a boil over high heat, then reduce the heat to a simmer and cook until the lentils are just tender, about 15 to 20 minutes. Drain the water and remove the smashed garlic cloves and the bay leaves and discard them. Refrigerate the lentils until they are cold, at least 30 minutes to 1 hour.

While the lentils are chilling, make the vinaigrette for the salad. In a small bowl, whisk together the whole grain mustard, the salt and the sherry vinegar. Slowly drizzle in the olive oil, whisking the mixture constantly as you add the oil, until the dressing has emulsified.

Combine the chilled lentils, the cucumbers, the Kalamata olives and the mint in a large bowl. Pour the vinaigrette over the lentil salad and toss everything to evenly coat all of the ingredients. Dot the top of the salad with ricotta or feta cheese, if using, just before you serve the salad.

That’s all there is to this salad and it tastes great. I love the mix of the cucumbers, olives and lentils and the vinaigrette has great flavor to it thanks to the mustard and the sherry vinegar. I have found that the salad actually gets better in flavor over a couple of days, though if you are going to add the mint to it you should add just enough to what you are serving so it does not go limp when you store it and lose some of its flavor. I did not use the cheese on my salad as I didn’t have either kind on hand, but I think the feta would add a nice touch to the overall flavor of the dish.

That’s all I have for today. Check back next time for another recipe. Until then, enjoy the rest of your day and enjoy your meal!

IMG_0650

 
Leave a comment

Posted by on August 19, 2014 in Beans, Cooking, Salad, Side Dishes


Tags: , , , , ,

 
National Day Calendar

Fun, unusual and forgotten designations on our calendar.

Jennifer Probst

a little bit naughty a little bit nice

Laissez Faire

Letting Life Lead

simple cooking recipes

a blog to share with you the best