RSS

Category Archives: Vegetables

Having an Easy London Broil Meal

London broil is one of those  cuts of meat that cries out for seasoning and marinade. When you cook it and season it right it can be a great meal at a very reasonable price. Leave it plain and overcook it and you might as well just eat a sneaker. I had picked up a London broil on sale recently and decided to make it for dinner last night using this recipe I picked up from Food Network. All that’s really required is the time to let the meat sit in the marinade; the cooking time itself is only about 15 minutes.

London Broil with Herb Butter

3/4 cup beef broth

3 tablespoons extra-virgin olive oil

1 tablespoon soy sauce

1 tablespoon Worcestershire sauce

2 tablespoons fresh lemon juice

Kosher salt and freshly ground black pepper

1 top round London broil steak (about 2 pounds)

4 tablespoons butter, softened

1 1/2 tablespoons chopped fresh chives

1 tablespoon chopped fresh parsley

1 tablespoon chopped fresh tarragon

Kosher salt and freshly ground pepper

1 tablespoon fresh lemon juice

Prepare the steak: Pour the beef broth into a medium bowl and whisk in 2 tablespoons of the olive oil, the soy sauce, Worcestershire sauce, lemon juice, 1 teaspoon of salt and 1/2 teaspoon of pepper. Place the steak in a large resealable plastic bag, pour in the marinade and seal, squeezing out the air. Refrigerate the steak for at least 4 hours and up to 1 day.

Prepare the herb butter: Mix the butter with the chives, parsley, tarragon, a pinch of salt, 1/2 teaspoon of pepper and the lemon juice in a bowl.

About 30 minutes before cooking, remove the meat from the bag and discard the marinade. Dry the steak well with paper towels and bring it to room temperature. Heat a large skillet over high heat, about 2 minutes. Rub the steak with the remaining 1 tablespoon of olive oil. Sprinkle 1 tablespoon of salt over the surface of the pan; add the meat and set a heavy skillet on top to weigh it down. Sear the steak for about 7 minutes; turn the steak, replace the weight over the steak and cook until a thermometer inserted into the side of the steak registers 110 degrees for medium-rare, about 5 minutes.

Transfer the steak to a cutting board, brush with some of the herb butter, tent with aluminum foil and allow the steak to rest for about 10 minutes. Thinly slice the steak against the grain and top with more of the herb butter.

The herb butter adds a really nice flavor to the steak and the marinade is tasty but not overpowering at all. You want to make sure that you don’t overcook this cut of meat. It gets very chewy pretty quickly, even if you marinade to help break the meat down some before cooking. I actually added 1 tablespoon of Montreal steak seasoning and rubbed it into both sides of the steak before cooking just to get some extra flavor and it was great. I served this steak with mashed potatoes, some mixed vegetables and I whipped up some caramelized onions right in the pan I had cooked the steak in.

Caramelized Onions

1 onion, sliced

1/4 cup beef broth

1 tablespoon balsamic vinegar

1 tablespoon butter

Add the sliced the onions to the pan you cooked the steak in along with the beef broth. Turn the heat to high and scrape up any browned bits on the bottom of the pan. Cook until the onion is softened, about 3 minutes. Add the balsamic vinegar and stir, allowing to cook down, about 1 minute. Add the butter to the pan and swirl to melt and coat the onions.

It’s a quick little side dish that makes up some great onions. You can try it anytime you cook any type of beef or change things up and use chicken broth when you make some chicken.

That’s all I have for today. Check back next time to see what recipe comes along. I am starting to plan some things out for next week so check and see what I decide to make. Until next time, enjoy the rest of your day and enjoy your meal!

003 001

 
Leave a comment

Posted by on August 31, 2013 in Beef, Cooking, Dinner, Sauce, Vegetables


Tags: , , , ,

How to Buy, Store, and Cook Garlic, In Season in August – Bon Appétit

How to Buy, Store, and Cook Garlic, In Season in August – Bon Appétit.

This is the time of year when you will find great heads of garlic at your local farmer’s market. Bon Appetit has a nice little article here about what you should look for when buying some garlic and how best to store it to get the most out of it. Check it out!

 
Leave a comment

Posted by on August 22, 2013 in Cooking Tips, Cooking Websites, Vegetables


Tags: , , ,

Cook’s Country Recipe Week Part 5 – Pan Roasted Chicken and Vegetables

If you follow along regularly with this blog, then you likely know that not only do we eat a lot of chicken, but also that I love to make roast chicken in various ways. I am always on the lookout for a new roast chicken recipe to try and when this one came along in Cook’s Country magazine, I knew right away that I would be giving it a try. The only thing that makes this recipe even better is that you can do the whole meal in just one pan and have it done perfectly in under an hour.

Pan-Roasted Chicken and Vegetables

3/4 pound Brussels sprouts, trimmed and halved

3/4 pound red potatoes, cut into 1-inch pieces

1/2 pound shallots, peeled and halved

4 carrots, peeled and cut into 2-inch pieces, thick ends halved lengthwise

6 garlic cloves, peeled

4 teaspoons minced fresh thyme

1 tablespoon vegetable oil

2 teaspoons minced fresh rosemary

1 teaspoon sugar

Salt and pepper

2 tablespoons butter, melted

3 1/2 pounds bone-in chicken pieces (2 split breasts cut in half crosswise, 2 drumsticks, 2 thighs), trimmed

Adjust an oven rack to the upper-middle position and heat the oven to 475 degrees. Toss the Brussels sprouts, potatoes, shallots, carrots, garlic, 2 teaspoons of thyme, oil, 1 teaspoon of rosemary, sugar, 3/4 teaspoon of salt and 1/4 teaspoon of pepper together in a bowl. Combine the butter, the remaining 2 teaspoons of thyme, the remaining 1 teaspoon of rosemary, 1/4 teaspoon of salt and 1/8 teaspoon of pepper in a second bowl; set aside.

Pat the chicken dry with paper towels and season with salt and pepper. Place the vegetables in a single layer on a rimmed baking sheet, arranging the Brussels sprouts in the center. Place the chicken, skin side up, on top of the vegetables, arranging the breast pieces in the center and the leg and thigh pieces around the perimeter of the baking sheet.

Brush the chicken with the herb butter and roast until the breasts register 160 degrees and the drumsticks and thighs register 175 degrees, about 35 to 45 minutes, rotating the pan about halfway through the cooking process. Transfer the chicken to a serving platter and tent loosely with aluminum foil and let it rest for 5 to 10 minutes. Toss the vegetables in the pan juices and transfer them to the platter with the chicken. Serve.

There are a few things about this recipe you want to keep in mind. Here is one time where it really pays to have a good, large rimmed baking sheet. You want a big one that will hold everything well without overcrowding so that everything roasts well instead of steams in the baking sheet. You also want one that will hold up well under high heat and not warp at all. The high heat used in the recipe lets you cook everything in under an hour, gives you great caramelization on the vegetables and makes the chicken skin crispy and perfect. Adding the herb butter the chicken really helps to give it extra flavor and crisp the skin too. The vegetables get a lot of great flavor from the drippings of the chicken. Having the Brussels sprouts in the middle of the pan makes a difference here too. Since they tend to cook faster than the carrots and potatoes, you want them in the middle and the other vegetables on the outer part of the sheet where there is more heat. Same goes for the chicken breasts. Keeping it in the cooler part of the sheet helps everything be at the right temperature at the same time.

That’s all I have for today. I hoped you liked the Cook’s Country recipes for this week. Check back tomorrow for the peach-blueberry ice cream pie recipe I have been promising all week. I am also planning some recipes for next week as well, so we’ll see what I can come up with and decide to make. until next time, enjoy the rest of your day and enjoy your meal!

IMG_1632

 
2 Comments

Posted by on August 2, 2013 in Cooking, Dinner, One Pot Meals, Poultry, Vegetables


Tags: , , , ,

A Double Dip: Chicken a la Vendemmia and Roasted Green Beans and Carrots

If you follow along with me on this blog, you know I tend to make a lot of chicken. This means I am always on the lookout for some new recipes on ways to make chicken, particularly when it comes to roasting or broiling. I came across this recipe one day while watching the Food Network and saw Michael Chiarello on the Barefoot Contessa preparing this dish. It looked wonderful and I knew I just had to give it a try.

Chicken a la Vendemmia

2 pounds seedless red grapes

4 large bone-in chicken breasts, skin on

Salt and freshly ground black pepper

2 teaspoons fennel spice

2 tablespoons extra-virgin olive oil

1/2 cup thinly sliced shallot

2 teaspoons minced fresh rosemary

1/2 cup chicken stock

Puree the grapes in a blender then strain them through a sieve, pressing on the solids to extract as much juice as possible. You should nave about 2 1/2 cups of juice when you are done.

Preheat the oven to 400 degrees. Season the chicken on all sides with salt, pepper and fennel spice. Heat a large ovenproof skillet over moderately high heat. When the skillet is hot, add the olive oil. Add the chicken breasts, skin side down, and brown well on all sides, about 7 minutes total. Transfer the skillet to the oven and cook until the chicken is done throughout, about 12 to 15 minutes.

Transfer the chicken to a serving platter and pour off all but 1 tablespoon of the fat in the skillet. Add the shallot to the skillet and return to moderate heat. Cook until softened, then add the rosemary and cook briefly to release its fragrance, about 30 to 60 seconds. Add 2 cups of the grape juice and simmer briskly until it is reduced by half. Add the chicken stock and any collected juices from the chicken platter and simmer until the mixture has reduced to a creamy, sauce-like consistency. The total volume of the sauce will be a little more than 1 cup.

Cut the chicken breasts in half with a heavy knife or cleaver and return them to the platter. Spoon the sauce over and around them.

During the program, Michael Chiarello also added 3 or 4 quartered fresh figs to the sauce after adding the grape juice and chicken broth just to warm them through for serving. I didn’t have any figs on hand, so I skipped this step. I have to say I loved the grape sauce that was made. It was wonderfully creamy and had a great taste to it with the chicken. I served the dish with white rice and the sauce added great flavor to the rice as well.I did cook the chicken for 2 or 3 minutes longer to really crisp up the skin and it was still nice and juicy, so cook the chicken to your liking and simply check the temperature with a thermometer.

I also served the chicken with some fresh green beans I had picked up at the farmer’s market. I wanted to be able to cook everything in the oven at once, so I found this recipe from Williams-Sonoma for roasting the green beans with carrots and onions.

Roasted Green Beans and Carrots with Red Onion

3/4 pound green beans, trimmed

1/2 pound carrots, peeled and cut diagonally, about 1/4– inch thick

1 red onion, sliced

2 large garlic cloves, very thinly sliced

1 1/2 tablespoons olive oil

1 teaspoon ground cumin

Salt and freshly ground black pepper, to taste

Preheat the oven to 350 degrees. Place an 8 x 11 heavy roasting pan or a very large, ovenproof fry pan on the rack in the oven to heat.

Bring a large saucepan three-fourths full of water to a boil over high heat. Add a pinch of salt and the green beans. Cook the beans until they turn bright green and are just tender, 1 to 2 minutes. The timing will depend on the age and size of the beans. Drain the beans and plunge them into a bowl of ice-cold water to stop the cooking and drain them again.

In a large bowl, toss together the beans, carrots, onion, garlic and olive oil. Sprinkle with the cumin, season with salt and pepper, and toss again to thoroughly combine. Transfer the vegetables to the preheated pan and spread them evenly. Roast, stirring occasionally, until the vegetables are tender and lightly browned, 45 to 55 minutes. Taste and adjust the seasonings with salt and pepper.

I actually cooked the vegetables for less time since I had them in the 400 degree oven with the chicken. They were actually done in about 25 to 30 minutes instead, which gave me enough time to make the sauce and the chicken to rest. I love roasted vegetables; the roasting really brings out the flavors of the vegetables and the mix of green beans, carrots and onion is great with just a touch of cumin added for heat and flavor.

That’s all I have for today. Check back next time for some more recipes of things I have tried recently. We have some events the next few days, so I won’t be doing much cooking, but I do have some things I have done recently or plan to do in the coming days, so check back and see what comes up. until then, enjoy the rest of your day, have a happy and safe 4th of July and enjoy your meal!

003

 
2 Comments

Posted by on July 4, 2013 in Cooking, Dinner, Poultry, Vegetables


Tags: , , , ,

Back to School: A Cook’s Illustrated Stir Fry Primer

I make a stir fry dinner about once a week, mainly because it is one of the easiest meals you can put together in a short amount of time. While any stir fry can come out tasting okay, you want yours to taste great every time you make one so it seems different and special. While it’s true that a stir fry often stems from trying to use up the leftovers in the refrigerator, you can also put some planning and strategy into what you use and how you make it. In the latest issue of Cook’s Illustrated Magazine, they have a wonderful article on steps you can take and follow to make a great stir fry every time.

A good stir fry usually starts with three basic components – some type of protein, vegetables and some type of sauce. Of course, you can vary this to fit any type of taste, but ideally you want to try to mix up texture and color as much as you can to create a vibrant, enticing plate. Another thing to remember is that while having lots of color can make the plate look nice, having too much can really clutter things up for you. If you can limit the types of produce you use to three at the most it will help avoid this and advance the flavor of your dish.

For proteins, you want to keep the quantity to around 1 pound of whatever you choose and select tender cuts that will soften up faster with this type of cooking. Sirloin tip steaks, boneless, skinless chicken breasts, pork tenderloin or shrimp are just some ideal examples that you can use. To make things even easier for yourself, try freezing your protein before cutting it so you can slice easier and get more uniform cuts. Generally about 30 minutes of freezing should suffice. You also want to make sure you take some time to pre-treat the protein you are using. it can really help to tenderize the protein and give it more flavor.Try soaking the protein for 15 minutes in 1 teaspoon of baking soda dissolved in 2 tablespoons of water. Don’t go longer than the 15 minutes or it will start to break down the protein too much and be sure you rinse the protein off before you start marinating it.

You want to marinate the protein in some type of salty liquid. This will help to brine the meat and boost the flavor. Just make sure you drain it well before you cook so you can make sure the meat will brown nicely and not steam in any excess liquid. Soaking the meat for 15 minutes in just 2 tablespoons of soy sauce or fish sauce can make a big difference. For shrimp, salty marinades can be a bit overwhelming. Cook’s Illustrated recommends using a simple mix of 3 tablespoons of oil, 6 cloves of minced garlic and 1/2 teaspoon of salt for 30 minutes to get great flavor from the shrimp.

For vegetables, again you want to stick to about a 1 pound limit of whatever combination you choose. Some vegetables, like broccoli, carrots, snap peas or cauliflower, need longer cooking times, about 3 to 7 minutes. Softer vegetables like mushrooms, onions, snow peas, peppers or asparagus need only about 1 to 3 minutes of cooking time. Smaller, more tender vegetables such as frozen peas, scallion greens, water chestnuts, tomatoes, bean sprouts or greens like spinach only need 30 to 60 seconds. Try to cut everything to a uniform size so that it all cooks evenly.

Lastly, you want to have some type of sauce to cook it all in. The sauces you buy in the jars in the store may work fine for some people, but I find them to be very sweet and loaded with salt. You can very easily make your own sauce in a minute or two with a few ingredients. A classic sauce, which I used in the chicken stir fry recipe below, has chicken broth, dry sherry, hoisin sauce, soy sauce, cornstarch and sesame oil.

I followed this simple recipe for a great chicken stir fry, but you can follow the same pattern for beef, fish or even tofu.

Easy Chicken Stir Fry

Sauce:

1/2 cup chicken broth

1/4 cup dry sherry

3 tablespoons hoisin or oyster sauce

1 tablespoon soy sauce

2 teaspoons cornstarch

1 teaspoon sesame oil

Chicken:

1 pound boneless, skinless chicken breasts, cut into 1/4-inch slices

1 teaspoon baking soda

2 tablespoons water

2 tablespoons soy sauce

6-8 teaspoons vegetable oil

1/3 pound broccoli, trimmed and cut into 1/4-inch slices

1/3 pound carrots, peeled and sliced into 1/4-inch slices

1 small onion, sliced

1 red bell pepper, seeded, cored and cut into 1/4-inch slices

1/3 cup frozen peas

3 garlic cloves, minced

1 tablespoon ginger, grated

For the sauce, whisk all the ingredients together in a small bowl and set aside. Heat a large, nonstick skillet over high heat. Add 1 1/2 teaspoons of oil and heat until just smoking. Add half of the chicken slices, breaking up any clumps, until browned, about 3 minutes. Transfer the chicken to a bowl and cover it to keep it warm. Repeat the process with another 1 1/2 teaspoons of oil and the remainder of the chicken. Remove the chicken to the bowl and cover to keep warm.

Add another 2 teaspoons of oil to the pan. Add the broccoli and cook until seared, about 3 to 5 minutes.Remove the broccoli from the skillet and add the carrots and cook, stirring occasionally, until seared, about 3 to 5 minutes. Remove the carrots and add the onion and bell pepper, stirring occasionally, until seared, about 1 to 3 minutes.Remove the onions and peppers from the skillet and add the frozen peas to the skillet and heat until seared, about 30 to seconds.Add the broccoli, peppers and onion back to the skillet and toss.

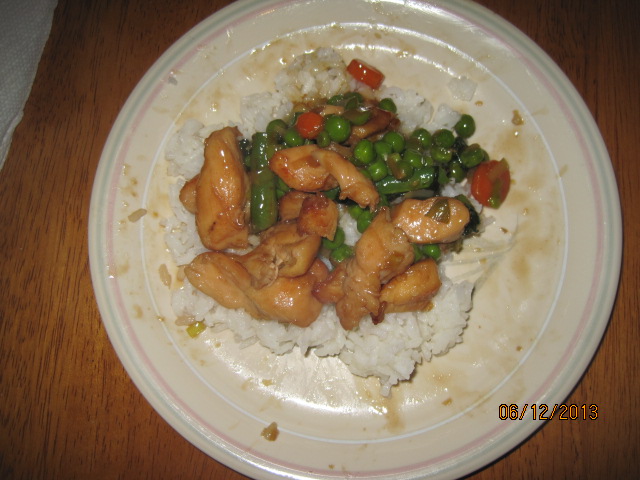
Clear the center of the pan and add the garlic, ginger and 1 teaspoon of vegetable oil. Mash the mixture until fragrant, about 15 to 30 seconds, then mix it into the vegetables. Return the chicken to the pan. Whisk the sauce to re-combine, then add it to the skillet and toss constantly until the liquid is thickened, about 30 seconds. Pour the stir fry into a serving bowl and serve with white rice or fried rice.

There are a few other tips you may want to follow when making a stir fry. First, as I have said before, while it is nice to have a wok, I don’t think they are very effective for cooking at home. unless you have a professional stove with the right kind of burners, a round-bottomed wok won’t work nearly as well as a large skillet when it comes to browning. Second, don’t put too much in the pan all at once. A crowded skillet won’t give you the searing that you want for a stir fry; it is just going to steam everything. Take the time to cook everything in batches and you will be well rewarded with nice browning. Third, try not to stir everything too much. I know it’s called a stir fry and everything tells you that you should be stirring constantly, but the thing is that most stoves don’t give you the kind of heat you get at an Asian restaurant’s stove or flat top so by moving things around all the time you don’t allow them to brown well. Give them a chance to cook and stir infrequently. Finally, remember that you don’t have to cook everything fully during the searing process. You want to remove items just before they are done. Everything is going to finish cooking in the end when you add it back into the pan with the sauce.

Of course you can do things in many combinations or try different sauces instead of this classic sauce if you want something different. You can vary things up each time by using different seasonal vegetables as well to make things different or top the final product with scallion greens, toasted seeds or nuts or whatever herbs or oils you may find appropriate or like. The combinations are endless here, so you can have a  lot of fun with it.

That’s all I have for today. Check back next time for some new recipes I have tried recently, including a very simple Italian bread salad and a great bay scallops I used recently. Until then, enjoy the rest of your day and enjoy your meal!

001


Tags: , , , , ,

Fine Food for Father’s Day, Part 1 – Strip Steak with Brandied Mushrooms and Sweet Potatoes

Father’s Day dinner is always treat. Michelle and Sean get to do all the cooking and I get to pick out what I would like to have for dinner. I picked something simple this year since it was just the 3 of us. Michelle had picked up some New York strip steaks and we had some other things around the house that could make for a simple yet elegant meal. We thought about using the grill, but the weather was kind of iffy at the time we were eating dinner so we thought on the safe side we would just do it inside. The recipe for the steaks comes from Tyler Florence.

New York Strip Steak with Brandied Mushrooms and Fresh Thyme

4 New York strip steaks, each about 1 1/2 inches thick
Extra-virgin olive oil
Kosher salt and freshly ground black pepper
2 pounds mushrooms, trimmed, brushed clean with the towel and stemmed
Leaves from 2 sprigs fresh thyme
2 cloves garlic, chopped
1/4 cup brandy
1/2 cup heavy cream

Remove the steaks from the refrigerator and allow them to come to room temperature. Heat 2 tablespoons of oil in a large sauté pan over medium-high heat until smoking. Sprinkle the steaks all over with salt and pepper. Put the steaks in the pan and cook, turning to brown all sides completely, until medium-rare, about 8 to 10 minutes depending on how thick the steaks are. Remove the steaks to a platter with tongs and cover loosely with a tent of aluminum foil to keep the meat warm while you make the sauce.

Put the sauté pan back over medium-high heat and add 1/4 cup olive oil. When the oil is smoking, add the mushrooms and cook, stirring, about 10 minutes, until golden brown. Add the thyme and the garlic, and season well with salt and pepper. Toss a few more times to cook the garlic, then dump the mushrooms out onto a platter. Take the pan off the heat, add the brandy, return the pan to the heat, and cook until almost evaporated. Add the cream and cook that down to 2 to 3 minutes until reduced by about one half and thickened. Return the mushrooms to the pan with whatever juices have collected on the platter and simmer the entire thing another 2 minutes until thickened again. Season with salt and pepper. Slice the steaks thin against the grain. Taste the sauce for salt and pepper and serve.

I loved the mushrooms sauce that came with the steaks. The steaks were cooked perfectly and the sauce added just the right amount of flavor with the mushrooms and the brandy. We did not have to pounds of mushrooms on hand, so we actually ended up about halving the recipe and cut down the amount of olive oil used to about 2 tablespoons and cut the brandy down to about 1/8 of a cup and the heavy cream to about one-fourth.

Besides making some corn on the cob to go with the steaks, we also used a recipe from Bobby Flay of the Food Network for grilled sweet potatoes with lime and cilantro. Even though we didn’t actually grill the potatoes, I think they still came out pretty nicely for indoor cooking. It’s very easy to make this recipe and takes next in no time at all.

Grilled Sweet Potatoes with Lime and Cilantro

3 sweet potatoes, unpeeled
Kosher salt
2 teaspoons finely grated lime zest
Pinch of cayenne pepper
1/4 cup canola oil
Freshly ground pepper
1/4 cup finely chopped fresh cilantro

To par-cook the potatoes, place the potatoes in a large pot of water and boil until fork tender, about 8 minutes. Allow the potatoes to cool completely. Slice each potato lengthwise into eighths.

Preheat the grill to medium or place a cast-iron grill pan over medium heat. Mix 1 tablespoon of salt, the lime zest and the cayenne pepper in a small bowl and set aside.

Brush the potato wedges with the oil and season well with salt and pepper. Grill the potatoes until they are golden brown on all sides (including the skin) and just cooked through, about 1 1/2 to 2 minutes per side. Transfer the potatoes to a platter and immediately season with the salt mixture and sprinkle with cilantro.

We simply made the potatoes in the cast-iron pan instead of dragging the grill pan out and I think they turned out just as well. Par-cooking them is really necessary here because you want to make sure the potatoes are going to be cooked all the way through when you make them this way. If you just put them in raw, they are not going to be done in one to 2 minutes and will burn. I really liked the mixture of the lime and the salt with the cayenne pepper; it really help to bring out the flavor of the potatoes and I actually used some of the salt on my piece of corn on the cob as well.

That’s all there is for today. Next time I will post the recipe Michelle used to make banana cream pie for dessert for Father’s Day. I can tell you it was pretty darn good and I really enjoyed it. Check back for that one as well as some of the recipes that I have done recently and plan to post on the blog. Until next time, enjoy the rest of your day and enjoy your meal!002


Tags: , , , , , , ,

One Pot Meal : Roast Provencal Chicken and Vegetables

Making a one-pot meal for dinner has some great advantages to it. Not only does it make cleanup after the meal simple and easy, but cooking everything together in one pot or pan gives all the food the chance to meld flavors. As soon as I saw this recipe in bon appétit Magazine, I knew I was not only going to give the recipe a try, but that I was going to add vegetables to it so we could have the complete meal together.

Roast Provençal Chicken with Roasted Vegetables

2 garlic cloves, finely chopped
1/4 cup herbes de Provence
1/4 cup extra-virgin olive oil
1 tablespoon kosher salt
1/2 teaspoon freshly ground black pepper
1 3 1/2 to 4 pound chicken, cut into 8 pieces
4 carrots, peeled and chopped
4 parsnips, peeled and chopped
2 onions, peeled and cut into quarters
2 sweet potatoes, chopped
2 Yukon gold potatoes, chopped
1/4 cup olive oil
Salt and freshly ground black pepper

Preheat the oven to 475°. Mix the garlic, herbes de Provence, oil, salt, and pepper in a small bowl. Rub the mixture all over the pieces of chicken, covering the skin on both sides. Place the chicken on a wire rack.

Add the carrots, parsnips, onions, sweet potatoes, and potatoes to the roasting pan. Mix the olive oil with the vegetables, tossing to evenly coat everything. Season with salt and pepper. Place the chicken on top of the vegetables and roast the chicken in the oven until the skin begins to brown, about 25 to 30 minutes. Reduce the heat to 350° and roast until an instant-read thermometer inserted into the largest piece of chicken registers 165°, about 30 to 40 minutes longer. Remove the chicken from the oven to a separate platter and cover to rest for 10 minutes. Put the roasting pan back in the oven to allow the vegetables to roast longer and caramelize for another 10 minutes. Remove the vegetables and place on a separate serving platter.

If you didn’t want to cut the chicken up beforehand, you could certainly leave it all and then rub the herb mixture inside and outside the chicken before you roast it. If you like your vegetables a little crisper, when you place them back in the oven after removing the chicken you could turn the heat up on the oven to 450° and let them roast at a higher temperature for a little bit longer. I particularly like the way the spices came out on the chicken itself. They tasted great with the vegetables and you could use any vegetables that you like here, although vegetables work best for this type of roasting because they can sustain in the oven a little bit longer than the other vegetables like broccoli or cauliflower or the like.

That’s all there is for today. Check back again next time to see what other recipes I use for the week. I still have a couple of other things planned for the coming days so hopefully I can get to them. I know I’ll be making something with Italian sausage, some type of chicken sandwich and I also have a couple of pork recipes that I want to try out soon so keep checking back to see what I decide to make. Until next time, enjoy the rest of your day and enjoy your meal!

001

 
Leave a comment

Posted by on June 6, 2013 in Dinner, One Pot Meals, Poultry, Vegetables


Tags: , , ,

Getting Fancy with Scallops with Carrot Cream, Pickled Carrots and Herb Oil

I came across this recipe thanks to Food Republic, who had posted it on their site about a week ago. The pictures of it looked great and it sounded simple enough to try out myself so I thought I would give it a shot. It doesn’t take long to make at all, so you can even do it for a weeknight meal without any trouble.

Scallops with Carrot Cream, Pickled Carrots and Herb Oil

Carrot Cream

1/2 pound carrots, cut into a large dice (about 2 cups)

1 teaspoon salt

1/2 cup heavy cream

Freshly ground black pepper

Pickled Carrots

1 large carrot, sliced into short ribbons using a vegetable peeler (about 1 cup)

1/4 cup seasoned rice wine vinegar

Scallops

1 pound sea scallops

Salt and freshly ground black pepper

1 tablespoon vegetable oil

Herb Oil

3/4 cup packed fresh Italian parsley leaves

1 tablespoon fresh marjoram leaves

1/4 cup extra-virgin olive oil

1/4 cup vegetable oil

For the carrot cream : Add the carrots and salt to medium saucepan and cover with water. Bring to a boil and cook for 7 to 8 minutes, or until the carrots are tender. Drain the carrots and add them to a blender along with the cream and a pinch of pepper to taste. Blend until the mixture is a very smooth puree and set aside.

For the pickled carrots: In a medium bowl, toss the carrots with the rice wine vinegar. Marinate the carrots for at least 20 minutes. Drain, reserving the vinegar for another use, and set aside.

For the herb oil: In a blender, combine the parsley, marjoram, olive oil, vegetable oil and the salt. Blend until the oil turns a vibrant green color, about 3 minutes. You can strain the oil through a fine mesh strainer or leave it alone if you like it with some texture to it. Transfer the oil to a bowl or a squeeze bottle.

For the scallops: Dry the scallops thoroughly with paper towels. Place them on a plate and season them generously with salt and pepper. Heat a heavy skillet over high heat. Add the vegetable oil and, when the skillet is very hot, carefully add the scallops to the pan, being careful not to splatter oil on yourself or crowd the pan with too many scallops. Cook the scallops for 2 minutes on one side without disturbing them, or until they are caramelized, then flip them over, cooking the other side for a minute or so more.

To assemble the dish: Gently re-heat the carrot cream, then spoon some on each plate for serving. Top each plate with several scallops. Drizzle some herb oil around the scallops and garnish with a sprinkling of pickled carrots and marjoram leaves.

This dish looked very nice and tasted fantastic. The scallops were cooked perfectly and I loved the combination of the carrot cream and the pickled carrots with the scallops themselves. The herb oil added a nice contrast to the dish with the parsley and marjoram. It seemed like a perfect combination. I also had plenty of oil left over to use for other dishes down the road. I served this with some white rice and broccoli to round out the meal.

That’s it for today. Tonight is our 20th anniversary and I have a nice dinner planned, so check back for the menu for that one later this week. Until next time, enjoy the rest of your day and enjoy your meal!

001


Tags: , , , ,

Mother’s Day Dinner Part 4 – Wilted Spinach Salad with Warm Bacon Vinaigrette

Okay, this is the finale of the recipes that I used for Mother’s Day dinner last week. It includes our vegetable course, which was a wilted spinach salad with a warm bacon vinaigrette and a simple tomato and mozzarella appetizer to start off the meal. Let’s start with the tomato appetizer, which is quick and simple and great for any time when you have a couple of fresh tomatoes around and are looking for something to do with them.

Tomato and Mozzarella Salad with Balsamic Vinaigrette

8 ounces fresh mozzarella, sliced

3 ripe tomatoes, sliced

2 tablespoons fresh basil, chopped

1/4 cup extra-virgin olive oil

3 tablespoons balsamic vinegar

1/2 teaspoon Dijon mustard

1/4 teaspoon salt, to taste

Freshly ground black pepper, to taste

Mix the vinegar, mustard, salt and pepper together in a small bowl.Gradually add the olive oil while whisking until well blended.Spread the tomato slices on a large plate or platter and lightly salt the tomatoes. Cover the tomatoes with the mozzarella slices. Drizzle the dressing over the tomatoes and mozzarella. Sprinkle the chopped basil on top and serve.

It is super quick and easy to make anytime. You could even add some salad greens into the mix and make it as a salad course if you choose to go that way.

Now for the spinach salad. This really only works well with fresh spinach, but everyone loved the combination here, so I think this one is a keeper. I got the recipe from the Cook’s Illustrated Cookbook, so you can find it in there if you want to take a look.

Wilted Spinach Salad with Warm Bacon Vinaigrette

6 ounces baby spinach

3 tablespoons cider vinegar

1/2 teaspoon sugar

1/4 teaspoon pepper

Pinch salt

8 slices bacon, cut into 1/2-inch pieces

1/2 red onion, chopped medium

1 small garlic clove, minced

3 hard-boiled eggs, peeled and quartered (optional)

Place the spinach on a large bowl. Stir the vinegar, sugar, pepper and salt together in a small bowl until the sugar dissolves. Set aside.

Cook the bacon in a large skillet over medium-high heat, stirring occasionally, until crisp, about 5 minutes. Using a slotted spoon, transfer the bacon to a paper towel-lined plate. Pour the fat into a heatproof bowl and the return 3 tablespoons of the fat to the skillet. Add the onion to the skillet and cook over medium heat, stirring frequently, until slightly softened, about 3 minutes; stir in the garlic until fragrant, about 15 seconds. Add the vinegar mixture, then remove the skillet from the heat; working quickly, scrape the bottom of the skillet with a wooden spoon to loosen and remove any browned bits. Pour the hot dressing over the spinach, add the bacon and toss gently with tongs until the spinach is slightly wilted. Arrange the egg quarters, if using, over the top of the salad and serve.

Again, you could easily use this as a salad course or as a side dish. I chose not to use the eggs and used this as our vegetable side for the meal. One thing to keep in mind when you add the vinegar to your skillet – move your face away from it as you pour the vinegar into a hot pan. It releases a very potent vapor that can be unpleasant to get right in your face. It will surely clear out your sinuses if that is what you are looking for, otherwise, take some caution and move away. Bacon and spinach go really well together and with the spinach barely wilted you still get the nice texture of the spinach with the crisp bacon.

So that finally wraps up Mother’s Day. I have a number of other recipes to come here in the next few days and this week, including a very garlicky shrimp scampi, making spaghetti and meatballs for a crowd, some fried chicken and cornbread, the Ethiopian beef stir fry, a great new scallops recipe and more. Keep checking back to see what comes next  I promise to be better about taking the pictures from now on :). Until next time, enjoy the rest of your day and enjoy your meal!


Tags: , , , ,

Mother’s Day Dinner, Part 1 – Eggplant Parmesan

Cooking on Mother’s Day is always a special event. I wanted to make sure I made things that Michelle really wanted to have for dinner and that would be good for the guests that we were having for the day. After some back and forth we decided on a few different things to make, but it was mostly going to have an Italian theme to it. I made a few things, so for the first day of the recipes I am going to post the recipe I used for Eggplant Parmesan that I got from the Cook’s Illustrated Cookbook. Actually, a lot of recipes that I used for the Mother’s Day meal came from this cookbook. This one, I think, was my favorite of the day.

Eggplant Parmesan

1/4 cup extra-virgin olive oil
2 garlic cloves, minced
1 (28-ounce) can crushed tomatoes
1/2 teaspoon dried basil
1/4 teaspoon dried oregano
1/4 teaspoon sugar
Salt and pepper
2 pounds eggplant, sliced into one fourth-inch-thick rounds
Kosher salt and pepper
8 slices white sandwich bread, torn into quarters
2 ounces Parmesan cheese, grated (1 cup)
1 cup flour
4 large eggs
6 tablespoons vegetable oil
8 ounces mozzarella cheese, shredded (2 cups)
1 ounce Parmesan cheese, grated (1/2 cup)
10 fresh basil leaves, roughly torn

For the tomato sauce, heat the oil and garlic in a large saucepan over medium heat. Cook, stirring often, until the garlic turns golden but not browned, about three minutes. Stir in the tomatoes, basil, oregano, sugar, 1/4 teaspoon pepper, and a pinch of salt, bring to a simmer, and cook until the sauce thickens and the flavors meld, about 10 to 12 minutes. Take the sauce off the heat, season with salt to taste and cover to keep warm.

For the eggplant, line a baking sheet with a triple layer of paper towels and set it aside. Toss the eggplant and 1 1/2 teaspoons of salt together in a bowl, then transfer it to a colander. Let it sit until the eggplant releases about 2 tablespoons of liquid, about 30 to 45 minutes. Wipe the excess salt from the eggplant, then arrange it on a prepared baking sheet. Cover the eggplant with another triple layer of paper towels and firmly press each slice to remove as much liquid as possible.

While the eggplant is draining, adjust oven racks to the upper-middle and lower-middle positions, place a rimmed baking sheet on each rack, and heat the oven to 425°. Pulse the bread in a food processor to fine, even crumbs, about 15 pulses. You should have about 4 cups of breadcrumbs when you are done. Transfer the crumbs to a pie plate or shallow dish and stir in the Parmesan cheese and a half teaspoon of pepper; set aside.

Combine the flour and 1 teaspoon of pepper in a large zipper-lock bag and shake to combine. Beat the eggs in a second pie plate or shallow ditch. Place 8 to 10 eggplant slices in the bag with the flour, sealed the bad, and shake to coat the eggplant. Remove the eggplant slices, shaking off any excess flour, then dip in the eggs, letting any excess egg run off. Then coat the eggplant evenly with the bread-from mixture. Set the breaded slices on a wire rack set in a rimmed baking sheet. Repeat the process with the remaining eggplant.

Remove the preheated baking sheets from the oven. Add 3 tablespoons of oil to each sheet, tilting the sheet to coat it evenly with the oil. Place half of the breaded eggplant on each baking sheet and a single layer; bake until the eggplant is well browned and crisp, about 30 minutes, switching and rotating the baking sheets after 10 minutes, and flipping the eggplant slices with a wide spatula after 20 minutes. (Do not turn off the oven.)

To assemble the dish, spread 1 cup of the tomato sauce over the bottom of a 13 x 9-inch baking dish. Layer in half of the eggplant slices, overlapping slices to make sure everything fits. Distribute 1 cup of sauce over the eggplant, then sprinkle with 1 cup of the mozzarella cheese. Layer in the remaining eggplant, then.with 1 cup of sauce, leaving the majority of the eggplant exposed so it will remain crisp. Sprinkle with the Parmesan cheese and the remaining 1 cup of mozzarella. Bake until bubbling and the cheese is browned, 13 to 15 minutes. Cool for 10 minutes, and scattered the basil over the top, and serve, passing the remaining tomato sauce separately.

I had never made eggplant Parmesan before, and the few times that I have had it be eggplant to me comes out to be quite soggy and full of oil. I think a lot of this is because most people just simply fry the eggplant before they put it in the oven. This technique seems to work better to me as salting the eggplant first helps draw out a lot of the moisture out of it, and then the baking process helps to keep it crisp. I actually used Panko breadcrumbs instead of making the breadcrumbs in the food processor as suggested and I think it actually came out better. Only putting a little bit of sauce on the eggplant cook in the dish also seem to help keep it nice and crisp as well. I used the same technique with the chicken Parmesan that we also made for dinner and that seemed to work really well too; you’ll see that recipe posted tomorrow. Everyone seemed to love the eggplant and it disappeared quite quickly, so fast in fact that I never even got a picture of it to take to post on here, so for that I apologize. But I will certainly make this dish again as the recipe proved to be popular even with those who are not big fans of eggplant.

That’s it for today. Time to get back to work. Tomorrow I will post the recipe for the chicken Parmesan that I need it. It is slightly different than the recipe I have posted here in the past and that everyone seemed to really like the way that came out as well so I think you’ll enjoy it. Check back tomorrow and see if you like it. Until then, enjoy the rest of your day and enjoy your meal!

 
1 Comment

Posted by on May 13, 2013 in Cookbooks, Cooking, Dinner, Holidays, Sauce, Vegetables


Tags: , , , , ,

 
National Day Calendar

Fun, unusual and forgotten designations on our calendar.

Jennifer Probst

a little bit naughty a little bit nice

Laissez Faire

Letting Life Lead

simple cooking recipes

a blog to share with you the best