RSS

My Oh My – An Amazing Maple-Glazed Meatloaf

By now I think everyone knows my love for meatloaf. I have lots of different recipes on the blog here that you can try – Alton Brown, America’s Test Kitchen, Cook’s Country and many others – but I am always on the lookout for new and exciting ways to serve meatloaf. Lately I have been getting a lot of recipes from New York Times Cooking, which is a great site that has thousands of fantastic recipes on from basic to more complex. I came across this great meatloaf recipe on there about a week ago for meatloaf with a wonderful maple glaze on it and it sounded like the perfect fall meatloaf to give a try. I was not disappointed in the results.

Maple Glazed Meatloaf

3/4 pound sliced bacon

1 cup finely chopped onion

3 cloves garlic, peeled and chopped

1/4 cup milk

1/4 cup sour cream or plain yogurt

2 eggs

1 tablespoon dry mustard

2 teaspoons kosher salt

3/4 teaspoon dried thyme

1 teaspoon Worcestershire sauce

1/2 teaspoon freshly ground black pepper

Dash of hot pepper sauce

1 pound ground beef

1 pound ground pork

1 pound ground veal

1/2 cup crushed saltines

1/2 cup finely chopped parsley

1/4 cup maple syrup

2 tablespoons Dijon mustard

Chop 1/4 pound of the bacon; saute the chopped bacon in a large skillet set over medium-high heat until the bacon is browned but not crisp, about 8 minutes. Transfer the cooked bacon to paper towels so it can drain. Add the onion and garlic to the skillet. Cover the skillet and cook the vegetables over low heat, stirring occasionally, until the onions have softened, about 10 minutes. Remove the skillet from the heat and set it aside.

Heat the oven to 375 degrees. In a medium bowl, whisk together the milk, sour cream or yogurt, eggs, dry mustard, salt, dried thyme, Worcestershire sauce, ground black pepper and the hot pepper sauce until it is blended.

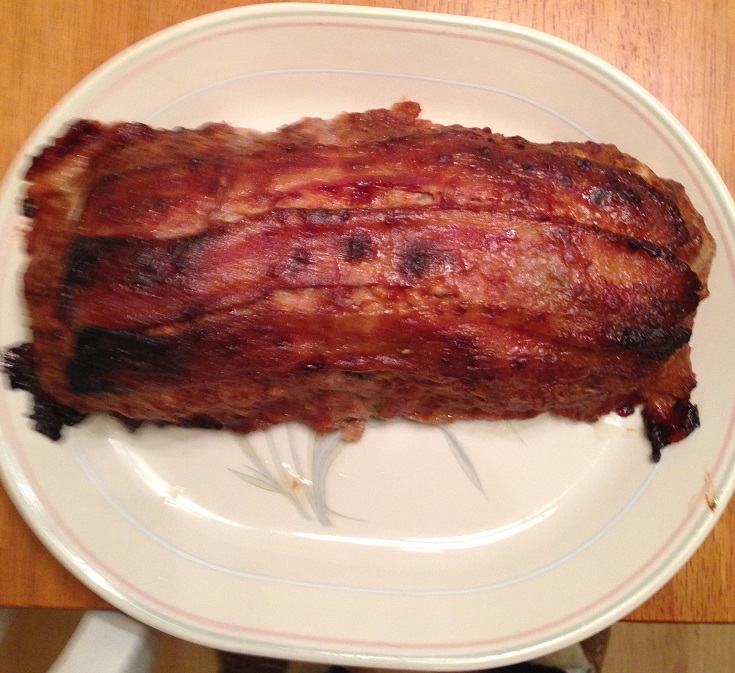
In a separate large bowl, combine the ground beef, ground pork and ground veal, the cooked bacon pieces, the cooked onion mixture and the milk mixture. Using your hands, toss the ingredients lightly to mix them together. Add the crushed saltines and the parsley and toss the mixture lightly again until everything is thoroughly combined. Line a rimmed baking sheet with aluminum foil. On the lined baking sheet for the meet into a loaf of about 5 inches by 12 inches. Drape the remaining strips of bacon lengthwise over the loaf to completely cover the loaf.

In a small bowl, combine the maple syrup and the Dijon mustard. Paint a thick coating over the bacon on the meatloaf. Bake the meatloaf, uncovered, until a thermometer inserted into the center of the loaf reads 165 degrees, about 1 1/4 to 1 1/2 hours. If you desire, baste the loaf occasionally with the remaining maple syrup mixture. Let the meatloaf rest for about 10 minutes before slicing it and serving it.

This meatloaf was delicious. I used meatloaf mix or beef, pork and veal that I get at the store and I didn’t use as much bacon in or on the meatloaf itself as the recipe indicates only because Michelle has some trouble with bacon, but the overall flavors for this meatloaf were fantastic. I loved the crust you get on the top from the maple glaze on the bacon and this meatloaf held together really well and was easy to slice. I think the combination of the saltines, milk and sour cream really helped bind everything, along with the eggs. The flavor in the meatloaf was great too, thanks to the bacon, onions and garlic with just a hint of spice and heat. This was great with the homemade tater tots I made that night, but I think it would be perfect with mashed potatoes or even better with sweet potatoes that have a little brown sugar and maple syrup on them as well. Of course, it was awesome for meatloaf sandwiches the next day as well and I think it would be great for an open-faced meatloaf sandwich with a little gravy. Yum! I will definitely add this one to my meatloaf arsenal.

That’s all I have for today. Check back next time for another recipe. Until then, enjoy the rest of your day and enjoy your meal!

IMG_0737

 
2 Comments

Posted by on November 6, 2014 in Beef, Cooking, Dinner


Tags: , , , , , ,

Kid Friendly and a Healthier Option – Oven Fried Shrimp

Any time that  I get some shrimp Sean is always asking me to make fried shrimp. Not that I don’t like fried shrimp, I love it myself; the problem is that I hate cooking with all of that oil from a health standpoint and clean up standpoint and there are other ways to cook shrimp that I love as well. He however, has a hang up on fried shrimp so when Michelle is traveling, I very often will get some shrimp and make something for dinner (Michelle likes shrimp, but they are not a favorite of hers, so she would just as soon not have them anyway). I had seen some recipes for oven fried shrimp before but none of them ever really looked like the breading or coating held up that well or cooked well so you got a good coating on them until I saw this recipe from Williams-Sonoma for oven fried shrimp. The picture looked pretty good and the recipe seemed simple enough, so I thought I would give it a try.

Oven Fried Shrimp

1 cup ketchup-style chili sauce or ketchup

2 tablespoons drained prepared horseradish

Finely grated zest of 1 lemon

1 tablespoons fresh lemon juice

Hot pepper sauce

1 1/4 cups panko or other dried breadcrumbs

1 teaspoon sweet paprika

1/2 teaspoon dried oregano

1/2 teaspoon dried basil

1/2 teaspoon dried thyme

1/2 teaspoon granulated garlic

1/2 teaspoon kosher salt

1/8 teaspoon cayenne pepper

4 tablespoons butter, melted

2 tablespoons olive oil

2 pounds large shrimp, peeled and deveined

To make the cocktail sauce, stir together the chili sauce or ketchup, the horseradish and the melon zest and lemon juice in a small bowl. Season the sauce with hot pepper sauce to taste. Set the cocktail sauce aside.

Preheat the oven to 400 degrees. Lightly oil a large rimmed baking sheet. In a medium bowl, stir together the bread crumbs, paprika, oregano, basil, thyme, garlic, salt and cayenne pepper. In another bowl, mix together the melted butter and the olive oil. Working in batches, toss the shrimp in the butter mixture to coat it well and then coat the shrimp with the bread crumb mixture, shaking off any excess. Spread the shrimp in a single layer on the prepared baking sheet.

Bake the shrimp until the coating is golden brown and the shrimp are opaque throughout when they are pierced with the tip of a knife, about 10 minutes.

Transfer the cocktail sauce to individual small bowls for dipping. Serve the shrimp with the sauce on the side.

This is very simple and turns out a pretty good coating for the shrimp. I used basic bread crumbs, but I think the coating would be even better with panko and will try it that way next time to see how it is. If you wanted to jazz things up a bit and make these coconut shrimp, you could try mixing in some shredded coconut with the breadcrumb mixture or even substituting it completely for the bread crumbs and following the recipe as indicated. Personally, I am not a fan of coconut myself, but a lot of people love the coconut shrimp. You can then make or buy your favorite sweet chili sauce for dipping instead of the cocktail sauce. I made this as our entrée for the meal and served it with some rice and vegetables, but it would be a great appetizer for any time. I liked the shrimp and the cocktail sauce in this one and Sean gobbled these up as well, so I think the recipe is a pretty good alternative to frying the shrimp and using all of that oil.

That’s all I have for today. Check back next time for another recipe. Until then enjoy the rest of your day and enjoy your meal!

01df51cbcced80f19903c1417f2508828d680ddb93


3 Comments

Posted by on November 5, 2014 in Appetizers, Cooking, Dinner, Sauce, Seafood


Tags: , , , , ,

Savor the Simple Chicken and Wild Rice Soup

We haven’t really had a lot of cool weather here in my part of New York just yet, though it is starting to get there with some nights down in the thirties. in any event, once the fall rolls around I start to think more about soups, stews and slow cooker meals because they just make you feel warm, make the house smell great and are easy to put together for a one pot meal. I decided I wanted to make something really easy and have a great soup and give some chicken and wild rice soup a try. This is a great options when you have some leftover chicken or a rotisserie chicken and want to do something different with it. There are lots of different types of wild rice that you can get, so you could always get your favorite quick version or get a regular version that takes longer to cook but seems to have better flavor, in my opinion. In either case, this turns out a very tasty soup for the whole family. I used this recipe from Food.com to make my soup when I did it, but the soup as a whole is pretty easy to put together on its own.

Chicken and Wild Rice Soup

4 cups chicken broth

1 cup peeled and sliced carrots

1/2 cup sliced celery

1/3 cup wild rice, uncooked

1/3 cup sliced leeks (white and light green parts) or green onions

1/2 teaspoon dried thyme, crushed

Freshly ground black pepper

2 tablespoons butter

3 tablespoons all-purpose flour

1 cup half-and-half or milk

1 1/2 cups chopped cooked chicken

2 tablespoons dry sherry

1 carrot peeled into thin strips, for garnish (optional)

In a saucepan set over medium heat, mix the chicken broth, sliced carrot, sliced celery, uncooked wild rice, leek or green onions, dried thyme and 1/4 teaspoon of black pepper. Bring the mixture to a boil then reduce the heat to low. Cover the saucepan and allow the mixture to simmer until the rice is tender, about 45 to 50 minutes.

Meanwhile, melt the butter in a small saucepan set over medium heat. Stir in the flour and then stir in the half-and-half or milk. Cook and stir the mixture until it is bubbly, about 1 to 2 minutes. Slowly add the half-and-half mixture to the rice mixture, stirring constantly to thicken the soup. Stir in the chicken and the dry sherry. Heat the soup and until the chicken is heated through, about 3 to 4 minutes. Divide the soup evenly among soup bowls and if desired, garnish the soup with the carrot peel strips.

This turned out to be a really great soup without a lot of work needed for it. You get great flavor from the wild rice and the stock thickens up nicely when you add the roux to it to make things even better, and the touch of dry sherry at the end really tops things off nicely. I could see adding different vegetables to this if you like, such as some broccoli or sliced mushrooms or really anything that you favor. The soup was even better the next day for lunch and we all really enjoyed the meal. I made some buttermilk biscuits to go along with the soup, but you could make any bread, rolls, biscuits or even just have crackers or a sandwich alongside of it and you have a great meal.

That’s all I have for today. Check back next time for another recipe. Until then, enjoy the rest of your day and enjoy your meal!

01a9f00081218a819fa6eb9845fc801a27dd5b733d


Tags: , , , ,

Better Believe This Bourbon-Butter Steak Tips with Maple Mashed Sweet Potatoes is the Bomb!

Leave it took Cook’s Country Magazine to keep supplying me with easy to make, quick weeknight meals. Finding something that uses just a few ingredients but comes together really nicely to taste great and can all be done in less than 30 minutes is my idea of the perfect weeknight meal. We have been so busy around out house lately with work and all of the other family things going on and it is only going to get crazier as we get further into November and December with birthdays, holidays, parties, travel and more. This means finding fast and easy meals that we can do without a lot of effort. This one for bourbon butter steak tips with maple mashed sweet potatoes is great because you can get the sweet potatoes softened in the microwave, get your steak tips going and have everything ready in about 20 minutes. Add a green vegetable and you are good to go.

Bourbon-Butter Steak Tips with Maple Mashed Sweet Potatoes

2 pounds sweet potatoes, peeled and cut into 1/2-inch pieces

3 tablespoons vegetable oil

Salt and freshly ground black pepper

1/4 cup heavy cream

1/4 cup maple syrup

1 1/2 pounds sirloin steak tips, trimmed and cut into 2-inch chunks

1/2 cup bourbon

2 teaspoons apple cider vinegar

2 tablespoons butter

1 tablespoon chopped fresh chives

Combine the sweet potatoes, 2 tablespoons of the vegetable oil, 1 teaspoon of salt and 1/2 teaspoon of black pepper in a large bowl. Cover and microwave until the sweet potatoes are tender, about 10 minutes, stirring the potatoes halfway through the cooking process. Add the heavy cream and 3 tablespoons of the maple syrup and mash the potatoes until they are smooth; cover the potatoes and set them aside.

Meanwhile, pat the steak tips dry with paper towels and season the steak with salt and pepper. Heat the remaining 1 tablespoon of vegetable oil in a large skillet set over medium-high heat until the oil is just smoking. Add the steak tips and cook them until they are well browned all over and the meat registers 125 degrees (for medium-rare), about 6 to 8 minutes. Transfer the steak tips to a platter and tent them loosely with foil to keep them warm.

Off the heat, add the bourbon, apple cider vinegar and the remaining 1 tablespoon of maple syrup to the skillet. Return the skillet to medium-high heat and cook until the sauce is slightly thickened, about 3 minutes, scraping up any browned bits from the bottom of the skillet. Off the heat, whisk in the butter and season the sauce with salt and pepper to taste. Return the steak and any accumulated juices to the pan and toss the steak to coat it well with the sauce. Sprinkle the steak with chives and serve it with the mashed sweet potatoes.

This was a very delicious meal with a nice hint of the maple syrup permeating the potatoes and the steak. Throw in the taste that the bourbon adds to the sauce and it really makes the steak out of this world. I really think you could make this with any cut of beef if you did not have steak tips to use; you could use a London broil, sirloin or any other cut of beef that you really prefer or even use a whole steak like a rib eye or strip steak and it would be great. It’s so easy to make and you get wonderful layers of flavor.

That’s all I have for today. Check back next time for another recipe. Until then, enjoy the rest of your day and enjoy your meal!

IMG_0721


2 Comments

Posted by on November 3, 2014 in Beef, Cooking, Dinner, Potatoes, Sauce


Tags: , , , , , ,

Fall Soups and Stews – Photo Gallery | SAVEUR

Fall Soups and Stews – Photo Gallery | SAVEUR.

It is definitely that time of year when my attention (and perhaps yours) turns to warm, comforting meals like soups and stews. These make great tasting, nourishing meals that are perfect for you to make any time, like on the weekend to get ready to have for lunches or dinner during the week. Saveur Magazine has put together 60 soup and stew recipes so you can try just about anything that you like. Check it out!


Tags: , , , , , , ,

A Crowd Favorite to Go With Anything – Broccoli Slaw

I know for many it may not seem like a coleslaw time of year and it might be something you only consider to be a summertime dish to go with your picnics and cookouts, but I like to have coleslaw just about any time of the year and I am always trying all different kinds. Coleslaw is a pretty versatile side dish that can go great with hamburgers and hot dogs for sure, but I really like it with all types of pork and chicken dishes. I often make it when we are just going to have sandwiches for dinner as an easy side dish. As I said I try to do different things with it, using different cabbage or changing up the dressing so it has mayonnaise or without mayo for more of vinaigrette style, but I also really like to try broccoli slaw now and then. Broccoli slaw is basically shredded broccoli and carrots and cabbage mixed together to get a unique flavor. You very often see it in the produce section of your store by the other bagged coleslaw options, though you could certainly make your own mix if you like. Last time I was at the store I decided to pick up a bag and give this recipe a try from Add a Pinch for a very simple broccoli slaw.

Broccoli Slaw

2 (12-ounce) bags of broccoli slaw

1/2 red onion, chopped

1/4 cup mayonnaise or Greek yogurt

1 tablespoon apple cider vinegar

1 teaspoon granulated sugar

Juice of 1 lime

Salt and freshly ground black pepper, to taste

1 teaspoon chopped fresh parsley (optional)

Pour the broccoli slaw into a large bowl and add the chopped red onion. In a 2-cup measuring cup, add the mayonnaise or yogurt, the apple cider vinegar, the sugar and the lime juice. Whisk the ingredients together with a fork or whisk and then pour about half of the dressing over the broccoli slaw in the bowl. Toss the slaw together to make sure it has all become well-dressed. Add any additional dressing as may be needed. Season the slaw with salt and pepper to taste and mix the slaw together well. Add the chopped parsley as a garnish, if using, and serve the slaw with any remaining dressing on the side.

You can easily make this ahead of time and store it in the refrigerator for a couple of days if you are planning to use it for a party or to take to someone’s home as part of a meal or a buffet. It goes really well with any type of sandwiches and I first served it with the steak sandwiches that we made recently and it was perfect. We have also used it for a side dish to go with lunches for the week and it goes really well with dishes like spare ribs or pulled pork, where you can put it right on the pulled pork sandwich as a topping. It is definitely easy and gives you a nice alternative to traditional coleslaw recipes.

That’s all I have for today. Check back next time for another recipe. Until then, enjoy the rest of your day, have a happy and safe Halloween and enjoy your meal (and your candy too!).

IMG_0727 IMG_0728


Tags: , , , ,

Living Large with Pat LaFrieda’s Filet Mignon Steak Sandwich

If you know me you know I am a big baseball fan and we go to a lot of Mets games during the season.Of course I enjoy the games and love watching and going to the stadium with Sean and Michelle, but there are also some great opportunities for eating that go on at Citi Field, more than there ever was at Shea Stadium. You can get great pastrami sandwiches, a shrimp po’boy, pizza, burgers, hot dogs, special fries, Shake Shack, Blue Smoke, and the list goes on and on. One of Michelle’s personal favorites is the stand set up by Pat LaFrieda that offers his meatball sliders sandwiches (which are out of this world) and his filet mignon steak sandwich, is unlike any other cheesesteak sandwich you will find. Michelle had been asking me for a while to try to find a recipe and I finally came across one at Food Republic for this phenomenal steak sandwich and we just happened to have a small piece of tenderloin in the freezer that I could use.

Pat LaFrieda’s Filet Mignon Steak Sandwich

4 tablespoons canola or vegetable oil, plus more as needed

2 sweet yellow onions or Spanish onions, thinly sliced (about 3 cups)

6 ounces thinly sliced Monterey Jack cheese

1 cup beef stock

1 1/2 teaspoons balsamic glaze

12 (1 1/2-inch thick) filet mignon medallions (about 1 1/2 pounds total of beef)

1 tablespoon kosher salt

1/2 teaspoon turbinado sugar or light brown sugar

1 long baguette, cut into 6-inch segments

In a large skillet, heat 2 tablespoons of the canola oil over medium heat until the oil slides easily in the pan, about 2 to 3 minutes. Add the sliced onions and cook, stirring occasionally so the onions do not stick to the pan, until the onions are soft and caramelized, about 20 minutes. Spread the onions out over the surface of the pan. Remove the pan from the heat and lay the Monterey Jack cheese on top of the onions, letting the cheese melt.

To make a jus, in a small saucepan bring the beef stock to a simmer over medium heat. Remove the pan from the heat and stir in the balsamic glaze. Cover the pan to keep the jus warm.

Season the tenderloin pieces on both sides with the kosher salt and the sugar. in another large skillet, heat the remaining 2 tablespoons of the canola oil over high heat. Add half of the filet medallions, or as many as will fit in a single layer in the pan, and sear them until they are caramelized, about 1 to 1 1/2 minutes per side. Cook the remaining filet medallions the same way, adding more canola and letting the oil get hot before adding the meat to the pan.

Meanwhile, without opening them, toast the baguettes so that the outsides, top and bottom, are hot and crispy. Halve the baguettes horizontally, leaving them hinged on one side.

To assemble the sandwiches, lay 3 medallions on the bottom of each baguette. Top the medallions with the onions and cheese, dividing the onions and cheese equally among all of the sandwiches. Drizzle 1/4 cup of the jus on the inside top half of each baguette and serve.

These sandwiches are amazing. The meat is super tender and cooked perfectly and the recipe is so simple but you get fantastic flavor from the onions and the jus. The balsamic glaze is quite simple to make on your own as it is just a mixture of balsamic vinegar and sugar that you warm in a saucepan until a glaze starts to form. The baguettes I used are actually from a recipe I posted recently from Mark Bittman for his not quite whole grain baguettes and they went perfectly with the meat. While Michelle and Sean had onions and cheese on theirs, I left the cheese off of mine and put some roasted red peppers on there instead, which was quite yummy. You could try this with other cuts of steak if you want to make a more inexpensive version and I think it would taste good, but if you have the chance to be decadent and use the filet medallions, go for it.

That’s all I have for today. Check back next time for another recipe. Until then, enjoy the rest of your day and enjoy your meal!

IMG_0727


1 Comment

Posted by on October 30, 2014 in Beef, Breads, Cooking, Dinner, Sandwiches


Tags: , , , , , , ,

Tasty, Tantalizing and Terrific – Homemade Tater Tots with Spicy Mayonnaise

Sean has been asking me for months now to try my hand at making some homemade tater tots. Tater tots are pretty much a religious experience around my home and Michelle and Sean absolutely love them. When we have burgers, it’s always with tater tots. I have looked at recipes for homemade tots before and they always seemed very involved and difficult and didn’t look like they would really turn out all that great so I stayed away from them. A few days ago I saw this recipe from Bon Appetit and read through it and could not believe how easy it would be, so I knew this was going to be the time I would try it out.

Homemade Tater Tots with Spicy Mayonnaise

For the Spicy Mayonnaise:

1 cup mayonnaise

1 teaspoon adobo sauce from canned chipotles in adobo

1 teaspoon hot pepper sauce

¼ teaspoon smoked Spanish paprika (optional)

Kosher salt and freshly ground black pepper

For the Tater Tots:

3 medium russet potatoes (about 2 pounds), scrubbed

2 scallions, chopped

½ cup seasoned Italian breadcrumbs

¼ cup heavy cream

1 tablespoon sour cream or plain yogurt

1 tablespoon butter, room temperature

½ teaspoon granulated garlic

¼ teaspoon freshly ground black pepper

2 teaspoons kosher salt, plus more

2 tablespoons grated Parmesan, plus more

2 large eggs, beaten to blend

Vegetable oil, for frying

For the spicy mayonnaise, combine the mayonnaise, adobo sauce, hot pepper sauce, and paprika, if using, in a small bowl; season the mayonnaise with salt and pepper to taste.


For the tater tots, preheat the oven to 400 degrees. Prick the potatoes all over with a fork and bake them directly on an oven rack until the potatoes are very soft when they are squeezed, about 60 to 75 minutes. Let the potatoes cool slightly so they are easy to handle.


Cut the potatoes in half and scoop the flesh into a medium bowl; discard the potato skins. Mash the potatoes, then mix in the scallions, breadcrumbs, cream, sour cream, butter, granulated garlic, pepper, 2 teaspoons of salt, and 2 tablespoons of Parmesan cheese. Mix in the eggs until they are just  combined. Roll 1-tablespoon portions of the potato mixture into balls.


Pour the vegetable oil into a medium skillet to a depth of ½-inch and heat the oil over medium heat until bubbles form immediately when a little potato mixture is added. Working in batches, fry the tater tots until they are a deep golden brown, about 3 minutes per side. Drain the tater tots on paper towels. Season the tater tots with salt to taste and serve them with the spicy mayonnaise.
I did do one thing that is not included in the recipe that does seem to make a difference, at least to me. After I rolled the tater tots (and I used a cookie scoop to roll them, the medium-sized one) I put them on a plate and put them in the refrigerator for 30 minutes. This seemed to firm the potatoes up nicely so they really held their shape well and went into the oil easily and did not fall apart along the way. I have to say while they are not exactly like the frozen tater tots you buy in the store, they are much creamier and have better texture. It kind of tastes like a deep-fried mashed potato, which for us was fantastic. They were really easy to make and came out perfectly for me and I think it made about 30 to 40 tater tots, which was plenty for us. It takes a little longer than opening up the bag out of the freezer but in my mind it is worth the effort to make them.
That’s all I have for today. Check back next time for another recipe. Until then, enjoy the rest of your day and enjoy your meal!
IMG_0738 IMG_0733
 
Leave a comment

Posted by on October 29, 2014 in Cooking, Potatoes, Sauce, Snacks, Uncategorized


Tags: , , , , , ,

Eat and Enjoy Herbed Chicken with Zesty Potato Salad

I’ve been working pretty hard the last few days and I haven’t had much time to blog so I will try to get to it early today so I can get a recipe up. I have made a bunch of different things over the last few weeks that I hope to get up here, including some different chicken dishes that give you a little something different to do with a tasty and more inexpensive option for your meal. To me chicken thighs are the best part of the chicken and even more versatile than the famous boneless chicken breast. You get much more flavor from the thighs and you can buy them boneless and skinless if you choose, though you get even more flavor from the boned version and you can easily remove the skin and bones on your own if you life and chicken thighs are very affordable. Most of the time I get them for about 99 cents a pound so you can do really well with them. This particular recipe I tried, from Williams-Sonoma. is a simple herbed chicken thigh recipe that you can do in the slow cooker with a warm zesty potato salad as a nice side dish.

Herbed Chicken with Zesty Potato Salad

3 pounds skin-on, bone-in chicken thighs, trimmed of excess fat

Salt and freshly ground black pepper, to taste

2 tablespoons olive oil

1/2 yellow onion, finely chopped

4 garlic cloves, smashed

2 fresh thyme sprigs

2 fresh oregano sprigs

3 bay leaves

1/3 cup white wine

2 teaspoons white wine vinegar

1/3 cup chicken broth

For the Zesty Potato Salad:

1 teaspoon Dijon mustard

1 shallot, minced

3 tablespoons red wine vinegar

Salt and freshly ground black pepper, to taste

1/4 cup extra-virgin olive oil

20 small red potatoes

2 cups cherry tomatoes, halved

1 tablespoon finely chopped fresh oregano

For the chicken, pat the chicken thighs dry and season them generously all over with salt and pepper. In a large, heavy frying pan over medium-high heat, warm the olive oil. When the oil is hot, working in batches to avoid crowding in the pan, add the chicken, skin side down, and sear until the chicken pieces are a golden brown, about 4 to 5 minutes. Do not turn the chicken. Transfer the chicken to paper towels briefly to drain then transfer the chicken thighs to the slow cooker.

Add the onion, garlic, thyme and oregano and bay leaves to the same frying pan used for the chicken and saute everything over medium-high heat until the vegetables are just beginning to color, about 5 minutes. Pour in the wine and the white wine vinegar and stir the pan to scrape up and browned bits on the bottom of the pan. Stir in the chicken broth, 1/2 teaspoon of salt and several grinds of black pepper, then pour the contents of the frying pan over the chicken in the slow cooker. Cover the slow cooker and cook in the low setting for 4 hours until the chicken is very tender.

About 30 minutes before the chicken is done, make the potato salad. In a small bowl, whisk together the Dijon mustard, shallot, red wine vinegar, 1/4 teaspoon of salt and a few grinds of black pepper. Whisk in the olive oil until it has emulsified. Set the dressing aside.

Quarter the red potatoes and place them in a large saucepan with salted water to cover. Bring the potatoes to a gentle boil over medium-high heat and cook, uncovered, until the potatoes are just tender, about 8 minutes. Drain and transfer the potatoes to a serving bowl, drizzle the potatoes with about 1/3 cup of the vinaigrette and toss to coat the potatoes. Taste the potato salad and more of the remaining vinaigrette if desired. Let the potato salad cool slightly, then add the cherry tomatoes and oregano. Toss the salad to combine everything.

When the chicken is done, transfer the chicken to a plate and keep it warm. Remove and discard the bay leaves and the thyme and oregano sprigs. Let the braising liquid stand for a few minutes then skim off the fat with a large spoon. Divide the chicken thighs among warm individual plates and drizzle the chicken with some of the braising liquid. Mound the potato salad alongside the chicken and serve.

It is a very easy meal to put together thanks to the slow cooker and you end up with very tender chicken that has great flavor from the braising liquid. It pairs very nicely with the zesty potato salad, which has some nice zing from the mustard and red wine vinegar and the tomatoes add a nice touch to the salad. The chicken was even better the next day as a leftover for lunch when the flavors had a chance to meld even more.

That’s all I have for today. Check back next time for another recipe. Until then, enjoy the rest of your day and enjoy your meal!

IMG_0723 IMG_0722


Leave a comment

Posted by on October 28, 2014 in Cooking, Dinner, Potatoes, Poultry, Salad, Slow Cooker Meals


Tags: , , , , , ,

Homemade Candy Recipes – Photo Gallery | SAVEUR

Homemade Candy Recipes – Photo Gallery | SAVEUR.

With the holiday time of year upon us, making homemade candy can be perfect for you to have for your own holiday parties or to give out as gifts to friends, family, neighbors, co-workers or anyone that you might like to say thank you to. Saveur Magazine has put together 40 homemade candy recipes for you to try out so you can make some delicious treats of your own. Check it out!

 
Leave a comment

Posted by on October 25, 2014 in Candy, Cooking, Cooking Websites, Dessert, Holidays, Snacks


Tags: , , , , ,

 
National Day Calendar

Fun, unusual and forgotten designations on our calendar.

Jennifer Probst

a little bit naughty a little bit nice

Laissez Faire

Letting Life Lead

simple cooking recipes

a blog to share with you the best