RSS

A Quick and Easy Use of Leftovers – Open Face Turkey Sandwiches

It is getting into that turkey time of year. For most of the year, turkey is kind of expensive and not something I buy very often, unless it is ground turkey. Even just getting a turkey breast can be kind of pricey. The other problem I have is unless we are having people over for dinner, it just doesn’t make sense to buy a huge turkey for just the three of us. That being said, last week I had a hankering for some turkey and bought a 15 pound one. Needless to say, after I made it we had lots of leftovers. I was able to use the carcass to make some turkey stock, which will be used in soups this week. I also made some turkey salad for lunches for Michelle and myself. That still left us with leftover turkey, mashed potatoes, stuffing and gravy. What better way to make use of them then to make some open face sandwiches for dinner the other night?

Open Face Turkey Sandwiches

1 1/2 pounds leftover turkey meat, sliced

1/2 cup leftover turkey gravy (add some water to it if necessary)

1/2 cup leftover turkey stuffing

4 slices bread

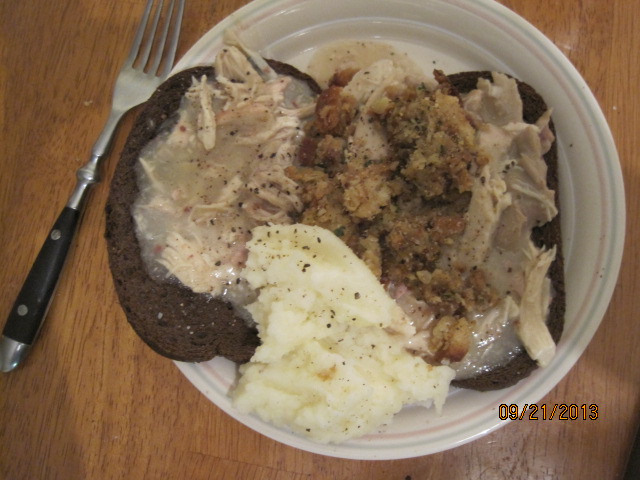
In a medium saucepan over medium heat, mix the turkey and the turkey gravy until the gravy is heated through and bubbling. Add more water or stock to thin out the gravy if necessary. Coat the turkey slices on all sides to make sure they are covered with gravy. Add in the stuffing and toss to coat and warm through, about 2 minutes. Toast the pieces of bread to your particular liking. Cover the toasted bread with the turkey, gravy and stuffing. Serve with a side of leftover mashed potatoes.

Okay, I know it’s not really much of a recipe, but it makes a great quick meal when you have lots of leftovers and just want something simple to use them with. You can also do the same thing here if you have any leftover chicken and gravy from a roasted chicken, or even with some meat dishes like a roast beef, pot roast or even a meatloaf with some gravy. If you would rather have a turkey panini, then I you can do that as well.it’s just a good way to make use of what you already have around the house without wasting anything and it is something to keep in mind as we get closer to the holidays and will undoubtedly have leftovers to deal with.

That’s all I have for today. Just a quick post this morning before you get on with the rest of your day. I have lots of recipes planned for the coming days, including several that make use of the slow cooker as we are getting into that time of year again and a few new soup recipes as with Fall comes the season of soup around our house. I also have some good ideas for some Oktoberfest meals if you are looking to do something fun with that (you can start by trying the pretzel recipe I posted yesterday). Keep a look out for all of those in the coming days and weeks. Until next time, enjoy the rest of your day and enjoy your meal!

003

 
Leave a comment

Posted by on September 23, 2013 in Cooking, Dinner, Leftovers, Sandwiches, Turkey


Tags: , , ,

A Ballpark Treat at Home – Homemade Soft Pretzels

Sean has been asking me to try to make my own pretzels for a while now. I had seen a bunch of recipes and I was always a little reluctant to try it. A lot of them seemed pretty time-consuming and called for a lot of space for rolling out dough, which I do not have. I finally came across one recipe that seemed easy enough to try. This one is from Chuck Hughes on the Cooking Channel and also includes a recipe for a cheese sauce. I personally didn’t make the cheese sauce, but I’ll include it here if you want something to go along with the pretzels.

Homemade Soft Pretzels

1 1/2 cups warm water (110 to 115 degrees)

1 tablespoon sugar

2 teaspoons kosher salt

2 teaspoons dry active yeast

3 cups flour, plus more for dusting

2 tablespoons melted butter

Vegetable oil

2/3 cup baking soda

2 egg yolks beaten with 1 tablespoon water

Coarse salt

Cheese Sauce:

1 bottle beer

2 cups grated sharp Cheddar cheese

1 tablespoon flour

1 cup cream cheese, diced and softened

1 clove garlic, minced

1/2 jalapeno, minced

Salt and pepper

Combine the warm water, sugar and kosher salt in the bowl of a stand mixer and sprinkle the dry yeast on the top. Let the mixture sit until it begins to foam, about 5 minutes. Add the flour and butter. Using the dough hook attachment for the mixer, mix on low-speed until everything is well combined. Change the speed to medium and knead until the dough is smooth and pulls away from the sides of the bowl, about 5 minutes. You can also knead the dough by hand.

Remove the dough from the bowl, clean the bowl and then oil the bowl with the vegetable oil. Return the dough to the bowl, toss the dough so it gets oiled, and cover the bowl with plastic wrap and allow it to sit in a warm location until the dough has doubled in size, approximately one hour.

Line a baking tray with parchment paper and lightly brush the parchment with vegetable oil. Set the tray aside.

When the dough is ready, lightly flour your working surface and divide the dough into 8 equal pieces. Roll out each piece of dough into a 24-inch rope. Make a U shape with the rope and, holding the two ends, cross them over each other and  press onto the bottom of the U in order to form the shape of a pretzel. Place the pretzels on the baking tray and leave it at room temperature for 1 hour. This helps to dry out the surface of the pretzels and makes them easier to handle.

Preheat the oven to 450 degrees.

In an 8-quart saucepan, bring 10 cups of water to a boil. Lower the heat and slowly begin to add the baking soda to prevent overflowing. Bring the water back to a boil and add the pretzels, one at a time, to the boiling water for 30 seconds. Remove the pretzels from the water using a large flat spatula or a spider and put them back on the tray. Repeat the process with the remaining pretzels. The boiling will help to create a shiny, brown crunchy pretzel shell.

Beat the egg yolks with 1 tablespoon of water and brush the top of each pretzel. Sprinkle he pretzels with coarse salt. Bake the pretzels until they are a dark, golden brown, about 12 to 14 minutes. Transfer the pretzels to a cooling rack for at least 5 minutes before serving.

For the cheese sauce, in a saucepan over medium heat, bring the beer to a simmer. In a separate bowl, mix the Cheddar cheese and the cream cheese with the flour. Add the cheese mixture to the beer with the remaining ingredients. Stir until all the cheese has melted and the texture is smooth, about 5 minutes. Keep the sauce warm until you are serving.

I have to say the pretzels took a little bit of extra work, but they were worth it. The first batch I tried I had the water too warm, killed the yeast, and had to start over. The second batch I ended up having to add more flour to, about 2/3 of a cup, to get a dough that held together well. Once I did that, everything else went along according to the recipe. The pretzels came out great with a really good flavor that we all enjoyed. The recipe only makes 8 pretzels, so if you were planning for a party, you might have to double the recipe. As for the cheese sauce, I didn’t make it myself but it would seem to me that it would be a good sauce to use not just for pretzels, but for vegetables like broccoli or cauliflower, for tacos, nachos or any other time you want a cheese sauce. You could also use other things instead of salt to cover the pretzels, like a  cinnamon sugar, or some Parmesan cheese if you desire.

That’s all I have for today. Check back next time for some more recipes. I’ll be trying out some new slow cooker recipes this week, so keep an eye out for those. Until next time, enjoy the rest of your day and enjoy your meal!

002 001

 
4 Comments

Posted by on September 22, 2013 in Cooking, Sauce, Snacks


Tags: , , , ,

You Can Never Have Too Many Meatloaf Recipes

It seems like every time I look at a cooking magazine or cooking website, there is a new recipe for a way to make meatloaf. Don’t get me wrong; I love meatloaf and could probably eat it every week, but I would have to try new recipes just to keep it from getting boring. I think that is why I am always willing to give a new meatloaf recipe a try. I saw this one in the recent edition of Cook’s Country magazine and it looked like it would have great texture and an interesting flavor to it, so I thought I would give it a try.

Meatloaf with Mushroom Gravy

1 cup water

1/4 ounce dried porcini mushrooms, rinsed

16 square saltine crackers

10 ounces white mushrooms, trimmed

1 tablespoon vegetable oil

1 onion, chopped fine

Salt and pepper

4 garlic cloves, minced

1 pound ground pork

2 large eggs

1 tablespoon plus 3/4 teaspoon Worcestershire sauce

1 pound ground beef

3/4 teaspoon minced fresh thyme

1/4 cup all-purpose flour

2 1/2 cups chicken broth

Adjust an oven rack to the middle position and heat the oven to 375 degrees. Microwave the water and the porcini mushrooms in a covered bowl until steaming, about 1 minute. Let the porcini mushrooms sit until softened, about 5 minutes. Remove the porcini mushrooms from the bowl with a fork and mince them. Strain the porcini liquid through a strainer lined with a coffee filter and reserve 3/4 cup.

Process the saltines in a food processor until they are finely ground, about 30 seconds. Transfer the crackers to a large bowl. Pulse half of the white mushrooms in the food processor until they are finely ground, about 8 to 10 pulses.

Heat the vegetable in a large, non-stick, oven-safe skillet over medium-high heat until shimmering. Add the onion and cook until it is browned, about 6 to 8 minutes. Add the processed white mushrooms and 1/4 teaspoon of salt and cook until any liquid present evaporates and the mushrooms begin to brown, about 5 minutes. Add the garlic and cook until fragrant, about 30 seconds. Transfer the contents of the skillet to the bowl with the saltines and allow it to cool completely, about 15 minutes.

Once the mixture has  cooled, add the pork, eggs, 1 tablespoon of Worcestershire sauce, 1 teaspoon of salt, 3/4 teaspoon of pepper, and 1/4 cup of the reserved porcini mushroom liquid to the cooled saltine-white mushroom mixture and knead gently until it is mostly combined. Add the beef and knead until the mixture is well combined. Transfer the meat mixture to the now-empty skillet and shape into a 10″ x 6″ loaf. Bake until the meatloaf registers 160 degrees, about 45 to 55 minutes. Transfer the meatloaf to a cutting board using a spatula and tent it loosely with aluminum foil.

Thinly slice the remaining white mushrooms. Discard any solids from the skillet and pour off all but 2 tablespoons of fat. If you don’t have enough fat left in the pan after removing the meatloaf, you can supplement it with melted butter or vegetable oil. Heat the fat over medium-high heat until it is shimmering. Add the sliced white mushrooms and the minced porcini mushrooms and cook, stirring occasionally, until a deep golden brown, about 6 to 8 minutes. Stir in the thyme and 1/4 teaspoon of salt and cook until fragrant, about 30 seconds. Add the flour and cook, stirring frequently, until golden, about 2 minutes. Slowly whisk in the chicken broth, the remaining 1/2 cup of reserved porcini liquid and the remaining 3/4 teaspoon of Worcestershire sauce, scraping up any browned bits in the pan, and bring the mixture to a boil. Reduce the heat to medium and simmer, whisking occasionally, until thickened, about 10 to 15 minutes. Season with salt and pepper to taste. Slice the meatloaf and serve with the mushroom gravy.

I really liked this recipe. There is nothing better than having a good gravy with your meatloaf and this recipe certainly gives you that. If you’re not a fan of mushrooms, you may not go for the gravy but Michelle and Sean are not big fans of mushrooms and they loved the meatloaf. The texture of it was perfect, it sliced nicely and tasted great. Cooking in the skillet instead of a loaf pan made a big difference in keeping the meatloaf from getting soggy and falling apart.Sauteing the vegetables to mix into the meatloaf also made a big difference. You also get to do everything in one pan to help save on cleaning up. I served this with mashed potatoes and some fresh steamed broccoli. I’ll be using this recipe again.

That’s all I have for today. Check back next time for more great recipes. I still have lots to go through of recipes I have gotten from magazines and online lately, so we’ll see what comes along for next week. Until then, enjoy the rest of your day and enjoy your meal!

002 001


7 Comments

Posted by on September 20, 2013 in Beef, Cooking, Dinner, Gravy


Tags: , , , ,

Let the Soup Season Begin – Hearty Vegetable Chowder

The weather is starting to get much cooler here at night now so Fall is not far away for us. It is still warm during the day, for the most part, but the nights have been crisp and cool. For me this means that it is time to start breaking out some soup recipes. Luckily, in the newest issue of Cook’s Country magazine, there was a great looking soup that was perfect to kick off the soup-making season for me. This vegetable chowder is very easy to make and makes good use of just a few simple ingredients.

Hearty Vegetable Chowder

6 slices bacon, chopped

1 pound leeks, white and light green parts only, halved lengthwise, sliced thin and washed thoroughly

4 carrots, peeled, halved lengthwise and cut into 1-inch pieces

2 celery ribs, halved lengthwise and cut into 1/2-inch pieces

1 teaspoon minced fresh thyme

Salt and pepper

1 1/2 pounds russet potatoes, peeled and cut into 1-inch pieces

2 garlic cloves, minced

4 cups chicken broth

1 bay leaf

1/2 cup half-and-half

1 tablespoon minced fresh chives

1 teaspoon lemon juice

Cook the bacon in a Dutch oven over medium heat until the fat has rendered and the bacon is nearly crispy, about 7 to 9 minutes. Add the leeks, carrots, celery, thyme and 1 teaspoon of salt and cook until the leeks are translucent, about 8 minutes. Add the potatoes and cook, stirring constantly, until the starch begins to release from the potatoes and coat all the vegetables, about 2 minutes. Add the garlic and cook until it is fragrant, about 30 seconds. Add the chicken broth and the bay leaf and bring to a boil.

Reduce the heat to low, cover, and simmer the soup, stirring occasionally, until the vegetables are tender, about 20 minutes. Remove and discard the bay leaf. Transfer 1 cup of the vegetables (using a slotted spoon) and 2 cups of the soup broth to a blender; process until the mixture is smooth, about 1 minute. Stir the processed soup back into the pot. Stir in the half-and-half, chives and lemon juice and gently re-warm the soup. Season with salt and pepper to taste and serve.

There are a couple of things about this easy recipe. If you don’t have any leeks, I think you could easily substitute onions instead and not really lose anything. Leeks are great in a soup, but they are not always easy to get and can be a little pricey. Stirring in the potatoes really does make a difference here. The starch acts as a bit of a thickener here for the soup so that when you puree that bit of soup, you are going to end up with a nice, thick chowder. it was tasty and easy enough to make in under an hour on a weeknight all with ingredients I already had in the house. Even better, it’s a one pot meal and you could easily make it vegetarian by eliminating the bacon altogether if you want.

That’s all I have for today. Check back next time to see what recipe I’ll be making. I have been checking a few things out in the latest issue of Cook’s Country and there are a bunch of things I want to try, so we’ll see what’s next. until next time, enjoy the rest of your day and enjoy your meal!

001

 
Leave a comment

Posted by on September 19, 2013 in Cooking, Dinner, Spices, Vegetarian


Tags: , , , , ,

Snacking it Up – Vegetarian Nachos and Caramelized Onion and Shallot Dip

I wanted to make a couple of snacks this weekend. it’s a busy sports time of year with the baseball season going, football season just starting, college football underway, NASCAR entering the chase and more, so there are plenty of good things for you ro watch. If you have some friends over for the game and want to make a couple of quick and easy snacks, these two are perfect to give a try. The first is a very easy vegetarian nachos recipe that you can whip up in just a few minutes.

Vegetarian Nachos

1 bag tortilla chips

1 15-ounce can black beans, rinsed

1 large onion, chopped

2 cups shredded cheese (such as cheddar or Monterey Jack)

1 bunch fresh cilantro leaves

Jalapeno peppers, sliced

Salsa, for topping

Guacamole, for topping

1 cup sour cream, for topping

Preheat the oven to 350 degrees. Coat a large baking sheet or a large pie plate with nonstick spray. In a saucepan over medium, add 1 tablespoon of vegetable oil and the black beans and chopped onion. Saute until the beans are warmed through and the onion is soft, about 2 minutes. Place a layer of tortilla chips on the sheet and cover with a layer of beans and onions and then cover with cheese. Repeat the process to make a second layer. Bake in the oven until the cheese is melted, about 20 minutes. Top with salsa, guacamole, cilantro and sour cream.

You could make these nachos with some beef or pork if you happen to have some on hand and ready to use, but you can just as easily throw it together without them and then they are suitable for anyone who is staying away from meat to eat. You could always vary the toppings and add more or less of what you and your guests like best to make a great snack.

It’s always good to have a good dip on hand and what is better and more liked than an onion dip? Naturally, you could simply used the dry soup mix that many people use with some sour cream or yogurt, but using fresh ingredients tastes so much better and has a lot less sodium and preservatives. This one is really easy to make and you can alter it up a little bit to make it even easier. I altered the original recipe somewhat from Bon Appetit to make a little bit of a smaller batch.

Caramelized Onion and Shallot Dip

1 pound large onions, thinly sliced

2 large shallots, thinly sliced

2 sprigs of thyme

2 tablespoons olive oil

Kosher salt and freshly ground pepper

1/2 cup dry white wine

1 tablespoon Sherry vinegar

1 cup sour cream

1/4 cup plain Greek yogurt

1 teaspoon onion powder

In a large skillet over medium-high heat, heat the olive oil until shimmering. Add the onions and shallots and saute until soft, about 8 minutes. Season with salt and pepper. Add the sprigs of thyme, the white wine and the Sherry vinegar and saute until the liquid has evaporated and the onions and shallots are well caramelized, about 6 minutes. Remove the skillet from the heat and discard the thyme sprigs. Allow the mixture to cool.

Transfer the onion mixture to a large bowl. Stir in the sour cream, yogurt and onion powder until the mixture is well blended. Season with salt and pepper to taste. Cover and chill the dip until ready to use.

The original recipe roasts the onions and shallots in the oven for well over an hour. If you have the time to put in and want to do it that way and get a deeper, richer flavor from the onions then you may want to give it a try. If you are pressed for time and want something faster but still tastes better than anything you can buy, give it a try with my method. Everyone thought the results were pretty good from what I made.

That’s all I have for today. Check back next time for another recipe. I do have a couple of things to post, including the first soup of the fall season that I made last night. Check back for that one. Until next time, enjoy the rest of your day and enjoy your meal!

003 002


1 Comment

Posted by on September 17, 2013 in Cooking, Snacks, Vegetarian


Tags: , , , , , , ,

Start of the Week With Some Quick Chicken Chimichangas

I had actually intended to make enchiladas this weekend, but Michelle thought she might like to have chimichangas instead. In reality, I was going to take as many shortcuts as possible whatever I was cooking because I had bought a rotisserie chicken to use for something, even if it was just rotisserie chicken for dinner. I got this recipe from Food Network, though I did alter it slightly to fit our family wants from the meal. Since I don’t eat cheese, I eliminated the cheese from the ones I made for myself. Also, Michelle and Sean would not go for the green chile sauce in the recipe, so though I included it in this recipe, I didn’t actually make it myself.

Chicken Chimichangas

2 tablespoons butter

4 tablespoons vegetable oil

1 onion, chopped

3 cloves garlic, chopped

1 jalapeno pepper, diced (you can take the seeds out if you want less heat)

1 1/2 teaspoons chili powder

1/2 teaspoon ground cumin

1/4 teaspoon ground cinnamon

Kosher salt

1 tomato, chopped, plus more for topping

2 tablespoons chopped fresh cilantro

2 1/2 cups shredded rotisserie chicken

1/4 cup sour cream

1 15-ounce can refried beans

4 10-inch flour tortillas

1 cup shredded Monterey Jack cheese, plus more for topping

Shredded lettuce, for topping

Mexican rice, for serving

Green chile sauce, for topping (see recipe)

Green Chile Sauce:

1/2 cup chopped onion

2 garlic cloves, chopped

1 tablespoon vegetable oil

Pinch chili powder

Pinch cumin

Pinch granulated sugar

Pinch Kosher salt

2 4-ounce cans chopped green chiles, drained and rinsed

1 cup chicken broth

1/4 cup chopped fresh cilantro

Preheat the oven to 450 degrees. Melt the butter with 2 tablespoons of the vegetable oil in a skillet; transfer the butter mixture to a bowl. Heat the remaining 2 tablespoons of vegetable oil in the skillet. Add the onion, garlic and jalapeno and cook until soft, about 3 minutes. Add the chili powder, cumin, cinnamon and 1 teaspoon of kosher salt.; toast the spices for about 30 seconds. Add the tomato and cilantro and cook until slightly dry, about 2 minutes. Stir in the rotisserie chicken and sour cream and warm through. Remove the skillet from the heat.

Brush a rimmed baking sheet with some of the reserved butter-oil mixture. Spread 2 tablespoons of refried beans down the center of each flour tortilla, leaving a 2-inch border on both ends. Top the beans with 1 cup of the chicken mixture and 1/4 cup of cheese. Fold in the ends and roll up the tortilla.

Put the chimichangas seam-side down on the baking sheet; brush the chimichangas with the butter-oil mixture. Bake for 8 to 10 minutes per side, brushing the chimichangas again after you flip them. Top with the green sauce, more cheese, lettuce and tomato. Serve with the Mexican rice and any leftover refried beans.

For the Green Chile Sauce: Saute the onions and chopped garlic cloves in a skillet with the vegetable oil. Add a pinch of chili powder, cumin, sugar and kosher salt; cook for 30 seconds. Stir in the two cans of drained, rinsed and chopped green chiles; cook for 2 minutes. Add the chicken broth and simmer until the sauce thickens, then puree the sauce in a blender or with a stick blender. Stir in the chopped cilantro and serve over the chimichangas.

Not only was this recipe very easy to make at the very last minute (made easier by the rotisserie chicken), it tasted great. The blend of spices with the chicken really was very nice. Personally, I think it would have been even better with the green chile sauce and plan to make it next time around. Of course, you could easily make your own chicken by simply sauteing a couple of boneless chicken breasts or baking them in the oven and use the chicken meat that way.

That’s all I have for today. Check back next time for some more recipes. I made a couple of homemade snacks yesterday that I will post recipes for and am planning on a nice vegetable chowder for dinner tonight that I will post this week as well. Until next time, enjoy the rest of your day and enjoy your meal!

002

 
Leave a comment

Posted by on September 16, 2013 in Cooking, Dinner, Poultry, Rice, Sauce


Tags: , , , , ,

Livening Up Dessert with Lemon Icebox Pie

I have had this recipe sitting idly by for a few weeks now just waiting for me to have the time to make it, and I finally got to it. I really don’t know why it took me so long to get around to it. The recipe itself is not very hard and it only takes minutes to put everything together. This recipe, for the classic lemon icebox pie, is from Cook’s Country magazine. If you have never had it before, it is very similar to a key lime pie, with of course lemons substituting for the key limes. I have seen lots of recipes out there  for this pie, but this one seems the easiest and the results are quite good.

Lemon Icebox Pie

9 whole graham crackers, broken into 1-inch pieces

3 tablespoons sugar

5 tablespoons butter, melted

2 (14-ounce) cans sweetened condensed milk

3 large egg yolks

3/4 cup plus 2 tablespoons fresh lemon juice (about 5 to 6 lemons)

1 cup heavy cream

1/2 teaspoon vanilla extract

Adjust an oven rack to the middle position and heat the oven to 325 degrees. Process the graham crackers and the sugar in a food processor until finely ground, about 30 seconds. Add the melted butter and pulse until combined, about 8 pulses. Transfer the crumbs to a 9-inch pie plate. Using the bottom of a measuring cup, press the crumbs into the bottom and up the sides of the plate. Bake until the crust is fragrant and just beginning to brown, about 15 minutes. Let the crust cool completely on a wire rack, about 35 minutes. Increase the oven temperature to 375 degrees.

Reserve 3 tablespoons of the sweetened condensed milk. Whisk the remaining sweetened condensed milk and the egg yolks together in a bowl until they are smooth. Slowly whisk in the lemon juice. Pour the filling into the cooled pie crust. Bake the pie until the edges are beginning to set but the center of the pie still jiggles when shaken, about 15 minutes. Let the pie cool for 1 hour on a wire rack. Refrigerate the pie until it is chilled and set, at least 3 hours and up to 24 hours.

Using a stand mixer fitted with a whisk, whip the heavy cream, reserved sweetened condensed milk and the vanilla extract on medium-low speed until it is foamy, about 1 minute. Increase the speed to high and whip until stiff peaks form, about 1 to 3 minutes. Spread the whipped cream evenly over the top of the pie and serve.

I really liked this pie. It was really easy to make and the taste is so refreshing and wonderful. Michelle and I both agreed maybe it could use a smidge more lemon juice for the lemon flavor to really shine, but I had a piece the next day and the flavor seemed even better, so it’s really up to your own personal tastes. You can save yourself even more time and simply buy a pre-made graham cracker crust to use for the pie and really cut your preparation time down to nothing. I’ll be making this one again for sure.

That’s all I have for today. Check back next time to see what other recipes come along. I’ll be going shopping this weekend, so we’ll see what I come back with and what recipes fit what I would like to do. The new issue of Cook’s Country has some great recipes in it, so I do plan to try some of them out next week. Check back for those. Until then, enjoy the rest of your day and enjoy your meal!

003

 
Leave a comment

Posted by on September 13, 2013 in Cooking, Dessert, Pie


Tags: , , ,

Pantry Primer | Williams-Sonoma Taste

Pantry Primer | Williams-Sonoma Taste.

It’s easy to be a good cook when you have a well-stocked pantry. Granted, not everyone has the space or the budget to have all of these items around ( I know I don’t), but having a few of these key ingredients can help you to make all kinds of great dishes and try all types of recipes. Williams-Sonoma has put together a great blog entry here that covers some of the basics you may want to try and fit into your pantry. Check it out!

 
Leave a comment

Posted by on September 12, 2013 in Cooking Tips, Cooking Websites, Pantry


Tags: , , ,

Twisting a Classic: Spaghetti (Squash) and Meatballs

As sacrilegious as it may sound, I don’t like pasta. I have never eaten it, even when I was a little kid. I don’t know if it’s the taste, flavor, texture or what, but I just don’t like it. Don’t get me wrong; if I am at someone’s home and that’s what they serve, I am eating it without a fuss. Do I go out of my way to make it at home? No, not for me. I do make it for Michelle and Sean, who both love pasta, but I make something else for myself. So when I decided I was making meatballs this week, I wanted to try something different. It was lucky that I had come across this recipe from Food Network recently to give me the inspiration.

Spaghetti Squash and Meatballs

1 medium spaghetti squash (about 2 pounds)

Kosher salt

3 tablespoons extra-virgin olive oil, plus more for brushing

2 stalks celery, chopped

1 medium carrot, roughly chopped

1 medium onion, roughly chopped

6 cloves garlic

1 cup fresh parsley leaves

1 pound ground beef

1 pound ground pork

2 large eggs

1 cup Italian-style breadcrumbs

1 cup plus 3 tablespoons grated Parmesan cheese

2 28-ounce cans tomato puree

2 large sprigs basil

1 teaspoon dried oregano

Preheat the oven to 425 degrees. Halve the squash lengthwise and scoop out the seeds. Sprinkle the cut sides with 1/2 teaspoon of kosher salt and then brush both sides with olive oil. Put the squash, cut side up, in a baking dish and cover it tightly with aluminum foil. Roast for 20 minutes, then uncover the squash and continue roasting until the squash is tender, about 35 more minutes.

Meanwhile, make the meatballs: Brush a baking sheet with olive oil. Pulse the celery, carrot, onion, garlic and parsley in a food processor to make a paste. Transfer half of the vegetable paste to a bowl; add the ground beef, ground pork, eggs, breadcrumbs, 1 cup of the Parmesan cheese and 1 teaspoon of salt and mix with your hands until it is just combined. Form the mixture into about 24 two-inch meatballs; transfer the meatballs to the prepared baking sheet. Bake the meatballs until they are firm but not cooked all the way through, about 10 minutes.

To make the sauce, heat 3 tablespoons of the olive in a large pot over medium-high heat. Add the remaining vegetable paste and cook, stirring occasionally, until it looks dry, about 5 minutes. Stir in the tomato puree; rinse each can with 1 cup of water and add it to the pot. Stir in the basil, oregano and 1 1/2 teaspoons of salt. Bring the sauce to a simmer, then add the meatballs and simmer until the sauce thickens and the meatballs are cooked through, about 15 to 20 minutes. Remove the basil.

Use a fork to scrape the spaghetti squash flesh into strands; transfer the squash to a large bowl and toss with 2 tablespoons of grated Parmesan cheese. Season with salt to taste.  Divide the squash among plates or bowls and top each with some meatballs, sauce and the remaining 1 tablespoon of Parmesan cheese.

A couple of notes about this recipe. This particularly recipe makes a lot of sauce and meatballs, so you will have leftovers to store or freeze if you like. You can store the sauce and meatballs for up to a month in the freezer. You can always skip making the sauce and just use your favorite jarred sauce if you choose to go that route. I have tried multiple meatball recipes and posted several of them on here. This one is one of the more flavorful I have tried, so it’s worth a shot. Everyone really liked the spaghetti squash as an alternative. I thought Sean would resist, but he really liked it too. There is a great flavor from the squash and it goes well with the meatballs.

That’s all I have for today. Check back tomorrow for another recipe. I did make the lemon icebox pie, so you’ll want to check back for that one. Until next time, enjoy the rest of your day and enjoy your meal!

001


1 Comment

Posted by on September 12, 2013 in Beef, Cooking, Dinner, Sauce, Vegetables


Tags: , , ,

A Honey of a Recipe: Honey-Roasted Ribs

I picked this recipe up from Cook’s Country a few weeks ago and have been planning to give it a try. I finally found the ribs on sale this past week, so the opportunity really presented itself. I also had quite a bit of honey on hand for some reason, so it lent itself perfectly for making good use of this recipe. All you need is the time to put into this. The recipe itself is quite simple and easy to make.

Honey-Roasted Ribs

2 (2 1/2- to 3-pound) racks baby back ribs, membranes removed, each rack cut into 3 equal pieces

1 cup honey

5 tablespoons soy sauce

1/4 cup cider vinegar

1/4 cup Dijon mustard

4 scallions, white parts minced, green parts sliced thin

4 garlic cloves, crushed

Kosher salt and pepper

1/4 teaspoon cayenne pepper

Divide the ribs between two 1-gallon zipper-lock plastic bags. Whisk the honey, soy sauce, vinegar, mustard, scallion whites, garlic, 1 teaspoon of salt, 1 teaspoon of pepper and the cayenne pepper together in a bowl. Divide the marinade between the two bags, seal, and turn to coat the ribs evenly with the marinade. Refrigerate the ribs for at least 1 hour or up to 24 hours, turning the bags occasionally.

Adjust an oven rack to the middle position and heat the oven to 325 degrees. Line a rimmed baking sheet with aluminum foil and set a wire rack in the baking sheet. Add enough warm tap water to cover the entire bottom of the sheet (about 2 cups of water). Transfer the ribs, meat side up, to the prepared wire rack; reserve the marinade in the refrigerator. Tent the ribs loosely with aluminum foil and bake for 1 1/4 hours. Uncover the ribs and continue cooking until just tender, about 1 hour longer.

Bring the reserved marinade to a boil in a Dutch oven over medium-high heat and cook until it is thickened to a glaze consistency, about 5 minutes. Brush the ribs with 1/3 cup of the glaze, return the ribs to the oven, and continue to cook until the glaze begins to bubble and the ribs are brown, about 15 to 30 minutes. Transfer the ribs to a cutting board (leave the hot water and the baking sheet in the oven to cool), tent the ribs loosely with foil and allow them to rest for about 10 minutes.

Cut the ribs between the bones, add them to the Dutch oven and toss them to coat with the remaining glaze. Transfer the ribs to a platter and sprinkle with the scallion greens and 1/2 teaspoon of salt.

Just a couple of quick points about this recipe. I didn’t have any scallions on hand, so I omitted them this time. i don’t think they make a very big difference in the recipe anyway. I also cut the recipe in half since I only made one rack of ribs for the 3 of us to have for dinner. It is important that you put the marinade in a Dutch oven and not just a saucepan. It may seem big for a small amount of marinade, but when the honey begins to boil it will bubble and rise up and if you have it in a small pan you risk making a big, sticky mess or burning yourself n very hot sugar. Using the Dutch oven also makes it possible for you to give the ribs one last toss in the glaze to make sure they have a really nice coating. I served the meal with some broccoli and sweet potatoes. I think the honey glaze was fantastic and was not overly sweet thanks to the soy sauce and mustard. I’ll surely be making this one again.

That’s all for today. Check back next time to see what recipes come along. I do have a lot of things planned, and the latest issue of Cook’s Country just arrived at my home yesterday and there are some great recipes I want to try out and share over the coming weeks. until next time, enjoy the rest of your day and enjoy your meal!

001

 
Leave a comment

Posted by on September 11, 2013 in Cooking, Dinner, Pork


Tags: , , ,

 
National Day Calendar

Fun, unusual and forgotten designations on our calendar.

Jennifer Probst

a little bit naughty a little bit nice

Laissez Faire

Letting Life Lead

simple cooking recipes

a blog to share with you the best