RSS

Tag Archives: food network

Fiesta Week Part 2 – Chicken Tacos

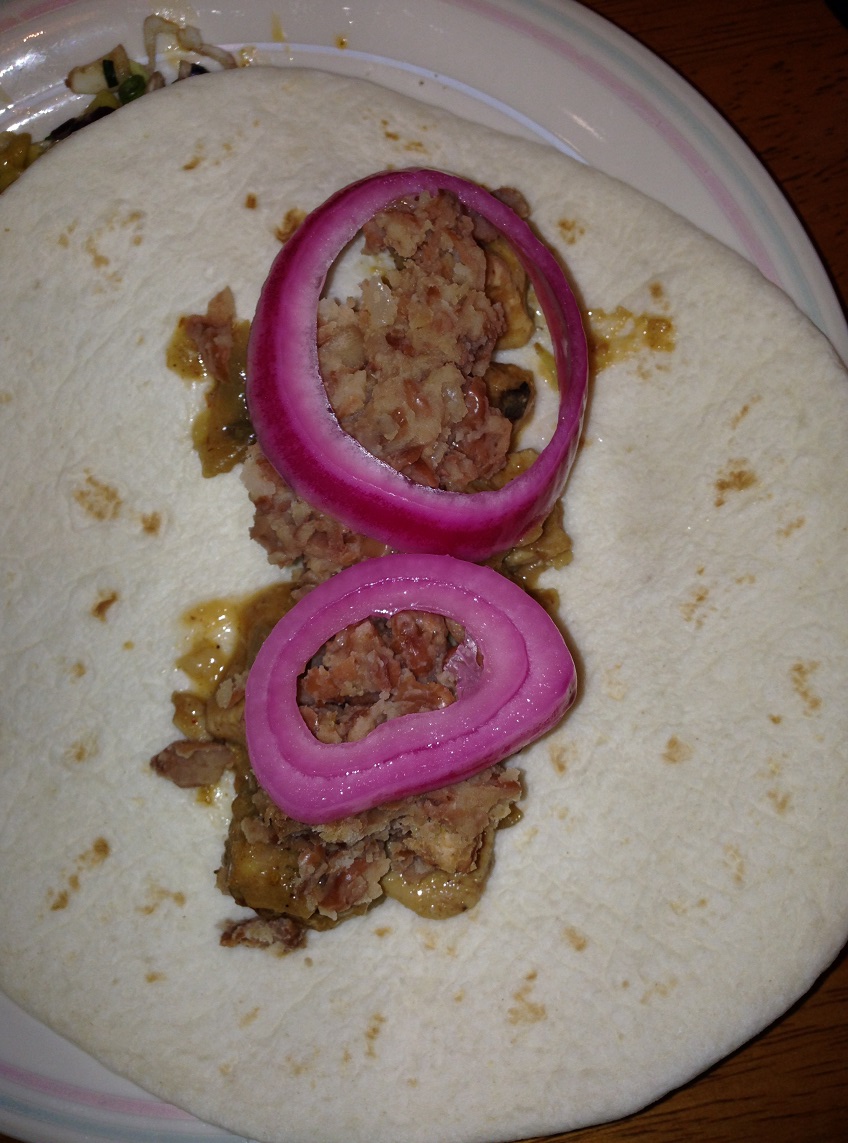
To go along with the chorizo tacos and the beef tacos I had made on Sunday I also wanted to make some chicken tacos. I didn’t want to do something with just shredded chicken, which would have been easy to do with some chicken, but I wanted something a little different with some nice sauce to go along with it. I had looked at a few different recipes I found on the Internet, but then I came upon this one from Michael Chiarello on the Food Network for a chicken taco filling. It looked pretty easy to make, only used a few ingredients and I could get it done along with all over the other things I was making that day. The original recipe is for a pretty large quantity, so I ended up scaling it down quite a bit to fit my crowd and I still had a lot left over, so you could make it even smaller if you only have a couple of people to feed. The recipe shown here is in the amounts that I actually used. If you want the larger quantities, all you need to do is double this recipe.

Chicken Tacos

1/4 cup extra-virgin olive oil

5 garlic cloves, minced

2-3 onions, minced

2 pounds boneless, skinless chicken breasts, diced into 1/2-inch chunks

Salt and freshly ground black pepper

2 tablespoons all-purpose flour

1 Serrano pepper or jalapeno pepper, sliced thin

1 tablespoon sweet paprika

1 tablespoon smoked paprika

1/2 tablespoon ground cumin

1 tablespoon ground oregano

2-3 cups chicken broth or water

For the Tacos:

Red onion, sliced thin

Lettuce, shredded

Radishes, sliced thin

Salsa (homemade or store-bought)

Guacamole (homemade or store-bought)

Flour or corn tortillas

Heat a large saute pan over medium heat and pour in enough olive oil to coat the bottom of the pan. Add the garlic and onions and cook until the vegetables are soft and nicely caramelized, about 10 to 12 minutes.

In the meantime, season the chicken breast pieces with salt and pepper. Sprinkle the flour over the chicken pieces and toss the chicken to coat it well. Heat another large saute pan over medium-high heat and add 3 tablespoons of the olive oil. Cook the chicken until it is lightly browned, about 6 to 8 minutes.

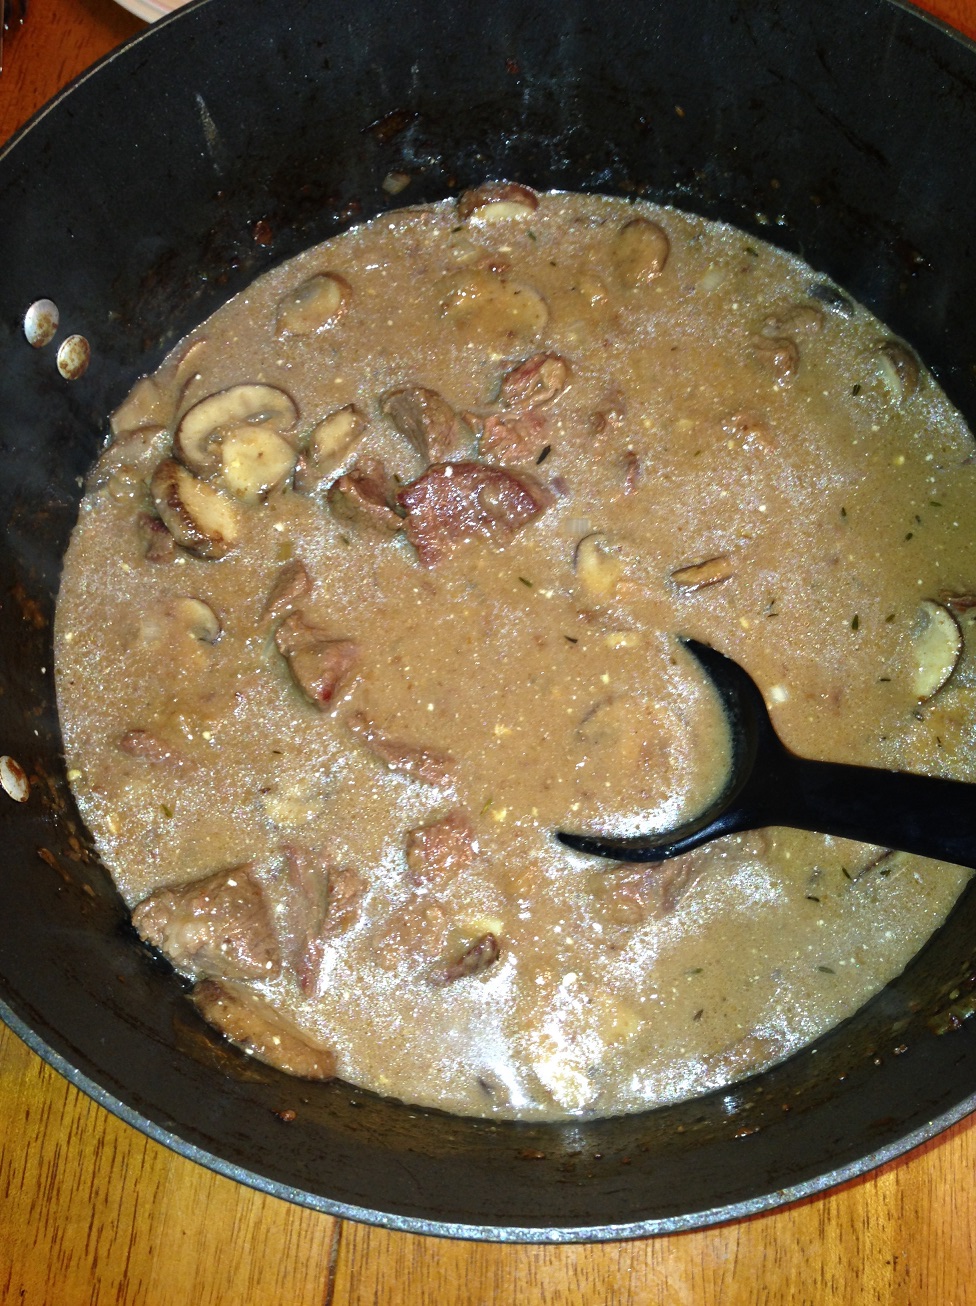
Once the onion mixture is caramelized and softened, add the chile peppers, sweet paprika, smoked paprika, cumin and oregano. When the chicken is done, transfer it to the pan with the onions. Pour in the broth or water and bring the mixture to a boil. Reduce the heat and simmer until the sauce is thickened, about 20 minutes. Adjust the seasoning with salt and pepper to taste.

To serve the tacos, place all of your  chosen toppings and the chicken filling in separate bowls along with the warmed tortillas so people can construct their own tacos.

This was a simple recipe for the chicken that yielded some great flavor thanks to the spices used. You could certainly substitute some rotisserie chicken and just heat it up with the onion mixture and spices if you have left over chicken from another meal or do not want to cook the chicken yourself. The sauce is nice and thick and clings nicely to the chicken to add another level of flavor to the dish. I would choose to make chicken tacos this way every time.

That’s all I have for today. Check back next time for another recipe. until then, enjoy the rest of your day and enjoy your meal!


IMG_0531

 
2 Comments

Posted by on May 6, 2014 in Cooking, Dinner, Holidays, One Pot Meals, Poultry


Tags: , , , , ,

A Tasty One Pot Meal – Smoky Chicken Brunswick Stew

I am always on the lookout for one pot meal ideas. Whether they are made in the slow cooker or on the stove, one pot meals can make life so much easier, particularly during the week when you may not have a  lot of time to throw together and entrée and a couple of side dishes and then have to deal with all of the clean up after the fact. When I came across this recipe from Guy Fieri of Food Network for a smoky Brunswick stew, it seemed to fit the bill perfectly and made use of all the ingredients that I already had in the pantry, refrigerator or freezer to make it even easier. While it may seem like a lot of ingredients, the whole meal comes together pretty easily for you and with some great flavor.

Smoky Chicken Brunswick Stew

1 tablespoon granulated garlic
1 tablespoon light brown sugar
2 teaspoons paprika
1 teaspoon dry mustard
2 pinches cayenne pepper
Kosher salt and freshly ground black pepper
10 chicken thighs, bone in and skin on
4 cups low-sodium chicken stock
2 tablespoons white wine
1 tablespoon Worcestershire sauce
1 tablespoon liquid smoke
1-pound bacon, cut into 1/2-inch pieces
2 tablespoons vegetable or canola oil
3 cloves garlic, minced
2 ribs celery, diced
1 large yellow onion, diced
1 bell pepper, seeded and diced
1 large russet potato, peeled and cut 3/4-inch dice
One 28-ounce can diced fire-roasted tomatoes
1 cup barbecue sauce
1 cup frozen corn kernels, thawed
One 15 1/2-ounce can pinto beans, drained
One 15 1/4-ounce can lima beans, drained
Hot sauce, to finish

Preheat the oven to 350 degrees.

Make the chicken marinade by combining the granulated garlic, brown sugar, paprika, dry mustard, cayenne and some salt and pepper together. Mix well then place the chicken thighs into a resealable plastic bag and pour the dry seasoning over the chicken. Seal the bag and shake it around so the chicken is seasoned evenly.

Transfer the chicken to a roasting pan. Pour over the chicken 2 tablespoons of the chicken stock, the wine, Worcestershire sauce and the liquid smoke. Cover the pan tightly with foil then place it in the oven and roast the chicken for 30 minutes.

Uncover the foil from the pan and continue to roast the chicken for another 30 minutes. Remove the pan from the oven and place it on the stovetop. Remove the chicken to a plate and turn the burners on to medium heat.

 Add the bacon and vegetable or canola oil and cook until the bacon is brown and the fat has rendered slightly, about 7 to 8 minutes. Using a slotted spoon, remove the bacon and set it aside. Add the garlic, celery, onions, peppers and potatoes to the pan and cook in the bacon fat until the vegetables are translucent, about 4 to 5 minutes. Using tongs, add the reserved chicken back to the pan. Cook the chicken to add a little color, about 2 to 3 minutes. Return the bacon to the Dutch oven, add the tomatoes and their juices and pour in the remaining chicken stock. Stir well, and then simmer for 35 minutes, stirring occasionally.

Add the barbecue sauce, corn, pinto beans and lima beans to the stew. Stir everything well and simmer the mixture until the chicken is very tender, the vegetables are soft and the beans are heated through, about 15 to 20 minutes.

When the stew is done, stir ir well and taste. Season with salt, pepper and a few dashes of hot sauce, if desired, to taste.

This dish had great flavor and the combination of the spices, vegetables and barbecue sauce really made it a hit. If you don’t have fire-roasted tomatoes around, you could easily substitute a can of whole tomatoes or diced tomatoes. The same goes with the beans added. I did not have lima beans on hand and put in some kidney beans instead and they were fine. The best thing about this dish, besides it being made all in one pot, is that it tastes even better after a day or two. We enjoyed it for lunches for a few days and the flavors just seemed to get richer and better each time. I’ll be making this one again as it was so easy to do and tasted awesome.

That’s all I have for today. Check back next time for another recipe. until then, enjoy the rest of your day and enjoy your meal!

IMG_0507

 
1 Comment

Posted by on April 28, 2014 in Cooking, Dinner, One Pot Meals, Poultry, Soups & Stews


Tags: , , , , , ,

It’s National Pretzel Day! Make These Alton Brown Soft Pretzels!

Since there seems to be a day for just about everything you can make or cook these days, I shouldn’t be surprised that it is National Pretzel Day today. There is nothing like a soft pretzel when you want a tasty snack. One of my favorite memories of all-time is getting a hot pretzel on the streets of New York City or just outside of Shea Stadium when we would go to see a ballgame. Guys would heat them right in a shopping cart and while it may not have been the most sanitary thing in the world, the taste and the smell were fantastic. I have made soft pretzels before, but when I saw this recipe from Alton Brown it sounded easier than what I had done in the past and they looked great, so I had to give them a try today.

Homemade Soft Pretzels

1 1/2 cups warm (110 to 115 degrees F) water
1 tablespoon sugar
2 teaspoons kosher salt
1 package active dry yeast
22 ounces all-purpose flour, approximately 4 1/2 cups
2 ounces unsalted butter, melted
Vegetable oil, for pan
10 cups water
2/3 cup baking soda
1 large egg yolk beaten with 1 tablespoon water
Salt

Combine the water, sugar and kosher salt in the bowl of a stand mixer and sprinkle the yeast on top. Allow the yeast to sit for 5 minutes or until the mixture begins to foam. Add the flour and butter and, using the dough hook attachment of your mixer, mix on low-speed until the dough is well combined. Change the mixer to medium speed and knead until the dough is smooth and pulls away from the side of the bowl, approximately 4 to 5 minutes. Remove the dough from the bowl, clean the bowl and then oil it well with vegetable oil. Return the dough to the bowl, cover it with plastic wrap and sit in a warm place for approximately 50 to 55 minutes or until the dough has doubled in size.

Preheat the oven to 450 degrees. Line 2 half-sheet pans with parchment paper and lightly brush the pans with the vegetable oil. Set the pans aside.

Bring the 10 cups of water and the baking soda to a rolling boil in an 8-quart saucepan or roasting pan.

In the meantime, turn the dough out onto a slightly oiled work surface and divide the dough into 8 equal pieces. Roll out each piece of dough into a 24-inch rope. Make a U-shape with the rope, holding the ends of the rope, cross them over each other and press onto the bottom of the U in order to form the shape of a pretzel. Place the pretzels onto the parchment-lined half sheet pan.

Place the pretzels into the boiling water, 1 by 1, for 30 seconds. Remove them from the water using a large flat spatula. Return the pretzels to the half sheet pan, brush the top of each pretzel with the beaten egg yolk and water mixture and sprinkle each pretzel with the salt. Bake the pretzels until they are dark golden brown in color, approximately 12 to 14 minutes. Transfer the pretzels to a cooling rack for at least 5 minutes before serving.

Wow, those were really easy to make and they taste fantastic! You can throw these together in under two hours and have a great snack anytime you want them for a party, watching the game or just because you feel like having them. Michelle, Sean and I loved them and we still have a few left over to enjoy tomorrow, if they last that long. I will definitely be using this recipe from now on when I make pretzels.

That’s all I have for today. Check back next time for another recipe. Until then, enjoy the rest of your day and enjoy your meal!

IMG_0525 IMG_0524

 
2 Comments

Posted by on April 26, 2014 in Cooking, Snacks


Tags: , , , , ,

Sunday Breakfast with Alton & Bobby – Southern Biscuits and Sausage Gravy

I’ve had a craving for biscuits and gravy lately and yesterday stopped over at Adam’s Farms and got some of their homemade bulk breakfast sausage so I could make some this morning for our Sunday breakfast. Sunday breakfast is usually the only day during the week where Sean, Michelle and I get to eat breakfast together, so we try to make it something different and special each week. I was looking for something quick and easy to use for the sausage gravy and for the biscuits, but I wanted homemade biscuits, not the stuff you get out of the refrigerated can. I turned to Food Network and found a good biscuit recipe from Alton Brown for southern biscuits to go alongside of the sausage gravy recipe I got from Bobby Flay. Both are really easy to make so you can get a different taste for breakfast in no time at all.

Alton Brown’s Southern Biscuits

2 cups flour
4 teaspoons baking powder
1/4 teaspoon baking soda
3/4 teaspoon salt
2 tablespoons butter
2 tablespoons shortening
1 cup buttermilk, chilled

Preheat the oven to 450 degrees.

In a large mixing bowl, combine the flour, baking powder, baking soda and salt. Using your fingertips, rub the butter and shortening into the dry ingredients until the mixture looks like crumbs.Try to do this quickly so that the fat does not completely melt. Make a well in the center of the mixture and pour in the chilled buttermilk. Stir just until the dough comes together. The dough will be very sticky.

Turn the dough onto a floured surface, dust the top of the dough with flour and gently fold the dough over on itself 5 or 6 times. Press into a 1-inch thick round. Cut out the biscuits with a 2-inch cutter, being sure to push straight down through the dough. Place the biscuits on baking sheet so that they just touch. Reform the scrap dough, working it as little as possible and continue cutting. 

Bake until the biscuits are tall and light gold on top, about 15 to 20 minutes.

Bobby Flay’s Sausage Gravy and Biscuits

1 1/2 pounds bulk breakfast sausage or mixture of hot and mild bulk sausage
4 tablespoons flour
1/2 gallon milk
Salt
Pepper
Biscuits, store-bought or homemade (see Alton Brown’s Southern Biscuit recipe above)

In a large pot, add the sausage and cook until it is browned and cooked through. Drain the grease and add the flour to the sausage. Cook the sausage in the flour over medium-high heat until the sausage is well-coated with the flour. Add the milk and stir until the gravy has the  desired thickness and add salt and pepper, to taste. Serve with the biscuits.


I did change up the sausage gravy recipe a little and did not use the 1/2 gallon of milk. I only use about 3/4 of a cup along with a 1/4 cup of heavy cream because we like a gravy that is much thicker for the sausage, and it turned out perfect. The real star here though is the biscuits. These are really easy to make, smell great and taste awesome. You could use these for all kinds of breakfast sandwiches that you like if you didn’t want the sausage gravy, like bacon, eggs, ham or anything else. They are also a great dinner biscuit and I plan to use the rest to go along with dinner tonight. You could even just have one warm with some butter to go with your tea or coffee in the morning and you would be all set.

That’s all I have for today. Check back next time for another recipe. Until then, enjoy the rest of your day and enjoy your meal!

IMG_0506 IMG_0505

 
4 Comments

Posted by on April 13, 2014 in Biscuits, Breads, Breakfast, Cooking, Gravy, Pork


Tags: , , , , , , , , , , ,

Need a Dessert Fast? Try This Blackberry Raspberry Pie

There are times when you find out at the last-minute that you’ll be having guests in an hour and you want to have something fast to serve for dessert with some coffee or tea. In times like these, I like to have some refrigerated pie crusts on hand along with some frozen fruit so that I can throw something together quickly. I had recently bought a big package of Pillsbury pie crusts at BJ’s Warehouse a week or so ago when I decided to make this quick and easy pie recipe I got from Giada De Laurentiis on the Food Network. All you need is some pie crusts and frozen bags of fruit and you can have a great tasting pie in a little over an hour.

Blackberry Raspberry Pie

Two 16-ounce bags frozen blackberries, thawed and strained
Two 16-ounce bags frozen raspberries, thawed and strained
1 cup sugar, plus 1 teaspoon for sprinkling
2 tablespoons cinnamon, plus 1/4 teaspoon for sprinkling
1/4 cup arrowroot powder
2 tablespoons all-purpose flour
1/4 teaspoon fine salt
Butter, for greasing
Two 9-inch unroll-and-bake refrigerated pie crusts

Line a baking sheet with foil. Place the baking sheet on the center rack of the oven and preheat the oven to 400 degrees F. Allow the baking sheet to heat for 15 minutes.

To a large bowl, add the blackberries, raspberries, 1 cup of the sugar, 2 tablespoons of the cinnamon, the arrowroot, flour and salt, and toss them gently to combine them. In a separate small bowl mix the remaining 1 teaspoon of sugar and 1/4 teaspoon of cinnamon and set it aside.

Butter a 9-inch ceramic or glass pie dish. Unroll one pie crust and place into bottom of the pie dish, flattening it out against the sides and bottom of the pie dish. Pour the berry mixture into the crust. Unroll the second pie crust and place it on top of the filling. Pinch the edges of the top and bottom crusts together to seal the crust. Fold the double edge under and crimp the edges, making a decorative edge. Sprinkle the reserved sugar and cinnamon mixture over the top. Using a paring knife, cut a few slits in the top of the pie crust.

Place the pie into the oven on the prepared baking sheet and bake the pie until the crust is deep golden and the filling is bubbling through the slits, about 1 hour and 15 minutes.

Cool the pie to room temperature before serving.

This is pretty much the same as the double berry pie I had made in the past. You can use any frozen berry that you have on hand and this would work, and of course you can always use fresh berries as well. Just make sure that if you use frozen that the berries are thawed and drained otherwise you will get a lot of moisture in your pie, despite the use of the arrowroot, which will give you a soggy bottom crust. You end up with a nice pie in just over an hour that is great with some ice cream, homemade whipped cream, coffee and tea or you can use this when you get an invite to someone’s home and want to bring something nice over.

That’s all I have for today. Check back next time for another recipe. Until then, enjoy the rest of your day and enjoy your meal!

IMG_0493

 
Leave a comment

Posted by on April 7, 2014 in Cooking, Dessert, Pie


Tags: , , , , ,

Enjoy Those Spring Vegetables – Awesome Asparagus Soup

We love asparagus in our household so it is great when it is in season and you can get lost of it at a really good price around here. It has such great flavor and there are so many different recipes you can make with it (we love it roasted; if you haven’t tried it that way, give it a shot). Couple the spring asparagus with the ridiculous cold weather we still have here in New York, and it seemed like a great time to make this great soup recipe I picked up from the food network. This recipe also makes some Parmesan breadcrumbs, which I did not make, but they sound pretty good to me. I opted to make some biscuits instead, but you could just as easily do the breadcrumbs.

Asparagus Soup:
1 tablespoon olive oil
1 shallot, minced
Kosher salt and freshly cracked black pepper
3 bunches pencil asparagus, trimmed and cut into 1 1/2-inch pieces
1 cup thawed, frozen peas or 1 cup shelled fresh English peas (about 1 pound unshelled)
1/4 cup dry white wine
2 cups lightly packed baby spinach

For the Parmesan Breadcrumbs:
Four 1/8-inch slices day-old sourdough bread (about 3 ounces)
Olive oil, for drizzling
1 1/2 tablespoons chopped fresh thyme
Kosher salt and freshly cracked black pepper
One 3-ounce wedge Parmesan

Garnishes for the Soup:
Creme fraiche
Finely chopped fresh chives
Fresh cilantro leaves
Lime wedges
Asparagus tips
Preheat the oven to 425 degrees F.

For the soup: In a large soup pot or Dutch oven, bring the oil to medium heat. Add the shallot and salt and pepper to taste. Sweat the shallots until they are translucent, about 1 minute, being careful not to brown them. Add the asparagus to the pot and sweat the asparagus until it is beginning to soften, about 3 minutes. Add the peas and sweat for another minute. Pour in the white wine and deglaze the pot. Add 5 cups of water and continue simmering until the asparagus are crisp-tender, about another 10 minutes. Remove the pot from the heat and set it aside.

Working in batches (and carefully as the liquid will be hot), puree the soup until it is smooth in a blender. In the last batch, add the baby spinach and puree; this will give the soup a vibrant green color. Strain the soup back into the pot through a fine mesh sieve. Return the soup to a simmer until it is slightly thickened, about 4 to 6 minutes. Season the soup with salt and pepper to taste. Remove the soup from the heat.

For the Parmesan breadcrumbs: While the soup simmers, pulse the bread in a food processor until you have very coarse crumbs. Once processed, transfer the breadcrumbs to a medium mixing bowl. Drizzle the breadcrumbs with a generous amount of olive oil. Toss the breadcrumbs with the thyme. Season the mixture with salt and pepper. Transfer the breadcrumbs to a parchment-lined sheet tray. Using a grater, finely grate a few tablespoons of Parmesan over the breadcrumbs. Place the breadcrumbs into the oven and bake until they are golden and crispy, about 7 to 10 minutes. Remove the breadcrumbs from the oven and cool.

To serve: Ladle the soup into shallow serving bowls. Sprinkle the soup evenly with a few teaspoons of Parmesan breadcrumbs and top with a dollop of creme fraiche, if desired. Garnish with chopped chives, cilantro leaves, asparagus tips or a squeeze of a lime wedge and a splash of extra-virgin olive oil, if desired.Serve immediately.

The soup has great flavor from all of the vegetables and looks a great green color, just right for spring. One thing to remember when you are blending hot liquids, is to first let cool for 5 minutes or so, then transfer it to a blender, filling the blender only halfway. Put the lid on, but leave one corner open so you don’t have a vacuum that can make the whole thing explode on you. It’s dangerous and messy if you don’t do this. Make sure you  cover the whole thing with a towel too while you are blending to catch any splatters that can happen along the way as well. It’s a great soup that is very easy to make. The Parmesan breadcrumbs would be a nice addition because the soup does need the salt and pepper to get really good flavor and the breadcrumbs can give you that and more.

That’s all I have for today. Check back next time for another recipe. Until then, enjoy the rest of your day and enjoy your meal!

IMG_0486


Tags: , , , , ,

Going Meatless – Sparrow Veggie Burger

Everyone once in a while I do try to make a meatless dish so we can stay away from red meat. We don’t eat a lot of it here, but every little bit helps some, right? It’s also no secret that I watch a lot of Food Network, especially when it isn’t baseball season, so a few weeks ago Michelle and I saw Diners. Drive-Ins and Dives and Guy Fieri  was a restaurant in Queens where they made this really great looking vegetable burger. Now most vegetable burgers I have had in the past have left a lot to be desired but this one looked like it had some great stuff in it so  I wanted to give it a try. It took me a while to track down a recipe online and even then it was not very specific so it took a little manipulation on my part to make this one work.

Sparrow Veggie Burger

2 shredded carrots

1 shredded zucchini

1 cup barley, cooked

Corn off the ear of 1 cob

1 cup green peas

1 large sweet potato, cooked

handful of scallions

Panko breadcrumbs

1 diced red pepper

5 large chopped mushrooms

1 cup cooked brown rice

Pita bread

Lettuce or bean sprouts

Pickles

Sweet Cayenne Mustard Sauce:

1 cup plain nonfat yogurt or mayonnaise

3 tablespoons cayenne pepper

1/2 cup grain or Dijon mustard

3/4 cup agave or maple syrup

Mix the carrots, zucchini, cooked barley, corn, green peas, sweet potato, scallions, breadcrumbs, red pepper, mushrooms and the cooked brown rice together in a large bowl until blended. Allow the mixture to sit for 1 hour so the flavors can meld together.

While the vegetables sit, make the sweet cayenne mustard sauce. Mix the yogurt or mayonnaise, the cayenne pepper, mustard and the agave or maple syrup together in a medium bowl with a whisk until smooth and well blended. Set the sauce aside.

Pre-heat the oven to 325 degrees.For the veggie burgers, measure out six-ounce portions – about the size of the palm of your hand – and form patties for the burgers. Place the patties on a lightly oiled baking sheet. Cook the patties in the oven until they are cooked through, about 45 minutes. Remove the baking sheet from the oven. Heat a large skillet over medium-high heat and add 1 tablespoon of vegetable and heat until the oil is shimmering. Add the patties to the skillet and cook until the burgers are browned and crunchy on the outside, about 4 minutes per side.

Drizzle the sweet cayenne pepper sauce inside a pita. Add the lettuce or bean sprouts to the pita, then add the veggie burger and the pickles and drizzle with more sauce if desired. Repeat with the remaining burgers.

Okay, here are a couple of things we noticed in this recipe. First, this recipe makes a lot more than the 6 portions the recipe purports to make. We had over twelve patties when all was said and done, so you can bake them and freeze them so you always have some ready to make when you feel like having one and just defrost it and bake it in the skillet. Second, these burgers do not hold together well because there is not much to bind them. We actually experimented with another batch and added 1 beaten egg to the mix and they held together much better than the first batch. From what I have been able to see about the Sparrow Diner, while they call it a burger, it is not really served as a burger that holds together, which is why they serve it in a pita, which is fine, but we wanted more of a burger texture so we added the egg and served it on a hamburger roll. Finally, for the sauce, I cut back on the cayenne pepper. Three tablespoons is a lot of cayenne pepper, so if you like it hot, go for it, but if you want something milder, cut back a bit and you will have a great sauce. Michelle and I both liked the results of the burger. It had great flavor with all of the vegetables and we enjoyed. In the interest of full disclosure, Sean hated it. He didn’t like the taste and said it didn’t hold together well, but I think for the majority of teenage boys who hear they are having burgers for dinner it was an understandable reaction. He did eat it, but he wasn’t happy with it, so next time around I guess it is just for me and Michelle.

That’s all I have for today. Check back next time for another recipe. I’ve been really busy lately so I haven’t been able to blog as much as I want, but I am going to try harder to keep up regularly since I still have lots to share. Until next time, enjoy the rest of your day and enjoy your meal!

IMG_0471


2 Comments

Posted by on March 30, 2014 in Cooking, Dinner, Sandwiches, Sauce, Vegetables, Vegetarian


Tags: , , , , ,

Changing Up a Classic (Just a Bit) – Stovetop Mac and Cheese

There is no other way for me to say it – I don’t like macaroni and cheese. I don’t eat pasta or cheese, so for me, this meal is almost the worst combination you can come up with (it’s right up there with lasagna and baked ziti for me). I know this may sound like blasphemy, but it is just the way it is for me and my family accepts it. That doesn’t change the fact that Michelle and Sean both love macaroni and cheese and would eat it just about every day if they could. That being said, usually when it comes to making macaroni and cheese in this house, I step away from the kitchen and let Michelle take over. She knows how it should be and should taste so I just let her do it. When she and Sean saw this recipe this morning from Amy Thielen on Food Network, they immediately decided they wanted to try it for lunch today.

Stovetop Mac and Cheese

4 ounces (about 3 to 4 slices) bacon, cut into small dice
Salt, for pasta water
1/2 pound pasta, such as elbows
2 tablespoons butter
2 ounces American cheese, shredded (about 3/4 cup)
2 ounces aged cheddar, shredded (about 3/4 cup)
2 to 3 tablespoons milk
1/2 teaspoon ground black pepper
1 to 2 tablespoons chopped fresh parsley, optional

Heat a small skillet over medium heat; add the bacon and cook, stirring, until the bacon is lightly crisp, about 7 to 8 minutes. Drain and set aside; reserve the bacon fat for another use.

Bring a 2-quart pot of water to a boil. Salt the water generously. Add the pasta and cook, stirring occasionally, until it is just tender to the bite, or al dente. Before draining the pasta, use a heavy liquid measuring cup to pull out 3/4 cup of the pasta water; set the water aside. Drain the pasta and return the pot to the heat.

Heat the butter in the pasta pot, then add the cooked pasta. Stir in 1/2 cup of the reserved pasta water. Add the shredded American cheese and stir until the mixture is smooth. Add the shredded cheddar cheese, milk, pepper and the cooked bacon and mix well. Dribble in the extra pasta water as needed to make a soft, creamy sauce. Garnish with parsley if using. Serve immediately.

It seems to me that this is just as easy as it would be to open one of those boxes of macaroni and cheese that have the cheese “dust” in it and I have to admit this smelled a lot better than the usual mac and  cheese to me because of the use of the bacon. Sean absolutely loved it with the bacon in it, since bacon pretty much makes everything better anyway. Michelle really enjoyed it as well, though she thought it could use some more cheese in it and vowed to add more the next time around. Overall it seemed to be a pretty good hit with both of them and showed plans on bringing some to school on Monday for lunch.

That’s all I have for today. Check back next time for another recipe. As always, there is still plenty to share as we are always trying something new around here. If you ever have any recipes you would like to share or something you would like to see on the blog, feel free to leave a comment, or catch up with me on Facebook or Twitter or send me an email at IguanaFlats@msn.com. Until next time, enjoy the rest of your day and enjoy your meal!

IMG_0481

 
Leave a comment

Posted by on March 22, 2014 in Dinner, Lunch, One Pot Meals, Pasta, Side Dishes


Tags: , , , , ,

A Sweet Side Dish – Twice Baked Sweet Potatoes

The sweet potato, in my opinion, is a side dish that often gets overlooked. At least I know in my house we forget about them a lot and we really shouldn’t see it is considered a super food. To me it’s a great side and has a lot more flavor than your typical Russet potato or Yukon gold potato and I would rather have a sweet potato than either of those. Anyway, I had come across this recipe from Guy Fieri on the Food Network when I was looking for something different to do with a sweet potato for dinner and I saw this simple recipe for twice-baked sweet potatoes. I actually changed it a little bit by microwaving the potatoes for 12 minutes first instead of baking them in the oven for an hour to soften them up so they could be done faster, but you can use either method and still get quality results.

Twice-Baked Sweet Potatoes

4 medium-sized sweet potatoes

5 tablespoons light brown sugar

1/2 teaspoon ground cinnamon

1/4 teaspoon ground nutmeg

Pinch cayenne pepper

1/2 stick butter

Vegetable oil, for greasing the roasting tray

Kosher salt and freshly ground black pepper

1/2 cup chopped pecans (optional)

Preheat the oven to 375 degrees. Lightly scrub the sweet potatoes under cold running water. Place the potatoes on a roasting tray and bake the potatoes until they are tender, about 1 hour to 1 hour and 15 minutes. Remove the sweet potatoes from the oven and allow the potatoes to cool slightly before cutting of the top third of the potato lengthwise. Scoop out the flesh using a large spoon and be sure to leave enough on the base so the skin will be able to hold its shape and reserve the bases.

Add the sweet potato flesh, 2 tablespoons of the brown sugar, the ground cinnamon, ground nutmeg, cayenne pepper and the butter to a food processor. Process the mixture until the ingredients are completely combined and the puree is smooth. Season the potato mixture with salt and pepper to taste. Drizzle a roasting tray with a little bit of the vegetable oil. Set the potato skin bases upright on the tray and fill the bases with the sweet potato mixture.

Combine the remaining 3 tablespoons of brown sugar and the pecans, if using, in a small bowl. Sprinkle the top of each stuffed sweet potato with the sugar-pecan topping. Bake the potatoes for 10 minutes. Finish the potatoes under the broiler for the top to brown, about 1 minute, if desired.

As I had said, I scrubbed the potatoes and poked them with a fork and cooked them in the microwave for 12 minutes until they were tender so I could significantly cut back on the cooking time and I think they came out just fine. The flavors of the potato with the sugar, cinnamon and nutmeg were great and although I omitted the pecans, I did drizzle a little bit of pure maple syrup on each one for some extra flavor. To me, it’s a great way to make an easy side dish to go with just about beef, pork or poultry dish that you want.

That’s all I have for today. Check back tomorrow for another recipe. Until then, enjoy the rest of your day and enjoy your meal!

IMG_0469

 
Leave a comment

Posted by on March 20, 2014 in Cooking, Potatoes, Side Dishes, Vegetables


Tags: , , , , , ,

Beefing Up Dinner with Beef Stroganoff over Buttered Noodles

There are some recipes that are classics that seem to get lost in the shuffle these days and you just do not see them around very often. Michelle had approached me not that long ago and said she really felt like having beef stroganoff for dinner one night. Now I had never made beef stroganoff before, and it is not hard to make at all, but I probably have not had any since I was a child. It just isn’t something I see around that often anymore or that a lot of people make at home. Anyway, there are plenty of recipes out there on the Internet and in cookbooks with various ways to make it, but I decided to stick to a very basic recipe that I found from Tyler Florence on the Food Network and give it a try.

Beef Stroganoff over Buttered Noodles

3 cups beef stock
1 carrot, chopped
6 sprigs fresh thyme
1 bay leaf
2 pounds chuck roast, cut into 2-inch cubes
Kosher salt and freshly ground black pepper
6 tablespoons extra-virgin olive oil
1 medium onion, chopped
2 tablespoons cognac or brandy
5 tablespoons unsalted butter
1 pound mushrooms, sliced
3 cloves garlic, chopped
2 tablespoons sour cream, plus more for garnish
1 tablespoon Dijon mustard
2 tablespoons chopped fresh parsley leaves, plus more for garnish
1 (1-pound) package wide egg noodles

Heat the beef stock with the carrot, 3 thyme sprigs, and the bay leaf in a large saucepan over medium heat. Pat the beef dry and season it with salt and pepper. Heat 3 tablespoons of the olive oil in a large heavy bottomed Dutch oven over high heat. Fry the meat in batches so that it is browned on all sides. Lower the heat to medium and return all the meat to the pot. Add the onions and cook until they are soft, about 5 minutes. Pour in the cognac or brandy and cook until the alcohol has burned off, about 5 minutes. Add the beef stock, discarding the carrot, thyme sprigs, and bay leaf. Cook, partially covered, over a very low flame for 1 1/2 to 2 hours.

In a large skillet over medium heat, melt 3 tablespoons of butter in the remaining 3 tablespoons of olive oil. Add the mushrooms, garlic, and the remaining 3 thyme sprigs and cook until the mushrooms are browned and cooked through. Remove the mixture from the heat and set it aside.

When the meat is done, remove it from the heat and fold in the mushrooms, sour cream, mustard, and parsley. Taste and adjust the seasoning with salt and pepper.

Meanwhile, cook the noodles in a large pot of boiling, salted water until they are tender. Drain the noodles well, toss them with the remaining 2 tablespoons of butter, and season them with salt and pepper to taste. Serve the stroganoff over the noodles; garnish the meal with more sour cream and chopped parsley, if desired.

That’s all there is to it really. you get nice, tender meat in a wonderful sauce that has the great flavors from the mushrooms, brandy and mustard to go along with the richness of the sour cream. Michelle and Sean both had theirs over noodles while I had mine over rice and there were plenty of leftovers for lunches during the week for everyone. It all comes together pretty easily and can make a nice meal during the week or for something different on the weekend.

That’s all I have for today. Check back tomorrow for more recipes to try out. Until then enjoy the rest of your day and enjoy your meal!

IMG_0466 IMG_0465

 
Leave a comment

Posted by on March 18, 2014 in Beef, Cooking, Dinner, Soups & Stews


Tags: , , ,

 
National Day Calendar

Fun, unusual and forgotten designations on our calendar.

Jennifer Probst

a little bit naughty a little bit nice

Laissez Faire

Letting Life Lead

What To Have For Dinner Tonight

Simple and delicious dinner inspiration