RSS

Category Archives: Cooking

The Best Recipes To Make In Your Cast Iron Skillet (PHOTOS)

The Best Recipes To Make In Your Cast Iron Skillet (PHOTOS).

If you follow my blog, you know how much I love using my cast iron skillet. The Huffington Post posted this article today highlighting 10 great recipes to try using your cast iron skillet. They cover everything from entrees to side dishes to dessert so you can try a little of everything. Check it out!


Tags: , ,

Better Than Delivery: Food Processor Pizza Dough and a Couple of Pizzas

Very often when I make pizza at home I use a store-bought dough to make life a little bit easier for me. I have bought the dough and sometimes a pre-made pizza crust so we can have a quick meal. Recently I came upon recipes both from Williams-Sonoma and America’s Test Kitchen that made pizza dough right in the food processor with minimal ingredients and no real kneading at all, making it very easy to make your own dough at home. I actually ended up combining the two recipes somewhat to make my own pizza dough for this one. The America’s Test Kitchen recipe used bread dough, which I liked, but made too many pizza crusts for me, so I combined it with the Williams-Sonoma recipe to get what I wanted.

Food Processor Pizza Dough

1 tablespoon active dry yeast
1 teaspoon sugar
1 cup warm water (105° to 115°F)
3 cups bread flour
1 teaspoon salt
2 tablespoons extra-virgin olive oil

In a small bowl, dissolve the yeast and sugar in the warm water and let stand until foamy, about 5 minutes.

In the bowl of a food processor fitted with the dough blade, combine the flour and salt and process with 3 or 4 pulses. With the motor running, slowly add the yeast mixture, allowing each addition to be absorbed before adding more. Continue processing until the dough forms a ball and cleans the sides of the bowl, about 1 minute, then process for 1 minute more.

Coat the inside of a large bowl with the olive oil and place the dough in the bowl. Cover with a clean kitchen towel and let the dough rise in a warm place until doubled in size, about 1 1⁄2 hours. Divide the dough in half and roll out as directed in the pizza recipe.

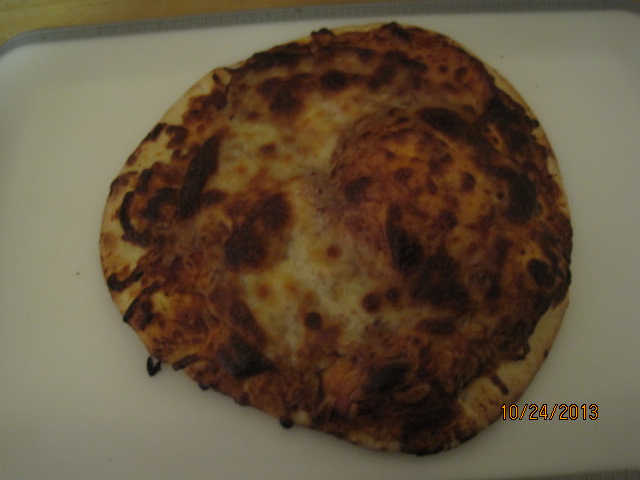
This recipe makes two 12-inch pizzas, which was perfect for my needs. It was very simple and didn’t take long at all. I was then able to move on to the pizzas. The first pizza I made was a simple cheese pizza, since that is all Sean really likes anyway.
Classic Cheese Pizza
1 Food processor pizza dough
Flour for the counter
1 recipe Pizza Sauce (to follow)
1 cup mozzarella cheese, shredded
1 tablespoon Parmesan cheese
Adjust an oven rack to the lower-middle position, place a baking stone on the rack and heat the oven to 500 degrees. Let the baking stone heat for at least 30 minutes.
Meanwhile, turn the dough out onto a lightly floured counter and shape it into a smooth, round ball and cover it with plastic wrap. Allow it to rest at room temperature for 20 to 30 minutes.
Uncover the ball of dough and stretch and shape the dough into a 12-inch round on a piece of parchment paper. Spread 1 cup of pizza sauce over the dough, leaving a 1/2-inch edge of dough uncovered. Sprinkle the mozzarella cheese and the Parmesan across the pizza to cover it. Lightly brush the edges of the pizza dough with some olive oil.
Slide the parchment paper and pizza onto a rimless or inverted baking sheet, then slide it onto the hot baking stone. Bake until the crust edges brown and the cheese is golden in spots, about 8 to 13 minutes.
Transfer the pizza to a cutting board, discarding the parchment paper. Cut the pizza into 6 or 8 wedges and serve.
I rolled out he pizza dough with a rolling pin instead of working it by hand. I just seem to have better luck working with the dough this way so I went with it, but do what you are most comfortable with. The crust came out great, though I probably kept the cheese pizza in for a minute or two too long as it browned a bit more than I would have liked, but Sean didn’t seem to care since he devoured all of the pizza. The pizza sauce recipe itself is quite simple:
Basic Pizza Sauce
2 tablespoons extra-virgin olive oil
2 garlic cloves, minced
1 (28-ounce) can crushed tomatoes
Salt and pepper
Heat the oil and garlic in a medium saucepan over medium heat until the garlic is sizzling, about 1 1/2 minutes. Stir in the tomatoes and simmer until the sauce is thickened, about 15 minutes. Season with salt and pepper to taste.
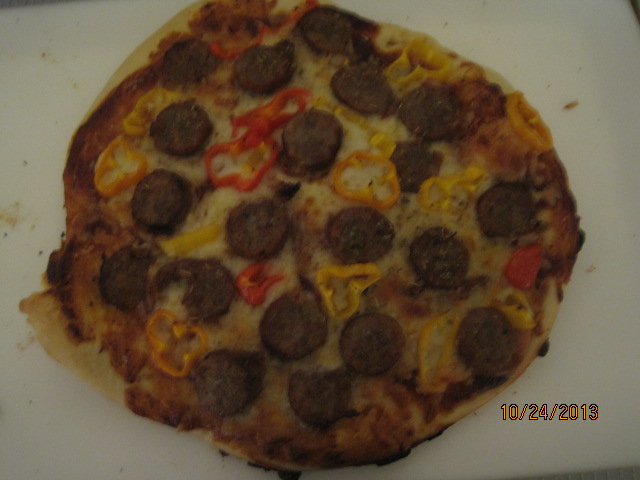
I made a second pizza, but decided to try things a little bit differently and went for a sausage and pepper pan pizza instead of using the baking stone.
Sausage and Pepper Pan Pizza
1 Food processor pizza dough
2 links Italian sausage, cooked and sliced 
1 yellow bell pepper, seeded and cored, sliced thin
1 cup Basic tomato sauce
1 cup mozzarella cheese, shredded
1 teaspoon dried oregano
Adjust an oven rack to the lower-middle position and preheat the oven to 400 degrees. Lightly coat a 9-inch cake pan with 1 tablespoon of olive oil or coat the bottom of an ovensafe skillet with 1 tablespoon of olive oil.
Lightly roll the dough into a smooth ball. Roll and shape the dough into a 9-inch round and press it into the oiled pan or skillet. Cover the pan with plastic wrap and set it in a warm spot (not in the oven) until puffy and slightly risen, about 20 minutes.
Remove the plastic wrap from the dough and ladle the tomato sauce on the pizza dough, leaving a 1/2-inch border around the edges. Sprinkle the pizza with the mozzarella cheese and then top it with the sliced Italian sausage and the bell pepper. Sprinkle the top with the dried oregano. Bake the pizza in the oven until the cheese is melted and the sausage is browning around the edges, about 20 minutes. Remove the pizza from the oven and allow it to rest for 1 minute in the pan. Using a spatula, transfer the pizza to a cutting board and slice into the desired amount of wedges.
I really liked the thick crust that came out with the pan pizza and I love the sausage and peppers on a pie, so it worked out well for me. I actually used red, yellow and orange pepper on my pizza since I had some small sweet peppers on hand. Since Sean was full from eating the other pizza, There was plenty leftover so I can have some for lunch today.
That’s all I have for today. Check back next time for some more recipes. There is still plenty to come – a classic Chinese chicken takeout recipe, some oven barbecued ribs, cinnamon buns, and more. Until next time, enjoy the rest of your day and enjoy your meal!
002 001
 
6 Comments

Posted by on October 25, 2013 in Cooking, Dinner, Pizza


Tags: , , , , , , , ,

The Easiest Chicken Noodle Soup You Will Ever Make

I had planned to make some pizza last night, but Sean and I both had dentist appointments so we got home late. As it turns out, Sean had a couple of fillings done, so he couldn’t really eat anything anyway and asked if he could have some soup for dinner. I didn’t have any pre-made in the freezer or anything, so I had to throw something together quickly using just what I had around the house. Luckily, they are fewer things that can make great use of leftovers and household items than chicken noodle soup. All you need is some homemade or store-bought broth, some leftover chicken and vegetables, a bag of noodles, are you are good to go in about 15 minutes.

Easy Chicken Noodle Soup

4 cups chicken broth

8 ounces noodles

1-2 pieces leftover chicken (breasts, thighs or drumsticks), shredded

6 ounces frozen vegetables (or any leftover vegetables you may have)

In a large saucepan over medium heat, bring the chicken broth to a boil, Add the noodles and return the broth to a boil, then turn the heat down to low to simmer until the noodles are almost tender, about 4 or 5 minutes. Add in the shredded chicken and the vegetables and heat until the chicken and the vegetables are warmed through, about 3 or 4 minutes. Serve.

That’s all there is to it. We actually made use of some leftover chicken gravy I had on hand and added that into the soup as well to act as a thickener and really make it nice. Sean loved it and ate all of it so fast I never even had a chance to take a picture of it. The nice thing is that you can do this same thing with just about any kind of leftovers you may have. You can use rice instead of noodles, use beef broth or vegetable broth instead of chicken, simply add some frozen tortellini and spinach to the broth for a spinach tortellini soup, use beef instead of chicken or just use all vegetables and some herbs along with the vegetable broth and you can make yourself a nice vegetarian soup. The options seem nearly limitless when it comes to making a quick soup if you just want something fast and satisfying. You can serve this with a side salad, just some crunchy bread or even have soup with a sandwich for a fast dinner or a great lunch (I had a tuna sandwich with mine).

That’s all I have for today. Check back next time for another recipe. I hope to get to the pizza tomorrow, I have some ribs planned for Friday, and I also have a cinnamon bun recipe I want to try, so there’s always more to check out. Until next time, enjoy the rest of your day and enjoy your meal!

 
Leave a comment

Posted by on October 23, 2013 in Cooking, One Pot Meals, Soups & Stews


Tags: , , , ,

Swift and Simple Glazed Salmon

Salmon is one of those meals I don’t make very often but I really should make more of it. It is very good for you, but Michelle really only likes the Wild salmon, which does have a different taste and look than that of farm-raised salmon and tends to cost quite a bit more. For this reason, I really only get some when I notice it on sale and looking particularly good. This was the case recently when I saw some at Adam’s Farm and picked up a pound for us to have for dinner. The great thing about fish meals is that they take almost no time at all to prepare, and this simple dish from Cook’s Illustrated is no exception and gives the salmon a great Asian flavor.

Glazed Salmon

1 teaspoon packed light brown sugar

1/2 teaspoon kosher salt

1/4 teaspoon cornstarch

1 (1 1/2 – 2-pound)skin-on salmon fillet

Pepper

1 teaspoon vegetable oil

1 recipe Asian Barbecue Glaze (to follow)

Asian Barbecue Glaze:

2 tablespoons ketchup

2 tablespoons hoisin sauce

2 tablespoons rice vinegar

2 tablespoons packed light brown sugar

1 tablespoon soy sauce

1 tablespoon toasted sesame oil

2 teaspoons Asian chili-garlic sauce

1 teaspoon grated fresh ginger

For the Asian barbecue glaze, whisk all the ingredients together in a small saucepan. Bring the mixture to a boil over medium-high heat; simmer until it is thickened, about 3 minutes. Remove from the heat and cover the saucepan to keep the glaze warm until use.

For the salmon, adjust an oven rack to the middle position and preheat the oven to 300 degrees. Combine the brown sugar, kosher salt and cornstarch together in a small bowl. Use a sharp knife to remove any whitish fat from the belly of the salmon and then cut the fillet into 4 equal portions. Pat the fillets dry with paper towels and season with pepper. Sprinkle the brown sugar mixture evenly over the top of the flesh side of the salmon fillets, rubbing it to distribute it evenly.

Heat oil in a large, oven-safe nonstick skillet over medium-high heat until it is just smoking.  Place the salmon, flesh side down, in the skillet and cook until it is well browned, about 1 minute. Using tongs, carefully flip the salmon and cook it on the skin side for about 1 minute.

Remove the skillet from the heat and spoon the Asian barbecue glaze evenly over all the salmon fillets. Transfer the skillet to the oven and cook until the fillets register 125 degrees (for medium-rare) and are still translucent when cut into with a paring knife, about 7 to 10 minutes. Transfer the fillets to a serving platter or individual plates and serve.

The brown sugar on the salmon helps it develop a nice crust when you first sear it while the cornstarch helps the glaze to adhere nicely to the fish. You end up with a beautiful pink salmon with just a nice crust and a great glaze to top it off. The whole meal can be cooked in about 20 minutes. I served this with white rice and spinach, though I also had a bit of the leftover Fall vegetable risotto with mine instead of the white rice. It was very good and simple enough to make anytime you have salmon and just want a quick and easy meal.

That’s all I have for today. Check back next time for some more recipes. Until then, enjoy the rest of your day and enjoy your meal!

001

 
Leave a comment

Posted by on October 22, 2013 in Cooking, Dinner, Sauce, Seafood


Tags: , , ,

Meals with Family and Friends Part 4 – Pan-Seared Rib Eye Steaks with Red Wine Sauce

One of my favorite meals to eat is just a simple steak dinner. Of all the cuts, I have to say that I think my favorite of all is the rib eye. it has a little more fat than some other cuts, but this does help to give it tremendous flavor and when it is cooked just right it melts when you cut it. Serve it with a nice pan sauce and a couple of good sides and you can have an elegant meal any night of the week. I made some steaks last night when we had a friend visiting and chose to make some nice rib eye steaks I had picked up at. I just followed this simple recipe from Cook’s Illustrated and made a nice pan sauce to go on the side.

Simple Pan-Seared Steaks

1 tablespoon vegetable oil

4 (8 to 10-ounce) boneless strip steaks or rib eye steaks, 1 to 1 1/4 inches thick

Salt and pepper

1 pan sauce recipe (to follow)

Heat the vegetable oil in a large skillet over medium-high heat until just smoking. Meanwhile, pat the steaks dry with paper towels and season both sides of the steaks with salt and pepper.

Lay the steaks in the pan, leaving 1/4 inch between them. Cook, without moving the steaks, until they are well browned, about 4 minutes. Using tongs, flip the steaks and continue to cook until the meat registers 115  to 120 degrees (for rare) or 120 to 125 degrees (for medium-rare), about 3 to 7 minutes. Transfer the steaks to a serving platter and tent them loosely with aluminum foil to rest while you prepare the pan sauce, if using.

Very, very simple. My preference is always to cook the steaks to about medium so they are still nice and pink inside. Letting them rest while you make the pan sauce will help them come up to just the right temperature and doneness. This particular sauce I made does require a little preparation beforehand, so you can make the wine reduction earlier before you cook the steaks.

Red Wine Pan Sauce

Wine Reduction:

1 small carrot, peeled and chopped fine (about 2 tablespoons)

1 small shallot, minced (about 2 tablespoons)

2 medium white mushrooms, chopped fine (about 3 tablespoons)

1 bay leaf

1 tablespoon chopped fresh parsley

1 cup red wine

Sauce:

1 medium shallot, minced (about 2 tablespoons)

1/2 cup chicken broth

1/2 cup beef broth

3 tablespoons butter, cut into 6 pieces

1/2 teaspoon fresh thyme leaves

Ground black pepper

Salt

For the red wine reduction, heat the carrot, shallot, mushrooms, bay leaf, parsley and wine in a large nonstick skillet over low heat; cook, without simmering (the liquid should be steaming but not bubbling) until the entire mixture is reduces to 1 cup, about 15 to 20 minutes. Strain the mixture through a fine-mesh strainer and return the liquid (about 1/2 cup) to a clean skillet. Continue to cook the liquid over low heat, without simmering, until the liquid is reduced to 2 tablespoons, about 15 to 20 minutes longer. Transfer the reduction to a bowl.

For the sauce, follow the recipe for the Pan-Seared Steaks, transferring the plate with the steaks to a 200 degree oven to keep them warm. To the same skillet used to make the steaks (do not clean the skillet or discard any accumulated fat), add the shallot and cook over low heat until softened, about 1 minute. Turn the heat to high; add the chicken and beef broths. Bring the mixture to a boil, scraping up any browned bits on the pan bottom with a wooden spoon until the liquid is reduced to about 2 tablespoons, about 6 minutes. Turn the heat to medium-low, gently whisk in the reserved wine reduction and any accumulated juices from the plate with the steaks. Whisk in the butter, one piece at a time, until it is melted and the sauce is thickened and glossy; add the thyme and season with salt and pepper to taste. Spoon the sauce over the steaks and serve.

The red wine sauce for the steaks turned out very nice and adds some great flavor to the steaks. Of course, you can always skip the sauce completely and just go with the steaks, but I think it added something quite nice to the meal. I served the steaks with the fall vegetable risotto recipe I posted last week and some pan roasted asparagus and sautéed spinach,  a recipe I will post later this week. For dessert that night, we also had the fallen chocolate cake that we have made before to completely round out the meal.

That’s all I have for today. Check back next time for some more recipes. I raided the freezer this weekend and took some things out to make this week, so look for recipes using wild salmon, pizza dough, Italian sausages, boneless chicken breasts and some spare ribs, among others. Until next time, enjoy the rest of your day and enjoy your meal!

001

 
2 Comments

Posted by on October 21, 2013 in Beef, Cooking, Dinner, Sauce


Tags: , , , , , , ,

Meals with Family and Friends, Part 3 – Fall Vegetable Risotto

As I have said in previous posts, we did some entertaining over the last couple of weeks so it gave me the opportunity to try out some new recipes. One thing I made when we had a friend over for dinner was a nice gluten-free dish of Fall vegetable risotto. I have gotten more ambitious lately in trying to make risotto and I think for the most part it has turned out pretty well with good results. There is some work and care that needs to go into the dish, but the results are quite worth it. This original recipe is from Williams-Sonoma, though I did alter it slightly and omitted the blue cheese from the recipe and substituted Parmesan cheese instead. We’re not big blue cheese eaters here in our house, but I have included it in the original recipe here.

Fall Vegetable Risotto

5 cups chicken or vegetable broth

10 ounces Brussels sprouts, ends trimmed, quartered lengthwise

2 tablespoons olive oil

1 large onion, finely chopped

1/4 pound shitake mushrooms, stems removed, sliced

Coarse kosher salt and freshly ground black pepper

1 1/2 cups arborio rice

1/2 cup dry white wine

1/2 cup gorgonzola or other blue cheese, crumbled

1/2 cup walnut pieces, toasted (optional)

in a saucepan, bring the chicken or vegetable broth to a boil. Add the Brussels sprouts and cook until they are a bright green color and almost tender, about 4 minutes. Using a slotted spoon, transfer the Brussels sprouts to a bowl and set aside. Reduce the heat on the broth to low.

In a heavy medium saucepan over medium-high heat, warm the olive oil. Add the onion and saute until it is a golden brown, about 5 minutes. Add the mushrooms, sprinkle with salt and pepper, reduce the heat to medium, and cook, stirring frequently, until they begin to soften, about 3 minutes. Add the arborio rice and stir until the rice turns opaque, about 1 minute. Add the wine and stir until it is absorbed. Add about 3/4 cup of the warmed broth and adjust the heat so the liquid bubbles and is absorbed slowly. Cook, stirring frequently, until all the liquid is absorbed. Continue cooking, adding the broth about 3/4 cup at a time and stirring frequently until the rice is just tender but slightly firm in the center and the mixture is creamy, about 20 minutes. Mix in the Brussels sprouts, blue cheese and a generous amount of pepper. Taste and adjust the seasoning as necessary.

Spoon the risotto into warmed shallow bowls or plates, sprinkle with the walnuts (if using), and serve.

A couple of notes about this recipe. As I stated, I used Parmesan instead of a blue cheese and I think the results were fine. I also omitted the walnuts as well but feel free to add them in if you like them and want the added crunchy texture. I also substituted water for the white wine in the recipe and it was fine. Finally, I could not get my hands on any shitake mushrooms locally so I just used sliced white mushrooms instead. I think they worked out well though if you can get shitakes, I would use them as I like the look and flavor of them myself. The risotto came out nicely and was very creamy. I loved the flavor of the Brussels sprouts in the mix and everyone seemed to enjoy the dish, I actually used this as a side dish to the meal, but this  could be a meal all on its own if you were going for a meat free meal and just serve this with a salad on the side and I think it would be nice. It could then be vegetarian if use vegetable broth and gluten-free.

That’s all I have for today. Check back next time for another recipe. There is still plenty more to come, as always. Thanks for following along and if you ever have any questions or comments, feel free to leave a comment here, or send me a message on Facebook or Twitter or at my email address of IguanaFlats@msn.com. Until next time, enjoy the rest of your day and enjoy your meal!

002

 
Leave a comment

Posted by on October 19, 2013 in Cooking, Dinner, One Pot Meals, Rice, Vegetarian


Tags: , , ,

Meals with Family and Friends, Part 2 – London Broil with Creamy Horseradish Sauce

This was actually a meal we made while my family was here visiting last week and it was the one I forgot to take a picture of. I wanted to make an easy dinner that could easily feed a crowd, and my brother generously offered up a couple of London broils he had in the freezer for us to use for dinner that night. I found this very easy recipe from Food Republic that is a very basic recipe with a nice marinade and it makes a great horseradish sauce to serve alongside the beef.

London Broil with Creamy Horseradish Sauce

For the London Broil:

3 cloves garlic, minced

2 teaspoons lemon juice

3 tablespoons balsamic vinegar

2 tablespoons Worcestershire sauce

1/2 cup red wine

1 tablespoon soy sauce

1 teaspoon honey

Salt and freshly ground black pepper

2 to 2 1/2 pounds top round London broil or flank steak

For the Creamy Horseradish Sauce:

1/4 cup prepared horseradish

1/2 cup sour cream

1 tablespoon Dijon mustard

Dash of Worcestershire sauce

1/4 cup red wine

1 tablespoon cider vinegar

Salt and freshly ground black pepper to taste

1 teaspoon finely chopped fresh chives

To make the London broil, Mix together all of the ingredients except for the meat. Place the meat in a shallow dish and cover it with the marinade. Cover the meat with plastic wrap and refrigerate for at least 4 hours but no more than 24 hours.

Remove the meat from the refrigerator and bring it to room temperature before cooking. Preheat a grill to high, oil the grate, and set it 5 to 6 inches above the coals. If you are cooking the meat indoors, preheat the broiler to high and set a rack 5 to 6 inches below the heat source.

Remove the meat from the marinade and discard the marinade. Pat the steak dry with paper towels. Grill (or broil on a broiler pan) on each side for 6 minutes for rare or 7 to 9 minutes for medium-rare. Transfer the meat to a carving board and allow it to rest for 8 to 10 minutes. Slice the meat at a 45-degree angle across the grain and serve with the horseradish sauce.

For the horseradish sauce, Whisk all the ingredients together until the mixture is smooth and creamy. Place the sauce in the refrigerator for at least 4 hours to allow the flavors to meld. Serve in a ramekin beside the meat.

This is a very simple recipe that produces a great tasting steak. The marinade really helps to break down some of the toughness of the meat and gives it fantastic flavor. I also really liked the horseradish sauce as a side dish and it goes really well with any kind of steak or beef meal that you make. We served this with mashed potatoes and asparagus, but baked potatoes would go really well with this as well and any steamed vegetable would be an ideal side. I wish I had remembered to take a picture of this one as it was a good one that is easy to make for any night of the week.

That’s all I have for today. Check back next time for another recipe. I still have a simple pan seared rib eye steak with a nice red wine sauce, some fall vegetable risotto, and a simple sautéed spinach among other recipes to share. Until next time, enjoy the rest of your day and enjoy your meal!


Leave a comment

Posted by on October 18, 2013 in Beef, Cooking, Dinner, Grilling, Sauce


Tags: , , , , ,

Meals with Family and Friends, Part 1 – Parker House Rolls

I have been doing some special cooking over the last week since we had some family staying with us and a friend over for dinner. I didn’t make anything too fancy, but I did try a few new things. The downside for me about doing cooking like this is that I very often forget to take pictures of what I have made so I don’t have any photos to share of some of the things I have made recently. I did remember to take a couple of pictures of some of the side dishes, so I have those, but I forgot pictures of the main meals themselves so we’ll have to do without photos of them when I post those recipes. Sorry about that. Anyway, one thing I made the last week to go along with the London broil meal we made was Parker House dinner rolls. This is a variation on the original recipe that dates back to the 1800’s from the Parker House Hotel in Boston and from the Fannie Farmer cookbook of that time period. The recipe I used I actually got from Willams-Sonoma and looks more like traditional dinner rolls instead of the half-ovals that the traditional Parker House rolls look like.

Parker House Rolls

1 1/2 cups milk

8 tablespoons (1 stick) butter, cut into 8 pieces, plus 2 tablespoons melted butter

4 1/2 teaspoons active dry yeast

4 cups all-purpose flour, plus more for dusting

3 tablespoon sugar

1 tablespoon kosher salt

1 1/2 teaspoons sea salt

1/2 teaspoon garlic flakes

1 teaspoon white sesame seeds

In a small saucepan over medium heat, combine the milk and the 8 tablespoons of butter. Heat until the butter is melted, about 7 minutes. Remove the saucepan from the heat and allow the mixture to cool to 105 degrees to 115 degrees. Add the yeast and stir until it is dissolved. Let the mixture stand for 10 minutes.

In the bowl of an electric mixer fitted with the dough hook attachment, combine the 4 cups of flour, the sugar and the  kosher salt and beat on low-speed until combined, about 30 seconds. Add the cooled milk mixture and knead until the dough forms into a ball, about 1 minute. Increase the speed to medium-low and knead until the dough is smooth and elastic, about 4 to 5 minutes. Remove the dough from the mixer bowl, oil the inside of the bowl and return the dough to the bowl. Cover the bowl tightly with plastic wrap and let the dough rise in a warm place until it has doubled in volume, about 1 hour. Divide the dough in half.

Grease a 13-by-9-inch baking pan. on a lightly floured work surface, roll each piece of dough into a log about 12 inches long. Using a bench scraper, divide each log into 12 equal pieces. Using the cupped palm of your hand, roll and shape each piece into a taut ball.

Arrange the dough balls in the prepared baking pan so there are 4 rows of 6. Cover the pan tightly with plastic wrap and let the dough rise in a warm place for 30 minutes. in a small bowl, mix the sea salt,garlic flakes and sesame seeds.

Preheat the oven to 375 degrees. Remove the plastic wrap from the baking pan. Brush the tops of the rolls with the 2 tablespoons of melted butter and sprinkle the tops with the sea salt mixture. Bake the rolls in the oven until the rolls are golden and an instant-read thermometer inserted into the center of a roll registers 190 degrees, about 18 to 20 minutes. Invert the rolls onto a wire rack, then turn them right side up onto another rack. Let the rolls cool slightly before serving.

Wow, these rolls were good and very easy to make. They were the perfect size dinner rolls and came out nice and brown and crunchy on the top and soft and buttery in the middle. Everyone gobbled them up and I only had 3 left after the meal, just enough for Michelle, Sean and I to have for dinner the next day with our meal. The other great thing I noticed about these rolls is that they would be perfect to use as slider rolls for sliders as an appetizer, snack or meal. I will definitely be making these again as they did not take very long to do and you get a good amount out of the recipe, so you can always throw a bunch in the freezer and just re-heat them for your meal as you want them.

That’s all I have for today. Check back next time for some more recipes. I still have the London broil with creamy horseradish sauce, a pan-seared rib eye with red wine sauce, simple sautéed spinach, a wonderful fall vegetable risotto and more. Until next time, enjoy the rest of your day and enjoy your meal!

IMG_0346


Leave a comment

Posted by on October 17, 2013 in Biscuits, Breads, Cooking, Side Dishes


Tags: , , ,

You Can Never Have Enough Chicken Recipes – Braised Chicken Thighs with Carrots, Potatoes and Thyme

Okay, I know I just posted a braised chicken thighs recipe the other day, but I decided to make another one for dinner on Monday anyway because we had a lot of chicken thighs on hand and because the recipe sounded too good to let go by. I found this one from Williams-Sonoma and saw that it was simple to make and looked like it would taste great so I gave it a try. What was even better about this one is that it is basically a one pot meal so you have everything together in one dish for easy preparation and clean up.

Braised Chicken Thighs with Carrots, Potatoes and Thyme

1 1/2 pounds skinless, boneless chicken thighs, fat trimmed

Kosher salt and freshly ground pepper

Sweet paprika

2 tablespoons olive oil

1 red onion, finely chopped

1 pound red-skinned potatoes, quartered

8 carrots, halved lengthwise and then cut into 1 1/2-inch pieces

1 tablespoon plus 1 teaspoon flour

1 1/3 cups chicken broth

1/3 cup dry vermouth or dry white wine

1 1/2 tablespoons minced fresh thyme

Season the chicken lightly with salt and pepper and then generously with paprika. In a heavy large frying pan or skillet over medium-high heat, warm the olive oil. Add the chicken and cook until brown, about 2 minutes on each side. Transfer the chicken to a plate. Add the onion to the frying pan and stir. Add the potato quarters and the carrots. Sprinkle the vegetables with salt and pepper and saute them until the vegetables are beginning to brown, about 5 minutes. Add the flour mix and stir the vegetables to coat them well. Gradually mix in the broth and vermouth or wine, stirring as you add the liquid. Bring the mixture to a boil and continue to stir frequently. Return the chicken to the pan and bring everything to a boil.

Cover the pan, reduce the heat to medium-low, and simmer until the chicken and vegetables are cooked through, stirring and turning the chicken occasionally, about 25 minutes. Mix in the thyme. Taste and adjust the seasoning. Divide the chicken and vegetables among 4 warmed plates and serve.

I did make a couple of substitutions in this recipe. i did not have any red potatoes on hand, so I used some Yukon Gold potatoes instead and I think they turned out just as well. Also, I rarely use wine or vermouth when cooking unless I think it will really make a difference, so I just used chicken broth where the recipe called for the wine and I think it turned out quite well. You can also use gluten-free flour where the flour is called for in this recipe if you want to make it a gluten-free meal. One thing to consider when trying to make gluten-free is that if you are using store-bought broth, check the ingredients to make sure there is no flour or other gluten products in the broth; many broths do use them so you want to be sure. I loved the sauce that went with the chicken in this meal and the paprika gave the chicken great flavor with a little bit of a kick to it. The whole meal was done in under 40 minutes, which made it even better.

That’s all I have for today. Check back again to see some more recipes. I promise, I am making other things this week besides braised chicken thighs. I have a couple of new recipes I am trying out tonight, so check for those in the coming days. Until next time, enjoy the rest of your day and enjoy your meal!

001


Leave a comment

Posted by on October 16, 2013 in Cooking, Dinner, One Pot Meals, Poultry


Tags: , , , , ,

Enjoying Beer-Braised Chicken Thighs

I tend to make a lot of chicken thighs for dinner when we eat chicken. I like the flavor of them, they stay moist through different types of cooking over boneless chicken breasts, and frankly they are very often much cheaper than chicken breasts. A lot of times I will buy them in bulk at BJ’s Warehouse or buy a family pack at the store and freeze them so I always have them on hand for cooking. I pulled a few out last week to make this recipe, that I got from Rachel Ray. It is a very simple recipe to make some easy chicken thighs and have leftovers for another meal.

Beer-Braised Chicken Thighs

8 bone-in, skin-on chicken thighs

Kosher salt and freshly ground black pepper

1 tablespoon extra-virgin olive oil

1 link andouille sausage, casing removed and chopped, or 4 slices bacon, chopped

1 onion, chopped

2 ribs celery, chopped

1 bell pepper, seeded and chopped

2 to 3 cloves garlic, chopped

2 tablespoons chopped fresh thyme

1 rounded tablespoon all-purpose flour

1 (12-ounce) bottle lager beer

1 (14-ounce) can diced tomatoes

1 cup chicken broth

2 tablespoons hot sauce

Scallions, white and green parts, thinly sliced, for garnish

Warm baguette

Pat the chicken thighs dry with paper towels and season them well with salt and pepper.

Heat 1 tablespoon of extra-virgin olive oil in a Dutch oven over medium-high heat. Add the chicken and brown the pieces on both sides in 2 batches about 10 minutes per batch until the chicken has good brown color and the skin is crisp.

Remove the chicken to a plate and spoon out about half of the drippings. Add the andouille sausage or bacon. Brown for about 2 minutes and then add in the onion, bell pepper, garlic and thyme and cook to soften for about 10 minutes over medium heat.

Add the flour and stir constantly for 1 to 2 minutes until it is well blended with the vegetables. Pour in the beer and let the foam subside. Stir in the tomatoes, chicken broth and the hot sauce. Stir occasionally and let the sauce thicken for about 6 to 8 minutes. Place the chicken pieces back in the pot and simmer the dish until the chicken is cooked through, about 5 to 10 minutes longer. Garnish the chicken with the scallions and serve with the warm baguette.

It is a very simple meal that makes same great tasting chicken. You want to make sure you get a good crust on the chicken skin when you are cooking it first before you start in on the rest of the meal. This will give you great color and good skin when you put the chicken back in the liquid and it won’t get as soggy from the cooking. The liquid gets great flavor from a lot of sources, such as the beer, the sausage, the tomatoes and the hot sauce. I served this over some white rice and we had a nice meal in no time at all.

That’s all I have for today. Check back next time for another recipe. I have quite a stockpile of things I have made recently, so we have some good recipes to come and I have found a bunch more I want to try in the coming weeks, so keep checking back to see what’s next. until then, enjoy the rest of your day and enjoy your meal!

IMG_1697 IMG_1696


1 Comment

Posted by on October 14, 2013 in Cooking, Dinner, Poultry


Tags: , , ,

 
National Day Calendar

Fun, unusual and forgotten designations on our calendar.

Jennifer Probst

a little bit naughty a little bit nice

Laissez Faire

Letting Life Lead

simple cooking recipes

a blog to share with you the best