RSS

Category Archives: Cooking

How to Use Squash, from Frying to Dips | Bon Appetit

Fall weather is upon us and winter is not far behind and among the bounty of great vegetables available this time of year or all the different types of squash that you can get. The choices seem almost endless and if you are looking for some ideas of what you can do with the different types of squash out there Bon Appetit has 23 squash recipe ideas you can try out that are ideal for all different types of cooking and baking. Check it out!

Source: How to Use Squash, from Frying to Dips | Bon Appetit


Tags: , , , , ,

Cast a Vote for Your Cast Iron Pan – Cast Iron Chicken Teriyaki Thighs

It is hard to conceive of cooking any other way than with cast-iron for me lately. I have a few cast-iron pans that are used for just about everything because they cook very well, retain heat nicely and are pretty easy to clean. I have a few different sizes of pans and skillet so I can do pretty much anything from a small meal to a larger roast in the oven. If you take good care of your cast-iron pans, they can last for many years and you will not have to worry about food sticking to the pan if it is seasoned correctly. Outside of all that, I find that I can get a really nice sear and great browning on things like chicken when I use cast-iron. When I came across this recipe for cast-iron chicken teriyaki thighs from the Taste and Tell Blog, it seemed like a perfect fit for an easy weeknight meal. The original recipe is from a Americans Test Kitchen cookbook called “Cook It With Cast Iron.”

Cast Iron Chicken Teriyaki Thighs

8 bone-in chicken thighs, fat trimmed

Salt and pepper

1 tablespoon vegetable oil

1/2 cups soy sauce

1/2 cup sugar

2 tablespoons mirin

1 clove garlic, minced

1 teaspoon freshly grated ginger

1/2 teaspoon cornstarch

2 green onions, thinly sliced on a bias


Set an oven rack in the center of the oven. Place a large cast-iron skillet on the rack, then preheat the oven to 500°.

While the skillet is heating, The chicken thighs dry with paper towels, then season them with salt and pepper.

When the oven reaches 500°, using potholders, remove the skillet from the oven and place it on the stove over medium heat. You can turn off the oven at this point. Add the vegetable oil, and heat the oil in till it is just smoking. Place the chicken thighs in the skillet, skin side down. Place a weighted Dutch oven over the chicken to weigh it down, and cook the chicken until the skin is crispy and well browned, about 16 to 20 minutes. Start checking the chicken at about ten minutes and adjust the heat as it is needed.

When the chicken is crispy and browned, remove the Dutch oven and flip the chicken thighs. Cook the second side (without being weighted down) until it is browned and crispy and when the chicken reaches 175° as an internal temperature, about 2 to 4 minutes. Transfer the chicken to a plate.

In a bowl, whisk the soy sauce, sugar, mirin, garlic, ginger and cornstarch together until all of the ingredients are well blended and the cornstarch is dissolved. Pour the fat off of the cast-iron skillet and add the mixture. Bring the mixture to a simmer over medium heat. Cook the mixture, stirring occasionally, until it thickens and becomes glossy, about 2 to 3 minutes. Add the chicken and any accumulated juices back to the skillet with the sauce. Turn the chicken to coat it well in the sauce. Sprinkle the chicken with the green onions. Serve the chicken with the pan sauce.

Just a note about weighing down the chicken so that you get a really nice sear on it. If you do not want to make a mess of your Dutch oven pan, you can always place a piece of aluminum foil on top of the chicken and then place the Dutch oven on top you will be able to get just the effect you are looking for without having to worry about cleaning another pot once you are done. You can also throw a couple of unopened cans that you may have in your pantry into the Dutch oven to give it even more weight. The final result of the recipe is a very nice crispy skin that has a beautiful coating of the teriyaki sauce on top. The taste of the sauce was fantastic with the chicken and I served the dish with some fried rice that I had made to really make it a somewhat more Asian inspired dish. You can do the entire meal in under thirty minutes so it can be a great choice for any weeknight.

That is all I have for today. Check back next time for another recipe. Until then, enjoy the rest of your day and enjoy your meal!

img_0591

 
Leave a comment

Posted by on October 28, 2016 in Cooking, Dinner, Poultry, Uncategorized


Tags: , , , , , , ,

Here’s a Beef for You – Herb Crusted Round Roast with Parmesan Black Pepper Popovers

I do not typically buy a lot of eye round to using my cooking. It is not because we do not like to eat it; the fact is very often the pieces are just too large for just the three of us so unless I was making something for crowd for a special occasion it does not really make much sense for us. However, I am always a sucker for a good sale so if something is a really good price I am willing to take the plunge and make the investment in. Such was the case recently when our local supermarket had large pieces of eye round for a very cheap price. It meant looking for a piece that was not too big but was one that I could cut up into portions that would be the appropriate size for the three of us and allow me to freeze the rest. I was able to cut the roast that I chose into three decent sized portions so that we will be able to get at least three separate meals from the roasts. It was then a matter of finding a recipe that looks good where we could cook the roast without having it get dried out or tough, which is one of my typical complaints about many eye round roasts that you get. I came across this recipe from Serious Eats for a herb crusted round roast with Parmesan black pepper popovers that, even though it sounds complicated, is a very easy recipe to make and came up with great results.

Herb-Crusted Round Roast with Parmesan-Black Pepper Popovers

For the Popovers:

3 eggs

3/4 cup all-purpose flour

1/2 teaspoon kosher salt

1/2 teaspoon fresh cracked black pepper

1/4 teaspoon cayenne pepper

1 teaspoon fresh thyme leaves

1 cup milk

3/4 cups shredded Parmesan cheese

For the Beef:

3-pound beef eye of round roast, trimmed of fat

2 1/2 tablespoons olive oil, divided

1/2 teaspoon fresh thyme leaves

1 tablespoon chopped fresh sage

1 1/2 tablespoons chopped fresh parsley

1/2 teaspoon dried oregano

1/4 teaspoon Spanish smoked paprika

3 medium cloves of garlic, minced (about 1 tablespoon)

1 tablespoon grain mustard

For the Horseradish Cream:

1/2 cups sour cream

2 tablespoons prepared horseradish

1 teaspoon Worcestershire sauce

1 teaspoon fresh lemon juice from one lemon

For the popovers, adjust an oven rack to the lower-middle position and preheat the oven to 400°. Place two muffin tins in the oven to preheat; note that you will be using about 18 of the tins.

Combine the eggs, flour, salt, pepper, cayenne pepper, thyme, milk and Parmesan cheese in a blender using a low-speed setting. Do not over mix. Remove the muffin tins from the oven, quickly spray the tins with cooking spray and pour the batter into the tins, filling eighteen wells halfway. Place the muffin tins in the oven and bake the popovers until they are puffed up and golden brown, about 20 to 25 minutes. Remove the popovers from the oven and cool them on a wire rack in the tins.

For the beef, while the popovers are baking, season the roast with salt and pepper. Heat 2 tablespoons of the olive oil in a Dutch oven or large heavy-bottomed, oven-safe roasting pan until the oil is shimmering. Add the roast and cook, turning it occasionally, until it is well browned on all sides, about 8 minutes total. Transfer the meat to a large platter and set it aside.

Add the thyme, sage, parsley, oregano, paprika, garlic, mustard and the remaining 1/2 tablespoon of olive oil to a blender or food processor. Season the mixture with a pinch of salt and pepper and pulse it until it forms a paste. Generously rub the herb mixture on the roast. Return the roast to the Dutch oven or roasting pan. When the popovers are done, reduce the oven temperature to 350°. Transfer the Dutch oven or roasting pan to the oven and roast the beef until an instant read thermometer inserted in the thickest part of the roast registers 125° for medium rare or 135° for medium, about 1 hour. Remove the roast from the oven and transfer it to a cutting board. Tent the roast with foil and allow it to rest for about 10 to 15 minutes.

For the sauce, while the roast is resting, combine the sour cream, horseradish, Worcestershire sauce, and lemon juice in a small bowl. Season the mixture with salt and pepper to taste. Return the popovers to the oven to reheat them for about 5 minutes.

Carve the roast, arrange the slices on a platter and serve them immediately with the Horseradish cream and the popovers.

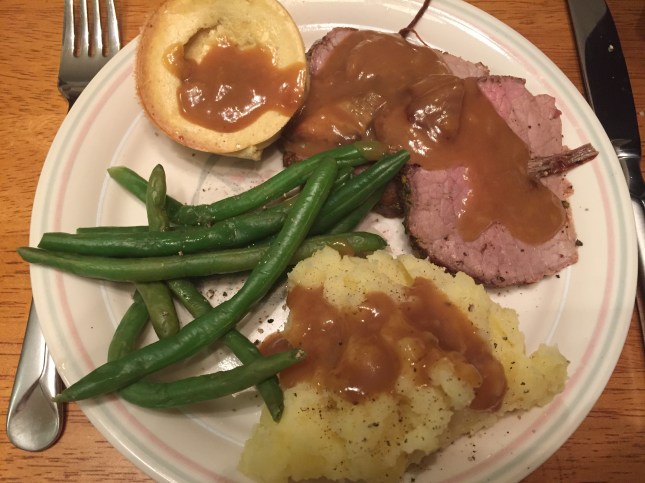
While this is certainly an elegant looking meal, it is simple enough where you could do this on a weeknight if you felt like having a beef roast. The roast came out perfectly, with a nice pink center and it was not tough at all. The herb crust on the outside added some very nice flavor to the beef. The popovers were very nice addition and made a great side dish that was very easy to do. I did not make the horseradish sauce to go with the beef since I am the only one who eats Horseradish but under normal circumstances I think it would be pretty tasty. I served this with some fresh green beans and some mashed potatoes and we made some gravy with the drippings that were left from the meat and the gravy really helped to punctuate the deliciousness of the meal. Since I still have some beef in the freezer, this is certainly a recipe that I would fall back on again since it went over so well.

That is all I have for today. Check back next time for another recipe. Until then, enjoy the rest of your day and enjoy your meal!

img_0582


2 Comments

Posted by on October 19, 2016 in Beef, Breads, Cooking, Dinner


Tags: , , , , , , , , , ,

The 101 Recipes You Need to Know How to Cook | Bon Appetit

Every home cook has some basic recipes that they turn to all of the time for weeknight meals, special Sunday suppers or dinner parties. There are some classics and basic recipes that you learn along the way that you can always rely on when you want to turn out a great meal. Bon Appetit has put together 101 of the basic classic recipes, with everything from appetizers to desserts and everything in between so that you can have recipes to fall back on, learn and use when you want them. Check it out!

Source: The 101 Recipes You Need to Know How to Cook | Bon Appetit


Tags: , , , ,

Easy From Start to Finish – Peach Glazed Pan Roasted Chicken Thighs with Potatoes and Broccoli

I find myself more and more trying to figure out ways where I can make meals that are all cooked in one pan. Not only does this make cleanup much easier for all of us after dinner so we don’t have to spend 45 minutes doing dishes (no dishwasher for us; everything is done by hand) but it also allows for dishes that provide a great melding of flavors along the way. I particularly like to do one pan meals with pork and chicken. They seem to be the best for meals of this type and are most adaptable so that you can use potatoes or rice and whatever vegetables you like the most and cook everything together. Of course, adding some great flavor to your protein helps a lot too. I had picked up some peach preserves when I last went to the farmer’s market and have been looking for a meal to use them with. The preserves tasted great on their own so I knew they would really perk up a chicken dish. Instead of going out and finding a recipe like I usually do I decided to wing this one on my own and see how it would turn out.

Peach Glazed Pan Roasted Chicken Thighs with Potatoes and Broccoli

1/2 cup peach preserves

3 tablespoons soy sauce

1/4 cup light brown sugar

1 tablespoon rice wine vinegar

1/2 teaspoon powdered ginger

1 clove garlic, minced

2 tablespoons vegetable oil

6 bone-in, skin-on chicken thighs, trimmed

Salt and freshly ground black pepper

8 ounces fingerling potatoes, rinsed and halved

2 cups broccoli crowns

Preheat the oven to 375 degrees. In a small saucepan set over medium-low heat, add the peach preserves, soy sauce, brown sugar, rice wine vinegar, ginger and garlic. Whisk the mixture until it is well blended and heat at a low simmer for about 10 minutes.

In a large oven-safe skillet or roasting pan set over medium heat, add the vegetable oil and heat it until it is shimmering. Pat the chicken thighs dry with paper towels and season with salt and pepper. Place the chicken thighs in the skillet, skin side down, and cook until the skin is nicely browned, about 7 to 8 minutes. Flip the chicken pieces over and heat on the second side for about 3 to 4 minutes just to lightly brown. Remove the chicken from the skillet and pour off all but 1 tablespoon of the fat and oil in the pan. Add the potatoes to the bottom of the pan and cook them for about 2 minutes. Add the broccoli on top of the potatoes. Nestle the chicken pieces into the broccoli and coat each piece of chicken with some of the peach glaze. Place the skillet in the oven and cook for 15 minutes.

After 15 minutes, coat the chicken pieces with more of the peach glaze. Return the chicken to the oven and cook until the chicken is nicely browned and cooked through and registers 170 degrees on an instant-read thermometer inserted into one of the thighs and the potatoes are fork tender, about 20 to 25 minutes.

The great thing about cooking this way is that you get the great flavors from the chicken and the glaze working their way down through the broccoli and potatoes to give them a touch of the sweetness from the peaches. You also get the nice roasting of the broccoli and potatoes as well, which is my favorite way to have each. You can use your own favorite glaze for the chicken to get the flavor you want (apricot would work well here as well) or even substitute pork for the chicken. You end up with nice crispy chicken that has wonderful taste and you get the entire meal done in one dish.

That’s all I have for today. Check back next time for another recipe. Until then, enjoy the rest of your day and enjoy your meal!

img_0583


Tags: , , , , , ,

Who Needs a Reservation? Rao’s Meatballs with Marinara Sauce in Your Home

No matter what large city you may be in there are always iconic places that you know of that can be great to dine at. New York City is chockful of places like this and if you are a lover of Italian food, Rao’s is a place you likely know of and would love to visit. If you have ever had the good fortune of dining there yourself you are among the very lucky. Rao’s is well-known for being the toughest reservation to get in New York City, not only because they have a highly-regarded menu but simply because they have very few tables to go around and a pretty regular clientele that takes them. Just because you can’t sit at a table at Rao’s doesn’t mean you can’t take the opportunity to enjoy one of their Italian classics,  such as meatballs with their famous red sauce. The recipe, from the New York Times, provides you the opportunity to make this signature dish on your own, saving you time, money and frustration.

Rao’s Meatballs with Marinara Sauce

For the Sauce:

¼ cup extra-virgin olive oil

2 ounces salt pork, thinly sliced

3 tablespoons minced onion

2 garlic cloves, minced

2 28-ounce cans imported Italian crushed tomatoes

6 leaves fresh basil, torn into small pieces

Pinch of dried oregano

Salt and ground black pepper

For the Meatballs:

1 pound ground lean beef

½ pound ground veal

½ pound ground pork

2 large eggs

1 cup freshly grated Pecorino Romano cheese

1 ½ tablespoons finely chopped flat-leaf parsley

1 small garlic clove, minced

Salt and ground black pepper

2 cups fine dry bread crumbs

1 cup extra-virgin olive oil

1 clove garlic, lightly smashed

To make the sauce, heat the olive oil in a large saucepan set over medium-low heat, then add the salt pork. Sauté the pork until the fat has rendered, about 5 minutes. Remove and discard the salt pork. Add the onion and sauté it  until it is translucent, about 3 minutes. Add the garlic and sauté it just until it is softened. Add the tomatoes with their juice and bring the mixture to a boil. Reduce the heat to low and simmer until the sauce is slightly thickened, about 45 minutes. Add the basil, oregano and salt and pepper to taste. Cook the sauce for 1 minute more.

To make the meatballs, in a large mixing bowl, combine the beef, veal and pork. Add the eggs, cheese, parsley and minced garlic, then salt and pepper as desired. Add the bread crumbs and mix everything well. Slowly add up to 2 cups water, 1/2 cup at a time, until the mixture is moist; all the water may not be needed. Shape the mixture into 1 1/2 -inch meatballs.

Heat the oil in a large sauté pan over medium heat. Add the smashed garlic and sauté it until it is lightly browned, about 1 to 2 minutes, then discard the garlic. Working in batches and taking care not to crowd the pan, add meatballs and fry them until the undersides are brown and slightly crisp, about 5 to 6 minutes. Turn and brown the other sides of the meatballs, about 5 minutes more. Transfer the cooked meatballs to paper towels to drain, and then add them to the marinara sauce. Mix the sauce and meatballs gently and serve.

This recipe is very simple and I have found that really great-tasting, classic Italian dishes are often this way. They don’t need to use a lot of complicated methods or fancy ingredients; they stick to basics and offer great flavor. You can use a basic meatloaf mix to make the meatballs for the mixture of fat and flavor they go for or stick to your own and just use basic ground beef if you like, but if you are trying to imitate the flavor of a Rao’s meal to try it out, I would try to stick to as close of the recipe as you can to see if it is something you enjoy. I did go the extra mile and purchased the more expensive San Marzano tomatoes for this recipe to see if it made a difference over what I traditionally used. The sauce was very tasty, allowing the basic tomato flavor to shine through with nice fresh basil adding to it. The meatballs also were very simple but had good taste to them as well. All you need after that is some pasta, nice crunchy bread, a good bottle of wine and some great mood lighting and you can recreate your own Rao’s experience in your dining room or kitchen. It is an easy enough recipe to make it part of your meal rotation.

That’s all I have for today. Check back next time for another recipe. Until then, enjoy the rest of your day and enjoy your meal!

img_0097

 
Leave a comment

Posted by on October 11, 2016 in Cooking, Dinner, Eating Out, Pasta, Sauce


Tags: , , , , , ,

Leftovers Redux – Pastrami Hash with Eggs

Continuing along with my last post’s theme of making use of some leftovers, I needed to find something to do with some of the leftover pastrami I had when I made it myself last week. Too much work and effort went into making it to just let what was left go to waste and Sean and I had eaten quite a bit of it for lunches over the days and needed something different. To the rescue comes breakfast for dinner! Breakfast for dinner is always a family favorite and something Sean has liked since he was a little boy. We do it every few weeks when I have run out of ideas of what to make for dinner that night. It usually involves something like pancakes, bacon, eggs or sausage, but since we had leftover pastrami to work with, what better opportunity was there to make some hash? Has is a great way to use up leftovers and create something new and tasty all at the same time and it gives you a change of pace for breakfast or dinner. I used this basic recipe from Bon Appetit for a pastrami hash with eggs as a template, though you probably don’t really need one when you are making hash.

Pastrami Hash with Eggs

4 tablespoons unsalted butter

4 tablespoons olive oil, divided

pounds Yukon Gold potatoes (about 4 large), scrubbed, cut into 1-inch pieces

½ pound winter squash (such as acorn, butternut, or kabocha), peeled, cut into 1-inch pieces

Kosher salt, freshly ground pepper

2 leeks, white and pale-green parts only, chopped

1 garlic clove, chopped

1 pound pastrami or any leftover braised meat, cut or shredded into bite-size pieces

4 large eggs

¼ cup sliced chives (optional)

¾ cup sour cream (optional)

Heat the butter and 2 tablespoons of the olive oil in a large skillet set over medium-high heat. Add the potatoes and the winter squash and season the vegetables with salt and pepper. Cook, stirring occasionally, until the vegetables are tender, about 25–30 minutes.


Add the leeks and garlic to the hash and season the mixture with salt and pepper. Using the back of a spoon or a spatula, lightly smash the vegetables. Add the pastrami and cook, stirring occasionally, until the meat is warmed through and the flavors have melded, about 10–12 minutes.


Heat the remaining 2 tablespoons of olive oil in a medium non-stick skillet set over medium-high heat. Carefully crack the eggs into the skillet one at a time and season them with salt and pepper. Cook the eggs until the whites are set and slightly puffed but the yolks are still runny, about 2 minutes.


Divide the hash among shallow bowls and top each bowl with an egg; scatter the chives over the top, if using. Serve with sour cream alongside, if desired.
If you have made corned beef hash before then you can see that this recipe is pretty similar. It would work with just about any type of meat you wanted to use – short ribs, prime rib, steak, turkey, sausage, chicken – and creates some great flavor. I really liked the spices that the pastrami already has and what they lent to the dish to give it even more flavor and it was a great way to use up the leftovers. I used butternut squash with the potatoes and opted for onions instead of leeks since I didn’t have any leeks on hand that day. Sean had his with scrambled eggs while my eggs were over easy and it was tasty to mix in the hash with some of the runny egg. We both loved it and there was a bit of hash leftover that is perfect to use with breakfast with an egg over an English muffin.
That’s all I have for today. Check back next time for another recipe. Until then, enjoy the rest of your day and enjoy your meal!
 
2 Comments

Posted by on October 8, 2016 in Beef, Breakfast, Brunch, Cooking, Dinner, Eggs, Leftovers, One Pot Meals


Tags: , , , , ,

A Lazy Day of Leftovers – Chicken Tarragon Pot Pie

If you are like me, there are probably many nights during the week where you make a meal and then end up with a bunch of different leftovers that you may or may not know how to use. It is not unusual to get tired of having the same meal two or three times a week just because you do not want to throw away perfectly good food but are not sure what you can do with those leftover chicken pieces or leftover vegetables. It is times like this where potpie can come to the rescue. Potpie is a great meal to put together just about any time of the year and you can do it with any type of protein (or no protein at all if you are vegetarian) and vegetables. The only real effort that goes into it is making the pie dough and even then, if you have no problem using store-bought pie dough you can get the meal together even quicker. Very often I will use store-bought pie dough simply because it is easy, I do not really have the room to make pie dough and for potpie purposes it tastes just fine. I decided to use this recipe from New York Times Cooking for a chicken-tarragon potpie and make a simple dinner.

Chicken-Tarragon Pot Pie

For the crust:

2 cups all-purpose flour

14 tablespoons (1 3/4 sticks) cold unnsalted butter, cut into pieces

1 tablespoon cold vegetable shortening

Scant 1/2 teaspoon salt

Scant 1/2 teaspoon sugar

1 egg

For the Filling:

5 tablespoons butter

1 cup chopped carrot

1 cup chopped celery

1 cup thinly sliced leeks

1 tablespoon chopped fresh tarragon, or 1 1/2 teaspoons dried tarragon

1 cup frozen baby green peas

4 tablespoons all-purpose flour

2 ½ cups chicken broth

1 cup heavy cream

¼ teaspoon salt

¼ teaspoon freshly ground pepper

3 cups leftover roast chicken, cut into 1/2-inch chunks

To make the crust, combine the flour, butter, shortening, salt and sugar in a food processor. Pulse the ingredients together just until the mixture is crumbly and the butter is broken into small pieces. Pour 1/3 cup of ice water into the machine, and pulse 3 or 4 times. Squeeze a little dough in your hand to see whether it clumps together and is evenly moist. If not, add another tablespoon of water, and pulse 1 or 2 times more. Don’t overmix so that the dough forms a ball.

Turn out the dough on a large sheet of plastic wrap. Lift the ends of the plastic to gather the dough together inside. Press the dough into a large disk, and wrap it tightly in plastic wrap. Refrigerate the dough until you are ready to use it, up to 2 days.

To make the filling, melt 2 tablespoons of butter in a large skillet set over medium-high heat. Add the carrot, celery, leeks and tarragon, and cook, stirring, just until slightly softened but not browned (reduce the heat if necessary to prevent browning), about 3 to 4 minutes. Transfer the cooked vegetables to a bowl, wipe out the skillet, and place it back on the stove.

Add the remaining 3 tablespoons of butter, and melt it over medium heat. Whisk in the flour, and cook, whisking, until the mixture bubbles and smells cooked. Do not let it brown. Whisk in 2 cups of chicken broth, and cook, whisking, for about 1 minute. Whisk in the cream, and cook 2 or 3 minutes, just until the mixture is thickened. Add the salt and pepper. If the sauce is too thick, whisk in the remaining broth.

Heat the oven to 400 degrees. Add the cooked vegetables and peas, the chicken and the sauce to an 8-inch deep pie dish or other baking dish, mix the ingredients gently, and taste for seasoning.

If you are using store-bought dough, take the dough out of the refrigerator and allow it to come to room temperature for about 10 to 15 minutes. If you are using your own homemade dough, flour a work surface. Remove the dough from the refrigerator. Roll out the dough, turning and flouring often, and cut a shape approximately the size of your baking dish plus 1 1/2 inches overlap all around.

Roll the dough up onto the rolling pin, and unroll it over the baking dish, so it rests evenly on top of the filling. Fold the edges under and crimp the edges. Poke the tip of a knife through the crust to create 3 vent holes near the center. Whisk the egg with a teaspoon of cold water. Use a pastry brush to lightly coat the entire crust with egg wash. Place the pie pan or baking dish on a cookie sheet, and place it in the oven.

Bake the pie for 20 minutes, then reduce the oven temperature to 375 degrees. Bake the pie for 25 to 30 minutes more, until the crust is golden and the filling is bubbling through the vents. Let the pie rest for 10 minutes before serving.

One of the great things about this recipe is that you can make use of any type of vegetables you want in a pot pie. I used the vegetables recommended but I also had some leftover broccoli that I put in as well. Pot pie works well with chicken, turkey, beef and pork that you may have leftover so you can make just about anything with it. I find pot pie tastes even better the next day and often have any leftovers for lunch, after the sauce and the flavors have had even more time to come together. It can be a great dinner to put together in under an hour.

That’s all I have for today. Check back next time for another recipe. Until then enjoy the rest of your day and enjoy your meal!

img_0568


Tags: , , , , , ,

Goodbye Carnegie Deli, Hello Homemade Pastrami

If you follow the news, at least here in New York, you have probably seen the story regarding the recent announcement from the Carnegie Deli. The deli is something of an institution here in New York and has been open for nearly 80 years but recently announced that they will be closing at the end of 2016. The Carnegie Deli is very famous for the different sandwiches that it offers, especially the pastrami. Pastrami can sometimes be something of an acquired taste and not everyone is a big fan of it. For me personally, pastrami is basically the only type of cold cut meat that I really eat. While you can still get pastrami in any supermarket and from of variety of different sources, there is something about the Carnegie Deli that people are particularly fond of. Personally, I have never been to the Carnegie Deli but they do offer their pastrami for sale in different supermarkets and I have tried it before. It is pretty good but I had always wondered if it could be better. Pastrami was not something I had never really considered making myself, particularly because I do not have a smoker to use, but Shawn had shown an interest recently in trying pastrami and it just so happens, that at this time of year with the Jewish holidays, that brisket is at a pretty good price. I decided I would get adventurous and started looking around for a recipe that would allow me to make it at home but make it in the oven instead of the smoker. I came across this recipe from Food52 that seemed to fit the bill. It is a bit of a process, but it seemed like it was worth a try.

Homemade Pastrami

3 1/2 tablespoons black peppercorns

3 1/2 tablespoons coriander seeds

2 tablespoons mustard seeds

1/2 teaspoon red pepper flakes

1/2 teaspoon allspice berries

1/2 teaspoon whole cloves

1/4 teaspoon ground mace

1/4 teaspoon ground ginger

1 bay leaf, crushed

1/4 cinnamon stick, crushed

1 1/4 cup kosher salt

2 2/3 tablespoons pink salt (sodium nitrite)

1 cup granulated sugar

1/2 cup packed dark brown sugar

1/4 cup honey

5 garlic cloves, minced

One 5-pound brisket from the fatty end (point), untrimmed

1 1/2 tablespoons fennel seeds

1/2 cup shiro dashi

In a small skillet, lightly toast 1/2 teaspoon of the black peppercorns, 1/2 teaspoon of the coriander seeds and 1/2 teaspoon of the mustard seeds over medium heat until the spices are fragrant, about 3 to 4 minutes. Remove the spices from the heat and allow them to cool slightly before grinding them in the spice mill.

Put the ground spices in a large pot and add the red pepper flakes, allspice berries, cloves, mace, ginger, crushed bay leaf, crushed cinnamon stick, kosher salt, pink salt, granulated sugar, brown sugar, honey, minced garlic and 4 quarts of water. Bring the brine to a simmer, stirring until the salt and sugar are dissolved. Remove the brine from the heat and allow it to cool to room temperature. Transfer the brine to a vessel large enough to hold it and the meat – which will be added later – and refrigerate the brine until it is chilled.

Put the brisket in the brine and weigh it down (with a plate or several tomato cans, for example) to keep it completely submerged. Cover the brisket and refrigerate it for 5 days. Remove the brisket from the brine, rinse it thoroughly, dry it, and place it on a large platter. Discard the brine. In a spice mill, process the remaining black peppercorns, coriander seeds, mustard seeds, and the fennel seeds. Transfer the spices to a small bowl and mix them well. Coat the brisket with the spice mixture and sprinkle the shiro dashi over it. Cover the platter and refrigerate the brisket for about 12 hours.

Preheat the oven to 250°. Put the brisket on a rack in a large roasting pan. Add a cup of water to the pan and tightly cover the pan with aluminum foil. Cook the brisket until it reaches 165° on an instant-read thermometer inserted into the center of the meat, about 3 to 4 hours. If you do not have a meat thermometer, the brisket is ready when the meat is very tender. Let the meat rest for at least 2 hours at room temperature, or cover it and refrigerate it overnight. To serve, transfer the pastrami to a cutting board and cut it against the grain into thin slices. The pastrami will keep, tightly covered, in the refrigerator for up to a week.

Okay, this is quite a project to undertake and you not only need to have the time to put into it, and the space in your refrigerator, but you also, if you are like me, are going to need to go out and buy a number of spices. I do not typically have things like allspice berries or ground mace on hand and I certainly do not normally have the pink salt required for preserving meat. Sodium nitrite is used to help prevent the growth of dangerous bacteria and is something of a necessity if you are going to do this recipe. I was able to get some online through Amazon and probably have more than enough now to last me for a lifetime. I also had some difficulty in tracking down the shiro dashi, which they use in this recipe to help add some of the smoky flavor that you would normally get if you cook the pastrami in a smoker. Shiro dashi is a Japanese stock base that does have a bit of a smoky smell to it. I was finally able to track some down at one of the specialty food stores not too far from here. After that, I had to make space in the refrigerator for a container large enough to submerged the brisket to do the brining.

Even after all of that, you still have to wait for five days, the twelve hours of resting with the spices and then the four hours in the oven before the recipe is complete. That being said, I think it was certainly worth the effort put into it. The final product was very tasty. It tasted just as good or better than anything that you might be able to buy at the supermarket. The mix of spices was perfect and the pastrami was cooked perfectly and made for some great sandwiches. Of course, I served the pastrami hot on homemade rye bread with some homemade pickles, a little bit of tomato salad and some homemade ranch coleslaw and with plenty of mustard. It made for an excellent meal and there were plenty of leftovers so that Sean and I have been enjoying it for lunches ever since then and we gave some to my brother and his wife to bring home for them to enjoy. Is it something that I will make often? Not likely since the process is lengthy and brisket is often pretty expensive around here, but it is certainly a recipe that I will keep in mind to have once in a while when I get a craving for some good pastrami.

That is all I have for today. Check back next time for another recipe. Until then, enjoy the rest of your day and enjoy your meal!

 
2 Comments

Posted by on October 5, 2016 in Beef, Cooking, Dinner, Lunch, Sandwiches, Spices


Tags: , , , , , ,

A Perfect Shout Out for Cooler Weather – Braised Short Ribs with Creamy Polenta

As much as summer may be trying to hang on here in the last few days of September, there have been some very cool nights here lately, making it feel much more like fall now. It is nice to have the window open in the evening to feel the cool air instead of the air conditioning. It is also a great sign that cooking more things like soups, stews and braises is right on the horizon. I have already started in on making some fall like dinners when I have had the chance to. One meal I particularly enjoy is short ribs. Unfortunately, as is the case with many of the meats that you find for sale today, short ribs tend to be very expensive, particularly if you are looking to feed several people. I had purchased some as part of a package of fresh meat I had purchased from Bishop Farms at a farmers market not that long ago so I had more than enough on hand to feed the three of us. I had been saving this recipe that I had found from Williams-Sonoma for braised short ribs with a creamy polenta and this seemed like the perfect opportunity to give it a try.

Braised Short Ribs with Creamy Polenta

3 tablespoons olive oil

6 pounds bone in, individual-cut short ribs

4 teaspoons kosher salt

1 teaspoon freshly ground pepper

1 yellow onion, chopped

2 carrots, diced

6 cloves garlic, chopped

1/3 cup all-purpose flour

2 cups red wine

3 cups beef stock or broth

2 tablespoons tomato paste

1 tablespoon minced fresh rosemary

1 bay leaf

1 cup milk

1 1/3 cups quick-cooking polenta

1/2 cup freshly grated Parmigiano-Reggiano, plus more for serving


Preheat the oven to 325°. In a Dutch oven, heat 2 tablespoons of the olive oil over medium-high heat. Season the short ribs with 2 teaspoons of the kosher salt and the pepper. In batches so you can avoid overcrowding, and the short ribs to the pot and cook, turning occasionally, until the short ribs are browned on all sides, about 5 to 6 minutes per batch. Transfer the short ribs to a separate plate.

Add the remaining 1 tablespoon of olive oil to the pot and heat it. Add the onion and carrots and cook, stirring occasionally, until the onion softens, about 5 to 6 minutes. Stir in the garlic and cook until the garlic is fragrant, about one minute. Sprinkle in the all-purpose flour and stir it well. Slowly stir in the red wine, then the beef stock. Stir in the tomato paste, rosemary and bay leaf. Return the short ribs to the pot. The short ribs should be barely covered with liquid. If not, add hot water as needed. Bring the liquid to a boil. Cover the pot, place the pot in the oven, and cook the short ribs, moving the position of the ribs every forty-five minutes or so to be sure that they are covered with liquid and are cooking evenly, until the short ribs are very tender, about 2 1/2 to 3 hours. Transfer the short ribs to a deep serving platter (do not worry if the meat separates from the bones; this should happen), and tent the platter with aluminum foil to keep the short ribs warm.

Let the cooking liquid stand for five minutes. Skim off the fat from the surface of the cooking liquid and discard the fat. Bring the liquid to a boil over high heat. Cook, stirring, until the liquid is reduced by about one-fourth, about 10 to 12 minutes. Discard the bay leaf. Return the short ribs to the pot.

Just before serving, make the polenta: In a heavy saucepan, bring 3 cups of water, the milk and the remaining 2 teaspoons of kosher salt to a boil over high heat. Slowly whisk in the polenta and reduce the heat to medium-low. Cook, whisking often, until the polenta is thick, about 2 to 3 minutes. Stir in the 1/2 cup of the Parmigiano-Reggiano cheese. Divide the polenta among warmed serving bowls or plates, top the polenta with the short ribs and the sauce and serve at once.

A meal like this involving short ribs is pretty elegant and since it takes quite a lot of time to cook, it is likely something you are going to want to save to use for a Sunday dinner or another meal on the weekend. The recipe itself is fairly basic but the short ribs take on a great deal of flavor and as the fat in the short ribs starts to break down the meat becomes more tender and succulent. The gravy adds just the right touch to the short ribs and tastes great when served over the polenta. If you did not want to have polenta, you could just as easily substitute mashed potatoes or even rice if you prefer, but the polenta seems to go really well with this type of meal. This is a great one to do when you are having people over as the recipe indicated serves six. I did halve the recipe so it was better suited for just three of us and we still had some leftovers. The leftover short ribs are great to use for a whole bunch of different meals. You can easily remove the meat from the bones and shredded and use the meat for things like tacos or put it back in the sauce and just serve it over rice or pasta. I served this with some Brussels sprouts and some homemade bread to complete the meal.

That is all I have for today. Check back next time for another recipe. Until then, enjoy the rest of your day and enjoy your meal!

img_0562

 
3 Comments

Posted by on September 28, 2016 in Beef, Cooking, Dinner


Tags: , , , , , ,

 
National Day Calendar

Fun, unusual and forgotten designations on our calendar.

Jennifer Probst

a little bit naughty a little bit nice

Laissez Faire

Letting Life Lead

simple cooking recipes

a blog to share with you the best