RSS

Category Archives: Dessert

A Sean Foray into the Kitchen – Lemon Angel Food Cupcakes with Lemon Curd and Mascarpone Frosting

It is not the often that Sean actually gets into the kitchen and wants to cook something, so when he saw this recipe for lemon angel food cupcakes and said he wanted to make it I thought it would be a good idea. The recipe comes from the Food Network and it is one we saw Giada di Laurentiis make a few weeks ago. It looked pretty good and used some easy ingredients, including an angel food cake mix, which made it even easier for Sean to try. They looked like tasty treats that would be perfect for dessert and gave Sean a chance to impress us with his kitchen skills.

Lemon Angel Food Cupcakes with Lemon Curd and Mascarpone Frosting

For the Lemon Curd:
3 egg yolks, at room temperature
Zest of 2 lemons
1/4 cup fresh lemon juice (about 2 large lemons)
1/3 cup sugar
1/8 teaspoon fine salt
4 tablespoons butter, cut into 1/2-inch cubes, at room temperature

For the Lemon Angel Food Cupcakes:
One 1-pound box angel food cake mix
Zest of 2 lemons
1/4 cup lemon juice

For the Mascarpone Frosting:
2 cups heavy whipping cream, chilled
1/4 cup powdered sugar
1 tablespoon pure vanilla extract
8 ounces mascarpone cheese, at room temperature
Yellow sprinkles or yellow sanding sugar, for decorating

For the lemon curd: Whisk together the egg yolks, lemon zest, lemon juice, sugar and salt in a medium saucepan. Set the saucepan over medium-low heat and cook, stirring constantly with a wooden spoon or spatula and making sure to scrape the sides and bottom of the pan, until the mixture is thick enough to coat the back of a spoon, about 3 to 5 minutes. Remove the mixture from the heat and add the butter, one piece at a time, stirring until it is smooth. Transfer the curd to a heat-proof bowl and cover the surface with plastic wrap to avoid a skin from forming. Refrigerate the curd until it is chilled and firm, about 30 minutes.

For the cupcakes: Set racks on the upper and lower thirds of the oven and preheat the oven to 350 degrees. Line two muffin pans with cupcake liners. In the bowl of an electric mixer, combine the cake mix, lemon zest and lemon juice, and 1 cup of water. Beat the mix on low-speed for 30 seconds to incorporate, then raise the speed to medium and beat until the mixture is light and fluffy, about 1 minute. With a scoop or spoon, fill the liners three-quarters full with batter. Bake for  about 15 minutes, or until the cupcakes are golden brown and the top feels dry. Let the cupcakes cool completely before filling and frosting, about 30 minutes.

For the frosting: In the bowl of an electric mixer, combine the heavy cream, powdered sugar and vanilla. Whip the mixture until it is thick, about 2 minutes. Add the mascarpone cheese and beat the mixture until stiff peaks form.

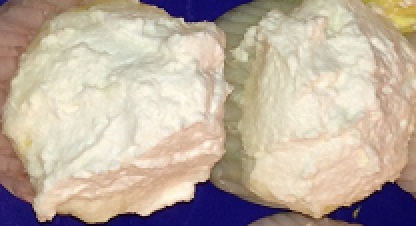
To assemble the cupcakes: Use a small spoon to make a shallow indentation in the center of each cupcake. Fill each indentation with 1 teaspoon of the lemon curd. Use a spatula or piping bag to swirl a generous dollop of frosting over the top of each cupcake. Decorate with sprinkles or sanding sugar.

We skipped the decorating with the sugar on top and just went with the cupcakes as they were. The cake had a nice lemon flavor and the curd was awesome inside each cupcake. Top it all off with the rich, creamy frosting and you have a really good dessert to serve. These are perfect for any type of summer party or buffet. We kept them chilled in the refrigerator because of the ingredients of the frosting even if the recipe does not indicate that they need to be stored this way. Anyway, I think the chilling added even more to the overall flavor and firmness.

That’s all I have for today. Check back next time for another recipe. Until then, enjoy the rest of your day and enjoy your meal!

lemoncurdcupcakes


Leave a comment

Posted by on June 11, 2014 in Cakes, Cooking, Dessert


Tags: , , , , ,

Getting Peachy – Upside Down Peach Bourbon Cake

I had a slow work day a few days ago and took the opportunity to try out a bunch of recipes all in one day. I made a great entrée and some good side dishes too that day that I will be sharing soon, but I think the star of that day was actually the dessert. I had seen this recipe from Kitchen Daily in my e-mail a few days before I wanted to try it  and the way it looked and sounded I knew it was going to be good. It is for an upside down peach bourbon cake. I love pineapple upside down cake, so I just had a feeling this was going to be a winner. While it is not the season for good fresh peaches around here by a long shot, I did have some nice looking jarred peaches that I was trying to figure out what to do with and this worked out perfectly for those.

Upside Down Peach Bourbon Cake

To Make the Topping:

3 medium peaches, cut into medium slices, or two jars of peaches, drained
1 stick butter
1 cup packed light brown sugar

To Make the Batter:

1 ½ cup all-purpose flour
2 teaspoons baking powder
¼ teaspoon salt
1 stick butter, softened
1 cup granulated sugar
2 large eggs
1 teaspoon vanilla extract
½ cup bourbon

Preheat the oven to 350° degrees. Butter the bottom and sides of an 8 or 9-inch cake pan.
To make the topping, lay the peach slices over the bottom of the baking pan. Melt the one stick of butter in a saucepan over medium heat. Add the brown sugar and simmer the mixture over medium heat, stirring occasionally, for about 5 minutes until the sugar is melted. Remove the saucepan from the heat and pour the mixture over the peaches in the cake pan.
To make the batter, Sift together the all-purpose flour, baking powder and salt into a medium bowl. In a separate large bowl, beat the butter with an electric mixer until it is soft, then add the granulated sugar and mix the two together until the mixture is light and fluffy. Add the eggs, one at a time, beating the mixture well after each addition. Add the vanilla extract and the bourbon and mix well for 1 minute. Add half of the flour mixture to the wet mixture and mix on low-speed just until the mixture is blended. Add the remaining flour mixture and mix again on low-speed just until everything is blended.. The batter may appear to be slightly curdled, but that is how it should look. Spoon the batter over the peach slices and spread the batter evenly in the pan.
Bake the cake on a middle rack in the oven until the cake is golden brown and a tester inserted into the center of the cake comes out clean, about 45 minutes. Let the cake stand for 5 minutes in the pan after taking it out of the oven. Invert a clean plate over the top of the pan and invert the cake onto the plate. Slice and serve.

I think this cake turned out great and would be even better with fresh peaches, but if you have some good jarred peaches it will certainly work well for you. The taste of the peaches in the sugar is wonderful as it glazes and crusts on the cake and you can get a hint of the bourbon flavor through the cake as well. If you did not want to use bourbon, Kitchen Daily notes that they have used milk in the recipe instead and achieved good results too. I’ll have to keep this one in mind as it would be great for the early summer in peach season to bring to someone’s home or to a party.
That’s all I have for today. Check back next time for another recipe. Until then, enjoy the rest of your day and enjoy your meal!
IMG_0520 IMG_0515
 
1 Comment

Posted by on April 29, 2014 in Cakes, Cooking, Dessert


Tags: , , , ,

Need a Dessert Fast? Try This Blackberry Raspberry Pie

There are times when you find out at the last-minute that you’ll be having guests in an hour and you want to have something fast to serve for dessert with some coffee or tea. In times like these, I like to have some refrigerated pie crusts on hand along with some frozen fruit so that I can throw something together quickly. I had recently bought a big package of Pillsbury pie crusts at BJ’s Warehouse a week or so ago when I decided to make this quick and easy pie recipe I got from Giada De Laurentiis on the Food Network. All you need is some pie crusts and frozen bags of fruit and you can have a great tasting pie in a little over an hour.

Blackberry Raspberry Pie

Two 16-ounce bags frozen blackberries, thawed and strained
Two 16-ounce bags frozen raspberries, thawed and strained
1 cup sugar, plus 1 teaspoon for sprinkling
2 tablespoons cinnamon, plus 1/4 teaspoon for sprinkling
1/4 cup arrowroot powder
2 tablespoons all-purpose flour
1/4 teaspoon fine salt
Butter, for greasing
Two 9-inch unroll-and-bake refrigerated pie crusts

Line a baking sheet with foil. Place the baking sheet on the center rack of the oven and preheat the oven to 400 degrees F. Allow the baking sheet to heat for 15 minutes.

To a large bowl, add the blackberries, raspberries, 1 cup of the sugar, 2 tablespoons of the cinnamon, the arrowroot, flour and salt, and toss them gently to combine them. In a separate small bowl mix the remaining 1 teaspoon of sugar and 1/4 teaspoon of cinnamon and set it aside.

Butter a 9-inch ceramic or glass pie dish. Unroll one pie crust and place into bottom of the pie dish, flattening it out against the sides and bottom of the pie dish. Pour the berry mixture into the crust. Unroll the second pie crust and place it on top of the filling. Pinch the edges of the top and bottom crusts together to seal the crust. Fold the double edge under and crimp the edges, making a decorative edge. Sprinkle the reserved sugar and cinnamon mixture over the top. Using a paring knife, cut a few slits in the top of the pie crust.

Place the pie into the oven on the prepared baking sheet and bake the pie until the crust is deep golden and the filling is bubbling through the slits, about 1 hour and 15 minutes.

Cool the pie to room temperature before serving.

This is pretty much the same as the double berry pie I had made in the past. You can use any frozen berry that you have on hand and this would work, and of course you can always use fresh berries as well. Just make sure that if you use frozen that the berries are thawed and drained otherwise you will get a lot of moisture in your pie, despite the use of the arrowroot, which will give you a soggy bottom crust. You end up with a nice pie in just over an hour that is great with some ice cream, homemade whipped cream, coffee and tea or you can use this when you get an invite to someone’s home and want to bring something nice over.

That’s all I have for today. Check back next time for another recipe. Until then, enjoy the rest of your day and enjoy your meal!

IMG_0493

 
Leave a comment

Posted by on April 7, 2014 in Cooking, Dessert, Pie


Tags: , , , , ,

A Bevy of Bountiful Beauty – Banana-Blueberry Buttermilk Bread

While I am not a big breakfast eater myself, I do like to have something around once in a while that goes nicely with my coffee in the morning. Very often I will make an easy banana bread, which is tasty, but I was looking for something a little bit different to try to that had some different flavor to it but would still be easy to make. I was also looking for a use for some of the whole wheat flour I had bought to make brown bread for St. Patrick’s Day. So I was quite fortunate when I came across this recipe from Kitchen Daily for a tasty banana-blueberry buttermilk bread that was simple to make.

Banana-Blueberry Buttermilk Bread

¾ cup nonfat or low-fat buttermilk
¾ cup packed light brown sugar
¼ cup vegetable oil
2 eggs
3 mashed ripe bananas
1 ¼ cup whole-wheat flour
1 cup all-purpose flour
1 ½ teaspoons baking powder
¾ teaspoon ground cinnamon
½ teaspoon baking soda
½ teaspoon salt
¼ teaspoon ground nutmeg
1 ¼ cups blueberries, fresh or frozen

Preheat the oven to 375°F. Coat a 9-by-5-inch loaf pan with cooking spray.
Whisk the buttermilk, brown sugar, vegetable oil and eggs in a large bowl. Stir in the mashed bananas.
Whisk the whole-wheat flour, all-purpose flour, baking powder, cinnamon, baking soda, salt and nutmeg in a medium bowl.
Fold the dry ingredients into the wet ingredients and stir until they are just combined. Fold in the blueberries. Transfer the batter to the prepared pan.
Bake the bread until the top is golden brown and a wooden skewer inserted in the center of the bread comes out clean, about 50 to 60 minutes. Cool the bread in the pan for 10 minutes, then turn it out onto a wire rack. Let the bread cool for about 2 hours before slicing.
You could also make these as muffins if you prefer to have muffins instead. For the muffin variation, preheat the oven to 400°F. Coat 12 (1/2 cup) muffin cups with cooking spray or line the cups with paper liners. Divide the batter among the muffin cups (they will be full). Bake the muffins until the tops are golden brown and a wooden skewer inserted in the center of a muffin comes out clean, about 20 to 25 minutes. Cool the muffins in the pan for 10 minutes, then remove the muffins and let them cool on a wire rack for at least 5 minutes more before serving.

One other note about this recipe. the original recipe calls for whole-wheat pastry flour instead of just whole wheat flour, which I did not have. The whole wheat pastry flour has less protein than regular whole wheat flour, so you will get less gluten in the results and it will make for a more tender bread or muffin. If you would prefer to go that way, then use the pastry flour instead. I think the results came out just fine with the regular whole wheat flour. I liked the flavor to go along with the mix of the bananas and blueberries and it was great as a breakfast with my coffee in the morning. it gives a nice, different and easy option for something like this or to make quickly when you are having guests at the last-minute or need something to bring to someone’s home.

That’s all I have for today. Check back next time for another recipe. until then, enjoy the rest of your day and enjoy your meal!

IMG_0482


Leave a comment

Posted by on April 5, 2014 in Breads, Breakfast, Cakes, Dessert


Tags: , , , , ,

Two Great Flavors in One – Bananas Foster Coffee Parfaits

This is another part of the Fat Tuesday meal I made a few weeks ago as a special dessert. I love Bananas Foster. It is probably my favorite dessert option, or at least right up there with Black Forest cake. Instead of just making simple Bananas Foster though, we wanted to try something that would be a little bit different for us. I searched around and found a bunch of different recipes but this one, from Bon Appetit, struck me as the one that looked like it would be very different and have great flavor. It is for Bananas Foster coffee parfaits. It tastes great, but be warned, it is labor intensive so you have to be willing to work a bit for it.

Bananas Foster Coffee Parfaits

4 large egg yolks
1 1/2 cups chilled whipping cream
2/3 cup packed light brown sugar
2 tablespoons molasses
2 tablespoons dark rum
2 tablespoons coffee liqueur
2 tablespoons instant coffee crystals
1/2 teaspoon vanilla extract
3 large bananas, cut into 3/4-inch chunks
3/4 cup (about) crushed gingersnaps
6 whole gingersnaps 
6 bananas slices 
6 fresh mint sprigs, optional

Combine the egg yolks, 1/2 cup of the whipping cream, 1/3 cup of the light brown sugar, molasses, rum, coffee liqueur and instant coffee in a medium stainless steel bowl. Set the bowl over a saucepan of simmering water (do not let the bottom of the bowl touch the water.) Using a handheld electric mixer, beat the yolk mixture until it is thick and a thermometer registers 160°F, about 18 minutes. Remove the bowl from over the water; continue beating the mixture until it is cool, about 4 minutes.

Using the same beaters, beat 1 cup of the whipping cream and the vanilla in a medium bowl until medium-firm peaks form. Fold the cream into the cooled yolk mixture in 2 additions. Cover and chill the mixture until it is thickened, about 4 hours. This portions can be made 1 day ahead. Just keep it chilled until you are ready to continue.

Preheat the broiler. Place the banana chunks on a baking sheet. Push 1/3 cup of the brown sugar through a fine mesh sieve onto the bananas, coating them evenly. Place the bananas close to the heat; broil the bananas until the sugar melts and crisps on the bananas.

Spoon 1/4 cup of the coffee custard into each of six 1 1/4- to 1 1/2-cup goblets.

Spoon the bananas over the custard, dividing them equally. Sprinkle each parfait with 1 rounded tablespoon of the crushed gingersnaps. Top each parfait with another 1/4 cup of the custard. Garnish each with a gingersnap, banana slice and mint, if desired.

I have to say that these were a lot of work getting the mixture just right, so I can understand while people might not want to make them, standing over a double boiler with your electric mixer, mixing for 18 minutes, but the end result is worth it. These parfaits had great flavor from the bananas, the rum, the coffee liqueur and the coffee. Throw in the ginger snaps for some extra crunch and to me it was great. It might not be something I make very often, but as a once a year treat I think it is a pretty good thing.

That’s all I have for today. Check back next time for another recipe. As always, there’s lots of good stuff to share. Until then, enjoy the rest of your day and enjoy your meal!

IMG_0458


Leave a comment

Posted by on March 25, 2014 in Cooking, Dessert, Fruit


Tags: , , ,

A Bevy of Beguiling Irish Dishes for St. Patrick’s Day

A Happy St. Patrick’s Day to you all! While for most people who think of Irish cooking as simply corned beef and cabbage and nothing more, I can tell you there are a lot of great Irish dishes you can try beyond that typical meal. There are some great meals you can choose from all over the Internet and I have posted a lot of Irish recipes on here, being he good Irish boy that I am. I have always wanted to see the cuisine beyond the corned beef and when Michelle and I went to Dublin we got to see, smell and taste a lot of different things. So if you are looking for some things to try this St. Patrick’s Day, here are some Irish meals I have posted on the blog that you can check out, including the classic corned beef and cabbage.

Beef and Barley Broth

Irish Cream and Coffee Cookies

Irish Onion Soup

Dark Chocolate Guinness Cake with Bailey’s Buttercream Frosting

Whiskey Glazed Carrots

Irish Mussels in Guinness Cream Sauce

Beef & Guinness Stew

Guinness Chocolate Truffles

Traditional Irish Stew

Guinness Brown Bread

Blood Pudding

Lemon Tart

Irish Coffee

Irish Spiced Beef

Corned Beef and Cabbage in the Pressure Cooker

Corned Beef and Cabbage

Colcannon

Guinness Mustard

Grasshopper Pie

Homemade Shamrock Shake

Potato and Leek Soup

Irish Soda Bread

There are also lots more great recipes out there on the Internet that you can check out from some great sources if you are looking for something a little different. I will be making the corned beef and cabbage in the pressure cooker, along with some Colcannon, cabbage and the brown bread. Of course there will be Guinness and Irish coffee later on as well.

That’s all I have for today. Check back next time for some more great recipes. Until then enjoy the rest of your day, have a happy St. Patrick’s Day and enjoy your meal!

IMG_0472


Tags: , , , , , , ,

Romance in the Air and On the Plate, Part 4 – Soft Chocolate Mini Cakes

To wrap up our Valentine’s Day meal, of course there had to be a chocolate dessert. This dessert recipe, from Williams-Sonoma, is easy enough that you can make this at any time. You only need a few ingredients on hand and you can have an elegant chocolate dessert in under 20 minutes any night of the week or for a quick dessert when you have last-minute guests or need something for a dinner party. The soft chocolate mini cakes are a lot like chocolate lava cakes as they have a nice crunchy chocolate exterior with a soft, velvety interior.

Soft Chocolate Mini Cakes

5 tablespoons butter, cut into small cubes, plus more for greasing

8 ounces bittersweet chocolate, chopped

1/2 cup sugar

2 eggs

1 1/2 teaspoons vanilla extract

Pinch of salt

1/4 cup all-purpose flour

Whipped cream, vanilla ice cream or creme fraiche for serving

Position an oven rack on the lowest level in the oven and preheat the oven to 400 degrees. Lightly butter six 1/2 cup oven-safe ramekins.

Put the butter and bittersweet chocolate in a heatproof bowl and place over (but not touching) simmering water in a saucepan. Heat until the butter and chocolate have melted, then stir the mixture until it is smooth. Remove the chocolate mixture from the heat and allow it to cool slightly.

Meanwhile, in a bowl, combine the sugar, eggs, vanilla extract and salt. Using an electric mixer set on high-speed, beat the mixture until it is thickened, about 3 minutes. Reduce the mixer speed to low. Gradually sprinkle the flour over the batter and continue beating just until it is combined. Using a spatula, fold the egg mixture into the cooled chocolate mixture until it is combined.

Divide the batter among the prepared ramekins. Place the ramekins on a rimmed baking sheet and bake until the tops are puffed and dry and a toothpick inserted into the center of one of the cakes comes out with some soft batter clinging to it, about 10 minutes.

Serve the cakes hot, in the ramekins, or inverted onto individual plates. Top with a dollop of whipped cream, vanilla ice cream or creme fraiche if you like and serve.

This is a really elegant looking dessert that takes little effort and no time at all. If you love chocolate this is a good for you to remember. You could also try dusting the cakes with a bit of confectioner’s sugar when they are done and maybe top with a raspberry, strawberry and a mint leaf for some added elegance. It was a great dessert that we all gobbled up and I had a few extra so we had them for dessert the next day as well. I just popped them in a 350 degree oven for a couple of minutes to warm them through and they were perfect.

That’s all I have for today. Check back next time for another recipe. That’s the end of the Valentine’s Day recipes so it is back to regular recipes tomorrow. Don’t worry, I have a lot of them to share that I have made lately, including some great  chicken dishes, some pork, a new risotto, turkey breast, lamb and more. until next time, enjoy the rest of your day and enjoy your meal!

012 011

 
1 Comment

Posted by on February 18, 2014 in Cakes, Cooking, Dessert, Holidays


Tags: , , , , ,

Craving Chocolate Crinkle Cookies

This particular recipe actually dates back to just before Christmas when we had a big snowstorm and we decided to make cookies all day. This was one the Michelle and Sean had picked out that Michelle had picked up online from Martha Stewart. It is for chocolate crackle cookies and while they were a great holiday cookie, I think they would be awesome for just about anytime of year and they were not hard to make at all. All you need is a handful of ingredients and the time to put them together and you can be dipping these in your milk or hot chocolate in just a few minutes.

Chocolate Crinkle Cookies

8 ounces bittersweet chocolate, melted and cooled
1 1/4 cups all-purpose flour
1/2 cup Dutch cocoa powder
2 teaspoons baking powder
1/4 teaspoon salt
8 tablespoons (1 stick) unsalted butter, room temperature
1 1/3 cups light-brown sugar, firmly packed
2 large eggs
1 teaspoon pure vanilla extract
1/3 cup milk
1 cup confectioners’ sugar, plus more for rolling

Heat the oven to 350 degrees. Chop the bittersweet chocolate into small bits and melt it over medium heat in a heat-proof bowl or the top of a double boiler set over a pan of simmering water. Set it aside to cool. Sift together the flour, cocoa, baking powder, and salt.

In the bowl of a heavy-duty electric mixer fitted with the paddle attachment, beat the butter and light-brown sugar until light and fluffy. Add the eggs and vanilla, and beat until they are well combined. Add the melted chocolate. With the mixer on low-speed, alternate adding the dry ingredients and the milk until they are just combined. Divide the dough into quarters, wrap it with plastic wrap, and chill it in the refrigerator until it is firm, about 2 hours.

On a clean countertop, roll each portion of the dough into a log approximately 16 inches long and 1 inch in diameter, using confectioners’ sugar to prevent it from sticking. Wrap the logs in plastic wrap, and transfer them to a baking sheet. Chill the dough for 30 minutes. Cut each log into 1-inch pieces, and toss each piece in confectioners’ sugar, a few at a time. Using your hands, roll the pieces into a ball shape. If any of the cocoa-colored dough is visible, roll the dough in confectioners’ sugar again to coat it completely. Place the cookies 2 inches apart on a parchment paper-lined baking sheet. Bake until the cookies have flattened and the sugar splits, about 12 to 15 minutes.

Transfer the cookies from the oven to a wire rack to let cool completely. Store in an airtight container for up to 1 week.

These cookies were delicious with a great chocolate flavor to them. I can tell you that these did not last long around the house and went over pretty well for the holidays. I can see making these again for a party or just as a nice chocolate cookie to have for dessert one night.

That’s all I have for today. Check back next time for another great recipe. There’s still lots of good stuff coming down the road. Until then, enjoy the rest of your day and enjoy your meal!

photo (8)


1 Comment

Posted by on January 14, 2014 in Cookies, Cooking, Dessert, Holidays


Tags: , , , ,

Cookies With a Kick – Irish Cream and Coffee Cookies

I am a fan of Irish cream and an even bigger fan of coffee,so something that can bring the two together is bound to be pretty tasty right? When we were on the lookout for Christmas cookies this year this is one of the recipes that we came across during our hunt and I knew we had to give them a try if for no other reason than I liked the way they sounded. A coffee flavored sugar cookie with and Irish cream butter cream meringue on top? Yes please! The recipe originally comes from the Cooking Channel and Nealey Dozier.

Irish Cream and Coffee Cookies

For the Coffee-Flavored Sugar Cookies:

8 ounces (2 sticks) unsalted butter, at room temperature
1 cup sugar
2 ounces cream cheese, at room temperature
1 teaspoon pure vanilla extract
1/2 teaspoon coffee extract
1 large egg
3 cups all-purpose flour (spooned in and leveled)
3 tablespoons finely ground coffee (not instant)
1 1/2 teaspoons baking powder
1/2 teaspoon salt

For the Irish Cream Italian Meringue Buttercream:

1 1/4 cups sugar
5 egg whites
1 pound (4 sticks) unsalted butter, cubed, at room temperature
1/4 cup Irish cream liqueur, such as Bailey’s Irish Cream
1/2 teaspoon or more coffee extract
Chocolate-covered espresso beans, for garnish

For the coffee-flavored sugar cookies: In the bowl of a stand mixer fitted with the beater blade (or with a hand mixer), beat the butter, sugar and cream cheese on medium speed until light and fluffy, 4 to 5 minutes. Combine the vanilla, coffee extract and egg in a small bowl. Reduce the mixer speed to low; add the egg mixture to the butter mixture and beat until combined.In another bowl, stir together the flour, ground coffee, baking powder and salt. On low-speed, slowly add the dry ingredients to the butter mixture and mix until completely incorporated and a soft dough has formed.

Place a rectangular sheet of parchment or wax paper on a clean surface. Pat the dough out into a rectangular shape on top of it. Cover with another sheet of parchment and roll the dough to 1/4- to 1/2-inch thickness. Remove the top sheet of parchment and transfer the dough to a baking sheet. Refrigerate for a minimum of 1 hour or overnight.

Preheat the oven to 350 degrees F. Line two baking sheets with parchment paper or silicone baking mats.

Cut the dough into rounds (or desired shape) using cookie or biscuit cutters. Transfer the cutouts to the baking sheets, spacing them about 2 inches apart. Gather the scraps, roll again and cut out more rounds (refrigerate to chill the dough if it gets too soft).

Bake for 10 to 15 minutes, depending on thickness and shape. Do not let the cookies brown; start checking for doneness early. The finished cookies will have slightly golden brown bottoms, but they will feel very soft and under-baked until they cool. Hold the cookies on the baking sheets for 10 minutes, and then transfer to a wire rack to cool completely before frosting.

For the Irish cream Italian meringue buttercream: In a small, heavy saucepan, stir together 1 cup of the sugar with 1/4 cup cold water to combine. Heat the mixture on medium-high heat. Dip a pastry brush in water and brush down the sides of the pan to remove any excess sugar, and then partially cover with a lid to prevent crystallization. Cook the sugar mixture until the temperature registers 245 degrees F on a candy thermometer.

While the sugar mixture is heating, make the meringue. Place the egg whites in the bowl of a stand mixer fitted with the whisk attachment. Beat the egg whites on high-speed until medium peaks form. Slowly add the remaining 1/4 cup sugar and continue beating until stiff peaks form, about 5 minutes total.

With the mixer running, slowly pour the hot syrup into the meringue. Continue beating at high-speed for 2 minutes. Reduce the speed to medium and beat until the meringue has cooled to room temperature and the bowl is cool to the touch, about 15 minutes.

Begin adding the butter two to three cubes at a time. Increase the mixer speed to high; add the Irish cream liqueur and coffee extract and beat until the butter and liquids are fully incorporated. (The buttercream can be held in the refrigerator for up to one week or frozen for one month.)

Transfer  the buttercream frosting to a disposable piping bag fitted with a star or round tip. Pipe a layer of frosting onto each cookie and top with a chocolate-covered espresso bean.

The recipe says it makes about 30 cookies, which we got. I have to tell you, this was a little tricky to do and we had some mishaps and restarts along the way, but the end results are pretty good. Coffee extract may not be easy to find in your area ( I know it isn’t easy in mine) and it took some hunting but we got it. The cookie itself can seem deceiving when you are making it because they are very soft even when they are done. They do harden up once they have cooled but you will keep checking yourself because you swear they aren’t finished. Trust me, when the time is done, they really are done! The meringue needs some careful watching too between making sugar syrup carefully to make sure it doesn’t get too hot and crystallize (which happened and I had to start again) to being convinced the meringue would never hold up because you are adding hot syrup to it (somehow it holds; I am no scientist, but I am glad it worked). The end results though is worth it. I think it is a great tasting cookie. You get great flavor from the cookie itself and the meringue is spectacular.

That’s all I have for today. Check back next time for another recipe. There is still lots to come, and I do have some recipes I forgot to take pictures of (sorry about that) but I will still share them anyway, Until next time, enjoy the rest of your day and enjoy your meal!

003


1 Comment

Posted by on January 6, 2014 in Cookies, Cooking, Dessert


Tags: , , , , , , , , ,

Christmas Cookie Ideas, Part 3: Alton Brown’s Gingersnap Cookies

Okay, so now that we have covered Sean’s cookie and Michelle’s cookie, it is time for the cookie that I made. There are a bunch of cookies I like that we eat fairly often, like chocolate chips, oatmeal raisin cookies and even Heath bar brickle cookies, but there is something about ginger snaps that I really enjoy. I love the deep ginger flavor a good one has, almost tasting spicy with a little bite to it. I can remember eating them out of the box when I was a little kid and just the smell of them alone is enough to get me thinking about them. I have made ginger snaps before, but I came across this recipe from Alton Brown a while back and had been holding back on it so that we  could use these for part of our Christmas cookies. The best thing is that they are really easy to make. One thing to note about this recipe is that Alton uses weight measurements for a few of the ingredients instead cup measurements. I don’t have a kitchen scale, but if you do you can make good use of one here. I did some research online to get some conversion rates and they seemed to work out fine, so I have included the conversions here.

Alton Brown’s Ginger Snaps

9 1/2 ounces (2 1/4 cups) all-purpose flour

1 1/2 teaspoons baking soda

1 tablespoon ground ginger

1/2 teaspoon ground cardamom

1/2 teaspoon ground clove

1/2 teaspoon kosher salt

7 ounces (1 cup) dark brown sugar

5 ounces butter, room temperature

3 ounces (1/4 cup) molasses

1 egg, room temperature

2 teaspoons finely grated fresh ginger

4 ounces (2/3 cup) finely chopped candied ginger

Preheat the oven to 350 degrees. In a medium bowl, whisk together the flour, baking soda, ground ginger, cardamom, clove and kosher salt.

Place the dark brown sugar and the butter in the bowl of a stand mixer fitted with the paddle attachment and beat on low-speed until the mixture is light and fluffy, about 1 to 2 minutes. Add the molasses, egg and fresh ginger and beat on medium speed for 1 minute. Add the crystallized ginger and, using a rubber spatula, stir the mixture to combine. Add the dry ingredients to the wet ingredients and stir the mixture until it is well combined and the dough has formed.

With a 2-teaspoon sized scoop, drop the cookie dough onto a parchment paper-lined cookie sheet or half sheet pan approximately 2 inches apart. Bake the cookies on the middle rack of the oven for 12 minutes for slightly chewy cookies or for 15 minutes for more crisp cookies. Rotate the pan halfway through the baking process to ensure even cooking and browning.

Remove the pan from the oven and allow the cookies to stay on the sheet pan for 30 seconds before transferring them to a wire rack to cool completely. Repeat the process with the remaining cookie dough. Store the cookies in an airtight container for up to 10 days.

You can even freeze the cookie dough if you want to make it ahead of time and then use it closer to your desired date for the freshest possible cookies. Just scoop and freeze the cookie dough on a sheet pan and once it is frozen place the  cookie dough in a resealable bag to store in the freezer. You can then bake the cookies directly from the freezer as the recipe instructions suggest.

One more thing about the recipe. The conversions can be a little confusing if you don’t have a scale and you may question if you have too much or too little of a particular ingredient.This recipe showed me that it is probably a good idea to have a kitchen scale for recipes like this. In any case, when I first mixed the dough it seemed way too loose and dry, as if it had too much flour. After some consideration, I decided to add another egg to help balance things out since that was the only liquid in the recipe other than the molasses. I think I could have added more molasses too and still have gotten good results but the taste might have been a lot stronger than I wanted. The extra egg seemed to even things out and the results were perfect. A very ginger-tasting cookie with just the right texture was what I ended up with.

That’s all I have for today. Check back next time for some more recipes. I made a nice Cuban pork shoulder and black beans in the slow cooker last night that was a great recipe that I will be sharing. Until next time, enjoy the rest of your day and enjoy your meal!

001


2 Comments

Posted by on December 21, 2013 in Cookies, Cooking, Dessert, Holidays


Tags: , , , , , , ,

 
National Day Calendar

Fun, unusual and forgotten designations on our calendar.

Jennifer Probst

a little bit naughty a little bit nice

Laissez Faire

Letting Life Lead

simple cooking recipes

a blog to share with you the best