For a lot of people, when you are deciding on a side dish to make with your dinner, the easy fallback is always to go with white rice or a potato. They are great sides to make, no doubt about it, and you don’t have to think much about them to make a baked potato or cook up some white rice. However, once in a while you need to have something different. It can get pretty boring if you eat just plain white rice all of the time. We eat a lot of rice in our house so I actually always have a few different options available that we can use for rice. There is always white rice, but I also have brown rice, jasmine rice, arborio rice for risotto and wild rice. I also try to keep a good selection of beans and other grains like quinoa or couscous around for those days when we really want something different. Now not everyone is a big fan of the wild rice option. Sean would prefer I didn’t make it since he doesn’t really care for it, but Michelle and I both like the flavor and texture it provides to a meal. Technically, wild rice is a combination of four separate grasses and the grain that is harvested from them. There are three species that are grown in North America – Texas wild rice, Northern wild rice, and wild rice – and one species that is grown in China. If you want to learn a little bit more, the Wikipedia entry on wild rice is interesting.
In any case, you can find wild rice pretty readily in most supermarkets. The great thing about is, that like other grains, when it is uncooked it can last almost indefinitely so you can get some to keep in your pantry and always have it available. I find that it goes particularly well with chicken dishes and fish and takes to a sauce really nicely, so this recipe from Delish for creamy lemon chicken with wild rice seemed like a great dinner to cook.
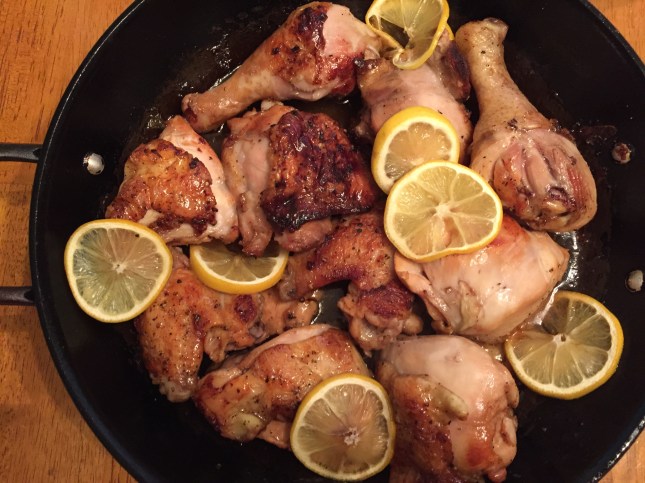
Creamy Lemon Chicken with Wild Rice
6–8 bone-in, skin on chicken thighs
Kosher salt
Freshly ground black pepper
Extra-virgin olive oil
1 tablespoon butter
3 garlic cloves, minced
1 onion, chopped
1/2 cup dry white wine (such as Sauvignon Blanc) or water
1 chicken stock
2 lemons
1/4 cup heavy cream
1 cup wild rice
1/4 cup chopped parsley
Preheat the oven to 475 degrees. Preheat a large cast iron skillet on high heat. Rinse the chicken and pat dry the chicken thoroughly with paper towels; season the chicken with salt and pepper. Add 1 tablespoon of olive oil and 1 tablespoon butter to the skillet. Cook the chicken skin side down in two batches until the skin is crisp and golden brown, about 5 minutes. Transfer the chicken to a dish skin side up and set it aside.
Reduce the skillet heat to medium-high. Add the garlic, onion, 1 teaspoon of salt and 1/2 teaspoon of pepper and cook for 1 minute. Deglaze the pan with the white wine and chicken stock; scrape the bottom of the pan and bring the mixture to a boil. Add the zest and juice of one lemon, then cut the remaining lemon into wheels and add it to the sauce. Stir in the heavy cream; bring the mixture to a boil and place the chicken in the skillet skin side up in a single layer. Bake the chicken in the oven for 20 minutes.
Meanwhile, cook the wild rice according to the package directions.
Add the cooked wild rice to the skillet to absorb the sauce. Garnish the dish with parsley and serve in the skillet immediately.
The wild rice can take anywhere from about 25 minutes to close to an hour depending on what type you buy, so I started my rice the same time I started the chicken and had both done at about the same time. If you like lemon sauce this one is certainly for you. The lemon really stands out and the sauce goes well with the chicken and the rice. You could make this an almost one pot meal if you put some vegetables in alongside the chicken when you bake it, like peas, asparagus, broccoli (it seems to need something green to me) or any other vegetable you prefer that will take well to baking and the lemon sauce. The dish thickens up nicely when you add the rice into it and it makes for a nice hearty meal during the week that is easy to make. I used chicken thighs because that is what the recipe called for and I always have them on hand in the freezer since they are inexpensive, but you could use any type of chicken pieces that you like best; just adjust your cooking time to be sure it is cooked through all the way or not overcooked (as could easily happen with boneless breasts).
That’s all I have for today. Check back next time for another recipe. Until then, enjoy the rest of your day and enjoy your meal!