RSS

Category Archives: Sauce

Friday Fried Chicken Sandwiches with Slaw and Spicy Mayo

It was hard to resist trying the recipe of the picture on the front cover of the April issue of Bon Appétit magazine. The picture of the fried chicken sandwich that they had on the front looked too good to pass up, so I thought I would give it a try. The recipe itself for the sandwich, the spicy mayonnaise and the Slavic goes with the sandwich were all very easy to prepare.

Fried Chicken Sandwiches with Slaw and Spicy Mayo

1 garlic clove, finely grated
1/2 cup mayonnaise
1 tablespoon Louisiana-style hot pepper sauce
1/2 small red onion, thinly sliced
1 jalapeno, thinly sliced
4 cups thinly sliced cabbage
1/2 cup bread-and-butter pickles slices, plus 1/4 cup pickle juice
2 cups all-purpose flour
1 tablespoon ground black pepper
1/2 teaspoon kosher salt, plus more if needed
1 cup buttermilk
2 8-ounce skinless, boneless chicken breasts, halved crosswise
Vegetable oil (for frying)
4 white sandwich rolls
2 tablespoons butter, room temperature

To make the spicy mayonnaise and slaw, mix the garlic, mayonnaise, and hot pepper sauce in a small bowl; cover and chill. Toss the onion, jalapeno, cabbage, pickles, and pickle juice in a large bowl to combine; cover and chill.

For the chicken, whisk the flour, pepper, and half teaspoon of salt in a shallow bowl. Pour the buttermilk into another shallow bowl. Working with one piece at a time, dredge the chicken in the flour mixture, shaking off excess. Dip the chicken in the buttermilk, allowing the access to drip back into the bowl. Dredge the chicken again in the flour mixture, shaking off any excess.

Pour the oil into a large, heavy skillet to a depth of half-inch. Using a deep-fry thermometer, heat the oil over medium heat until the thermometer registers 350°. Fry the chicken until Golden Brown and cooked through, about three minutes per side. Transfer to a wire rack set inside a baking sheet; season with salt.

Spread the cut sides of the roles with butter. Heat and another large skillet over medium heat. Working in batches, cook the roles buttered side down until browned and crisp, about one minute. Spread each role with spicy mayonnaise. Build the sandwiches with the roles, the chicken, and the cabbage slaw.

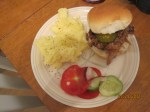
The sandwich itself was awesome. The crispy chicken with the spice from the mayonnaise and the tang of the slaw was a perfect combination. I think if you wanted to cut some fat out you could either use less oil for frying or even try oven-frying the chicken, though it may not come out quite as crispy. For the slaw, I used a bag mix of cole slaw cabbage instead of slicing the cabbage itself. I really liked the way the pickles and jalapeno added great flavor to the slaw and the sandwich. I think you could easily change the recipe around some and not use the mayo if that is what you wanted and go with some mustard or just have the slaw with it instead. I served the sandwiches with some potato salad as a simple side, although Sean opted to have tater tots instead.

That’s it for this recipe. I do have another post to put up about a restaurant we ate at this weekend so that one will follow shortly. I also have a few recipes to try this week, including crab cakes with oven fries, a sweet and sour pork stir fry, and another from Bon Appetit that was on the cover of the most recent issue for griddle cakes. Check back this week and see if you like any of them. Until next time, enjoy your day and enjoy your meal!

004

 
Leave a comment

Posted by on April 28, 2013 in Cooking, Poultry, Salad, Sandwiches, Sauce


Tags: , , , , , ,

How to Make the Best Pork Chops – How to Cook – Cook’s Country

How to Make the Best Pork Chops – How to Cook – Cook’s Country.

Pork Chops seem to be a staple in every home. We all make them one way or another, but a lot of people are afraid of cooking them because they fear under-cooking or overcooking them. They can also be very dry just on their own if they aren’t done right and don’t have a little sauce to go with them. The folks at Cook’s Country give you some great techniques here on the best methods to cook pork chops, some recipes and some sauces to go along with them. Check it out and the next time you make pork chops you’ll be much happier with the results!

 
Leave a comment

Posted by on December 7, 2012 in Cooking, Cooking Websites, Dinner, Pork, Sauce


Tags: , , , ,

Don’t Forget Your Thanksgiving Appetizers

Yesterday I covered the side dishes I am making for Thanksgiving, and on Monday it was the soup for the day, and Sunday I wrote about the turkey, stuffing and gravy. There’s not much left to write about  unless you want to make some appetizers for everyone before the meal. Here’s my advice on appetizers for the holidays. You have enough going on in the oven and on the stove, so try to do things that you don’t have to cook at all if you can avoid it. It’s just one less thing you have to cook for the day and you may not have the room or time to do it anyway. You can go simple, and just do a nice selections of cheeses and crackers, maybe some sliced apples and pears, some grapes and some pepperoni or sliced dry sausage. I am trying to keep it simple by doing some shrimp cocktail and some homemade horseradish cocktail sauce.

Shrimp Cocktail

2 teaspoons fresh lemon juice

2 bay leaves

1 teaspoon salt

1 teaspoon black peppercorns

1 teaspoon Old Bay Seasoning

1 pound extra-large shrimp, peeled and deveined

1 cup Horseradish Cocktail Sauce (recipe to follow)

Bring the lemon juice, bay leaves, salt, peppercorns, Old Bay and 4 cups of water to a boil in a medium saucepan for 2 minutes. Remove the pot from the heat and add the shrimp. Cover and steep off the heat until the shrimp are firm and pink, about 7 minutes. Drain the shrimp and plunge them immediately into ice water. Drain and refrigerate the shrimp until thoroughly chilled, about 1 hour. Arrange a platter and serve with the cocktail sauce.

Horseradish Cocktail Sauce

1 cup ketchup

2 tablespoons fresh lemon juice

2 tablespoons prepared horseradish, plus extra for seasoning

2 teaspoons Tabasco or other hot sauce, plus extra for seasoning

1/2 teaspoon salt

1/4 teaspoon pepper

Stir all of the ingredients together in a small bowl. Season with additional horseradish and hot sauce as desired.

The cooked shrimp and the cocktail sauce can be refrigerated separately for up to 1 day, so you can make them ahead if you want to. If you get uncooked shrimp that is already peeled and deveined, you can save yourself some extra work and make things a little quicker for yourself.

You’re likely to have some people who don’t like shrimp cocktail, so you’ll need to have some other things available too. You can always put out an array of different chips and snacks or vegetables and have some dip for them. Instead of using the soup packet for your onion dip this year (I have nothing against it, I do it a lot, but it is often a little stale and always very salty), how about making a simple onion dip on your own. It’s not really any work and it tastes a lot fresher. You can just use straight sour cream or try this dip base and add the onions to it.

Simple Onion Dip

3/4 cup mayonnaise

3/4 cup sour cream

1 tablespoon fresh lemon juice

1/2 cup caramelized onions

2 garlic cloves, minced

Salt and pepper, to taste

Stir all of the ingredients together and season with salt and pepper to taste. Refrigerate the dip for at least 1 hour so all of the flavors can blend together nicely. The prepared dip can keep covered and refrigerated for up to 2 days.

For the caramelized onions, if you have never done it before, simply melt 1 tablespoon of butter with a tablespoon of vegetable oil over high heat. Add about 4 onions, halved and sliced thin, 1 teaspoon of light brown sugar and 1/2 teaspoon of salt. Cook until the onions are soft, about 5 minutes. Reduce the heat to medium and cook, stirring frequently, until the onions are deep brown, about 40 minutes. Take them off the heat, stir in 1 tablespoon of water, season with salt and pepper, and you’re done.

Yes, it takes some planning ahead if you are going to use caramelized onions, but they are so tasty, not just for dips but as a condiment for nearly anything.

If you want to make something ahead of time and like nuts, you can try this recipe for spiced nuts. I tried this with some mixed nuts and a spice blend I got from PepperMary’s Spice Blends and boy was it good. I used the Cajun Blend for the nuts, but Mary was kind enough to send me samples of her other spices, which I plan to try after Thanksgiving on some fish that I got. Thanks Mary, they are awesome. I also used the Mesquite Blend on a London broil I marinated last night for dinner and it had a nice taste and kick to it. Give her stuff a try if you get the chance.

Spiced Nuts

1 egg white

1 tablespoon water

1 teaspoon salt

1 pound of mixed nuts, unsalted

2 tablespoons sugar, maple syrup or honey

4 teaspoons PepperMary Cajun Spice blend (or other spice blend you like) or:

2 teaspoons cumin, 1 teaspoon cayenne pepper and 1 teaspoon paprika

Adjust 2 oven racks to the upper and lower-middle positions and heat the oven to 275 degrees. Whisk the egg white, water and salt together in a medium bowl. Add the nuts and toss to coat. Drain in a colander for 5 minutes.

Toss the sugar, maple syrup or honey with the spice blend or desired spices with the nuts. Spread the nuts evenly on two parchment paper-lined baking sheets. Bake until the nuts are dry and crisp, about 50 minutes, stirring occasionally and rotating the baking sheets halfway through. Remove from the oven and let the nuts cool completely on the baking sheet, about 30 minutes. Break the nuts apart and serve.

These can also be made ahead and stored at room temperature wrapped tightly in plastic wrap for up to 1 week.

If you still aren’t sure what to make, you can always try going for an antipasto platter. This lets you put out a variety of meats, cheeses, olives and vegetables that people like and you can pretty much choose what suits your crowd the best. I put together just a few ideas in this one.

Antipasto Platter

1/2 pound soppressata salami or other dry sausage, skin removed and sliced thin

2 cups mixed olives, black and green, marinated, such as Kalamata, Nicoise or others

1 jar marinated roasted red peppers

1 jar marinated artichoke hearts

1/2 pound fresh mozzarella, sliced thin

Arrange all the items on a platter for people to choose as finger foods. You could always add other cheeses, like marinated mozzarella, or other meats like ham, or even some marinated and grilled vegetables like eggplant, asparagus or zucchini, and some sliced tomato. The options are endless with this. Have some good extra-virgin olive oil on hand if you want to do any marinating of anything.

Okay, I think that covers the appetizers. There are a lot of other choices out there, that I didn’t go into, but I could be here all day writing suggestions and I still have prep work myself to do. Later on today, I will post a couple of dessert options if you are still looking for ideas. Check back and see what I have. Until then, enjoy the rest of your day!


Tags: , , , , , , , , , , ,

There’ Nothing Better Than a Burger…Except a Steak Burger!

I love burgers. I’m pretty sure I could eat one every day if it wouldn’t eventually kill me. There’s just something about a nice, juicy burger with all the accompaniments you like – bacon, tomato, lettuce, avocado, really anything you want – and it’s just plain good. I didn’t think there was too much else you could do to a burger until I came across this recipe for a Steak Burger from Cook’s Country. This burger is made from ground sirloin, which is why they call it a steak burger. Now the thing about ground sirloin is that there is hardly any fat in it at all, so you need to add a little fat to this to make it perfect. it’s nothing a little melted butter can’t take care of, and while you’re at it you can add a little spice to it as well. They also use a steak sauce on the burger to really give it some intense flavor. This recipe calls for the burgers to be grilled, but of course it was raining today when I started cooking so everything got moved inside.

Grilled Steak Burgers

For the Burgers:

8 tablespoons butter

2 garlic cloves, minced

2 teaspoons onion powder

1 teaspoon pepper

1/2 teaspoon salt

2 teaspoons soy sauce

1 1/2 pounds 90 percent lean ground sirloin

4 hamburger buns

For the Steak Sauce:

2 tablespoons tomato paste

2/3 cup beef broth

1/3 cup raisins

2 tablespoons soy sauce

2 tablespoons Dijon mustard

2 tablespoons balsamic vinegar

1 tablespoon Worcestershire sauce

For the burgers, melt the butter in a large skillet over medium-low heat. Add the garlic, onion powder, pepper and salt and cook until fragrant, about 1 minute. Pour all but 1 tablespoon of the butter mixture into a bowl and let cool slightly, about 5 minutes.

For the steak sauce, add the tomato paste to the skillet and cook over medium heat until the paste begins to darken, 1 to 2 minutes. Stir in the broth, raisins, soy sauce, mustard, vinegar, and Worcestershire sauce and simmer until the raisins plump, about 5 minutes. Process the sauce in a blender until smooth, about 30 seconds; transfer to a bowl.

Add 5 tablespoons of the cooled butter mixture and the soy sauce to the ground beef and gently knead until well combined. Shape into 4 3/4-inch-thick patties and press a shallow divot in the center of each. Brush each patty all over with 1 tablespoon of the steak sauce. Combine the remaining 2 tablespoons of the cooled butter mixture with 2 tablespoons of the steak sauce; set aside.

For a gas grill, turn all the burners to high, cover, and heat the grill until it is hot, about 15 minutes. Leave the burners on high. Clean and oil the cooking grate. Grill the burgers, covered, until the meat registers 120 to 125 degrees, 3 to 4 minutes per side, or 130 to 135 degrees (for medium), 4 to 5 minutes per side. Transfer the burgers to a plate, tent loosely with aluminum foil, and let rest 5 to 10 minutes. Brush the cut side of the buns with the butter-steak sauce mixture. Grill the buns, cut side down, until golden, 2 to 3 minutes. Place the burgers on the buns and serve with the remaining steak sauce.

The steak sauce has just the right bite to it and tastes very good on the burgers. Of course, you can top the burgers with whatever you like to top them with. I prefer some sliced pickle, red onion and tomato myself, maybe a piece of bacon or avocado. You could just eat them with the steak sauce. I still had some of the remoulade I made a few days ago and used that. It was delicious.

There’s no meal tomorrow since we are going to the Mets game at Citi Field tomorrow night, but I do have a dinner planned for Wednesday involving, chicken, Italian sausage and potatoes. Check back on Wednesday to see what it is. until then, enjoy your evening and enjoy your meal!

 
Leave a comment

Posted by on August 20, 2012 in Beef, Cooking, Dinner, Picnic Fare, Sauce


Tags: , , , ,

Scrumptious Shrimp Po’Boys

I had some shrimp to cook and Sean just wanted some simple fried shrimp. I, on the other hand, wanted to jazz things up a little bit and decided to make some po’boys. Well, they are about as close as I can get to it anyway, since I don’t have the bread from Louisiana, but the recipe was pretty darn good anyway. If you’re going to go through the effort to do the shrimp, you absolutely need to make your own remoulade. It tastes awesome, takes minutes to do and is completely worth it, trust me.

Shrimp Po’Boy Sandwiches

1 pound medium shrimp, shelled, deveined and with tails removed
3/4 cup fine cornmeal
3/4 cup flour
1 Tbsp Cajun seasoning
1 teaspoon salt
2 eggs, beaten
Vegetable oil for frying
1/2 head lettuce, shredded
2-3 tomatoes, sliced about 1/4 inch thick
4 small French sandwich rolls

Remoulade
1/4 cup mustard, preferably Creole mustard
1 1/4 cups mayo
1 teaspoon pickle juice or vinegar
1 teaspoon hot sauce 
1 large garlic clove, minced and smashed
1 Tbsp sweet paprika
1-2 teaspoons Cajun seasoning

For the remoulade, mix all the ingredients together in a medium bowl until they are well blended. Cover and refrigerate for at least 30 minutes before serving so the flavors meld.

Pour 1/4 inch of oil in a deep-frying pan or Dutch oven and heat the oil over medium high until a candy thermometer inserted reads 375 degrees.

Meanwhile, mix the cornmeal, flour, Cajun seasoning and salt in a large bowl. Working with several shrimp at a time, place the shrimp in the beaten egg and then in the cornmeal mixture. Shake off any excess and place the shrimp in the hot oil, frying until golden on both sides, about 2-3 minutes total. Remove the shrimp to a paper towel-lined plate to drain. Repeat the process with the remaining shrimp.

To assemble the sandwiches, slice the rolls and smear the remoulade on the insides of both halves. Lay a layer of lettuce over the remoulade on the bottom of the sandwich, then place a few shrimp over the lettuce. Cover the shrimp with two or three slices of tomato and press the top of the roll down on the bottom to compress the sandwich a little. Repeat with the remaining rolls, accompaniments and shrimp and serve.

It tasted great. Michelle didn’t eat a sandwich but still dipped the shrimp in the remoulade and loved it. It makes enough remoulade so you’ll have extra to use for something else later on. I served this with fries to keep it simple.

That’s what I made last night. Tonight I think is going to be a leftovers night since we have lots of them. Tomorrow is shopping day, where we will hit Adams Farms and the farmer’s market so I am not sure what we will come up with. Check back and see what we find. Until then, enjoy your day (it’s beautiful here today) and enjoy your meal!

 
Leave a comment

Posted by on August 16, 2012 in Cooking, Sandwiches, Sauce, Seafood


Tags: , ,

Making Good Use of Those Extra Meatballs

Yesterday I made a big try of meatballs so Michelle could use some in her Italian Wedding Soup. Since we still had a lot left to use, we decided to put some in sauce and simmer them and then make some meatball sub sandwiches. Sean opted to have just spaghetti and meatballs, but I made a sub for myself on some garlic bread.

Meatball Sub Sandwiches

For the meatballs:

2 slices of white bread (use good white bread for this)

1/3 cup buttermilk

3/4 pound ground beef

1/4 pound ground  pork

1/4 cup grated Parmesan cheese

2 tablespoons minced fresh parsley

1 large egg yolk

1 garlic clove, minced

Salt and pepper

For the sauce:

3 tablespoons olive oil

3 garlic cloves, minced

1 (28-ounce) can crushed tomatoes

1 (14.5-ounce) can diced tomatoes

3 tablespoons minced fresh basil (if you’re using dried basil, cut this in at least half)

1/4 teaspoon sugar

Salt

For the garlic bread:

1 loaf Italian bread or French bread

4 tablespoons butter, softened (use less if you like, I often do)

2 teaspoons olive oil

3 cloves garlic, crushed

1 teaspoon dried oregano

1 cup shredded mozzarella cheese (or other cheese of your liking, or no cheese at all, it’s optional)

Fresh mozzarella, sliced for the sandwiches

For the meatballs, remove and discard the crusts from the bread, then tear the bread into small pieces. Mash the bread pieces and buttermilk to a smooth paste in a large bowl, using a fork.

Add the beef, pork, Parmesan, parsley, yolk, garlic, 3/4 teaspoon of salt, and 1/8 teaspoon of pepper to the mashed bread. Stir the mixture gently until combined and uniform. Gently form the mixture into 1-inch round meatballs ( I made them smaller this time for the soup we made).

Heat the oven to 350 degrees. Place the meatballs on a wire rack in a cookie sheet or roasting pan. Cook for approximately 20 to 30 minutes or until well browned.

For the sauce, cook the oil and garlic in a saucepan over medium heat, stirring often until fragrant but not browned, about 2 minutes (don’t scorch the garlic, it tastes pretty bad when you do. As soon as you can smell it, you’re ready for the next step). Stir in the crushed tomatoes and diced tomatoes with their juice. Bring to a simmer and cook until slightly thickened, 15 to 20 minutes. Stir in the basil and sugar. Season with salt to taste. Add the meatballs to the sauce and simmer until the meatballs are heated through, about 10 minutes.

For the garlic bread, preheat the broiler. Cut the loaf of bread in half lengthwise. In a small bowl, mix the butter, oil, garlic and oregano. Spread the mixture evenly on the bread. On a baking sheet, place the bread under the broiler for 3-5 minutes, or until slightly browned. Check frequently to make sure it doesn’t burn. Remove from the broiler and serve, or, if using the cheese, sprinkle cheese over the bread and place under the broiler for another 2 minutes, or until cheese is melted and slightly brown.

To assemble the sandwich, place as many meatballs as you desire on the bread. Cover the meatballs with some extra sauce and add some slices of fresh mozzarella. Place the sandwich back under the broiler for 1 to 2 minutes until the cheese is melted.

Of course, there are always variations on this. I don’t eat cheese, so my sandwich went without. Michelle only wanted a small sandwich so she could have some pasta too, so she only had a half sandwich. You could also add some Italian sausage to the mix and have them on the sandwich as well.

It’s a great use of some leftovers. Everyone loves a good sub sandwich, and having this one on the toasted garlic bread makes it even better.

I think I am going to make some shrimp tomorrow, although I am not sure how I am going to do it just yet. Check back and see what I come up with. until then, enjoy your evening and enjoy your meal!


1 Comment

Posted by on August 13, 2012 in Beef, Breads, Cooking, Dinner, Sandwiches, Sauce


Tags: , , , , ,

Preparing Pulled Pork Indoors

I love pulled pork. There’s nothing quite like the taste of  pork slow cooked and then covered in a barbecue sauce. I have made pulled pork before and posted the recipe here, but that recipe is for outdoor cooking. The weather here has been so hit and miss this week with rain that I decided to make one completely indoors and without the slow cooker being involved. This recipe, from America’s Test Kitchen, makes a great rub for the pork so you get great barks and the sauce is perfect.

Indoor Pulled Pork with Sweet and Tangy Barbecue Sauce

Pork

1 cup plus 2 teaspoons table salt

1/2 cup plus two tablespoons sugar

3 tablespoons plus 2 teaspoons liquid smoke

1 boneless pork butt (about 5 pounds), cut in half horizontally

1/4 cup yellow mustard

2 tablespoons ground black pepper

2 tablespoons smoked paprika

1 teaspoon cayenne pepper

Barbecue Sauce

1 1/2 cups ketchup

1/4 cup light or mild molasses

2 tablespoons Worcestershire sauce

1 tablespoon hot sauce

1/2 teaspoon salt

1/2 teaspoon ground black pepper

For the pork: Dissolve 1 cup of salt, 1/2 cup of sugar, and 3 tablespoons of liquid smoke in 4 quarts of cold water in a large container. Submerge the pork in the brine, cover with plastic wrap, and refrigerate for 2 hours.

While the pork brines, combine mustard and the remaining 2 teaspoons of liquid smoke in a small bowl; set aside. Combine the black pepper, paprika, the remaining 2 tablespoons sugar, remaining two teaspoons of salt and cayenne pepper in a second small bowl; set aside. Adjust an oven rack to the lower-middle position and heat the oven to 325 degrees.

Remove the pork from the brine and dry thoroughly with paper towels. Rub the mustard mixture over the entire surface of each piece of pork. Sprinkle the entire surface of each piece with the spice mixture. Place the pork on a wire rack set inside a foil lined rimmed baking sheet. Place a piece of parchment paper over the pork, then cover with a sheet of aluminum foil, sealing the edges to prevent moisture from escaping. Roast the pork for 3 hours.

Remove the pork from the oven; remove and discard the foil and parchment paper. Carefully pour off the liquid in the bottom of the baking sheet into a fat separator and reserve it for the sauce. Return the pork to the oven and cook, uncovered, until well browned, tender and the internal temperature registers 200 degrees on an instant-read thermometer, about 1 1/2 hours. Transfer the pork to a serving dish, tent loosely with foil, and allow it to rest for 20 minutes.

While the pork rests, pour 1/2 cup of the defatted cooking liquid from the fat separator into a medium bowl. Whisk in all the sauce ingredients.

Using 2 forks, shred the pork into bite size pieces. Toss with 1 cup of the sauce and season with salt and pepper. Serve, passing the remaining sauce separately.

If you can’t find smoked paprika, sweet paprika will work just fine here. Using the parchment paper will help prevent the mustard from eating holes in the foil (it is acidic). I served the pork on plain hamburger buns with some pickle chips and sliced red onion. You could always use any store-bought barbecue sauce for the sauce if you prefer or don’t want to go through the work of making your own. The leftovers, of course are great for sandwiches the next day or even for pulled pork nachos (which are very tasty, by the way).

There are several side dishes you could do with this meal. Cole slaw, of course, is a great addition. You could also add some baked beans to the side as well. I came across a recipe this morning by Guy Fieri for mashed root vegetables that Michelle and I both liked, so I went with that one.

Creamy Mashed Root Vegetables

5 cups milk

2 1/2 cups heavy cream

2 tablespoons salt, plus more for seasoning

4 sprigs fresh thyme

2 bay leaves

2 pounds turnips

2 pounds Yukon gold potatoes

3 tablespoons butter, cut into cubes

Freshly ground black pepper

Set a large pot over high heat and add the milk, cream, salt, thyme and bay leaves. Peel and cut the turnips into 1-inch chunks. Add the turnips to the pot and cover partially with a lid. Bring to a boil and then reduce the heat to a simmer and cook the turnips for 30 minutes.

Cut the potatoes into 1-inch chunks. After the turnips have cooked for 30 minutes (turnips take a lot longer to cook than potatoes), add the potatoes and continue to simmer until all the vegetables are very tender, about 20 more minutes. Discard the bay leaves and thyme. Drain the potatoes and turnips, reserving 2 cups of cooking liquid, and then mash. Add the cooking liquid and the butter. Mix well and season with salt and pepper.

You can play with this recipe a bit and add or subtract things as you wish. You could use other root vegetables, like carrots, parsnips or sweet potatoes, instead of or with the turnips or potatoes. I like the idea of cooking with the milk and cream to add some texture to the vegetables and they mix really well when you are mashing.

Some good eating for today, and I did get a few things to make for this week, like some chicken (a whole one and some boneless breasts), a skirt steak (it was a really good sale on these this week) and some ground beef, so we’ll see what I make this week. Sean starts his cooking class this week so I think he’ll be helping in the kitchen with some things, so we’ll see what we can come up with. Check back to see what we cook. Enjoy the rest of your day and enjoy your meal!

 
11 Comments

Posted by on July 29, 2012 in Cooking, Dinner, Pork, Potatoes, Sauce, Vegetables


Tags: , , ,

Sock It To Me With Sockeye Salmon!

I have been eyeing up the salmon at Adams Farms for a couple of weeks now. It has looked great and this week, the price was finally low enough where I decided to get some to have for dinner this weekend. Now, Michelle is not a big fan of salmon, but what she doesn’t really care for is the Atlantic salmon. This salmon is typically farm raised and can have a distinct, fishy flavor. Wild Pacific salmon, like sockeye salmon, has a completely different flavor to it, It’s a deeper red, more delicate and doesn’t taste fishy at all. The catch, of course, is that wild salmon tends to be very expensive. It’s most abundant in the spring and summer, when the price might be lower. I got mine for $11.99 a pound. Off season, it typically approached $20.00 a pound. The great thing about wild salmon is that you practically have to do nothing to it. This recipe is fast and simple, with next to nothing included but the salmon.

Pan-Seared Wild Salmon

1-2 pounds of wild salmon, cut into fillets (about 6 ounces each is good)

Salt and pepper

1 tablespoon vegetable oil

Lemon or lime wedges, for serving

Pat the salmon dry with paper towels, then season with salt and pepper. Heat the oil in a large nonstick skillet over medium-high heat until just smoking. Gently lay the salmon skin side up in the skillet and cook until well browned, about 5 minutes.

Gently flip the fish skin-side down and continue to cook until all but the very center of the fish has turned from translucent to opaque, about 3 minutes. Serve with lemon or lime wedges.

A couple of notes about the fish. First, with salmon, you need to check for pin bones in the fish before you cook it. Typically, in most stores, the pin bones have already been removed for you, but it never hurts to check again to make sure they are all gone. Just run your fingers gently over the surface of the flesh. If you feel any bumps, there is a bone there that you should pull out. A pair of pliers will do the trick nicely. Second, a nonstick skillet when cooking salmon is a godsend. It will help you cook the fish all the way through without drying the fish out and leaving half the fish stuck to the pan.

I made a simple, quick sauce to put over the fish. This sauce will work for anything really –  fish, chicken, rice, pasta, vegetables – you name it. It’s really just a simple vinaigrette with some herbs added to it.

Simple Sauce

4 tablespoons extra virgin olive oil or butter

1 tablespoon minced onion

2 tablespoons lemon juice

Salt and pepper

Put the oil or butter in a small saucepan over medium heat. When the oil is warm or the butter is melted, add the onion and cook, stirring occasionally, until it softens (turn the heat down if the onion starts to color), 1 to 2 minutes.

Stir in two tablespoons of water and the lemon juice and sprinkle with some salt and pepper; maintain the heat so it bubbles gently for a minute or two. Taste, adjust the seasoning, and serve.

There are a lot of different ways you can go with this. Instead of using onion, try garlic, shallot or scallion. Add a couple of tablespoons of fresh herbs like basil, cilantro, oregano or mint. Add some jalapeno or a dried chile for some heat. You can pretty much do whatever you want with this. it also makes a great dipping sauce for some crunchy bread. I served the whole meal with some sweet potato, a tomato cucumber salad and some crunchy bread I got at the farmer’s market today.

That’s it for today. Tomorrow I plan to make some pulled pork indoors, so I’ll be posting the recipe for that one. It looks pretty good. Check back and see if you like it. Until then, enjoy your evening and enjoy your meal!

 
Leave a comment

Posted by on July 28, 2012 in Cooking, Dinner, Sauce, Seafood


Tags: , , , ,

My Sous Chef Takes Over For the Night

I had planned on chicken all week for dinners, but I had also taken out some pork chops to make for dinner one night. I thought tonight would be a good night to do that and I thought it would be an even better night to have Sean take over in the kitchen. He is planning on taking a cooking class later on this summer so I figured tonight would be a good night for him to do some of the cooking while I just supervised. He chose this recipe of skillet barbecued pork chops as his first test. You don’t have to do the brining of the pork chops if you don’t have time to do it, but it does help to add to the meal by making the pork chops more moist.

Skillet-Barbecued Pork Chops

1/2 cup salt

4 bone-in rib loin pork chops, 3/4 to 1 inch thick, trimmed of excess fat

4 teaspoons vegetable oil

For the spice rub:

1 tablespoon paprika

1 tablespoon brown sugar

2 teaspoons ground coriander

1 teaspoon ground cumin

1 teaspoon ground black pepper

For the sauce:

1/2 cup ketchup

3 tablespoons light or mild molasses

2 tablespoons grated onion

2 tablespoons Worcestershire sauce

2 tablespoons Dijon mustard

1 tablespoon cider vinegar

1 tablespoon brown sugar

1 teaspoon liquid smoke

Dissolve the salt in 2 quarts of cold water in a large bowl or container. Submerge the chops in the brine, cover with plastic wrap and refrigerate for 30 minutes.

For the spice rub, combine all the spices in a small bowl. Measure 2 teaspoons of the mixture into a medium bowl and set aside for the sauce. Transfer the remaining spice rub to a large plate. For the sauce, whisk the ingredients in the bowl with the reserved spice mixture until thoroughly combined; set aside.

Remove the chops from the brine, rinse and pat dry with paper towels. Use a sharp knife to cut 2 slits, about 2 inches apart, through the outer layer of fat and silver skin of each chop (don’t cut into the meat of the chops). Coat both sides of the chops with the spice rub, pressing gently so the rub adheres. Shake off the excess rub.

Heat 1 tablespoon of the oil in a large nonstick skillet over medium heat until just smoking. Place the chops in the skillet in a pinwheel pattern, with the ribs pointing toward the center, and cook until browned and charred in spots, 5 to 8 minutes. Flip the chops and continue to cook until the second side is browned and the center of the chops registers 130 degrees on an instant read thermometer, 4 to 8 minutes. Remove the skillet from the heat and transfer the chops to a plate. Lightly brush the top of each chop with 2 teaspoons of the sauce.

Wipe the pan out with paper towels and return it to medium heat. Add the remaining 1 teaspoon of oil and heat until just smoking. Add the chops to the pan, sauce side down, and cook without moving them until the sauce has caramelized and charred in spots, about 1 minute. While cooking, lightly brush the top of each chop with 2 more teaspoons of sauce. Flip the chops and cook until the second side is charred and caramelized and the center of the chops registers 140 to 145 degrees on an instant read thermometer, 1 to 2 minutes.

Transfer the chops back to the plate, cover loosely with foil, and let rest until the center of the chops registers 150 degrees on an instant read thermometer, about 5 minutes. Meanwhile, add the remaining sauce to the pan and cook over medium heat, scraping up any browned bits, until thickened and it measures 2/3 cup, about 3 minutes. Brush each chop with 1 tablespoon of the sauce and serve, passing the remaining sauce separately.

Sean handled most of the prep and the actual cooking pretty well. The only thing I really did was take the chops out of the pan. He also made some oven roasted potatoes, corn on the cob and skillet cornbread to go along with the meal. Again, he did most of the work himself, including the chopping of the potatoes, mixing everything for the sauce, the rub and the cornbread. All I handled was the hot cast iron skillet for the cornbread. I have to say I was quite proud of how well he did with everything. Now if I could just get him to clean his room, all would be wonderful!

That’s it for tonight. It might be back to chicken tomorrow night, or maybe some burgers, i haven’t quite decided yet. We’ll see what I feel like doing. Enjoy the rest of your evening and enjoy your meal!

 
Leave a comment

Posted by on June 28, 2012 in Breads, Cooking, Dinner, Pork, Sauce, Spices


Tags: , , ,

Chicken Week, Day 2: Let’s Kabob it Up!

I had boneless chicken breast to use out of the freezer it since it was a nice, comfortable day here today outside I thought it might be a good day to use the grill and make some chicken kabobs. I looked at a few different recipes and settled on this one from Williams-Sonoma. it falls right into the simple with simple ingredients category and makes a nice sauce to go with it.

Grilled Chicken Kabobs

2 teaspoons Dijon mustard

Grated zest of 1 lemon

2 tablespoons fresh lemon juice

1/3 cup extra virgin olive oil, plus more for brushing

1 small serrano chili, seeded and minced (optional)

1 teaspoon minced fresh marjoram

1 tablespoon minced fresh basil

Salt and fresh ground pepper, to taste

1 pound boneless chicken breast, cut into chunks

1 yellow squash, cut into chunks

1 red onion, cut into chunks

Soak bamboo skewers in water to cover for 30 minutes. Prepare the grill to medium-high.

Put the mustard in a small bowl. Add the lemon zest and lemon juice and mix well. Gradually whisk in the 1/3 cup of olive oil, then mix in the chili, if using, marjoram and basil. Season the sauce with salt and pepper. Set aside.

Drain the skewers. Thread the chicken, squash and onion onto the skewers, alternating each piece until the skewers are filled. Brush the chicken, squash and onion with olive oil and season with salt and pepper. Arrange the skewers on the grill, cover the grill and cook, turning once until tender and lightly charred, about 5 minutes per side. Transfer to a plate and remove the chicken and vegetables from the skewers. Serve with the lemon-herb sauce.

You could certainly vary this in many ways, substituting different colored peppers, using zucchini, or using scallops or shrimp instead of chicken. One way I decided to vary it a little bit was by making a second sauce to serve along with the lemon-herb sauce. I opted to make a cucumber yogurt sauce, knowing I already had all the ingredients on hand it wouldn’t take long to put together.

Cucumber Yogurt Sauce

2 cups plain yogurt

1 cucumber, peeled, seeded and chopped

1 shallot, minced

1 tablespoon parsley, minced

1 tablespoon finely chopped fresh mint

1/2 teaspoon cumin, ground

1 tablespoon olive oil

1 large pinch salt

Ground white pepper, to taste

Drain the yogurt in a cheesecloth-lined strainer set over a bowl for 1 hour. In a bowl, combine all the ingredients. Serve as an accompaniment with any variety of foods or as a salad dressing.

Michelle really likes the yogurt cucumber sauce, so I do make it as a dipping sauce for other meals. It goes great with lamb, chicken or beef.

I served the whole meal with some corn on the cob and white rice to round things out. For dessert, since I had the grill on, I grilled some peaches and pineapple slices, Simply slicing the peaches in half and brushing them with a little olive oil and then brushing the pineapple also with olive oil and grilling both just until you get good grill marks on each, about 4 or 5 minutes. When I took them off the grill, I put just a touch of honey on each piece for some extra flavor.

That’s all for tonight’s meal. Tomorrow will be either pork chops or chicken drumsticks in one form or another, I haven’t decided yet. Check back and see what decide to do. Until then, enjoy your evening and enjoy your meal!

 
Leave a comment

Posted by on June 26, 2012 in Cooking, Dinner, Grilling, Poultry, Sauce, Vegetables


Tags: , , , ,

 
National Day Calendar

Fun, unusual and forgotten designations on our calendar.

Jennifer Probst

a little bit naughty a little bit nice

Laissez Faire

Letting Life Lead

What To Have For Dinner Tonight

Simple and delicious dinner inspiration