RSS

Category Archives: Seafood

A Batch of Beer Battered Fish (and Roasted Fries)

This recipe is actually one that Sean picked out a while back and had not had the opportunity to make it until just a few days ago. It’s not often that he picks out a fish recipe for us to try, so I was more than willing to give it a shot, especially because I had just picked up some cod on sale. The timing for it was perfect and the recipe, from Bobby Deen, is actually one that is lighter than what often comes from Deen family recipes. This one uses very little oil in cooking and roasts the fries instead of frying them in oil.

Beer Battered Fish and Roasted Fries

Roasted Fries:

4 medium sweet potatoes, skin-on, cut into French fry strips

2 teaspoons vegetable oil

1 teaspoon paprika

1 teaspoon salt

1/4 teaspoon black pepper

Zest of 1 orange

Beer Battered Fish:

One 12-ounce bottle beer

1 1/4 cups all-purpose flour

1/4 teaspoon salt

1/4 teaspoon garlic powder

1/4 teaspoon pepper

1 1/2 pounds cod fillets, skin and bones removed, cut diagonally into 4-inch long, 1-inch wide strips

2 tablespoons vegetable oil

1/2 teaspoon salt for sprinkling (optional)

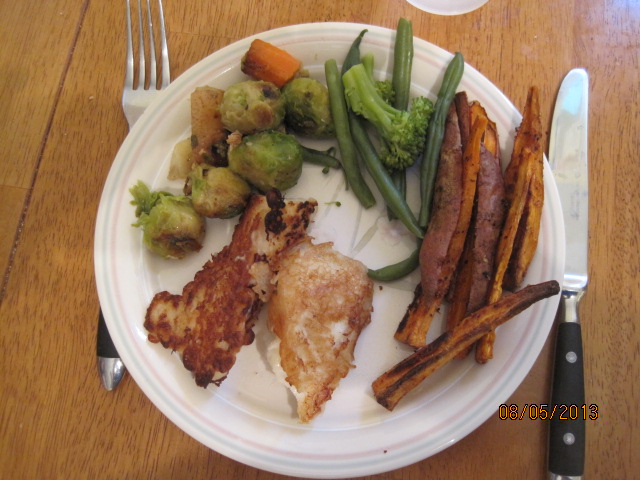
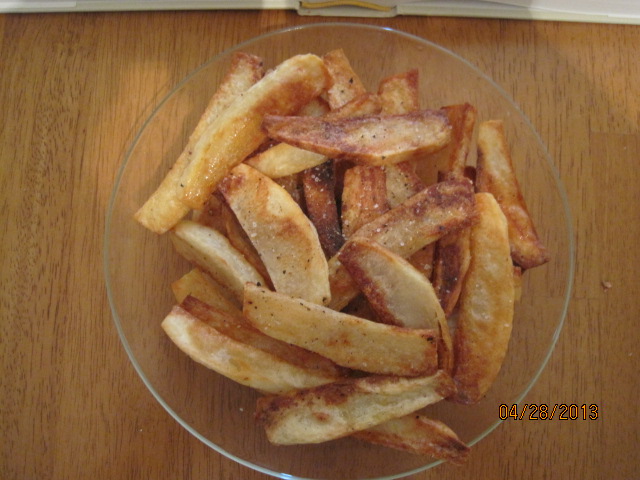
For the fries: Preheat the oven to 400 degrees. Place the potatoes in a medium bowl. Whisk together the vegetable oil, paprika, salt, pepper and orange zest and toss with the potatoes to evenly coat. Place the potatoes in a single layer on a parchment paper-lined baking sheet and roast until the potatoes are tender and starting to brown, about 40 to 45 minutes.

Turn the oven up to 450 degrees and continue roasting until the potatoes get crispy around the edges, about another 5 minutes longer. Reduce the oven temperature to 200 degrees and hold the potatoes in the oven to keep them warm while you prepare the fish.

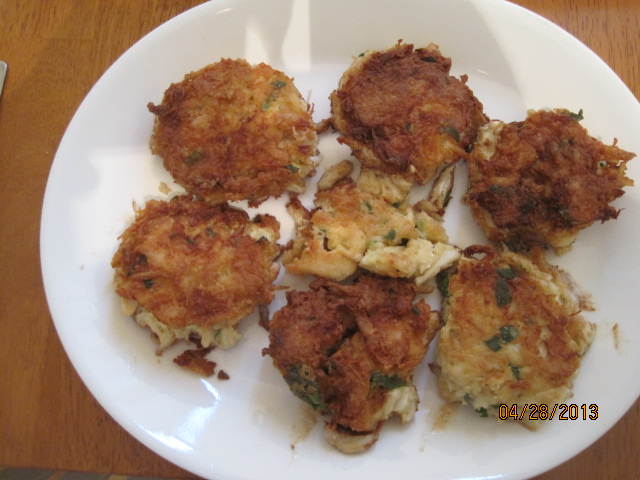
For the beer battered fish: Pour the beer into a large bowl. Sift the flour over the beer, whisking gently until it is just combined. Pat the fish fillets dry with paper towels and sprinkle on both sides with the salt, garlic powder and pepper. Coat the fish in the beer batter.

Heat the vegetable oil in a large, non-stick skillet until it is very hot. Remove the fish from the batter using tongs and allow any excess batter to drip off. Place the fish in the hot oil and fry it in batches so as not to crowd the pan. Fry the fish until it is a deep golden brown and cooked through, turning once, about 2 minutes per side. Transfer the fish to a paper towel-lined baking sheet and keep it warm in the oven. Repeat the process with the remaining pieces of fish. While the fish is still hot, sprinkle it with salt, if using, and drizzle with a little fresh lemon juice (optional). Serve with the roasted sweet potato fries.

It is a very simple and light meal that tastes great. I would recommend using a light-colored or light beer for the batter. This way the beer itself will not impart any flavors directly onto the fish (unless of course you want that and in that case you may want to choose a stronger flavored beer). The fries were perfectly cooked and tasted great. They would be an excellent side replacement for French fries with any sandwich or meal. Sean and Michelle both loved the lightness and crispness of the fish as well. I’ll be glad to make this one again for dinner anytime as it was easy to make and everyone liked it. One thing to remember is that you don’t want to cook the fish too long. Fish takes just minutes to cook and will get very rubbery if you overcook it, so be careful.

That’s all I have for today. Check back next time for some more recipes. I do have one I tried last night when we had breakfast for dinner for pancakes and homemade hash browns. I also have one for tonight that we are trying from Bobby Flay for New York-style street hot dogs with onion sauce and a pepper relish that promises to be tasty. There are lots more to come, so keep checking back. Until next time, enjoy the rest of your day and enjoy your meal!

IMG_1635

 
Leave a comment

Posted by on August 7, 2013 in Cooking, Dinner, Potatoes, Seafood


Tags: , , , ,

Down by the Bay Scallops

I don’t often buy bay scallops for myself. While they are the cheaper alternative to good sea scallops, most of the time bay scallops are soaked in solution and chemicals and they just don’t taste very good. The exception is if you can find “dry” or chemical-free bay scallops to use. These can be a lot better and can actually make for a great tasting and inexpensive seafood meal if you can catch them at just the right price. The trick can often be finding them dry and on sale, and I happened to stumble across them when I was shopping this past week so I picked up a pound. Bay scallops are great just sautéed over with some garlic, butter, white wine and parsley over rice or pasta, but I was looking to do something a little different this type out. I found a recipe from Ina Garten, the Barefoot Contessa of the Food Network and this recipe sounded like it would taste great and took no time at all to make.

Bay Scallop Gratin

6 tablespoons butter, at room temperature

6 garlic cloves, minced

2 medium shallots, minced

2 ounces thinly sliced prosciutto, minced

4 tablespoons minced fresh parsley, plus extra for garnish

2 tablespoons freshly squeezed lemon juice

2 tablespoons Pernod

2 teaspoons kosher salt

1 teaspoon freshly ground black pepper

6 tablespoons olive oil

1/2 cup panko bread crumbs

6 tablespoons dry white wine

2 pounds bay scallops

Lemon, for garnish

Preheat the oven to 425 degrees. Place 6 (6-inch round) gratin dishes on a sheet pan.

To make the topping, place the butter in the bowl of an electric mixer fitted with the paddle attachment (you can also use a hand mixer). With the mixer on low-speed, add the garlic, shallot,prosciutto, parsley, lemon juice, Pernod, salt and pepper and mix until combined. With the mixer still on low, add the olive oil very slowly as though making a mayonnaise, until combined. Fold the panko bread crumbs in with a rubber spatula and set aside.

Place 1 tablespoon of the white wine in the bottom of each gratin dish. With a small, sharp knife, remove the white muscle and membrane from the side of each scallop and discard (many times this is already done with bay scallops, but if it’s not, you should do it). Pat the scallops dry with paper towels and distribute them evenly among the dishes. Spoon the garlic butter mixture over the top of the scallops. Bake for 10 to 12 minutes, until the topping is golden and sizzling and the scallops are barely done. If you want the top crustier, place the dishes under the broiler for 2 minutes, until they are browned to your liking. Finish the dish with a squeeze of fresh lemon juice and a sprinkling of chopped parsley over each dish and serve with crusty French bread.

Just a couple of things about this recipe. Since I was only making this for 3 of us, I cut the recipe in half and found that a pound of bay scallops was more than enough for 3 dishes. The recipe does call for a couple of items most people may not have on hand for cooking, but there are substitutions available. I do not have prosciutto on hand most times, so I simply fried a couple of pieces of bacon beforehand and crumbled them up to use in the dish. If you don’t have any white wine on hand or don’t like to cook with alcohol, don’t fret. I didn’t have any white wine either and just dotted the bottom of each dish with some extra-virgin olive oil. You could easily leave it out of the dish altogether. The same can be said of the Pernod, which is a particular brand of anise flavored liqueur. If you have anisette, ouzo or Sambuca, you can use them in the recipe instead if you really want the licorice-like flavor you get from them. I didn’t have any of them on hand, so I simply left it out and I don’t think it hurt the dish at all. One final thing about scallops in general – don’t overcook them. Scallops, whether sea scallops or bay scallops, need to be barely cooked cooked, just until they are opaque, otherwise it will feel like you are eating pencil erasers.

That’s all I have for today. Check back next time for some new recipes I have been trying, including a polenta pizza, a new chicken dish and a few other things I have planned. Until next time, enjoy the rest of your day and enjoy your meal!002

 
1 Comment

Posted by on June 29, 2013 in Cooking, Dinner, One Pot Meals, Seafood


Tags: , , ,

‘Tis the Season for Soft Shell Crab

While you can get soft-shell crab until about the month of September, the best time of year is to get it between June and July. The local fish market that I go to just recently started having it in and since I was there yesterday I decided to get some. Ideally, if you can get the crabs live that is the best way for you to get them. Most fish places will then clean it for you, which usually involves them trimming off the eyes and mouth and cleaning out the gills. Soft-shell crab should be eaten within 24 hours of purchasing that way you can be sure that it is good and fresh. Most recipes you will come across involved sautéing or frying the crab in some way. I decided to use this recipe that I’ve found from Tyler Florence that makes a soft-shell crab BLT with a special lemon-pepper mayonnaise.

Soft-Shell Crab BLT with Lemon-Pepper Mayonnaise

Lemon-Pepper Mayonnaise

2 large egg yolks
1 teaspoon salt
1 teaspoon dry mustard
1 lemon, juiced
1 cup vegetable oil
2 teaspoons cracked black pepper
1 handful fresh flat-leaf parsley, finely chopped

Crabs

2 cups buttermilk
1 tablespoon crab boil seasoning
Sea salt and freshly ground black pepper
4 medium soft-shell crabs, cleaned and rinsed
Vegetable oil, for frying
2 cups all-purpose flour

Sandwich

4 soft bread rolls, such as brioche or croissants, split and lightly toasted
4 red leaf lettuce leaves
1 fine-ripe tomato, sliced
8 slices hickory-smoked bacon, cooked
1 avocado, halved, pitted, peeled, and sliced

To make the mayonnaise, in a food processor, combine the egg yolks, salt, dry mustard, and lemon juice; process together to form a stable base. With the motor running on the food processor, add a few drops of the oil through the feed tube, until the mixture begins to thicken. Begin adding the remaining oil in a thin, steady stream. Scrape down the sides of the food processor and pour the mayonnaise into a small bowl. Mix in the black pepper and the parsley, cover, and refrigerate. The mayonnaise may be kept for up to 3 days.

To prepare the soft-shell crabs, pour the buttermilk in a shallow bowl large enough to hold all the crabs. Season the buttermilk with crab boil seasoning, salt, and pepper. Lay the crabs in the buttermilk mixture and marinate, covered, in the refrigerator for 1 hour. Soaking the crabs in the buttermilk will help them plump up when cooked. Remove the crabs from the milk bath and let the excess drip off.

Pour 2 inches of vegetable oil in a heavy frying pan or large pot and heat to 350°. Put the flour in a pie dish or plate and season with a fair amount of salt and pepper. Dredge the crabs in seasoned flour to coat, shaking off the excess. Lay the crabs in the hot oil in a single layer without crowding; you may have to fry them in batches. Be careful since the crabs have a tendency to pop and spatter (if you have a splatter screen, now is a good time to break it out and use it). Cook the crabs for about 3 minutes on each side, turning once, until golden brown. Drain on paper towels.

To build the sandwich, spread the lemon-pepper mayonnaise on both halves of the toasted bread. Add the lettuce, tomato, bacon, and avocado. Lay a fried soft-shell crab on top and close up the sandwich.

I love the way this sandwich came out. The crab tasted great with the bacon and avocado and the lemon-pepper mayonnaise added just the right flavor to the sandwich. I did season the flour a little bit with some Old Bay seasoning to add some extra flavor. One word of warning when making the mayonnaise – when you’re going to use raw egg yolks, I would recommend that you use eggs that have already been pasteurized to avoid any risk of salmonella. You could also make the lemon-pepper mayonnaise by using store-bought mayonnaise and simply mixing and the lemon juice, dry mustard, pepper and parsley yourself and avoid the problem altogether. Mayonnaise itself isn’t that hard to make if you have food processor or a really strong wrist for whisking, so you should give it a try sometime if not this time. I also added a little bit of sliced red onion to the sandwich. I served the sandwiches with some homemade coleslaw and it was a perfect meal for a hot night.

That’s all there is for today. Check back again during the week to see what other recipes we decide to use. I did go shopping yesterday and I do have some plans this week to make some chicken, some pork chops and I did get some ground beef and some sausage, though I have not yet decided what to do with them. So check back and see what comes along. Until the next time, enjoy the rest of your day and enjoy your meal!

002 001

 
Leave a comment

Posted by on June 3, 2013 in Cooking, Dinner, Sauce, Seafood, Side Dishes


Tags: , , , , ,

An Anniversary Dinner: Pan Seared Rib Eye Steak, Port Wine Sauce and Bacon Wrapped Shrimp

Okay, so I probably want a little overboard with dinner for our anniversary last night, but it was certainly worth it. It was a lot of work to get everything prepared and it was an awful lot of food for just the three of us (of course Sean joined us for dinner), but everything tasted great so I had nothing to complain about. I went to the store yesterday morning and picked out some nice-looking rib-eye steaks to make and with a little help from Denise Landis of The New York Times I was able to put together a quick port wine pan sauce to go with the steaks. Both were pretty easy to do.

Pan Seared Rib-eye Steaks

1 tablespoon vegetable oil
4 (8-to 10-ounce) rib-eye steaks, 1 to 1 1/4 inches thick
Salt and pepper
1 recipe Port Wine Pan Sauce (to follow)

Heat the oil in a large skillet over medium-high heat until just smoking. Meanwhile, pat the steaks dry with paper towels and season both sides generously with salt and pepper. Lay the steaks in the pan, leaving 1/4 inch between the steaks. Cook, without moving the steaks, until well browned, about 4 minutes. Using tongs, flip the steaks and continue to cook until the meat registers 115 to 120° (for rare) or 120 to 125° (for medium-rare), 3 to 7 minutes. Transfer the steaks to a serving platter and tent loosely with aluminum foil to rest or while preparing the pan sauce, then serve.

Port Wine Pan Sauce

1 small shallot, minced
1 small onion, minced
8 ounces mushrooms, sliced
Salt and pepper
1/2 cup ruby port
2 tablespoons butter
1/4 teaspoon chopped fresh thyme

In the same skillet that the steaks were seared in, add the shallot, onion and mushrooms. Cook, stirring occasionally, until the onions begin to soften, about 3 to 4 minutes. Remove the vegetables from the pan. Deglaze the pan with the ruby port, stirring to loosen any browned bits. Add the butter, 1 tablespoon at a time, and gently swirl into the sauce until well blended, about 1 to 2 minutes. Add the vegetables back into the pan, season with salt and pepper to taste, and stir in till slightly thickened about 1 to 2 minutes more. Off the heat, add in the fresh thyme and gently mix. Serve the sauce on the side with the steaks.

The steaks were cooked perfectly and have great flavor to them even though the only spices I added were salt-and-pepper. I actually cooked them for about 2 minutes longer so they were closer to medium, but you want to make them to your own personal preference. The pan sauce was just right for the steaks. I love the taste that the port wine adds to the sauce on it blended well with the shallots, onion and mushrooms. It also tasted great on the mashed potatoes that I made to go along on the side.

And the other dish that I made to go along with the meal was a very simple bacon wrapped shrimp. This doesn’t have to be a messy project or a big production; there are really only three ingredients to the entire recipe and most of the work goes into the preparation and not the cooking itself.

Bacon Wrapped Shrimp

24 large uncooked shrimp, shelled and deveined
6 slices bacon, cut into quarters
1 tablespoon Montreal Steak seasoning

Preheat the oven to 450°. Cover the bottom of a rimmed baking sheet with aluminum foil. Insert a wire rack into the baking sheet. Spray the baking sheet with nonstick vegetable spray. Wrap each shrimp in a 1/4 slice of bacon, being sure to wrap the bacon tightly. Secure the bacon with toothpicks if necessary. Place the shrimp on the wire rack in the baking sheet. Sprinkle the shrimp with the steak seasoning on both sides.

When the oven has come up to temperature, place the baking sheet inside the oven and bake the shrimp until opaque and the bacon has begun to crisp, approximately 10 to 15 minutes.

It doesn’t get much easier than this one. There are a couple of notes to take into mind when making this for yourself. First, make sure that you using large shrimp for this particular recipe. The size of the shrimp will take just about as long to roast in the oven as the bacon will to crisp so you won’t end up with any rubbery shrimp. If you are using smaller shrimp such as a medium-sized shrimp, you may want to think about cooking the bacon slightly before you wrap the shrimp to make sure that the bacon will be crisp at the same time the shrimp is done. You don’t have to use the steak seasoning if you don’t want to, although I think it added a nice flavor to the shrimp and the bacon. You could also use a barbecue sauce instead of the seasoning if you wanted to try something a little different. Having the shrimp up on the wire rack in the pan allows the air to get underneath and the heat to get underneath so that the bacon and the shrimp both cook on both sides. You could also put the shrimp on a skewer if you didn’t want to use toothpicks, or if you wrap the bacon tight enough, as I tried to do, you don’t really need any toothpicks at all.

I also served a side dish of roasted asparagus for the vegetable. Overall, I think it was a pretty good meal and we all seem to enjoy it. There were some leftovers of course but will be able to re-purpose them for another meal.

That’s all there is for today. Check back next time this see the recipes I use for dinner tonight. I’m hoping to get to the Ethiopian stir-fry tonight; I’m curious as to how well that one will turn out. Check back and see how it goes. Until then, enjoy the rest of your day and enjoy your meal!

001

 
Leave a comment

Posted by on May 23, 2013 in Beef, Cooking, Dinner, Sauce, Seafood


Tags: , , , , , ,

Getting Fancy with Scallops with Carrot Cream, Pickled Carrots and Herb Oil

I came across this recipe thanks to Food Republic, who had posted it on their site about a week ago. The pictures of it looked great and it sounded simple enough to try out myself so I thought I would give it a shot. It doesn’t take long to make at all, so you can even do it for a weeknight meal without any trouble.

Scallops with Carrot Cream, Pickled Carrots and Herb Oil

Carrot Cream

1/2 pound carrots, cut into a large dice (about 2 cups)

1 teaspoon salt

1/2 cup heavy cream

Freshly ground black pepper

Pickled Carrots

1 large carrot, sliced into short ribbons using a vegetable peeler (about 1 cup)

1/4 cup seasoned rice wine vinegar

Scallops

1 pound sea scallops

Salt and freshly ground black pepper

1 tablespoon vegetable oil

Herb Oil

3/4 cup packed fresh Italian parsley leaves

1 tablespoon fresh marjoram leaves

1/4 cup extra-virgin olive oil

1/4 cup vegetable oil

For the carrot cream : Add the carrots and salt to medium saucepan and cover with water. Bring to a boil and cook for 7 to 8 minutes, or until the carrots are tender. Drain the carrots and add them to a blender along with the cream and a pinch of pepper to taste. Blend until the mixture is a very smooth puree and set aside.

For the pickled carrots: In a medium bowl, toss the carrots with the rice wine vinegar. Marinate the carrots for at least 20 minutes. Drain, reserving the vinegar for another use, and set aside.

For the herb oil: In a blender, combine the parsley, marjoram, olive oil, vegetable oil and the salt. Blend until the oil turns a vibrant green color, about 3 minutes. You can strain the oil through a fine mesh strainer or leave it alone if you like it with some texture to it. Transfer the oil to a bowl or a squeeze bottle.

For the scallops: Dry the scallops thoroughly with paper towels. Place them on a plate and season them generously with salt and pepper. Heat a heavy skillet over high heat. Add the vegetable oil and, when the skillet is very hot, carefully add the scallops to the pan, being careful not to splatter oil on yourself or crowd the pan with too many scallops. Cook the scallops for 2 minutes on one side without disturbing them, or until they are caramelized, then flip them over, cooking the other side for a minute or so more.

To assemble the dish: Gently re-heat the carrot cream, then spoon some on each plate for serving. Top each plate with several scallops. Drizzle some herb oil around the scallops and garnish with a sprinkling of pickled carrots and marjoram leaves.

This dish looked very nice and tasted fantastic. The scallops were cooked perfectly and I loved the combination of the carrot cream and the pickled carrots with the scallops themselves. The herb oil added a nice contrast to the dish with the parsley and marjoram. It seemed like a perfect combination. I also had plenty of oil left over to use for other dishes down the road. I served this with some white rice and broccoli to round out the meal.

That’s it for today. Tonight is our 20th anniversary and I have a nice dinner planned, so check back for the menu for that one later this week. Until next time, enjoy the rest of your day and enjoy your meal!

001


Tags: , , , ,

Let’s Get Really Garlicky with Shrimp Scampi

I usually buy shrimp about every 10 days or so because it makes a good protein and it is one form of seafood that Sean really likes. Of course, if it were up to him, I would make fried shrimp or popcorn shrimp every time, but I do like to try different things with it every now and then. I have made shrimp scampi many times before, and it is almost always the same way, so I wanted to give something a little different a try. Personally, I like a lot of garlic, so this version of shrimp scampi worked out quite nicely.

Very Garlicky Shrimp Scampi

1/2 cup flour

Salt and freshly ground pepper

2 tablespoons olive oil, plus more if needed

1 1/2 pounds extra-large shrimp, peeled and deveined, tails intact

8 tablespoons butter

4 cloves garlic, minced

1/4 cup dry white wine

Grated zest of 1 lemon

2 tablespoons fresh lemon juice

2 tablespoons fresh parsley

Lemon wedges, for serving

In a small bowl, sit together the flour, 1/2 teaspoon of salt and 1/4 teaspoon of pepper. In a large skillet, heat the 2 tablespoons of olive oil over medium-high heat. Toss half of the shrimp in the flour mixture to coat evenly, shaking off any excess. Add the shrimp to the pan and cook, turning occasionally, until the shrimp are opaque throughout, about 3 minutes. Transfer to a plate and tent the plate with foil. Repeat the process with the remaining shrimp, adding more oil to the skillet if needed.

Reduce the heat to medium-low, add 2 tablespoons of the butter and the garlic and cook, stirring frequently, until the garlic softens and is fragrant but not browned, about 2 minutes. Add the wine, the lemon zest and the lemon juice and bring to a boil over high heat. Cook until the mixture is reduced by half, about 1 minute. Reduce the heat to very low. Add the remaining 6 tablespoons of butter, 1 tablespoon at a time, letting each addition soften into a creamy emulsion before adding more.

Return the shrimp to the sauce and mix gently to coat the shrimp well. Remove the shrimp from the heat and season with salt and pepper to taste. Transfer the shrimp to a serving dish and sprinkle with the parsley. Serve with the lemon wedges.

I have to admit, it was very garlicky even though it didn’t seem like there was a lot of garlic in there. I did like coating the shrimp a bit with flour first to brown them nicely and the sauce came out nicely adding the butter in a bit at a time. I always serve shrimp scampi with white rice myself as I love the way the sauce tastes with the rice. This time though Michelle and Sean had it with pasta so you get the nice garlic and butter taste on the pasta.

That’s it for today. I have lots of recipes to use for this week, so keep checking back to see what I have for the day. Until then, enjoy the rest of the day and your weekend (even though it is rainy here in New York) and enjoy your meal!

 
1 Comment

Posted by on May 19, 2013 in Cooking, Dinner, Seafood


Tags: ,

Pan-Fried Crab Cakes and Oven Fries

I have posted crab cakes and oven fries recipes on the blog before, but I did make them a little differently this past week when we had them for dinner. This time, I decided to use the Cook’s Illustrated Cookbook, which I find I used for many different things. It has lots of great recipes in it, both basic and a little more technical see you can cover just about everything. The cookbook also has a lot of great hints as far as equipment, kitchen accessories, techniques, and more. I highly recommend it if you are looking for a cookbook batting compresses everything. The crab cakes recipe that I used is pretty basic and easy to follow.

Pan-Fried Crab Cakes

1 pound jumbo lump crab meat, picked over to remove cartilage and shell fragments
4 scallions, green parts only, minced
1 tablespoon chopped fresh parsley, cilantro, dill, or basil
1/4 cup mayonnaise
2-4 tablespoons plain dried breadcrumbs
1 1/2 teaspoons Old Bay seasoning
Salt and ground white pepper
1 large egg, lightly beaten
1/4 cup flour
1/4 cup vegetable oil
Lemon wedges
Tartar sauce (recipe to follow)

Line a rimmed baking sheet with parchment paper. Gently mix the crab meat, scallions, parsley, mayonnaise, 2 tablespoons of breadcrumbs, and Old Bay in a medium bowl, being careful not to break up crab lumps. Season with salt and white pepper to taste. Carefully fold in the egg with a rubber spatula until the mixture just clings together. If the cakes do not bind, add more breadcrumbs, 1 tablespoon at a time, until they do.

Divide the crab mixture into four portions and shape each portion into a fat, round cake, about 3 inches in diameter and 1 1/2 inches thick. Arrange on a prepared baking sheet, cover, and refrigerate at least 30 minutes or up to 24 hours.

Place flour in a shallow baking dish or pie plate. Lightly dredge the cakes in the flour. Keep your loyal in a large nonstick skillet over medium-high heat until shimmering. Gently lay the flowered cakes in the skillet and cook until the exteriors are crisp and browned, about 4 to 5 minutes per side. Serve immediately with lemon wedges or sauce.

I’ve always found that the key to really good crab cakes is having less breadcrumbs, less filling and more crab. Most of the crab cakes you seem to get when you go out to a restaurant are just filled with breadcrumbs and don’t have much crab in them at all. Also, I have found many places tend overcook them so you really only need about four minutes per side just to crisp them up. Jumbo lump crabmeat can be quite expensive, so if you want a cheaper alternative you can certainly buy pasteurized crabmeat. That is what I used this time and I think the recipe turned out just fine. Another key is you really do need a good nonstick skillet to use to make these. There is nothing worse than trying to flip the crab cake that is stuck to the bottom of the pan. I served the crab cakes with that recipe that I also got from this cookbook for the tartar sauce. It’s really easy to make and it’s certainly better than anything you’re going to find in a store.

Homemade Tartar Sauce

3/4 cup mayonnaise
1/2 shallot, minced
2 tablespoons capers, rinsed and minced
2 tablespoons sweet pickle relish
1 1/2 teaspoons white vinegar
1/2 teaspoon Worcestershire sauce
1/2 teaspoon pepper

Mix all the ingredients together in a small bowl. Cover and let sit to blend of flavors together, about 15 minutes. Stir again before serving. The sauce can be refrigerated and stored for up to one week.

I didn’t have sweet pickle relish on hand, but I did have bread-and-butter pickles so I use them instead, I minced a few up and added a tiny bit of pickle juice to the mixture and I think it came out great. I also cut back a little bit on the mayonnaise as I am the only person leads tartar sauce in our house so this way we didn’t end up with a lot left over. The final piece of the dinner was one of Sean’s particular favorites for the night, which were the oven fries. I’ve tried making oven fries in the past with mixed results and this recipe is very similar to one I have tried before.

Oven Fries

2 1/4 pounds russet potatoes, peeled and cut lengthwise into 10 to 12 even wedges
5 tablespoons vegetable oil
Salt and pepper
Adjust an oven rack to the lowest position and heat the oven to 475°. Place the potatoes in a large bowl, cover with hot tap water, and soak for 10 minutes. Meanwhile, coat a large, heavy-duty rimmed baking sheet with 4 tablespoons of oil and sprinkle evenly with 3/4 teaspoon of salt and 1/4 teaspoon of pepper; set aside. Line the second baking sheet with triple layers of paper towels and set aside.

Drain the potatoes. Spread the potatoes out on the paper towel lined baking sheet, then thoroughly Pat dry the potatoes with additional paper towels. Rinse and wipe out the now empty bowl. Return the potatoes to the bowl and toss with the remaining 1 tablespoon of oil. Arrange the potatoes in a single layer on the oil baking sheet, cover tightly with aluminum foil, and bake for five minutes. Remove the foil and continue to bake until the bottoms of the potatoes are spotty golden brown, about 15 to 20 minutes, rotating the baking sheet after 10 minutes. Using a metal spatula and tongs, scraped to loosen the potatoes from the pan, then flip each wedge, keeping the potatoes in a single layer. Continue baking until the fries are golden and crisp, about 5 to 15 minutes longer, rotating the pan as needed if the fries are browning unevenly.

While the fries bake, line a baking sheet with a triple layer of paper towels. Transfer the baked fries to the prepared baking sheet to drain. Season with additional salt and pepper to taste and serve.

There seems to be a couple of keys to the recipe that made it turn out better for me this time than the past. First, I tried to cut the potatoes as evenly as possible so everything would cook at about the same time frame. Soaking the potatoes for the required amount of time really makes a big difference as it pulls out a lot of the starch from the potato and helps to keep them from sticking to the pan. Adding the oil to the pan and a little bit to the potato not only helps with the sticking but helps with the browning process. Finally, covering the potatoes with aluminum foil for five minutes at the beginning of cooking allows the potatoes to steam so you can then crisp them up the rest of the cooking time. I certainly think it was a pretty successful effort this time out.

That’s it for today. Time for me to get back to work after spending yesterday evening at Citi Field watching the Mets game. I’ll have another recipe for you tomorrow so check back and see if it’s something you are interested in giving a try. Until then, enjoy the rest of your day and hopefully you were not in the rain as we are here in New York. Enjoy your day and enjoy your meal!

002 001

 
4 Comments

Posted by on May 8, 2013 in Cookbooks, Cooking, Dinner, Potatoes, Sauce, Seafood


Tags: , , , , , , ,

Fish Sticks and Sweet Potato Fries

I know it’s been a while since I’ve done a post on this blog, and my other blog as well. I apologize for the lapse in time but life has a way of getting in the way more often than I would like some times and had just haven’t had the time and energy to keep up with the blogs is much as I would like to. Anyway, I am going to make a concerted effort to try to do better as far as posting recipes on here and other posts on by personal blog if you follow that one as well. For now I’ll try to go back and cover some recipes that I’ve done in the past few weeks that I haven’t had a chance to write about on here. We’ll start off with a nice easy recipe that I tried not that long ago that I picked up from Cooks Country. It’s a recipe for fish sticks with tartar sauce.

Fish Sticks with Tartar Sauce

4 slices of white bread, torn into large pieces
16 Saltine crackers
1/2 cup all-purpose flour
2 large eggs
1 cup mayonnaise
2 pounds skinless cod or other thick white fish, cut into 1 inch thick strips
1/4 cup finely chopped dill pickles, plus 1 tablespoon pickle juice
1 tablespoon capers, minced
1 cup vegetable oil

Adjust an oven rack to the middle position and heat the oven to 200°. Pulse the bread and the saltines in a food processor until they are fine crumbs; transfer the mixture to a shallow dish Place the flour in a second shallow dish. Beat the eggs with 1/4 cup of the mayonnaise in a third shallow dish.

Pat the fish dry with paper towels and season well with salt and pepper. Taking one piece at a time, coat the fish strips lightly with the flour, then into the egg mixture, and then dredge in the crumbs, pressing on both sides to make sure the crumbs adhere properly. Transfer the breaded fish to a clean plate. Combine the remaining mayonnaise, pickles, pickle juice, and capers in a small bowl and set aside.

Heat 1/2 cup of the oil in a large nonstick skillet over medium heat until just smoking. Fry half of the fish strips until a deep golden brown and crisp, about two minutes per side. Drain the fish on a paper towel lined plate and transfer them to the oven to keep them warm. Discard the oil, wipe out the skillet, and repeat the process with the remaining oil and fish. Serve with that tartar sauce on the side.

I have to admit I was a little skeptical whether or not Sean and Michelle would like this particular recipe. Fish sticks are not always the most popular thing in any home. I think too many of us are used to growing up with what would come out of the box in the freezer and the taste that went along with these particular fish sticks. I can remember most of the time that they weren’t that great, but this recipe using the fresh fish and the saltines in the breadcrumbs really seem to come out nice crunchy and have great flavor. If you are not a big fan of tartar sauce, you can always eliminate that or make a simple cocktail sauce with some ketchup and with horseradish if that is something you prefer.

The next recipe is also quite a simple one. I got this one from the March issue of Bon Appétit magazine. They have a bunch of recipes in there that are great for family dinners, including the one I posted a while back for a shrimp fried rice. This one in particular is for sweet potato wedges with lime mayonnaise, although I did not make the lime mayonnaise as it didn’t seem like something the rest of the family would go for.

Sweet Potato Wedges with Lime Mayo

3 sweet potatoes, peeled, each cut lengthwise into eight wedges
2 tablespoons vegetable oil
Kosher salt and freshly ground pepper
1/3 cup mayonnaise
1/4 teaspoon finely grated lime zest
2 teaspoons fresh lime juice
Chopped fresh cilantro (for serving)

Preheat the oven to 450°. Toss the sweet potatoes and oil on a foil lined large rimmed baking sheet; season the potatoes with salt and pepper to taste. Roast the potatoes, turning once, until golden brown and crisp, approximately 25 to 30 minutes.

Meanwhile, whisk the mayonnaise, lime zest, and juice in a small bowl. Season the fries with salt, top with those cilantro, and serve with the lime Mayo for dipping.

I think the fries tasted just fine without the lime mayo, and we used ketchup as a replacement without any problem at all. All you need to round out this meal is a fresh vegetable to complete the meal, such as broccoli, asparagus, or some roasted carrots. You could even just go with a nice side salad and I think everything would be fine.

That’s the recipe for today. I am planning on making a lamb tonight. I should be able to get the recipe up for that either tonight or tomorrow. I have posted lamb recipes before, but I think I’m going to try something new as I have gotten a couple of new recipes lately for a few different things. I also have some other recipes that we have done in the last few weeks that I think would be good to post. Unfortunately I do not have pictures of a lot of the things I have made lately, but I hope to get back into that tonight with the lamb and keep going from there. Thanks for stopping by and checking out the blog and sticking with it. I hope you enjoy the recipes and get to try out some things on your own. If you ever have any recipes you would like to share, please feel free to leave a note in the comments section below with your email address and I would be happy to get back to you about posting the recipe or even doing a guest blog post on your own if you would like to do that. Thanks again, enjoy the rest of your day, and enjoy your meal!

 
Leave a comment

Posted by on April 8, 2013 in Cooking, Dinner, Potatoes, Seafood


Tags: , , , ,

A Couple of Recipes of Old Favorites

While I have been cooking regularly and keeping up with trying new things, I have been bad about blogging and putting them online. There just doesn’t seem to be enough hours in a day to do everything I need to do anymore, which really only gives me the weekends to blog. Hopefully I can get around to more than just that, but we’ll see how it goes.

We did make a couple of things this week that are old stand by recipes that I am sure many people have made before. They are both very simple recipes that are not only easy to make but easy to clean up afterwards and they taste awesome. The first of these I made early on in the week and it was just a simple Shrimp Fried Rice. I love this recipe because it is a great one pot meal to make. If you have leftover rice already, most of the work is already done for you and you can get it done even faster.

Shrimp Fried Rice

2 tablespoons vegetable oil, divided

1 pound peeled and deveined small shrimp, thawed if frozen

8 scallions, whites chopped, greens thinly sliced

2 garlic cloves, chopped

1 tablespoon finely chopped peeled ginger

3 cups cold cooked white rice

2 large eggs, beaten to blend

1/2 cup frozen peas, thawed

3 tablespoons soy sauce

2 tablespoons rice wine vinegar

1 teaspoon toasted sesame oil

Heat 1 tablespoon of the vegetable oil in a large, nonstick skillet over medium high heat. Season the shrimp with salt and cook, turning once, until just opaque in the center, about 3 minutes. Transfer the shrimp to a plate.

Heat the remaining 1 tablespoon of vegetable oil in the same skillet; add the scallion whites, garlic, and ginger. Cook, stirring, until fragrant, about 1 minute. Add the rice and stir to coat. Cook until the rice is crisp, about two minutes. Push the rice to one side of the skillet; add the eggs to the other side and cook, stirring and working them into the rice mixture, about 1 to minutes. Add the peas, soy sauce, vinegar, sesame oil and the cooked shrimp. Cook, tossing constantly until the shrimp and the vegetables are heated through, about 1 minute. Top with the scallion greens and serve.

I actually added some mushrooms and water chestnuts to this to make it a more filling meal. The original recipe I got from Bon Appetit calls for edamame, which I did not have, but feel free to add it if you like. The great thing about a dish like this is you can really add whatever you want to it to make it a meal. If you don’t like shrimp, add some boneless chicken or pork. You could go all vegetarian and just add some vegetables to it like snow peas, corn, zucchini or whatever you like. Since it is all one dish, clean up is a breeze.

The other recipe for today is one we make once in a while. It is for a simple, quick batch of Banana Muffins. We used Bisquick to make these and we had some overripe bananas on hand already, so it makes baking these quite simple.

Quick Banana Muffins

2 cups Bisquick baking mix

1 egg, lightly beaten

1 1/3 cups bananas, mashed (about 3 bananas)

1/2 cup brown sugar, packed

3 tablespoons milk

2 tablespoons vegetable oil

1 teaspoon vanilla extract

1/2 cup chocolate chips (optional)

Preheat the oven to 400 degrees. Place the baking mix in a medium bowl and break up any lumps. Combine the egg, bananas, brown sugar, milk, vegetable oil and vanilla extract with the mix and stir thoroughly until well blended. Fill paper lined muffin cups of a muffin tray until about 2/3 full. Bake in the oven for 15 to 20 minutes or until a toothpick inserted in the center of a muffin comes out clean. Cool the muffins in the pan for 5 minutes before serving.

Of course, these are great for breakfast with your morning coffee or just to have as an afternoon snack. We left the chocolate chips out for ours, but you can use them, or some walnuts or pecans if you like. You can really use other fruit too if you wanted blueberry or some other berry muffin.

That’s it for today. I promise to have some other recipes this week. I have made a bunch of things and have recipes for them, I just haven’t had time to post anything, so I will get to some of them this week for sure. Until next time, enjoy the rest of your Sunday and enjoy your meal!

 
1 Comment

Posted by on March 10, 2013 in Breakfast, Cooking, One Pot Meals, Rice, Seafood


Tags: , , , ,

It’s About Time For A Home Cooked Meal

Between my being sick and then Sean being sick, I haven’t had much time to do any real meals during the week, let alone doing any blogging about the meals. Since we are all finally starting to feel better around here, I though today would be a good day to try and get things back to normal around here and cook some good meals. I have had some flounder in the freezer and was looking for something to do with it when I came across this recipe in America’s Test Kitchen’s cookbook “Quick Family Cookbook.” I like this cookbook because it gives me some good meal options that can all be made in under 45 minutes, which make thhem great for any weeknight meal when you may not have a lot of time or energy to put into your meal but still want something made at home. This is a simple fried fish with Southwestern corn, though to be honest I eliminated a lot of the heat from this meal since Sean and Michelle both don’t really care for spicy food. Nonetheless, it’s a good recipe that you can play around with and use a variety of fish with if you have some on hand.

Cornmeal Fried Fish and Southwestern Corn

2 tablespoons butter

8 ounces chorizo sausage, chopped

1 red bell pepper, stemmed, seeded and chopped fine

1 jalapeno chile, stemmed, seeded and minced

1 shallot, minced

1 garlic clove, minced

Salt and pepper

4 cups frozen corn

2 teaspoons minced fresh cilantro

1/2 cup all-purpose flour

1/2 cup cornmeal

2 (12 ounce) skinless flounder fillets, cut in half lengthwise

1 cup vegetable oil

Melt the butter in a large nonstick skillet over medium-high heat. Add the chorizo and cook until lightly browned, about 2 minutes. Stir in the bell pepper, jalapeno, shallot, garlic and 1/2 teaspoon of salt and cook until the bell pepper begins to brown, about 5 minutes. Stir in the corn and cook until heated through, about 2 minutes. Stir in the cilantro and season with salt and pepper to taste. Transfer to a bowl and cover.

Meanwhile, mix the flour and cornmeal together in a shallow dish. Pat the flounder dry with paper towels and season with salt and pepper., then dredge the fish in the cornmeal mixture, pressing gently so it adheres to the fish.

Wipe out the now-empty skillet with paper towel, add the vegetable oil and return to medium-high heat until the oil is shimmering. Lay the fillets in the skillet and cook until golden on both sides, about 2 minutes per side. Transfer the fish to a paper towel-lined plate. Let the fish drain briefly, then serve with the corn.

You could really use any fish fillets you like for this meal – catfish, sole, tilapia, trout, snapper – you name it. Ialso added some other colored peppers to the corn to make the meal look a little more festive since I wasn’t using the chorizo or the jalapeno. You could serve this white rice or brown rice and you would have quite a nice meal.

A nice simple meal that is great for any dinner. We are getting back to the meal plan this week after I go shopping tomorrow. We have gotten away from it lately and haven’t been planning things out and I feel we actually eat better from a health standpoint when everything is planned out for the week, so we are going to try and get back to it and try to get back to one meatless meal for the week, one fish meal, one stir fry, one chicken and one lean meat. I’ll have to see how things go at the market tomorrow to see what I can pick up and go with it, so check back tomorrow and see what we have for the week. until then, have a great day and enjoy your meal!

 
Leave a comment

Posted by on February 25, 2013 in Cookbooks, Cooking, Dinner, Seafood


Tags: , , , , ,

 
National Day Calendar

Fun, unusual and forgotten designations on our calendar.

Jennifer Probst

a little bit naughty a little bit nice

Laissez Faire

Letting Life Lead

What To Have For Dinner Tonight

Simple and delicious dinner inspiration